
As an Amazon Associate I earn from qualifying purchases.
Earth Day Upcycled Craft Projects turn everyday discarded items into playful, useful pieces that brighten a home while honoring the planet and reducing waste, inviting small creative acts that add personality to spaces for family and friends. I remember turning a chipped mug and faded T-shirt into a little planter and tote the summer of a neighborhood clean-up; those Earth Day Upcycled Craft Projects sparked neighborhood conversations and a few delighted smiles.
Mason jar indoor herb garden from scraps
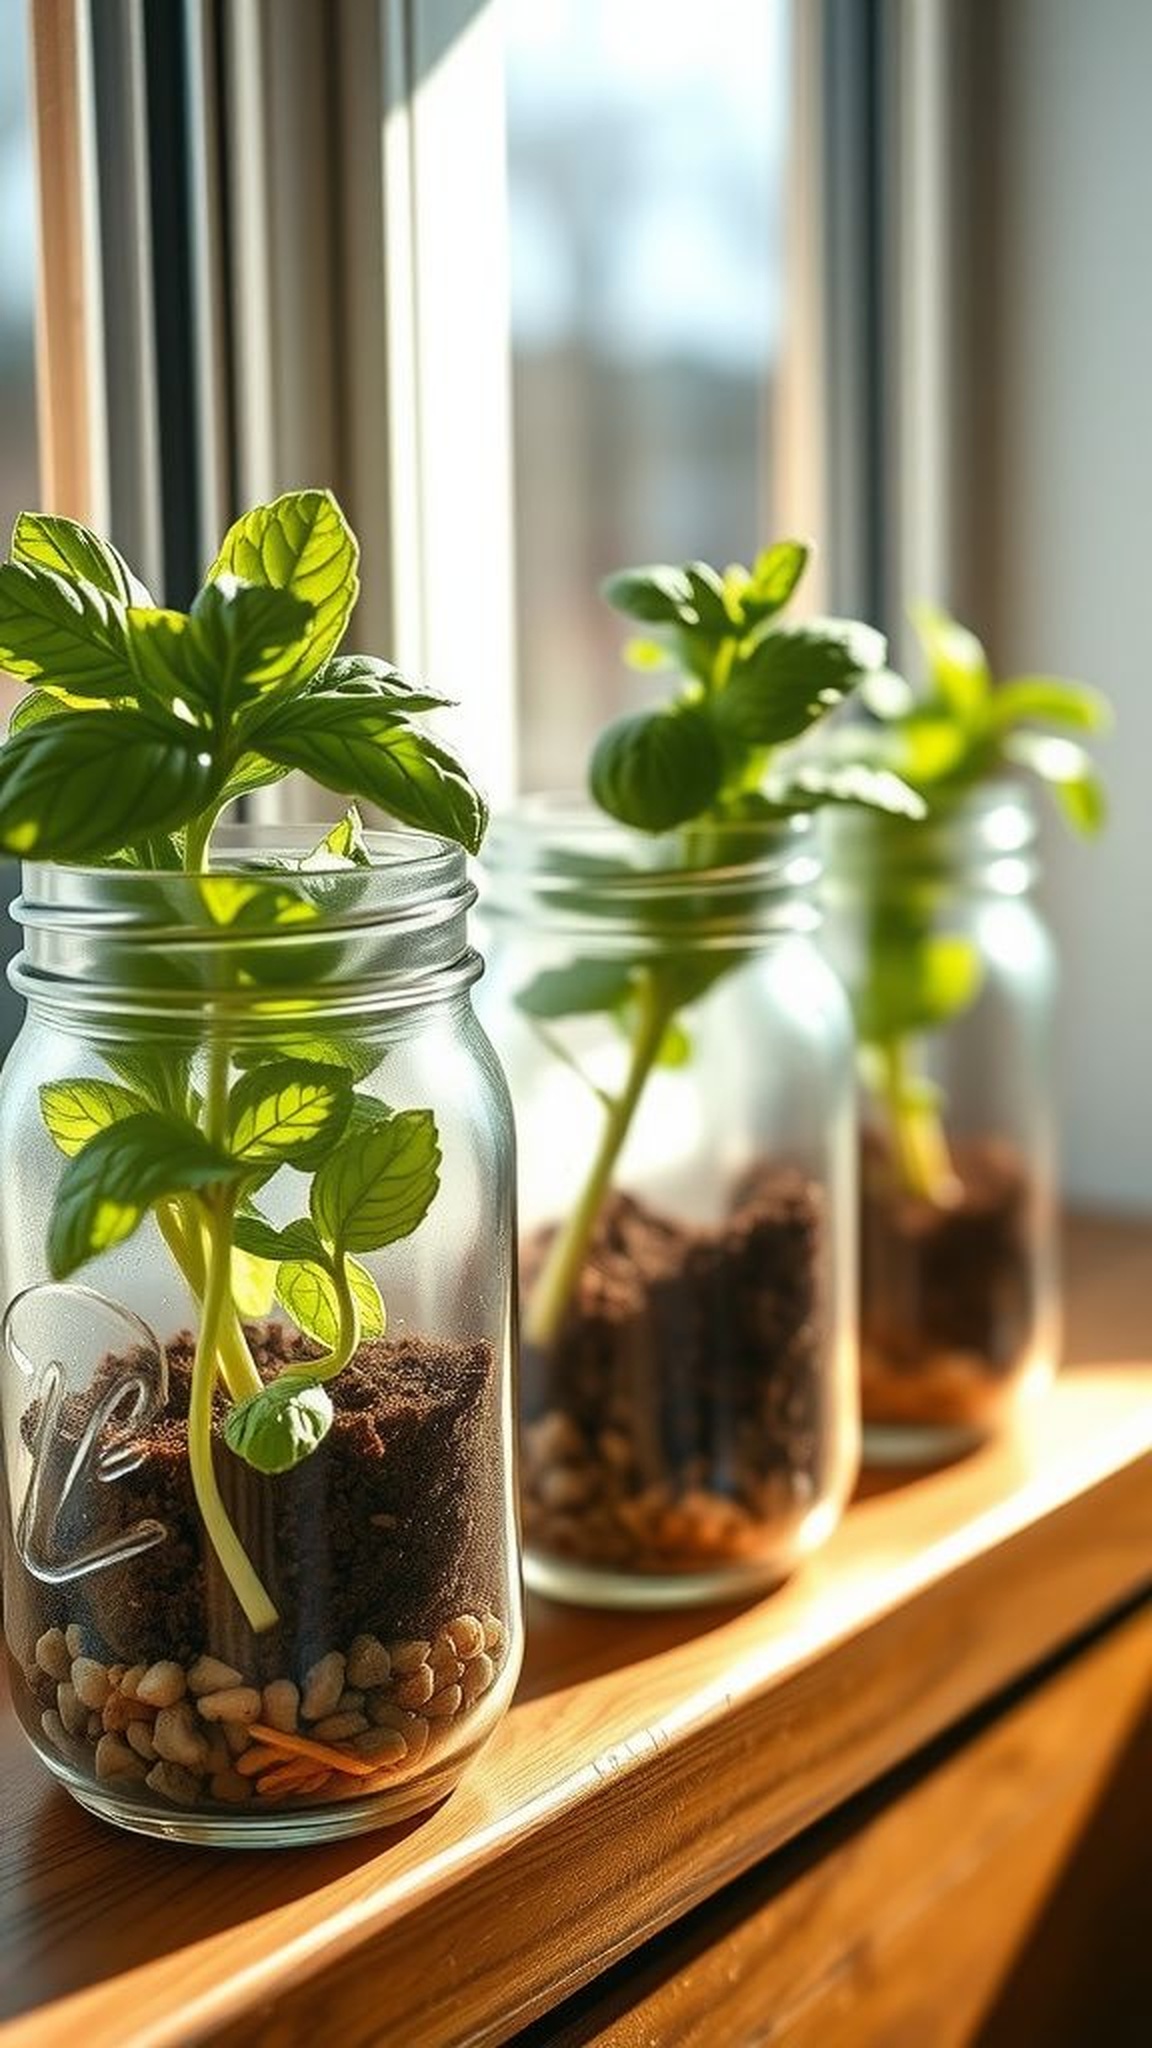
A row of glass jars catching morning light felt like a small miracle the first time the windowsill filled with green. The cool smooth glass, damp soil scent, and tiny sprigs of basil and mint made the kitchen feel alive.
Old lids carried water rings and fingerprints from past meals, now supporting fresh life. The clink of glass when reaching for a spoon became part of the ritual.
Watching little leaves unfurl brought a quiet satisfaction and a sensory reminder that simple objects can hold new purpose.
Steps
- Gather clean mason jars and rinse them until they sparkle.
- Add a layer of small stones for drainage followed by fresh potting mix.
- Nestle herb seedlings into the soil and press gently to settle roots.
- Position jars on a sunny sill and water sparingly to keep soil moist.
- Rotate jars every few days for even light and trim hitching bits as needed.
Plastic bottle hanging planter with colorful flair
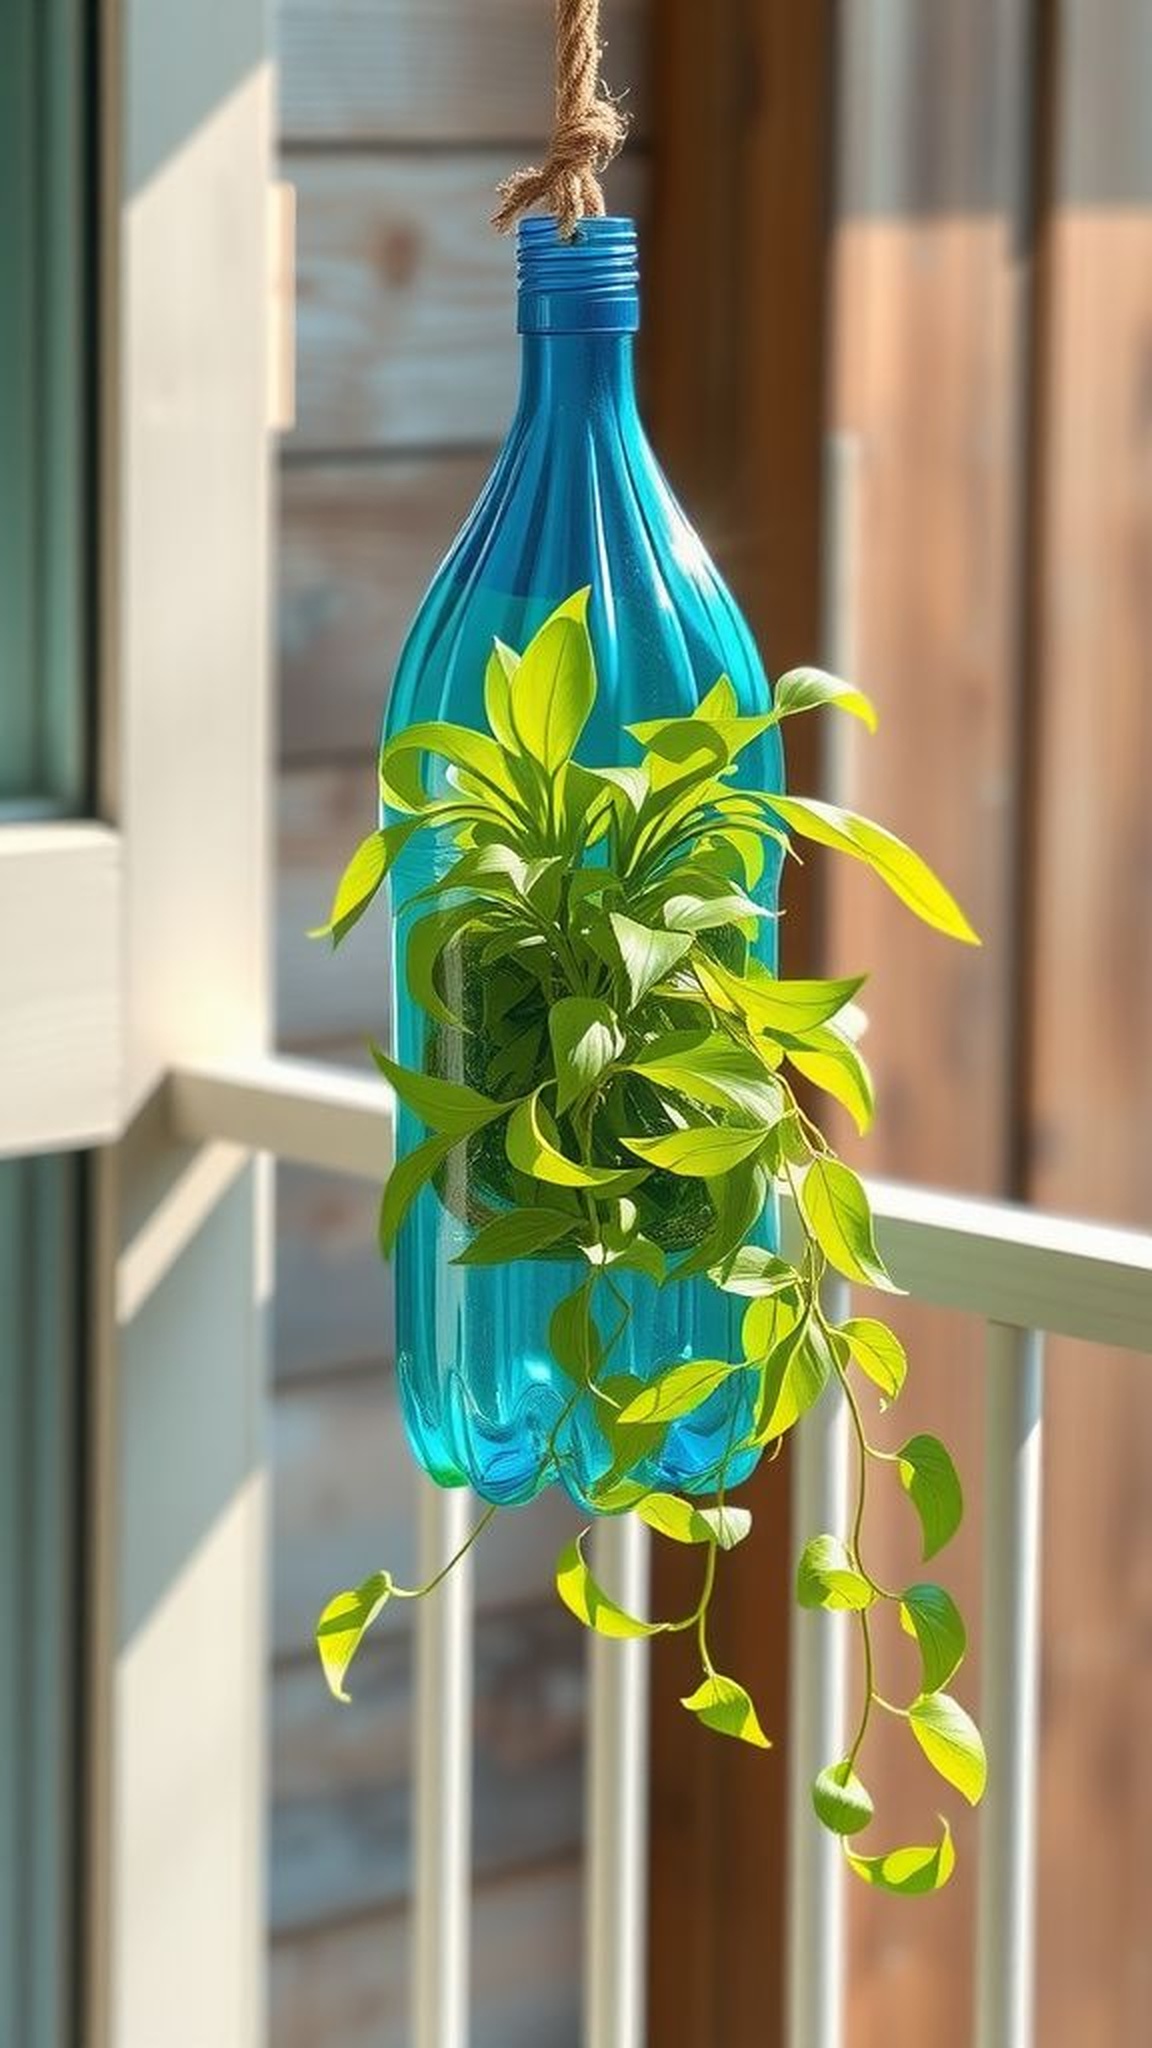
A single plastic bottle transformed into a dangling pocket of greenery brought a splash of color to an otherwise plain balcony. The slick plastic reflects mid-afternoon sun while soft leaves nod in the breeze.
There was a faint plastic smell at first that faded, replaced by damp earth and floral notes. The visual contrast between manufactured curve and delicate plant created a playful tension.
Little droplets gather on the inner wall after watering, catching light like tiny jewels and making the planter feel unexpectedly lively and cheery.
Steps
- Choose a sturdy plastic bottle, clean it thoroughly, and let it dry.
- Create a wide opening along one side and roughen the surface for planting.
- Fill with a small amount of drainage material then add potting mix.
- Place a small plant inside and secure a hanging cord through the top.
- Hang in a sheltered bright spot and water sparingly to avoid pooling.
Tin can lanterns casting warm recycled light
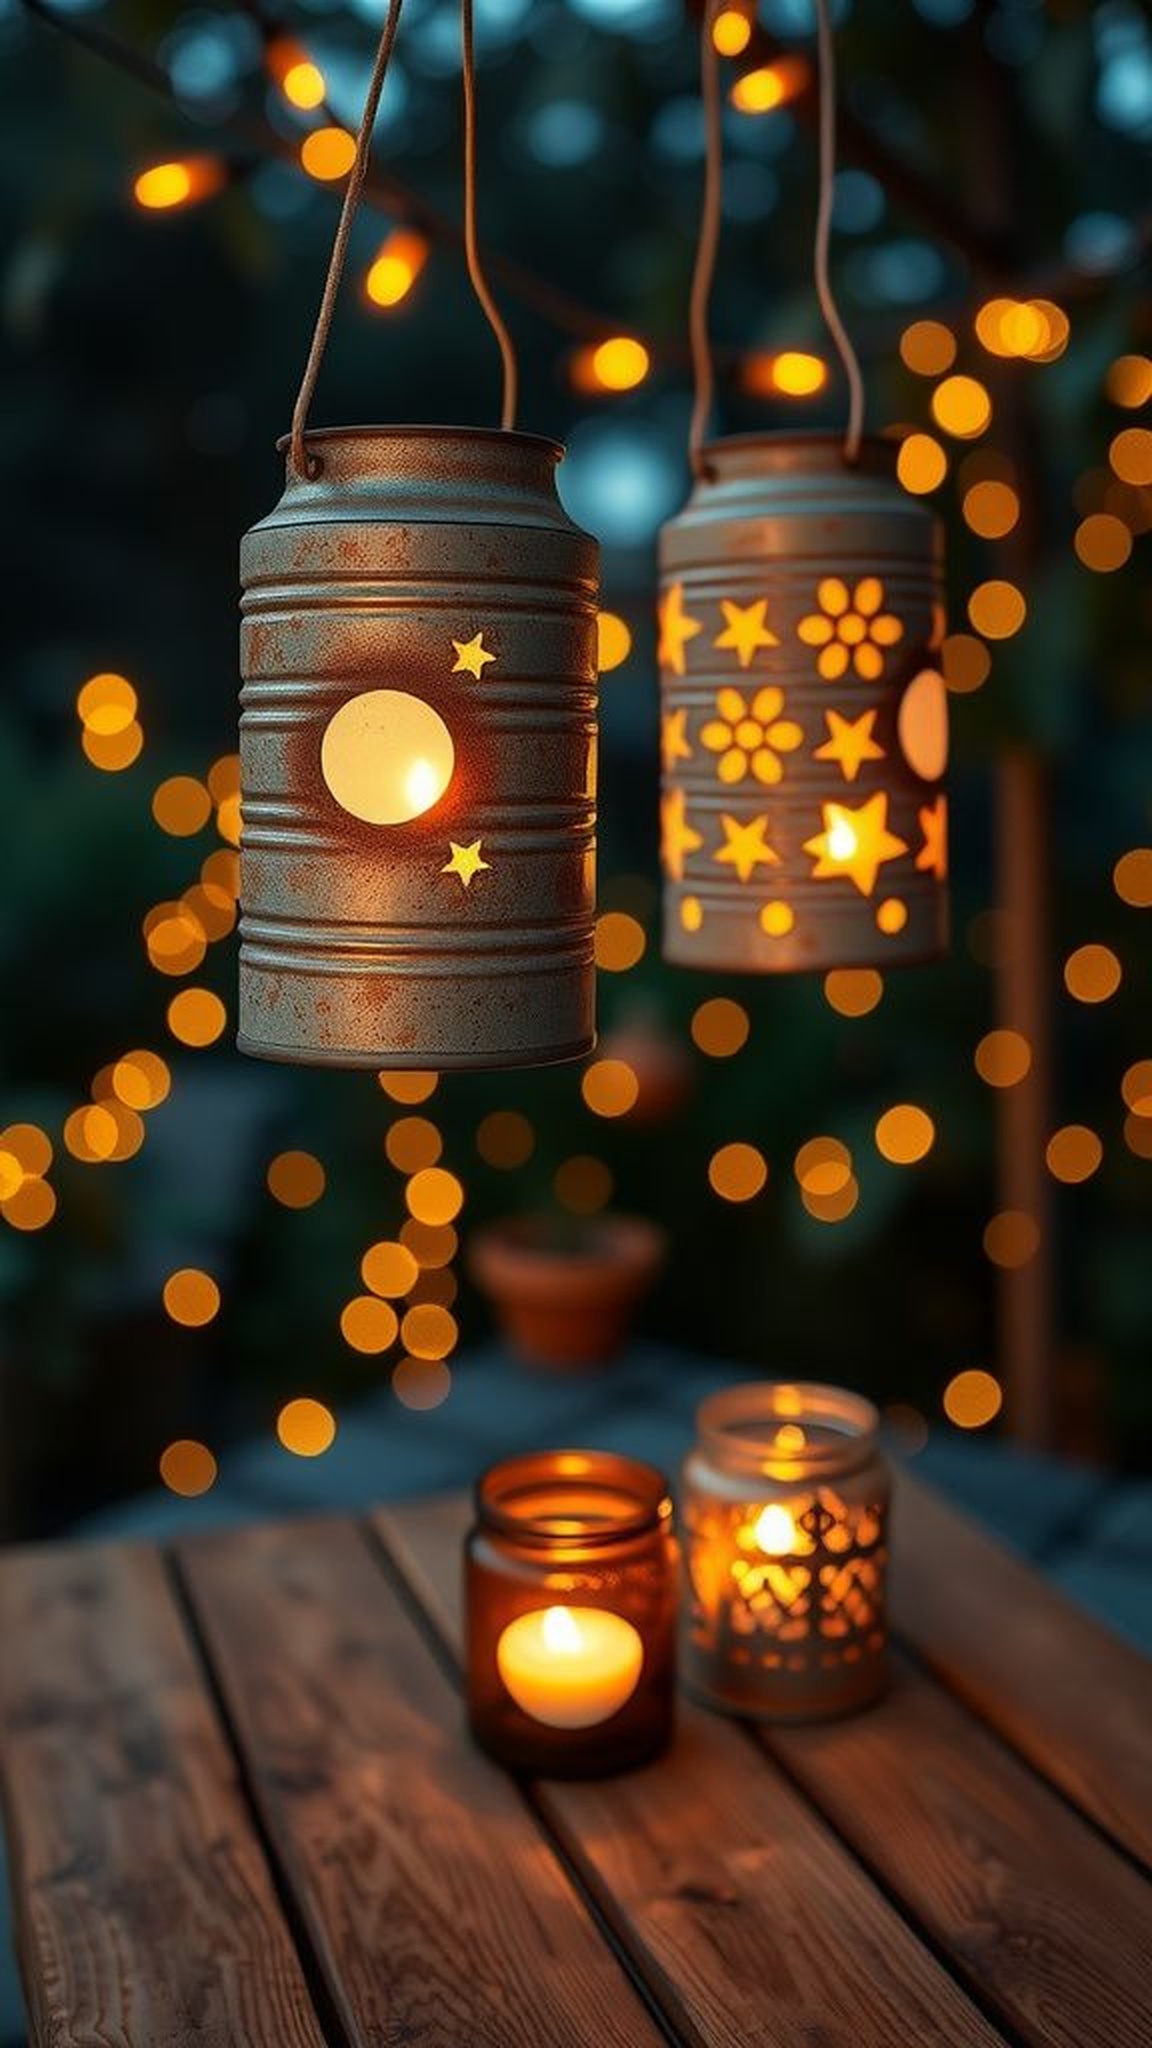
Nightfall brought a soft glow from a cluster of repurposed tin cans, each perforation sending tiny stars across the patio. Fingers traced the punched holes where old labels once clung, remembering grocery runs and family dinners.
The metallic scent felt faintly industrial until warm candle wax filled the air with cozy notes. Flickering light made rough edges shimmer and created a playful dance of shadow and gold.
Those humble cylinders felt unexpectedly elegant, turning ordinary evenings into moments worth lingering over with warm tea and casual conversation.
Steps
- Select clean tin cans with labels removed and dry them fully.
- Mark a simple pattern around each can and tap holes along the lines.
- Soften sharp edges by rubbing with fine cloth and metal-friendly smoothing material.
- Place a small flameless candle inside each can for safe ambient glow.
- Arrange cans in a cluster on a table or hang them with sturdy wire.
Save time and printer ink with 50+ printable templates and step-by-step instructions in one ad-free guide.

Just $19.99 — lifetime access
T-shirt tote bag with comfortable, lived-in feel
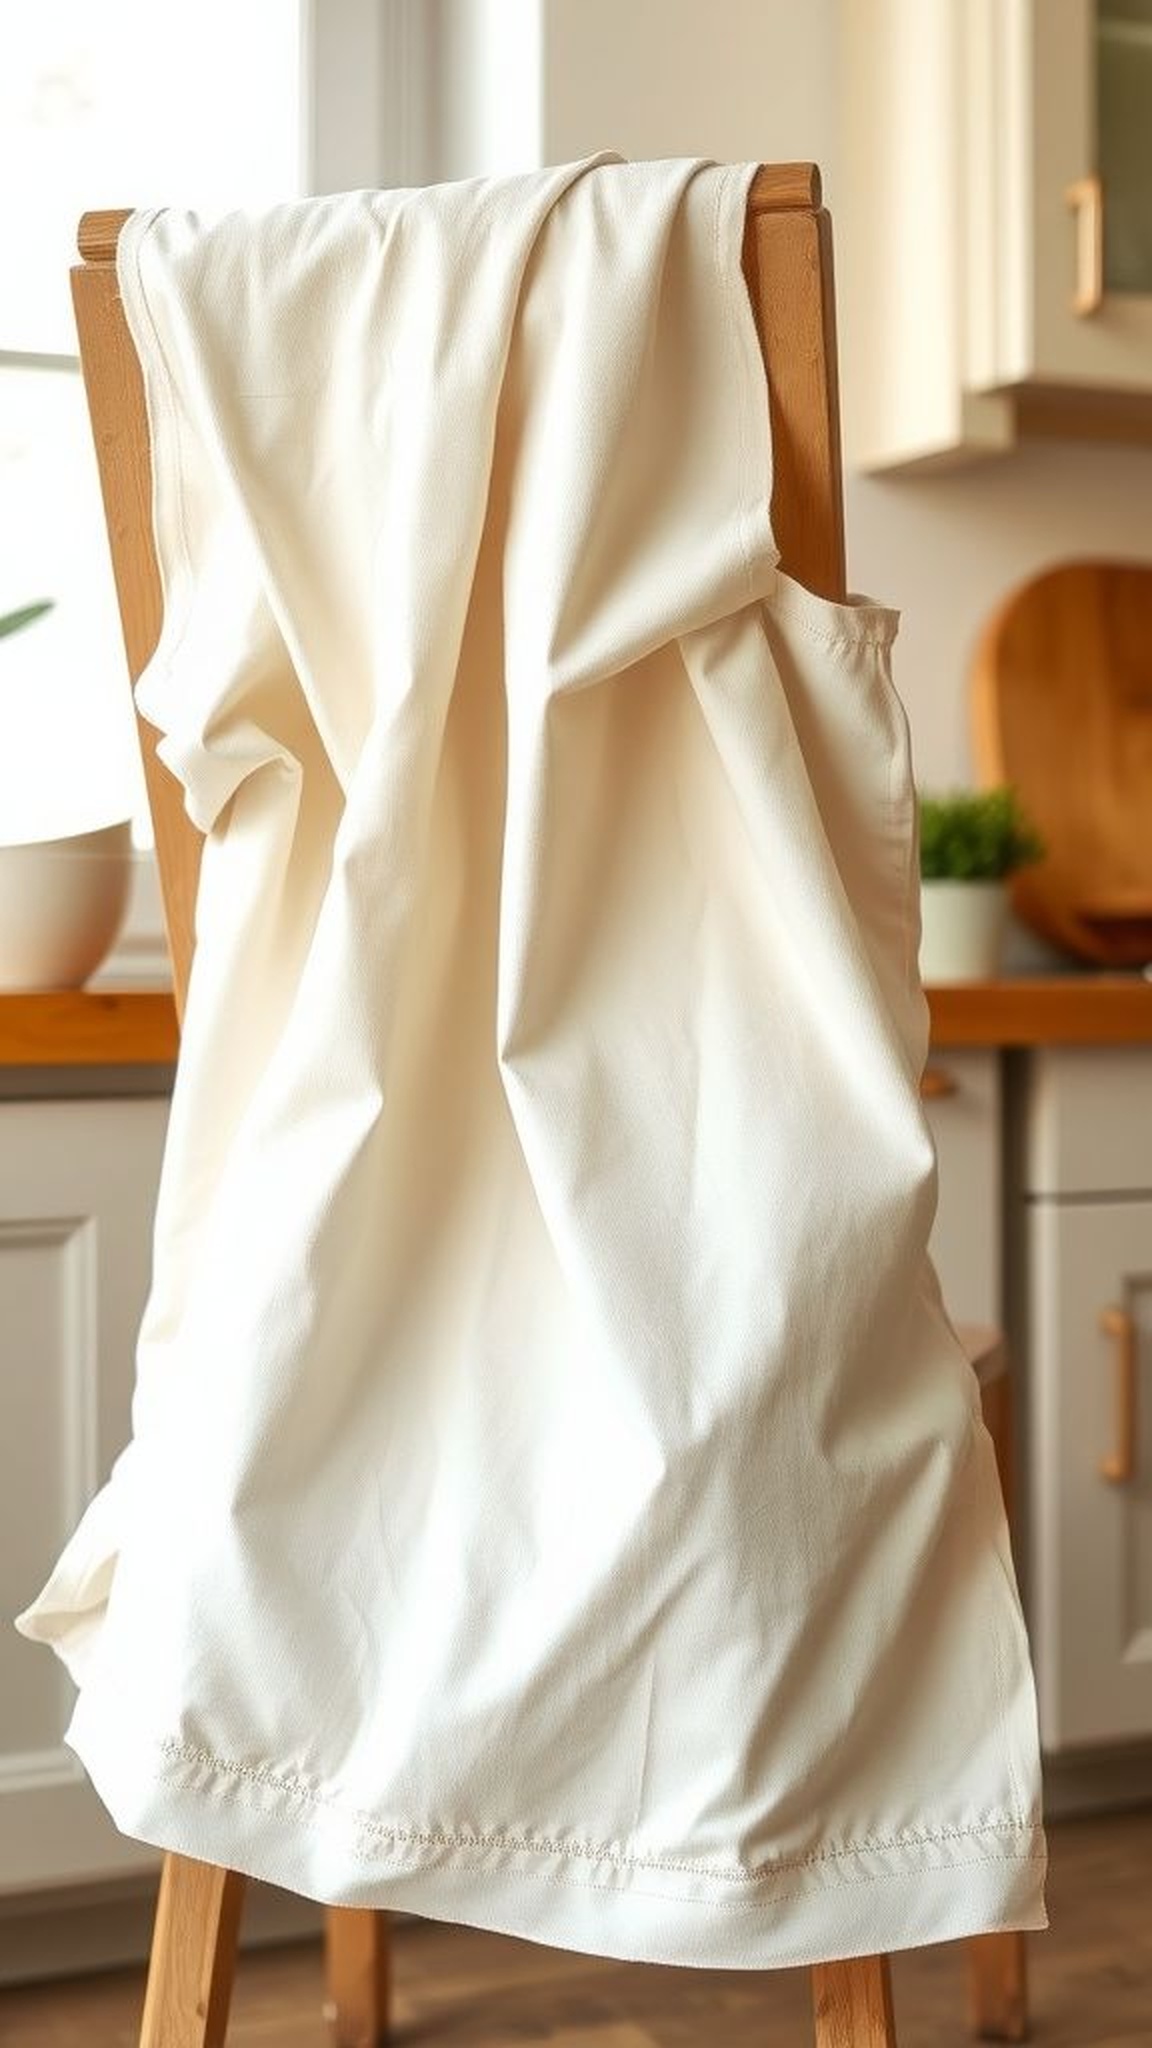
An old soft tee became a carry-all that smelled faintly of sun-dried cotton and Sunday mornings. The fabric had thinned in places and those worn patches added character rather than shame.
The handle sat comfortably over the shoulder, familiar as a well-loved sweater. The stretch of the knit lent itself to casual shopping trips and a handful of stray groceries.
Threads frayed in a friendly way at the rims, and small stains seemed like badges from past adventures. Each time it swung by the hip, the bag told a quiet story of reuse.
Steps
- Lay the T-shirt flat and decide how deep the bag should be.
- Remove the neckline to form the main opening and shape comfortable handles.
- Gather the bottom edges and secure them together with a strong stitch or knot.
- Reinforce connections where handles meet the body for extra strength.
- Turn the bag right-side out and smooth seams for a finished look.
Wine cork mini herb markers and tiny signs

A handful of wine corks collected over months turned into a scatter of tiny garden markers that felt pleasantly tactile between fingers. Each cork carried memory of long dinners and laughter, now repurposed into small placards with handwritten names.
The rough cork surface smelled faintly woody, and ink sunk into its pores with a soft, absorbed look. Nestling one between pots felt like tucking in a story alongside a sprout.
The assortment of fonts and little doodles made everything feel hand-curated, an intimate gallery of small intentions at plant level.
Steps
- Gather dry corks and trim any rough bits at the ends with kitchen scissors.
- Write plant names or little symbols on the flat face with a permanent marker.
- Press a wooden skewer into the base of each cork to create a stake.
- Place markers into soil near the corresponding plants for easy identification.
- Refresh faded ink occasionally and replace any corks that break down.
Magazine paper woven basket with bright pattern
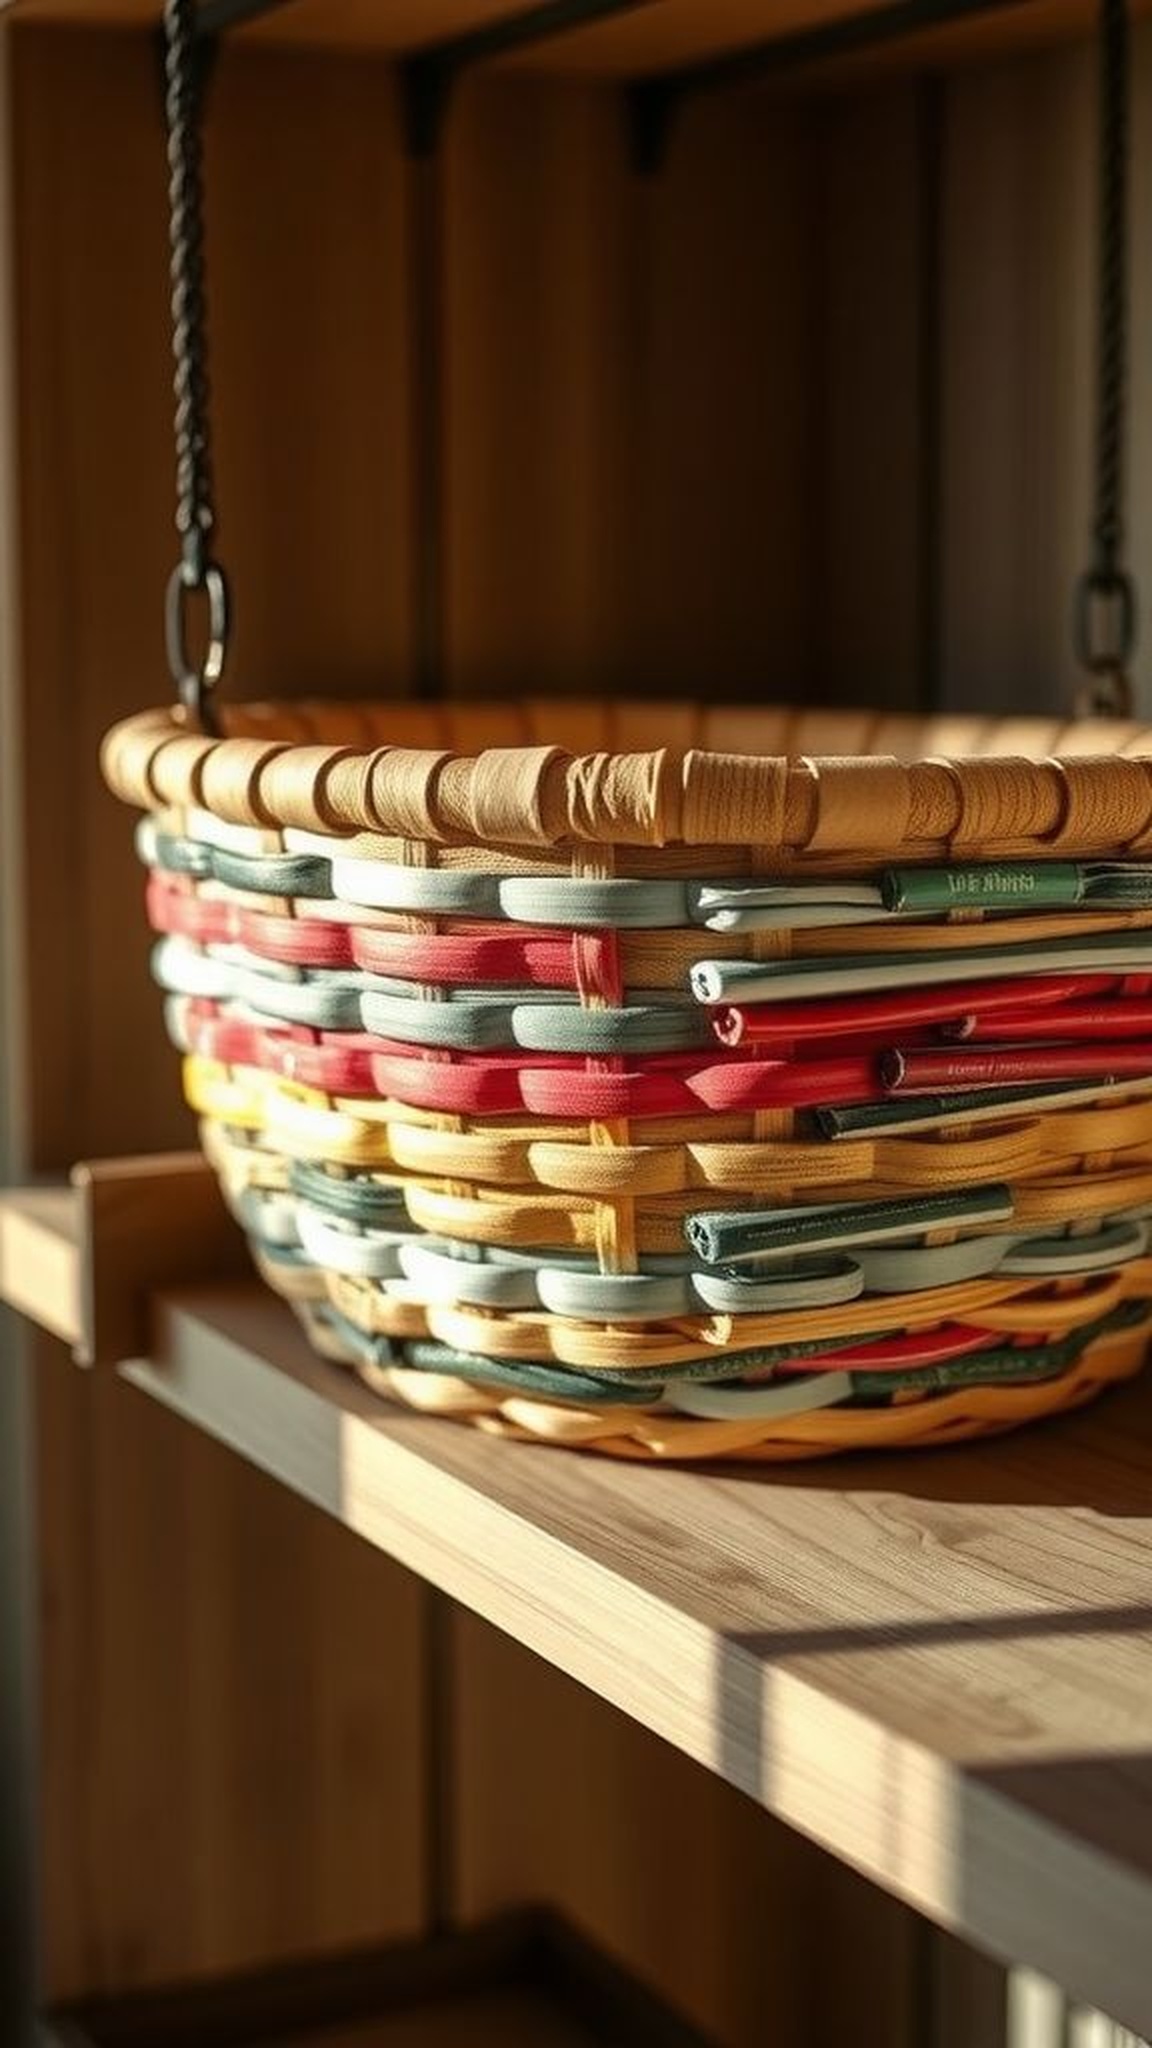
Rolls of glossy magazine pages became a curling mosaic of color that felt oddly luxurious in the hand. The paper had a subtle scent of ink and a slick finish that contrasted with the rough braided texture.
Fingers remembered turning pages over lazy afternoons, now twisting them into long tubes that shimmered when the sun hit the varnish. The finished basket rattled softly when set down and cradled small objects like stray keys and hair ties with an unexpected dignity.
The pattern shifted depending on which spreads had been included, giving each weave a personal history.
Steps
- Collect colorful magazine pages and roll them tightly into long thin tubes.
- Arrange several tubes side by side to form the base and begin weaving new tubes over them.
- Bend the woven base upward to form the basket walls and continue weaving around.
- Tuck in or bind the end tubes securely to keep the weave stable.
- Press the finished basket gently to shape and allow it to rest overnight.
Egg carton succulent garden with soft textures
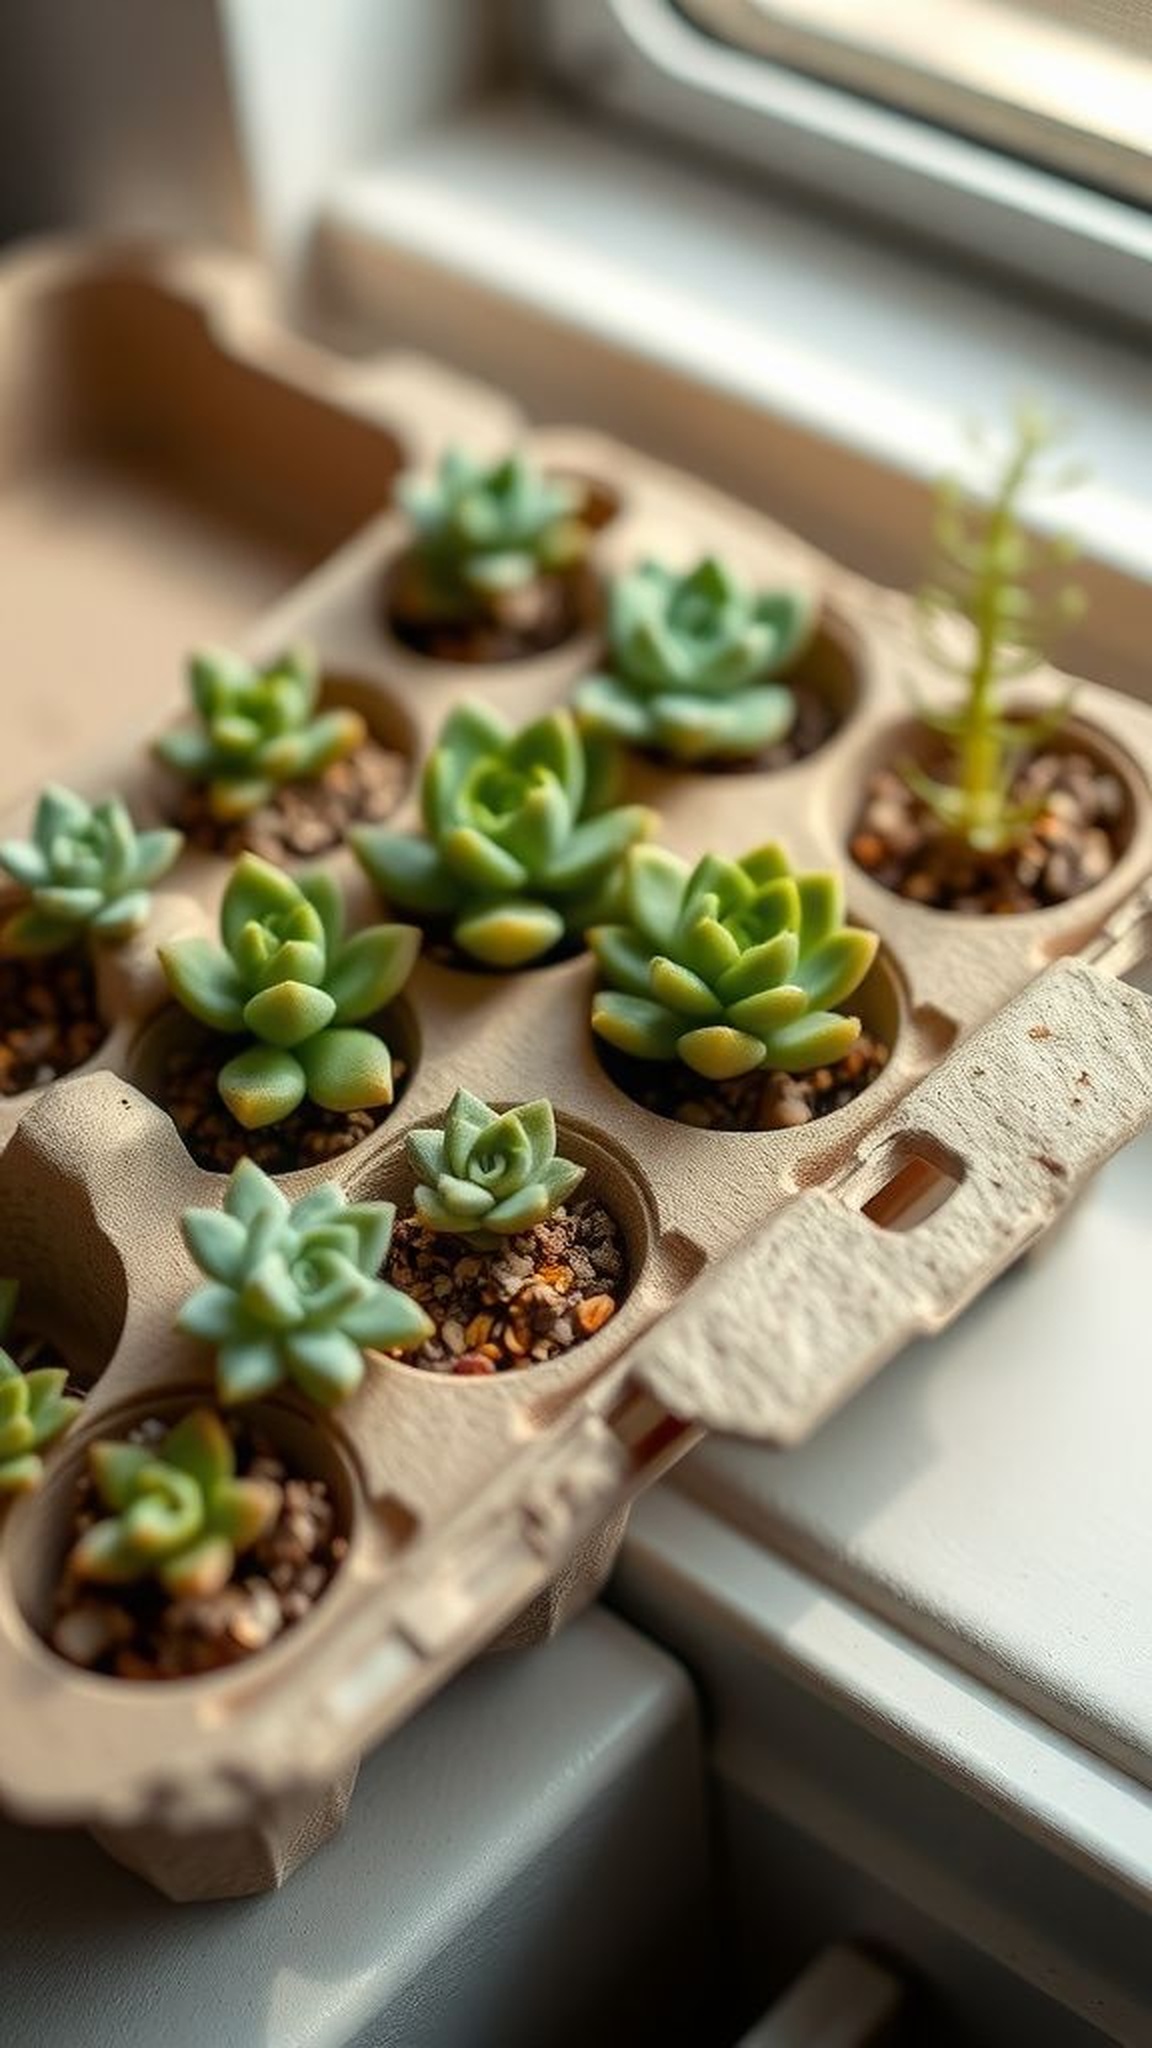
A cracked egg carton, once plain and utilitarian, turned into a tiny clustered garden that fit in the palm like a secret. The pulp material felt papery and slightly fuzzy, absorbing a little of the damp soil and lending a matte finish.
Tiny succulents with waxy leaves contrasted against the carton’s muted beige, creating a play between fragile and sturdy. When watered sparingly, the soil gave off a faint earthy aroma and the arrangement glowed under a low sunbeam.
It sat on a sill as a miniature landscape, inviting quiet moments of attention.
Steps
- Separate a clean egg carton into sections and add a small layer of coarse grit for drainage.
- Fill each cup with a light succulent mix and create a shallow depression for roots.
- Gently nestle tiny succulent cuttings into the soil with care.
- Position the carton in bright indirect light and water very sparingly.
- Replace or compost the carton once it shows wear and move plants to more permanent pots.
CD mosaic coaster with playful refracted light
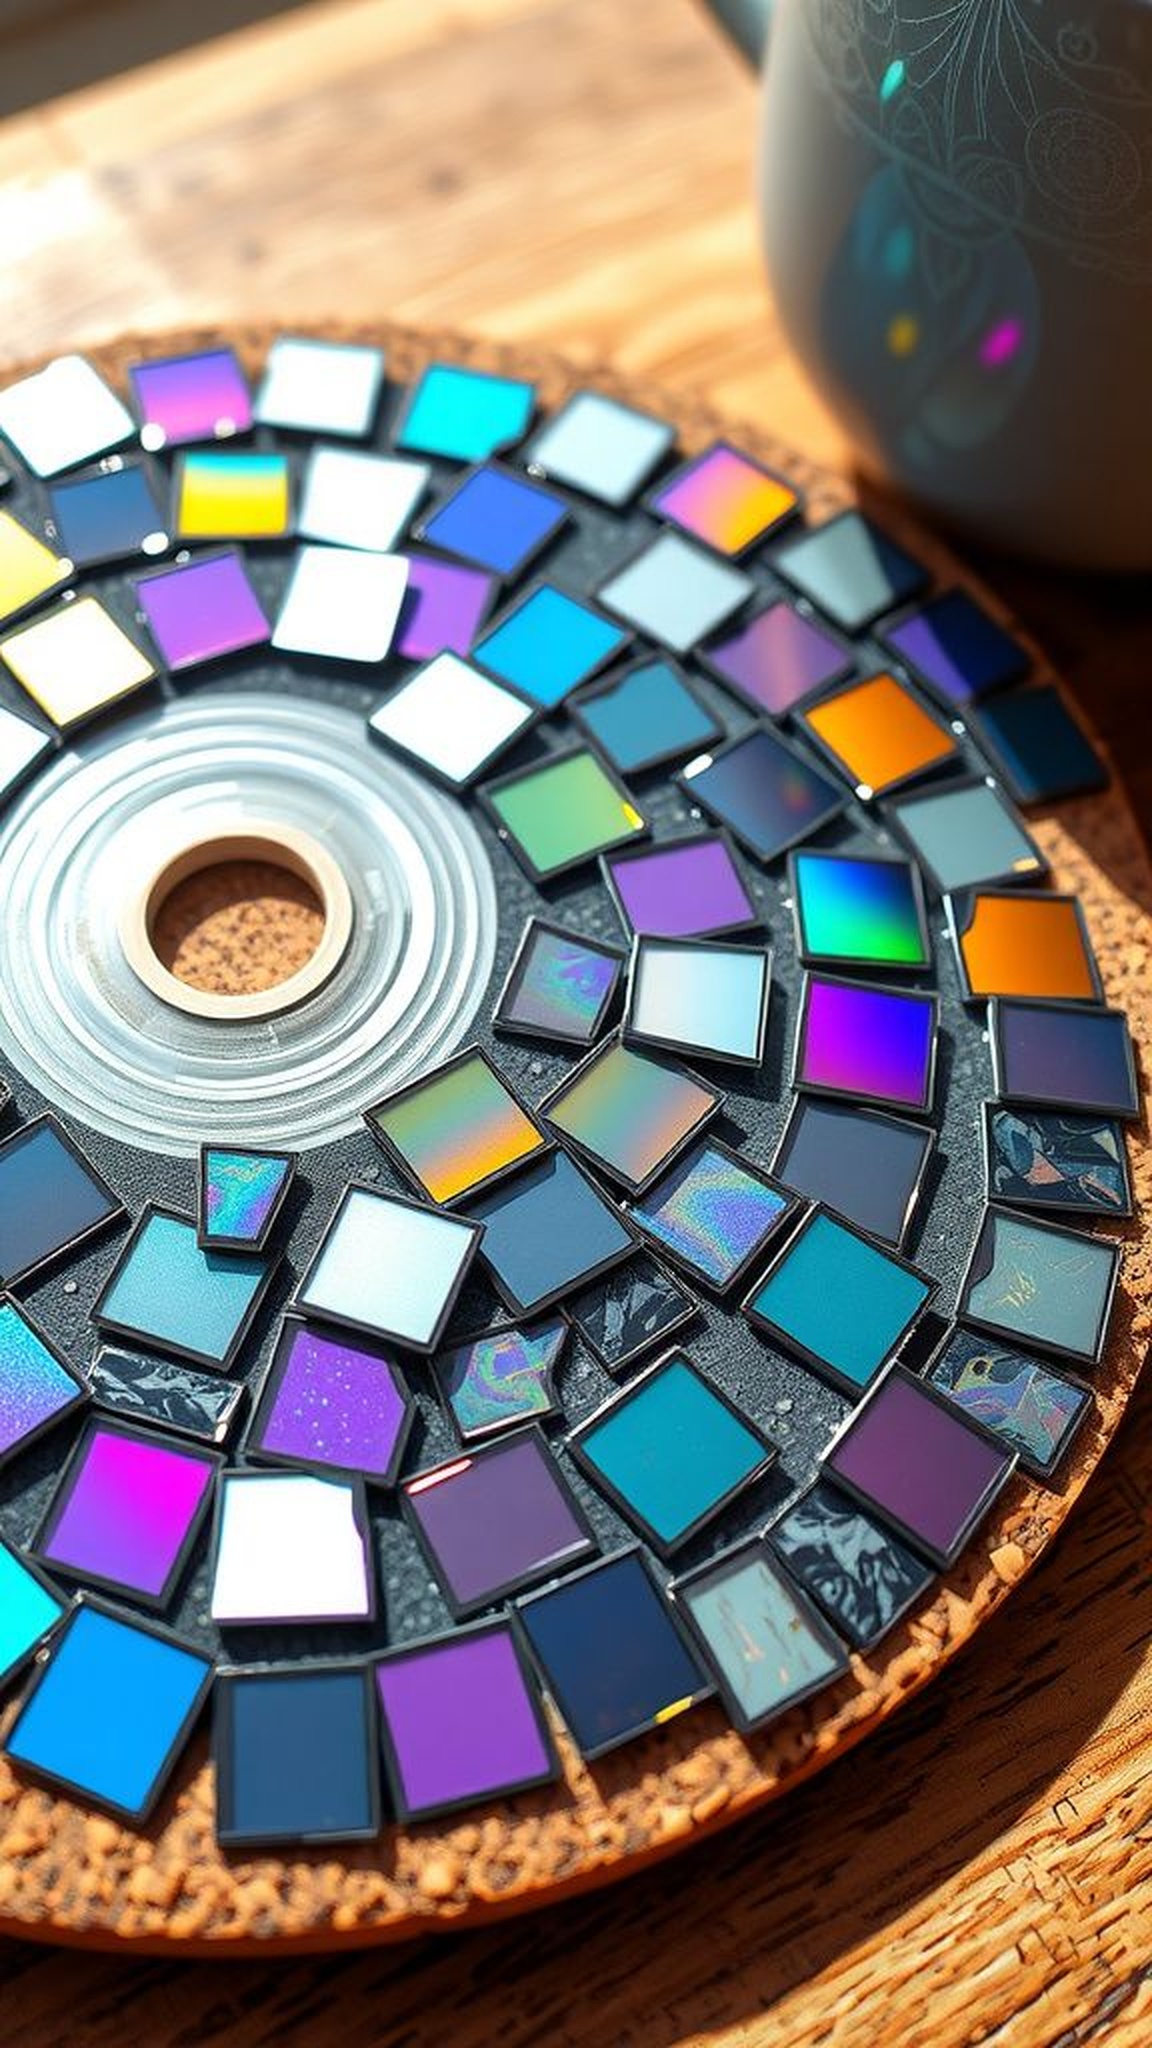
Old shiny discs broke into slivers of rainbow when caught in sun, each shard reflecting tiny rainbows across a tabletop. The smooth fractured edges glinted against matte grout and sat in a ring like miniature prisms.
Fingertips traced the cool reflective surface and the coaster felt pleasantly hefty beneath a mug. Sound of a cup setting down mixed with soft clinks as glass edges touched.
Together the colors created a moving image that changed with angle, inviting a pause to watch how light could be coaxed into new, small spectacles.
Steps
- Break old CDs into varied small pieces while wearing protective gloves and eyewear.
- Arrange shards into a circular pattern on a sturdy base such as cork or ceramic.
- Press pieces in flush and fill gaps with grout to secure them in place.
- Wipe away excess grout gently after it begins to set for a clean finish.
- Allow the coaster to cure fully before placing any hot mugs on it.
Pallet vertical garden for narrow outdoor spaces
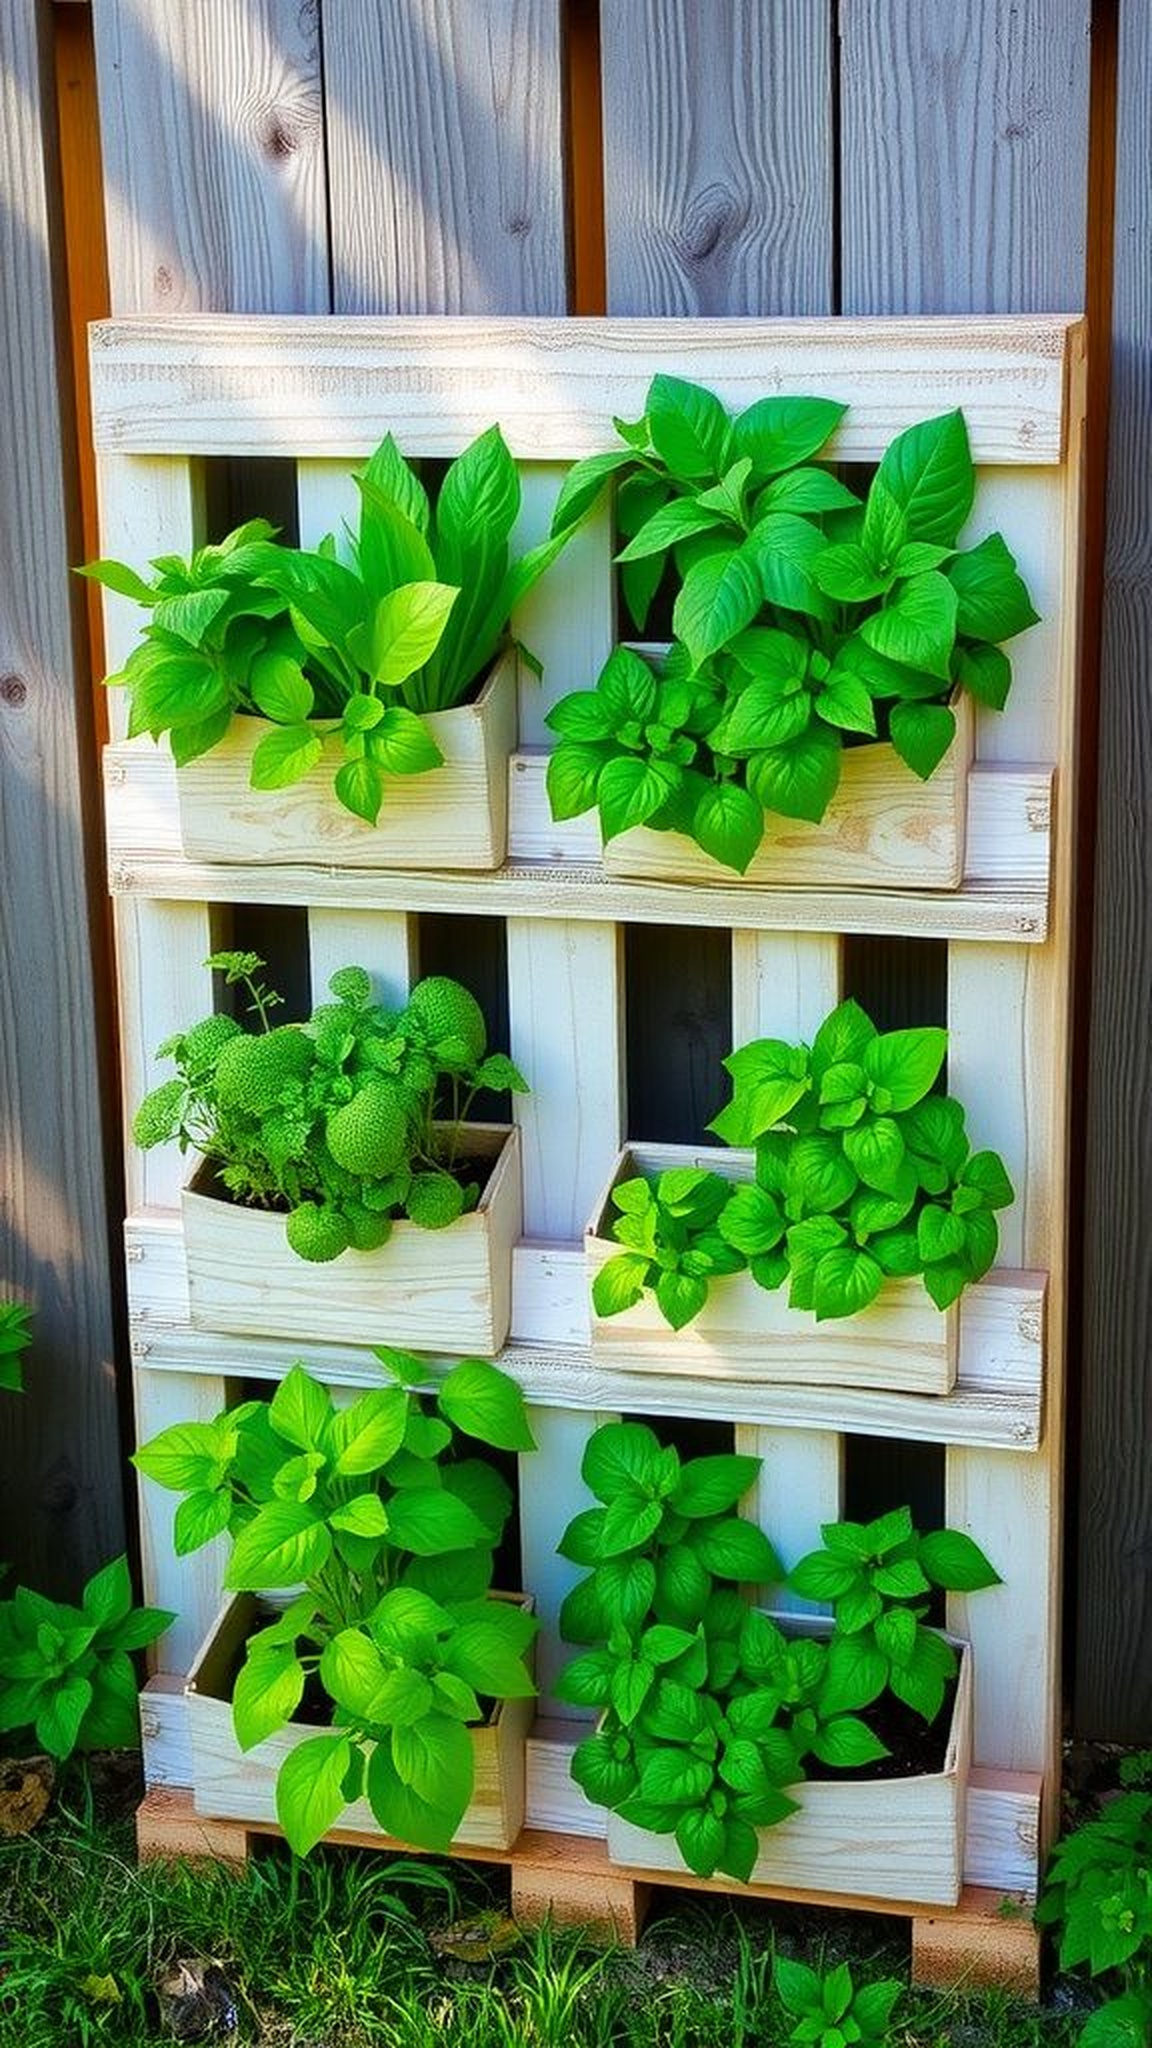
A weathered pallet leaned against the fence like an old friend, its rough wood smelling faintly of rain and sun. Pockets of soil sat between slats, and small herbs peeked out, their green against grey wood creating a pleasing contrast.
The palette of greys and greens felt grounding, and the vertical layout turned a skinny corner into a living mural. Watering sent tiny splashes down the planks and the damp wood released a woodland scent.
Passersby often paused, fingers brushing leaves, and the pallet transformed a spare wall into shared green life.
Steps
- Choose a sturdy pallet and clean it of dirt and loose splinters.
- Line the pallet rows with breathable landscape fabric to hold soil and allow drainage.
- Fill pockets with a light potting mix and place small plants into the spaces.
- Stand the pallet upright in a bright spot and anchor it securely to a wall or fence.
- Water gently from the top and let excess drain out to keep plants healthy.
Glass bottle pendant terrarium with delicate layers
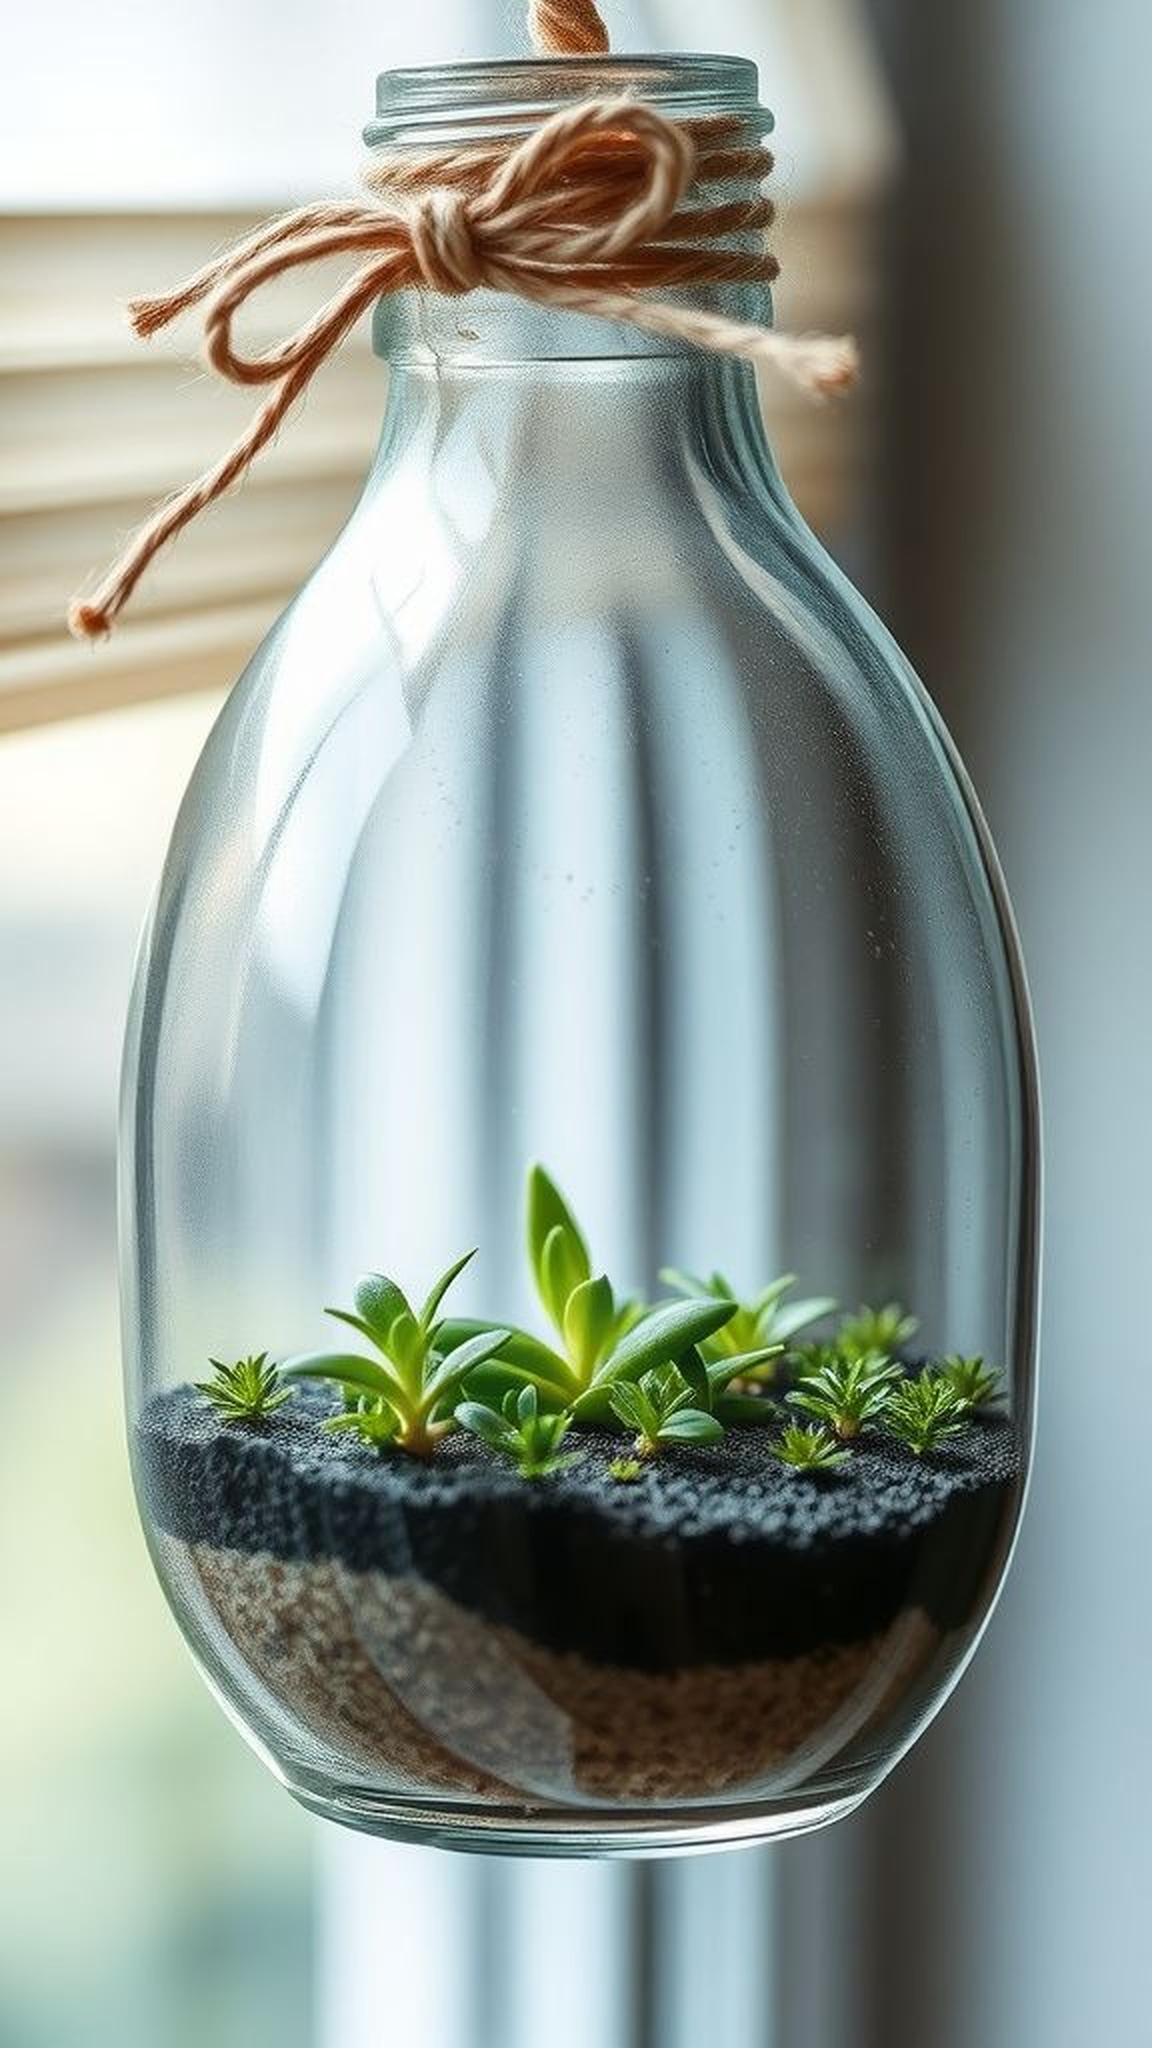
A clear glass bottle suspended at eye level revealed a tiny layered world, like a slow-motion landscape. Tiny granules of sand shifted beneath moss and pebbles, and the glass magnified small ferns so they seemed larger than life.
There was a faint mineral smell from damp stones and a coolness when fingers hovered near the glass. The bottle’s curve warped the view in a delightful way, turning a single leaf into an abstract sculpture.
Hanging among window light, it moved slightly with air currents and felt like a living ornament shared quietly with the room.
Steps
- Select a clean clear bottle and remove any stubborn labels or residue.
- Layer small stones, activated charcoal, and a thin layer of sand for filtration.
- Add a small amount of potting mix and tuck in miniature plants like moss or tiny ferns.
- Close the bottle and suspend it using a secure cord looped around the neck.
- Place in bright indirect light and mist occasionally to maintain humidity.
Denim pocket wall organizer for small objects
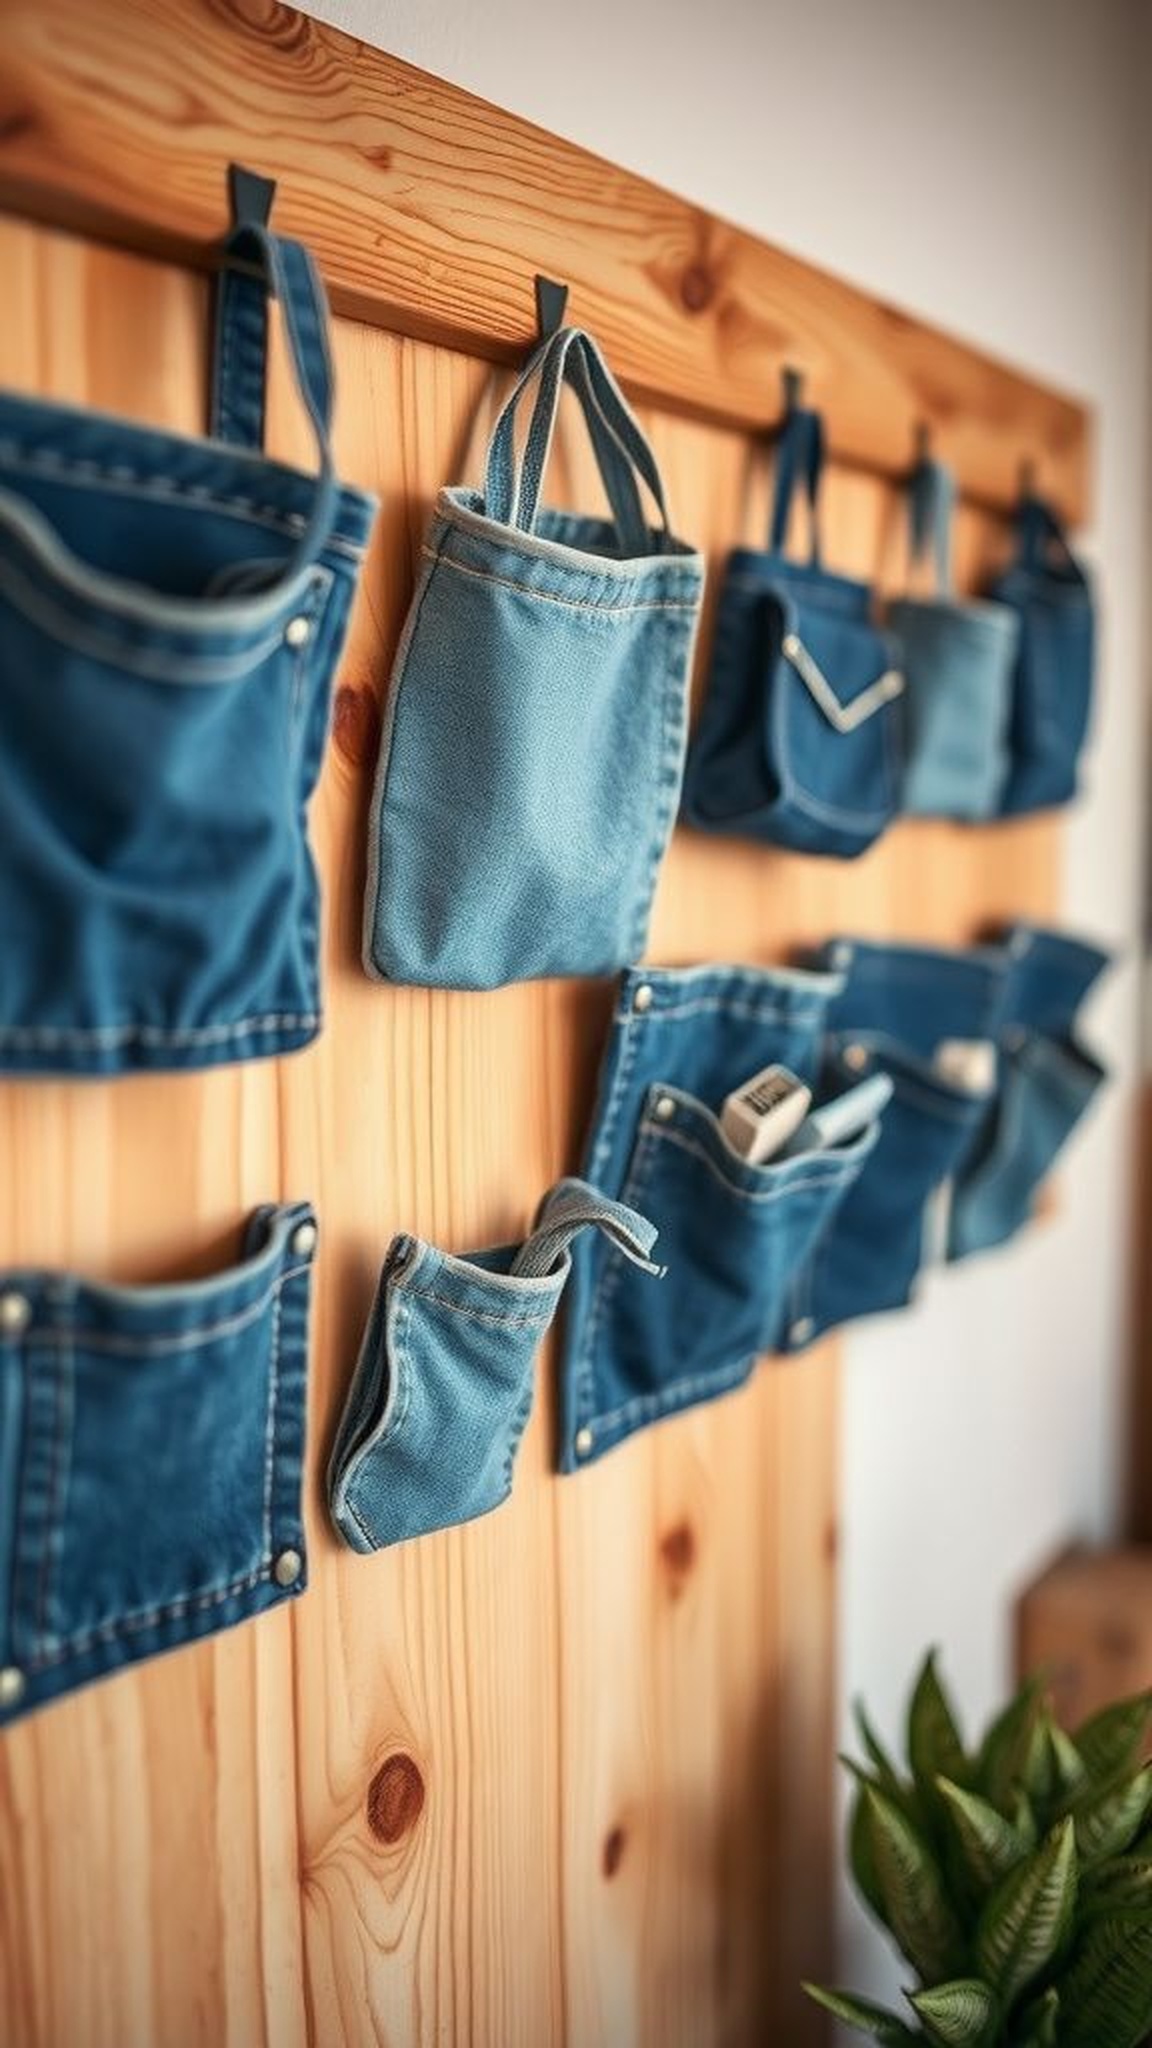
The worn jean pocket held a history of coins and folded notes and now became a wall-mounted keeper of pens and scissors. The denim felt cool and slightly stiff where it had been washed many times, with faded indigo and frayed edges telling a slow story.
When mounted on a painted board the pockets offered tactile contrast and a pleasing row of blue hues. Fingers slipping into the pockets found little surprises — a stray receipt, a forgotten ticket stub — and the whole setup made household clutter look intentionally casual and comforting.
Steps
- Collect waistbands and pockets from old jeans and clean them thoroughly.
- Arrange pockets on a sturdy backing board in a pleasing layout.
- Secure each pocket to the board by stitching or strong fabric adhesive along the edges.
- Add a hanging device to the board and mount it on a wall at comfortable reach.
- Fill pockets with small items like writing tools and mail for tidy storage.
Glass jar soap dispenser with vintage charm
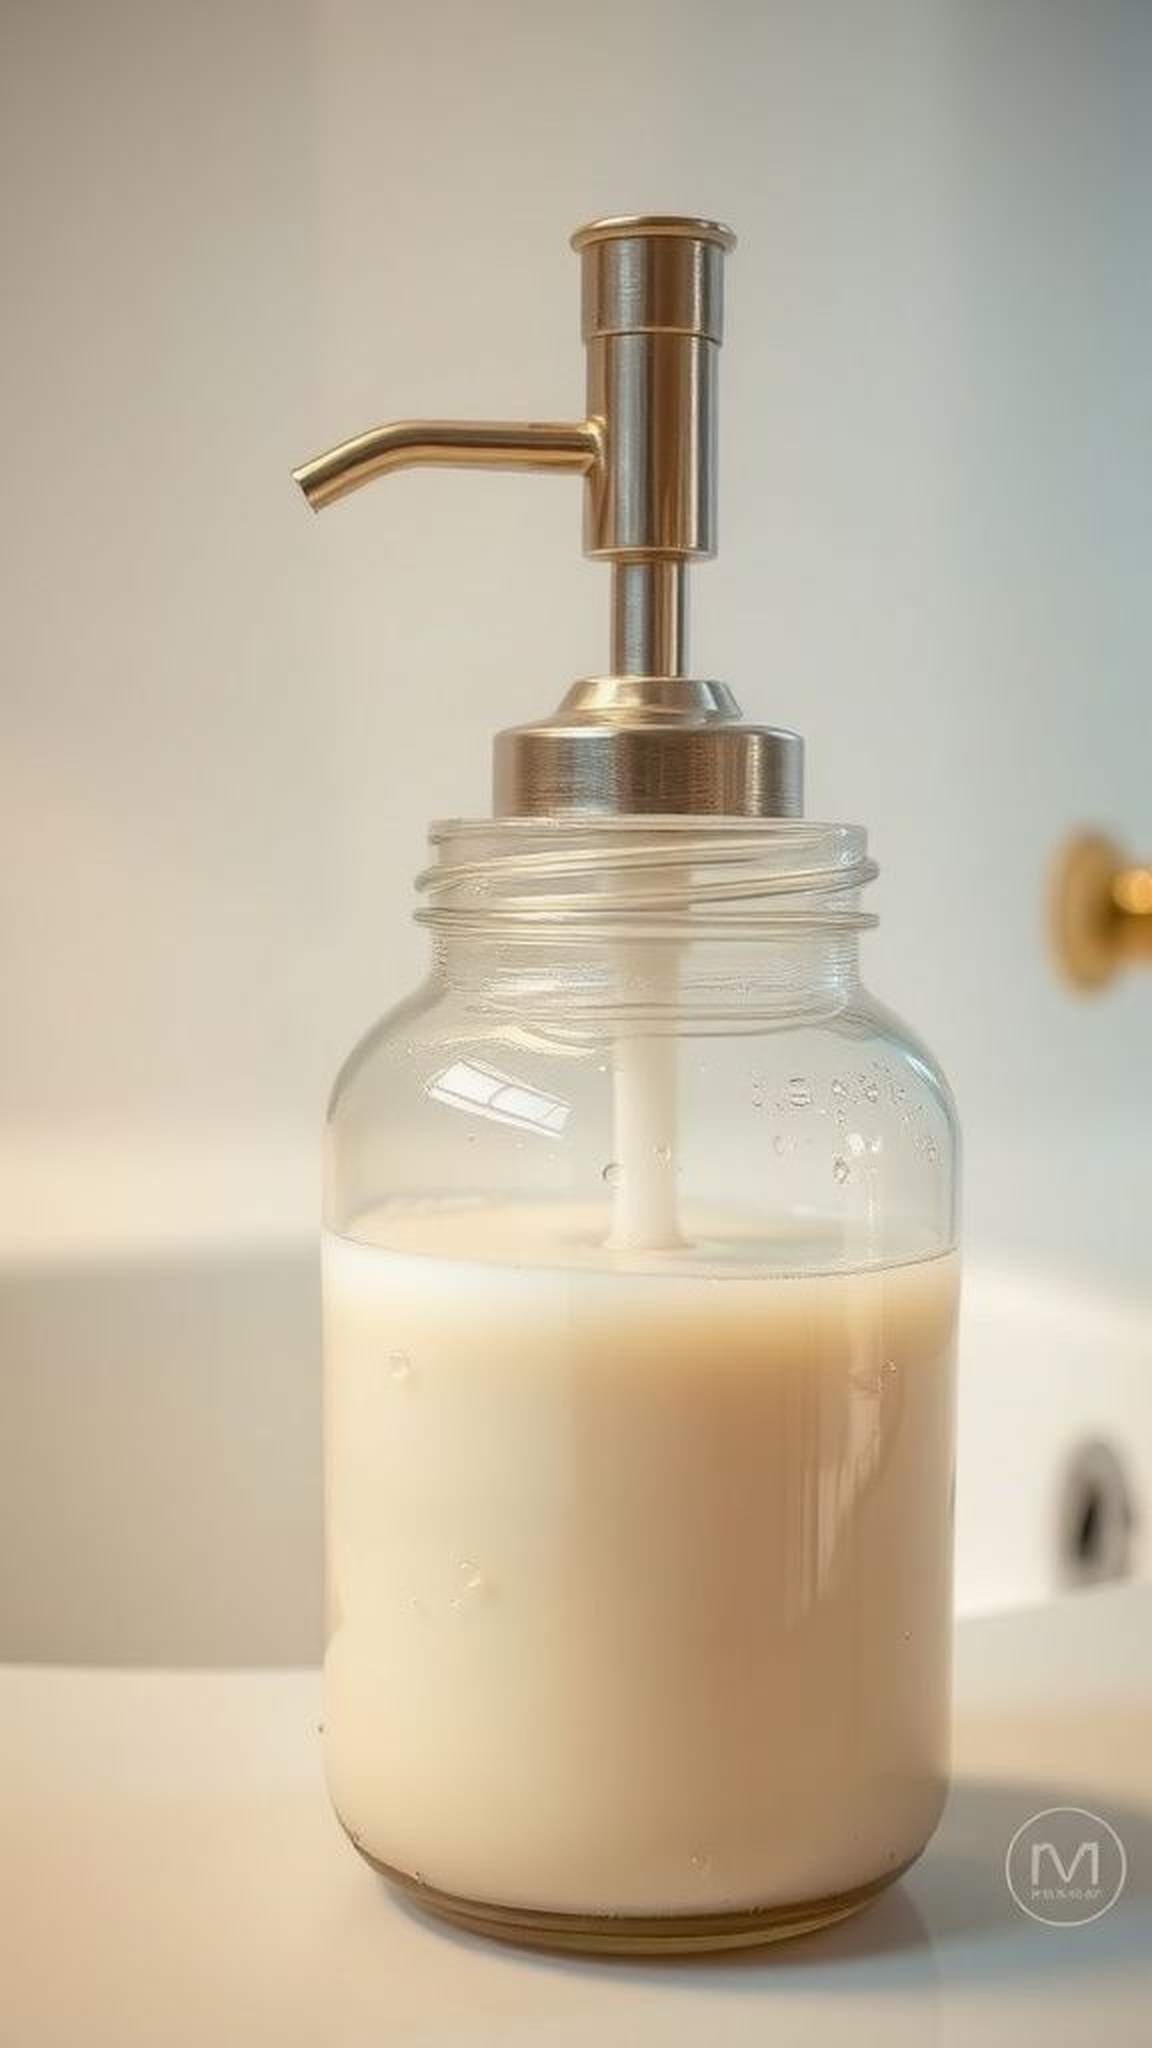
A once empty jar took on the rhythm of daily routines when fitted with a pump head, the cool glass meeting palms each morning. The jar still smelled faintly of its original contents, which blended with citrus soap to create a clean, uplifting scent.
Foam rose in a pleasing swirl and dribbled down the jar with a satisfying soft sound. The pump’s metal finish warmed under fingertips and the jar’s weight felt reassuring on the sink edge.
It turned a mundane hand-wash into a small, tactile pleasure with a nod to thrift.
Steps
- Choose a clean glass jar and ensure it is completely dry inside.
- Fit a compatible dispenser pump through a drilled hole in the lid and secure it.
- Pour liquid soap into the jar and test the pump action until smooth.
- Wipe any spills and place the dispenser near the sink for daily use.
- Refill with natural soap blends as needed and rinse the pump occasionally.
Denim mitts from an old cozy sweater sleeve
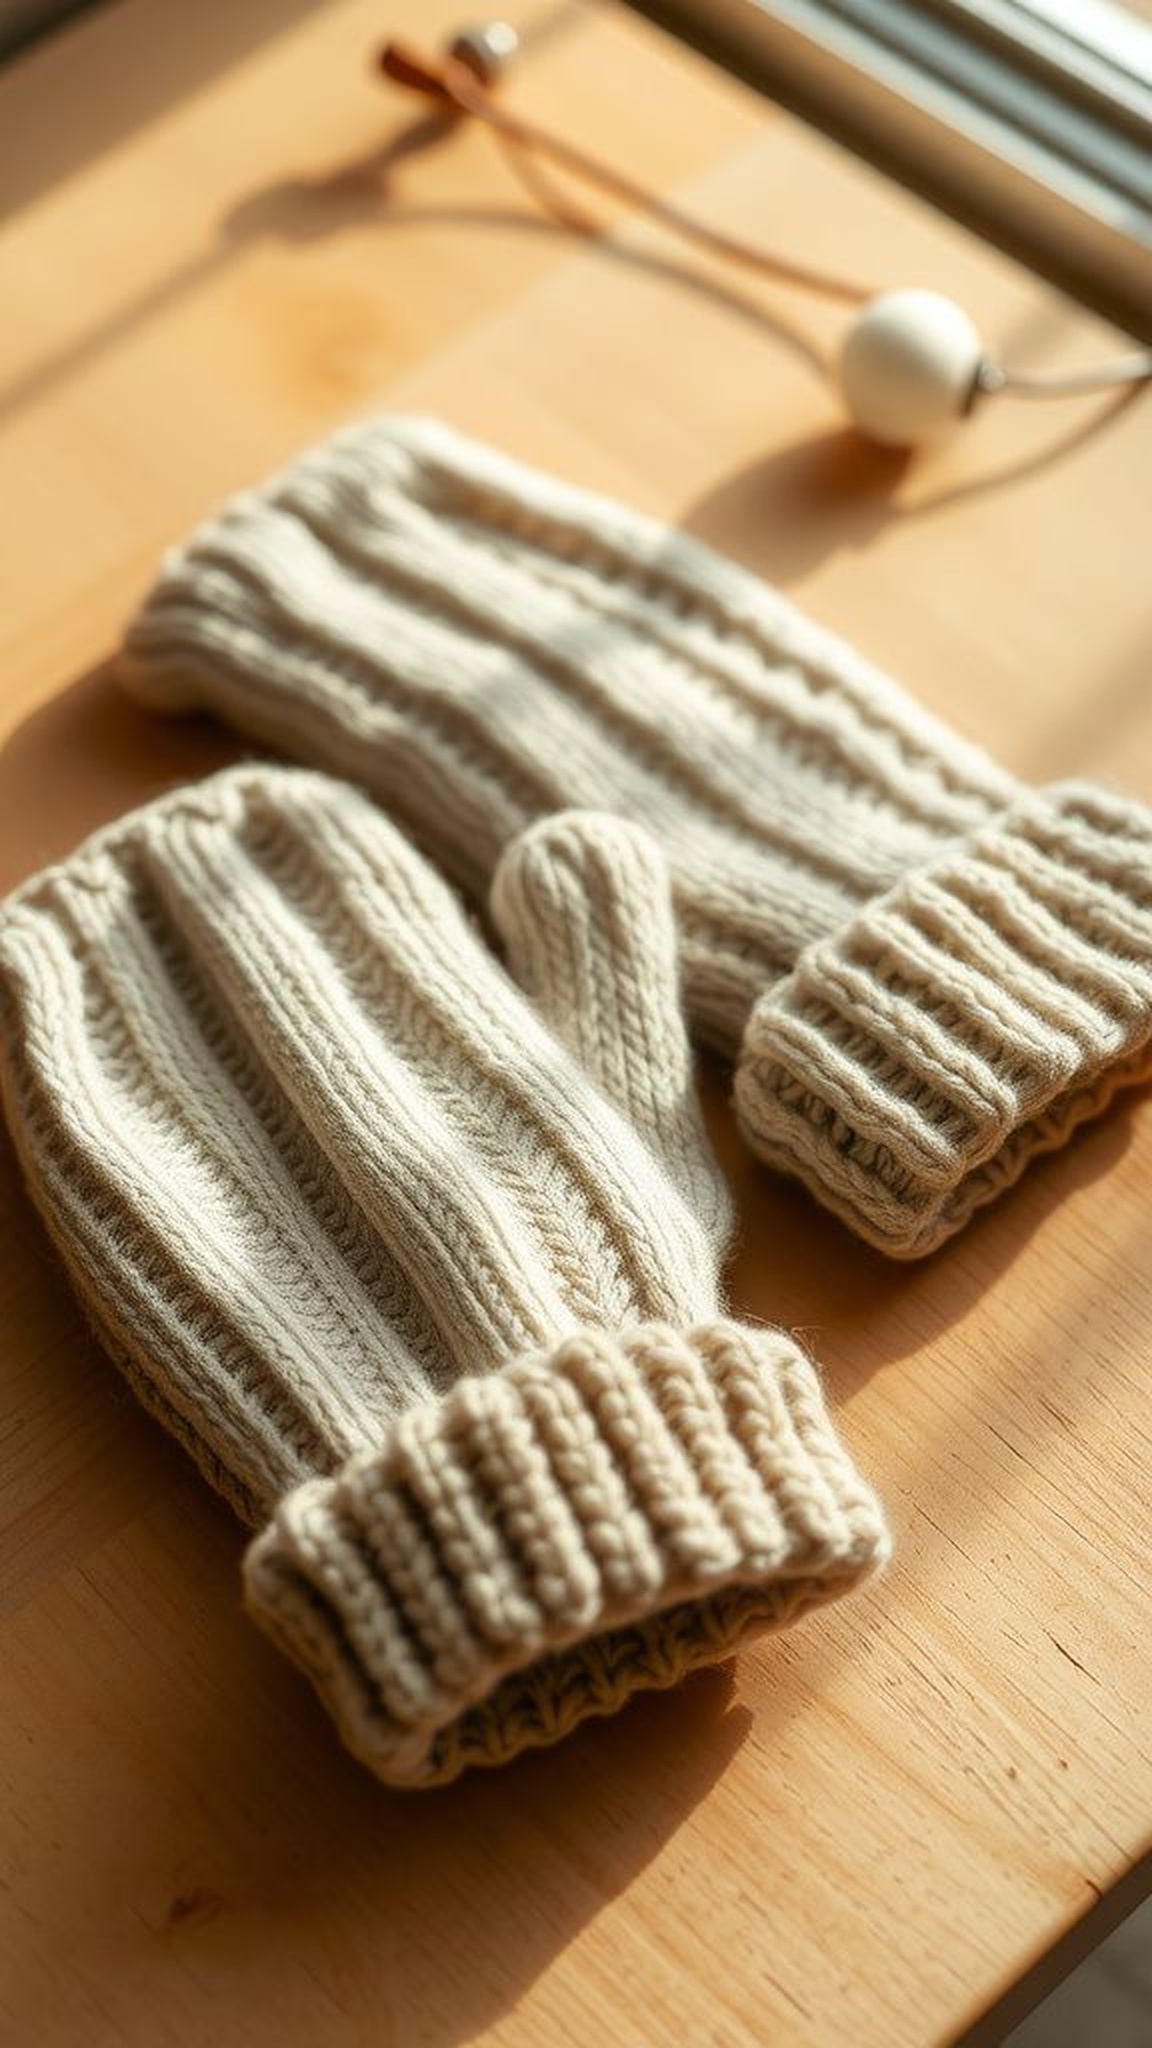
An old sweater sleeve, once soft from years of wear, became a pair of cozy hand warmers that fit like familiar hugs. The knit smelled faintly of wool and coffee from afternoons curled up with a book.
The cuff held its elastic memory, pulling snugly at the wrist in a way that felt comforting. Each stitch told a memory of chilly mornings and layered layers.
When slipping them on, there was a gentle muffled hush to sound and a softness that made thumb and fingertip chores feel quieter and oddly luxurious.
Steps
- Select a soft old sweater and identify sleeves with intact cuffs.
- Cut the sleeve a few inches below the cuff to form the mitt body.
- Close the cut edge with a secure stitch to create a neat seam.
- Turn the mitt right-side out and check that the fit feels comfortable.
- Repeat for the second mitt and wear them during cool mornings.
Cork bulletin board mosaic for notes and memories
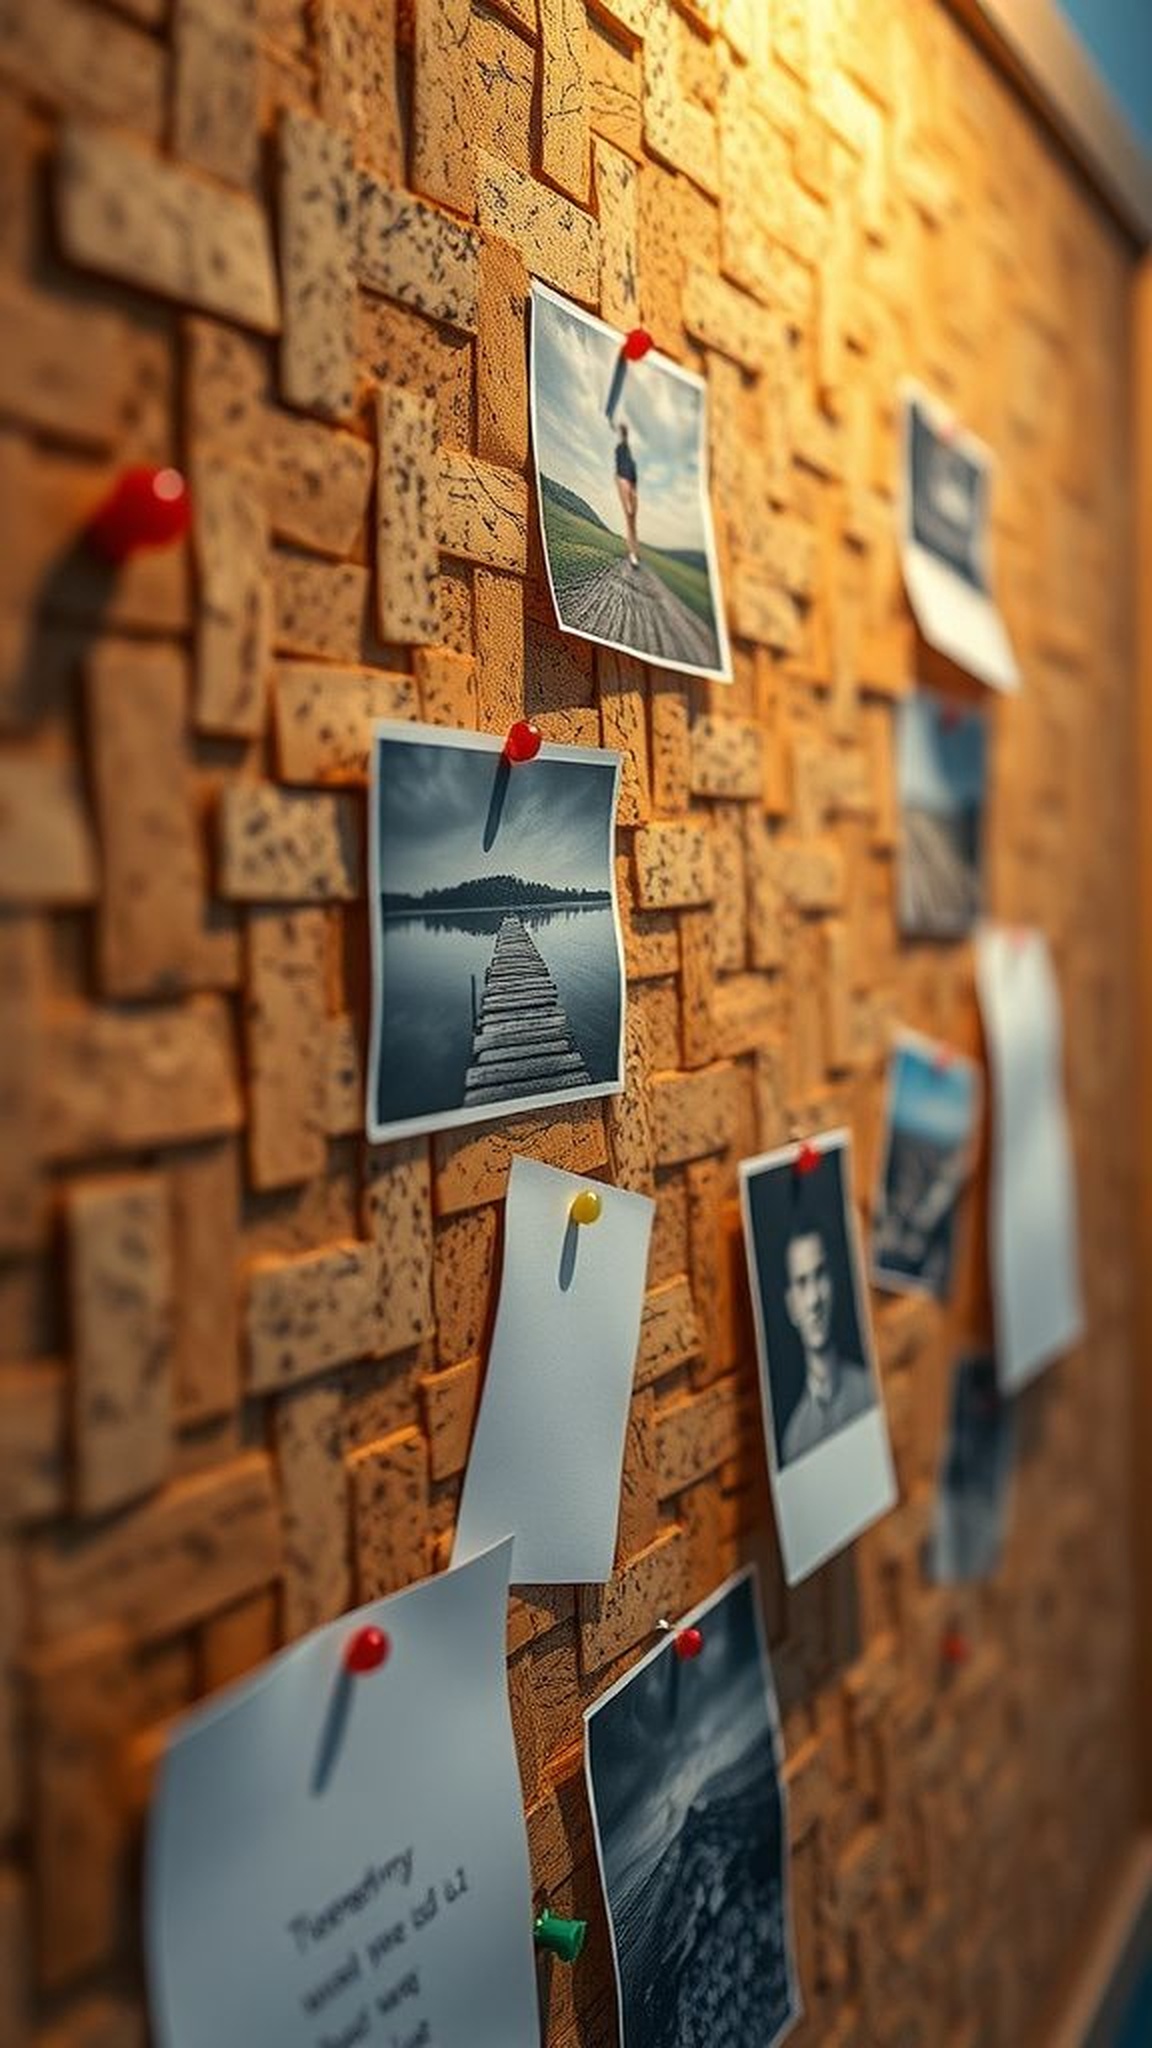
A collection of corks arranged into a patchwork board felt tactile and warm, each plug carrying traces of celebratory evenings. The cork had a soft, faintly woodsy aroma and small pores that invited tiny pushpins.
Clips and Polaroids found the board easily, and the uneven heights of the corks lent a relaxed, handcrafted look. When the sun struck at an angle little shadows played between pieces, adding depth to photographs and notes pinned there.
It became a bedroom anchor, a place where reminders and small treasures landed to be seen and touched.
Steps
- Collect a pile of wine corks and slice them lengthwise for a flat surface.
- Arrange the cork pieces in a tight mosaic on a firm backing board.
- Adhere each cork with a strong craft adhesive, keeping edges close together.
- Allow the board to dry fully and attach hanging hardware to the rear.
- Pin photos and notes onto the cork surface for a curated memory display.
Cardboard magazine phone stand with playful angles

Layers of corrugated cardboard layered together produced a surprisingly sturdy little stand that cradled a phone at a comfortable angle. The cardboard edges showed their ridged innards and smelled faintly of paper and glue.
It felt satisfyingly light but solid enough to support a device while streaming music. The angular profile cast geometric shadows on a desk, and thumb-sized grooves kept the phone steady.
The stand’s neutral tan fit most spaces and the slightest scuff only added to its handmade charm, making the desk feel both tidy and approachable.
Steps
- Gather thick corrugated cardboard and cut matching trapezoid shapes for the base pieces.
- Stack and bond the pieces together to reach the desired thickness.
- Carve a shallow groove along the top edge to cradle a phone.
- Sand any rough edges lightly and test stability with a device.
- Decorate the surface with colored paper or fabric if desired.
Bottle cap mosaic picture frame with crafty charm
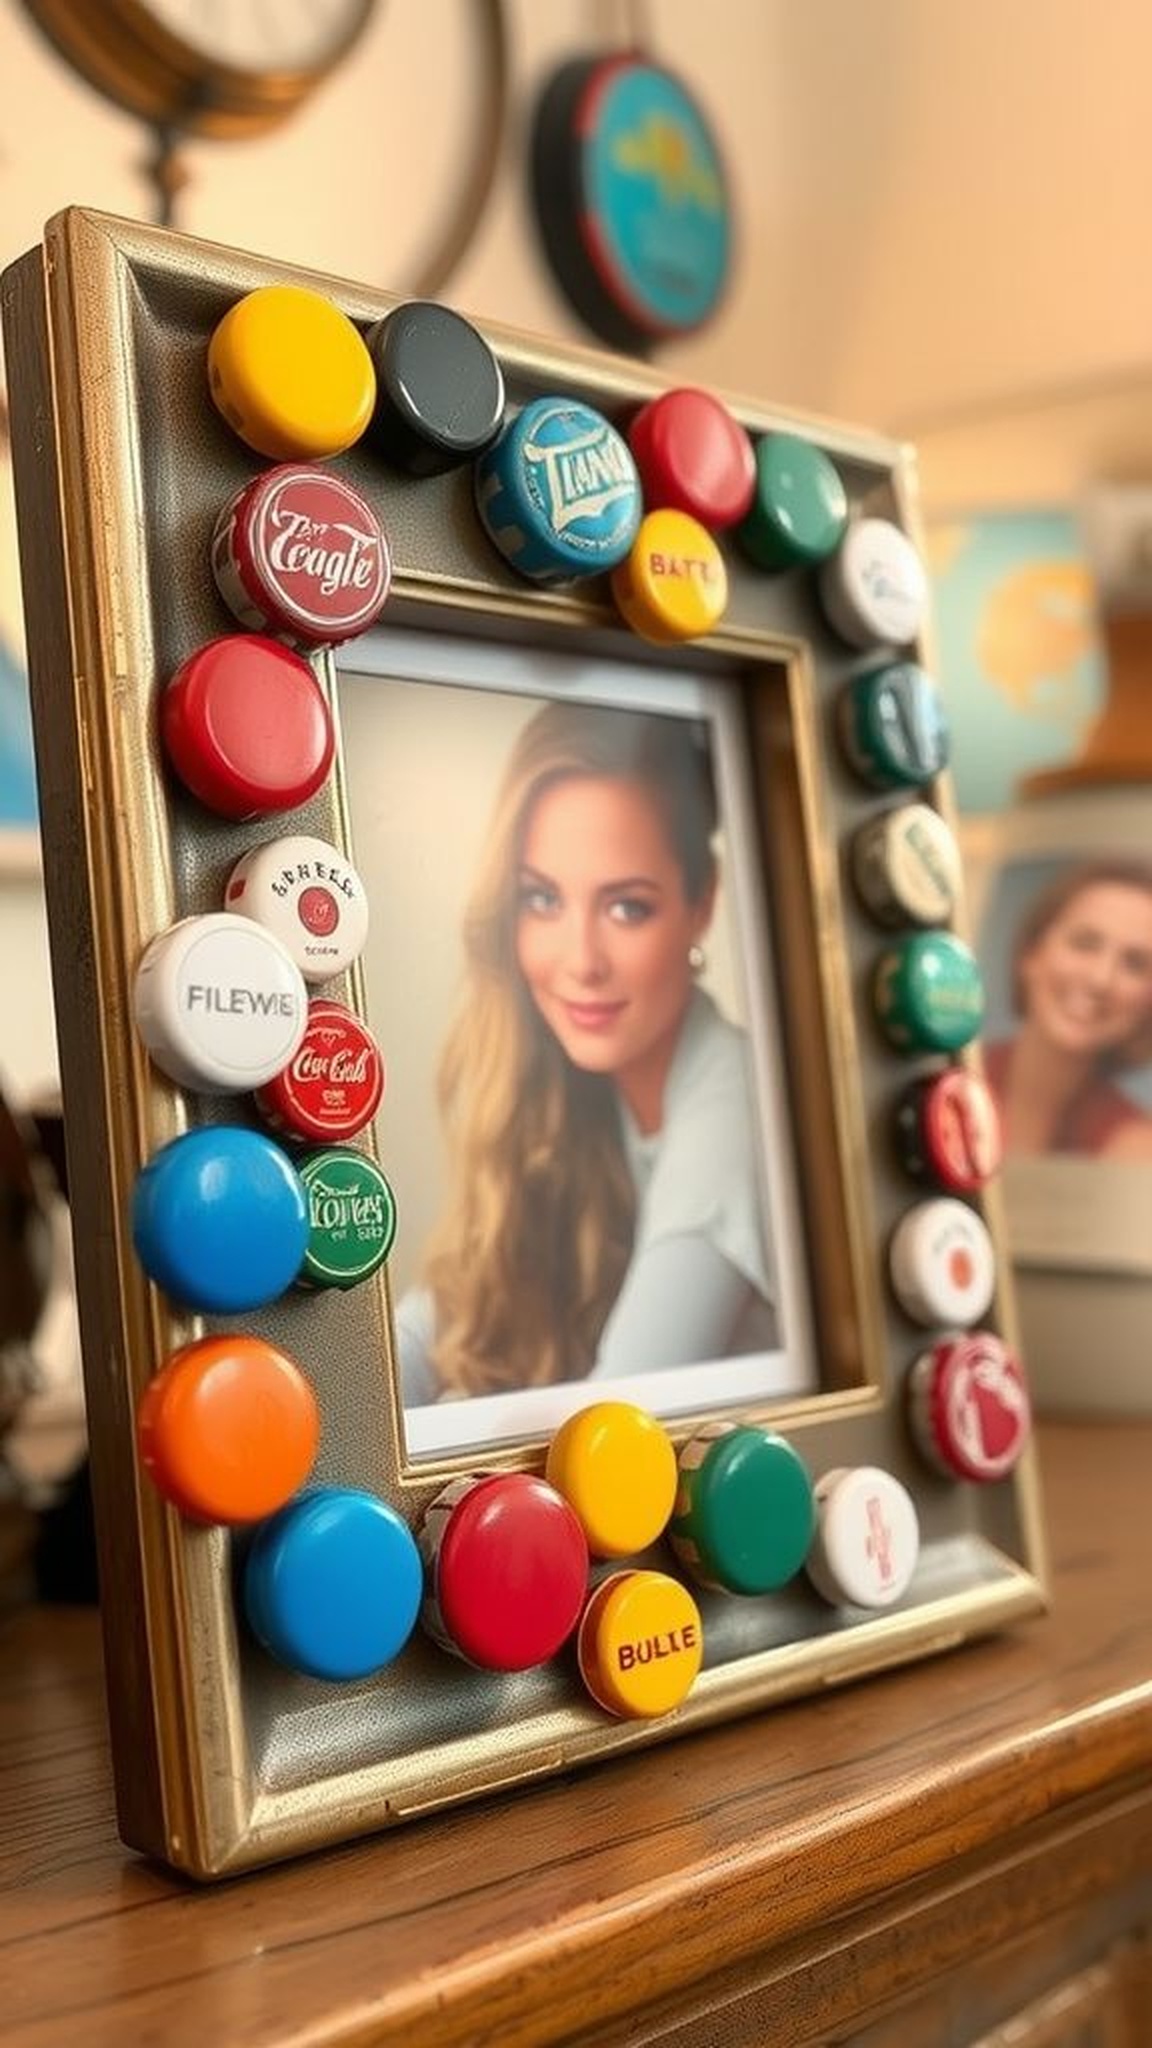
Colorful bottle caps arranged around a photo created a rim that jingled faintly when picked up, each cap carrying a glossy smudge or logo. The metal felt cool and smooth against fingertips, and the circular repetition drew the eye toward the image within.
There was a tactile pleasure in feeling the tiny ridges and seeing how sunbeams bounced differently off printed graphics. The frame turned an ordinary snapshot into something playful and slightly nostalgic, as if the picture were being honored by a crown of collected evenings and shared drinks among friends.
Steps
- Gather bottle caps of varied colors and clean them to remove residue.
- Arrange caps around a plain frame to establish a pleasing pattern.
- Affix each cap to the frame backing with a strong adhesive suitable for metal.
- Allow the adhesive to set fully before inserting the photo.
- Hang the framed piece on a wall that receives soft natural light.
Milk carton birdhouse with painted natural motifs
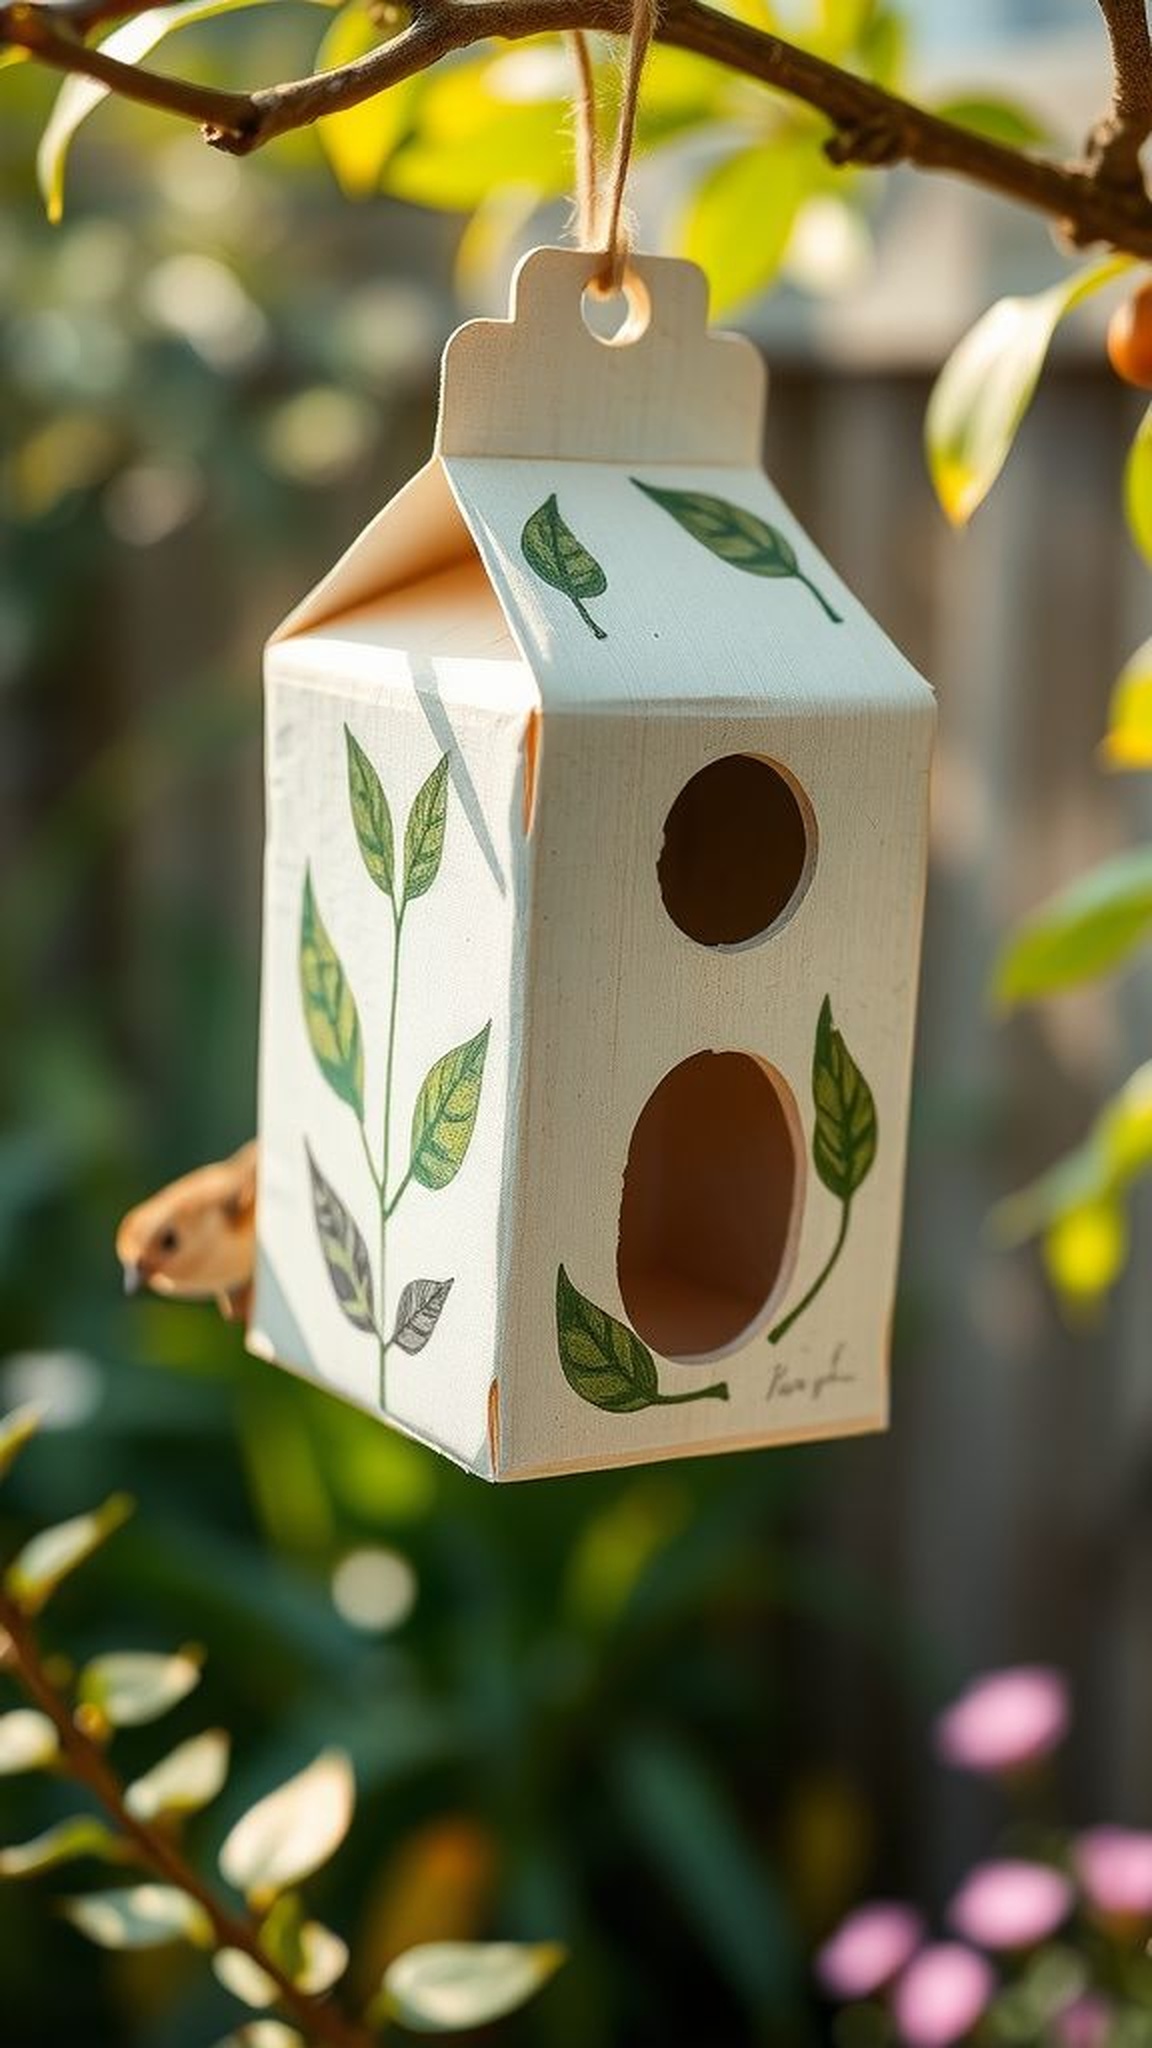
A rinsed milk carton turned into a tiny shelter that smelled faintly of the outdoors after being painted with soft leaves and little birds. The carton’s paper texture held brushstrokes like a small canvas and the opening became an inviting round doorway for visiting sparrows.
The surface had a slight ripple where liquid sat once, adding a handmade imperfection that felt charming. The birdhouse rocked gently in the breeze, and small chirps made the whole thing feel like a secret mailbox for feathered neighbors.
It added a playful, slightly weathered accent to the garden fence.
Steps
- Clean and dry an empty milk carton thoroughly to remove odors.
- Create an entrance hole on one side and fold the top to form a roof.
- Paint the exterior with weather-safe colors and let the design cure.
- Add ventilation holes near the top and a small perch beneath the entrance.
- Hang the birdhouse in a sheltered spot away from predators.
CD sun-catcher mobile with shimmering strips
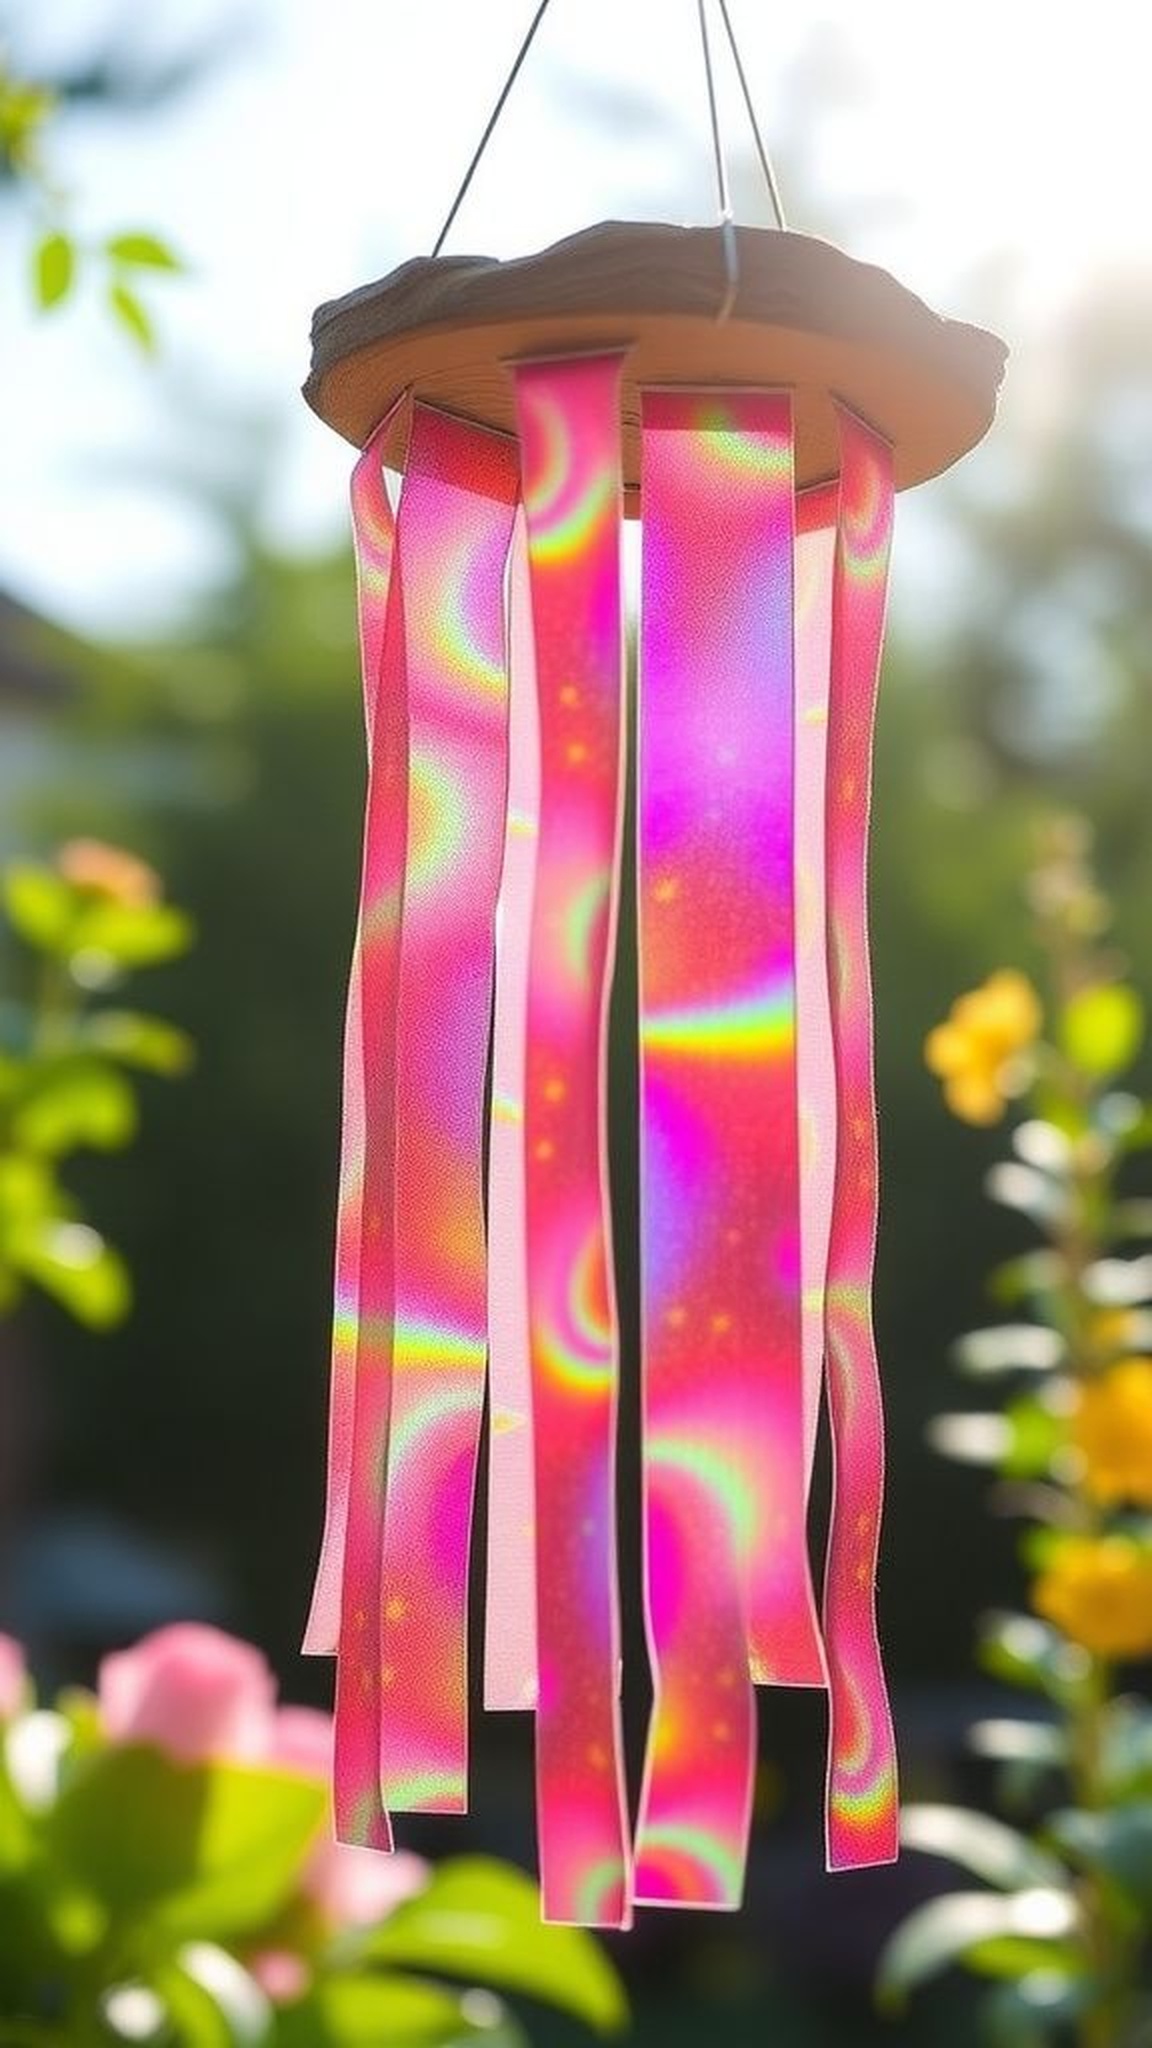
Light passing through sliced CD pieces made a lively display that rolled tiny rainbows across a porch. The thin reflective strips chimed softly as they brushed one another, producing a faint metallic whisper.
Hanging at various lengths, they caught morning sun and scattered color in a playful sequence. The mobile felt joyous in a quiet way, and watching it move became a tiny ritual that brightened slow afternoons.
The shifting highlights and gentle motion turned a plain corner into a small celebration of light and movement, full of fleeting, gleaming moments.
Steps
- Cut old CDs into narrow reflective strips while wearing protective gloves.
- Thread each strip onto clear fishing line at varied lengths.
- Secure lines to a lightweight hoop or driftwood base to form a mobile.
- Hang the mobile where it will catch direct sunlight for sparkling effects.
- Check attachment points occasionally to ensure all pieces remain secure.
Tin can utensil holder with hammered texture
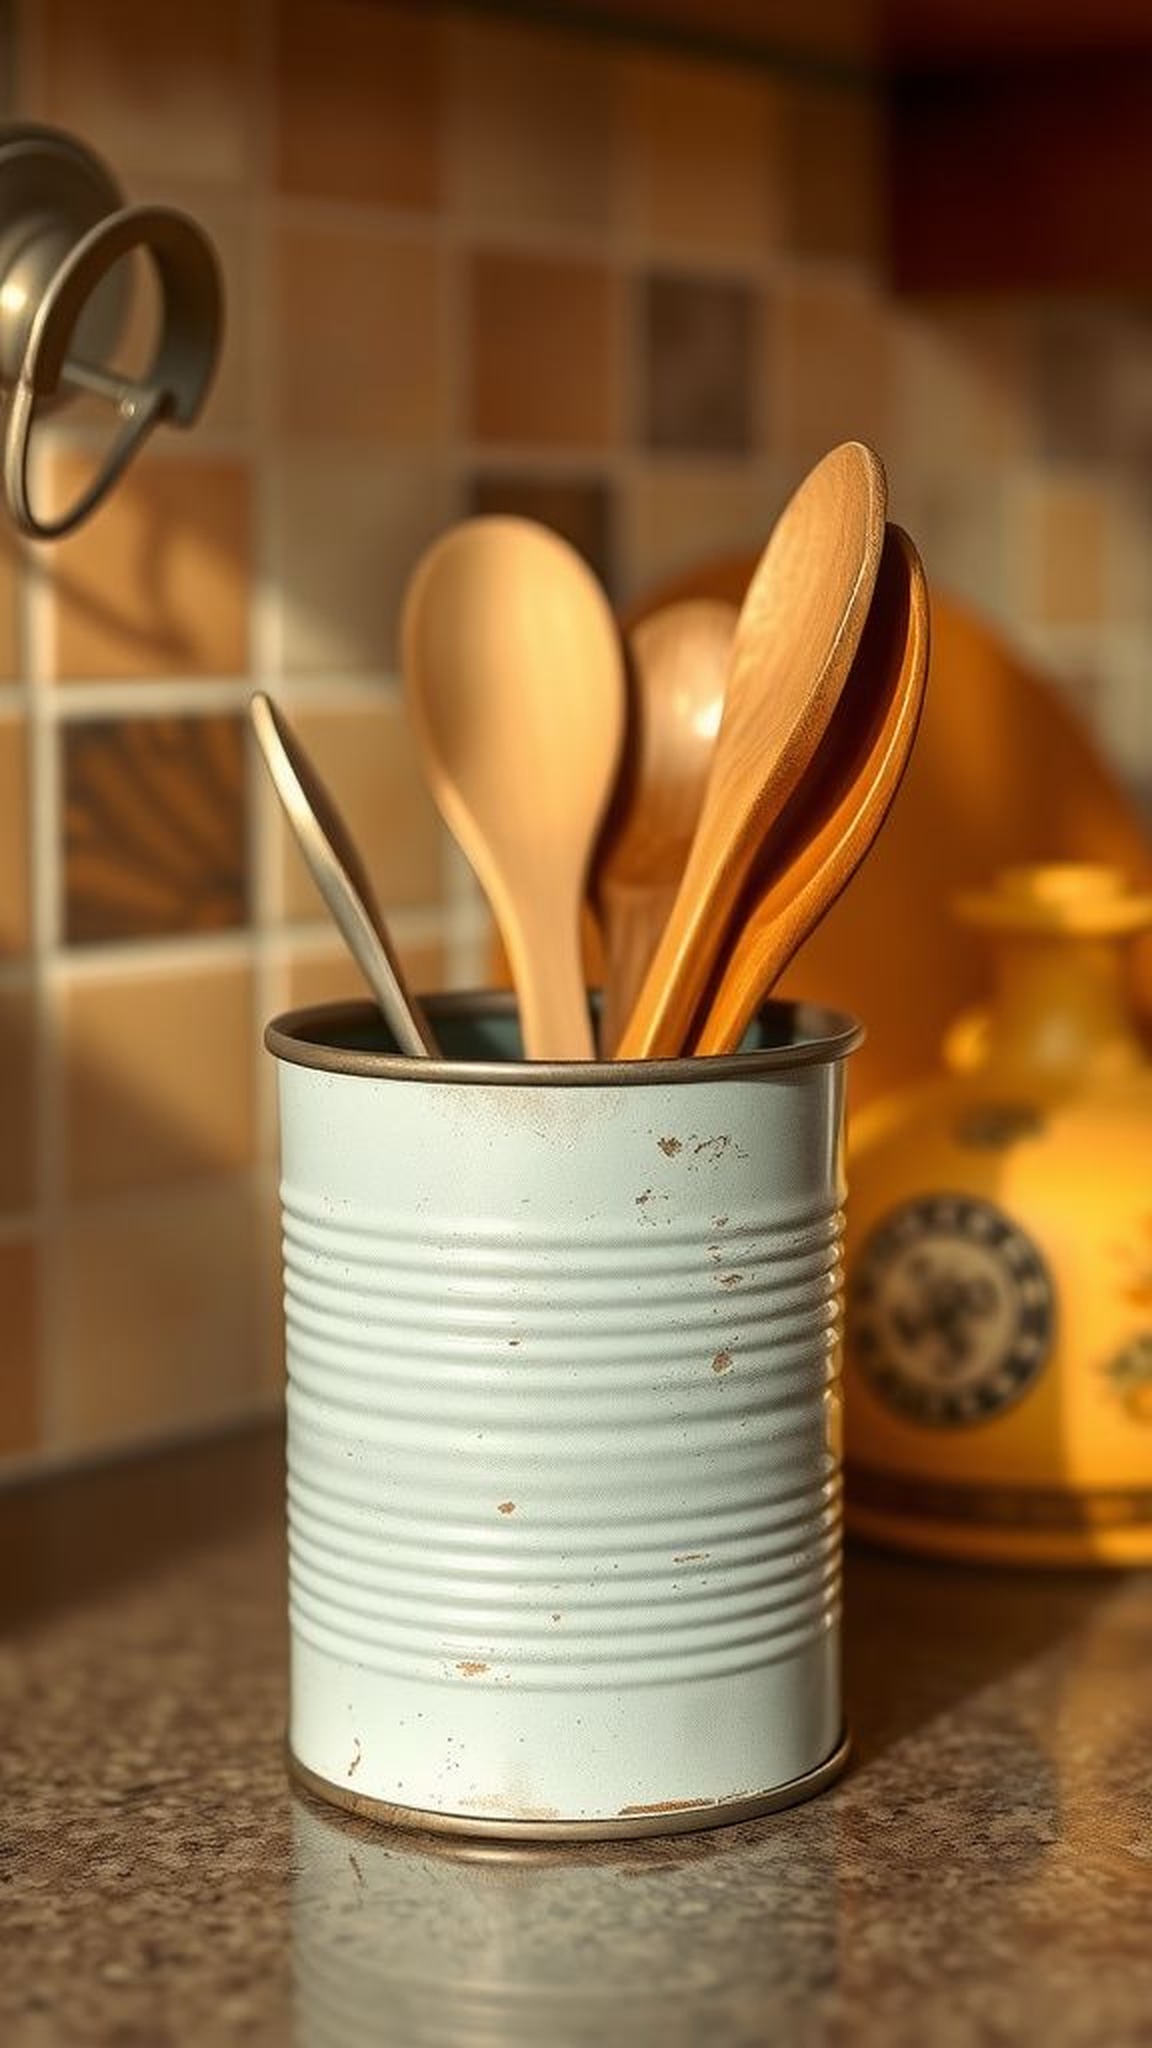
A repurposed tin can on the counter carried wooden spoons and spatulas with a humble usefulness. The warm metallic ring at the rim and the subtle dents from previous life made it feel lived-in.
When tapping the side it gave a satisfying hollow note, and the paint finish had a chalky matte that contrasted with gleaming metal at the lip. It made cooking feel a touch more intentional, as each utensil found a dependable home.
The holder’s surface took on little smudges of flour and olive oil, evidence of meals shared over time.
Steps
- Clean cans and remove any sharp edges around the opening for safety.
- Apply a layer of primer suitable for metal and let it dry thoroughly.
- Add color or a textured finish and allow each coat to cure.
- Place a felt pad on the base to protect surfaces and set utensils inside.
- Refresh the finish when chips appear and repurpose as needed.
Cardboard seed starter tray with earthy tones
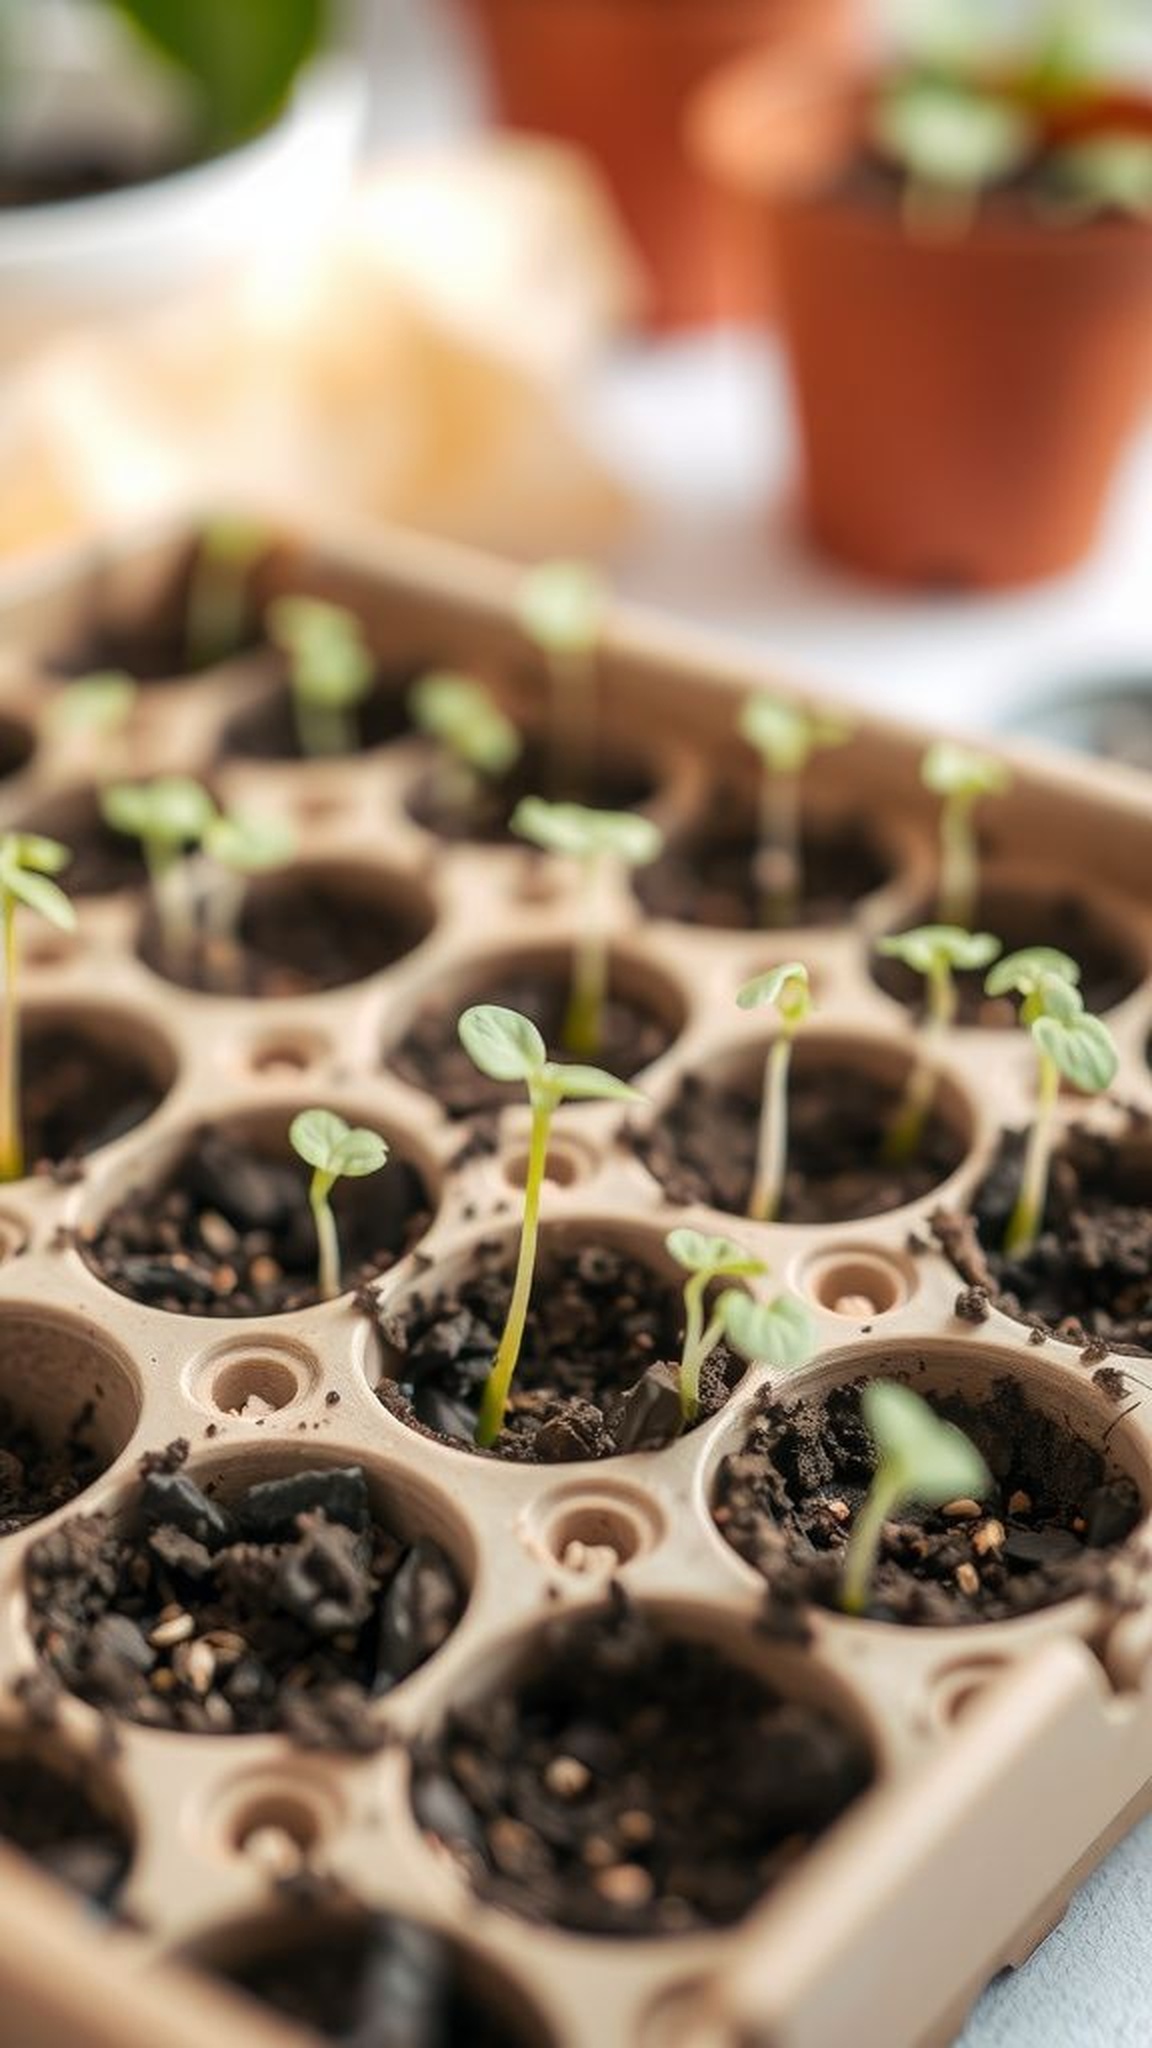
A shallow cardboard tray lined with soft paper pulp held tiny rows of seedlings that felt like a hopeful promise. The smell of damp cardboard mixed with moist soil and a hint of green growth.
Tiny stems leaned toward light, casting delicate shadows on the pale tray. The material softened with watering yet still supported root systems for a brief season, and small roots peeked through at the edges in a surprisingly tender reveal.
Handling the tray during transplant day was a quiet ritual, a bridge between indoor nurturing and outdoor expansion.
Steps
- Form a shallow tray from sturdy cardboard and add small cells using separated pulp or paper inserts.
- Fill each cell with a light seed-starting mix and sow seeds at recommended depths.
- Place the tray in a warm bright spot and keep the soil gently moist.
- Thin seedlings as they emerge to avoid overcrowding and provide good air circulation.
- Harden off young plants before moving them outdoors for permanent planting.
Jar candle with layered scents and rustic lid
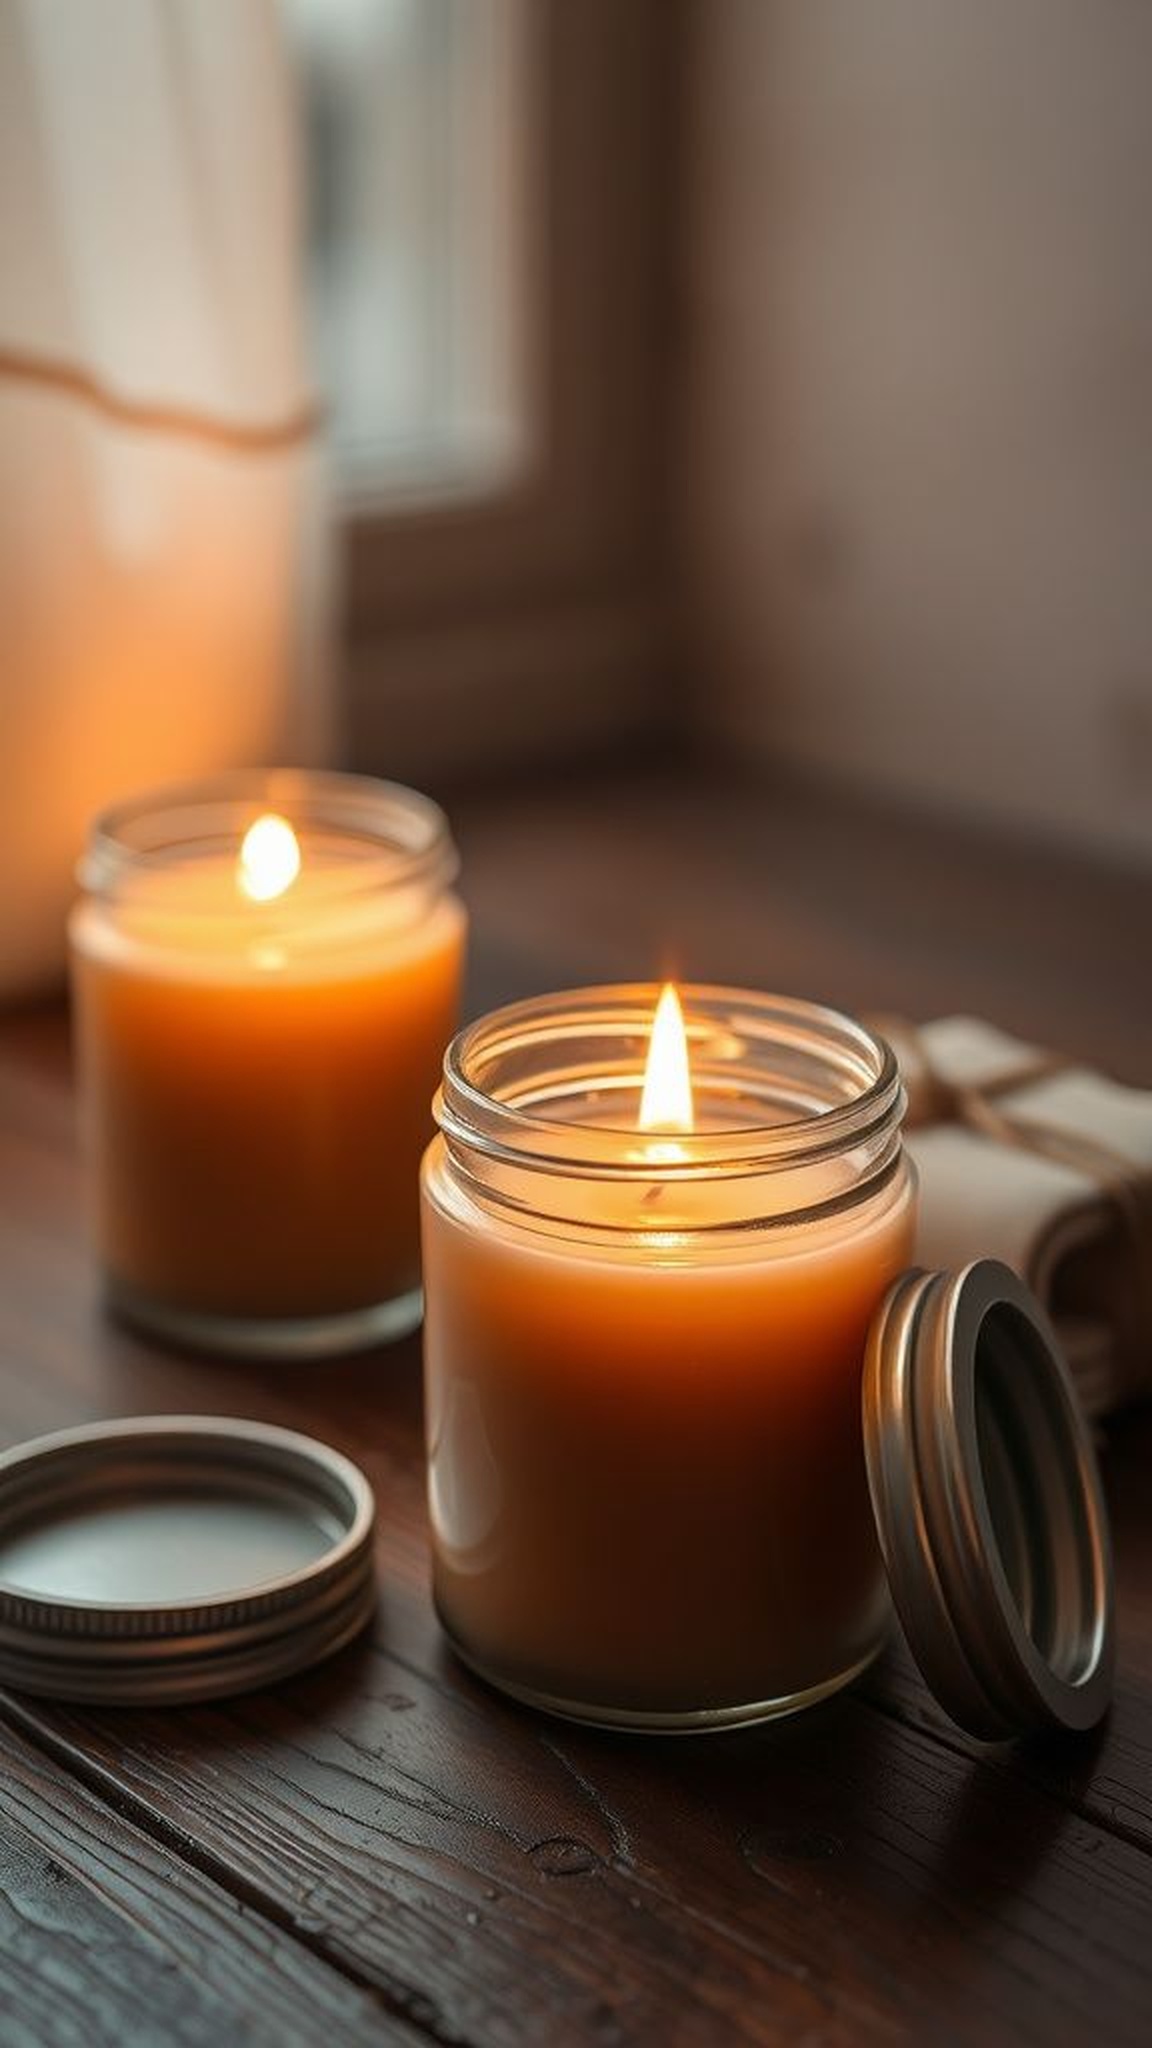
A repurposed jam jar carried candlelight with a softness that felt intimate. The glass caught the flicker and threw back a gentle amber that warmed the surrounding room.
When lit the scent of beeswax or soy mingled with hints of citrus or spice, making the air gentle and homey. The lid, slightly dented from its past life, rested nearby and gave off a muffled metallic note when set down.
The candle made reading by lamp light feel extra cozy, and the spooning of wax into the wick area was a quiet, tactile pleasure.
Steps
- Clean a small jar and ensure it is completely dry before adding wax.
- Secure a wick in the center and pour melted soy or beeswax into the jar.
- Allow the wax to set fully and trim the wick to a safe length.
- Light the candle in a well-ventilated area and monitor while burning.
- Reuse the jar once the candle is spent for storage or new candles.
