
As an Amazon Associate I earn from qualifying purchases.
Creative handmade presents can turn quiet afternoons into memorable keepsakes, and Mother’s Day DIY gift ideas breathe new life into small rituals with color, texture, scent and a sense of thoughtful presence that outlasts a single morning, from pressed florals to hand-scented candles.
I remember a rainy afternoon when a tiny jar of lavender bath salts felt like treasure; making Mother’s Day DIY gift ideas turned a scrap of ribbon and a scribbled note into a keepsake that smelled like home.
Hand-Painted Wooden Photo Frame with Floral Accents
A warm wooden frame given a fresh coat of paint feels tactile and honest under fingers, with faint brush ridges and the soft smell of acrylic in the air. There was a small pride in fitting a faded photograph inside, where colors popped against hand-drawn petals at the corners.
The painted florals looked slightly imperfect up close, which made the piece feel lived-in and personal. A ribbon loop caught light and cast a tiny shadow across the grain, reminding that a handmade frame keeps a single moment tucked into everyday spaces.
Steps
- Select a smooth wooden frame and wipe the surface clean.
- Apply a primer layer and let it dry before adding colored paint in gentle strokes.
- Create floral accents with a fine brush and let each color dry fully.
- Seal the paint with a protective clear finish and place a chosen photograph inside.
Teacup candle with vintage charm and soft scent
A teacup candle sits like a tiny ritual on a saucer, the wax surface smooth and faintly glossy, and the fragrance threadable through the room in gentle waves. I noticed how the porcelain rim caught a warm glow when the wick burned low, the scent leaning on vanilla or bergamot and pulling memory into the moment.
Tiny specks of dried lavender floated near the wick and invited a slow smile. That little teacup felt both delicate and stubborn, an object that asked to be held and returned to a shelf as a comforting memory.
Steps
- Measure and melt a neutral wax base over low heat until fully liquid.
- Stir in a few drops of chosen fragrance and optional dried botanicals.
- Secure a wick in the center of a vintage teacup and pour the scented wax carefully.
- Allow the wax to cool until firm and trim the wick before presenting.
Pressed flower resin pendant with gentle hues
A small pendant held pressed petals like a tiny preserved day, cool and glassy to the touch with colors that seemed magnified inside clear resin. The crisp edges of petals remained visible, and the pendant caught a slant of afternoon light, sending a speckled gleam against a collarbone or scarf.
There was a quiet pleasure in watching fragile blooms preserved like a pocket of summer, and the little weight of the pendant felt reassuring when fingers toyed with the chain. Each pendant had a tiny imperfection in the resin that read as honest and warm.
Steps
- Arrange carefully dried flowers within a small silicone mold and position a pendant loop.
- Mix clear resin according to the product ratios and remove bubbles with gentle passes.
- Pour resin to fully cover blooms and let it cure on a level surface until hard.
- Demold, sand any rough edges, and attach a chain or cord for wearing.
Save time and printer ink with 50+ printable templates and step-by-step instructions in one ad-free guide.

Just $19.99 — lifetime access
Lavender sachets that smell like slow afternoons
Tiny fabric pouches filled with lavender felt like folded calm, the scent drifting up when the pouch was squeezed between fingers. The cloth had a linen weight and a faint weave that caught thread from a working table, while the lavender itself crunched softly when pressed.
I tucked a pouch into a drawer and returned to find the whole space smelling like a remembered garden. Stitched edges were slightly uneven, which gave each sachet a private personality.
A faded ribbon tied around a seam made the pouch look as if it had lived a little life already.
Steps
- Cut two matching pieces of natural fabric slightly larger than the desired pouch size.
- Sew three edges with a small seam allowance, keeping an opening for filling.
- Fill with dried lavender buds and a hint of complementary herbs, then finish sewing the opening closed.
- Add a small ribbon or label for a finished touch.
Memory jar filled with handwritten notes and keepsakes
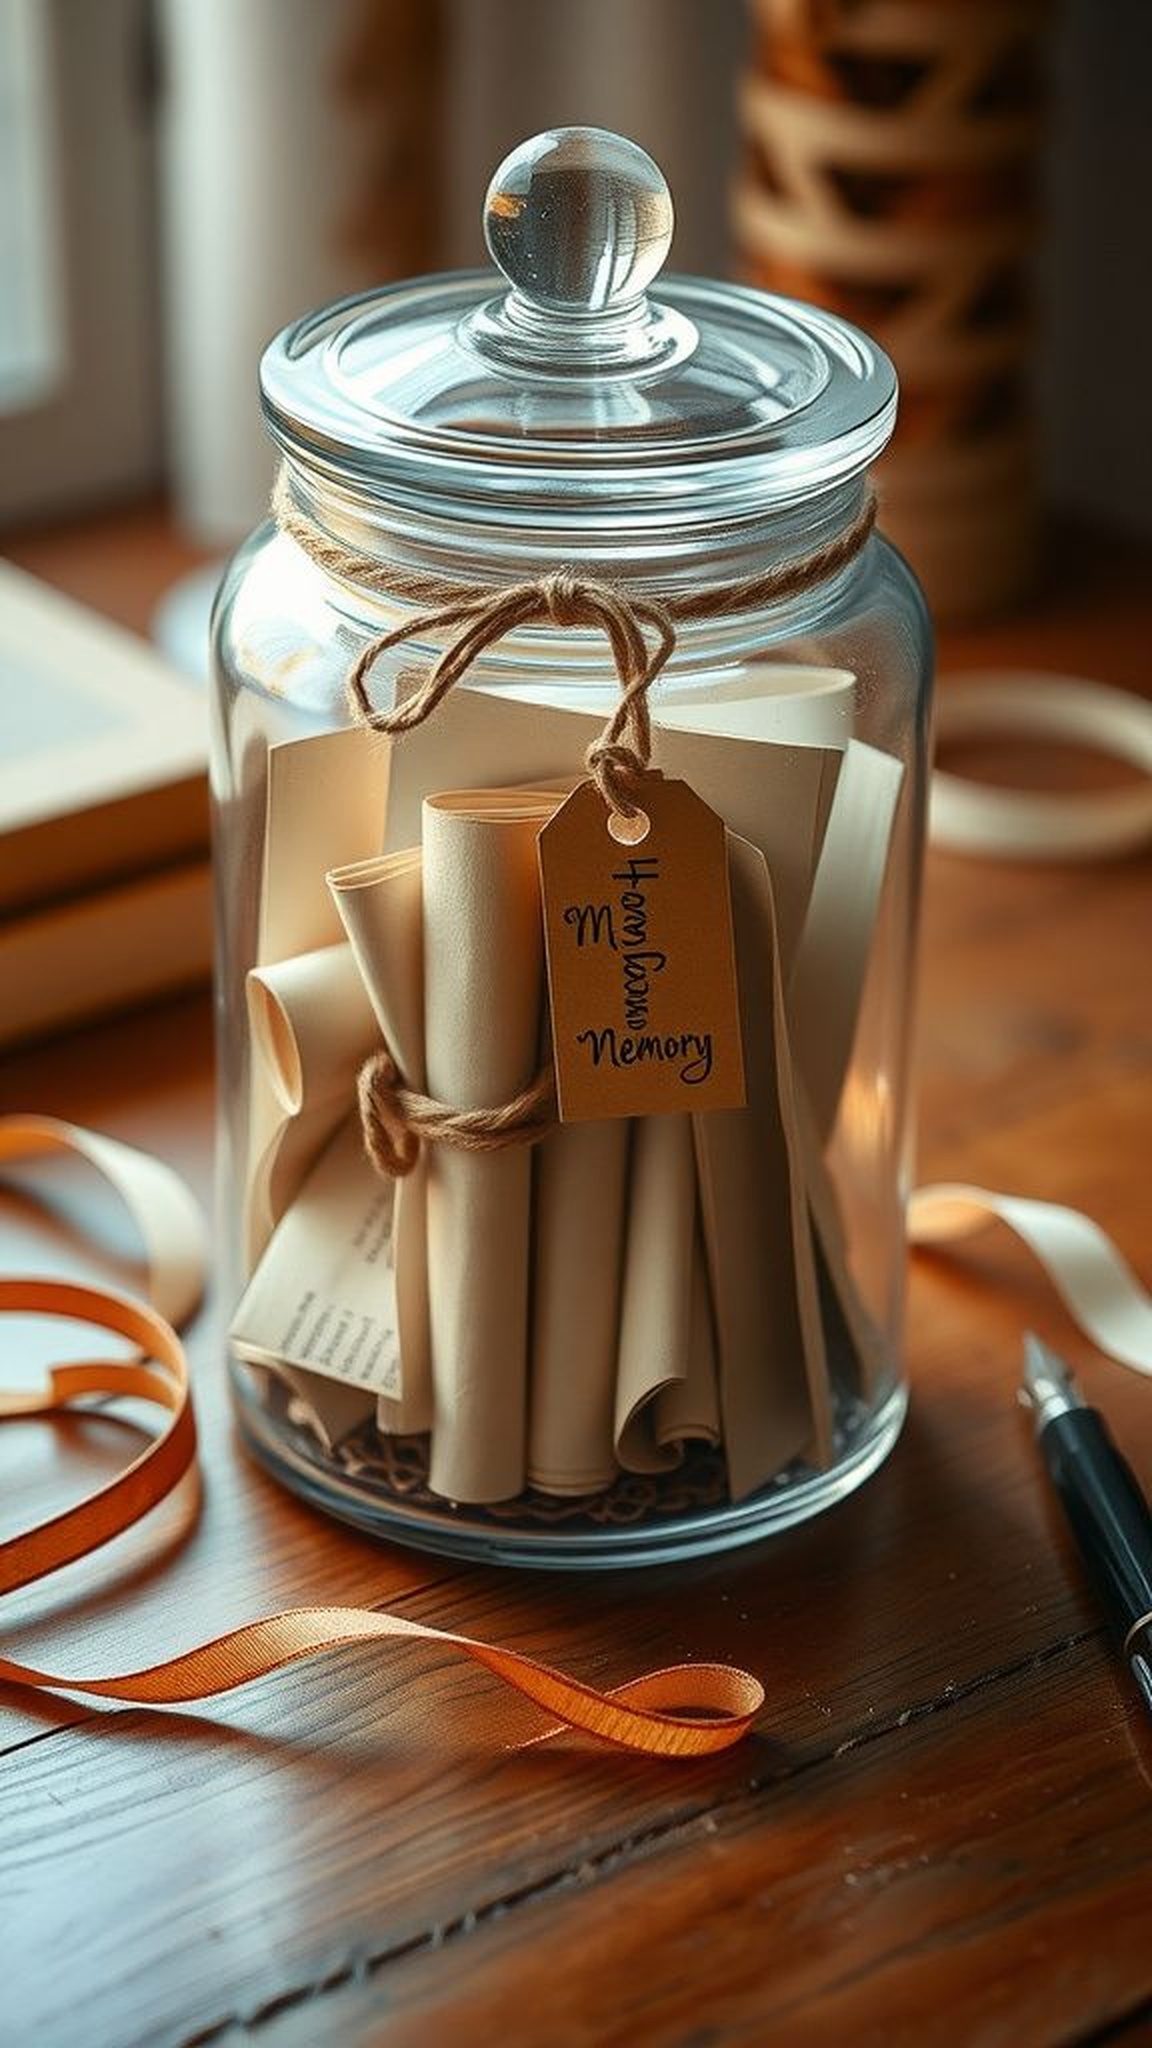
A clear jar packed with folded notes became a little honest archive, each scrap of paper carrying a smell of ink and the faint texture of a hurried pen stroke. Pulling a note from the jar felt like unwrapping a small story, the edges soft from handling and the handwriting turning into a voice across months.
Small ticket stubs and ribbon bits slipped between messages, adding a collage of material memory. I found myself smiling at the uneven handwriting and the way some notes smelled faintly of coffee from the day they were written.
Steps
- Gather a clean clear jar and an assortment of small papers and keepsakes.
- Fold notes with short memories, gratitude lines, or little drawings and place them inside the jar.
- Layer in tiny mementos such as ticket stubs, dried petals, or ribbon scraps for texture.
- Seal the jar with a lid and attach a small tag for labeling.
Hand-stamped linen napkins with subtle charm
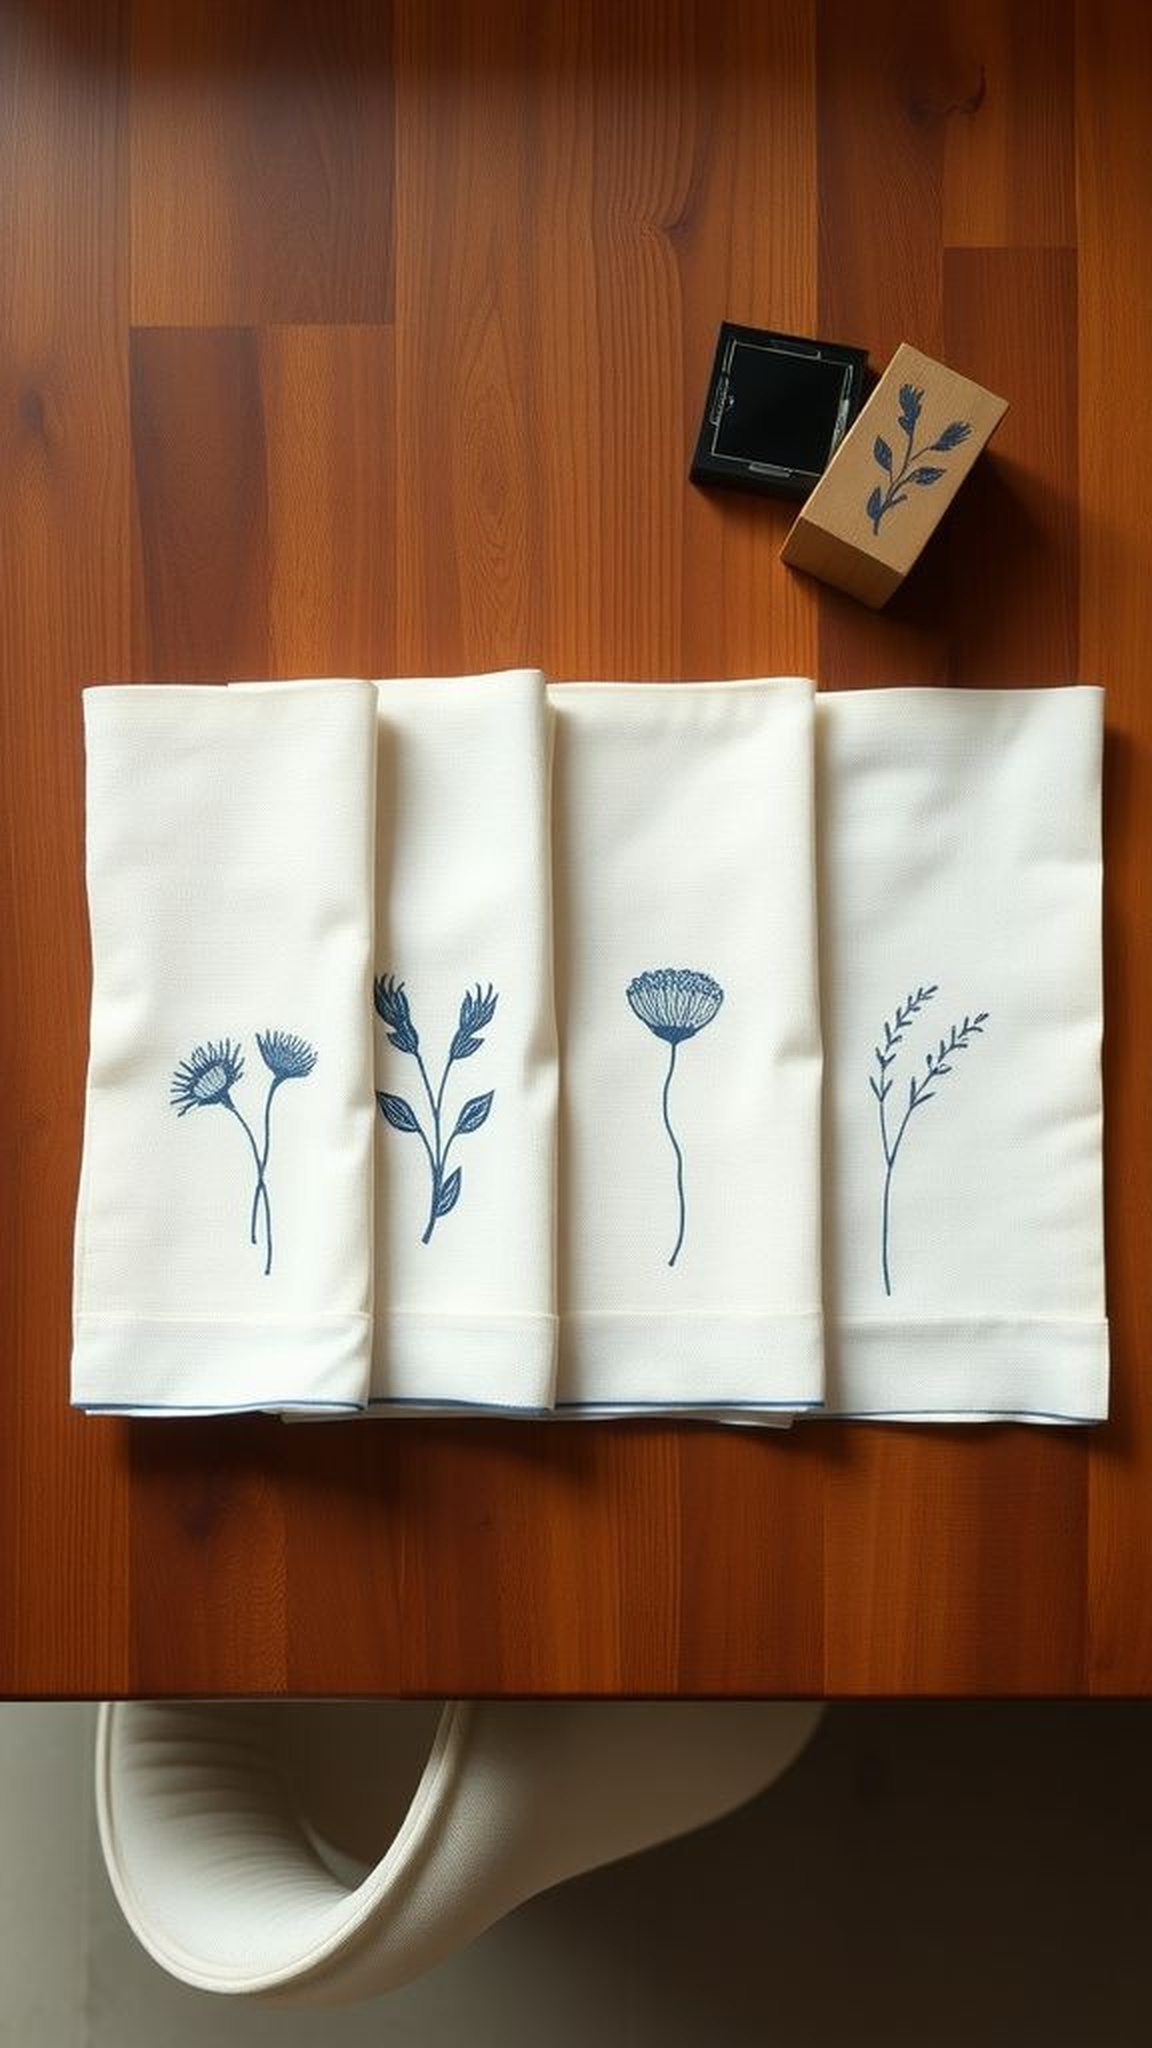
Linen napkins stamped with a tiny motif felt homey and thoughtfully worn, the ink soaking into fibers and creating faint feathered edges. The fabric had a cool weight and the smell of starch when freshly pressed.
Folding a stamped corner into a place setting made the table feel curated without fuss, and I liked how slight differences in stamp pressure turned each napkin into a small original. Watching the ink dry took patience, and the softened imprint later softened even further with washing, turning a crisp mark into a gentle echo on cloth.
Steps
- Choose natural linen squares and lay them flat on a protected surface.
- Apply fabric ink evenly to a rubber or wooden stamp.
- Press the stamp firmly onto each napkin, lifting straight up for a clean impression.
- Heat-set the ink according to product instructions and launder gently to soften.
Personal recipe book bound with handwritten notes
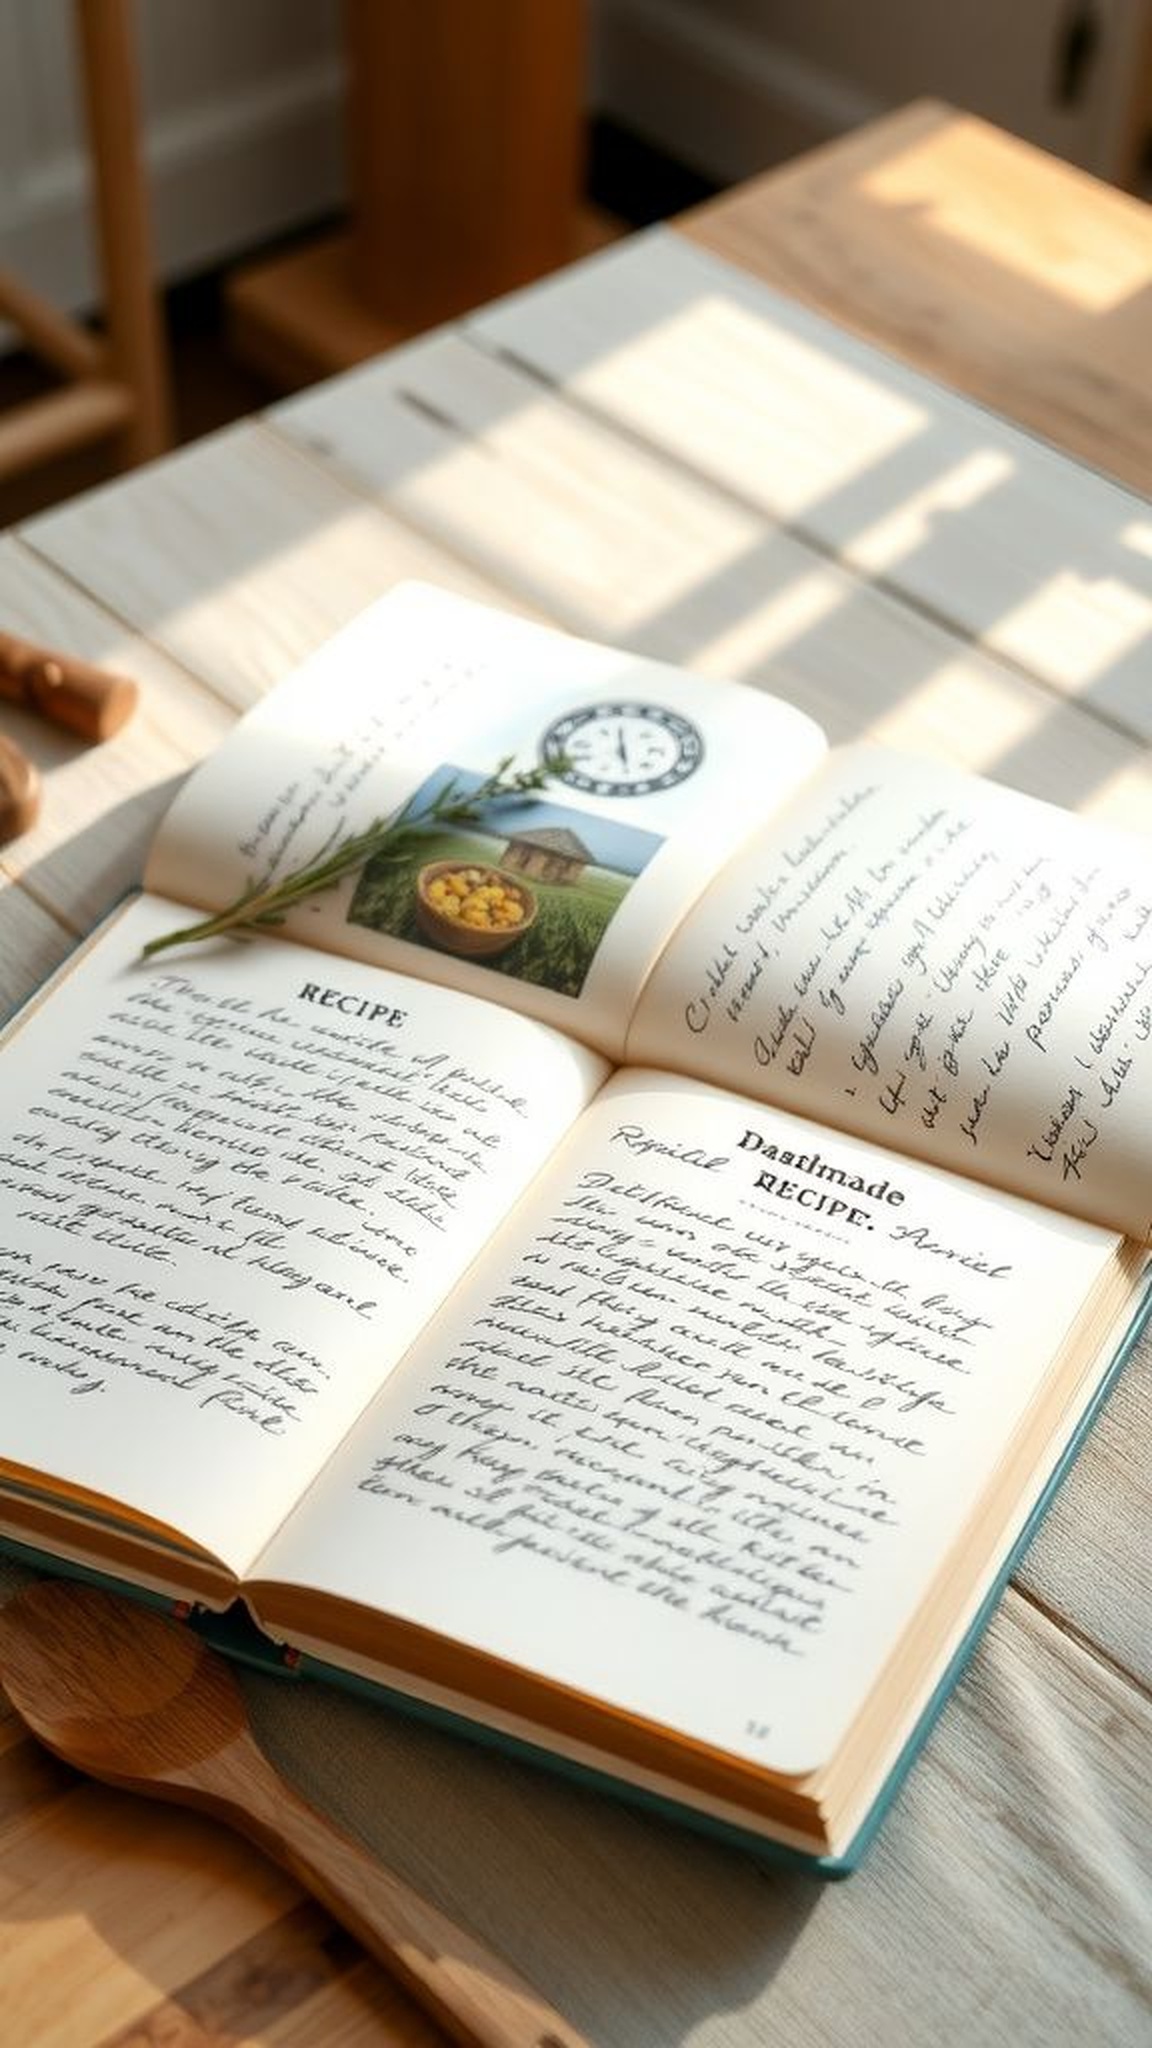
A slim recipe book with breezy handwriting felt like a conversation across dinners, pages faintly scented with spices and kitchen air. The paper had a soft tooth and little smudges of flour along the edges, as if it had been consulted mid-bake.
Handwritten marginalia and a folded photograph tucked into a recipe breathed life into the instructions, making the whole book a map of afternoons and laughter. I turned a corner and found a note that mentioned an inside joke, which made the book feel like a living family heirloom rather than a sterile list of steps.
Steps
- Collect favorite recipes on quality paper, writing each by hand or printing in a warm font.
- Arrange pages in a chosen order and add personal notes or photos between entries.
- Bind the stack with a sewn spine or secure with decorative rings and a sturdy cover.
- Decorate the cover with a title label and a small illustration.
Mini herb garden planted in a vintage teacup
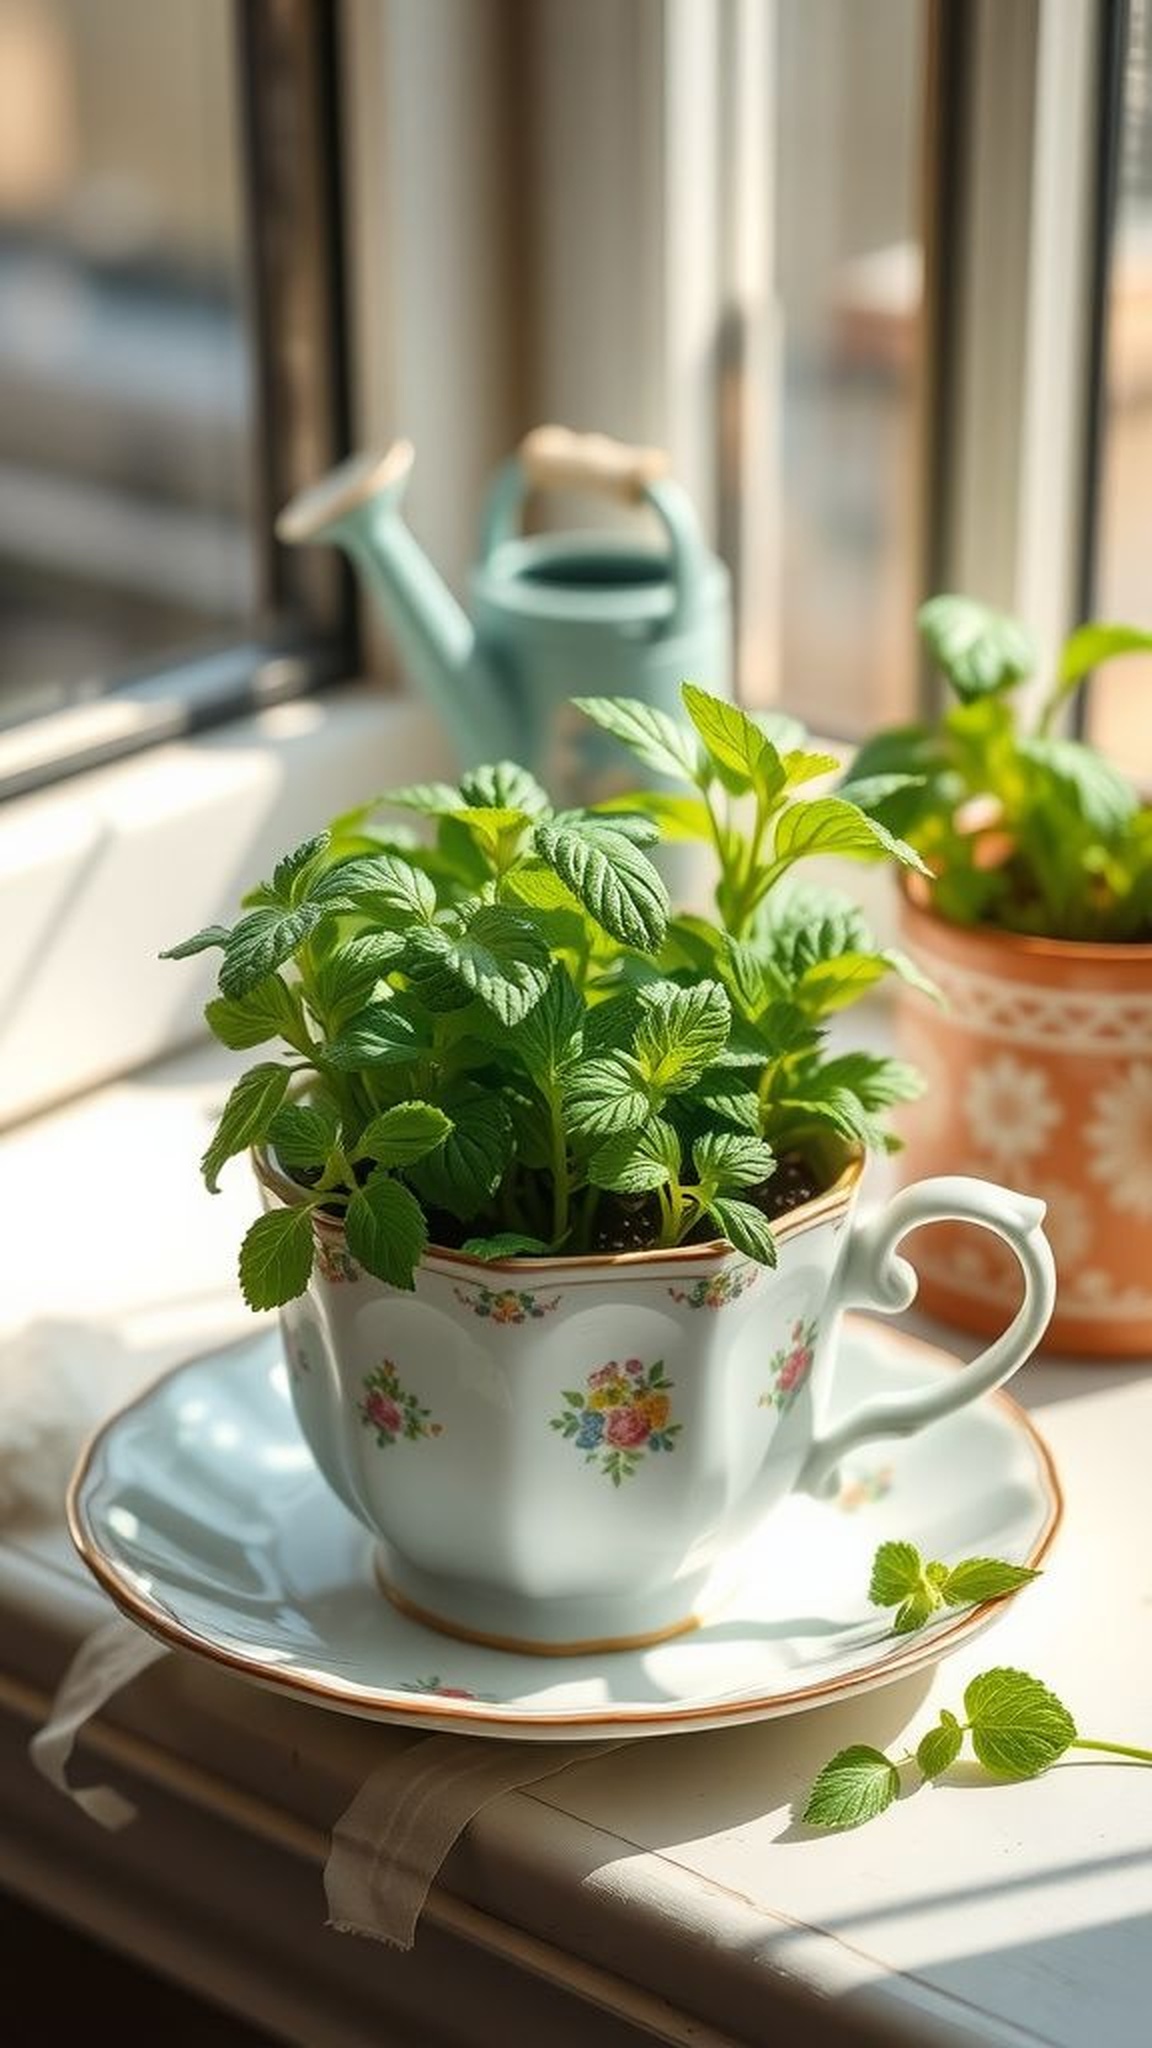
A tiny cluster of green sprouts in a chipped teacup felt like a quiet, living present, the soil smelling faintly of rain and peat. Little leaves reached toward light and the porcelain edge contrasted with living texture in a pleasing way.
Tending the cup plant over a few days felt like keeping a tiny secret, and the sight of morning dew clinging to basil leaves made routine waterings feel meaningful. The teacup sat on a saucer, catching a few stray soil grains, and gave a green corner an instant boost of domestic charm.
Steps
- Place small stones in a teacup bottom for drainage and add potting mix on top.
- Position herb seedlings at comfortable spacing and press soil gently around roots.
- Water lightly until soil is evenly moist and set the teacup in a bright spot.
- Rotate occasionally for even light exposure and trim herbs when they reach usable size.
Jar of bath salts scented like summer evenings
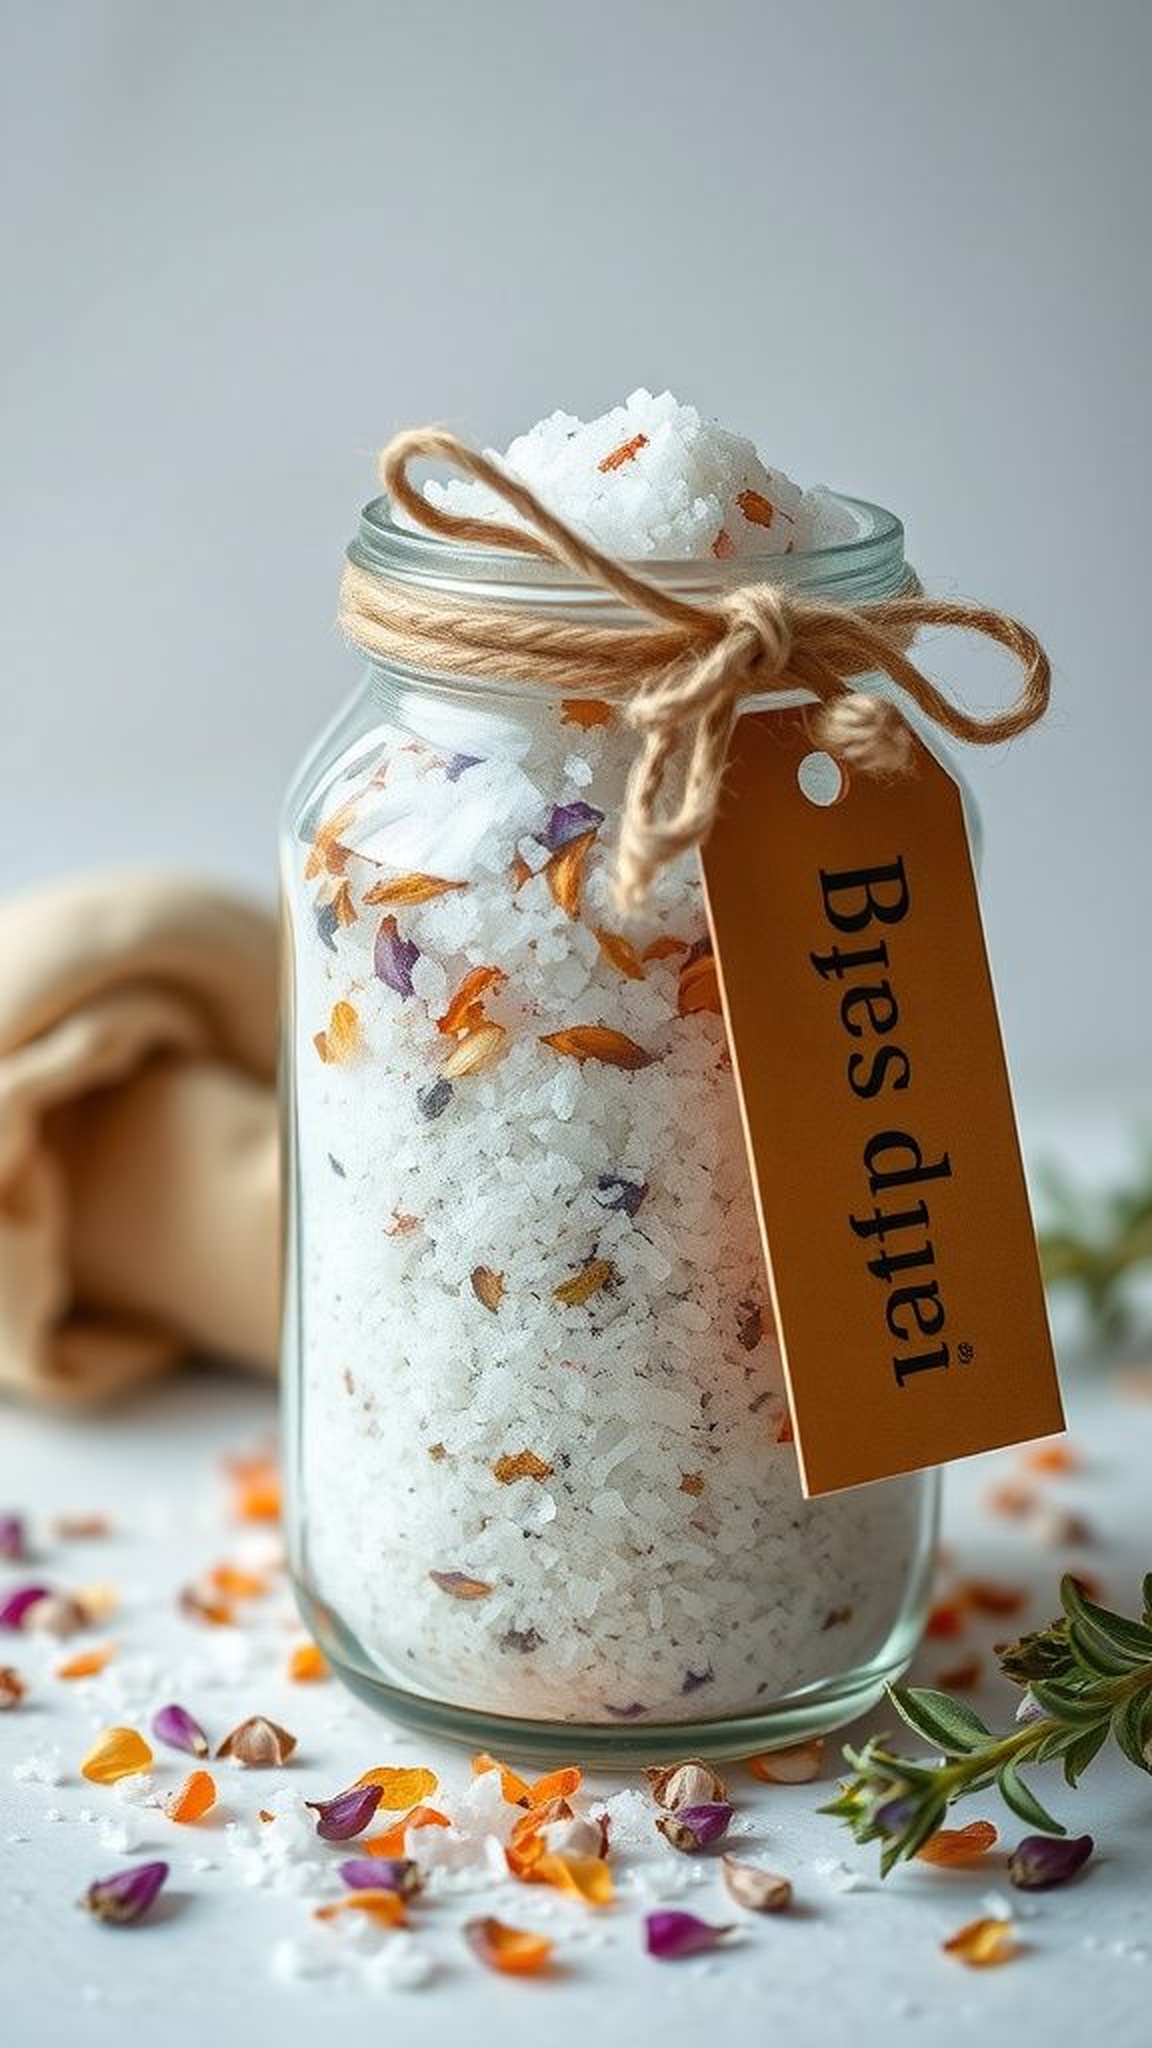
A jar of bath salts looked like a crystalline little landscape, grains twinkling under kitchen light and releasing an airy scent when the lid was lifted. The texture felt both coarse and delicate between fingertips, and the first inhale brought herbaceous notes mingled with citrus or lavender.
A strip of kraft paper tied around the neck bore a handwritten label that folded into the jar’s silhouette. I imagined an evening soak and the way steam might carry the scent through towels and tile, turning an ordinary tub into a small indulgence.
Steps
- Combine coarse salts with a finer salt in a mixing bowl and stir gently to blend.
- Add a few drops of fragrance oil and a touch of carrier oil to help scent adhere.
- Fold in dried botanicals for texture and fragrance and transfer the mixture into a clean jar.
- Seal the jar and attach a labeled tag for keeping or gifting.
Mosaic trinket dish made from broken ceramics
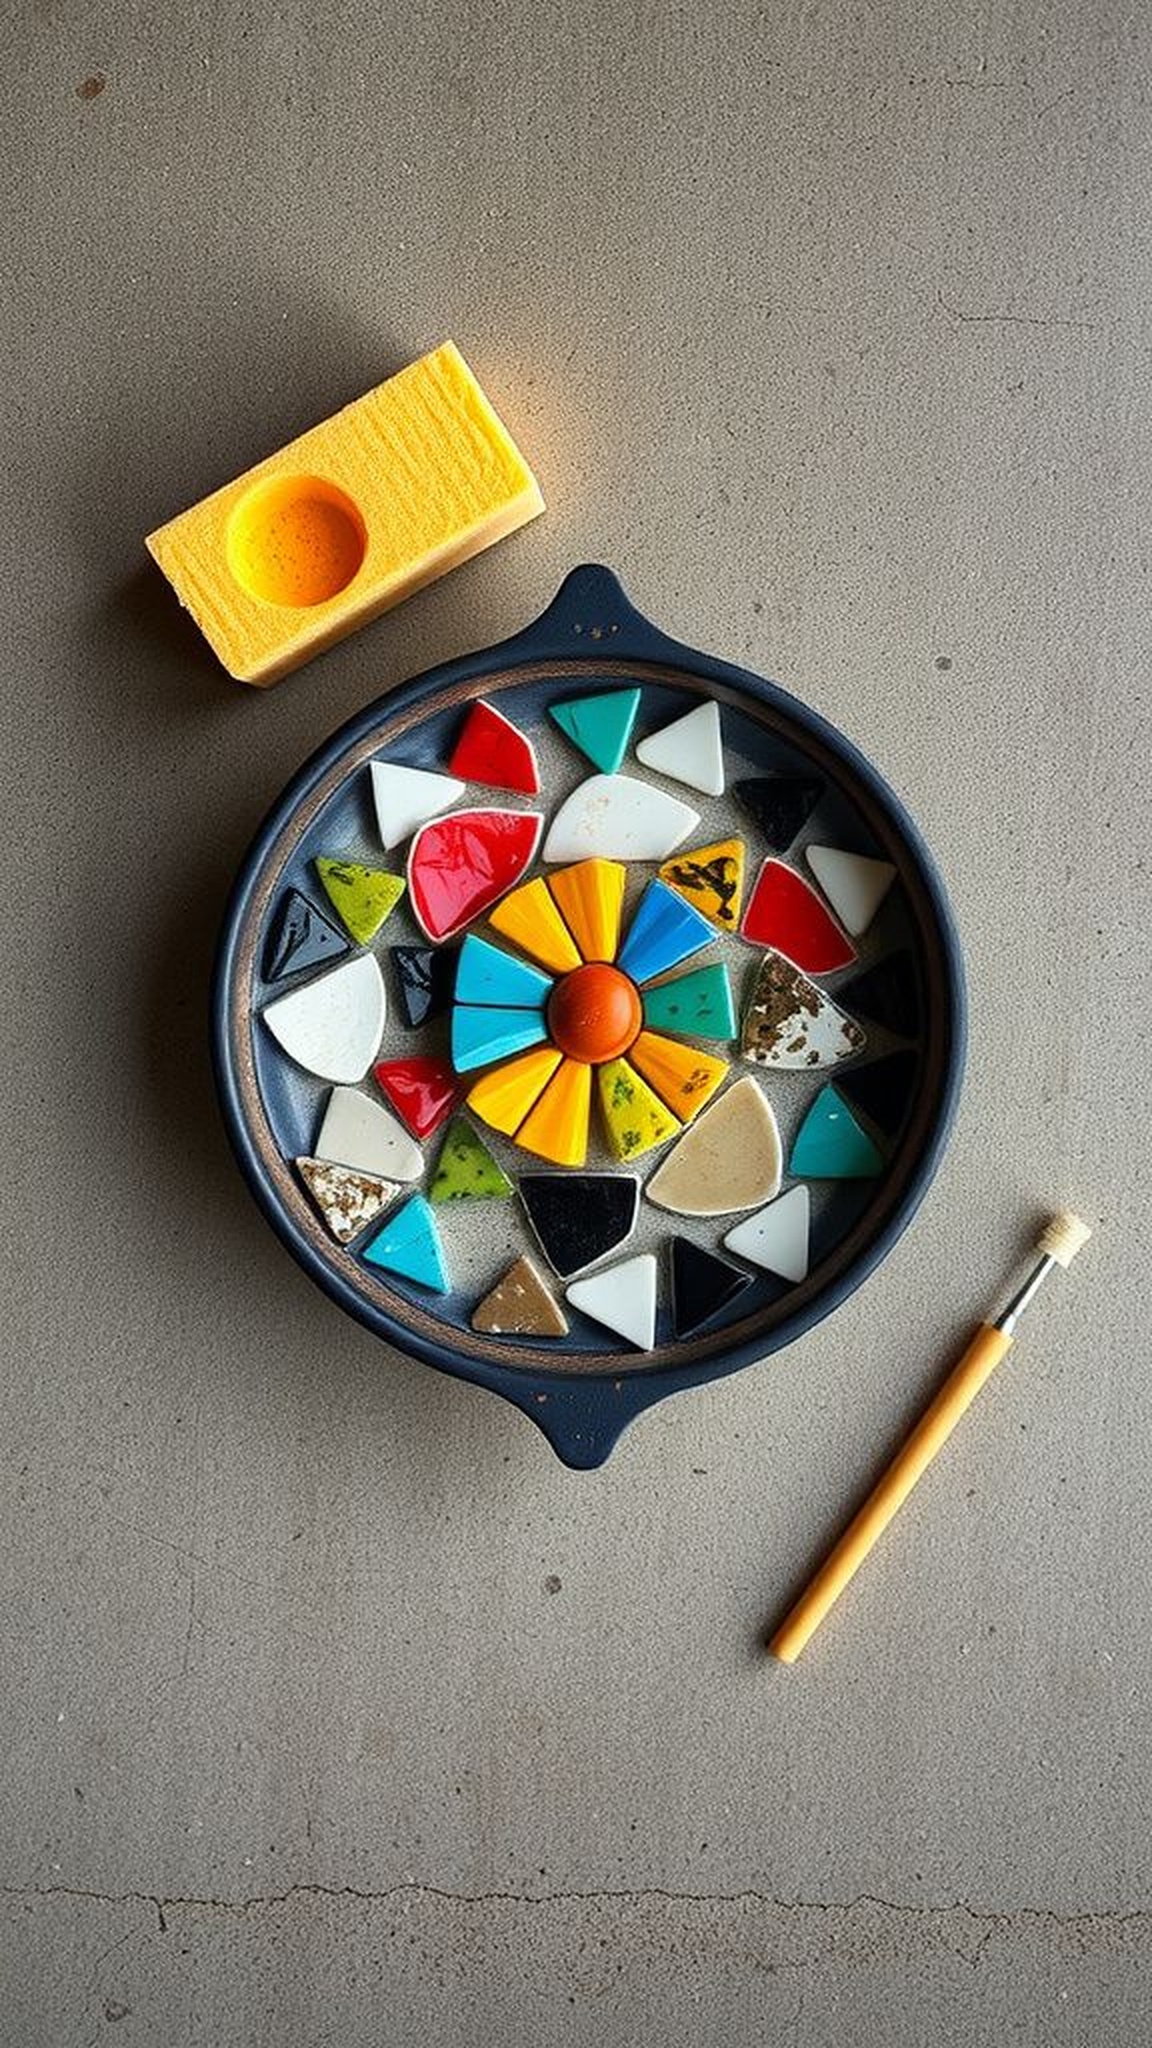
A small dish pieced from tiny ceramic shards felt like a collage of other lives, glossy fragments catching light in unpredictable flashes. Edges were smoothed and a curve of grout cast a soft chalky contrast against shiny glaze.
Setting keys or a ring on that dish felt ceremonious, like depositing a small secret into a pool of color. The dish had a history stitched into its surface, and I liked tracing where patterns met and mismatched, noticing how a green sliver sat beside a floral curve to create a new motif entirely.
Steps
- Arrange cleaned ceramic shards into a shallow mold to create a pleasing mosaic pattern.
- Mix grout and press it between the pieces, filling gaps and evening the surface.
- Wipe excess grout from the shards with a damp cloth before it dries fully.
- Allow the grout to cure completely and buff the shards to reveal glossy highlights.
Hand-poured soy candle in a vintage tin container
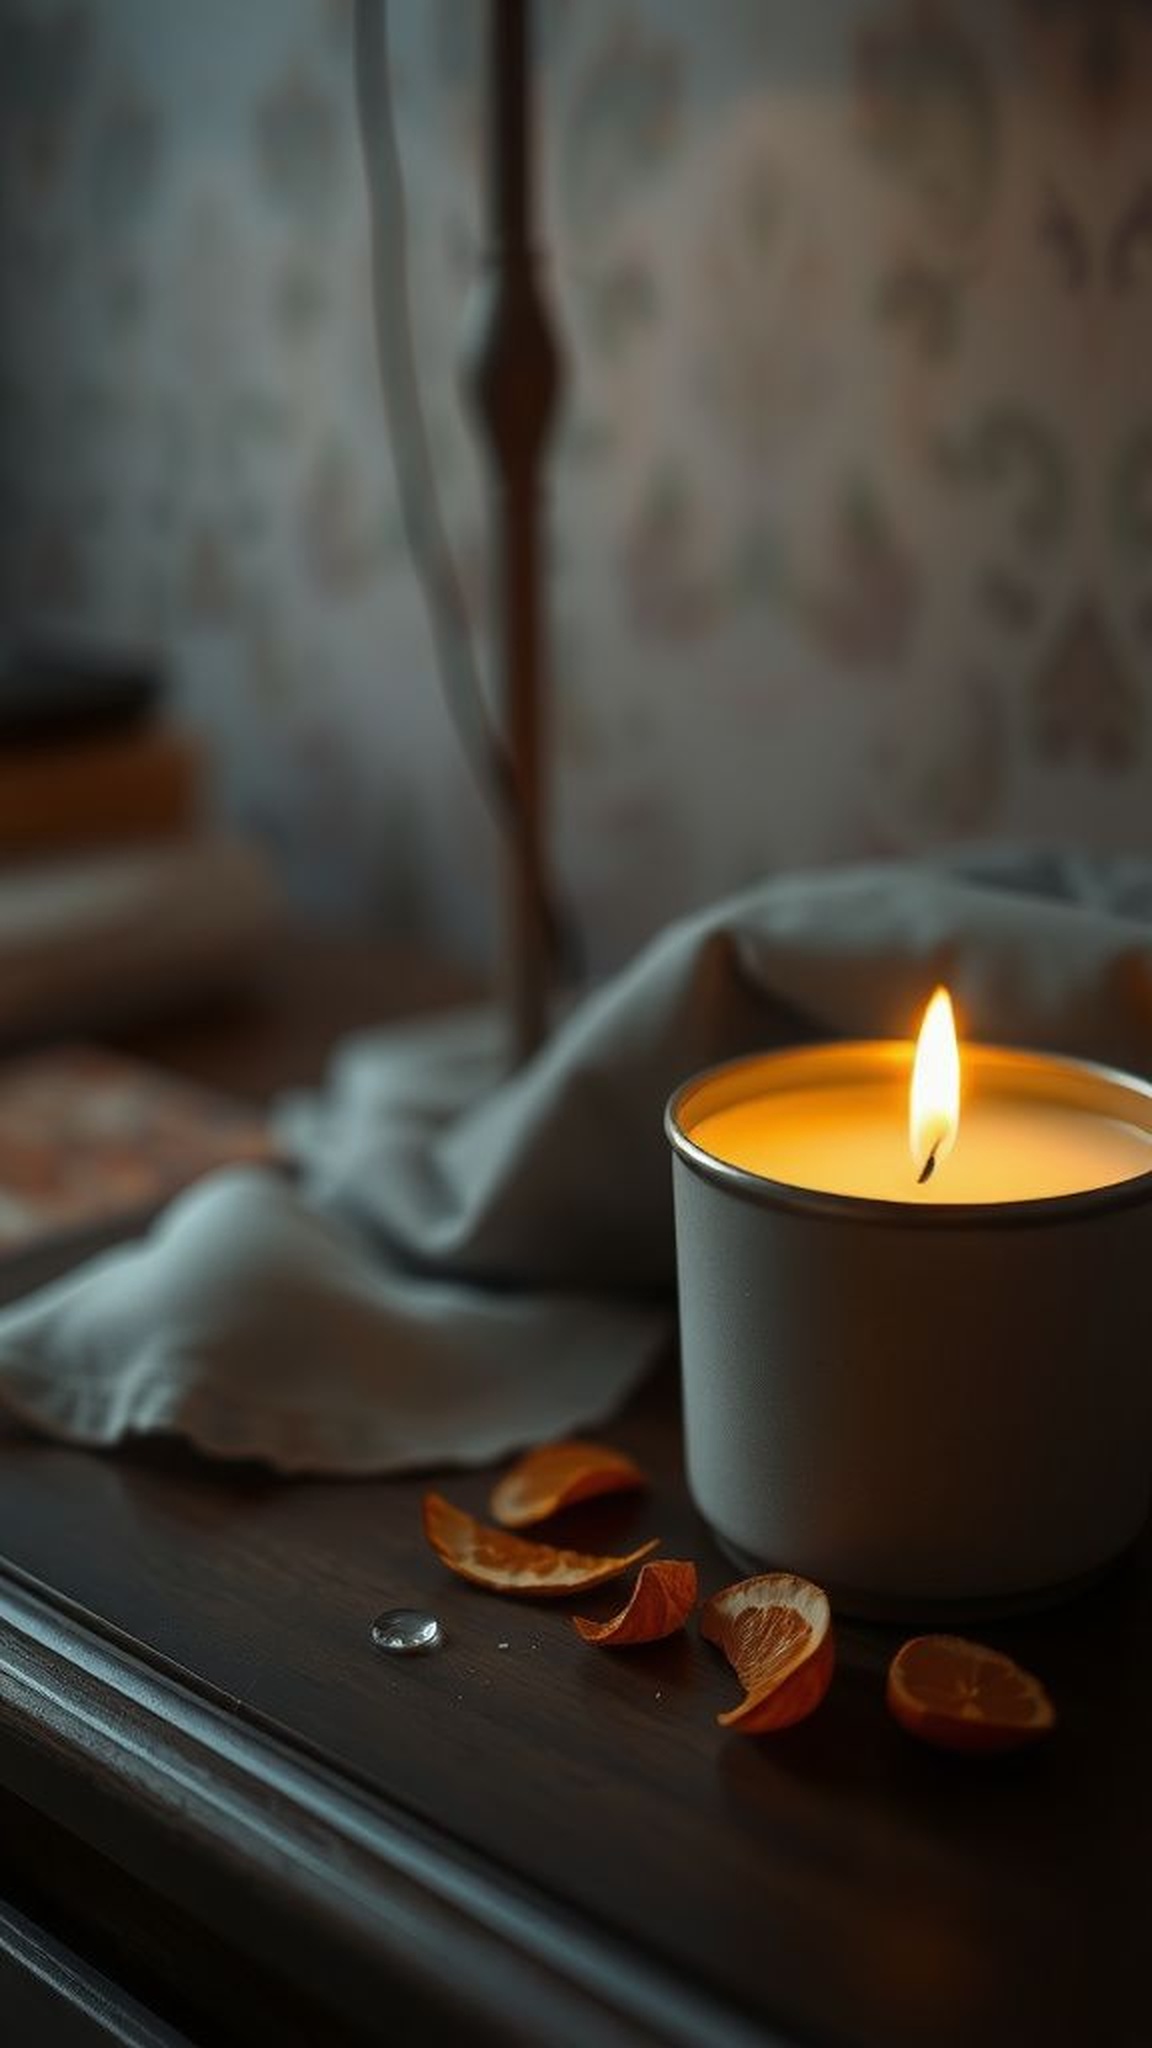
A soy candle in a small tin had a quiet glow and the soft almost-porcelain scent of beeswax and essential oil, lending a room a gentle hush. The metal carried a faint warmth when the flame burned, and the wax surface showed a faint ring where the wick sat.
I kept one on a bedside table and watched how the flame leaned toward a window draft, painting small moving shadows on wallpaper. The tin itself had scuffs and a faded label, which made the candle feel like something that had already lived a pleasant life.
Steps
- Melt soy wax in a double-boiler setup and monitor until fully liquid.
- Stir in chosen essential oils and allow the mixture to cool slightly.
- Secure a wick in the center of a clean vintage tin and pour wax carefully.
- Let the candle cool fully and trim the wick before lighting.
Watercolor card set with soft color washes
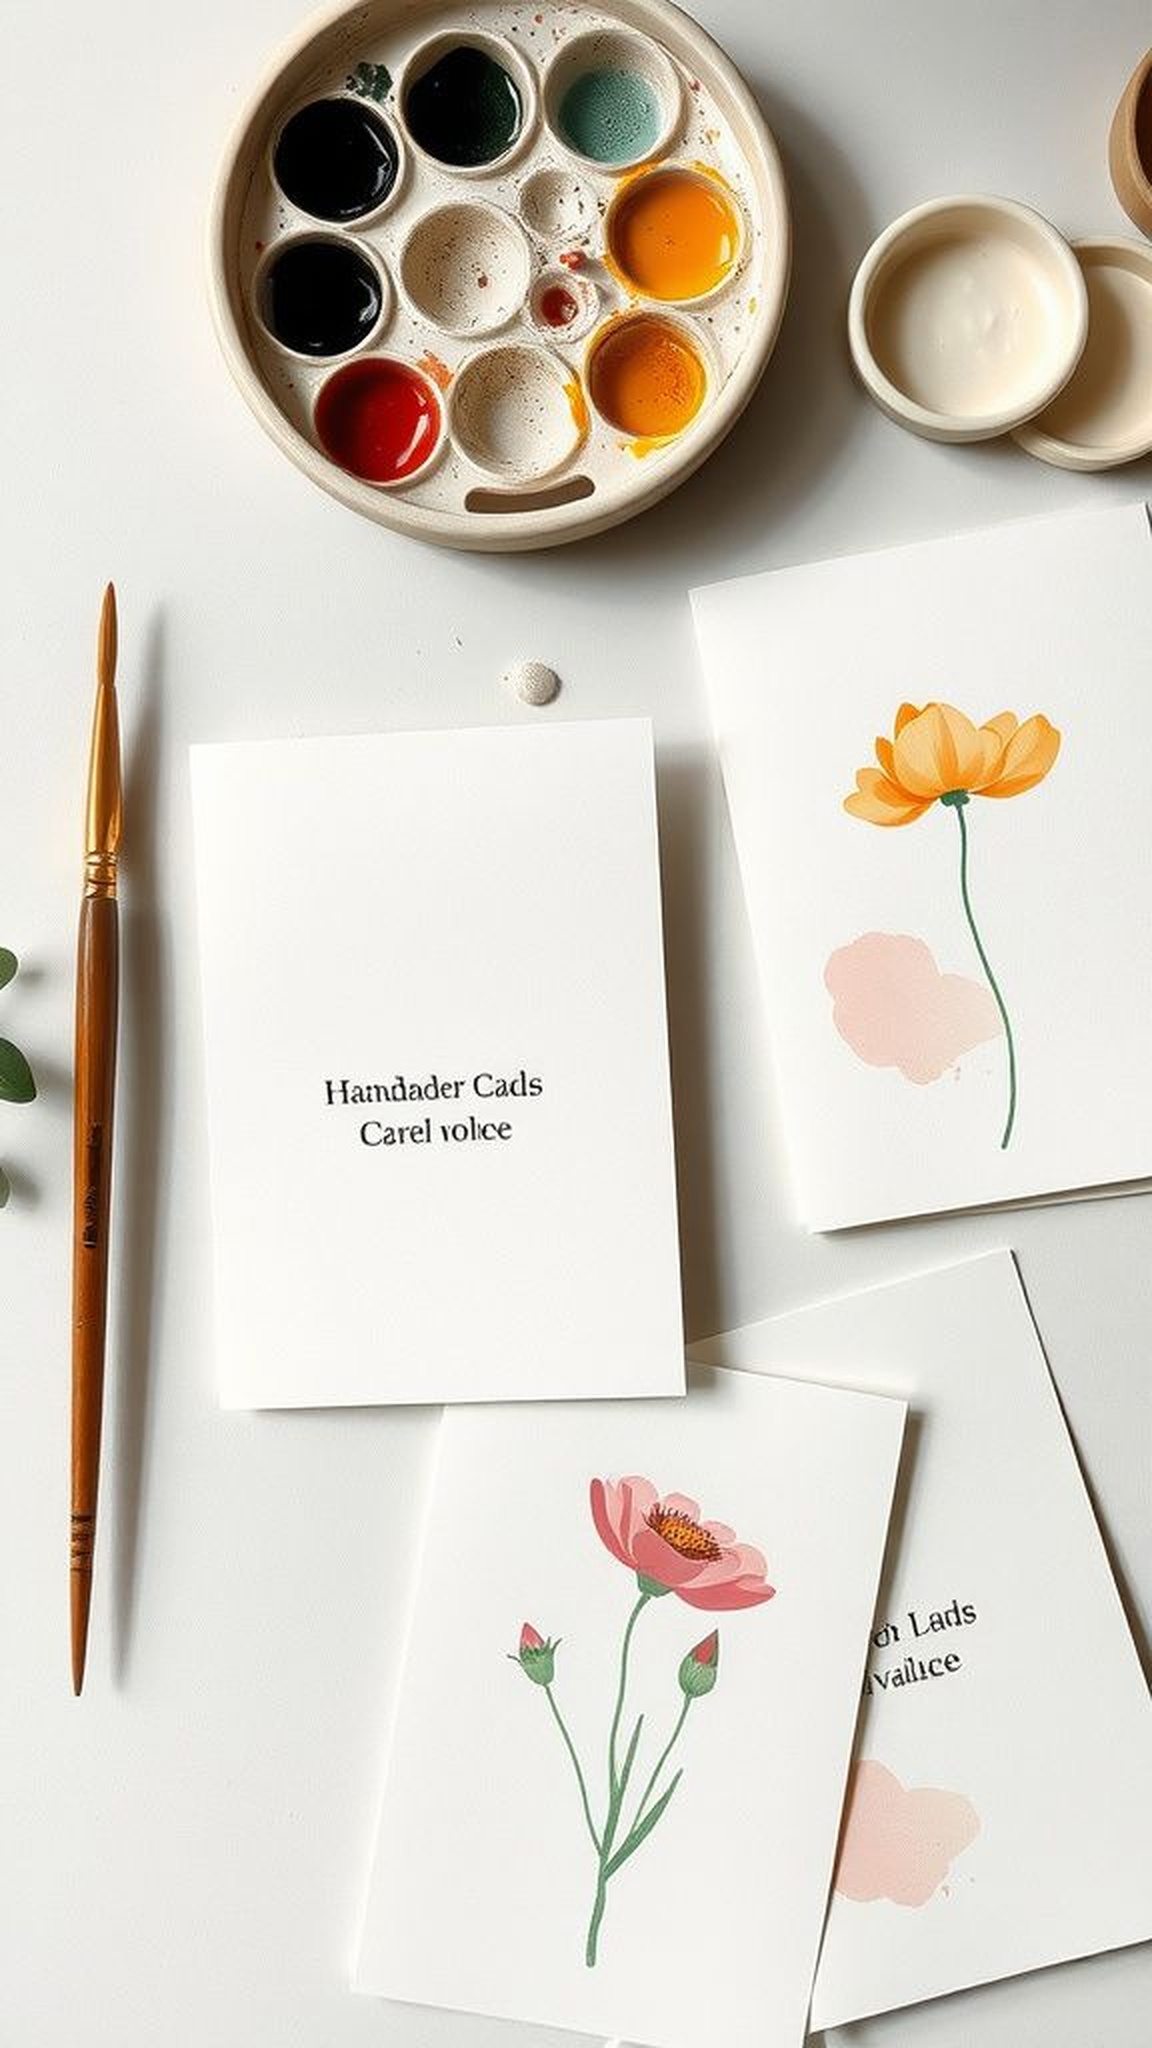
A stack of watercolor cards held airy washes and faint blooms where pigment pooled and faded into paper fibers. The deck smelled faintly of paper and water, and thumb prints left tiny charcoal smudges along the edges from testing colors.
Giving a handwritten note on that paper felt like folding a tiny painting into a message, and recipients could keep the card as a small sheet of quiet art. I loved the way edges curled a bit after drying, making each card feel tactile and lived-in rather than flat and perfect.
Steps
- Select heavyweight watercolor paper and cut it into matching card sizes.
- Create soft washes and layered marks with watercolor paints, letting each layer dry between applications.
- Add small hand-lettered sentiments or accents once paint is fully dry.
- Pair the cards with envelopes and tie them together for presentation.
Embroidered handkerchief with a tiny floral motif
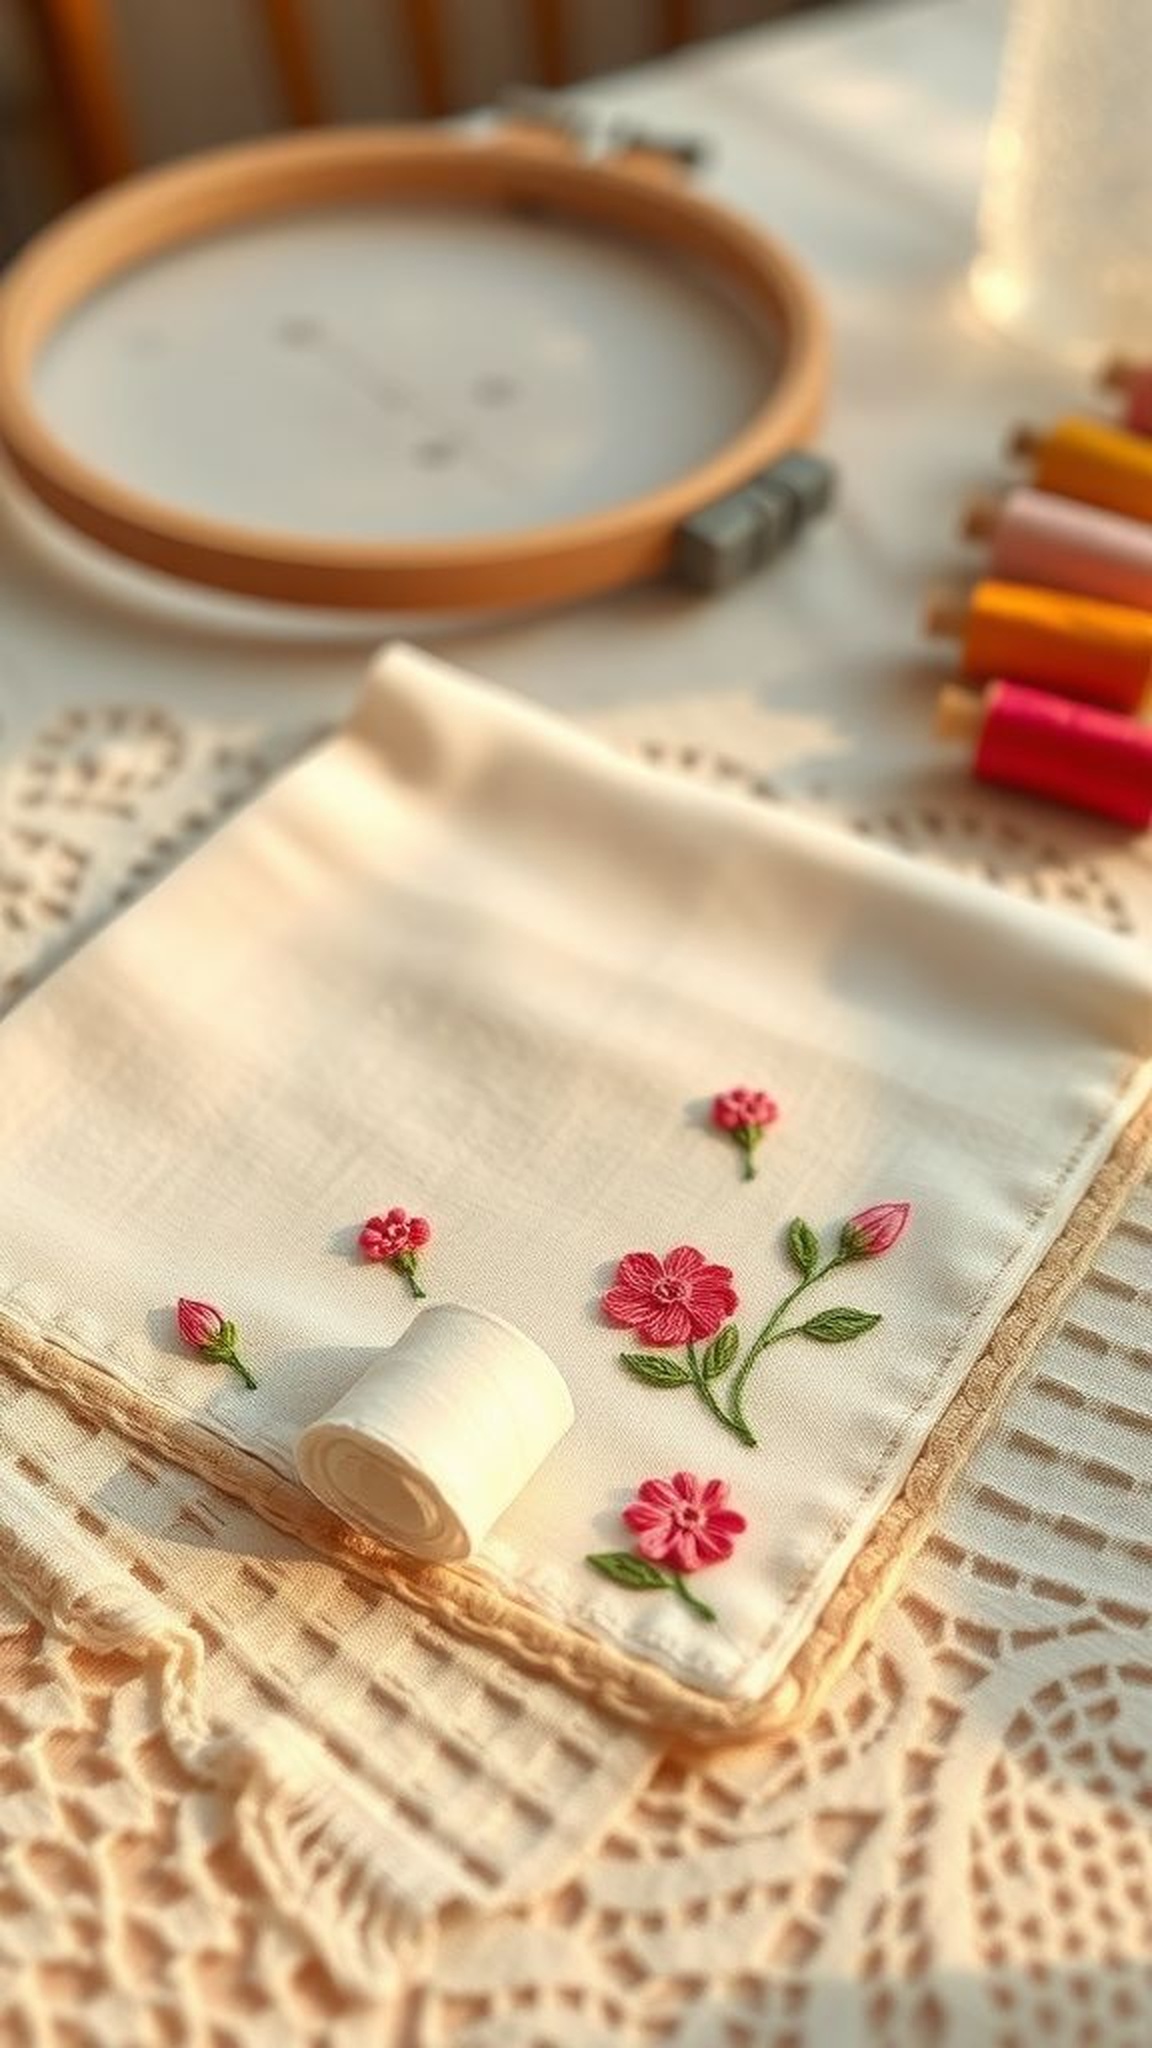
A crisp handkerchief embroidered with a single bloom felt like a small private gift, the stitches forming a tactile landscape against soft cotton. Fingers moved over the embroidery and felt the tiny knots and smooth satin stitches, and the contrast thread brought depth to the motif.
I found the act of unfolding such a square to be quietly ceremonial, as if each stitch held a thought. The cloth carried the faint scent of laundry soap and a memory of an afternoon with a spool of thread, and it fit easily into a pocket or purse as a delicate companion.
Steps
- Choose a fine cotton handkerchief and mark a simple floral motif lightly with a pencil.
- Select embroidery floss colors and stitch the design using basic stitches like satin and backstitch.
- Tie off threads neatly on the reverse and press the finished area gently with a warm iron.
- Present the handkerchief folded with a small note or ribbon.
Fabric scrap bouquet that never wilts
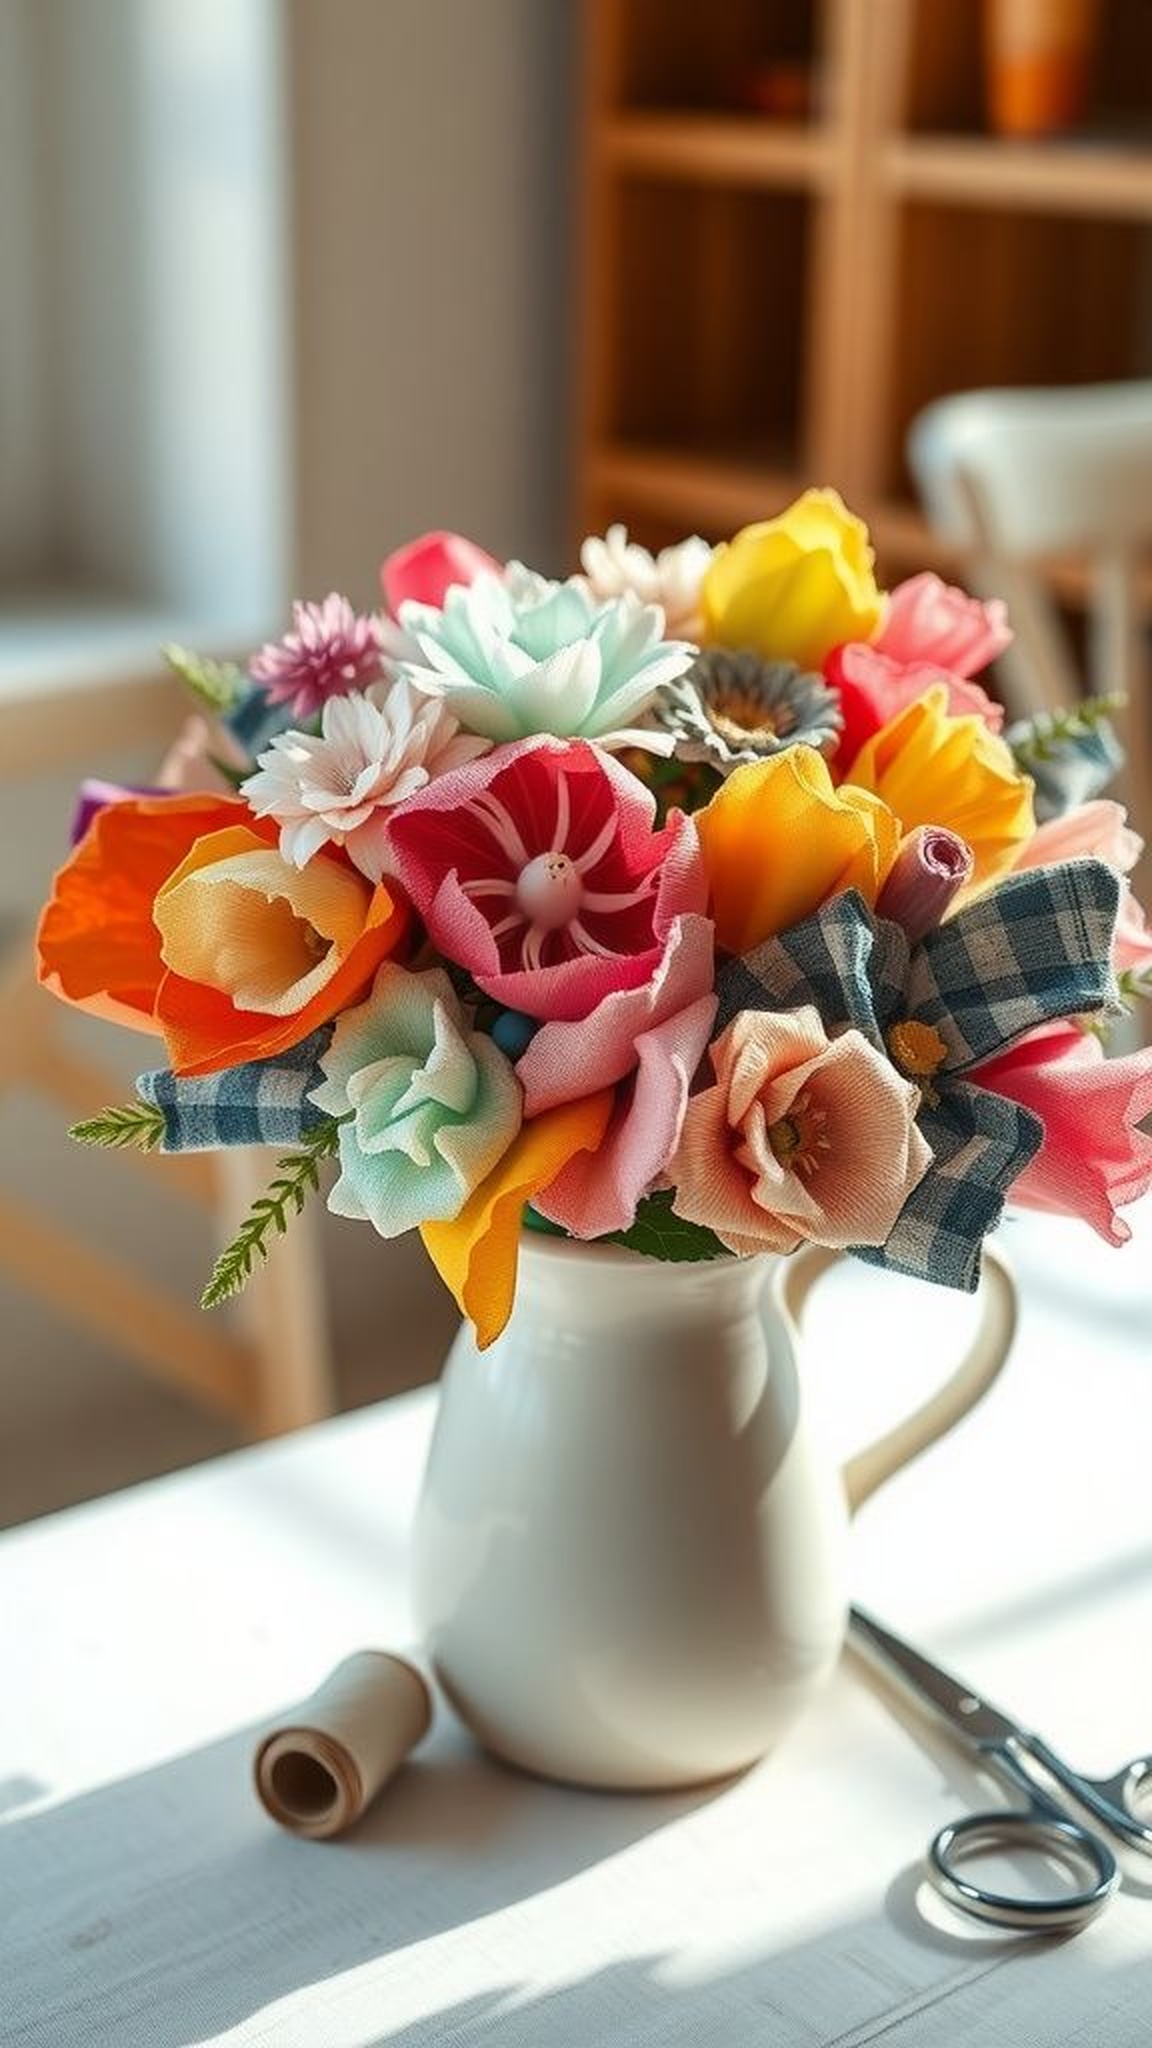
A bouquet made from fabric scraps kept color and texture but none of the fragility of fresh stems, petals folded into petal shapes and wired to hold a pose. The cloth whispered when moved and the edges showed playful fraying, which made the bouquet feel like a soft sculpture.
I liked arranging a few stems in a small vase, where patterns met and reacted in surprising ways, stripes beside florals and velvet beside cotton. The bouquet brightened a corner without needing sunlight, and its tactile layers invited touch rather than careful avoidance.
Steps
- Cut petal shapes from assorted fabric scraps and layer them to create dimensional blooms.
- Secure petals to floral wire with wrapping and bind stems with floral tape.
- Arrange stems into a small vase or ribbon-tied bundle for display.
- Fluff and shape petals to create a full bouquet silhouette.
Marbled mug with polymer clay bead handle accents
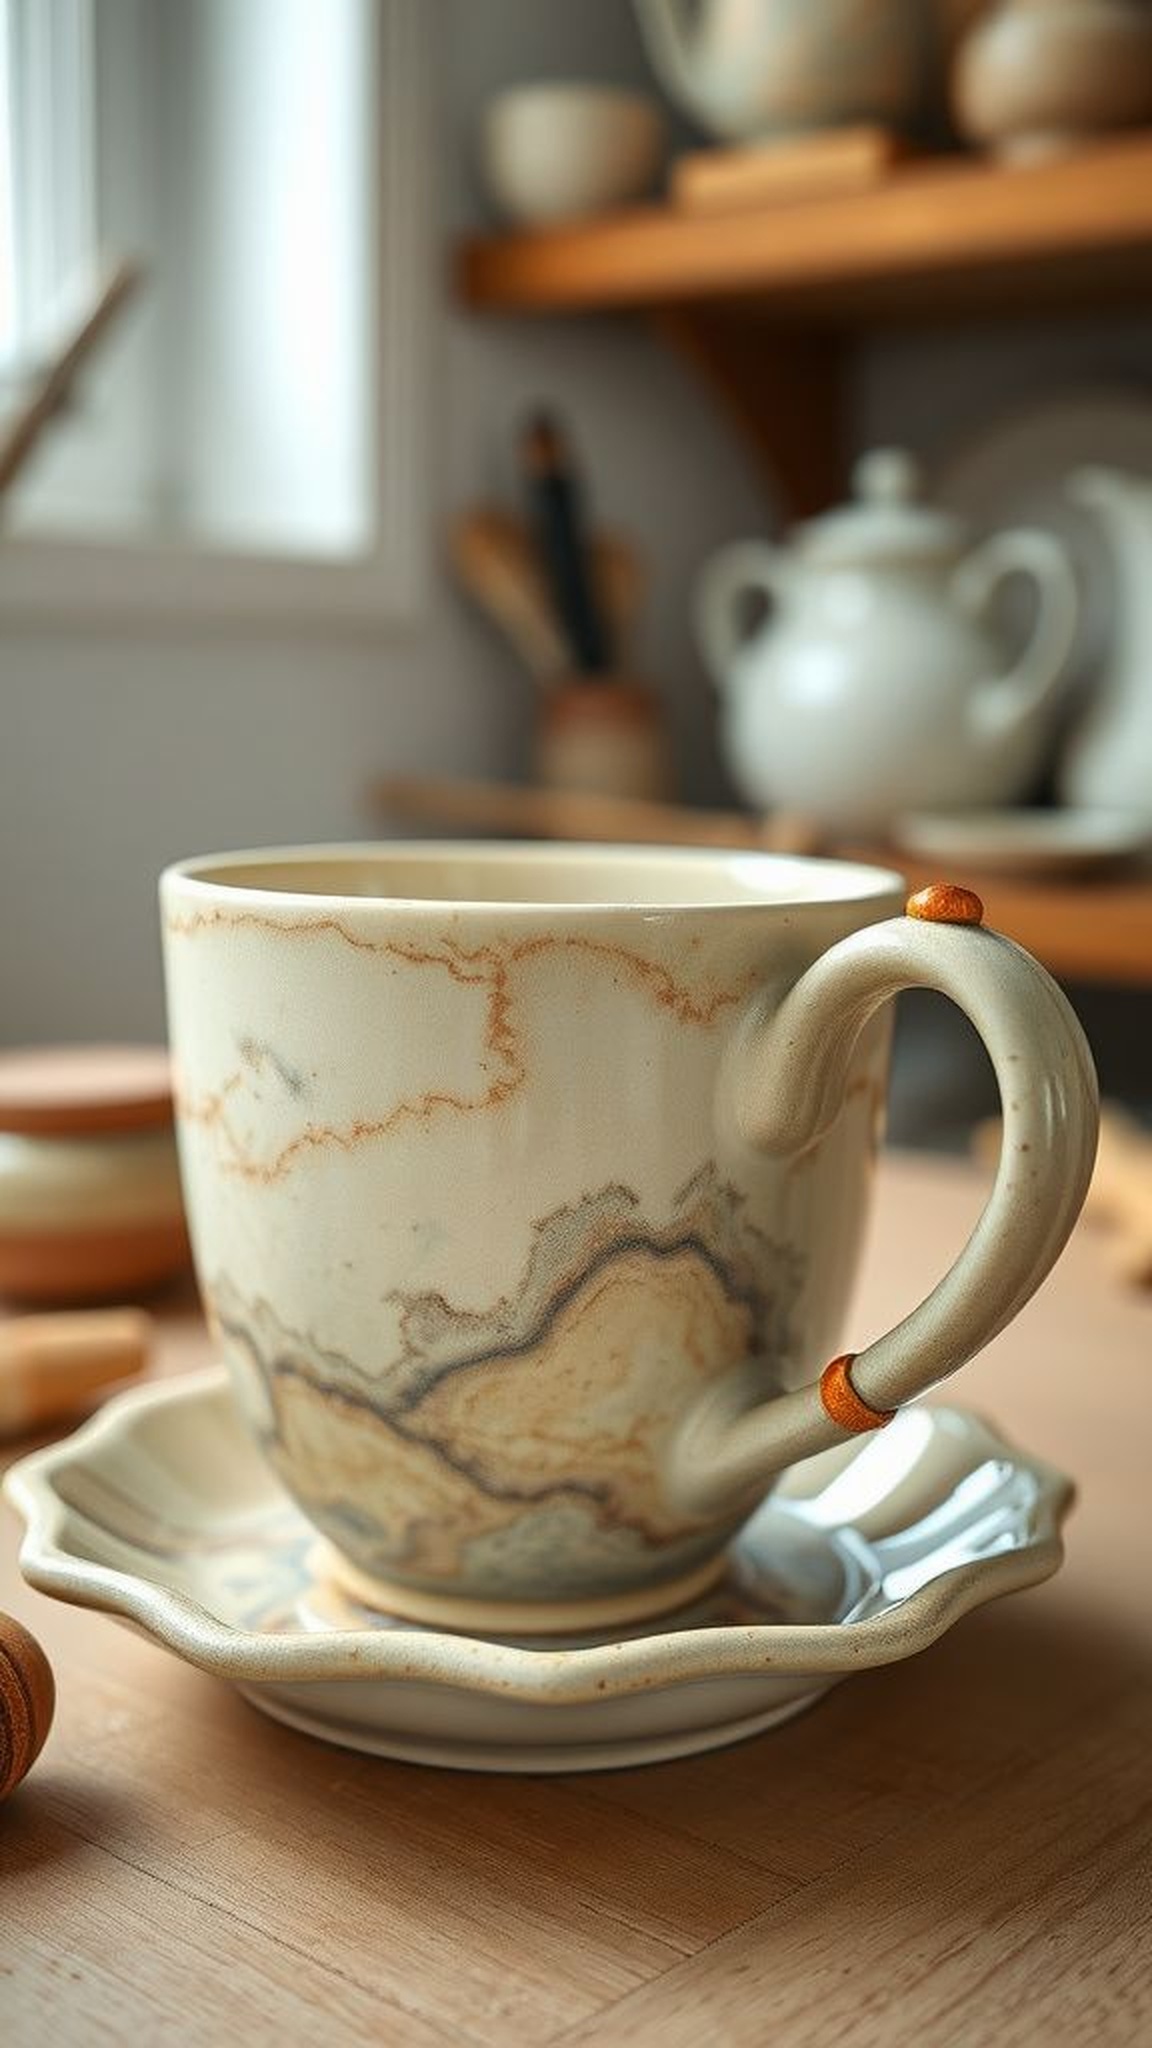
A mug with marbled swirls felt like a small landscape of color, glossy glaze catching a pinch of sunlight and lending a reflective sheen. Tiny polymer clay beads threaded along the handle added a playful weight and a contrast of matte texture against smooth ceramic.
Holding the mug was a comfort, the rim cool and the body warm with tea, and the marbling pattern made each sip feel slightly special. I kept mine on a saucer that had a matching fleck, which created a tidy pairing that looked relaxed and handcrafted rather than staged.
Steps
- Create a marbled pattern on a plain mug using ceramic-safe paints or glazes.
- Condition polymer clay and shape small beads, baking them according to package directions.
- Affix the cooled beads to the handle using a strong adhesive suitable for ceramics.
- Cure any paints or adhesives fully before using the mug with hot beverages.
Felted wool keychain with cozy tactile charm
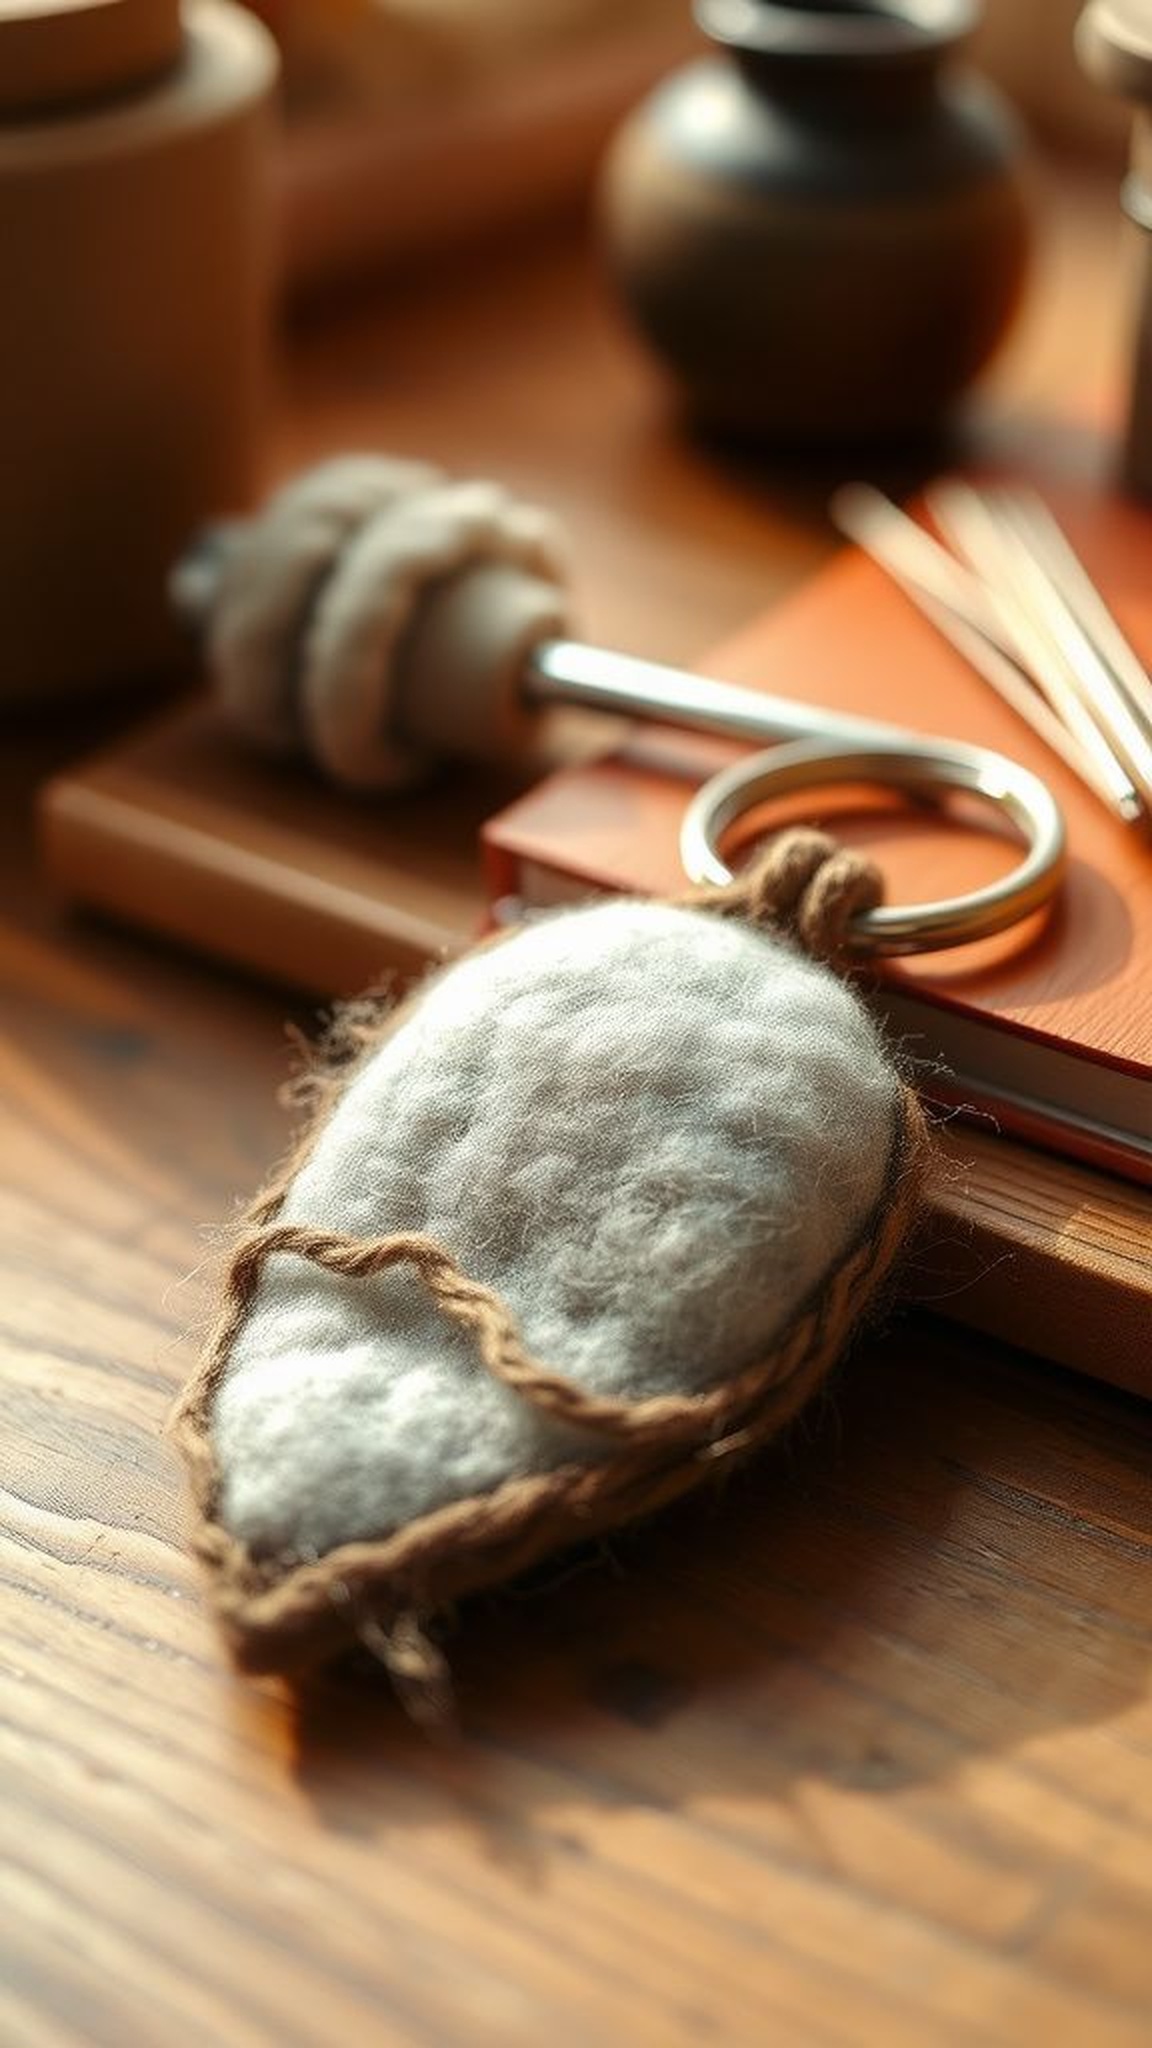
A felted wool shape carried a dense, pillowy feel in the hand and a faint sheep-warm scent from the fibers, like a small cloud. The surface had tiny raised bits where fibers tangled and a soft matte hue that absorbed light.
Attaching it to keys made jangling feel gentler, and I liked the weight this little piece added to an otherwise metallic bundle. The edges were rounded by hand and bore tiny asymmetries that read as human.
When touched, the felt warmed slightly, inviting that quick, calming palm rub that small keepsakes encourage.
Steps
- Form shapes from roving wool and felt them together using needle felting or wet felting techniques.
- Add subtle details with contrasting wool and secure a small loop for attachment.
- Attach a key ring or clasp to the felted loop.
- Trim stray fibers and shape the piece for a neat finish.
Photo coaster set sealed with glossy resin finish
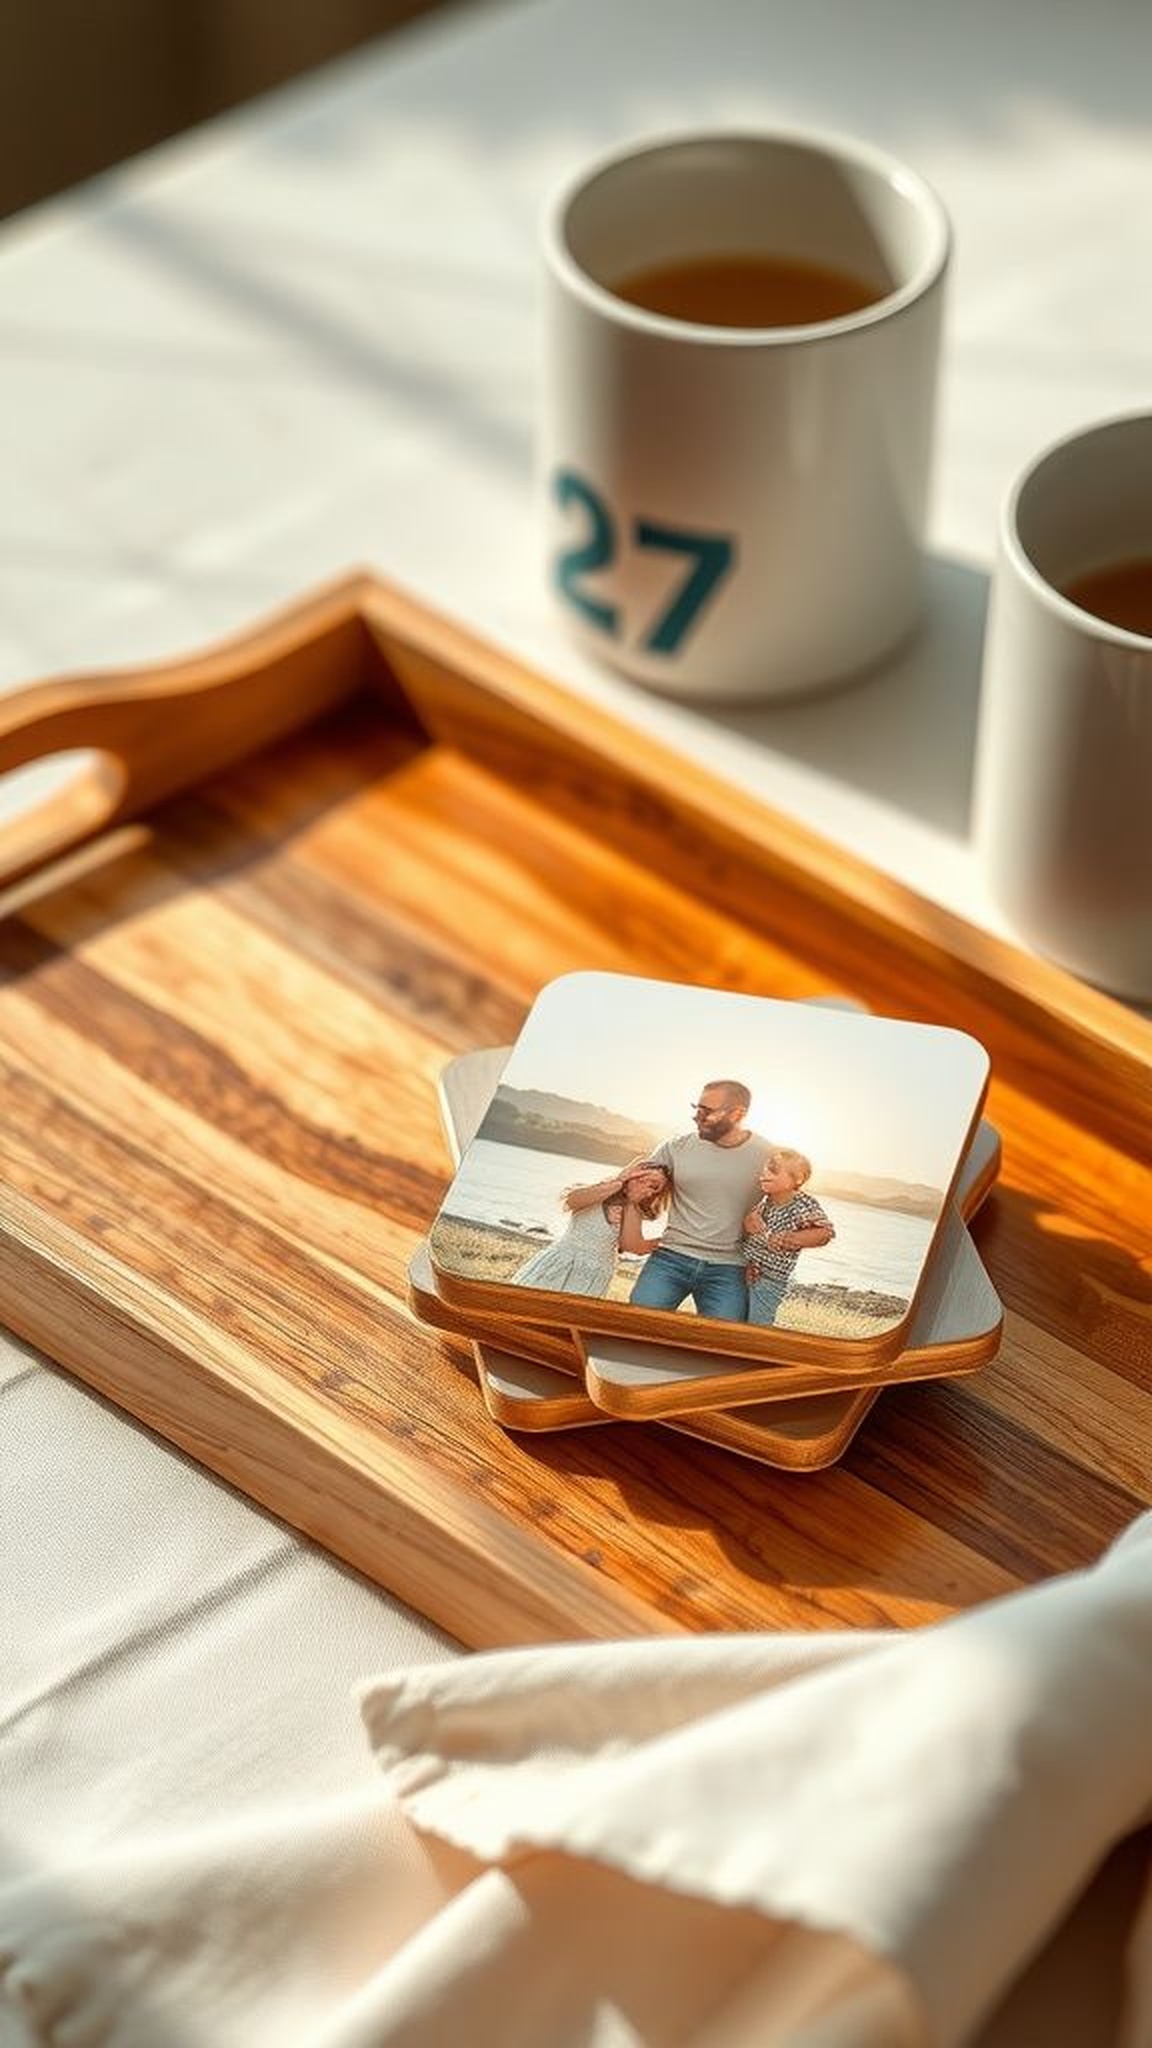
A set of coasters bearing tiny printed photos felt like small windows on a table, glossy resin catching cup rings and reflecting a warm light. The surface was slick and cool under a glass, while edges showed a careful finish that promised durable use.
I liked how a single image split across coasters created a puzzle when stacked, and the sound of a mug meeting resin had a satisfying, slightly muted clink. Each coaster seemed to store a small domestic narrative, and passing them around at tea made conversations circle back to the memory held within each image.
Steps
- Affix printed photos to blank coaster bases and seal edges to prevent lifting.
- Mix clear resin and pour a thin layer over each coaster, removing bubbles as they appear.
- Allow the resin to cure fully on a level surface before adding a second protective layer if desired.
- Apply felt pads to the underside to protect furniture.
Beaded suncatcher with vintage glass and soft colors
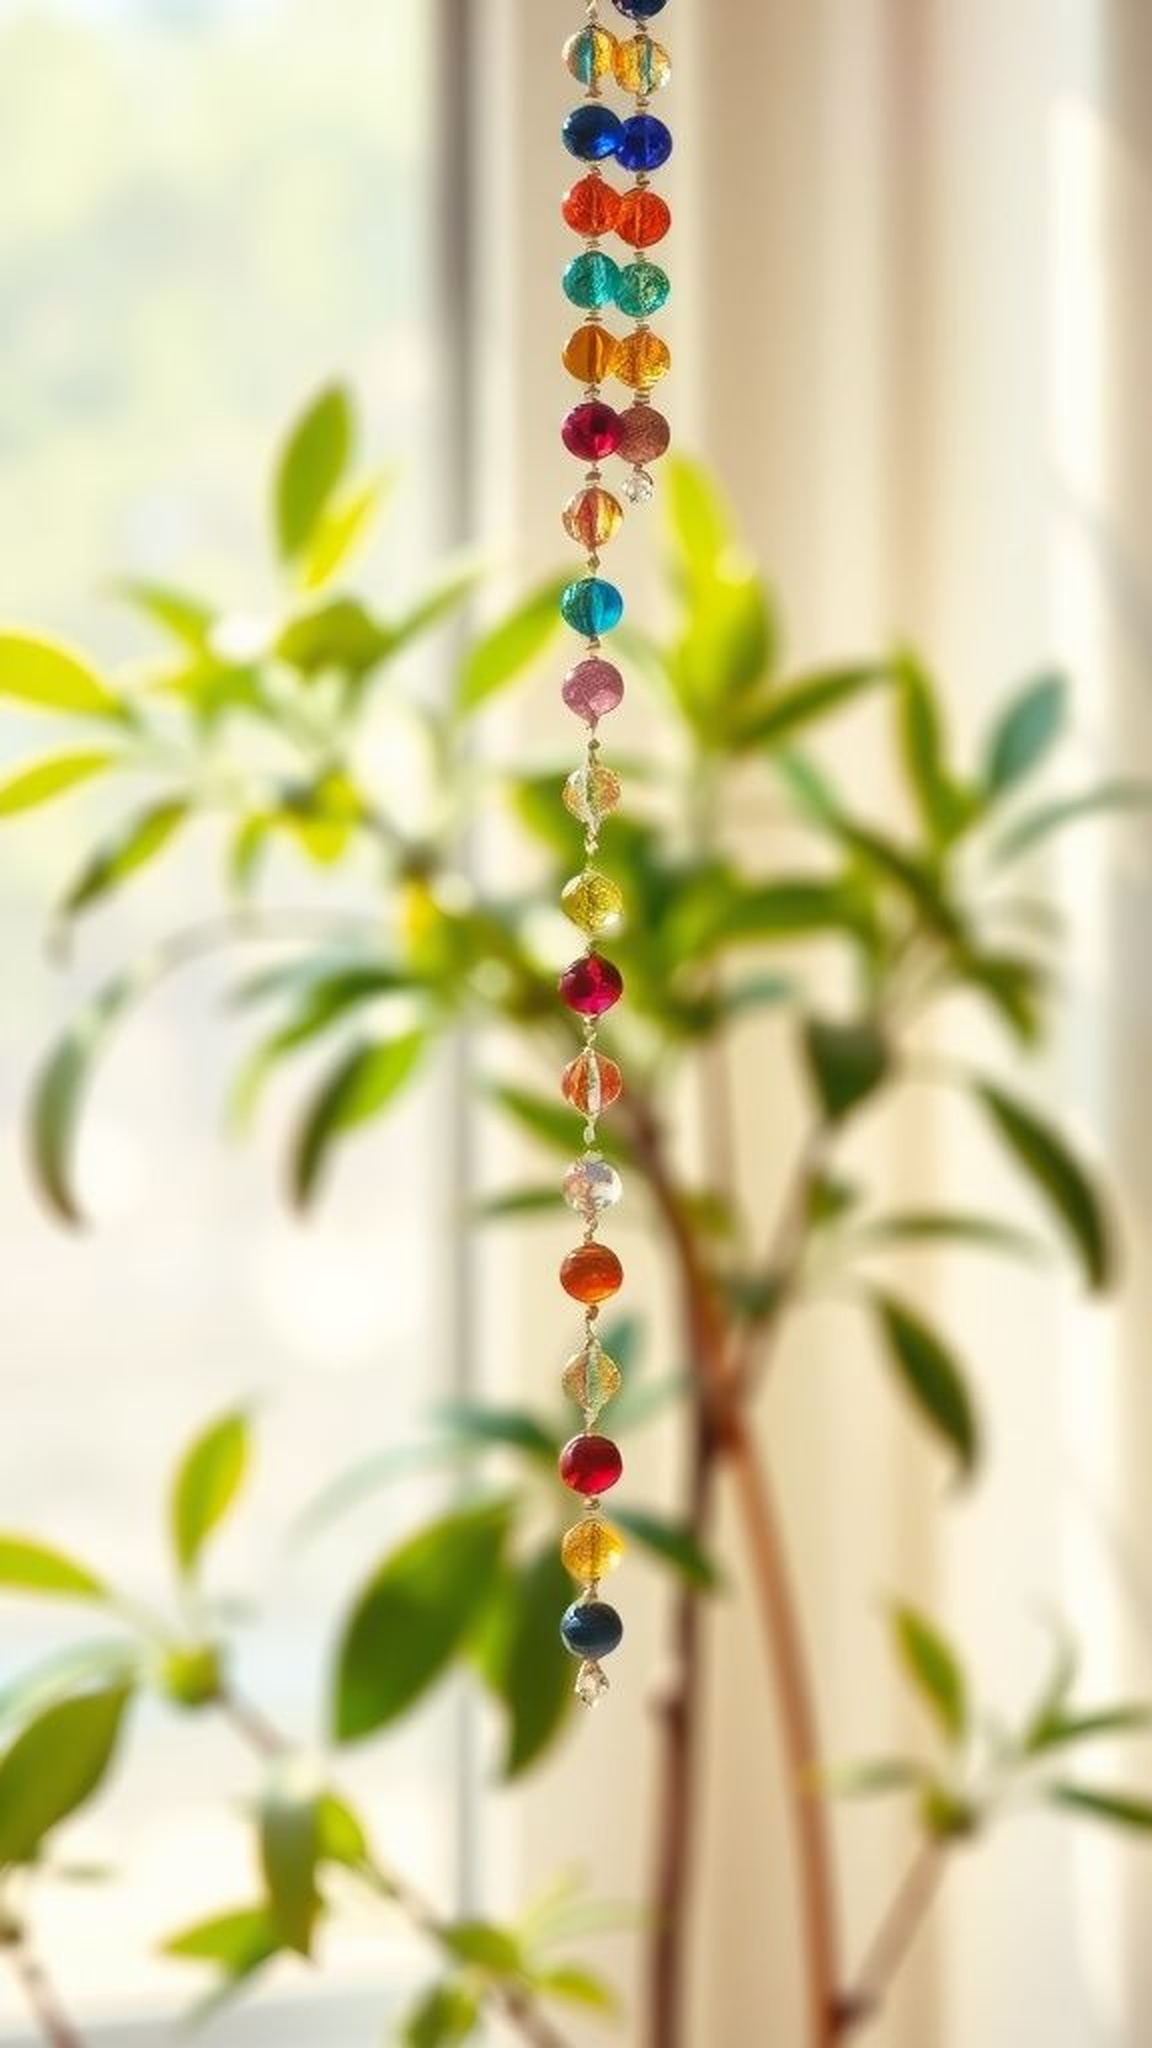
A beaded suncatcher hung like a tiny constellation, glass beads catching morning sun and scattering speckles across a wall. The beads chimed subtly when a window draft passed, producing a delicate sound that felt like a secret.
Colors ranged from pale seafoam to warm amber, and small vintage glass pieces added an irregular sparkle that modern beads couldn’t match. I liked watching light travel through those facets and settle on different surfaces through the day, each angle offering a new tiny constellation to notice between chores and cups of tea.
Steps
- Select a sequence of glass beads, small vintage glass pieces, and a sturdy thread or wire.
- String beads in a visually pleasing pattern and include a central focal piece.
- Secure knots or crimp beads at either end and add a hanging loop.
- Suspend the suncatcher in a sunny window and adjust lengths for balanced movement.
Handmade soap bars with layered colors and scent
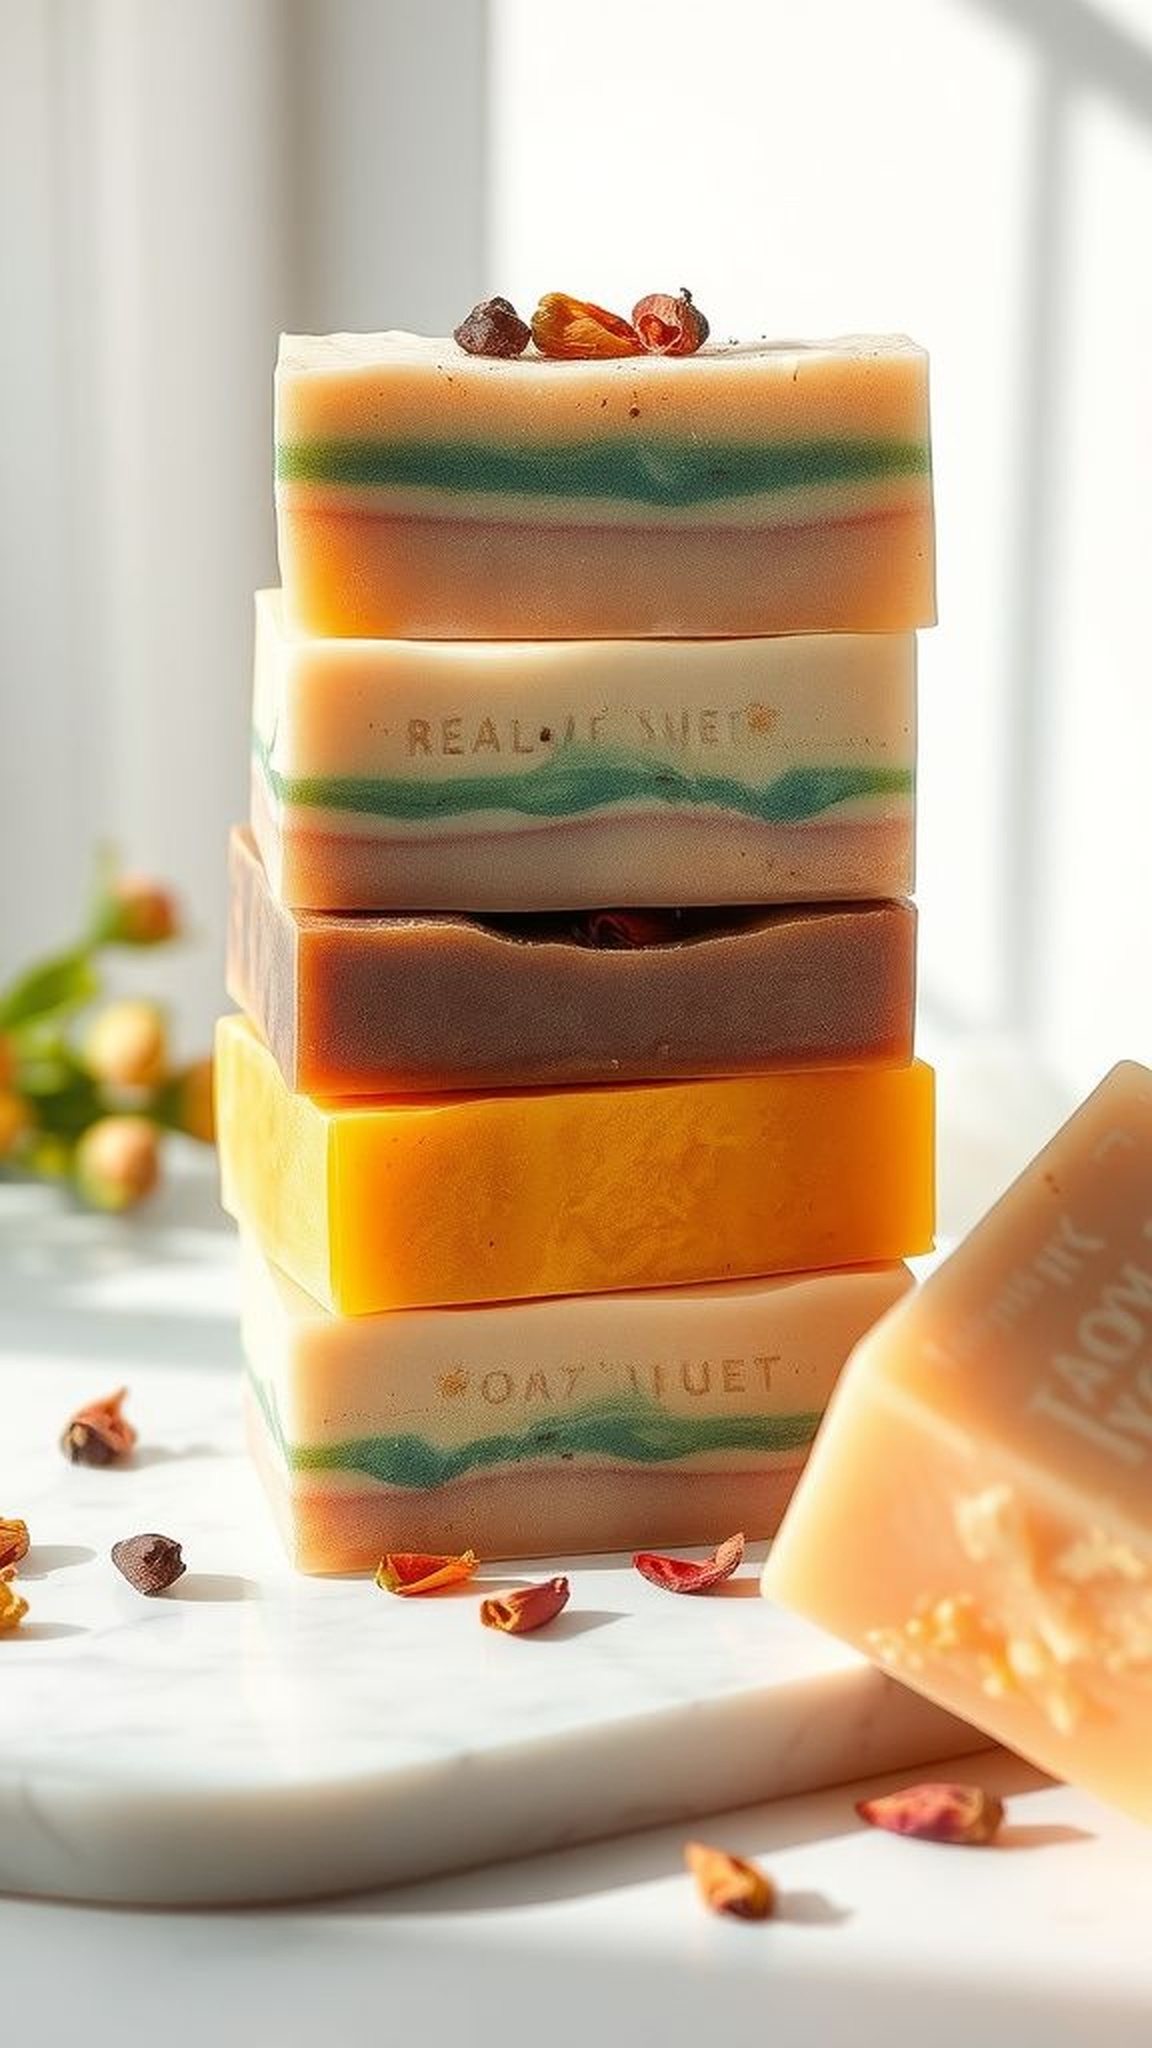
A trio of soap bars stacked like small cakes smelled of citrus and herb, their layers distinct and the edges slightly rough where they had been cut. The texture under skin felt creamy and dense, and lather whispered up into soft foam that smelled like morning gardens.
A faint sprinkling of dried petals on the top gave each bar an heirloom look, and I noticed the way light struck soap ridges to reveal tiny translucent veins. Leaving one on the sink made daily rituals feel considered and quietly pampering.
Steps
- Melt a soap base gently and blend in chosen fragrance oils and colorants.
- Pour a thin layer into molds, allow it to set slightly, then add subsequent colored layers.
- Top with dried botanicals if desired and let the soap cure completely.
- Remove from molds and slice bars to reveal layered patterns.
Lace-dipped mason vase with romantic edge
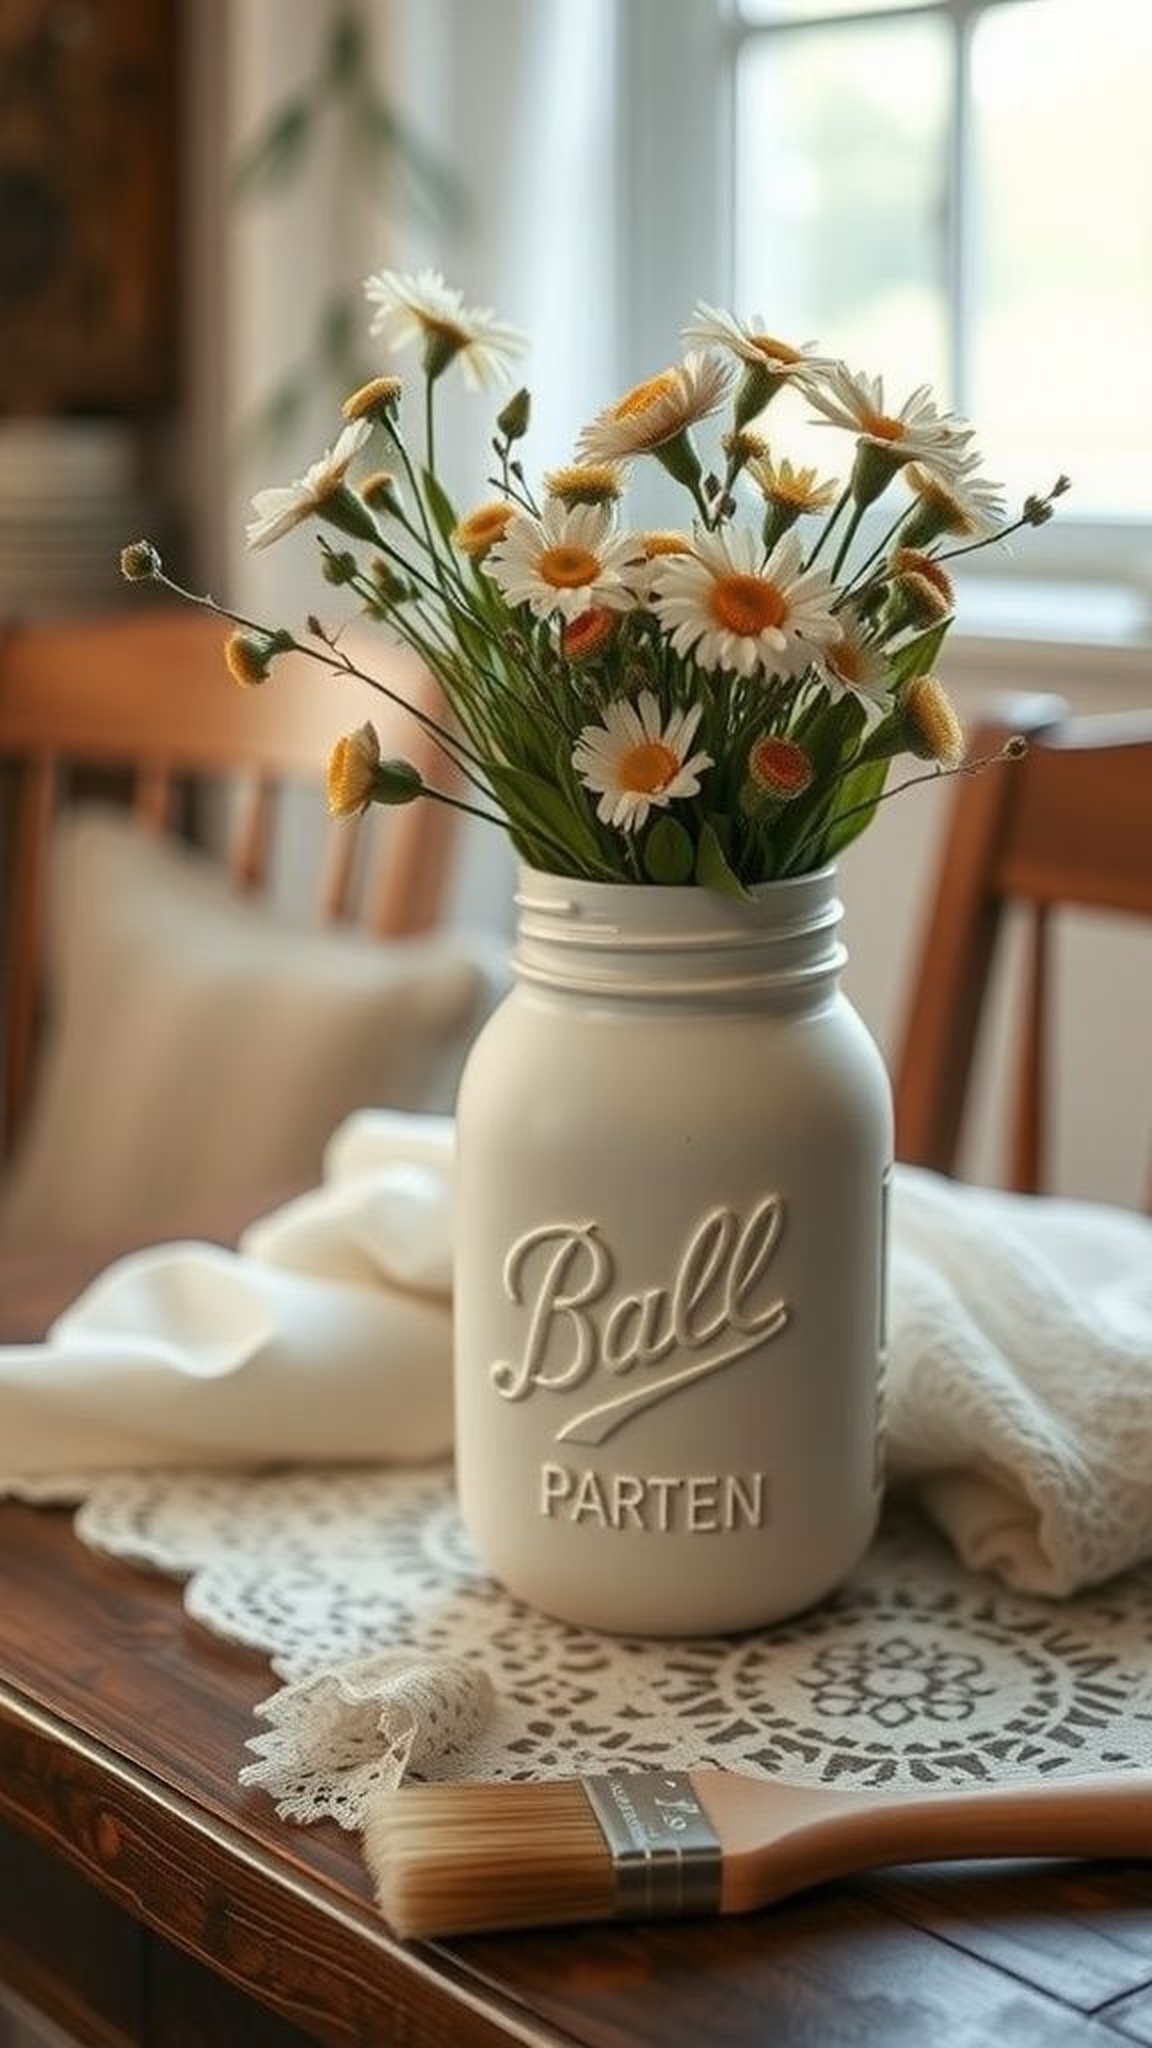
A mason jar dipped in paint left a lace imprint that read like a small whisper of texture, matte paint clinging in delicate patterns where fabric met glass. The rim remained raw and reflective, contrasting with the softened body that caught morning light differently across each motif.
I filled one with a handful of grocery-store blooms and watched petals rest against the patterned glass, which lent an instant romantic note to the kitchen table. The jar felt thrifted and updated at once, like a piece that had been found and given new life.
Steps
- Wrap a mason jar with a lace fabric and secure it snugly around the body.
- Dip or paint over the lace with a chalk or acrylic paint and let it sit.
- Remove the lace once paint is tacky to reveal the printed pattern.
- Allow the jar to dry fully before filling with flowers or other arrangements.
Handwritten coupon book for tiny thoughtful favors
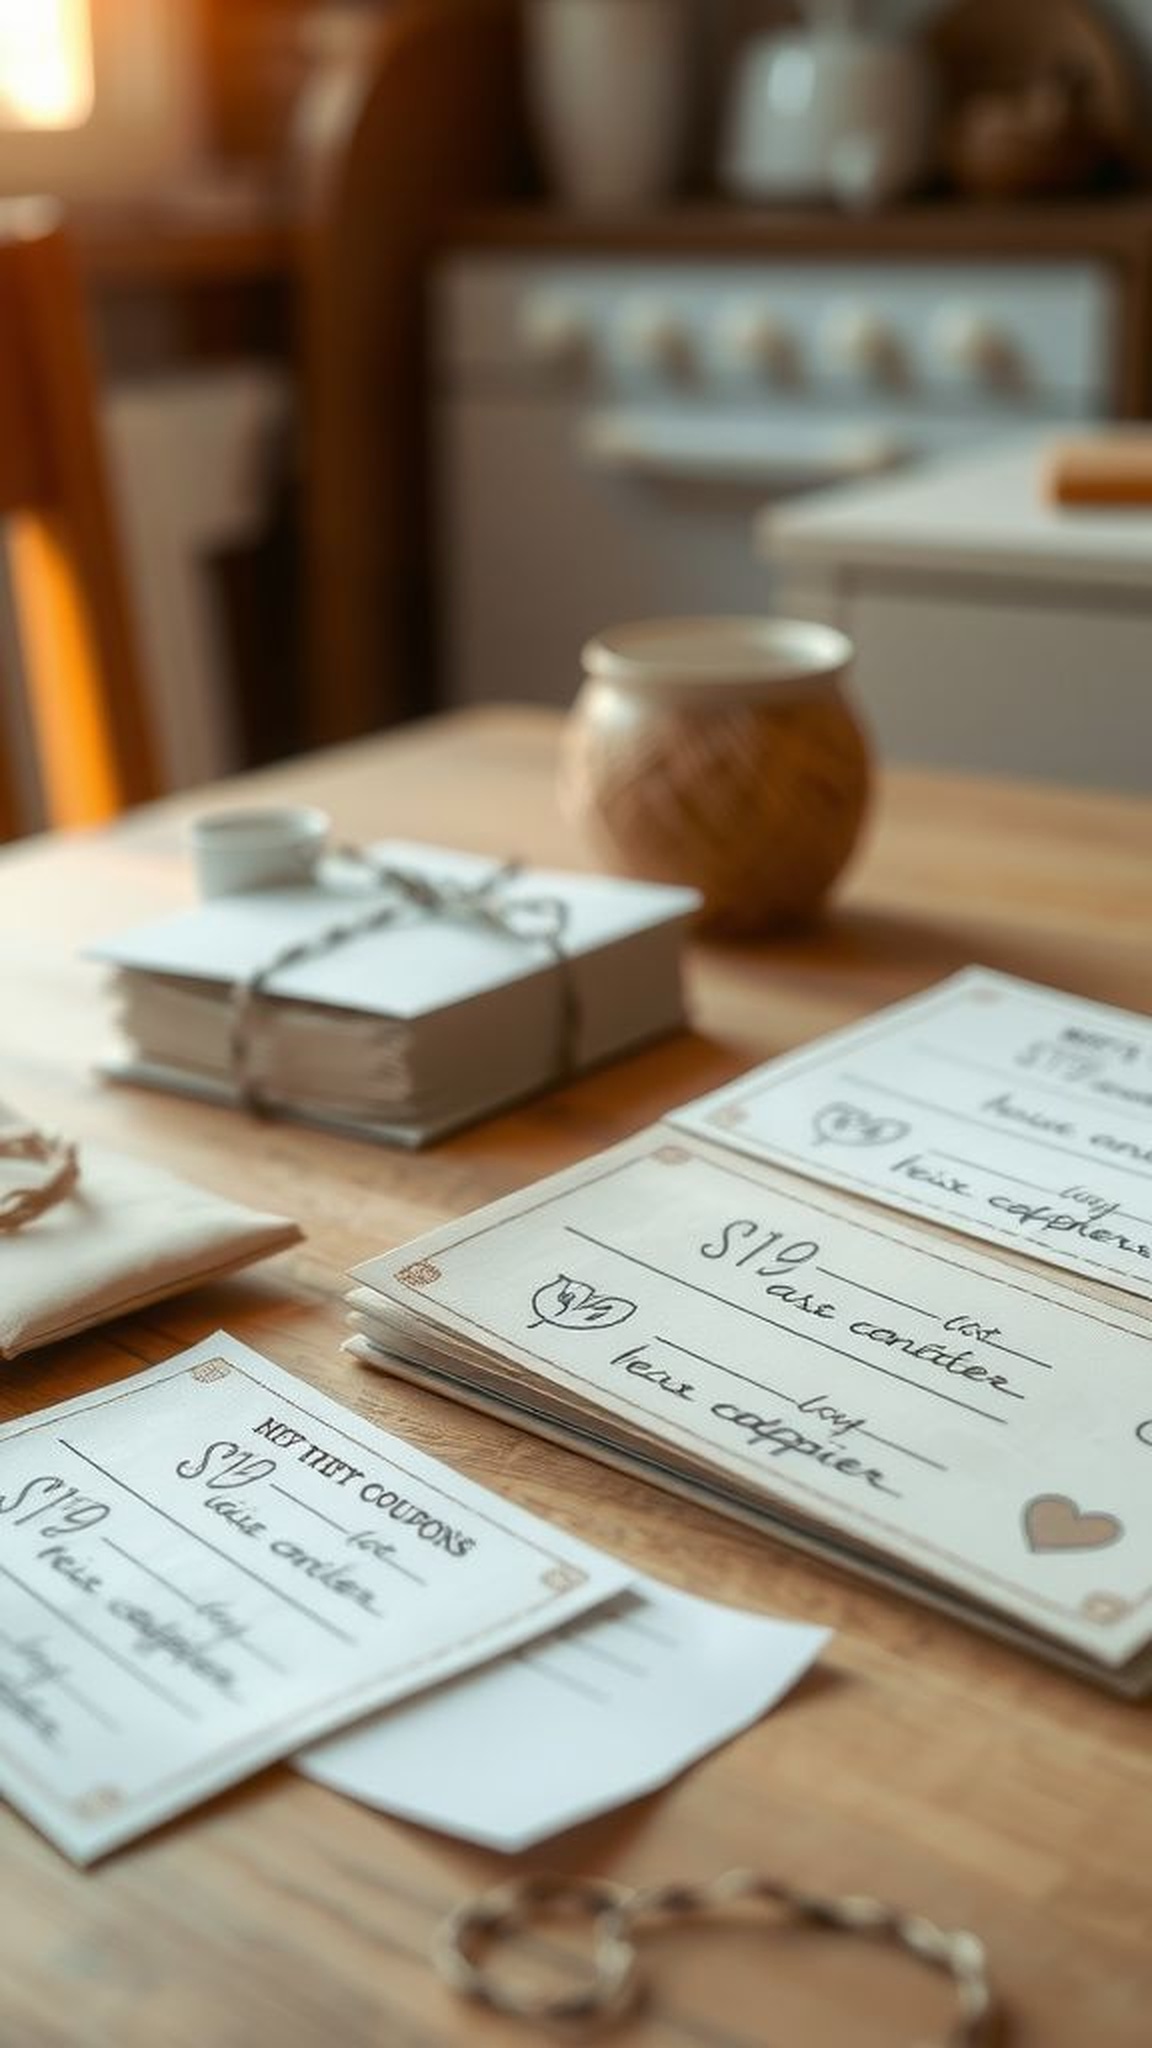
A small stapled book of handwritten coupons felt like a string of promises written in pen, each page a small excuse to pause for a shared cup or a quiet errand taken on someone else’s behalf. The paper bore a few ink smudges and fold creases from being opened and reclosed, and the handwriting varied between careful and rushed, which made it feel genuine.
I watched how a single coupon handed over at breakfast could brighten a day; the gestures were small, easy to redeem, and stacked into a thoughtful offering that fit in a pocket.
Steps
- Cut cardstock into matching coupon-sized rectangles and write brief, clear offers on each one.
- Add small decorative touches like hand-drawn icons or colored borders.
- Stack the coupons and bind them with a staple, ribbon, or small string.
- Present the booklet with a short personal note or envelope.
