
As an Amazon Associate I earn from qualifying purchases.
Relaxing craft projects bring calm and gentle focus through small tactile activities that soothe the mind. Relaxing craft projects like watercolor journaling or a simple knitting piece and a clay pinch pot or a pressed flower bookmark fit into slow evenings where relaxing craft projects become quiet rituals. A relaxing craft project or a string of relaxing crafts can shift mood with soft textures and rhythmic motion, making relaxing craft projects an everyday creative rest.
Loose watercolor journaling for slow evenings
⏱️ 30-45 min · 🟢 Beginner
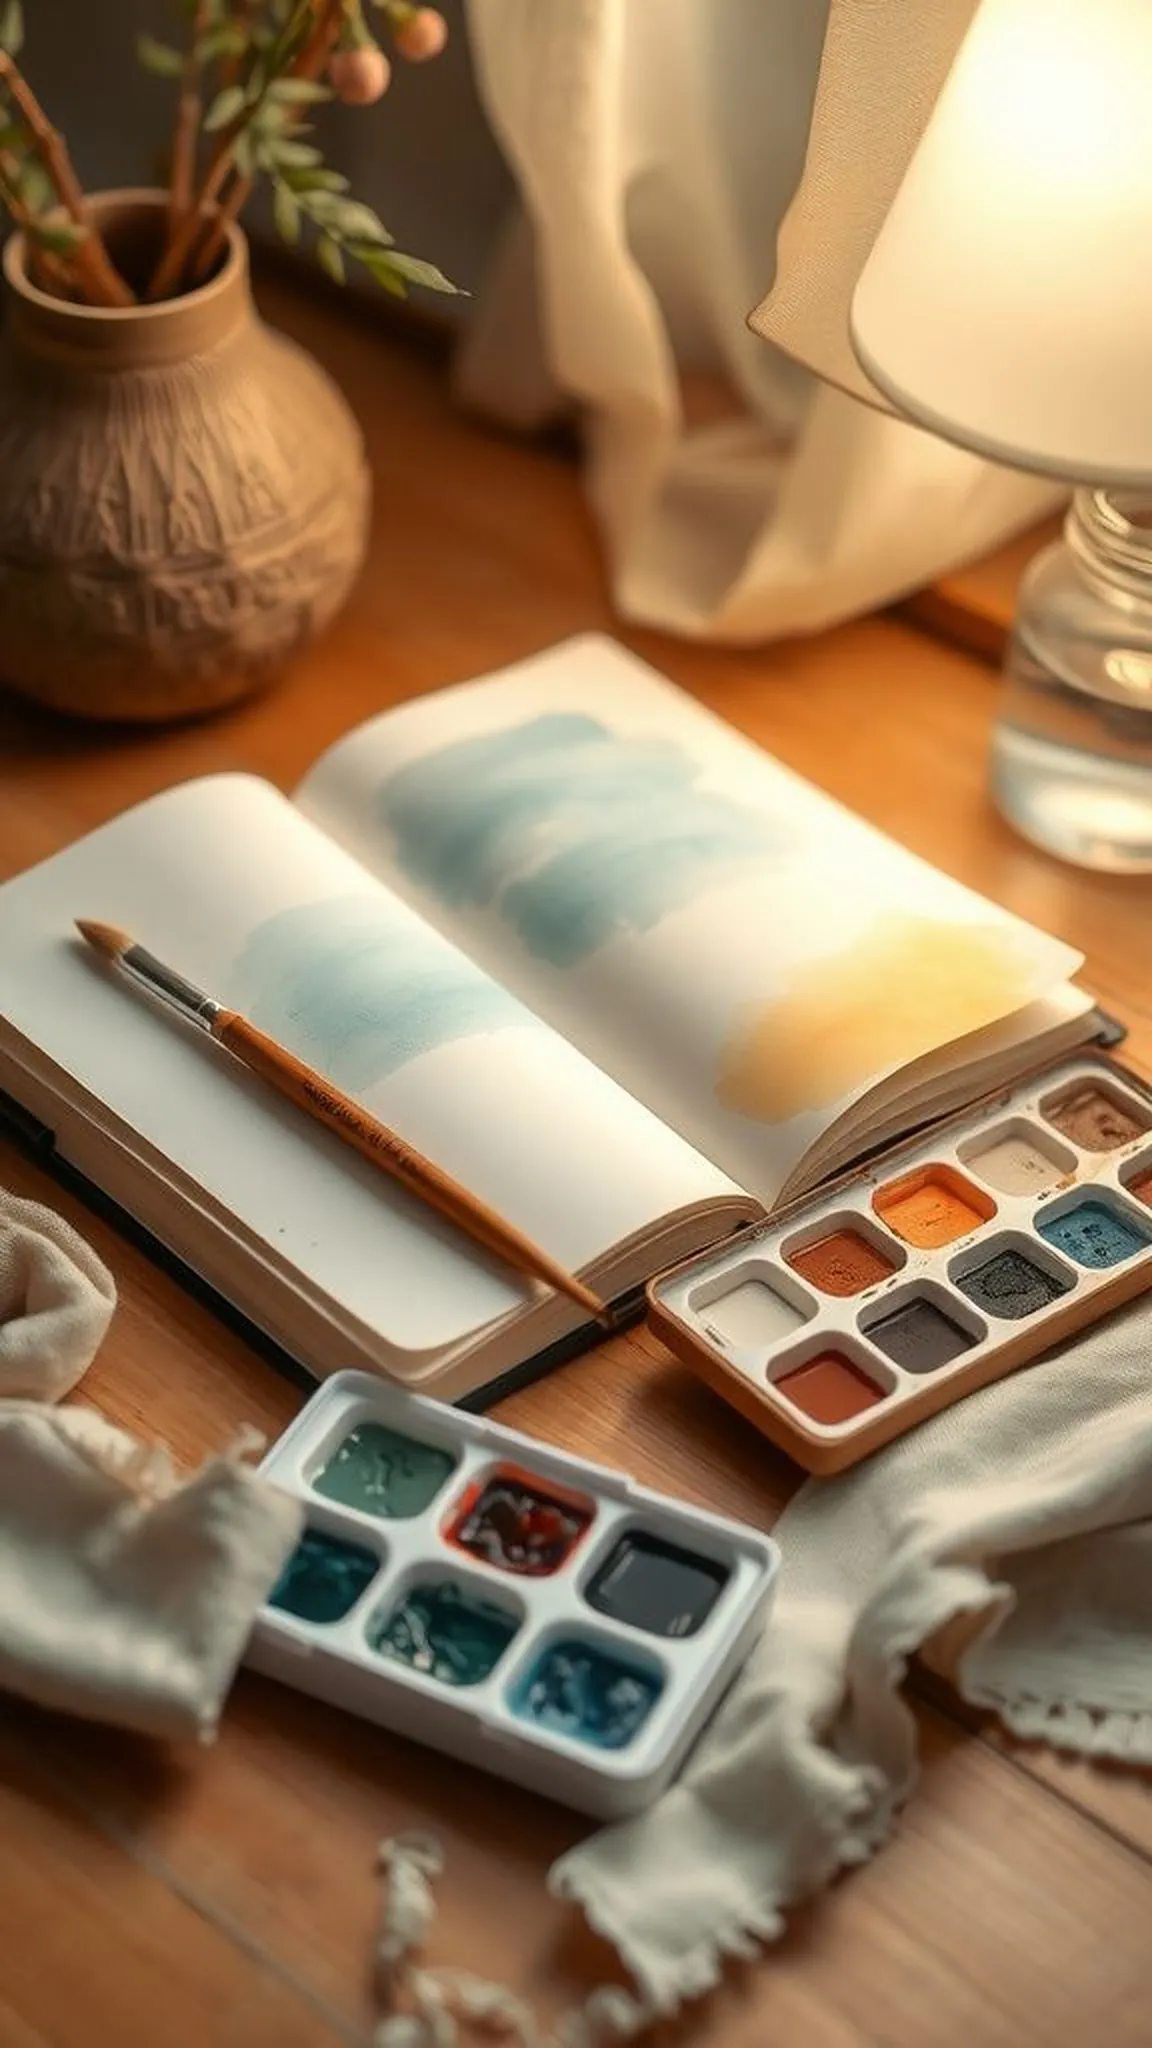
There is something soothing about a page of soft color floating on slightly textured paper. I leaned into muted blues and warm ochres while the paper drank the pigment, watching blooms spread and edges blur. The brush felt light in the hand and a warm cup nearby made the scene feel domestic and calm.
When a page was finished there was a satisfying quiet, like the kind of breath that follows a small, unrushed achievement.
📋 How to Make This ▶
- Gather watercolor paper, a round wash brush, a small pan set or tubes, a mixing palette, and a jar of clean water.
- Wet the paper lightly in areas meant for soft washes and pick two or three harmonious colors for a calm palette.
- Lay down broad, gentle washes across the page and lift color with a clean brush to create soft highlights.
- Let layers dry between applications and add a few delicate marks or ink accents if desired.
⚠️ Avoid: A frequent beginner mistake is adding too many dark marks before washes dry, which can muddy the page. Waiting brings clearer layers and calmer results.
🔄 Try Also: Try a monochrome page in one pigment for a meditative study, or swap paper texture to see how granulation changes the mood.
🛒 Products & Materials ▶
📌 “Soothing watercolor pages that feel like a breath.”
• • •
Simple knitting cowl for quiet hands
⏱️ 2-3 hours · 🟢 Beginner
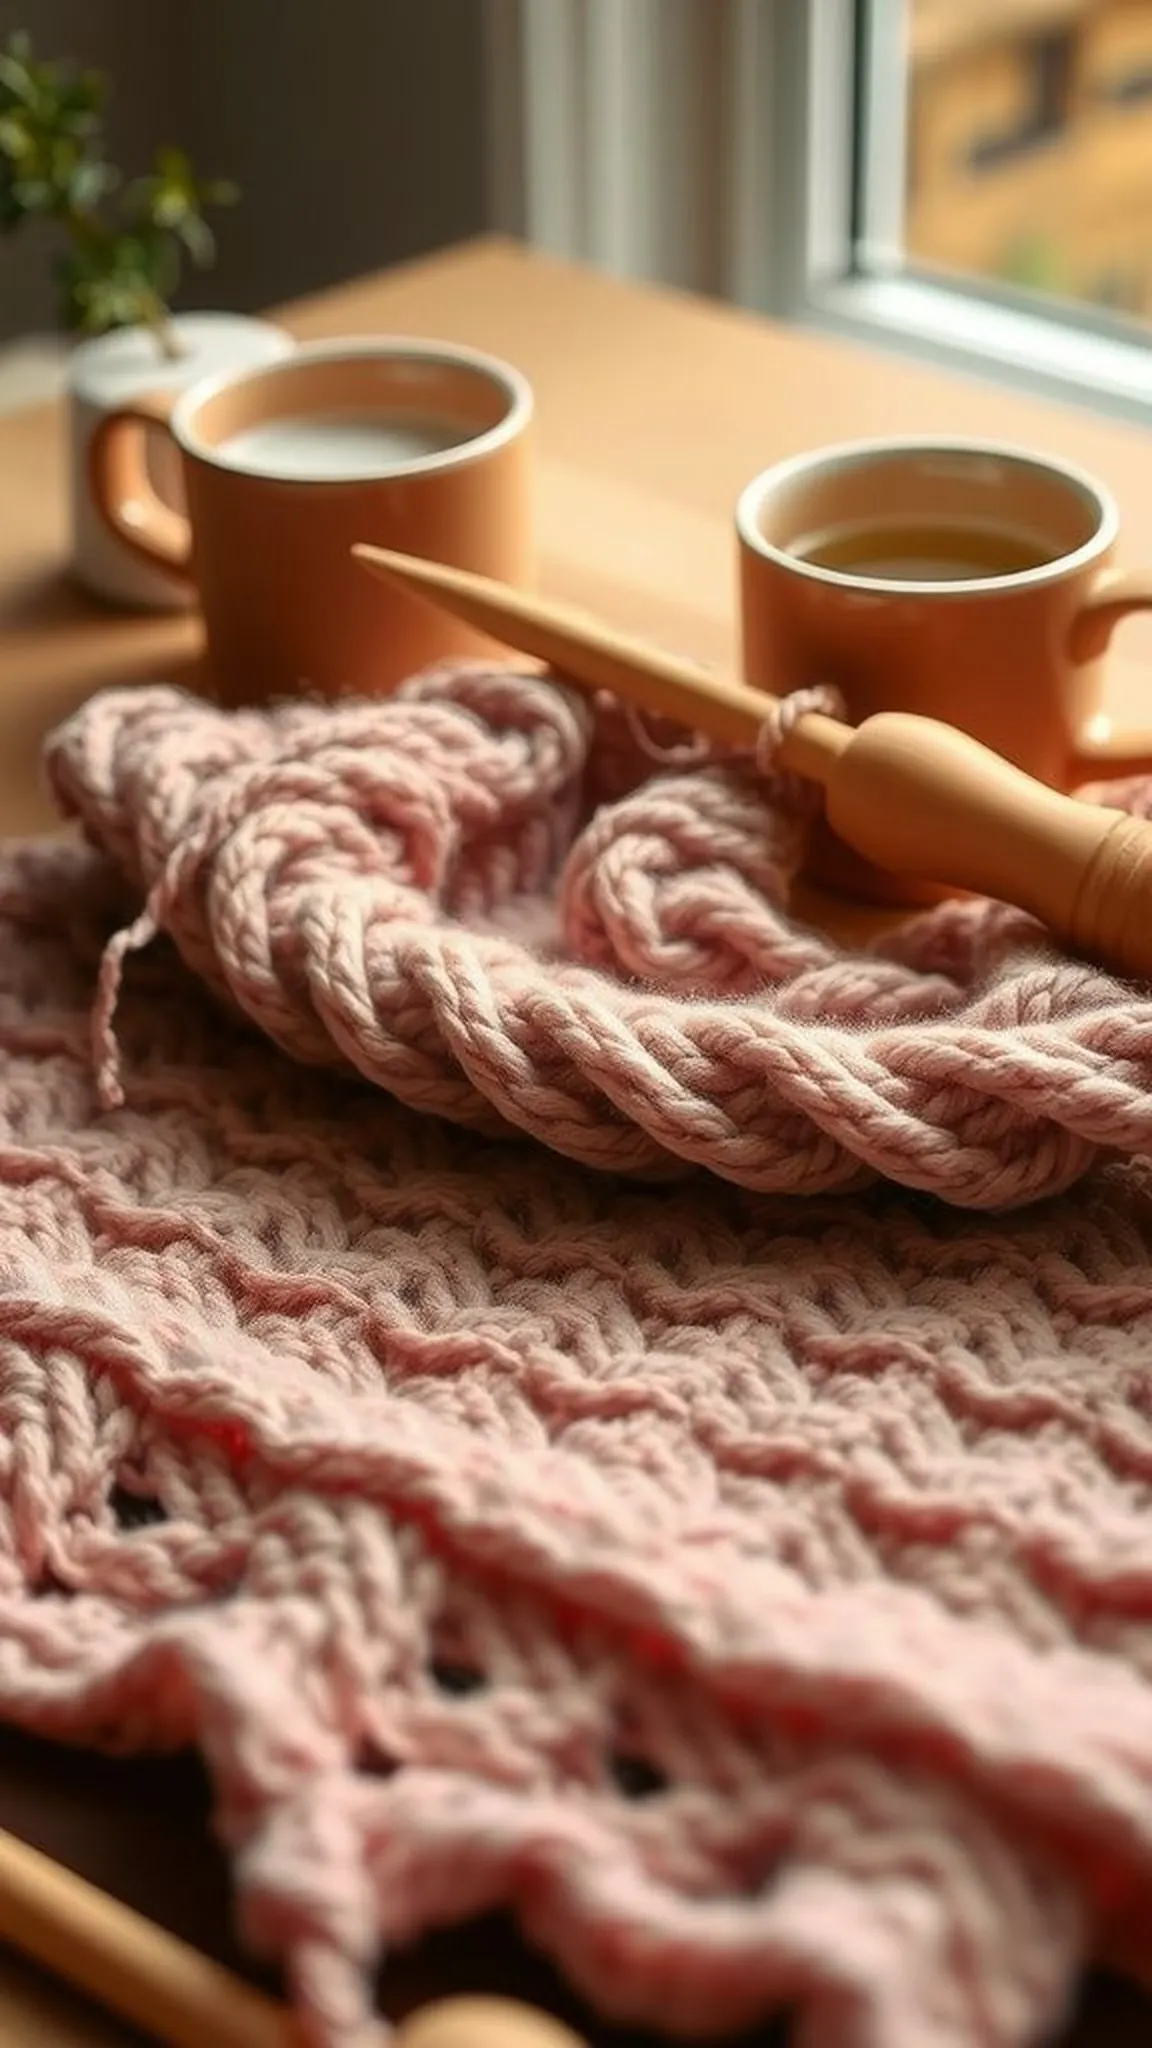
The rhythm of a single stitch repeated folds time into a comfortable rhythm. Knitting a narrow cowl felt like moving through a calm loop where the yarn slipped softly and each row grew into a gentle tube. Fingers remembered small motions while the mind wandered to everyday pleasantness, and the wool gathered warmth that transferred to the lap.
The final fabric had a soft drape and a tactile reassurance that invited wearing on chilly evenings.
📋 How to Make This ▶
- Select a soft worsted weight yarn and a circular needle suited to the yarn weight, plus a stitch marker.
- Cast on enough stitches for a comfortable circumference using a stretchy cast on and join to knit in the round.
- Work in a simple rib or stockinette pattern until the piece reaches desired height, checking drape occasionally.
- Bind off loosely and weave in the ends with a blunt tapestry needle for a tidy finish.
⚠️ Avoid: A frequent beginner mistake is tension that is too tight, which can make the fabric stiff; relaxing the grip produces a softer result.
🔄 Try Also: Swap ribbing for a seed stitch for texture, choose a chunky yarn for a faster project, or make a longer length for a wrap style.
🛒 Products & Materials ▶
📌 “A soft, meditative knit cowl for cozy evenings.”
• • •
Hand-formed clay pinch pots with texture
⏱️ 1-2 hours plus drying · 🟠 Intermediate
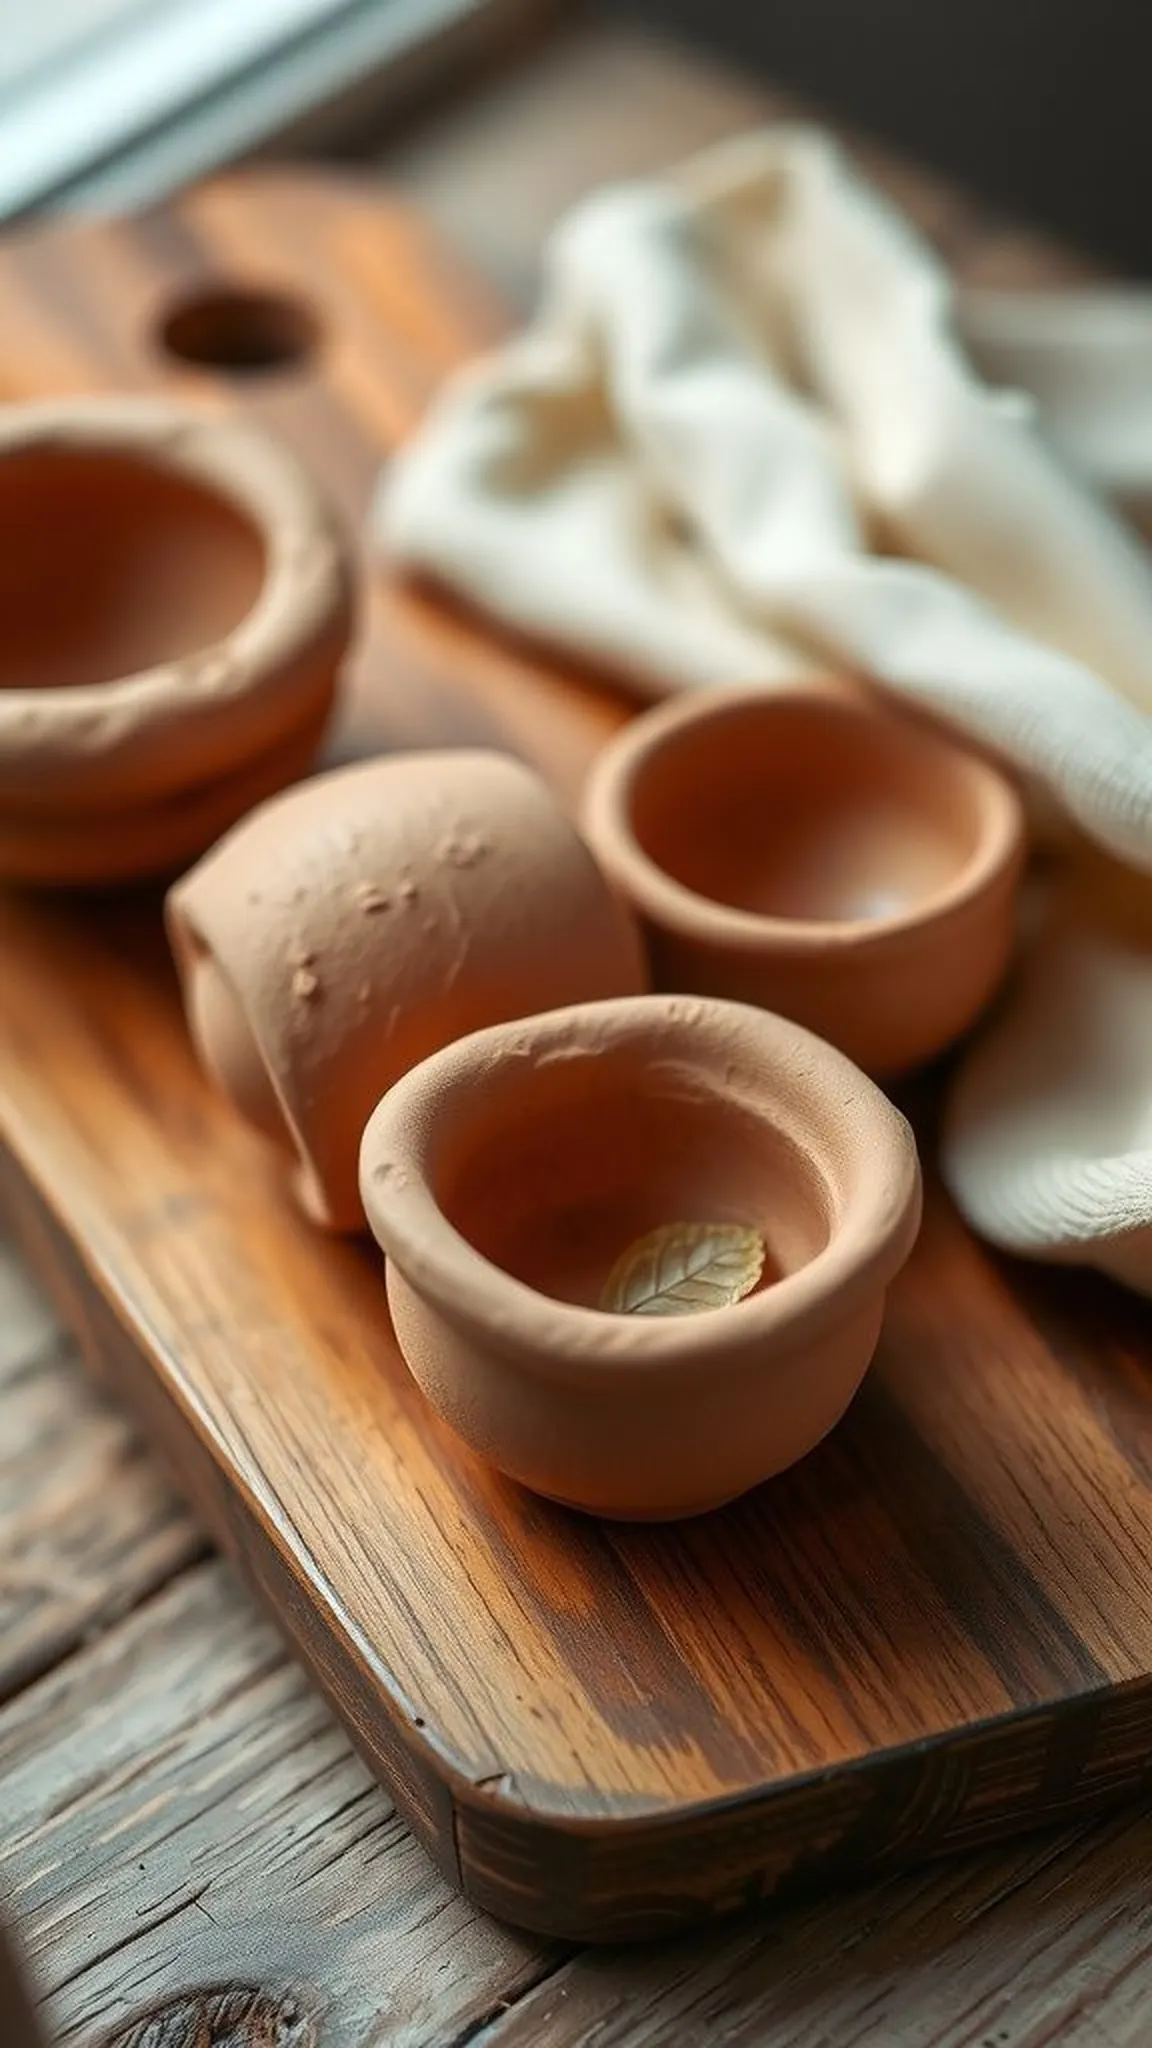
Working with clay felt grounding as fingers smoothed and coaxed walls into gentle curves. The small pinch pots developed unique irregularities that made each piece feel personal and alive. Textures pressed with everyday tools left soft shadowed marks and the rims varied in thickness in a pleasing, handmade way.
While waiting for pieces to firm, the studio smelled faintly of damp earth and the hands retained a cool, clay residue that felt oddly comforting.
📋 How to Make This ▶
- Prepare a lump of air-dry or low-fire clay and a small bowl of water for smoothing.
- Press a thumb into the center to form a hollow and gently pinch around to raise walls evenly, rotating as work continues.
- Refine the rim and create texture with a rib or household tools, smoothing with a damp finger for cohesion.
- Allow pieces to firm before final drying or firing, then sand lightly and finish with a sealer or glaze if appropriate.
⚠️ Avoid: A frequent beginner mistake is letting walls become too thin while pinching, which can lead to cracking when drying; gradual shaping avoids stress.
🔄 Try Also: Try stamping with leaves for natural impressions, make tiny spoon rests, or create a set in graduated sizes for a small grouping.
🛒 Products & Materials ▶
📌 “Small handmade pinch pots with earthy texture and personality.”
• • •
Save time and printer ink with 50+ printable templates and step-by-step instructions in one ad-free guide.

Just $19.99 — lifetime access
Pressed flower bookmarks that feel like pockets
⏱️ 45 min plus drying · 🟢 Beginner
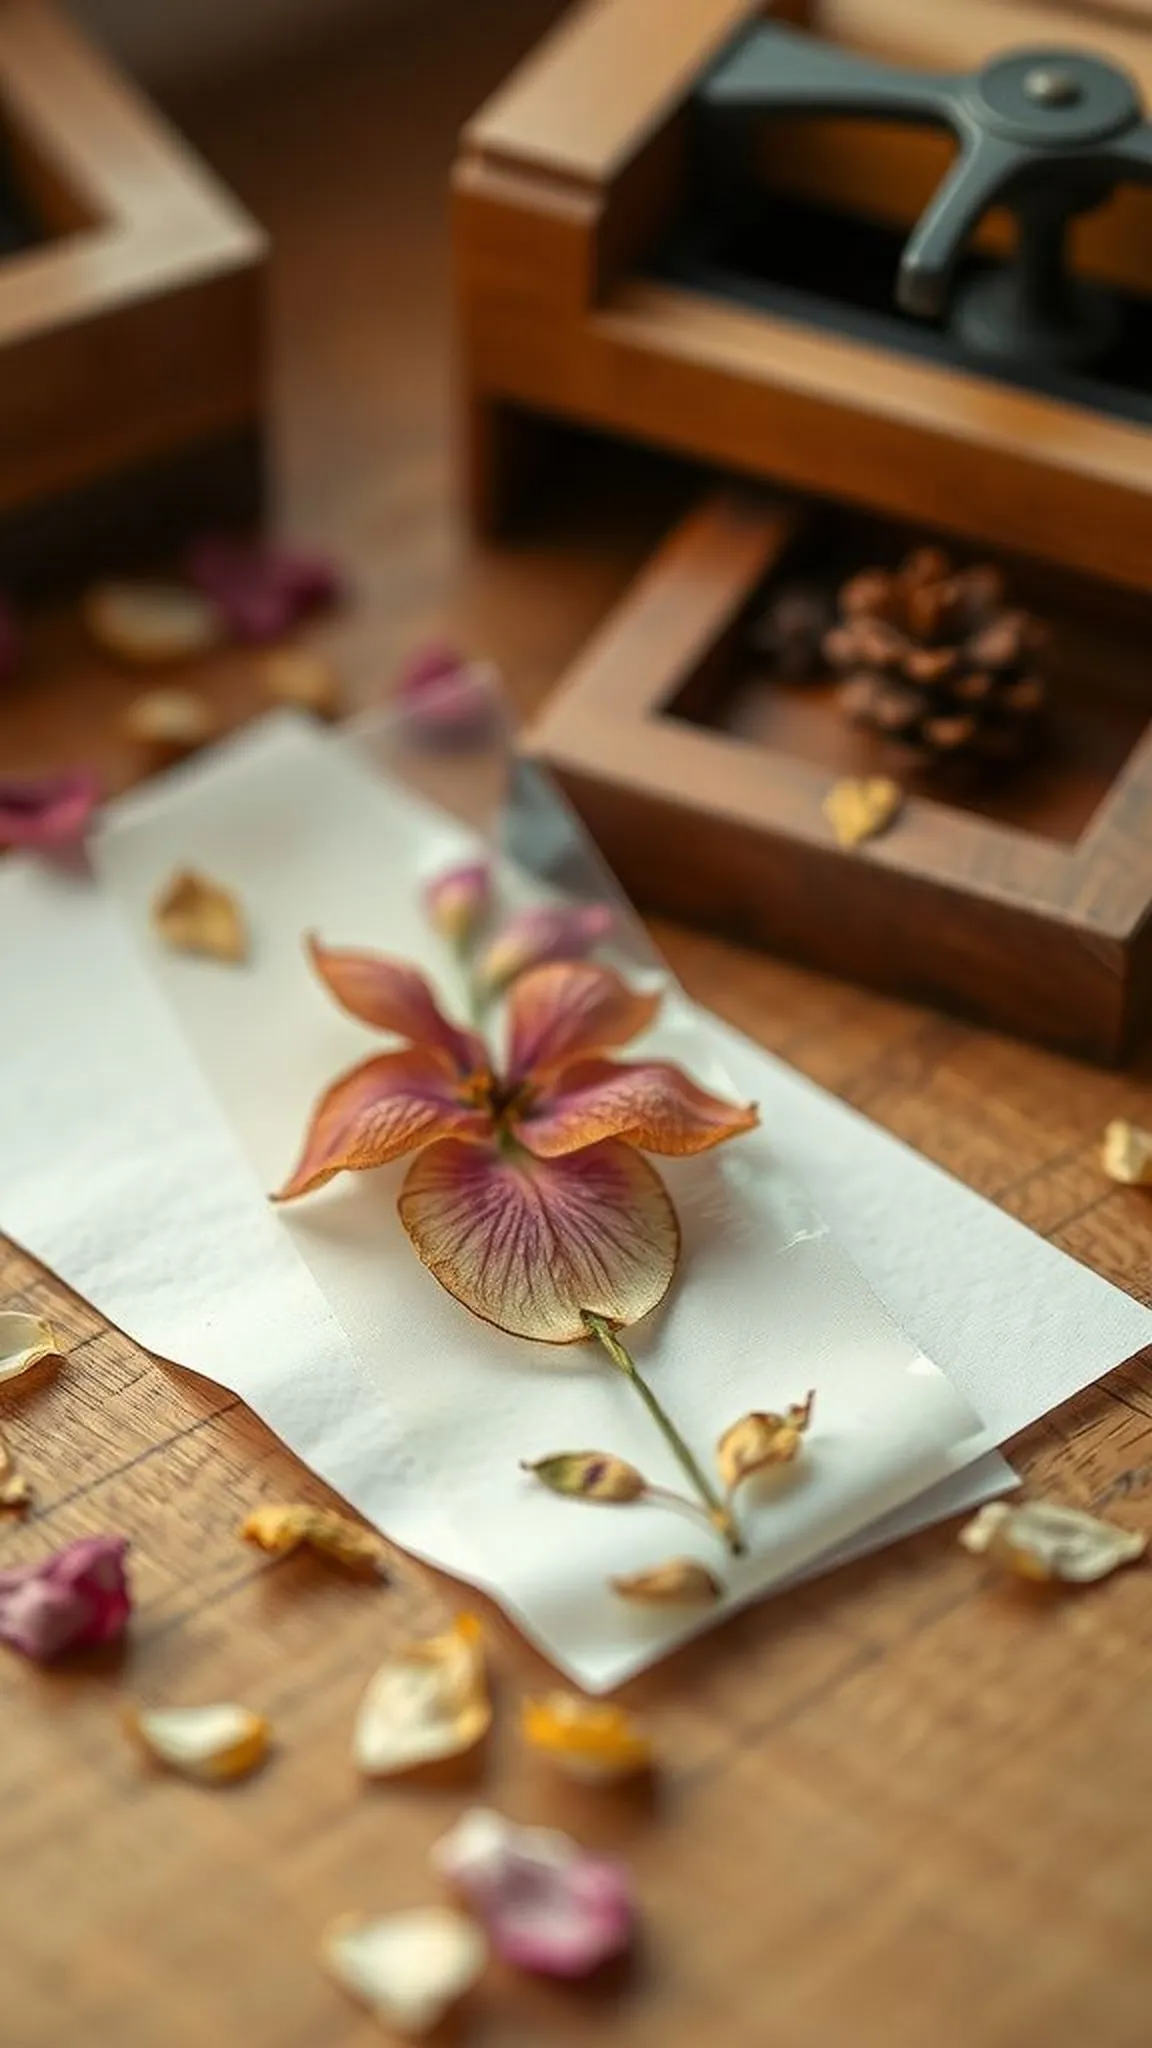
Pressed blooms trapped between clear layers felt like carrying a tiny garden in the pages of a book. The petals retained faint translucence and the paper edge offered a crisp counterpoint to delicate botanicals. Handling the finished bookmark brought a soft scent and a memory of the path where the flowers were gathered.
The beauty lay in imperfection, a slightly uneven leaf edge or a petal overlap that read as a paper-age vignette rather than a polished object.
📋 How to Make This ▶
- Collect fresh flat flowers and press them between absorbent paper under weight for a few days until fully dry.
- Prepare a strip of sturdy cardstock or thin wooden bookmark base and arrange pressed blooms in a pleasing composition.
- Seal the arrangement between two sheets of clear adhesive film or laminate and trim edges neatly.
- Punch a hole and add a ribbon if desired after edges are finished.
⚠️ Avoid: A frequent beginner mistake is sealing flowers that still carry moisture, which can cause discoloration; fully dry florals preserve color best.
🔄 Try Also: Create layered sets with tiny sprigs and fine grasses, or switch the base to lightweight wood for a rustic feel.
🛒 Products & Materials ▶
Items Used
- pressing paper stack
- laminating film or clear adhesive sheets
- sturdy cardstock bookmarks
📌 “Carry a tiny pressed garden inside every book.”
• • •
Mandala rock painting for focused calm
⏱️ 30-60 min · 🟢 Beginner
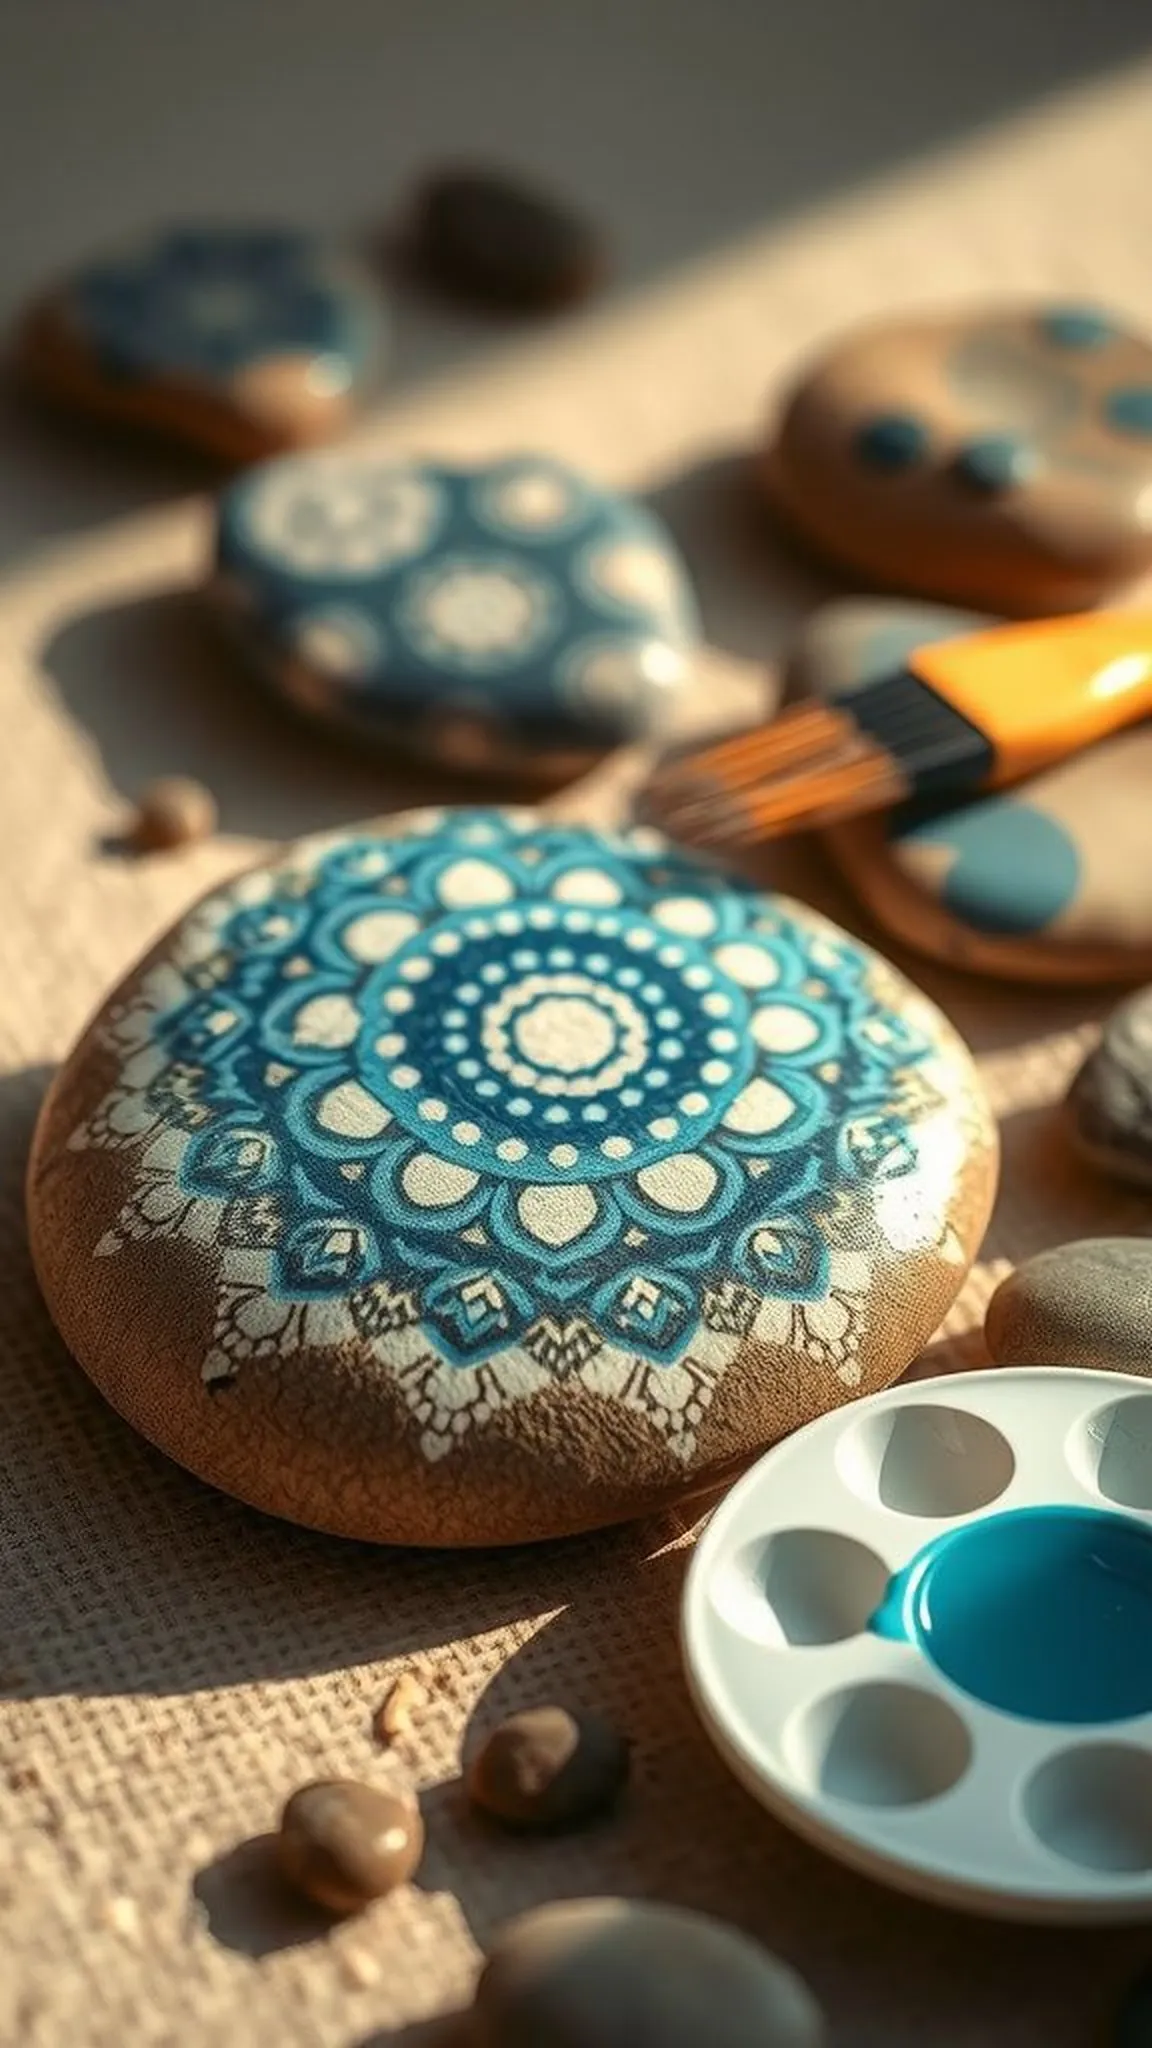
A smooth river stone became a tiny meditation center under a fine brush. Dot patterns and concentric circles built slowly outward and each repeat offered a soft satisfaction. The paint sat matte and opaque on the stone, and a subtle contrast between cool blues and warm creams made the design quietly vivid.
Holding the finished stone felt grounding, a little weight that anchored a moment of ease and provided a tactile reminder of the slow making.
📋 How to Make This ▶
- Select clean, flat river stones and prepare a palette of acrylic paints with a few coordinated colors.
- Apply a base coat and let it dry before marking a center point for the mandala layout.
- Work outward with dotting tools or a fine brush, repeating simple patterns and alternating colors for rhythm.
- Seal the finished stone with a matte varnish to protect surface work and reduce shine.
⚠️ Avoid: A frequent beginner mistake is rushing dot spacing, which can make patterns look crowded; patience yields even repeats and calm symmetry.
🔄 Try Also: Try a monochrome stone using shades of one color, or swap dots for tiny lines for a lace-like effect.
🛒 Products & Materials ▶
Items Used
- smooth river stones
- acrylic paint set
- dotting tools
- matte varnish spray
📌 “Tiny mandala stones that calm the hand and mind.”
• • •
Simple embroidery hoop with one motif
⏱️ 1-2 hours · 🟠 Intermediate
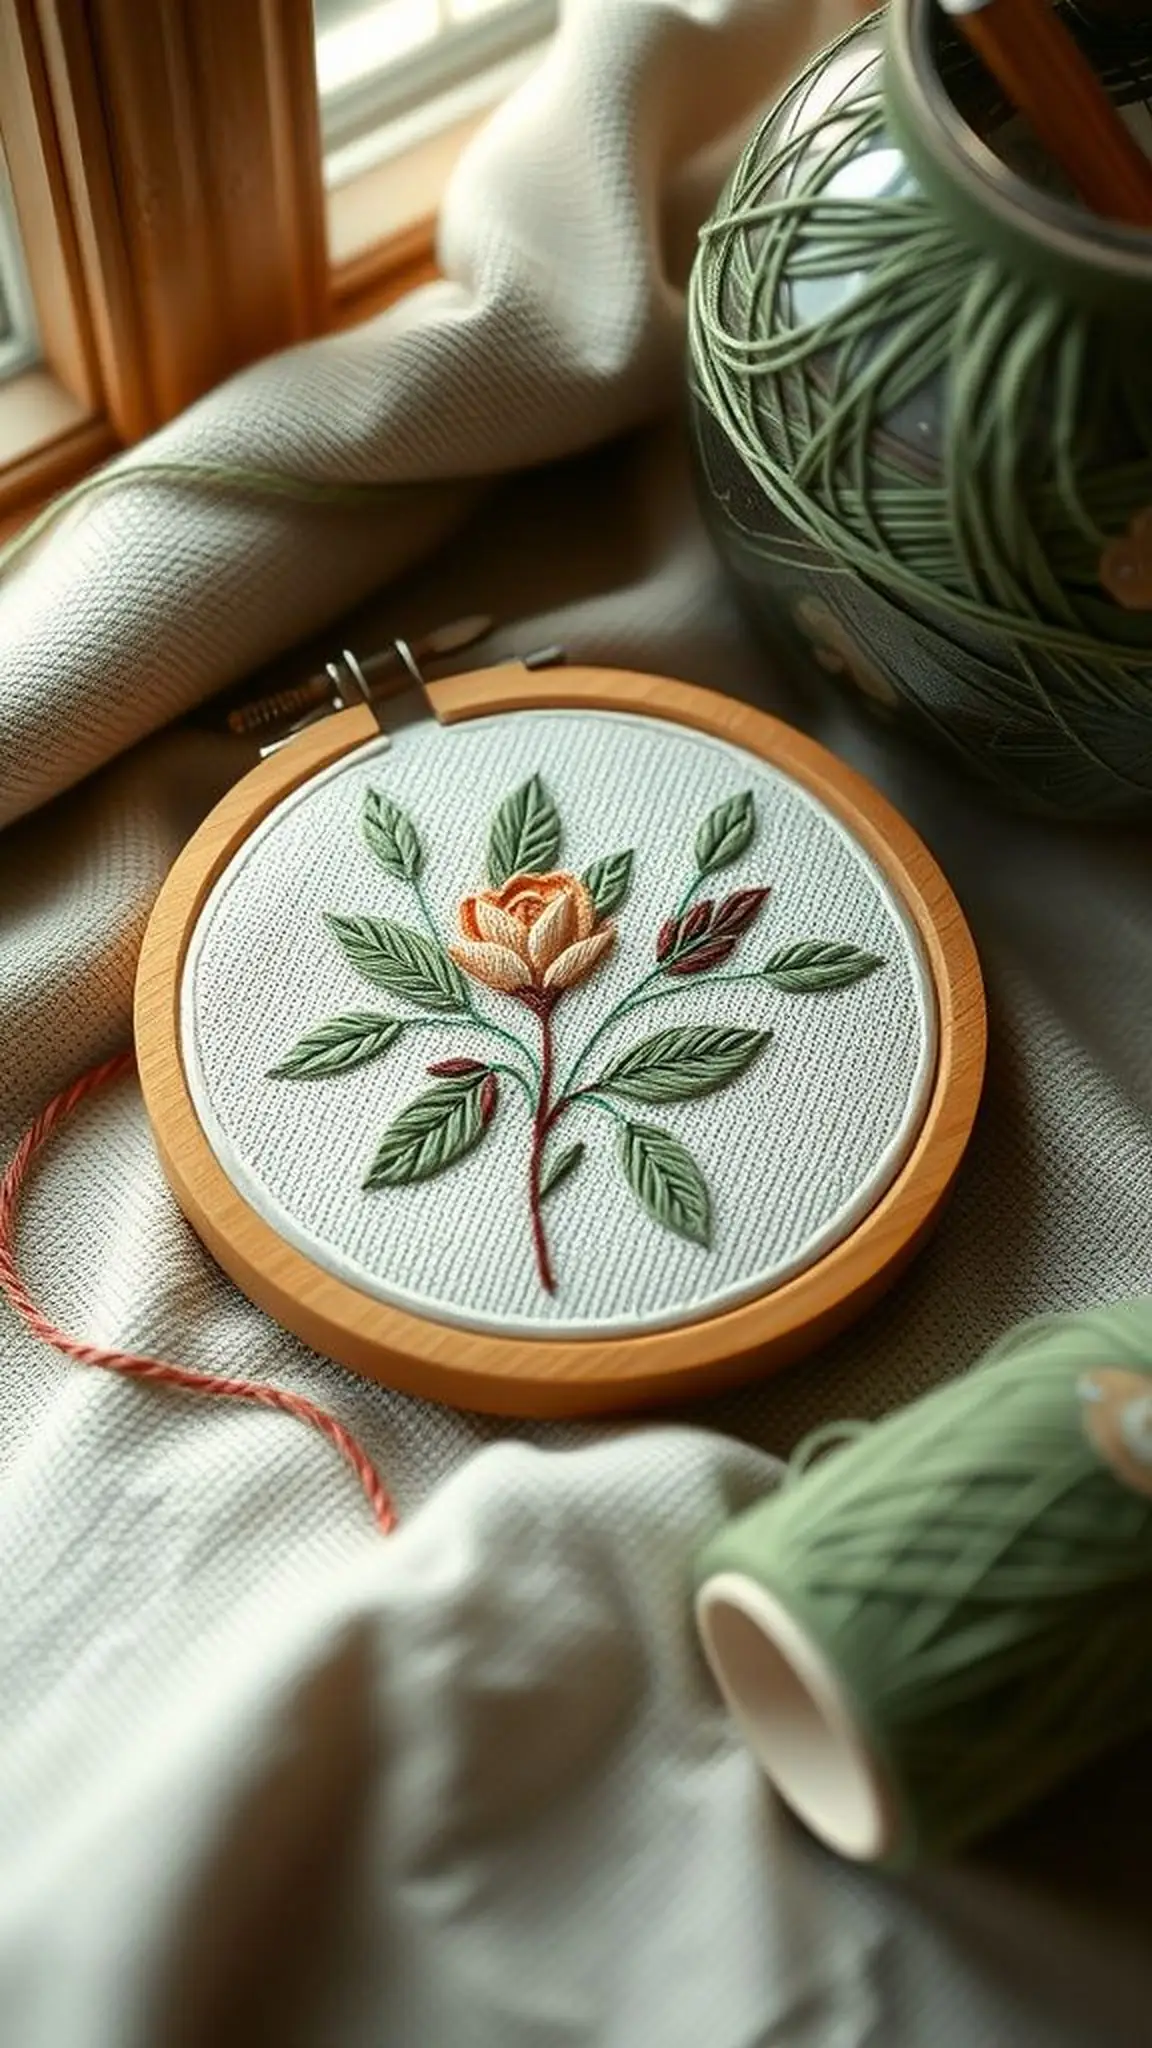
A small hoop with a single stitched motif felt like a tiny window into slow handiwork. Threads glowed against plain fabric and the gentle click of the needle passing through created a satisfying cadence. The motif was intentionally modest so that each stitch counted, and the finished surface showed a stitched texture that invited touch.
Hanging the hoop by a thin cord brought a quiet flourish to a corner wall where light caught the embroidery and made threads glimmer softly.
📋 How to Make This ▶
- Choose a small embroidery hoop, plain cotton fabric, an easy motif pattern, embroidery needles, and floss in two or three colors.
- Stretch the fabric in the hoop and secure it taut before tracing or positioning the motif.
- Stitch the motif with basic stitches like backstitch, satin stitch, and French knots to add texture.
- Trim excess fabric at the back and finish the hoop edge for a neat hanging display.
⚠️ Avoid: A frequent beginner mistake is pulling stitches too tight, which puckers the fabric; relaxed tension keeps the motif flat and neat.
🔄 Try Also: Try a tiny botanical motif in muted tones for subtlety, or larger stitches with thicker thread for a bolder look.
🛒 Products & Materials ▶
📌 “A tiny embroidered hoop that calms with each stitch.”
• • •
Paper quilling medallion for a calm focal point
⏱️ 1-1.5 hours · 🟠 Intermediate
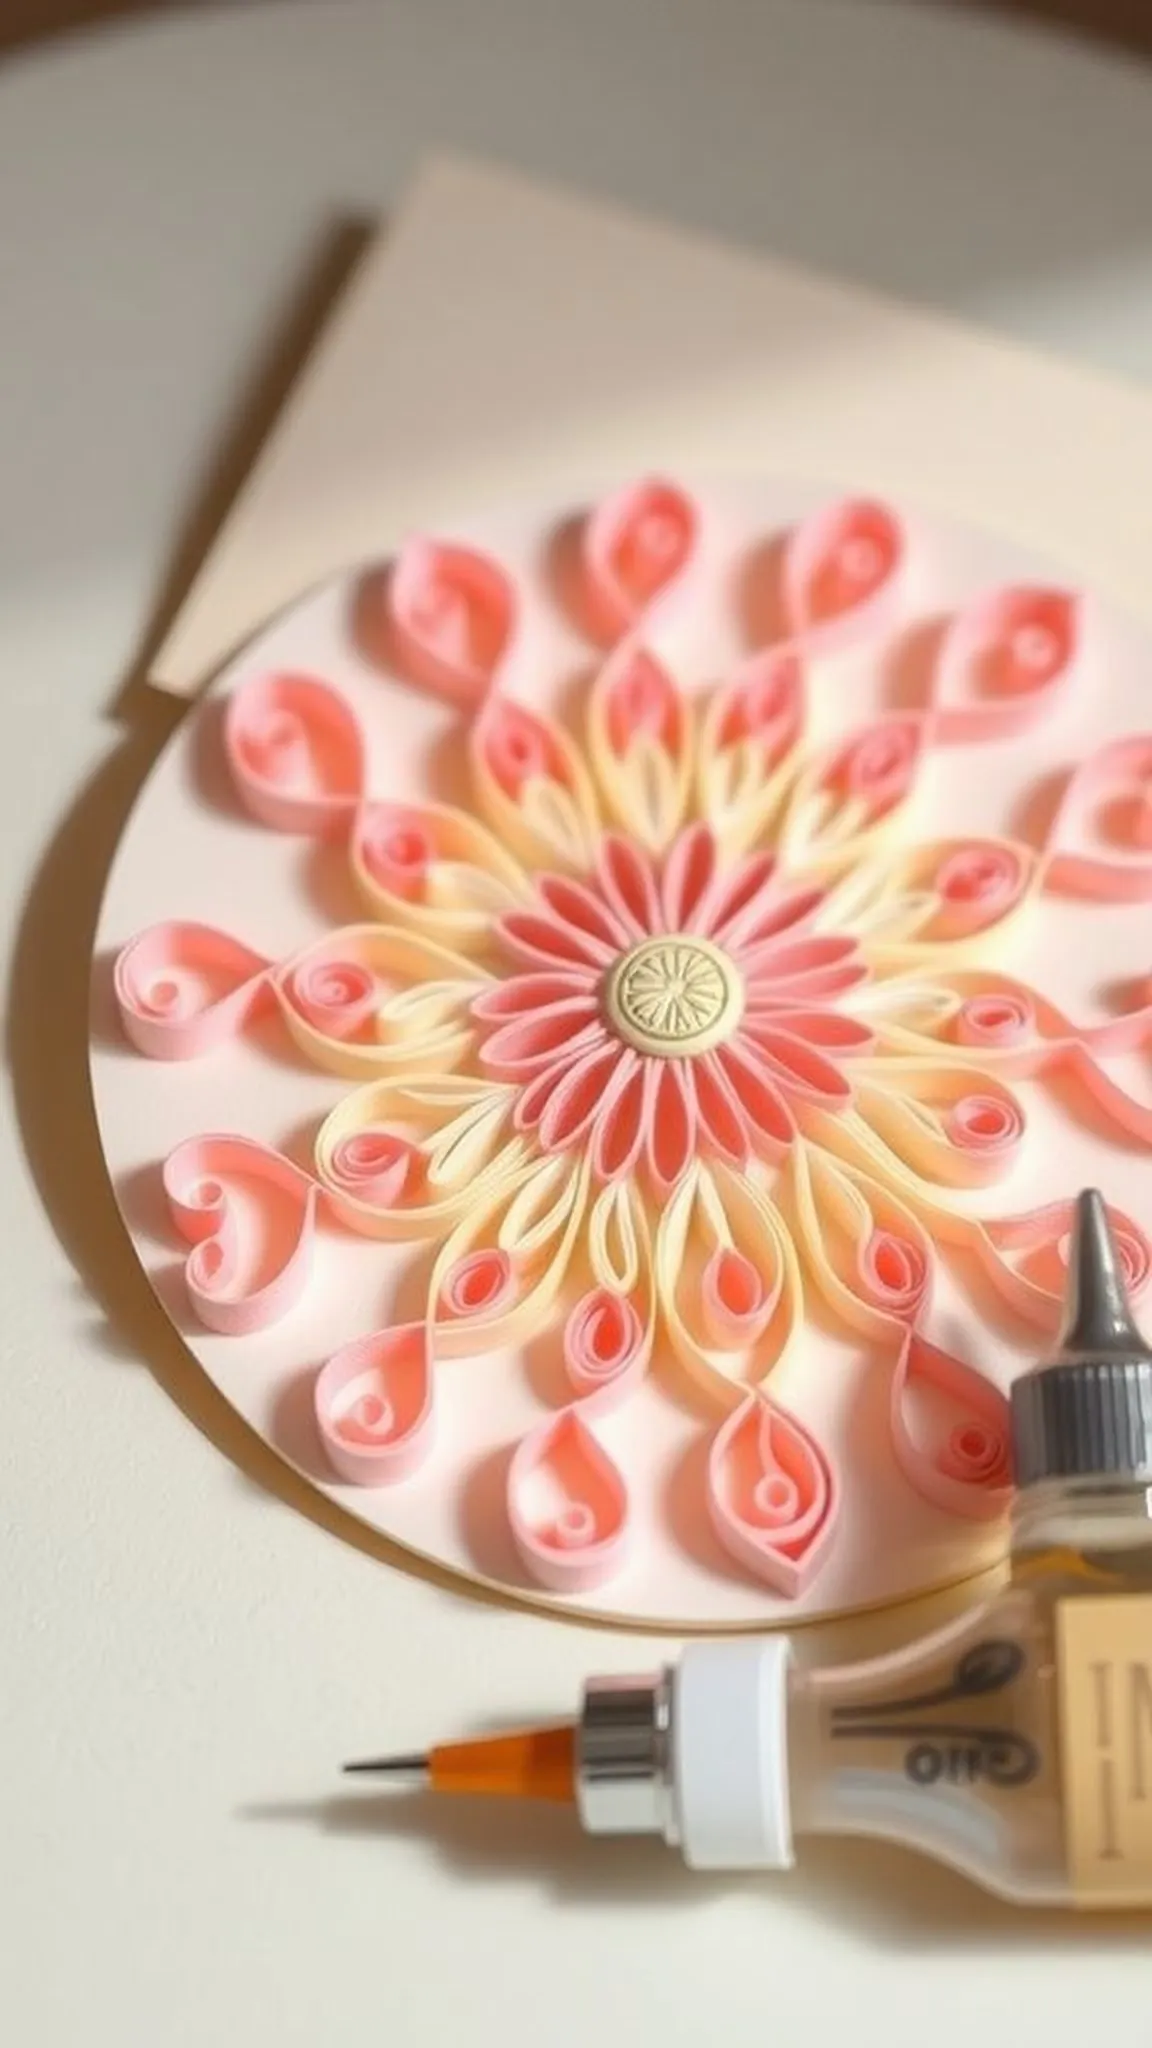
Thin strips of paper curled and nested into a medallion had a lacy, meticulous quality that drew attention without fuss. The motion of winding lent a quiet repetitiveness that felt almost like counting, and the finished medallion cast delicate shadows on the backing paper. Color choices mattered in subtle ways; a soft ombré read like sunrise while high contrast made the piece more graphic.
Holding the finished item close revealed tiny edges and layered depth that rewarded that focused time.
📋 How to Make This ▶
- Select quilling paper in a few coordinated colors, a slotted tool or thin skewer, glue, and a backing card.
- Wind strips into tight coils and allow them to loosen slightly for the desired shape, pinching and shaping coils as needed.
- Arrange coils into concentric patterns on the backing card and adhere carefully to secure the medallion.
- Let glue dry fully before framing or mounting so the relief remains crisp.
⚠️ Avoid: A frequent beginner mistake is over-applying adhesive which can warp thin coils; a small dot of glue usually holds well without mess.
🔄 Try Also: Make a set of matching medallions in a toned palette, or scale up coils for a freer, more organic look.
🛒 Products & Materials ▶
Items Used
- quilling paper strips
- slotted quilling tool
- clear craft glue
- tweezers for paper craft
📌 “Tiny paper coils form a tranquil, lacy medallion.”
• • •
Aromatherapy sachets for linen drawer calm
⏱️ 20-30 min · 🟢 Beginner
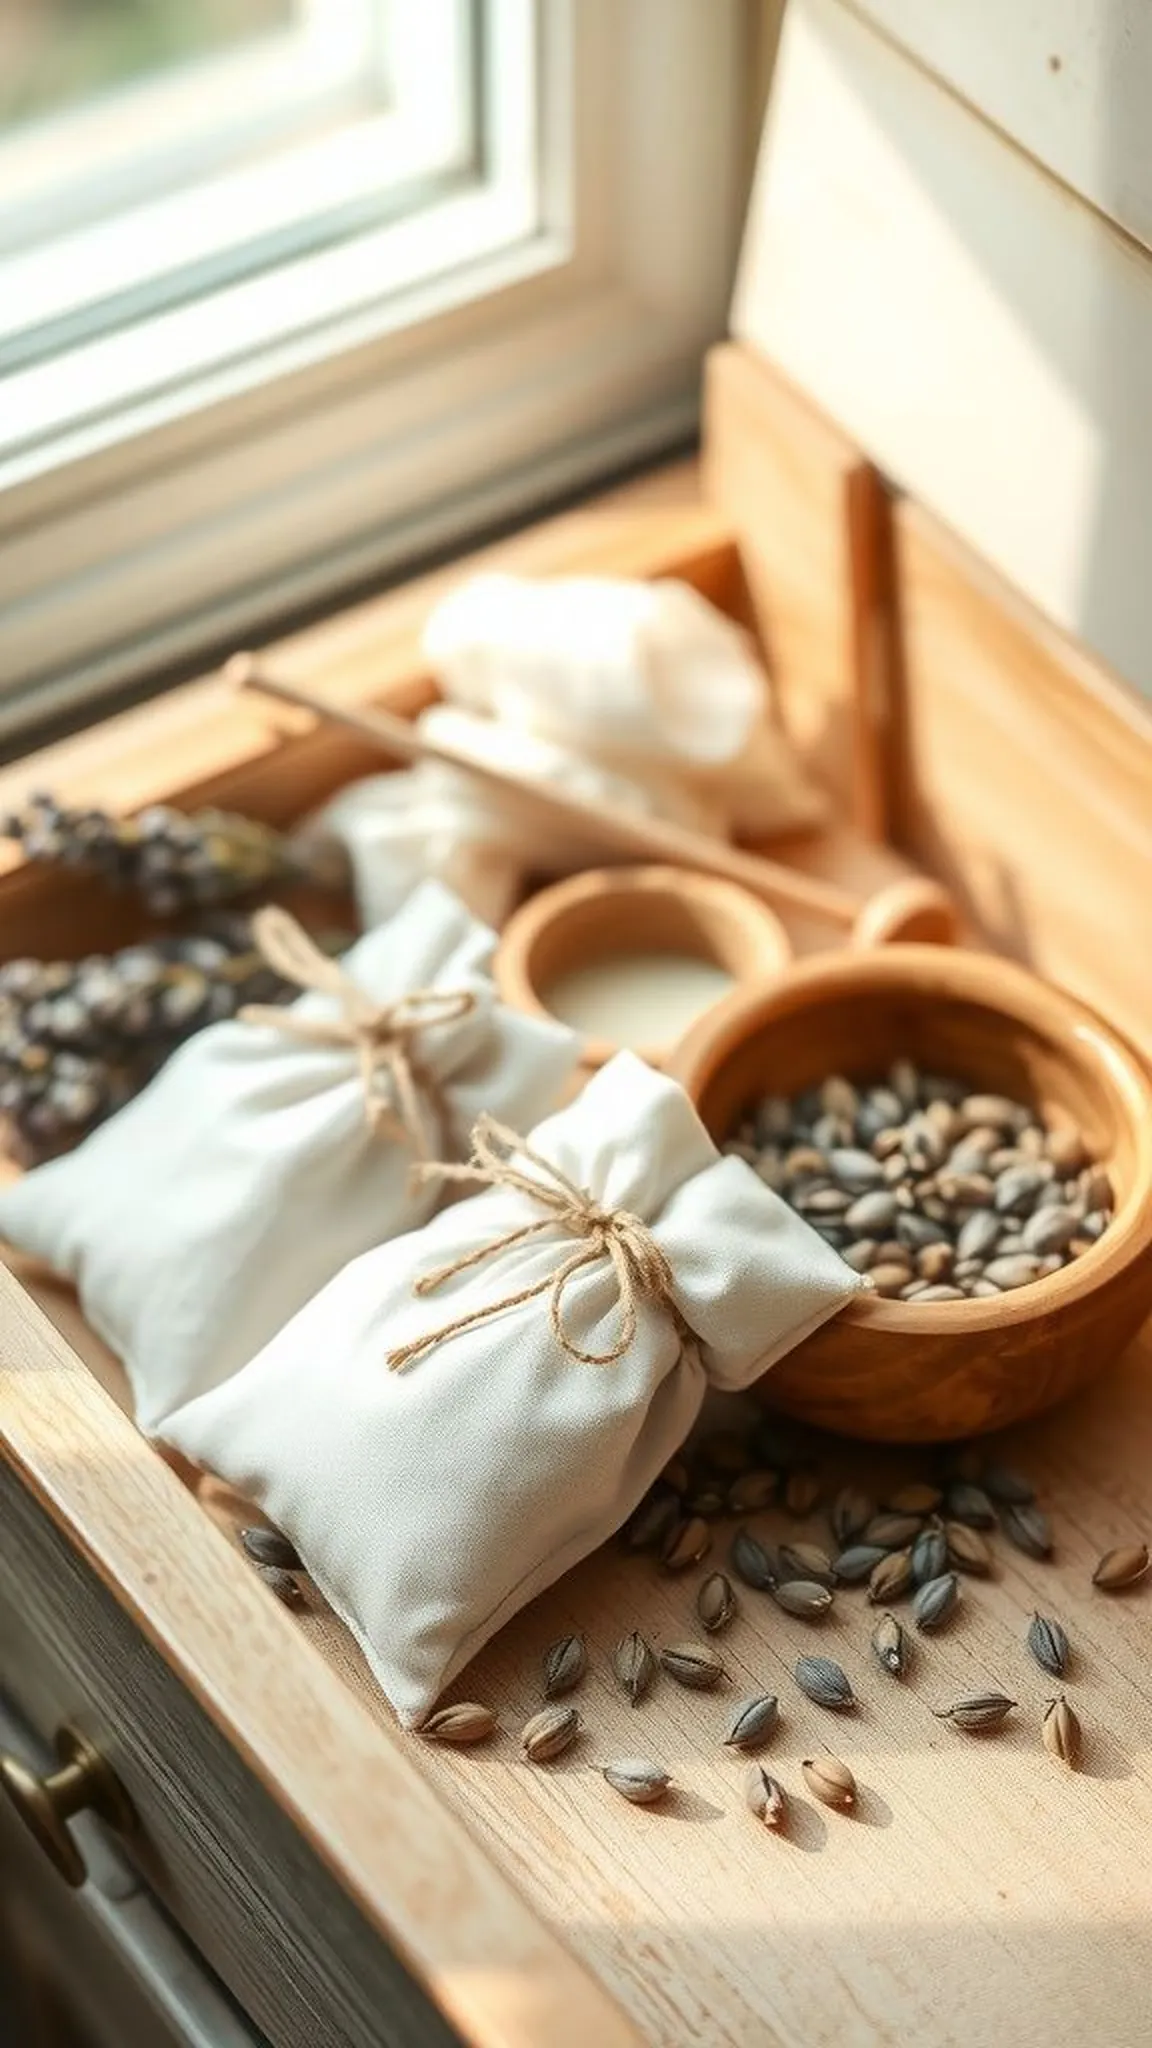
Tiny fabric pouches filled with fragrant herbs felt like miniature rituals tucked into drawers. The linen held scent in a mild way and a soft squeeze released whispers of lavender and cedar. The fabrics formed small rounded shapes that fit comfortably in the palm, and stitching around the edges produced an approachable, handmade look.
Opening a drawer became an invitation to slow down because the scent suggested rest and a small, domestic luxury.
📋 How to Make This ▶
- Cut small rectangles of lightweight fabric and fold them over to create a pouch, keeping a small seam allowance.
- Sew three sides by hand or machine, leaving an opening at the top for filling.
- Fill with dried lavender, dried herbs, or a scent blend and finish sewing the opening closed.
- Optionally add a stitched label or simple embroidery for a personal touch.
⚠️ Avoid: A frequent beginner mistake is overfilling sachets which can strain seams; a gently filled pouch keeps fabric relaxed and scent diffuses better.
🔄 Try Also: Try a linen sachet with dried rosemary for a herbaceous note, or add whole cloves for a wintery warmth.
🛒 Products & Materials ▶
📌 “Tiny scented pouches that bring calm to every drawer.”
• • •
Tassel wall hanging with soft color bands
⏱️ 1-2 hours · 🟠 Intermediate
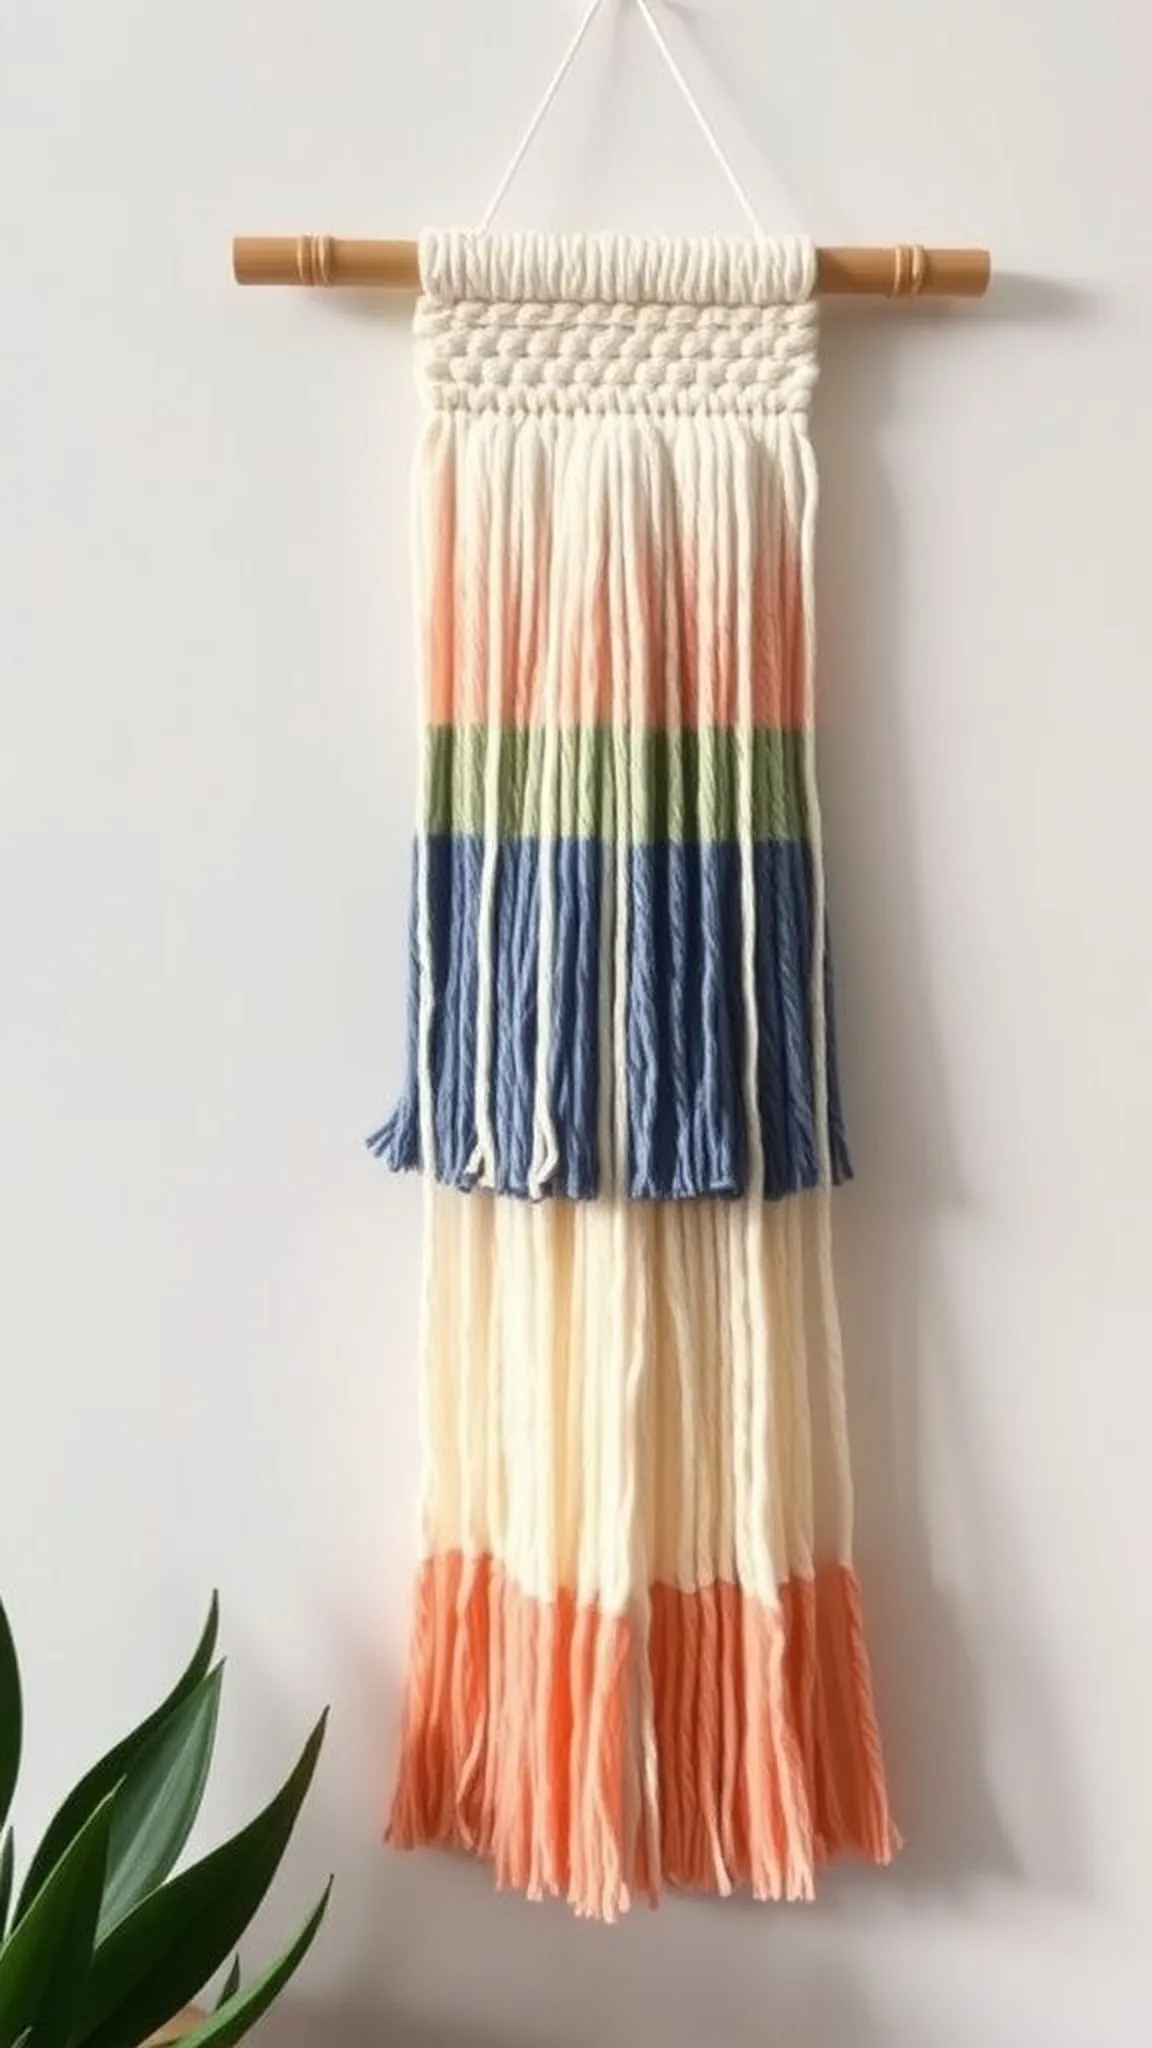
A band of tassels flowing from a slim dowel read like a quiet banner for a small wall. The yarn felt warm and pillowy and the color bands blended gently from one hue to the next. The work held a balance between tidy repetition and playful irregularity where lengths varied just a touch.
When hung, the fringe moved slightly with air and caught a little shadow, creating a slow, kinetic texture that softened a bare wall without shouting.
📋 How to Make This ▶
- Choose a palette of yarn and a wooden dowel, then wrap yarn around a template to form tassels of consistent length.
- Secure tassel tops and attach each to the dowel in color bands, spacing them evenly along the length.
- Trim ends for uniformity and add a hanging cord to the dowel for display.
- Optional steaming or gentle brushing can help relax fibers for a softer finish.
⚠️ Avoid: A frequent beginner mistake is irregular tassel lengths, which can make the piece look uneven; aligning strands before trimming produces harmony.
🔄 Try Also: Create a chevron shape with color changes, or mix yarn textures like boucle and smooth strands for depth.
🛒 Products & Materials ▶
Items Used
- assorted yarn skeins
- wooden dowel rod
- scissors for yarn cutting
📌 “Soft tassel banner that adds mellow texture to walls.”
• • •
Beaded stretch bracelet for mindful hands
⏱️ 20-30 min · 🟢 Beginner
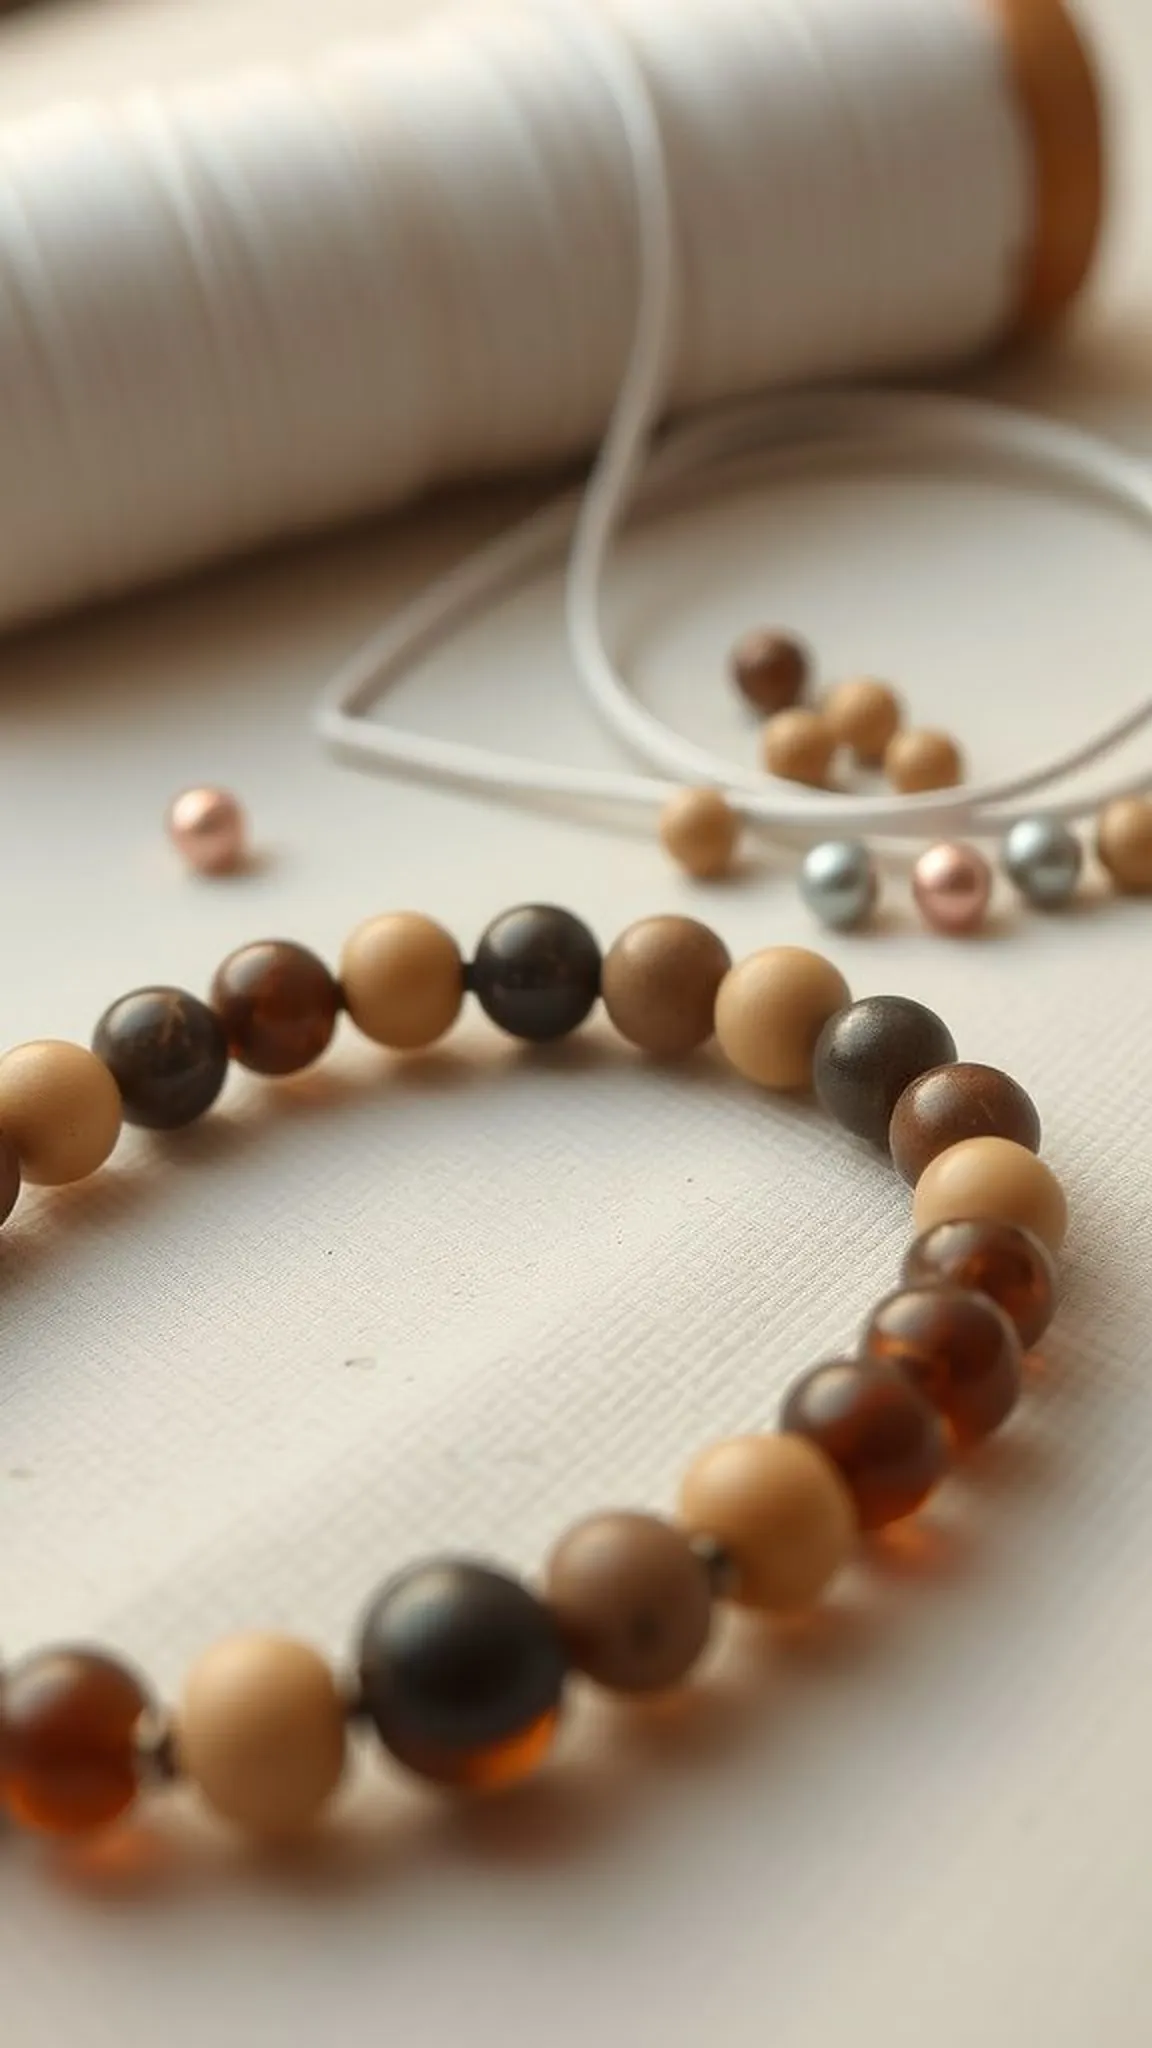
A simple loop of beads slipped onto the wrist with a gentle snap and felt like a discreet reminder to breathe. Smooth stone beads warmed slightly against the skin while matte spacers gave a quiet contrast. The act of selecting color and rhythm among beads felt almost like choosing a small vocabulary for the mood.
Wearing the bracelet turned the calm of choosing into a wearable rhythm that chimed subtly with movement.
📋 How to Make This ▶
- Choose a selection of beads and a length of clear elastic cord appropriate for wrist size.
- String beads in a pleasing sequence and check fit periodically for comfort.
- Tie a secure double knot and tuck the knot inside a bead or use a small amount of glue to finish.
- Trim excess elastic and allow any glue to set before wearing.
⚠️ Avoid: A frequent beginner mistake is cutting elastic too short which makes knotting difficult; leaving a modest tail makes finishing neater.
🔄 Try Also: Mix matte stones with metallic spacer beads for subtle contrast, or create a stacked set with smaller bead sizes.
🛒 Products & Materials ▶
Items Used
- assorted stone beads 8mm
- clear elastic cord 0.8mm
- crimp covers or glue
📌 “A simple beaded bracelet that calms with every movement.”
• • •
Jarred bath salt blend for slow soaks
⏱️ 15-30 min · 🟢 Beginner
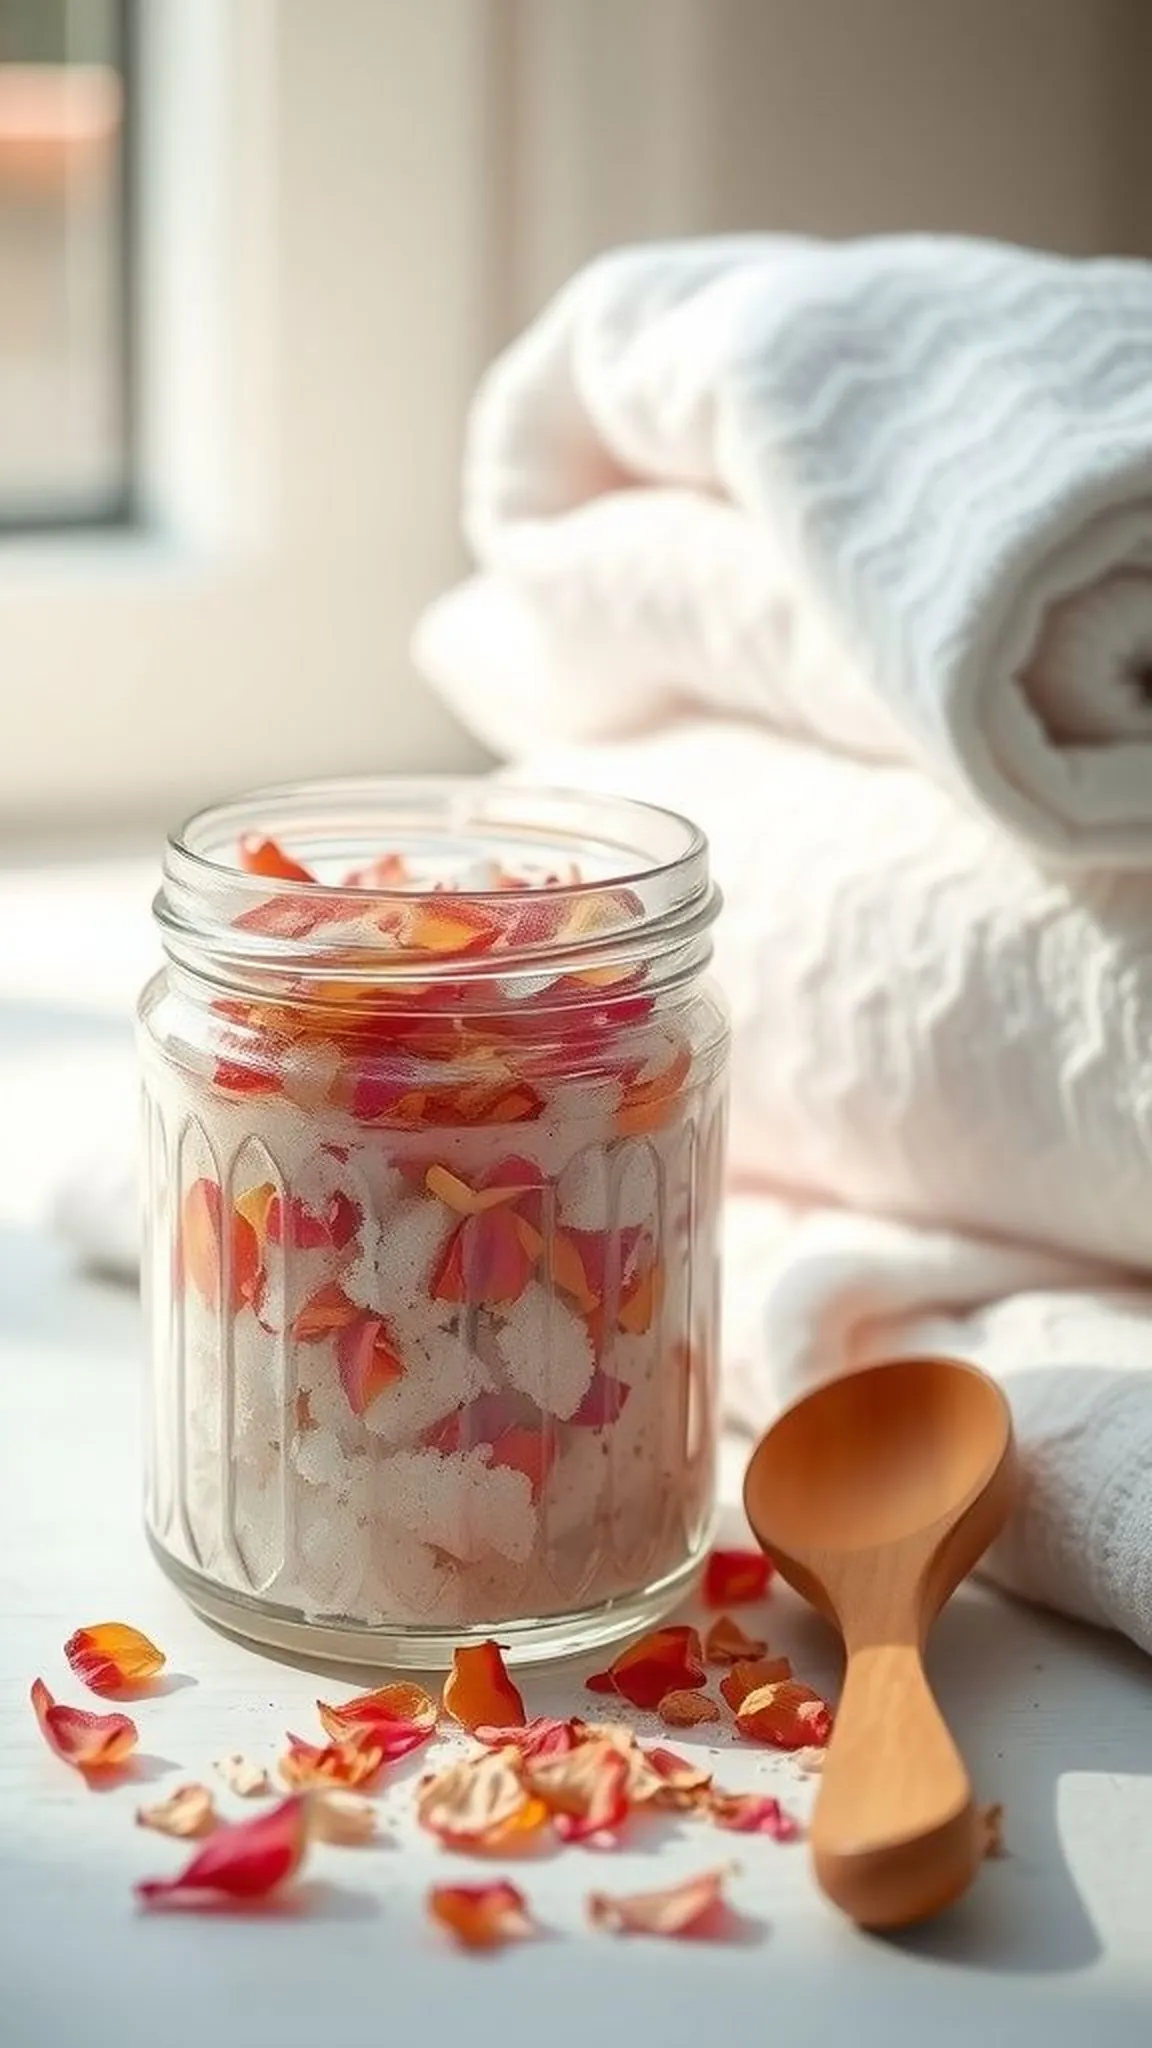
Layers of coarse salt and dried petals looked like a miniature landscape in a jar. The scent hit as the lid lifted, bright citrus or mellow lavender unrolling into the air. The coarse grains felt substantial between fingers and the colors arranged into bands that read as calm and domestic.
A single jar on a shelf suggested a slow evening ahead, a ritual of warm water and quiet reflection held in a compact, pretty package.
📋 How to Make This ▶
- Measure coarse Epsom or sea salt into a mixing bowl and add a smaller portion of baking soda if desired.
- Stir in a few drops of essential oil and fold through dried petals or citrus zest for color and scent.
- Pack the blend into a clean glass jar and seal, labeling with ingredients and a suggested scoop amount.
- Store in a cool, dry place away from direct sunlight to preserve fragrance.
⚠️ Avoid: A frequent beginner mistake is adding too much essential oil which can be overpowering; a few drops per jar keeps scent gentle and balanced.
🔄 Try Also: Create a eucalyptus blend for an invigorating soak, or a chamomile and lavender mix for extra calm.
🛒 Products & Materials ▶
Items Used
- Epsom salt bag
- essential oil small bottle
- glass storage jar with lid
- dried flower petals
📌 “Pretty jarred bath salts that invite a slow soak.”
• • •
Mini zen sand tray with tiny raked lines
⏱️ 20-30 min · 🟢 Beginner
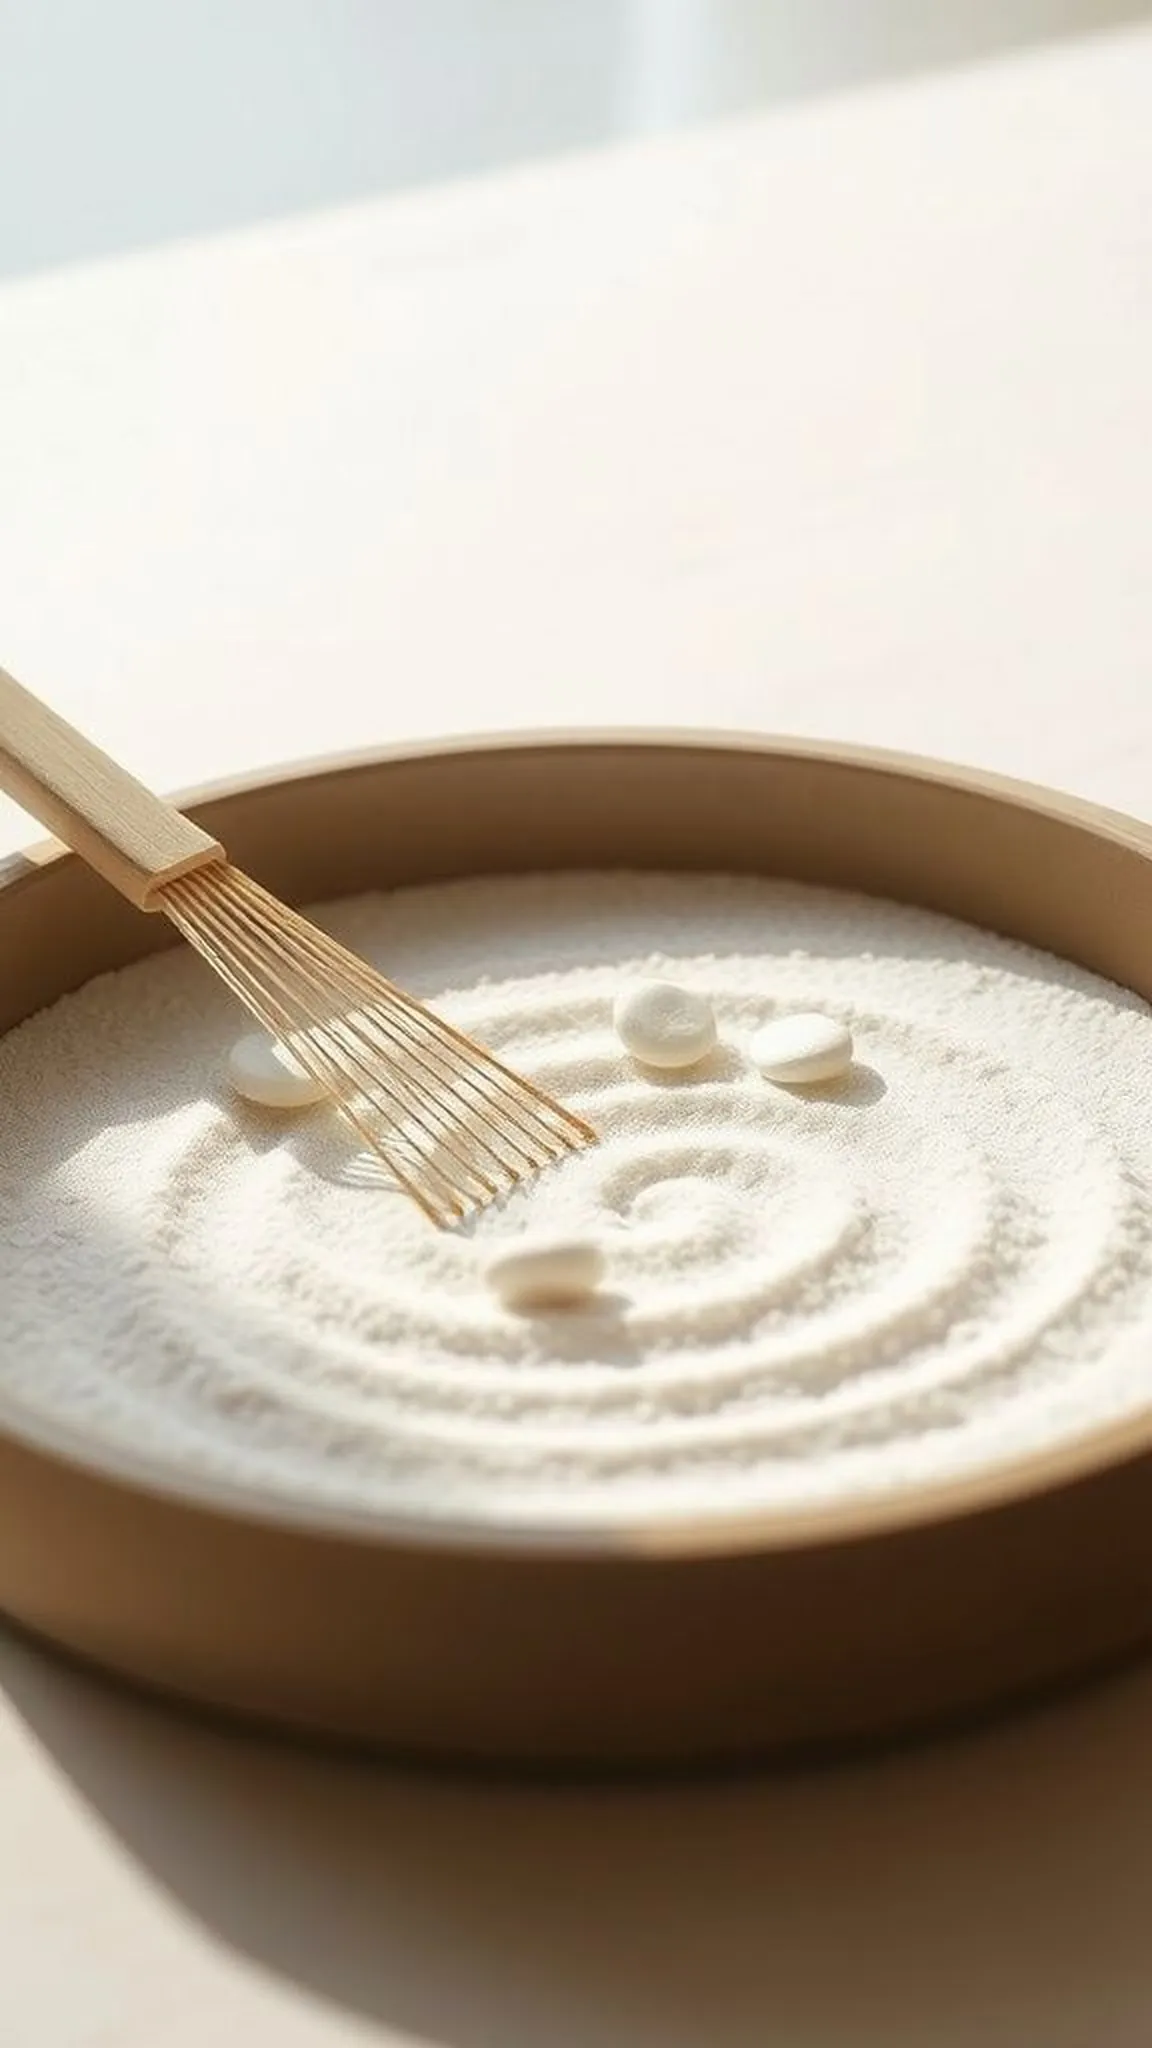
A shallow tray of fine sand invited small, intentional gestures that soothed. Raked lines formed gentle arcs and tiny stones placed at intervals created a miniature landscape to return to between tasks. The tactile feel of the rake through sand was whisper-soft, and the tray held a quiet geometry that asked only for a moment of attention.
When the fingers lifted away the scene remained orderly and calming, like a pause button for a busy day.
📋 How to Make This ▶
- Select a shallow wooden tray and pour in an even layer of fine, clean sand.
- Arrange a few small stones or pebbles as anchors within the tray.
- Use a small rake or comb to draw gentle lines and arcs across the surface for a meditative pattern.
- Smooth the sand between sessions to refresh the design and begin anew.
⚠️ Avoid: A frequent beginner mistake is using coarse sand, which makes raking less satisfying; fine sand holds crisp patterns more readily.
🔄 Try Also: Swap stones for tiny succulents in shallow pockets, or add a single ceramic lantern for a contemplative vignette.
🛒 Products & Materials ▶
Items Used
- fine craft sand
- small wooden tray
- miniature rake
📌 “A tiny raked tray for quick moments of calm.”
• • •
Mosaic coaster from broken tile shards
⏱️ 2-3 hours plus setting time · 🔴 Advanced

Shards of color came together into a small, resilient surface that felt sturdy under a mug. The interplay of glossy tile and matte grout created a tactile contrast and tiny reflections when light hit the glazed pieces. Laying fragments into a circular pattern produced a rhythmic visual pulse and the grout softened edges so the coaster sat pleasant to the touch.
The process rewarded patience; the finished coaster had a domestic confidence that made daily tea feel slightly ceremonial.
📋 How to Make This ▶
- Gather broken tile or craft tesserae, a ceramic coaster base, tile adhesive, grout, and safety goggles for handling shards.
- Arrange tile fragments in a pleasing pattern on the base and adhere pieces with small amounts of tile adhesive.
- Once adhesive sets, apply grout over the surface, pressing into gaps and wiping excess with a damp sponge.
- Allow grout to cure fully and buff the surface to reveal the mosaic pattern before sealing if desired.
⚠️ Avoid: A frequent beginner mistake is using too light a grout with very dark tiles which can distract from the mosaic; matching grout tone helps unify the design.
🔄 Try Also: Try a monochrome tile selection for subtle texture, or mix small mirror pieces for a reflective accent.
🛒 Products & Materials ▶
Items Used
- ceramic coaster base
- assorted mosaic tiles or tile shards
- tile adhesive and grout
- sponge for grout cleanup
📌 “Colorful mosaic coaster made from tiny tile fragments.”
• • •
Decoupage candle holder with soft patterns
⏱️ 45-60 min · 🟢 Beginner
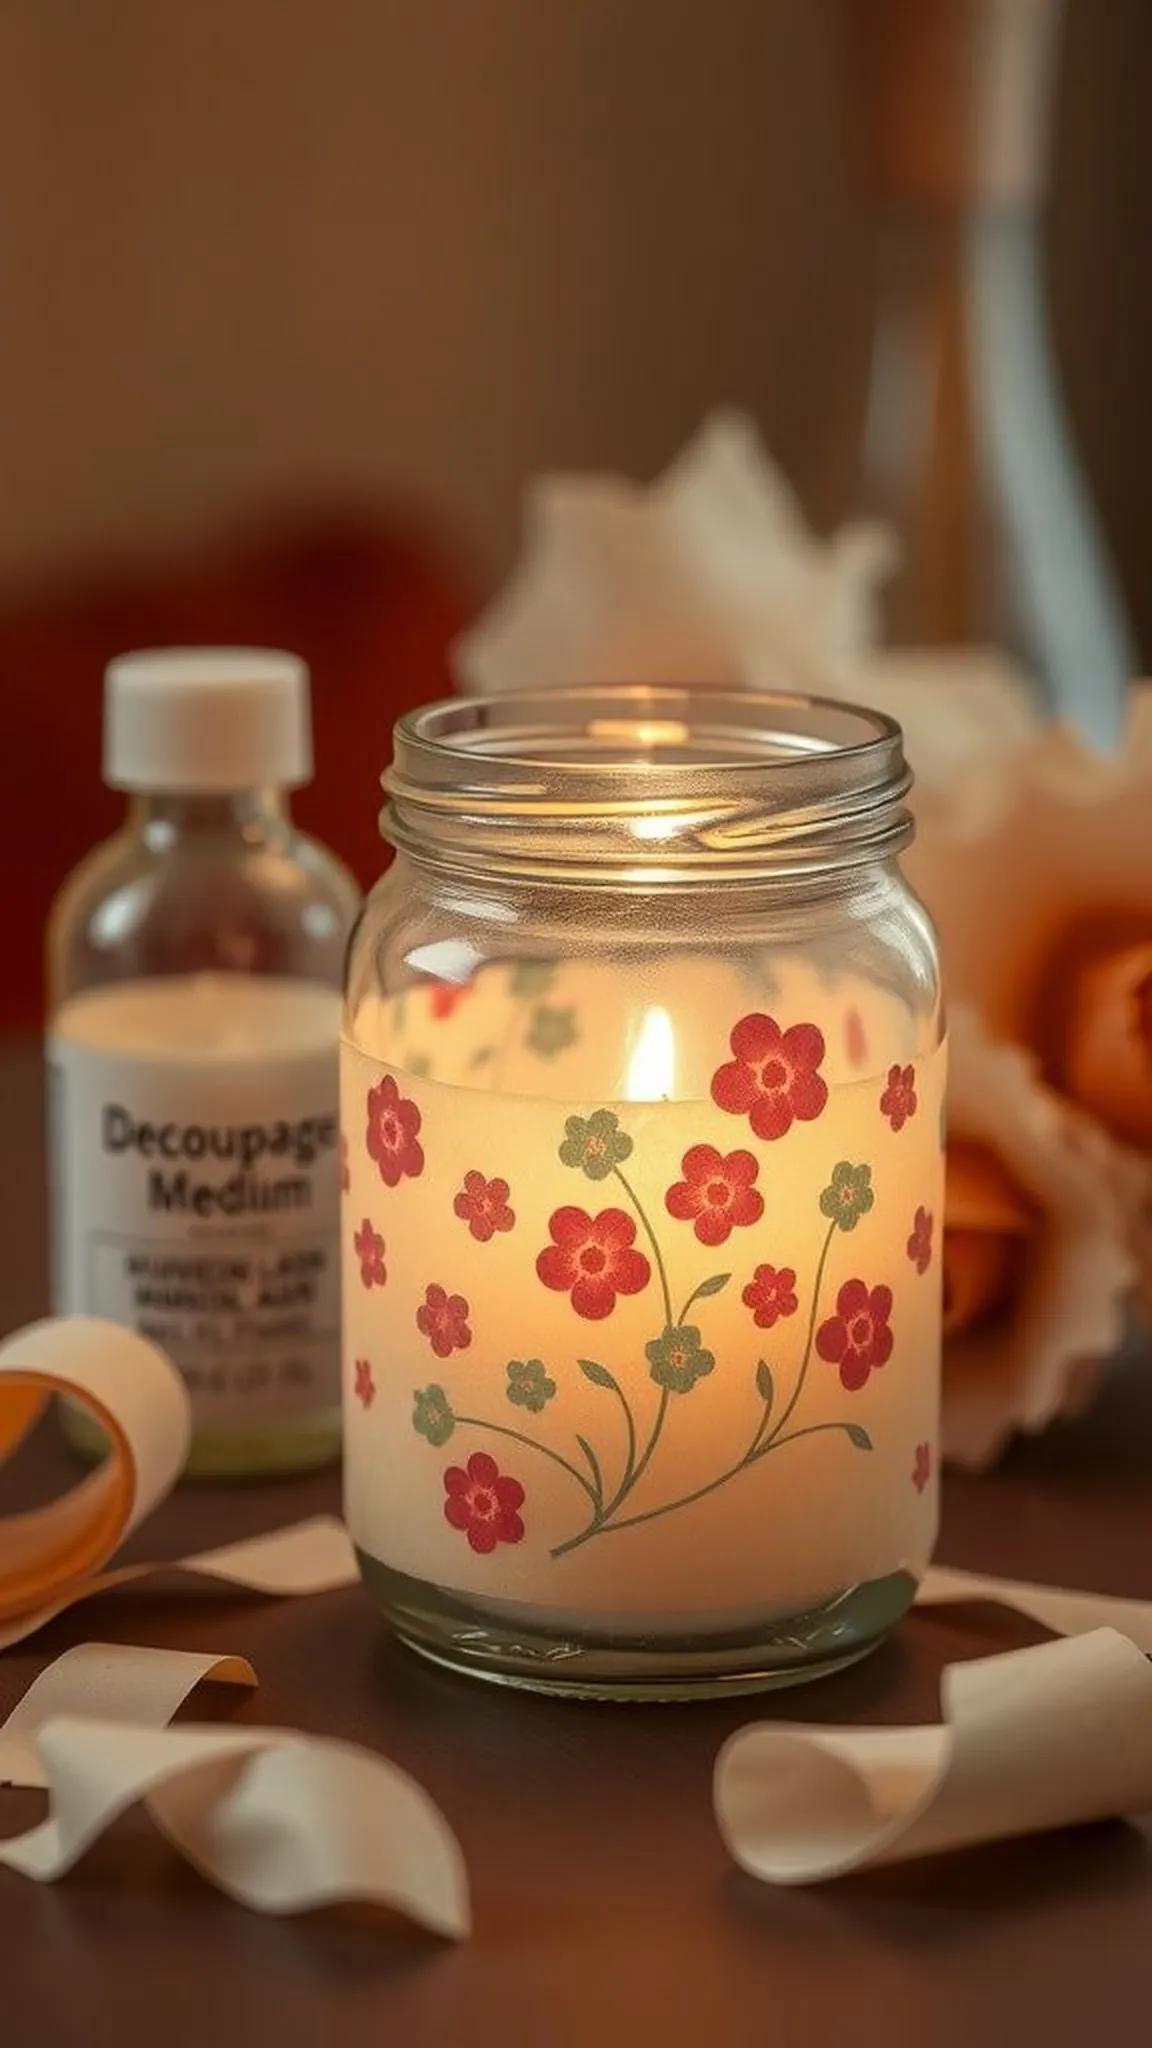
A plain glass jar transformed into a faintly patterned glow when tissue and adhesive came together. The paper settled into subtle wrinkles that read like gentle folds, and the light through the glass created patchy warmth. The scent of adhesive was faint and the fingers felt a tacky residue briefly before everything dried into a matte surface.
The finished holder returned a domestic, handmade shimmer to tealights and small candles without needing elaborate tools or heavy effort.
📋 How to Make This ▶
- Clean a clear glass jar or votive and select lightweight patterned tissue paper or napkins for decoupage.
- Apply a thin layer of decoupage medium to the jar and lay the paper gently, smoothing with a soft brush.
- Seal with additional medium layers once dried for durability and let the holder cure before adding a candle.
- Trim excess paper and allow a full drying period to prevent tackiness when handling.
⚠️ Avoid: A frequent beginner mistake is using heavy paper which resists smoothing; lightweight tissue or napkin layers conform more easily to curved glass.
🔄 Try Also: Try a frosted effect with white tissue and translucent paint, or add metallic leaf accents for subtle shimmer.
🛒 Products & Materials ▶
Items Used
- glass jar or votive
- decoupage medium
- patterned tissue paper or napkins
- soft craft brush
📌 “Gentle patterned candle holders that glow softly.”
• • •
Hand-stamped clay tags as tiny keepsakes
⏱️ 1 hour plus drying · 🟢 Beginner
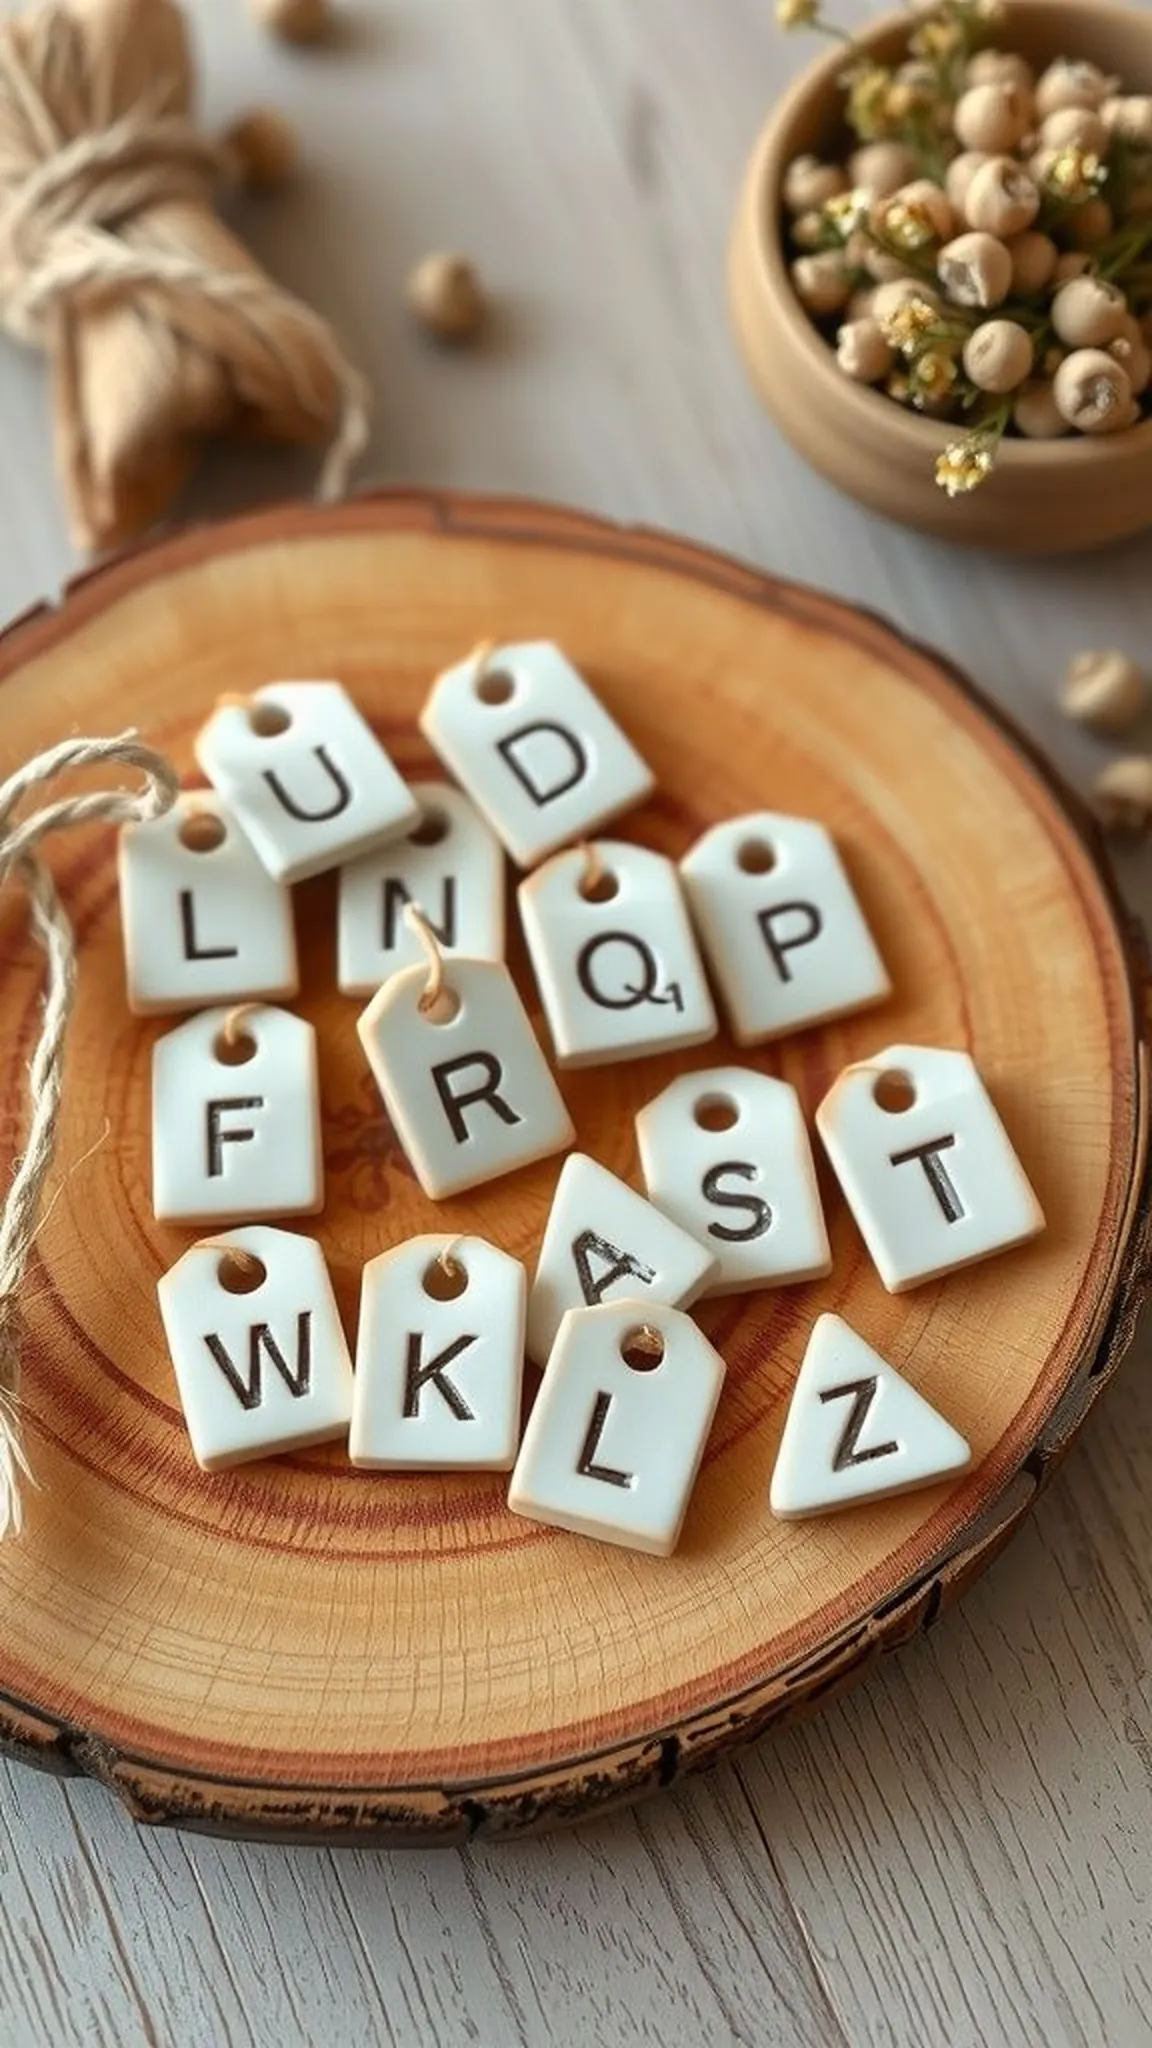
Small clay tags carried impressions of type and tiny motifs and had a reassuring weight once firm. Inked impressions left crisp lettering and tool marks framed each piece with a handcrafted border. The tactile surface invited fingers to trace letters and the clay color read as earthy and warm.
When tied to a gift or hung on a string, the tag felt like a quiet signature, a small tangible fragment of time and care captured in a miniature shape.
📋 How to Make This ▶
- Roll out a small portion of air-dry clay to an even thickness and use cookie cutters or a knife to cut tag shapes.
- Press alphabet stamps or small motifs into the surface and create a hole near one edge for a cord.
- Let tags dry fully according to clay instructions, then sand edges lightly and finish with a clear sealer if desired.
- Thread twine through the hole and trim to attach to gifts or hang as ornaments.
⚠️ Avoid: A frequent beginner mistake is pressing stamps too hard which can distort surrounding clay; firm but gentle pressure keeps impressions crisp.
🔄 Try Also: Try painted backgrounds for contrast, or emboss botanical sprigs for a nature-themed collection.
🛒 Products & Materials ▶
📌 “Tiny stamped clay tags perfect for gifts and keepsakes.”
