
As an Amazon Associate I earn from qualifying purchases.
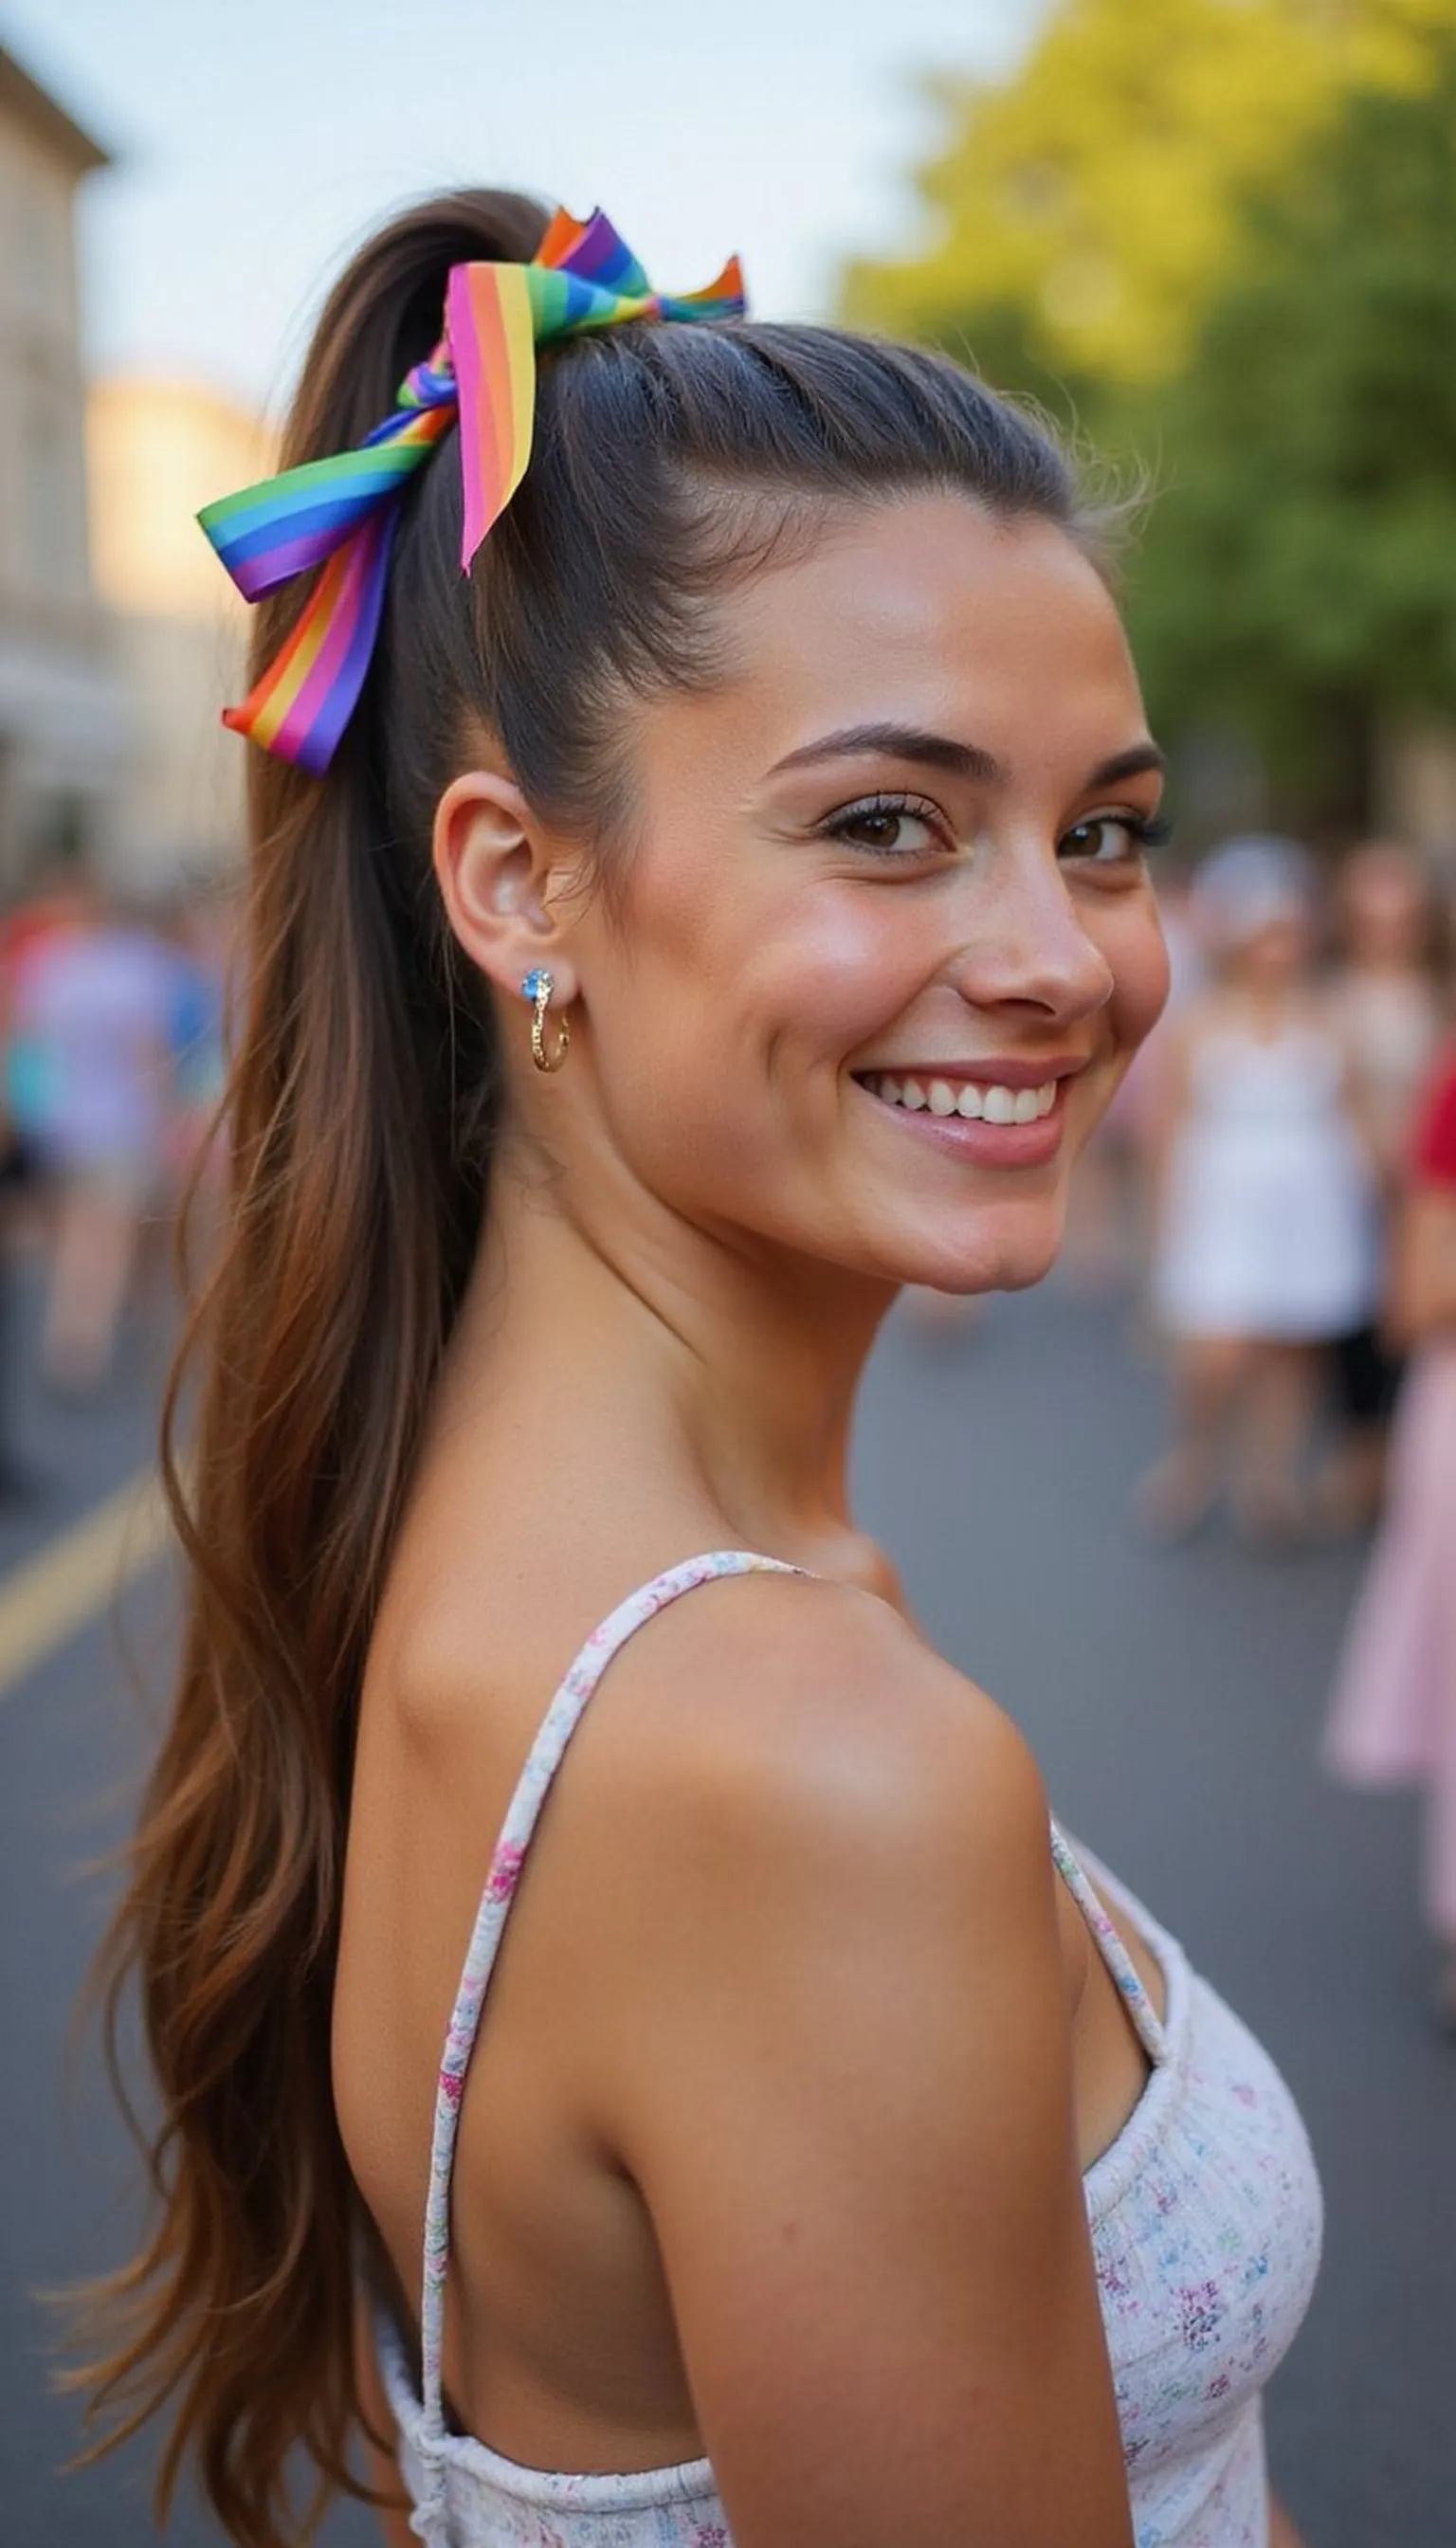
Pride Parade Hairstyles bring bold color, joyful texture, and festival energy to every look. Pride Parade Hairstyles mix rainbow braids, glitter roots, colorful clips, and space buns so Pride Parade Hairstyles stand out in a crowd. From subtle Pride Parade Hairstyles with a single color streak to full rainbow Pride Parade Hairstyles with beads and ribbons, these Pride Parade Hairstyles are ideal for parades, block parties, and daytime celebrations where playful Pride hairstyles shine.
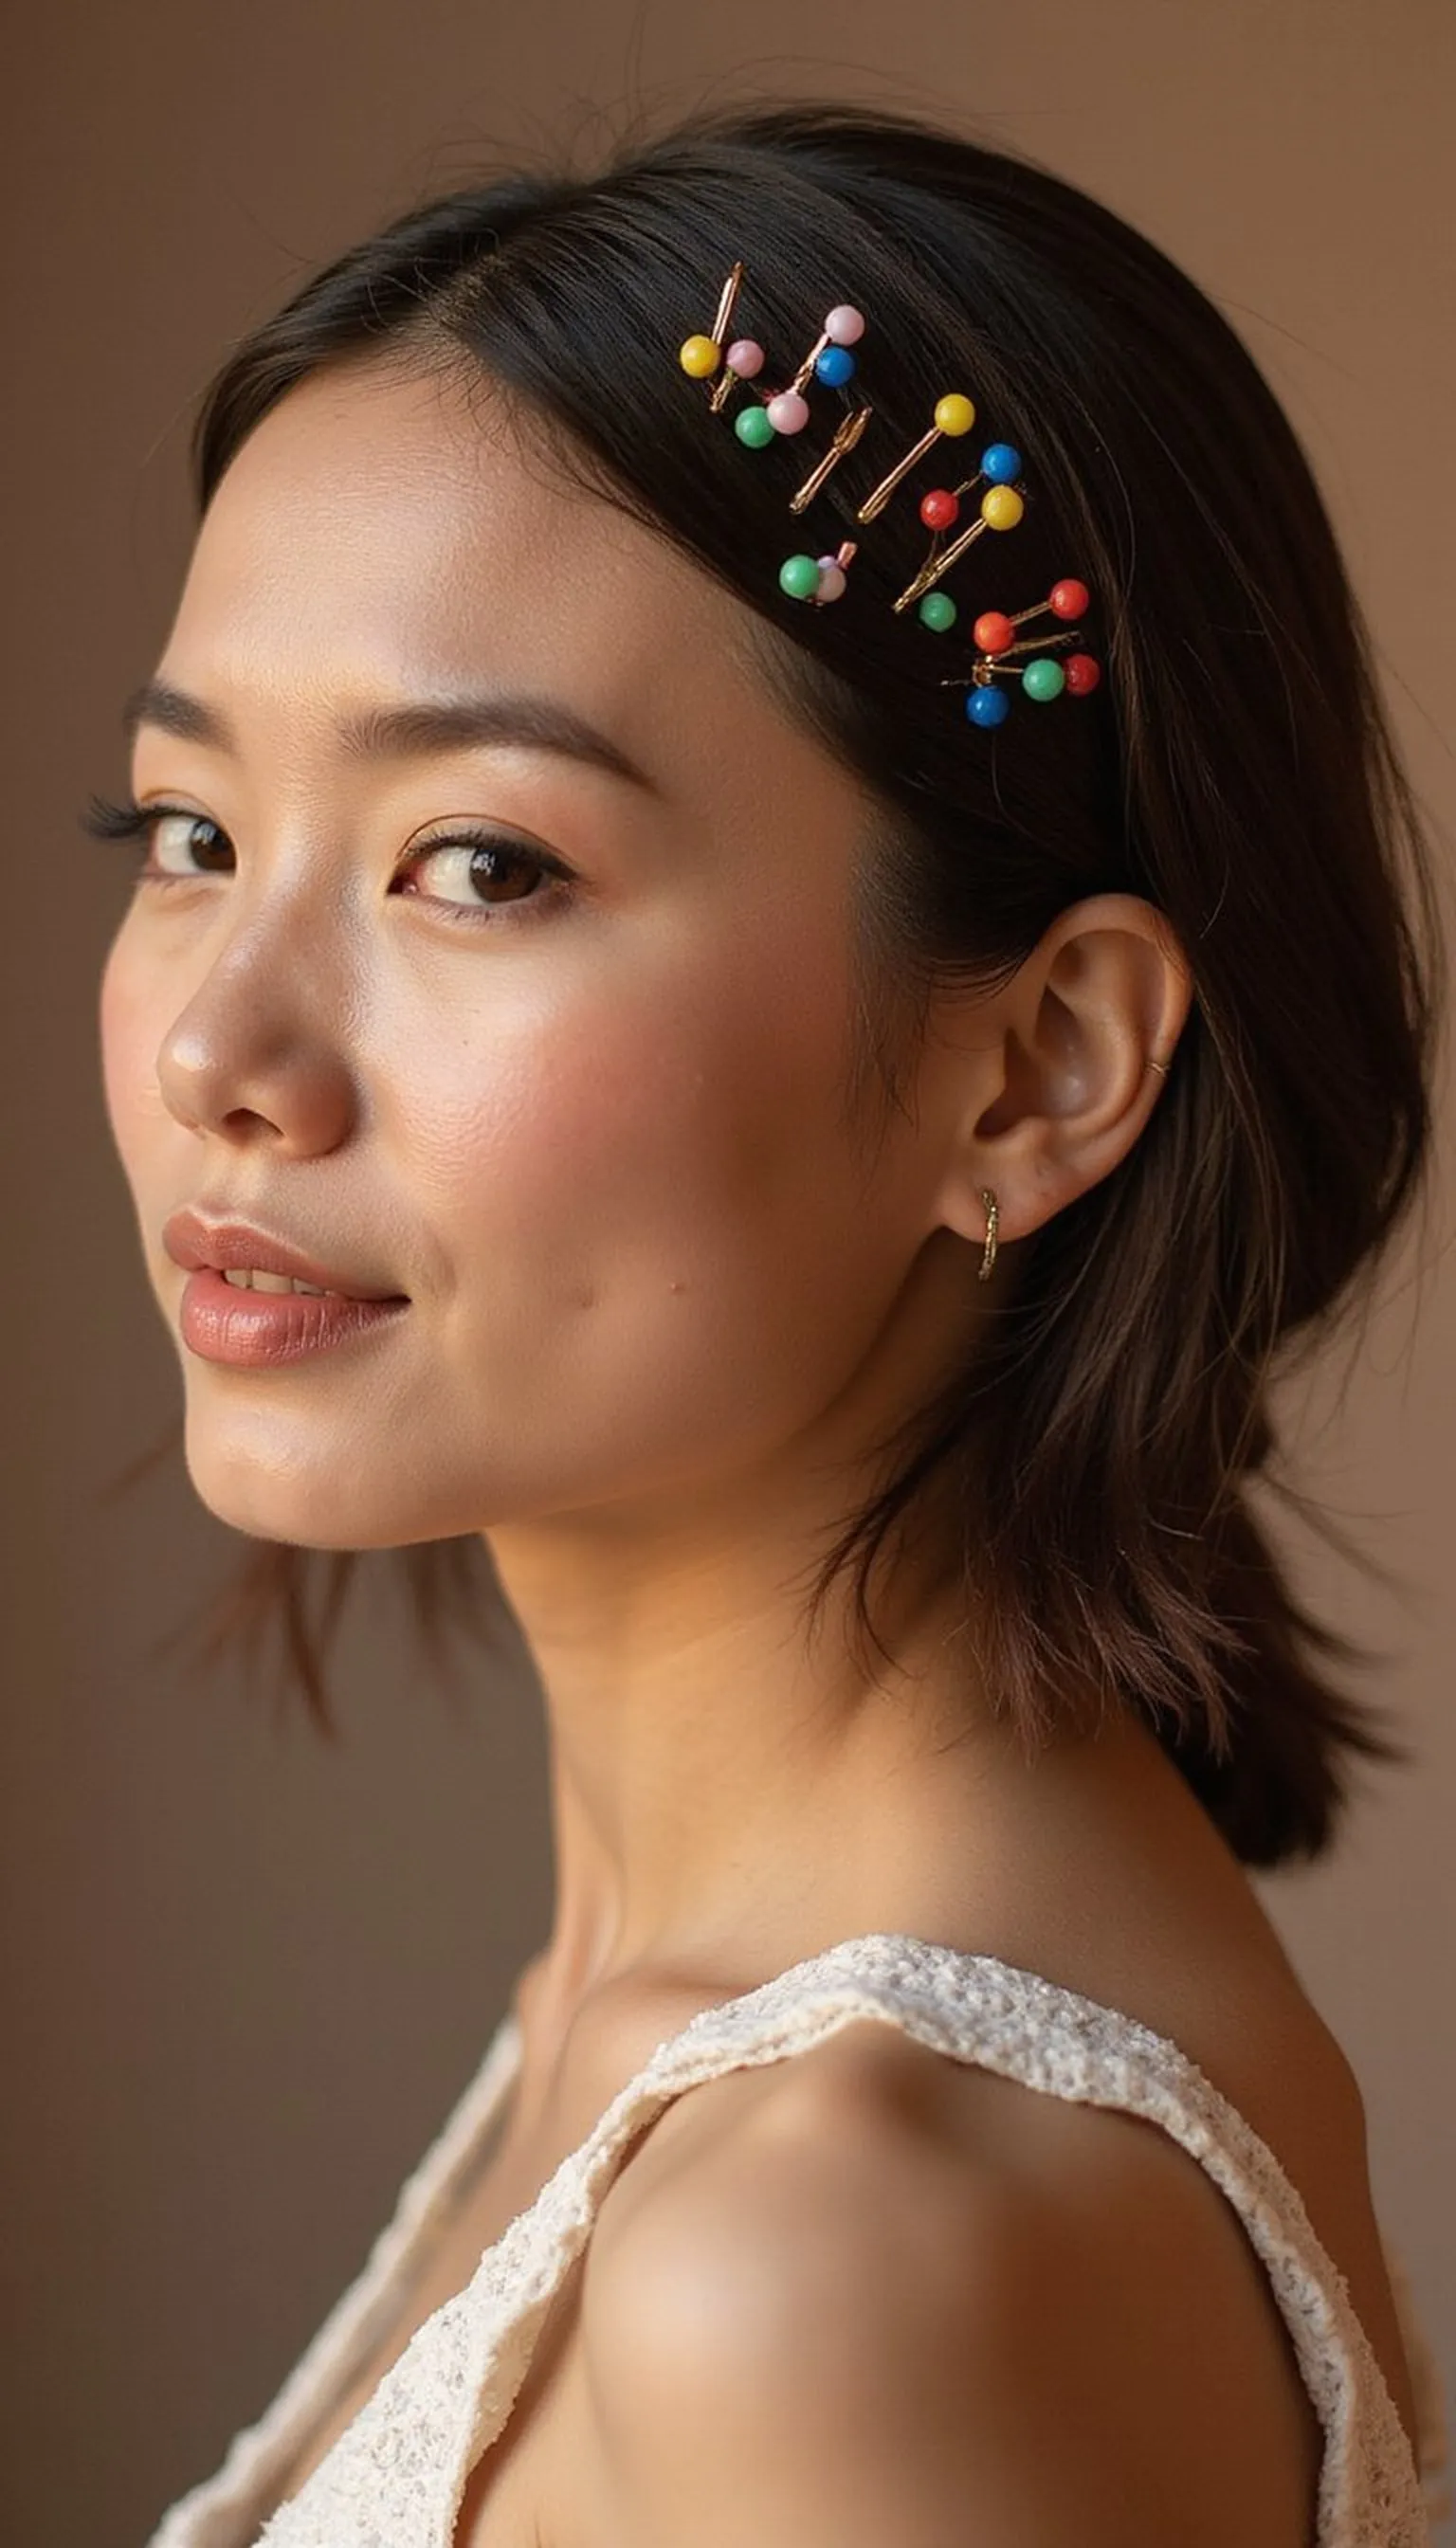
Rainbow Braided Crown With Clips
⏱️ 30 min · 🟠 Intermediate
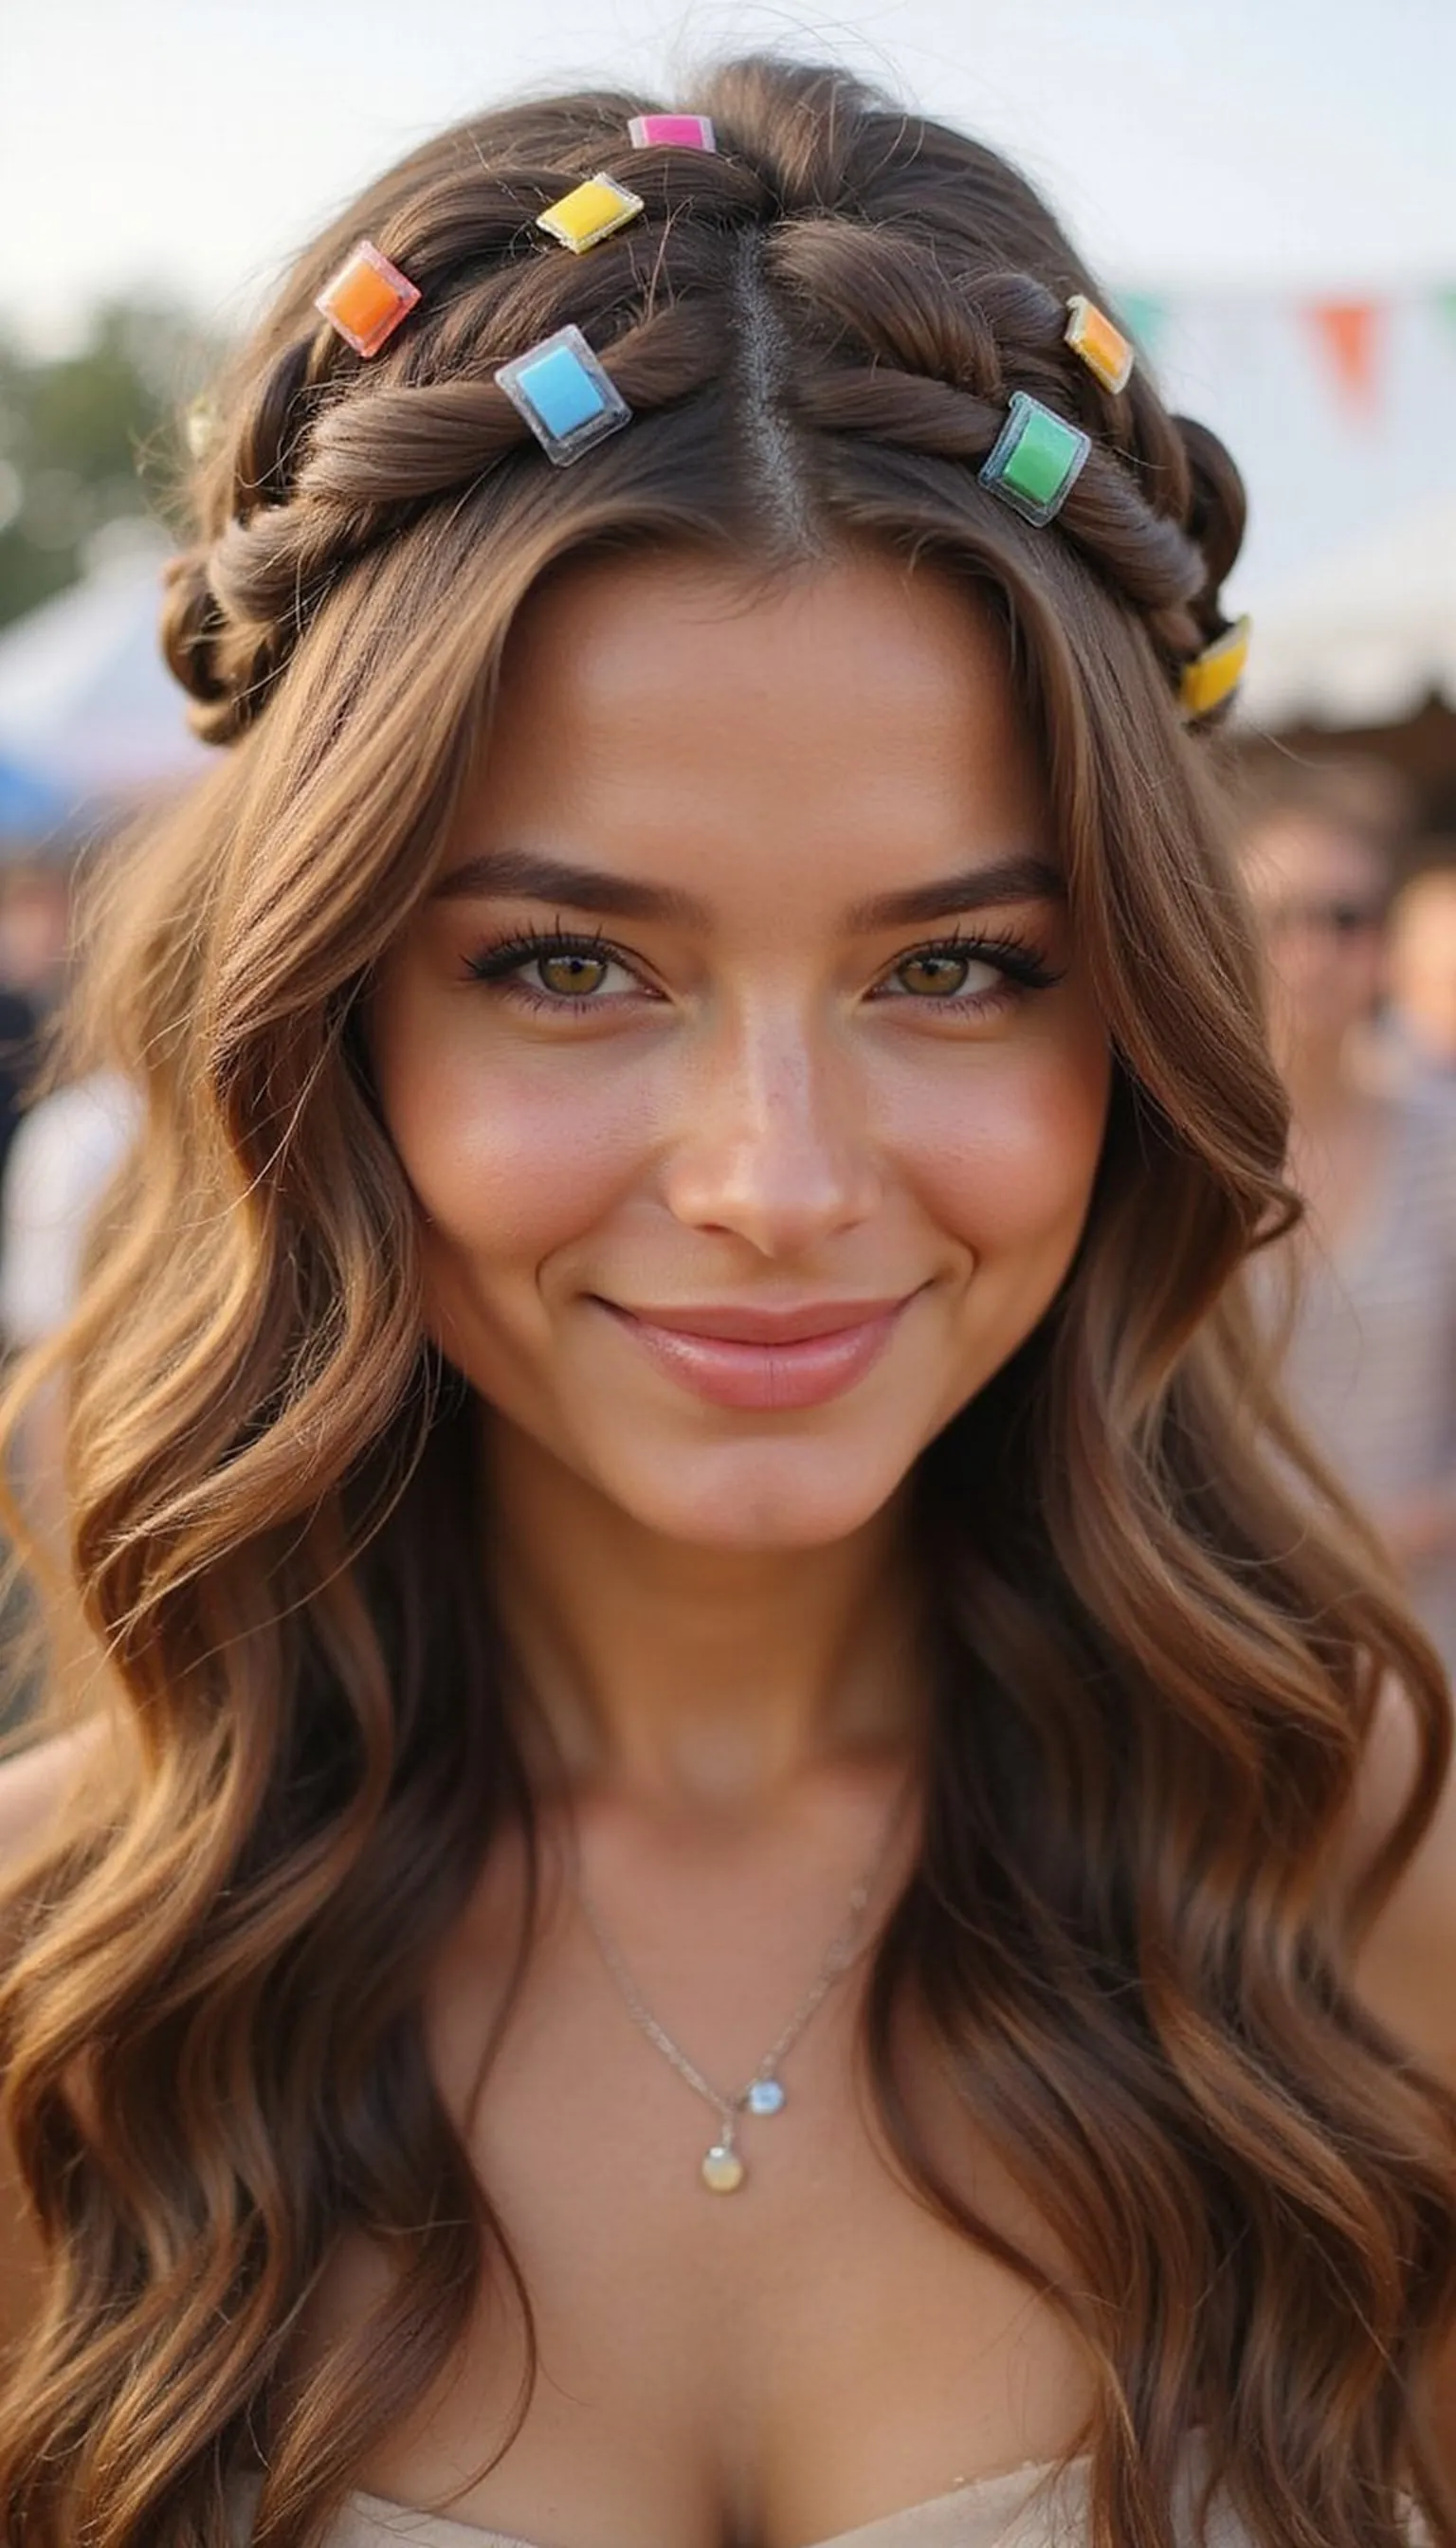
A braided crown woven with rainbow hair clips turns a classic halo braid into parade-ready flair. Start with three-strand braids along the hairline, weave them into a crown, and secure colorful clips along the braid to show off every hue. This look keeps hair out of the face while making a clear rainbow statement that feels polished and festive for marching or photos.
💇 Styling Tips ▶
Styling Tips
- Add thin clear elastics to braid ends for neatness and clip placement.
- Loosen braid loops slightly for a softer, fuller crown look.
- Match clip placement to the braid’s color sections for a cohesive rainbow.
⚠️ Avoid: Placing clips too densely flattens the braid and hides texture. Avoid clipping over loose, unbraided sections that can slip.
🔄 Try Also: Try adding small hair beads down the braid or swap clips for tiny faux flowers for a softer vibe.
🛒 Products & Materials ▶
Items Used
- rainbow hair clips
- small clear elastics
📌 “Crown braid with rainbow clips for instant parade glam.”
• • •
Glitter Roots With Sleek Ends
⏱️ 15 min · 🟢 Beginner
Glitter roots add show-stopping sparkle at the hairline while keeping lengths sleek for a chic parade-ready contrast. Apply cosmetic glitter gel at the roots and along the part, smooth mid-lengths and ends with a flat iron if desired, and let the glitter catch sunlight during marches and photos. This approach gives instant glam without full-head color, perfect for quick prep before stepping out.
💇 Styling Tips ▶
Styling Tips
- Work glitter gel into a damp part for strong hold and sparkle.
- Smooth lengths with a light serum to contrast the textured roots.
- Use a small comb to create a clean part before applying glitter.
⚠️ Avoid: Rubbing glitter into dry hair can flake; apply to slightly damp roots for better adhesion.
🔄 Try Also: Use colored glitter at the part or add a few glitter streaks along the temples for an accent look.
🛒 Products & Materials ▶
Items Used
📌 “Sparkly glitter roots meet sleek ends for effortless parade sparkle.”
• • •
Double Color Space Buns With Neon Scrunchies
⏱️ 10 min · 🟢 Beginner
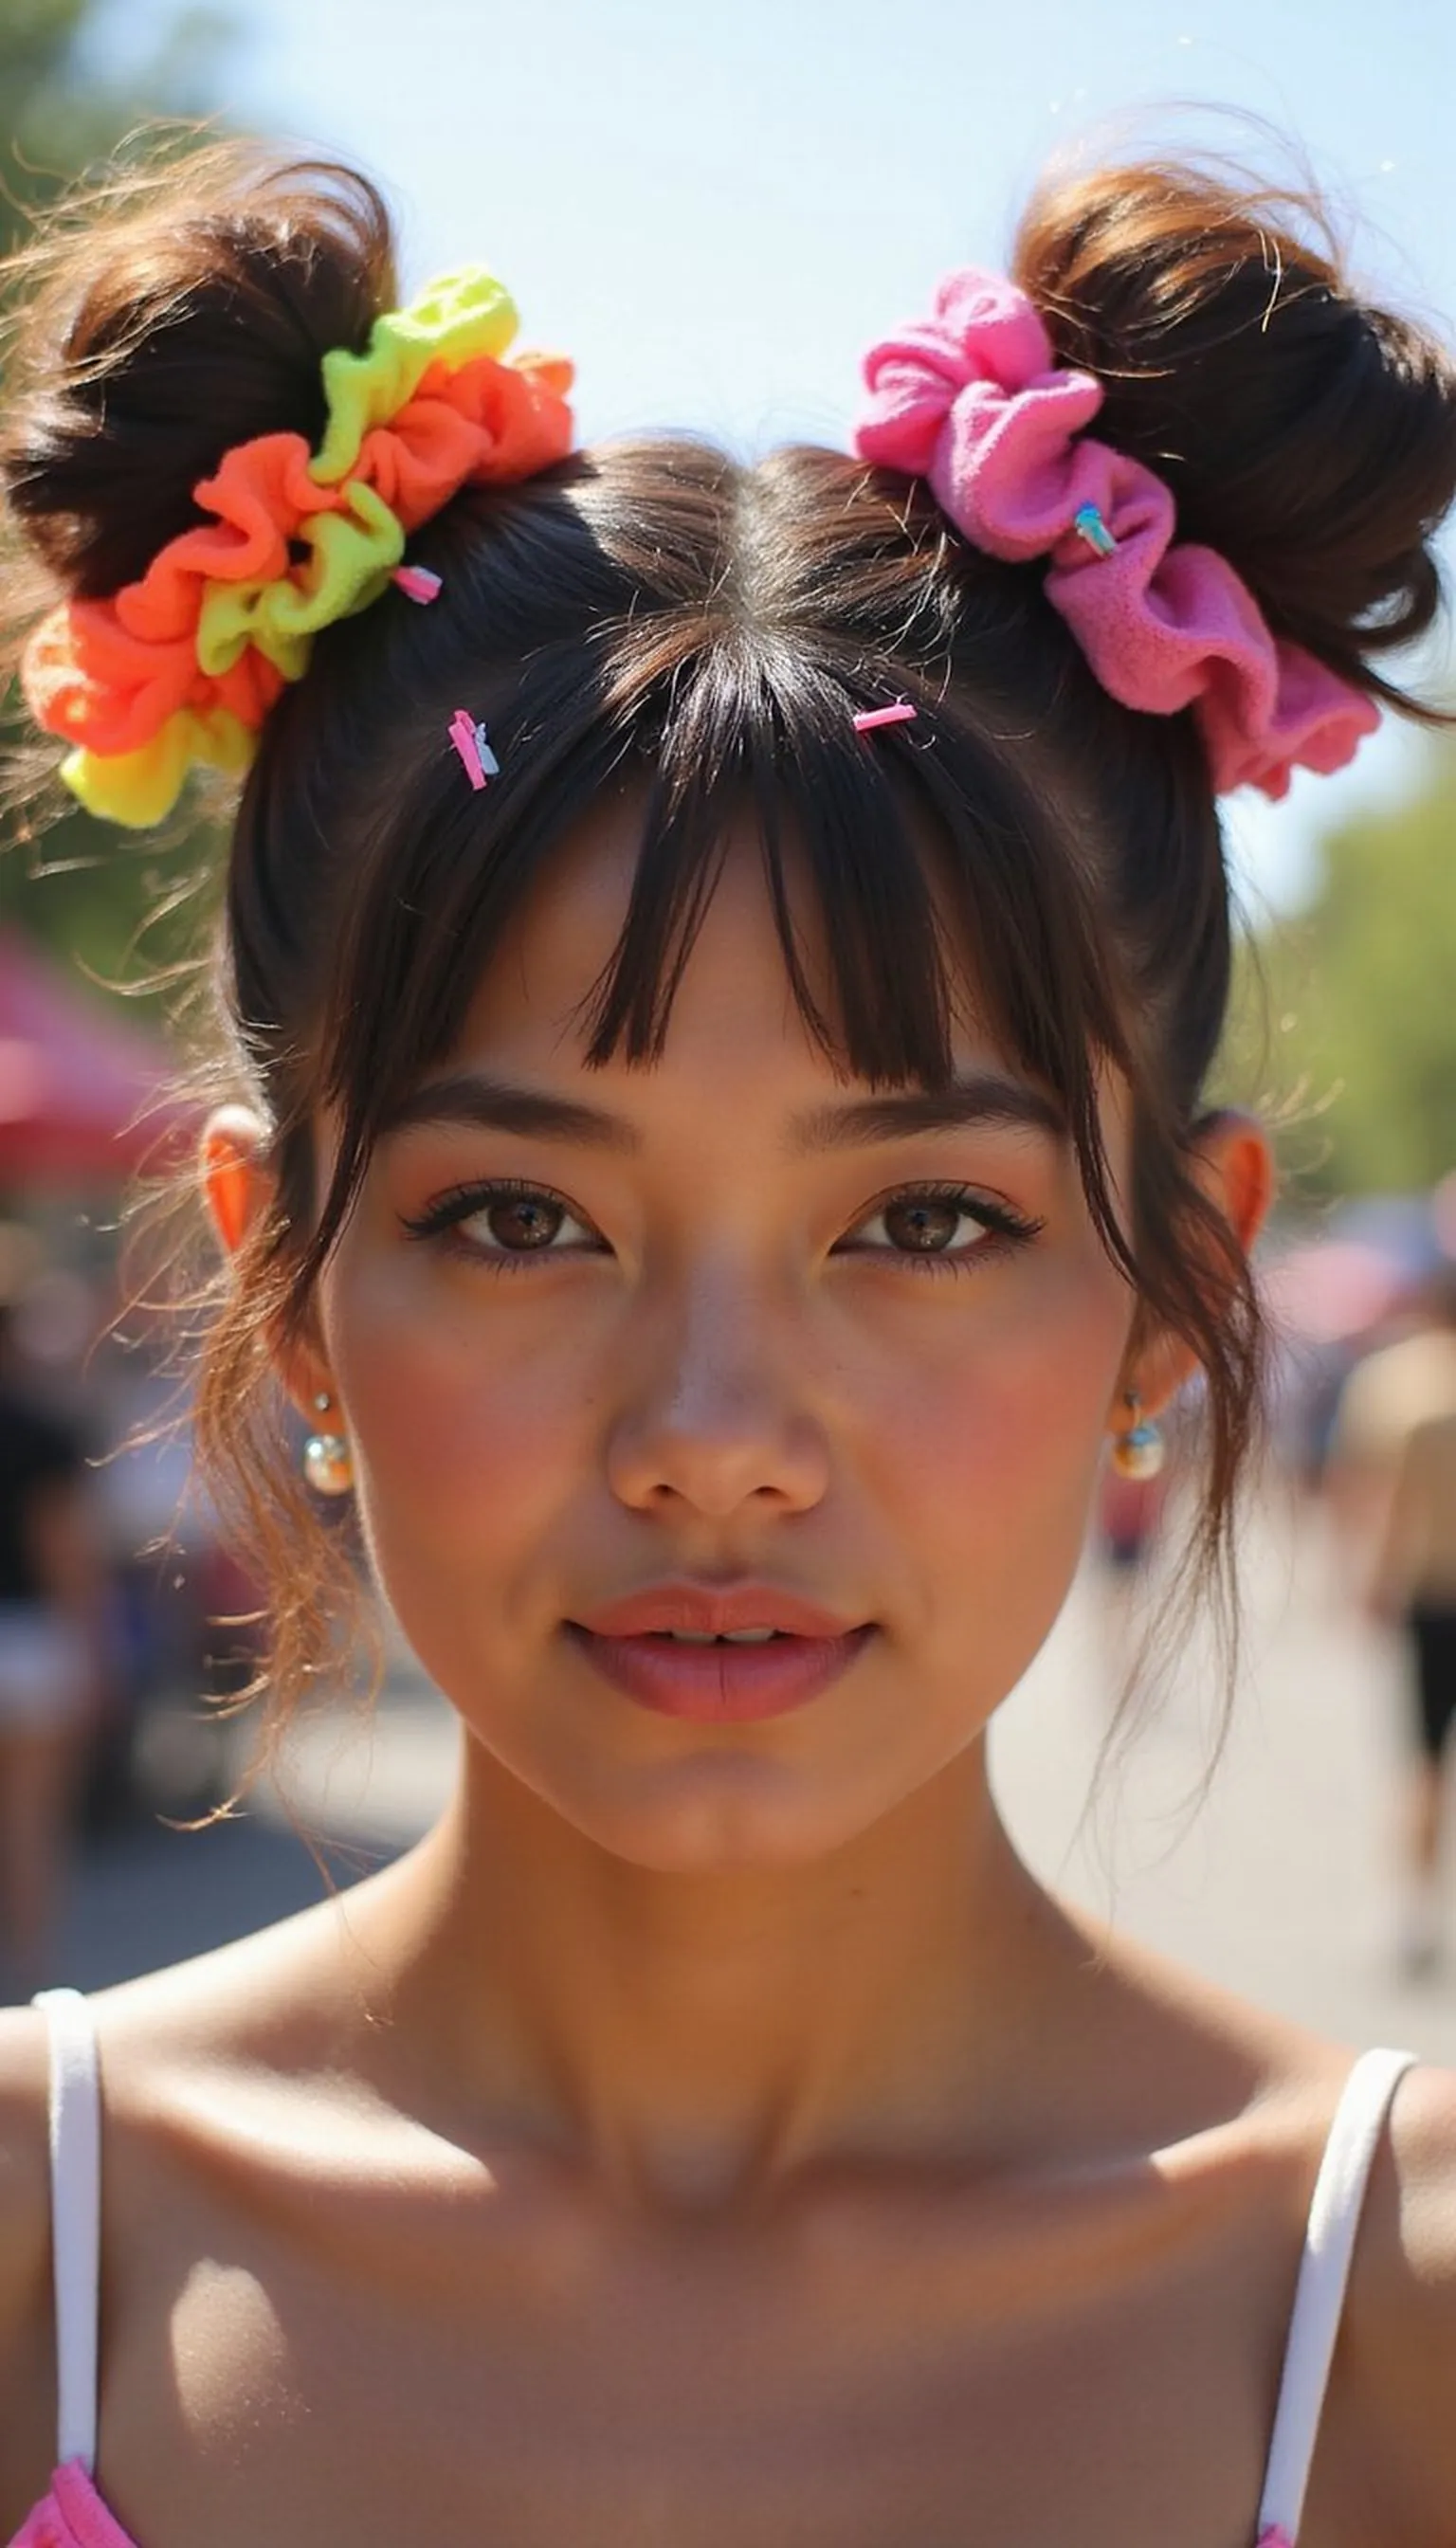
Space buns get a playful update with neon scrunchies and a center part that highlights vibrant color pops. Section hair into two high ponytails, wrap each into a tight bun, and secure with bright scrunchies. Pull out a few face-framing tendrils and add bobby pins for extra hold. This joyful look is comfortable for dancing, waving flags, and staying cool during long parade routes.
💇 Styling Tips ▶
Styling Tips
- Twist each ponytail tightly before coiling for neat, long-lasting buns.
- Use bobby pins to tuck flyaways and keep buns secure through activity.
- Match scrunchie colors to other accessories for a cohesive outfit.
⚠️ Avoid: Putting scrunchies on loose ponytails causes drooping; tighten the base before wrapping the scrunchie.
🔄 Try Also: Try low double buns for a softer look or add temporary color chalk to ponytails before coiling.
🛒 Products & Materials ▶
Items Used
📌 “Fun double space buns secured with neon scrunchies for parade-ready charm.”
• • •
Get 75+ ad-free, high-resolution printable tutorials for salon-quality results every single morning.
One printable guide · $19.99 · yours forever
Braided Faux Hawk With Hair Cuffs
⏱️ 45 min · 🔴 Advanced
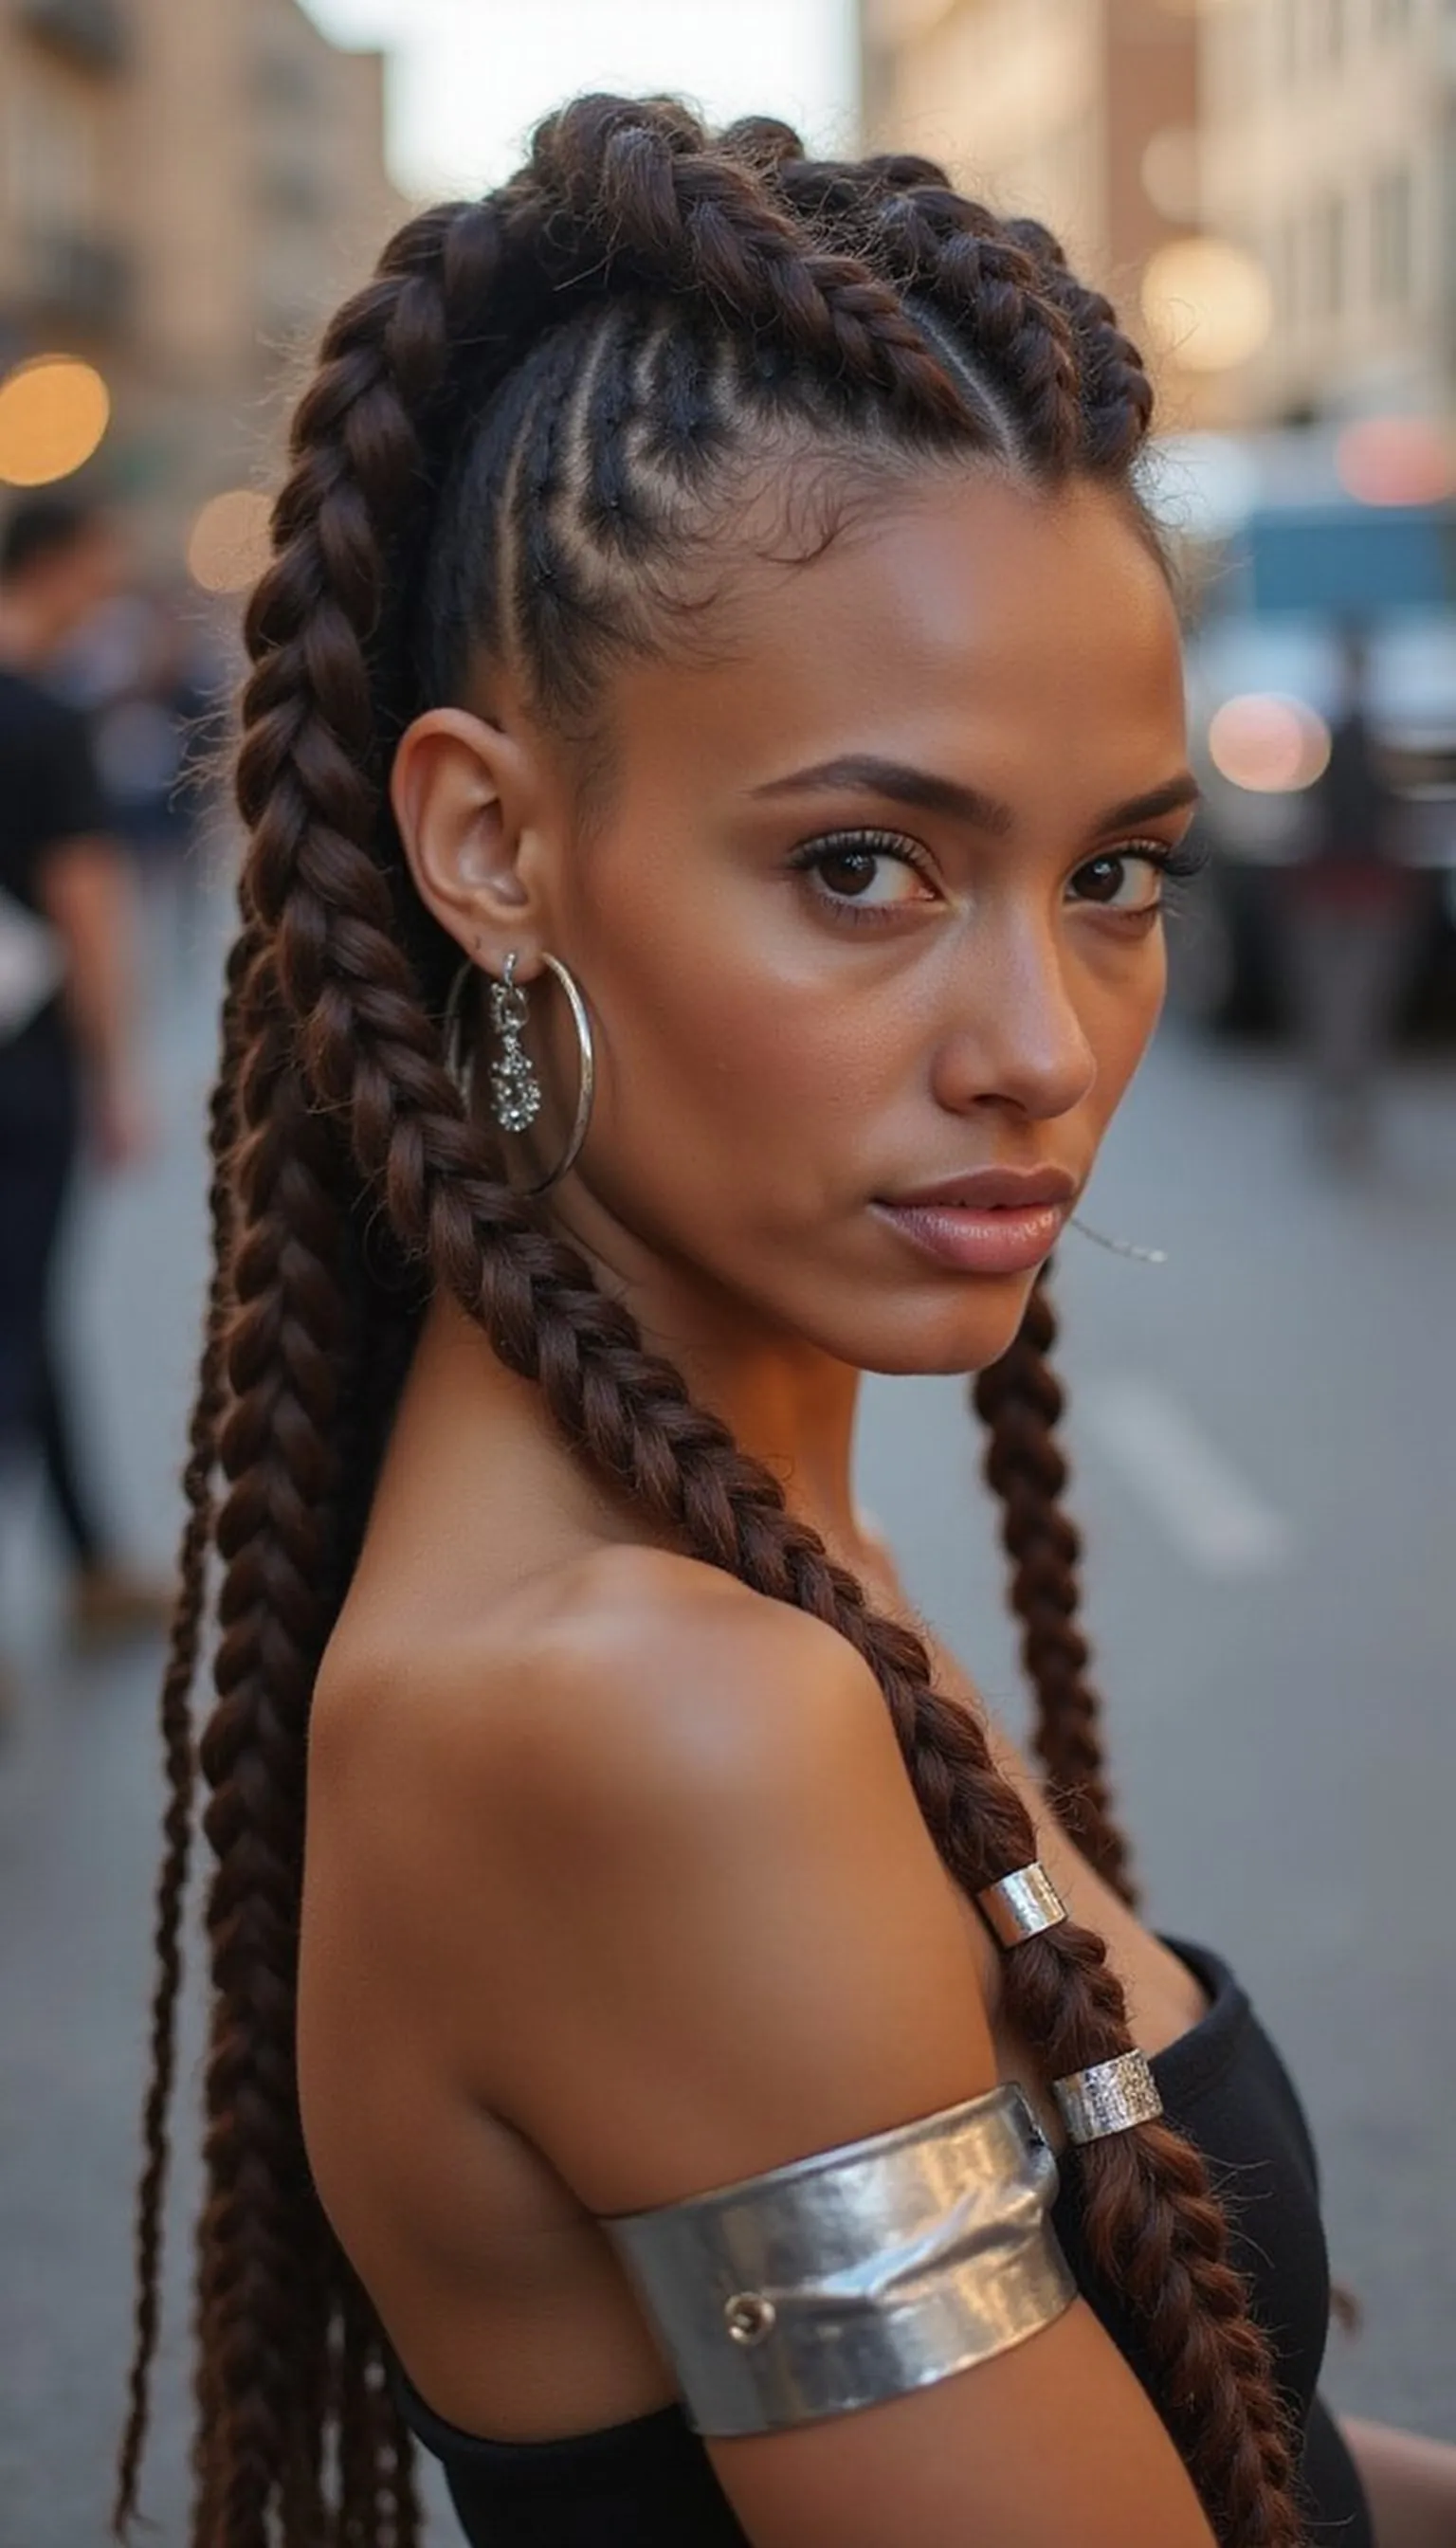
A braided faux hawk uses tight cornrows up the center with textured side sections, then finishes with metallic hair cuffs threaded into the braids for edgy, eye-catching shine. Start with three parallel cornrows along the crown, gather them into a top braid, and accent each braid segment with cuffs. This look reads bold and structured, perfect for a statement walk down any parade route.
💇 Styling Tips ▶
Styling Tips
- Prep hair with a light gel to smooth edges without stiffness.
- Place hair cuffs evenly for a balanced metallic rhythm.
- Secure braid ends with small elastics to prevent slippage.
⚠️ Avoid: Bunching cuffs too close makes braids look heavy; space them evenly for better movement.
🔄 Try Also: Swap cuffs for colored beads or metallic thread wrapped along the braids for different finishes.
🛒 Products & Materials ▶
Items Used
📌 “Edgy braided faux hawk accented with metallic hair cuffs for bold pride looks.”
• • •
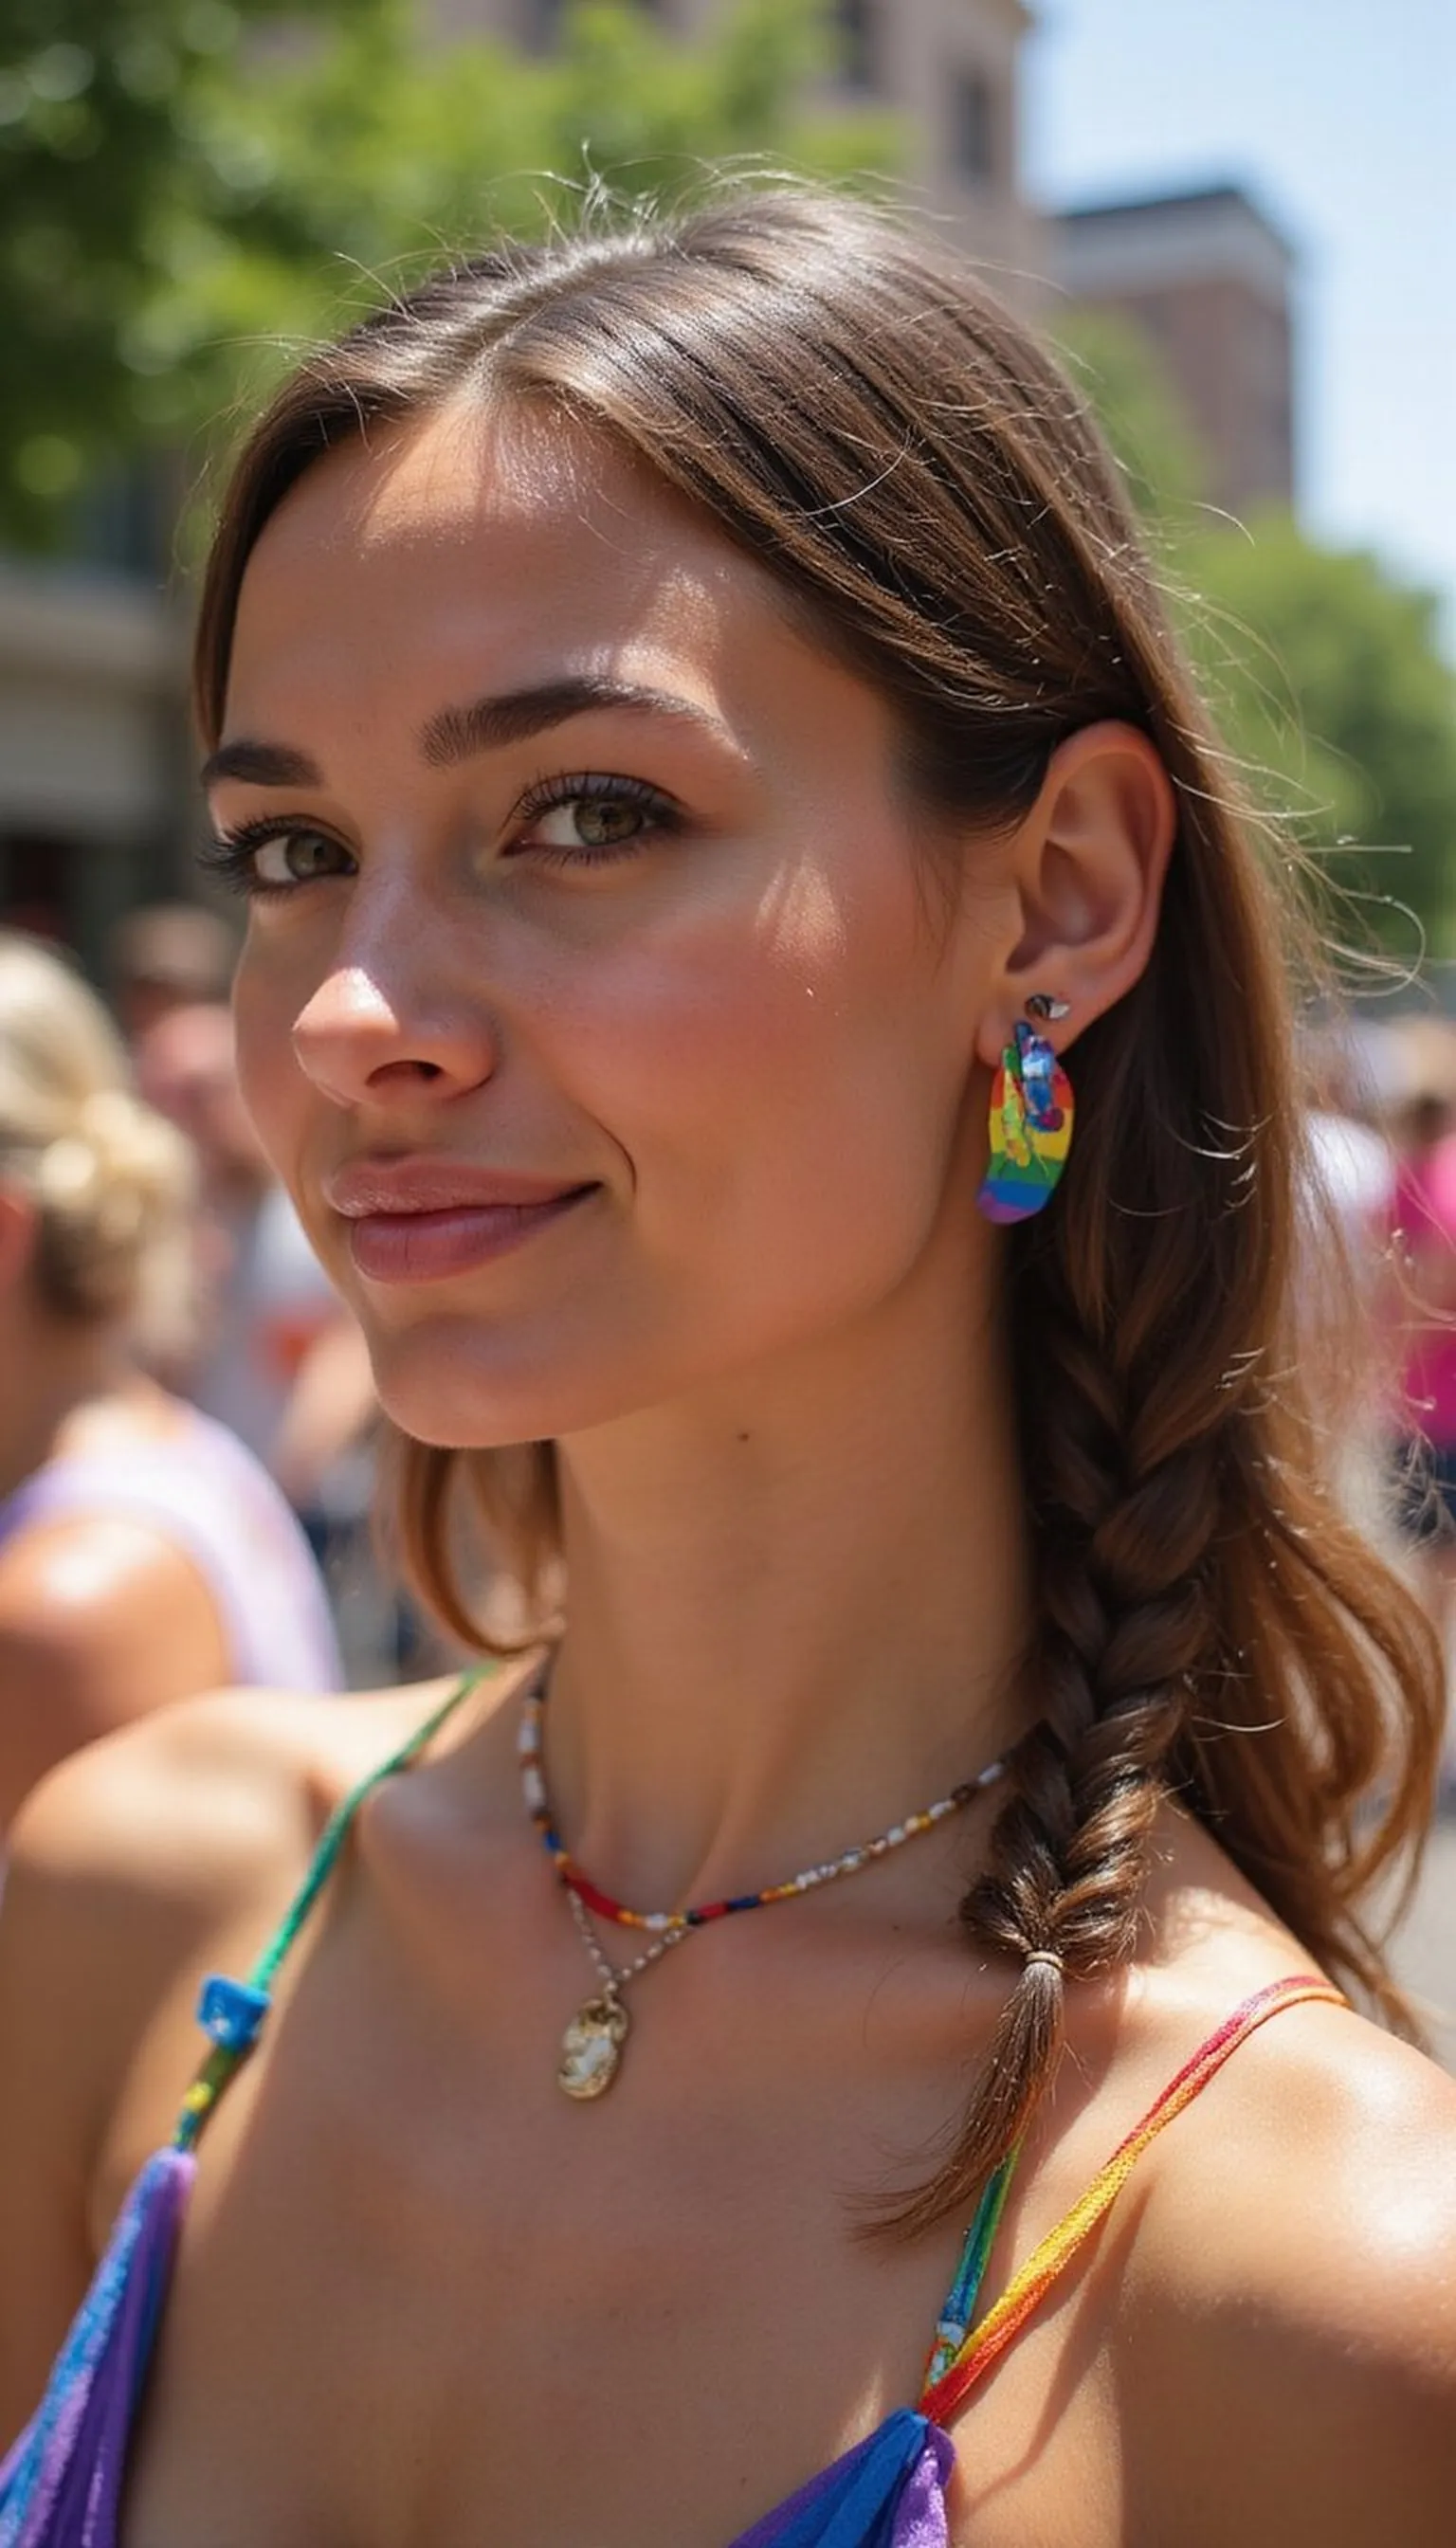
Rainbow Ponytail Wrapped With Ribbon
⏱️ 15 min · 🟢 Beginner
A high ponytail wrapped with rainbow ribbon feels polished and festive without heavy prep. Secure hair into a sleek pony, then tightly wrap thin rainbow ribbon down the base and a section of the ponytail. This keeps hair tidy while adding motion and color during marches. The ribbon can flutter in photos, creating playful movement and a clear nod to Pride colors.
💇 Styling Tips ▶
Styling Tips
- Tape the ribbon end under the ponytail base to start a clean wrap.
- Use a light hairspray on the ribbon-wrapped section to reduce slipping.
- Leave ends of ribbon long for movement or trim for a neat finish.
⚠️ Avoid: Wrapping ribbon too loosely causes unraveling; keep tension consistent for a sleek look.
🔄 Try Also: Try a low wrapped ponytail or split the pony into two wrapped sections for extra color play.
🛒 Products & Materials ▶
Items Used
📌 “Sleek ponytail wrapped in rainbow ribbon for playful parade movement.”
• • •
Pastel Ombre Waves With Chalk Streaks
⏱️ 25 min · 🟠 Intermediate
Soft pastel waves with color chalk streaks give a delicate rainbow vibe that reads dreamy in photos. Create loose waves with a curling method, then apply pastel hair chalk sticks to select strands for temporary ombre highlights. Brush through gently to soften the chalk and finish with a light texturizing spray. The result is whimsical, photo-friendly hair that brightens outfits without permanent dye.
💇 Styling Tips ▶
Styling Tips
- Apply chalk to slightly damp hair for stronger, cleaner pigment.
- Wrap small sections around a curling iron for blended color edges.
- Seal with a clear texture spray to extend wear and reduce fallout.
⚠️ Avoid: Rubbing chalk into dry hair creates dust; apply gently to damp strands for cleaner color payoff.
🔄 Try Also: Try brighter chalk for bolder vibes or smaller face-framing streaks for subtle color peeks.
🛒 Products & Materials ▶
Items Used
- pastel hair chalk sticks
- texturizing spray
📌 “Dreamy pastel waves with temporary chalk streaks for soft rainbow hair.”
• • •
Flower Crown Headband With Loose Waves
⏱️ 12 min · 🟢 Beginner
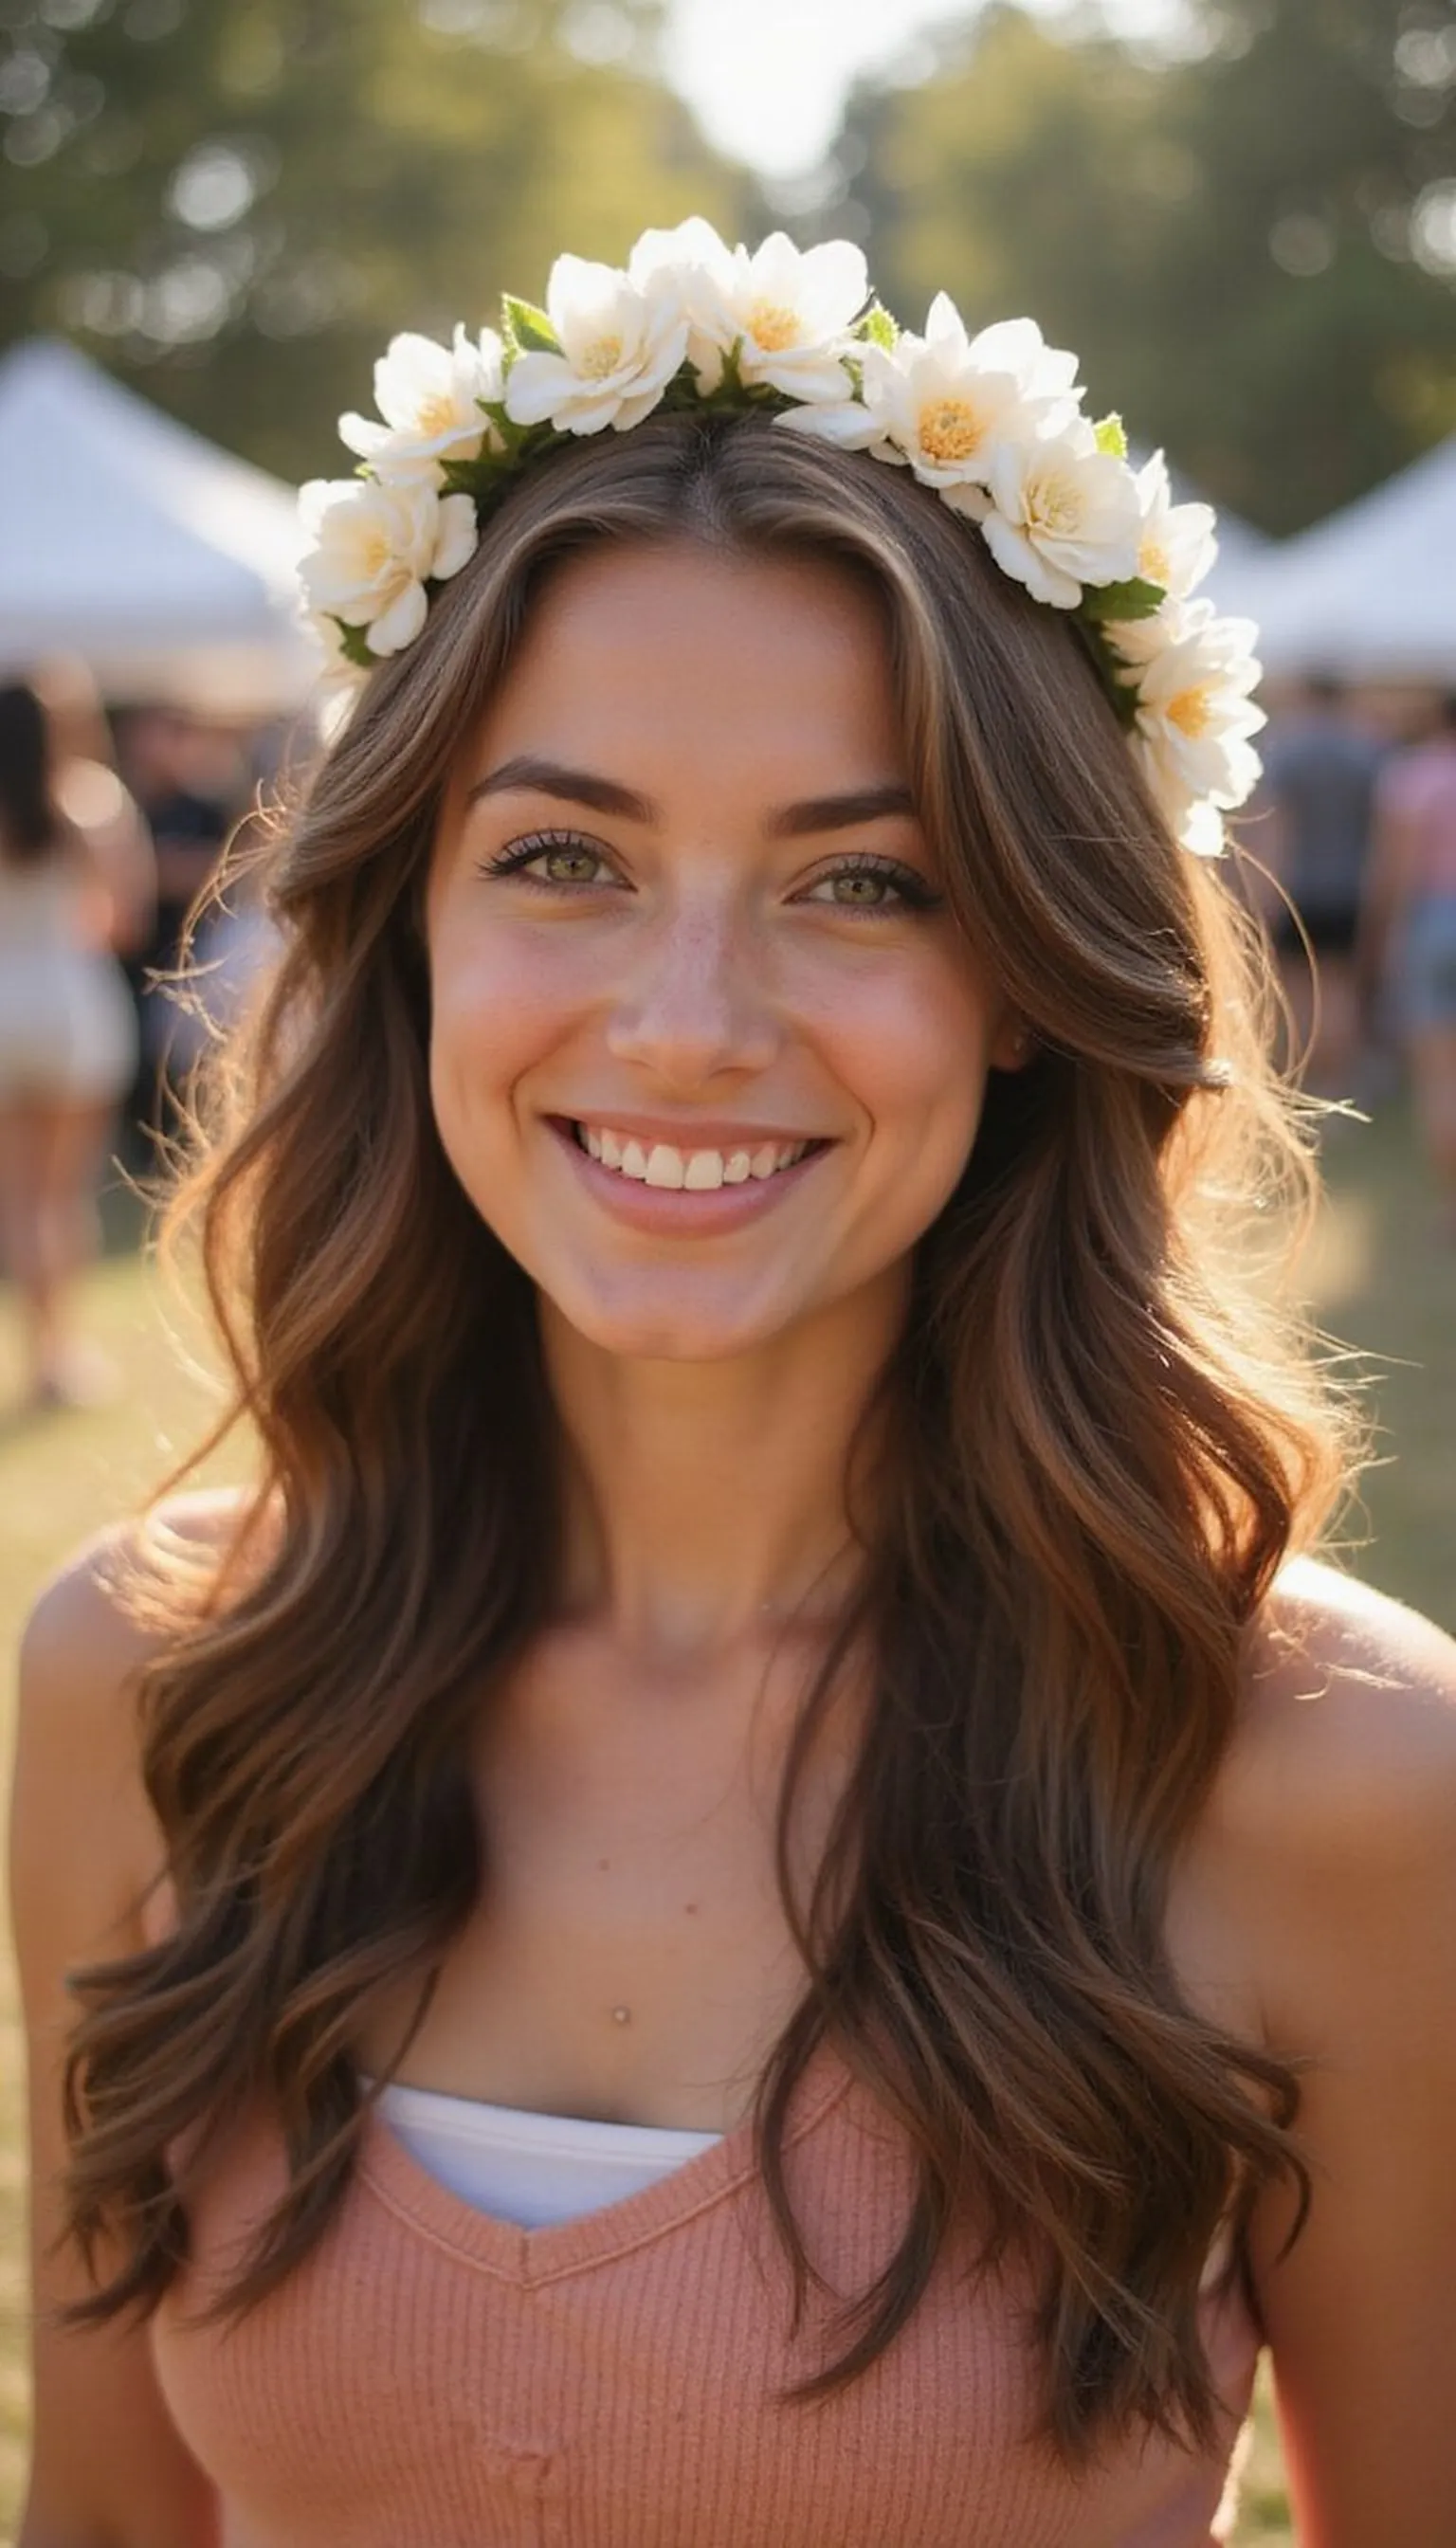
A flower crown headband placed over loose waves creates a romantic, celebratory Pride look perfect for daytime parades. Sweep hair into relaxed waves, place a floral crown headband slightly back on the crown, and pull a few face-framing tendrils forward. The floral crown adds instant festival energy while keeping the style comfortable and easy to refresh between events.
💇 Styling Tips ▶
Styling Tips
- Backcomb lightly at the crown for extra lift beneath the headband.
- Secure headband with bobby pins if movement is expected.
- Mist waves with flexible-hold spray to keep texture soft and touchable.
⚠️ Avoid: Placing the headband too far back hides face-framing waves; position it slightly forward for balance.
🔄 Try Also: Swap faux florals for bright fabric blooms or add ribbon ties trailing down the back for extra movement.
🛒 Products & Materials ▶
Items Used
- flower crown headband
- bobby pins
📌 “Romantic loose waves topped with a floral crown headband for parade-perfect style.”
• • •
Mini Pride Flag Braid Accent
⏱️ 10 min · 🟢 Beginner
A tiny braid threaded with a mini pride flag clip makes a cute, wearable accent for any hairstyle. Braid a small section near the temple, secure the end with a clear elastic, then clip a mini pride flag clip to the braid’s tip. This low-effort accent works with ponytails, buns, or loose hair and creates a clear Pride nod without a full-on color commitment.
💇 Styling Tips ▶
Styling Tips
- Pick a braid near the face for best visibility in photos.
- Tighten the braid base to prevent slipping while walking.
- Use a tiny clear elastic to keep the braid neat and discreet.
⚠️ Avoid: Braiding too loosely causes the flag clip to flop; keep the braid tight for a neat attachment.
🔄 Try Also: Add two mirrored braids or create a tiny waterfall braid with multiple mini flag clips.
🛒 Products & Materials ▶
📌 “Tiny braid finished with a mini pride flag clip for subtle parade flair.”
• • •
Rainbow Beaded Box Braids
⏱️ 2 hours · 🔴 Advanced
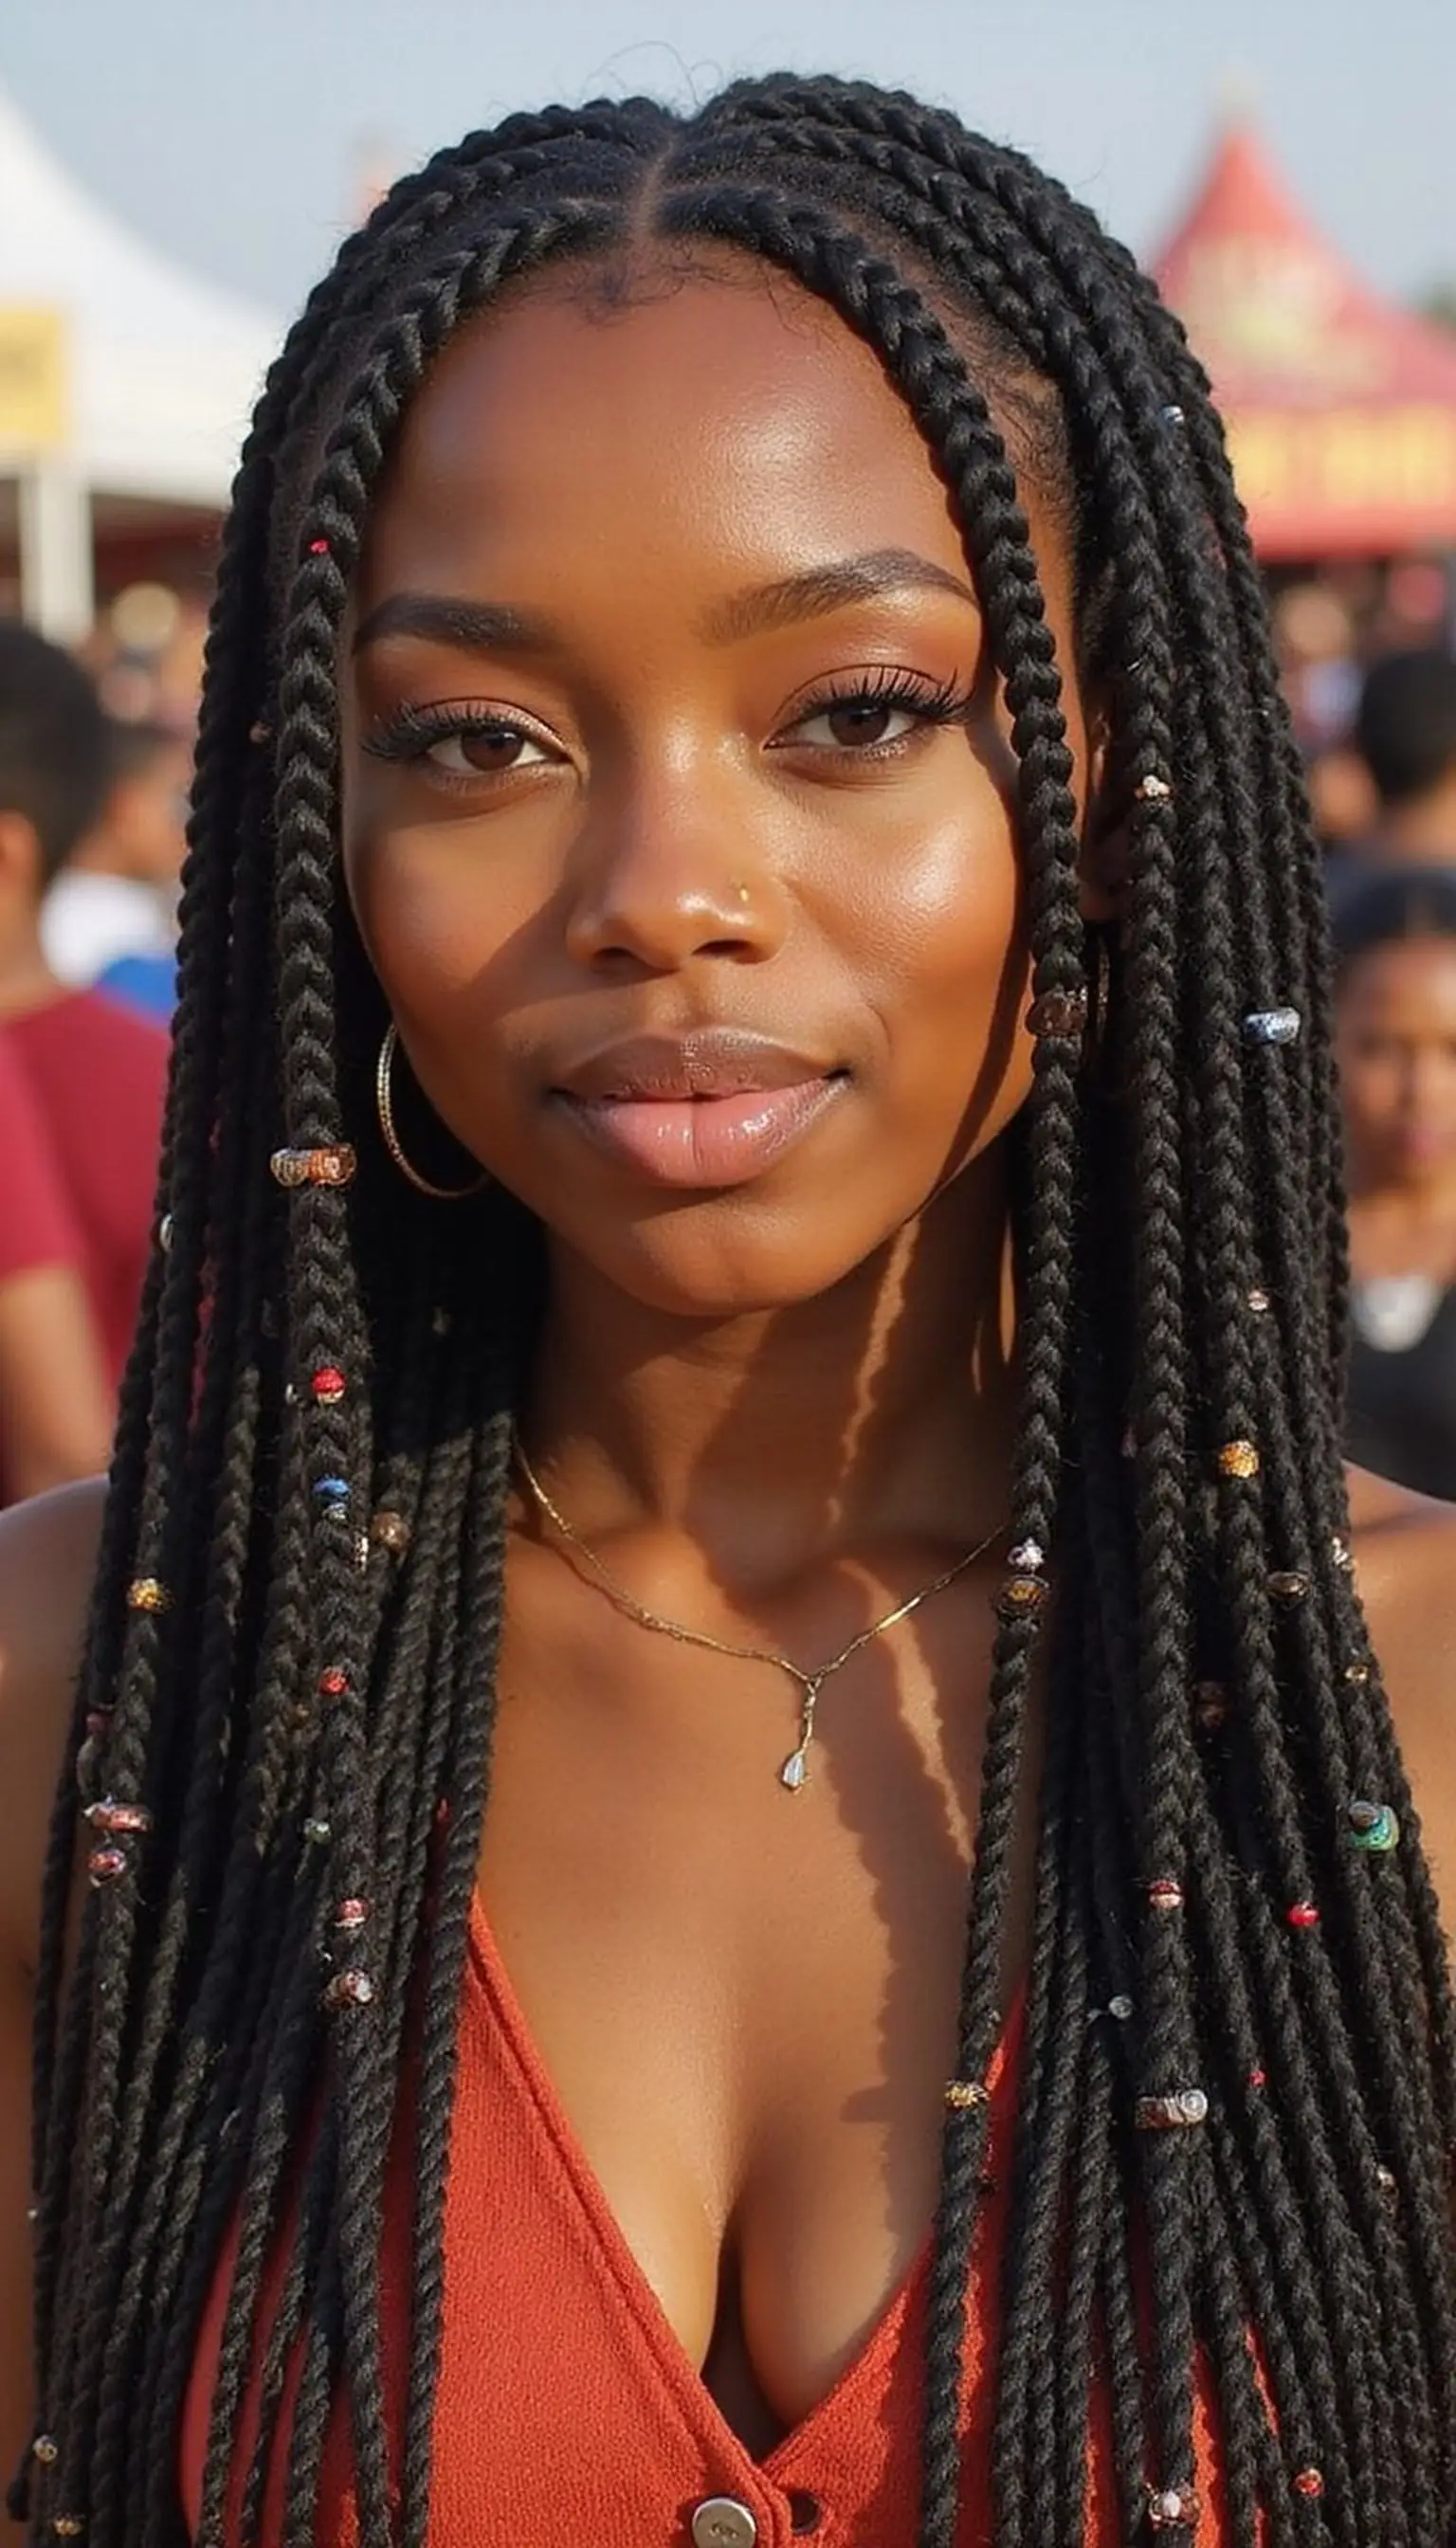
Box braids threaded with multicolor hair beads make a long-lasting, playful statement that swings beautifully during parades. After braiding sections, secure bead clusters at the ends or intersperse beads along strands for texture and movement. This style is ideal for multi-day events since it stays neat and can be accessorized with cuffs, ribbons, or tiny flags for extra personality.
💇 Styling Tips ▶
Styling Tips
- Add beads to cooled braids to avoid stretching while warm from braiding.
- Use bead fasteners to lock beads in place for long wear.
- Alternate bead colors for a balanced rainbow pattern throughout the braid.
⚠️ Avoid: Adding beads too early can loosen braids; attach beads only after braids are fully set and tightened.
🔄 Try Also: Mix metallic cuffs with beads or create half-beaded, half-plain braids for a graphic contrast.
🛒 Products & Materials ▶
Items Used
- multicolor hair beads
- bead fasteners
📌 “Lively box braids accented with multicolor hair beads for parade movement.”
• • •
Temporary Color Streaks With Chalk Set
⏱️ 20 min · 🟢 Beginner
Temporary color streaks with a chalk set are perfect for easy weekend Pride plans. Section off thin slices of hair and swipe pastel or neon chalk onto damp strands for vivid color that washes out. Blend edges with a comb, dry, and style as desired. This quick method lets you experiment with rainbow pops for the day without long-term commitment or salon visits.
💇 Styling Tips ▶
Styling Tips
- Wear gloves and old towel to reduce pigment transfer during application.
- Tap color on small sections for the brightest payoff.
- Seal with a light mist to minimize transfer onto clothing.
⚠️ Avoid: Using chalk on dry, coarse hair gives uneven color; dampen strands slightly for smoother application.
🔄 Try Also: Create thin rainbow face-framing streaks, a hidden underlayer, or a bold full-side block of color.
🛒 Products & Materials ▶
Items Used
📌 “Quick chalk streaks for playful temporary rainbow color at parades.”
• • •
Glitter Top Knot With Star Confetti
⏱️ 12 min · 🟢 Beginner
A high top knot sprinkled with star hair confetti and sparkle gel creates a playful focal point that glints in parade sunlight. Twist hair into a sleek or messy top knot, apply sparkle gel to the hairline and knot, then press star confetti into the gel. The confetti adds texture and whimsy while the knot keeps hair manageable during a long day of festivities.
💇 Styling Tips ▶
Styling Tips
- Use a clear elastic to secure the knot before adding confetti for stability.
- Apply confetti sparingly for a chic, not overdone, sparkle.
- Press confetti gently into gel so it adheres without falling out.
⚠️ Avoid: Sprinkling confetti on dry hair causes fallout; press into gel to keep pieces attached.
🔄 Try Also: Create low glitter buns, scatter confetti through loose waves, or use heart-shaped confetti for a different motif.
🛒 Products & Materials ▶
Items Used
- star hair confetti
- sparkle hair gel
- clear hair elastics
📌 “Star-studded glitter top knot for playful parade-ready sparkle.”
• • •
Colorful Bobby Pin Mosaic
⏱️ 8 min · 🟢 Beginner
A colorful bobby pin mosaic along the temple or browline is an easy way to paint a rainbow without dye. Arrange colorful bobby pins in overlapping rows or geometric patterns on one side for an asymmetric, editorial effect. This accessory-forward approach is fast, low-commitment, and highly photogenic when paired with sleek hair or a sharp part for crisp lines.
💇 Styling Tips ▶
Styling Tips
- Start placing pins from the smallest section to the largest for clean layering.
- Use a light gel to smooth hair before pinning for a polished look.
- Mix metallic pins with colorful ones to add shimmer to the mosaic.
⚠️ Avoid: Placing pins haphazardly looks messy; plan the pattern before inserting pins for a neat finish.
🔄 Try Also: Make mirrored mosaics on both sides, or line the hair part with a single-color row for subtlety.
🛒 Products & Materials ▶
Items Used
📌 “Bold colorful bobby pin mosaic for graphic, low-effort parade style.”
• • •
Satin Scrunchie Low Bun With Hoop Earrings
⏱️ 10 min · 🟢 Beginner
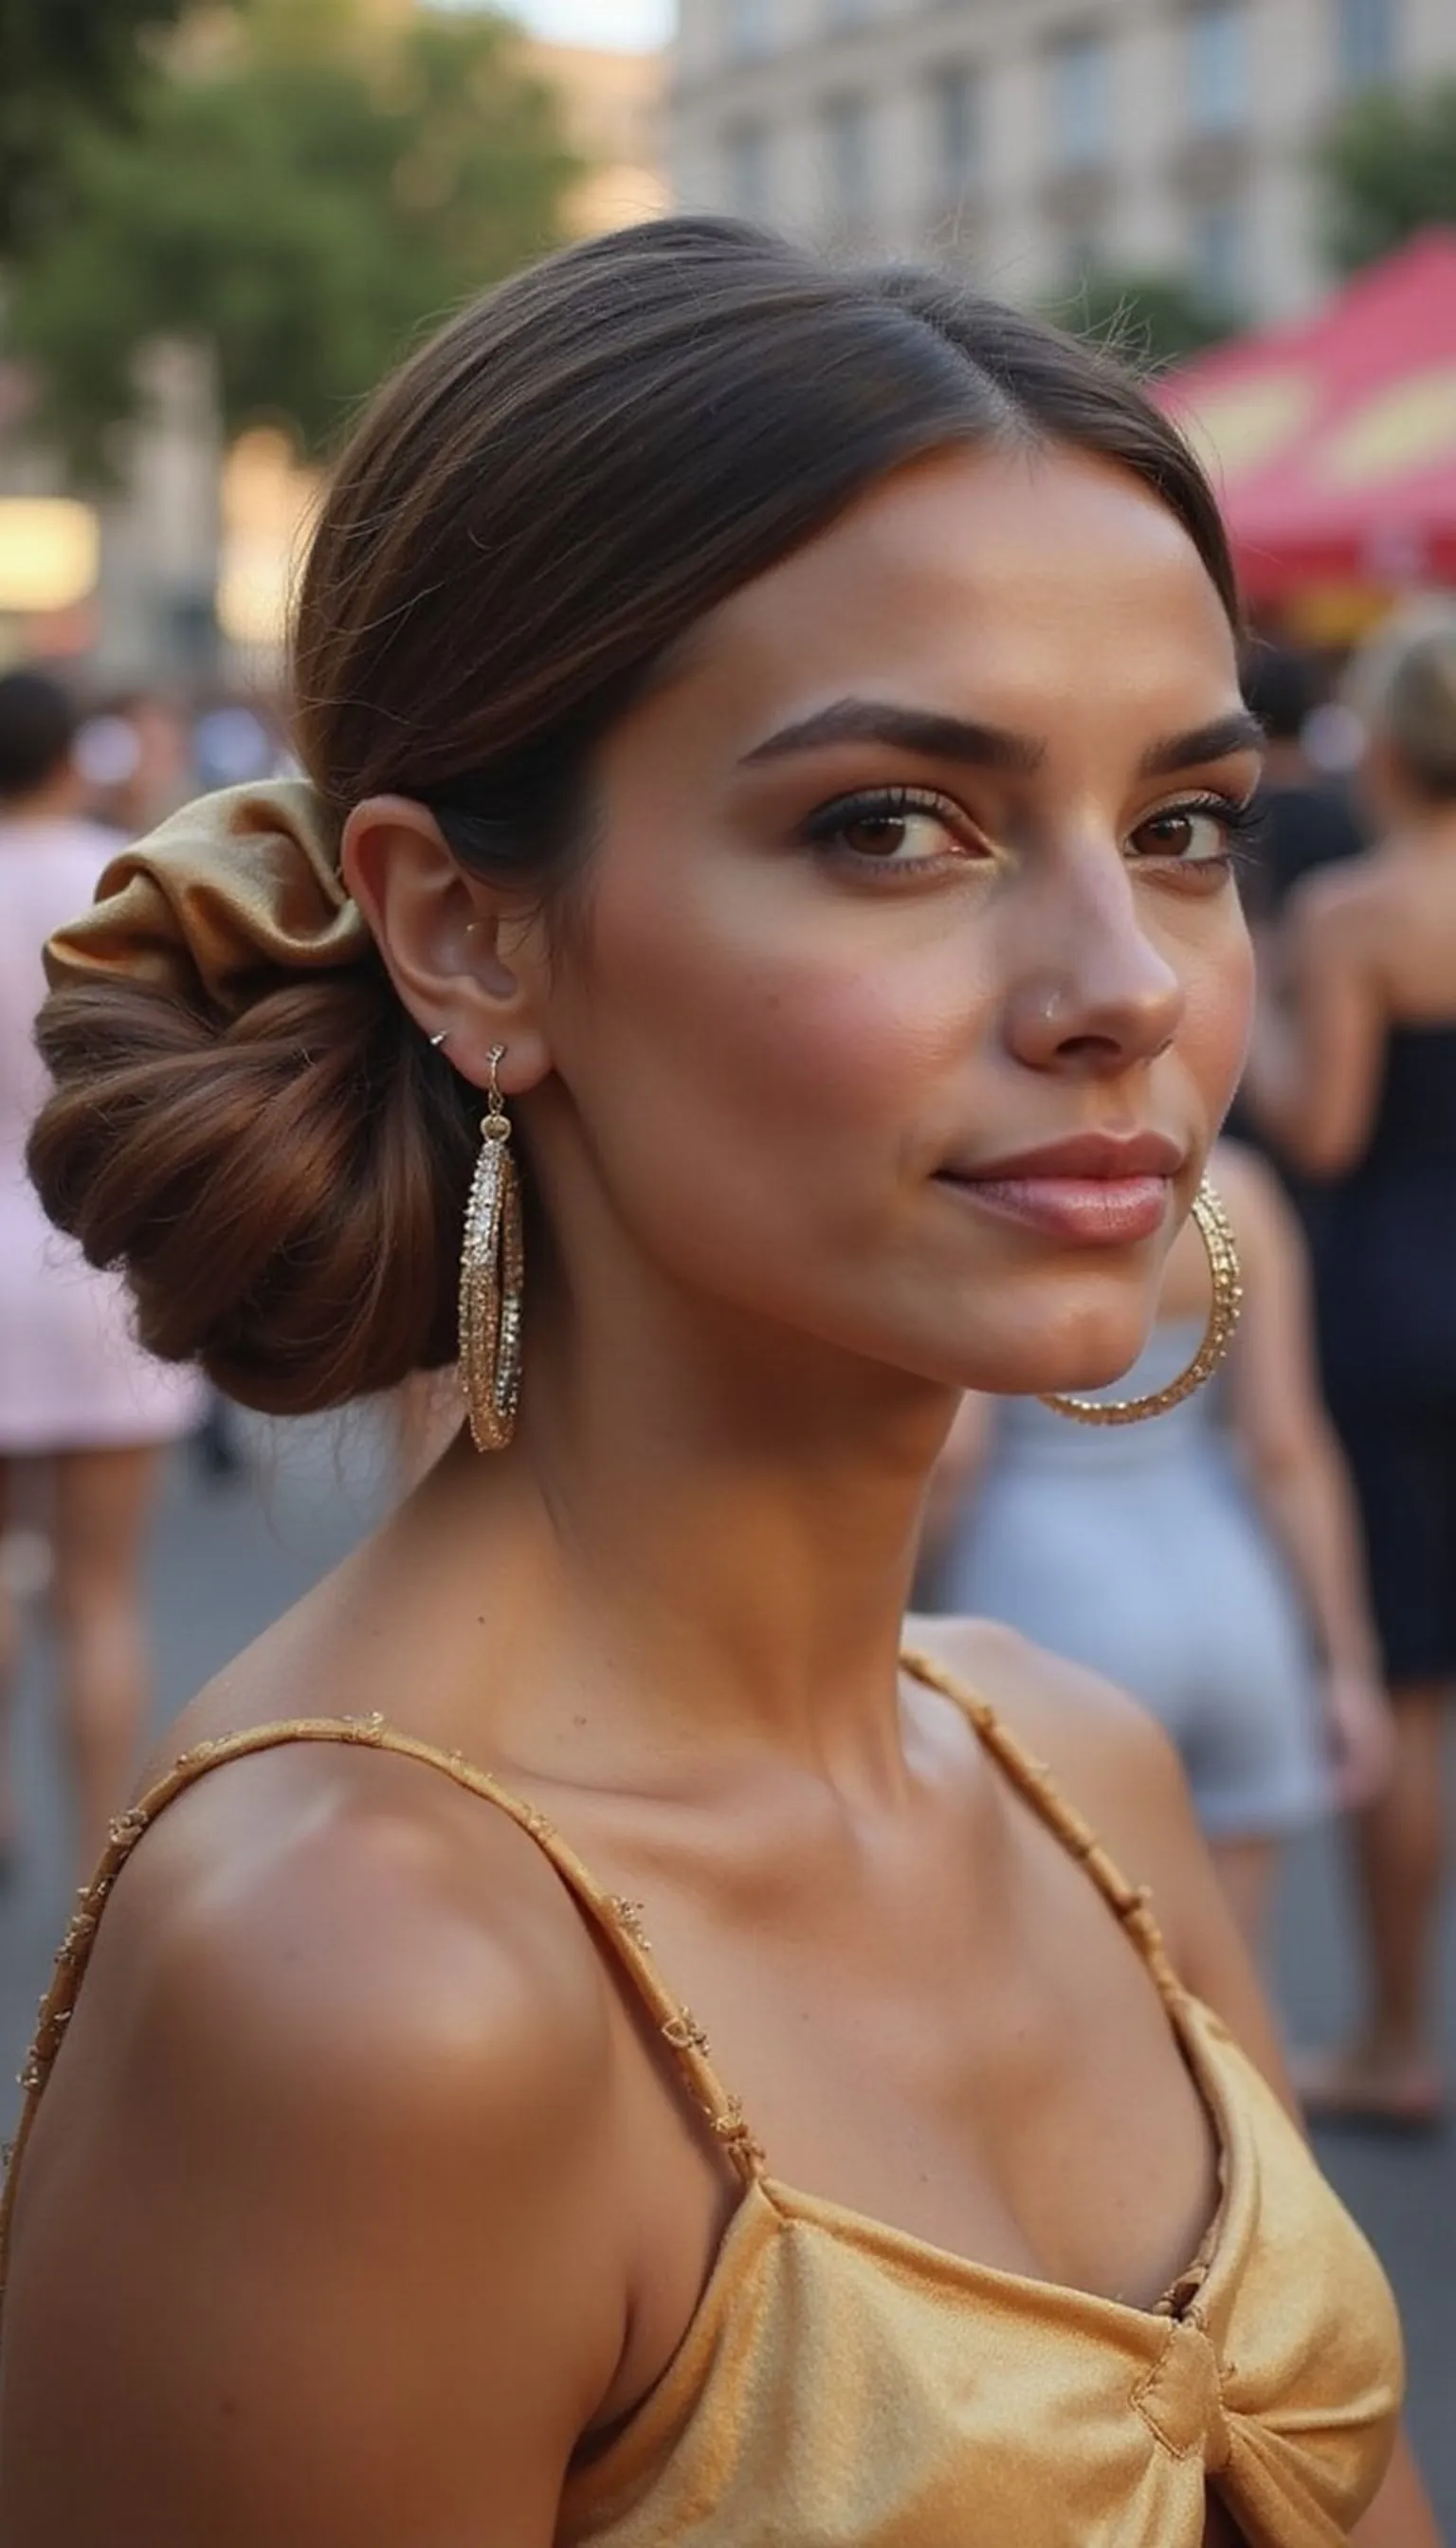
A satin scrunchie tucked into a low bun adds elegant shine to a casual Pride outfit, especially when paired with statement hoop earrings. Smooth hair into a low pony, coil into a bun, and wrap a satin scrunchie around the base for luxe texture. The scrunchie protects hair while looking polished and pairs well with bold accessories for photos and parades alike.
💇 Styling Tips ▶
Styling Tips
- Use a lightweight serum to smooth frizz for a sleek bun finish.
- Tuck small face-framing pieces for a softer silhouette around the face.
- Choose scrunchie color to complement outfit or flag hues.
⚠️ Avoid: Wrapping scrunchie once often looks limp; wrap twice for better volume and hold.
🔄 Try Also: Try a high satin scrunchie bun or a half-up scrunchie loop for a more casual look.
🛒 Products & Materials ▶
Items Used
- satin scrunchie
- hoop earrings
📌 “Polished low bun secured with a satin scrunchie and statement hoops.”
• • •
Neon Thread Hair Wraps On Braids
⏱️ 35 min · 🟠 Intermediate
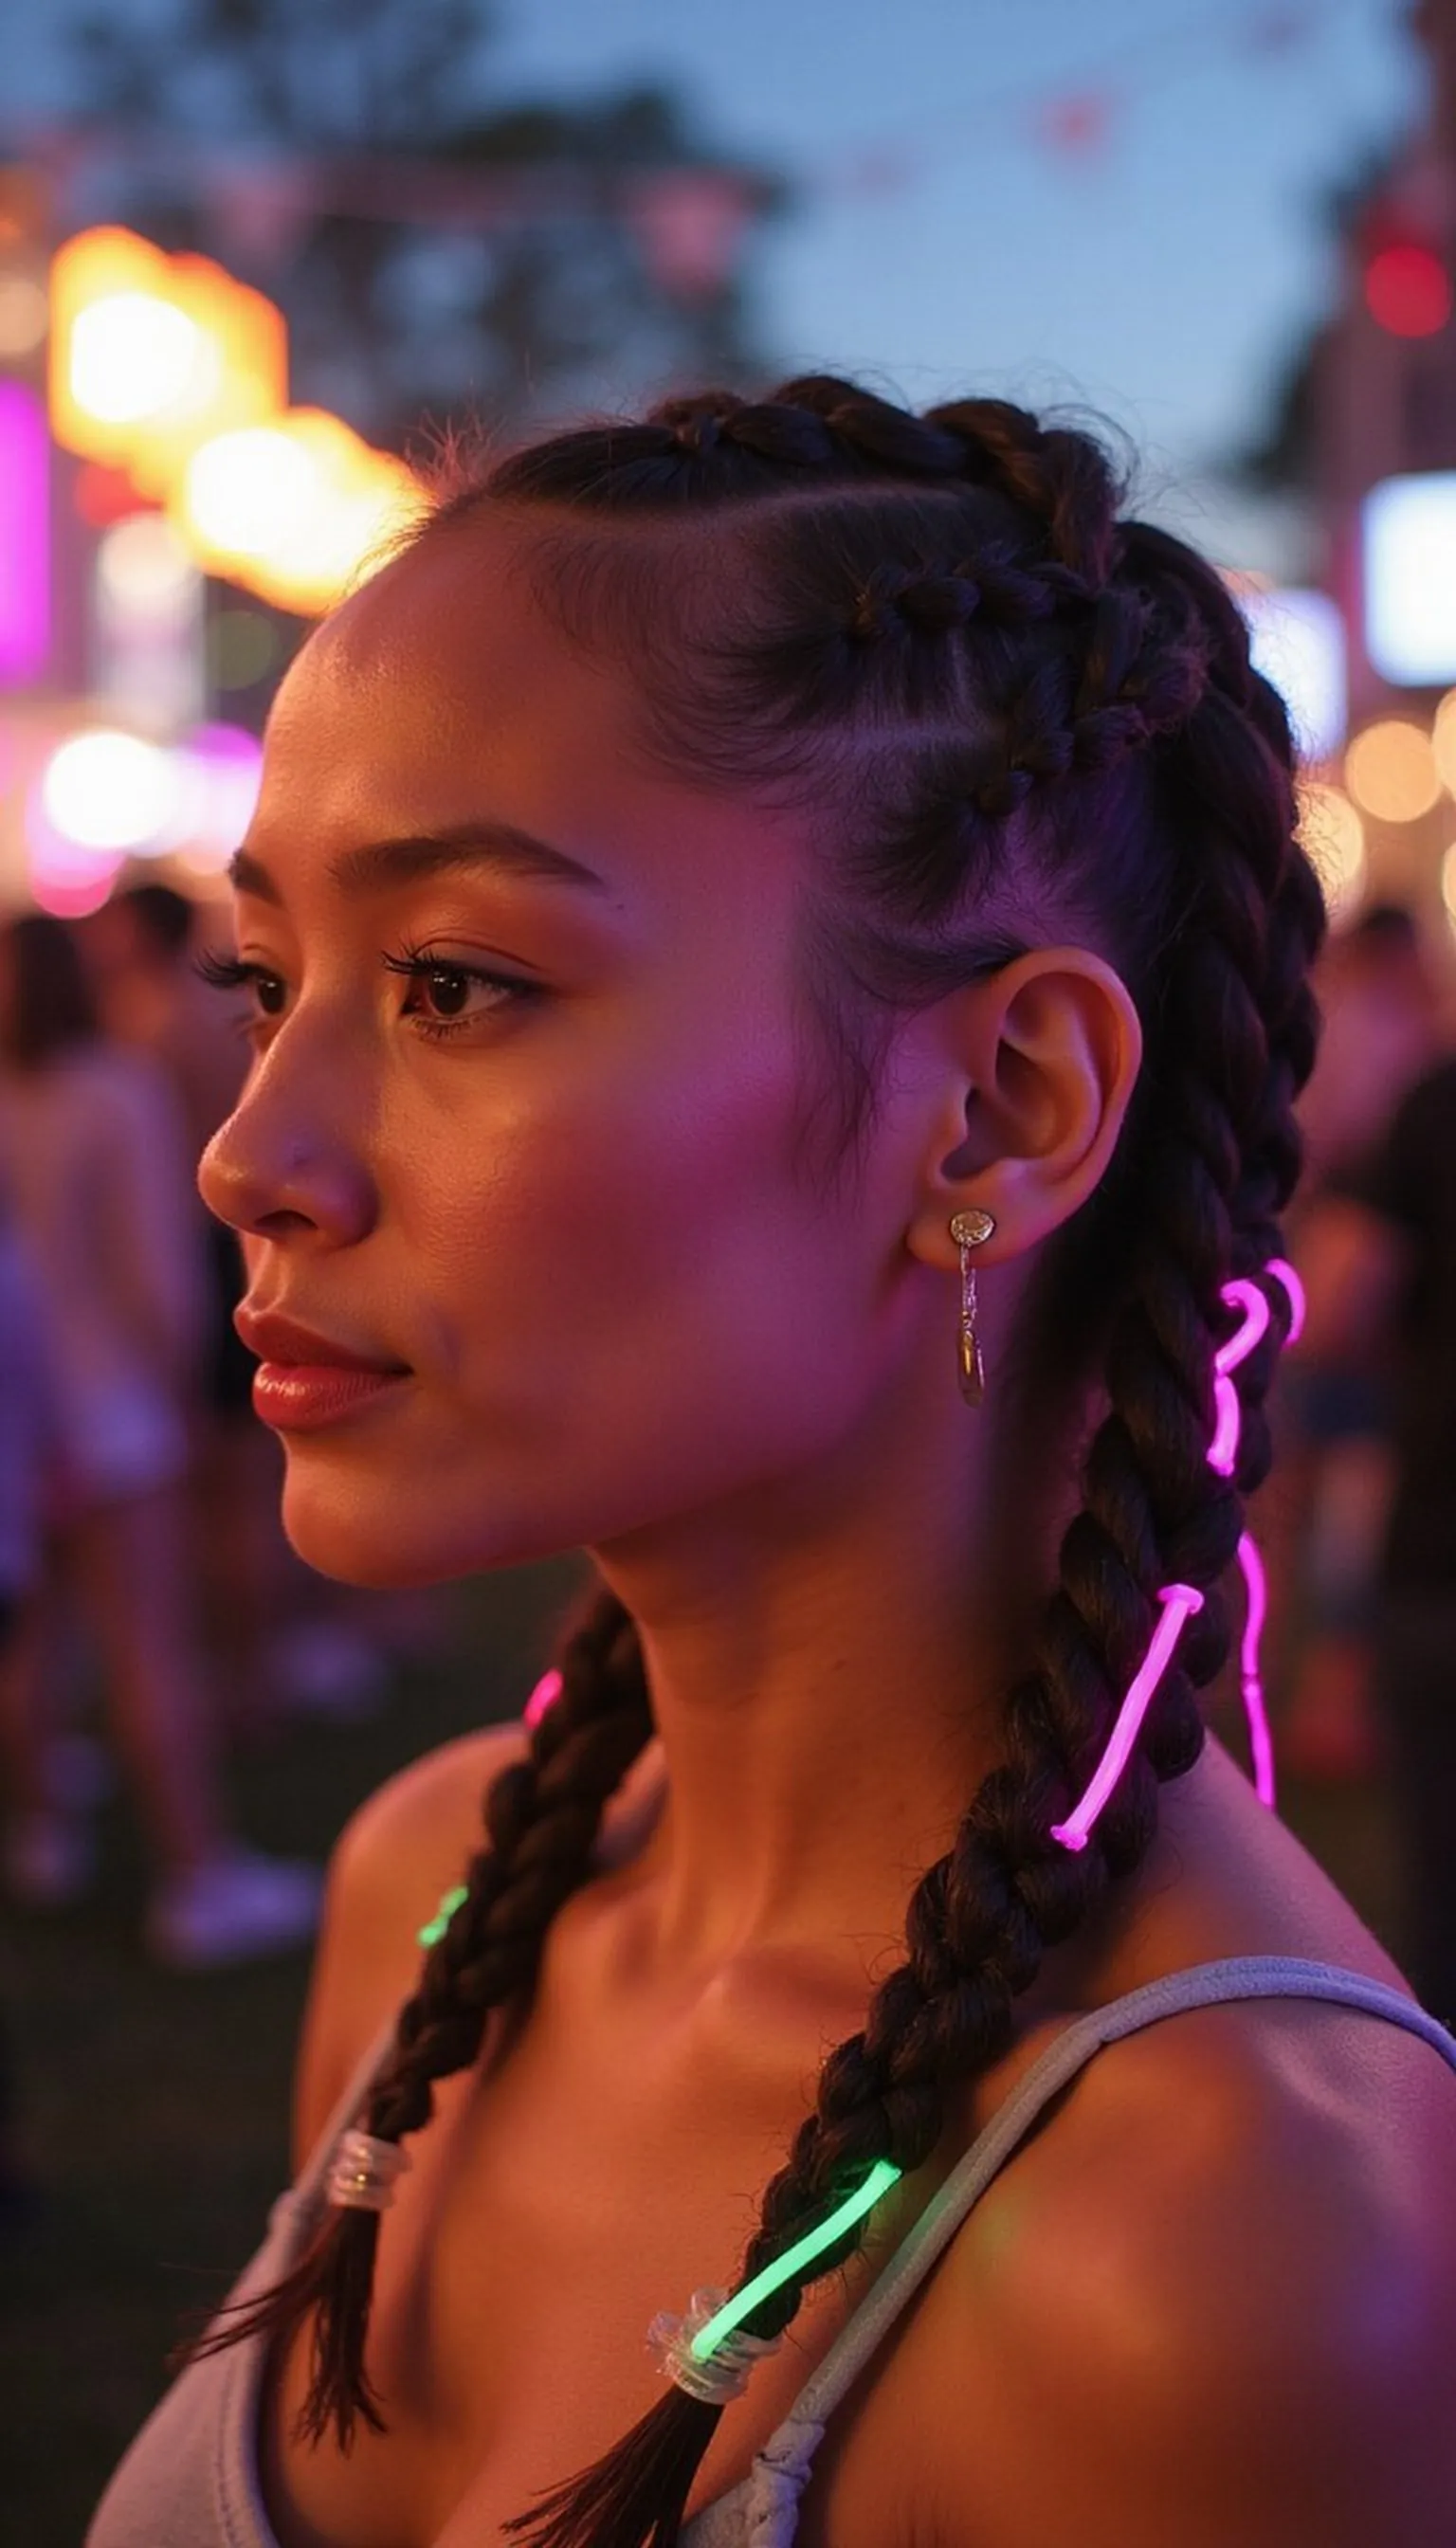
Neon thread wraps woven around braids lend a handcrafted, festival-ready energy that pops in photos and movement. Braid small sections, then tightly wrap neon thread from root to tip, knotting securely at the end. These wraps work as individual accent pieces or across many braids for a full graphic effect. They hold up to dancing and add playful texture to any parade look.
💇 Styling Tips ▶
Styling Tips
- Seal thread ends with a tiny knot and a dab of clear glue for long wear.
- Wrap thread with consistent tension to avoid lumps and gaps.
- Mix thread colors for a striped rainbow effect along the braid.
⚠️ Avoid: Wrapping too loosely creates gaps and tangles; keep tension even and smooth as you go.
🔄 Try Also: Combine wraps with beads or metallic thread, or wrap only face-framing braids for subtle detail.
🛒 Products & Materials ▶
📌 “Hand-wrapped neon thread braids for playful, tactile parade hair.”
• • •
Faux Rainbow Fade With Colorful Clips
⏱️ 20 min · 🟠 Intermediate
A faux rainbow fade created with layered colorful clips along the side gives the illusion of multi-hued hair without dye. Section hair on one side and clip overlapping colorful clips from root to mid-length, creating a stepped rainbow. The clipped cascade reads like a gradient and can be removed afterward, making it a quick swap for those who want bold visuals for the day only.
💇 Styling Tips ▶
Styling Tips
- Start with the lightest shade near the part and build toward darker hues for a soft gradient.
- Place clips at a slight angle for a flowing, fade-like effect.
- Secure base hair with light smoothing cream so clips lay flat and neat.
⚠️ Avoid: Using mismatched clip sizes breaks the gradient; keep clip sizes consistent for a clean fade.
🔄 Try Also: Use metallic clips for a shinier finish or mirrored clips on both sides for symmetry.
🛒 Products & Materials ▶
Items Used
📌 “Clever faux fade made from colorful clips for instant rainbow impact.”
