
As an Amazon Associate I earn from qualifying purchases.
Paper Flower DIY Crafts are a joyful gateway to colorful home accents, and Paper Flower DIY Crafts turn simple paper into lifelike blooms. Paper Flower DIY Crafts invite hands-on play with paper flower crafts for parties, weddings, paper flower bouquets for tabletops, and DIY paper flowers that last. Paper Flower DIY Crafts blend folding, layering, and curling for tactile petals and paper flower templates that bring bright, long-lasting floral arrangements and playful table displays.
Rolled crepe paper roses with soft edges
⏱️ 30-45 min · 🟢 Beginner
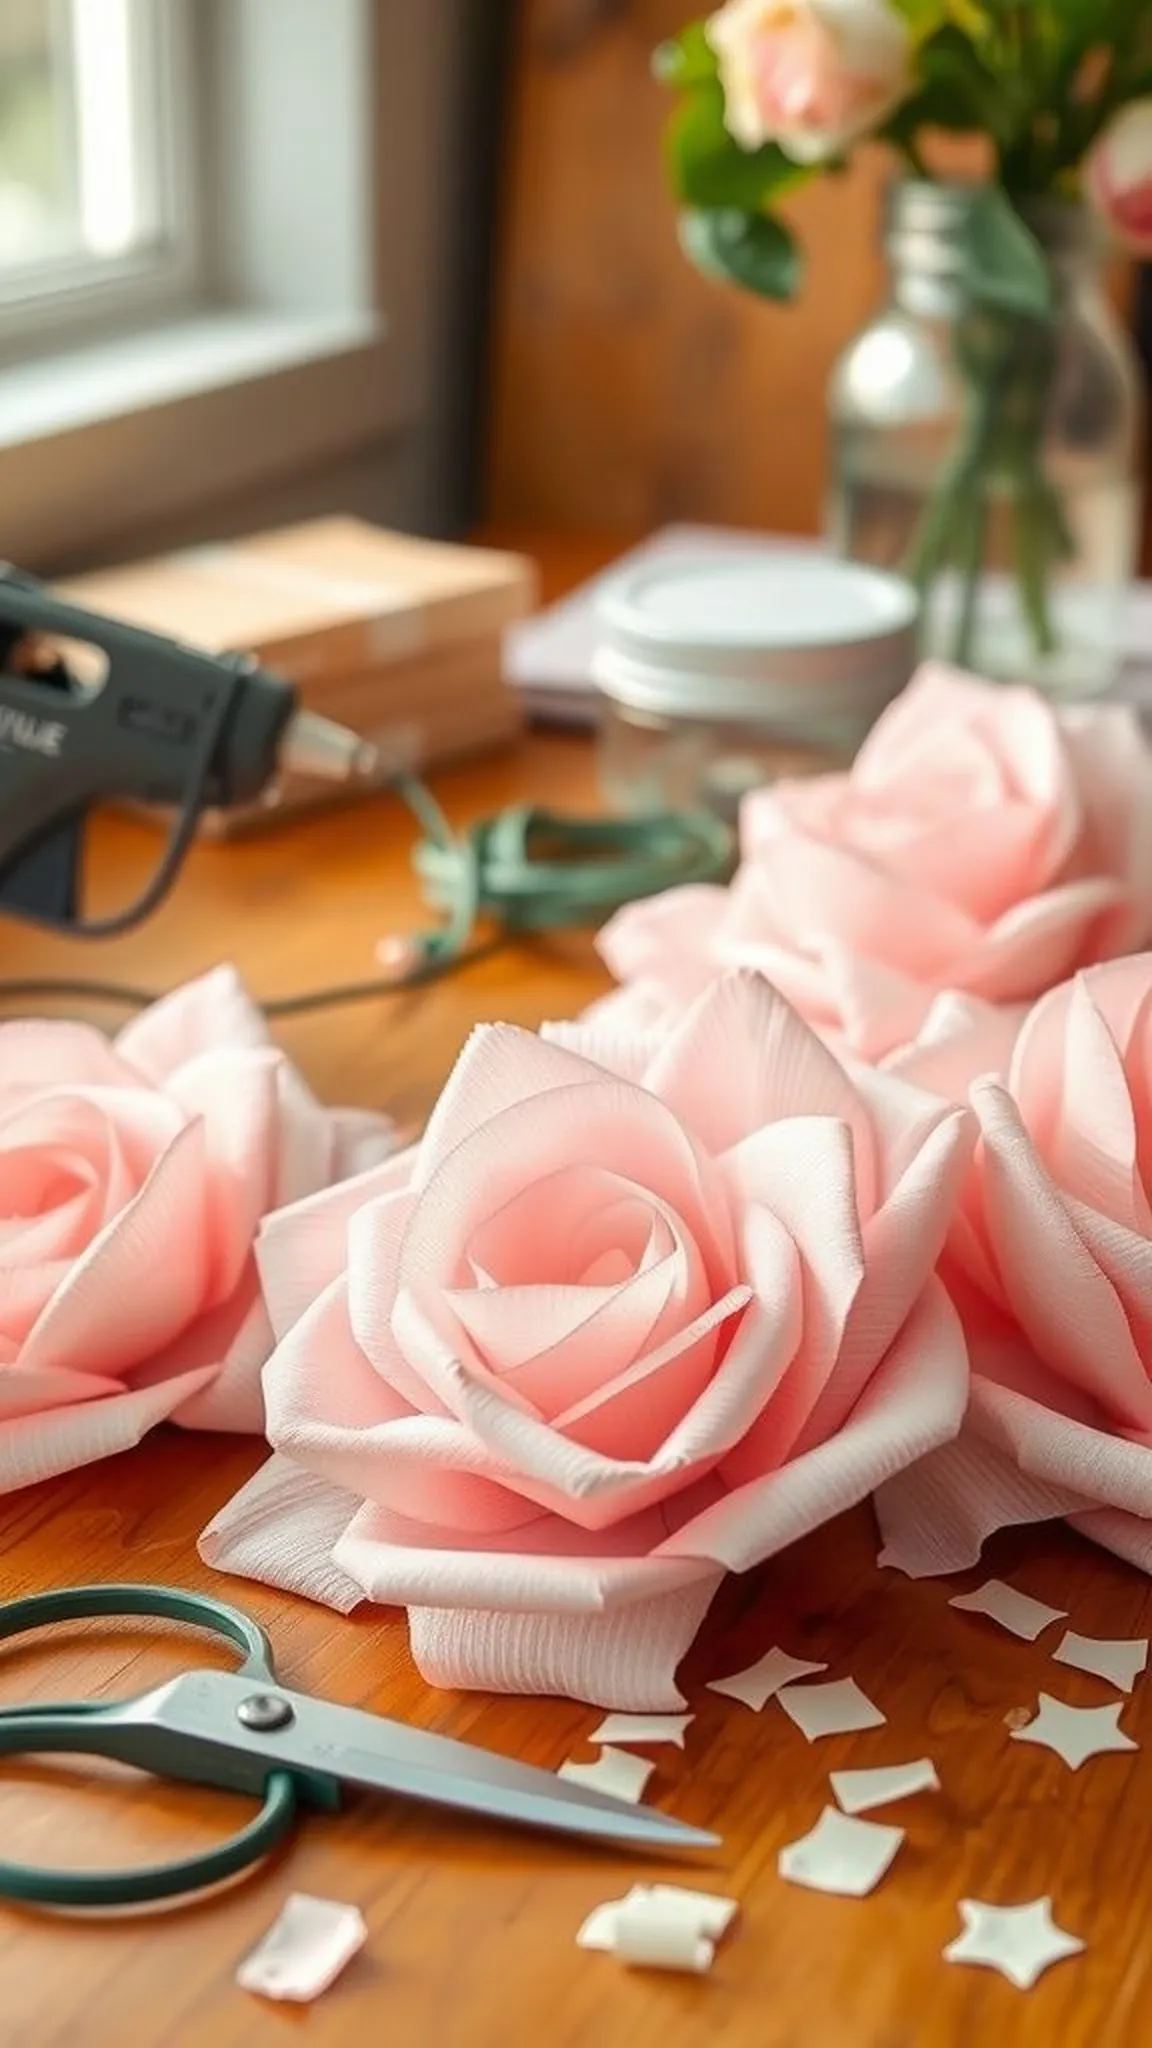
Working with thin crepe paper, these rolled roses feel both delicate and weighty at once. The ridged surface catches light so each petal shows subtle shadows and highlights, and the center remains snug before the outer layers unfurl into a broader silhouette. Fingers often pause on the edges to feel the texture, and a light scattering of paper fibers from handling gives the craft a slightly dusty, handmade scent.
Arranged in a small jar they read like fresh florals, lively yet comfortably domestic.
📋 How to Make This ▶
- Cut a spiral from a circle of crepe paper and leave a small central disc as the bud base.
- Roll the spiral tightly around the disc, easing the outer layers slightly looser for a natural bloom.
- Secure the base with a dab of hot glue and insert floral wire through the center for a stem.
- Wrap the wire with floral tape and shape the bloom to desired openness.
⚠️ Avoid: Beginners often make the center too tight, causing the rose to appear closed instead of open and blooming. Overhandling the petals can flatten them and reduce volume.
🔄 Try Also: Try thinner crepe for dainty buds or heavier crepe for fuller garden roses, and experiment with two-tone petals for a painted look.
🛒 Products & Materials ▶
Items Used
- crepe paper sheets
- floral wire
- hot glue gun
- scissors
- floral tape
📌 “Delicate rolled crepe roses that look fresh on a mantel.”
• • •
Fluffy tissue paper pom-pom blooms for parties
⏱️ 20-30 min · 🟢 Beginner
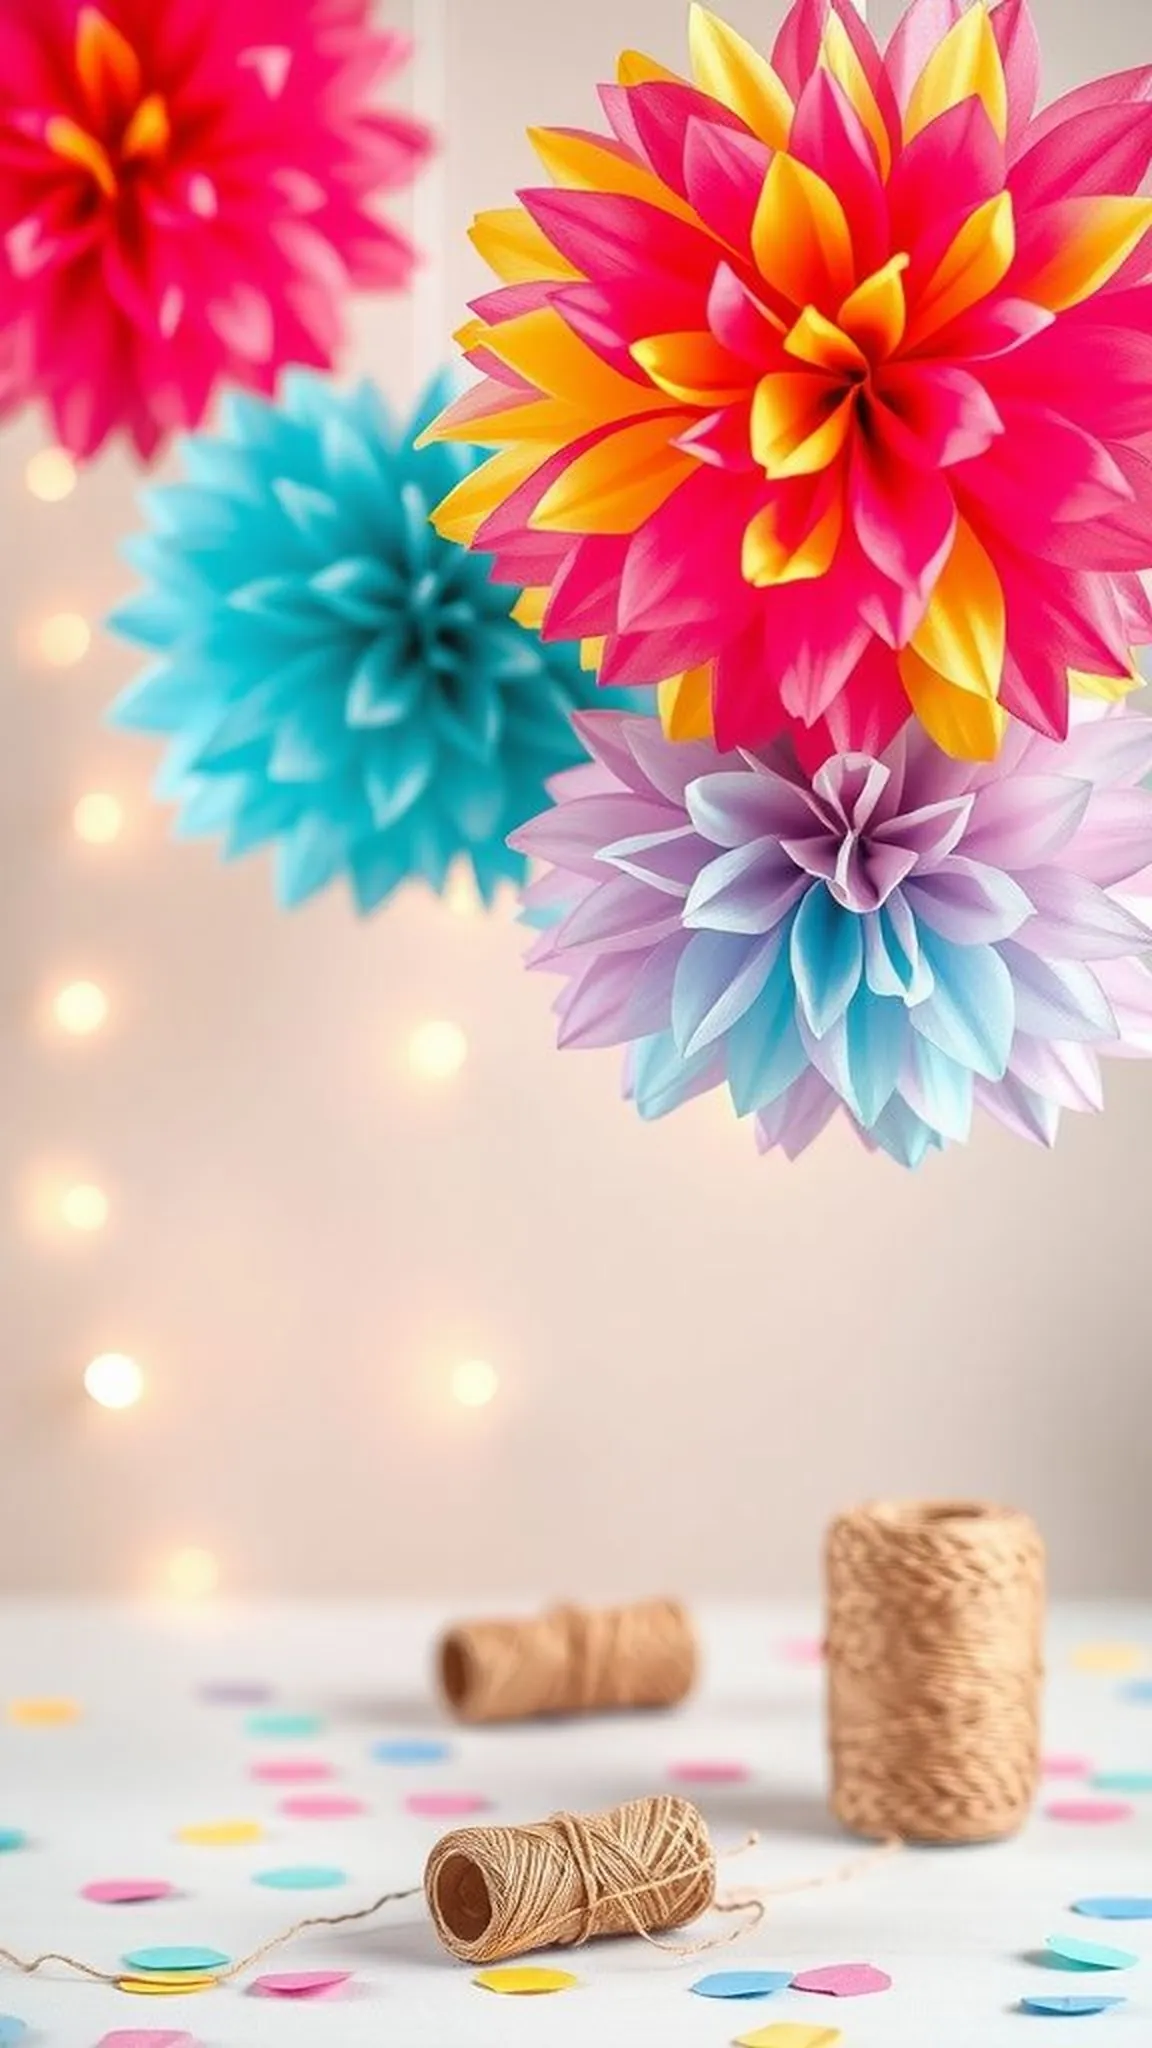
Tissue paper pom-pom blooms offer a burst of cloudlike color that feels festive and lightweight. Each layer lifts and fluffs into airy volume, producing a soft halo that moves with the slightest breeze. The thin paper edges catch highlights, creating a luminous, almost translucent quality.
When grouped, the blooms form a cheerful canopy that reads like confetti suspended in slow motion. The crisp scent of fresh paper mixes with a faint adhesive tang where the base meets the stem, and the overall effect is playful and buoyant.
📋 How to Make This ▶
- Stack multiple tissue paper sheets and bind the center with a small length of floral wire or string.
- Fold the stack accordion-style and secure the folded center with another wire for a stem.
- Separate each tissue layer by lifting toward the center to create a rounded, fluffy shape.
- Trim uneven edges for a neater silhouette if desired.
⚠️ Avoid: New crafters often pull too aggressively, causing layers to tear and leaving ragged holes. Overcompacting the stem binding can make the flower droop.
🔄 Try Also: Mix two contrasting tissue colors in one bloom, make mini pom-poms for table décor, or combine multiple sizes on a string for a garland.
🛒 Products & Materials ▶
📌 “Cloudlike tissue pom-poms that brighten any celebration instantly.”
• • •
Layered crepe paper peonies with ruffled centers
⏱️ 1-2 hours · 🟠 Intermediate
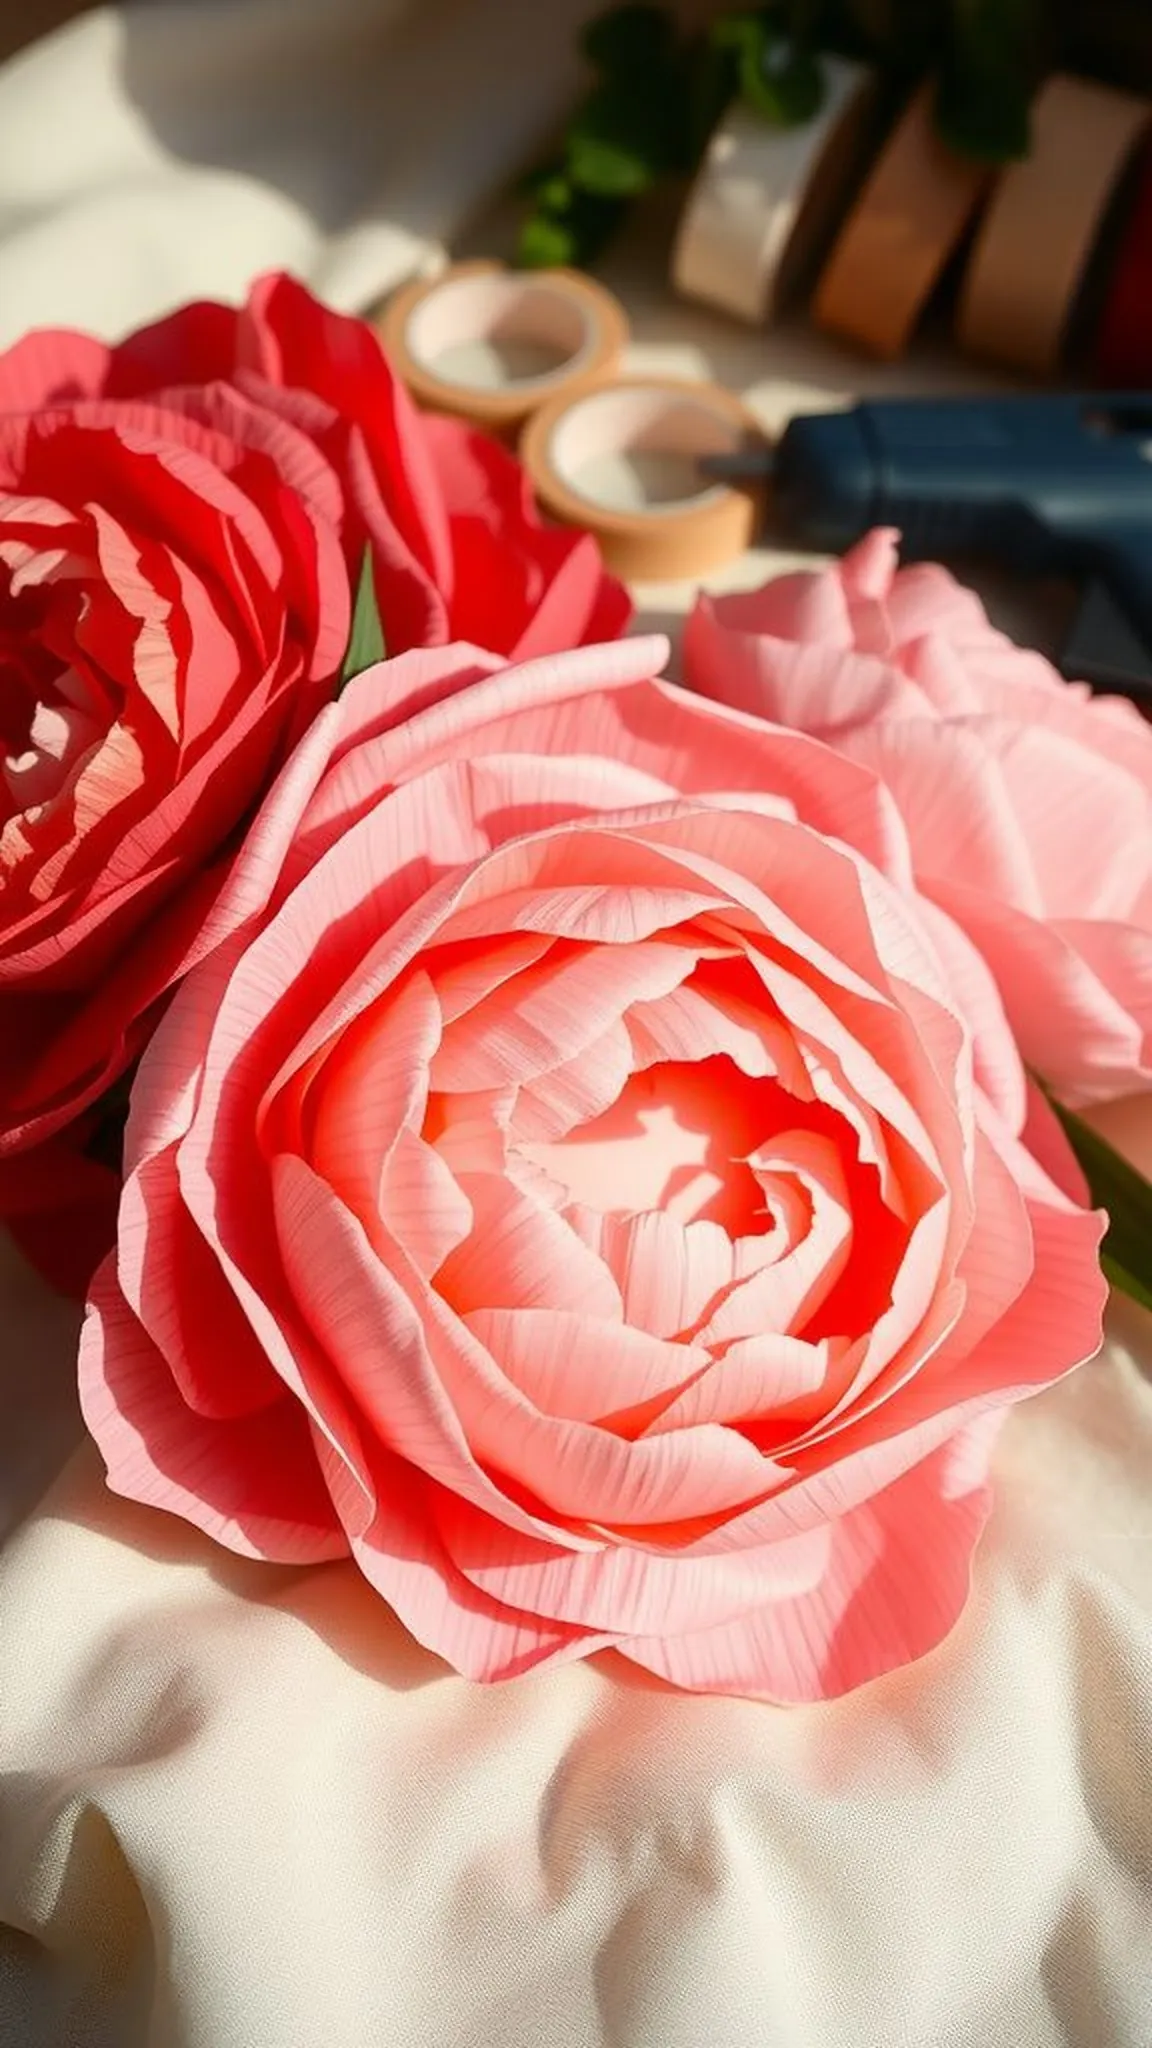
Crepe paper peonies bring a lush, ruffled drama that feels indulgent and tactile. Multiple petal layers build a dense crown whose edges ripple and cast delicate shadows, suggesting depth in every curve. The central frill packs concentrated texture, while outer petals fall into a generous, open face that reads like a favorite garden bloom.
Working with saturated hues gives the peony a painterly quality; the paper holds soft crimps and small nicks that add character. When bunched together they create a lavish bouquet with visual weight and soft movement.
📋 How to Make This ▶
- Cut petal shapes in graduated sizes from crepe paper, keeping a slightly wider base for each petal.
- Create a small fringed cone for the center, wrapping it around a short piece of floral wire and securing the base.
- Add petals around the center in overlapping rows, attaching each petal at the base with hot glue.
- Finish by wrapping the stem with floral tape and shaping petals for a soft, open face.
⚠️ Avoid: A typical beginner error is making outer petals too small, resulting in a dense center with little bloom spread. Crowding too many petals at the same radius can flatten the overall shape.
🔄 Try Also: Create half-peonies by omitting back petals for a cup-like bloom, or use ombré crepe for depth and a vintage feel.
🛒 Products & Materials ▶
Items Used
- crepe paper sheets
- floral wire 20 gauge
- hot glue gun
- scissors set
- floral tape
📌 “Luscious crepe peonies with ruffled, full-bodied blooms.”
• • •
Save time and printer ink with 50+ printable templates and step-by-step instructions in one ad-free guide.

Just $19.99 — lifetime access
Quilled paper flowers with delicate rolled petals
⏱️ 1-1.5 hours · 🟠 Intermediate
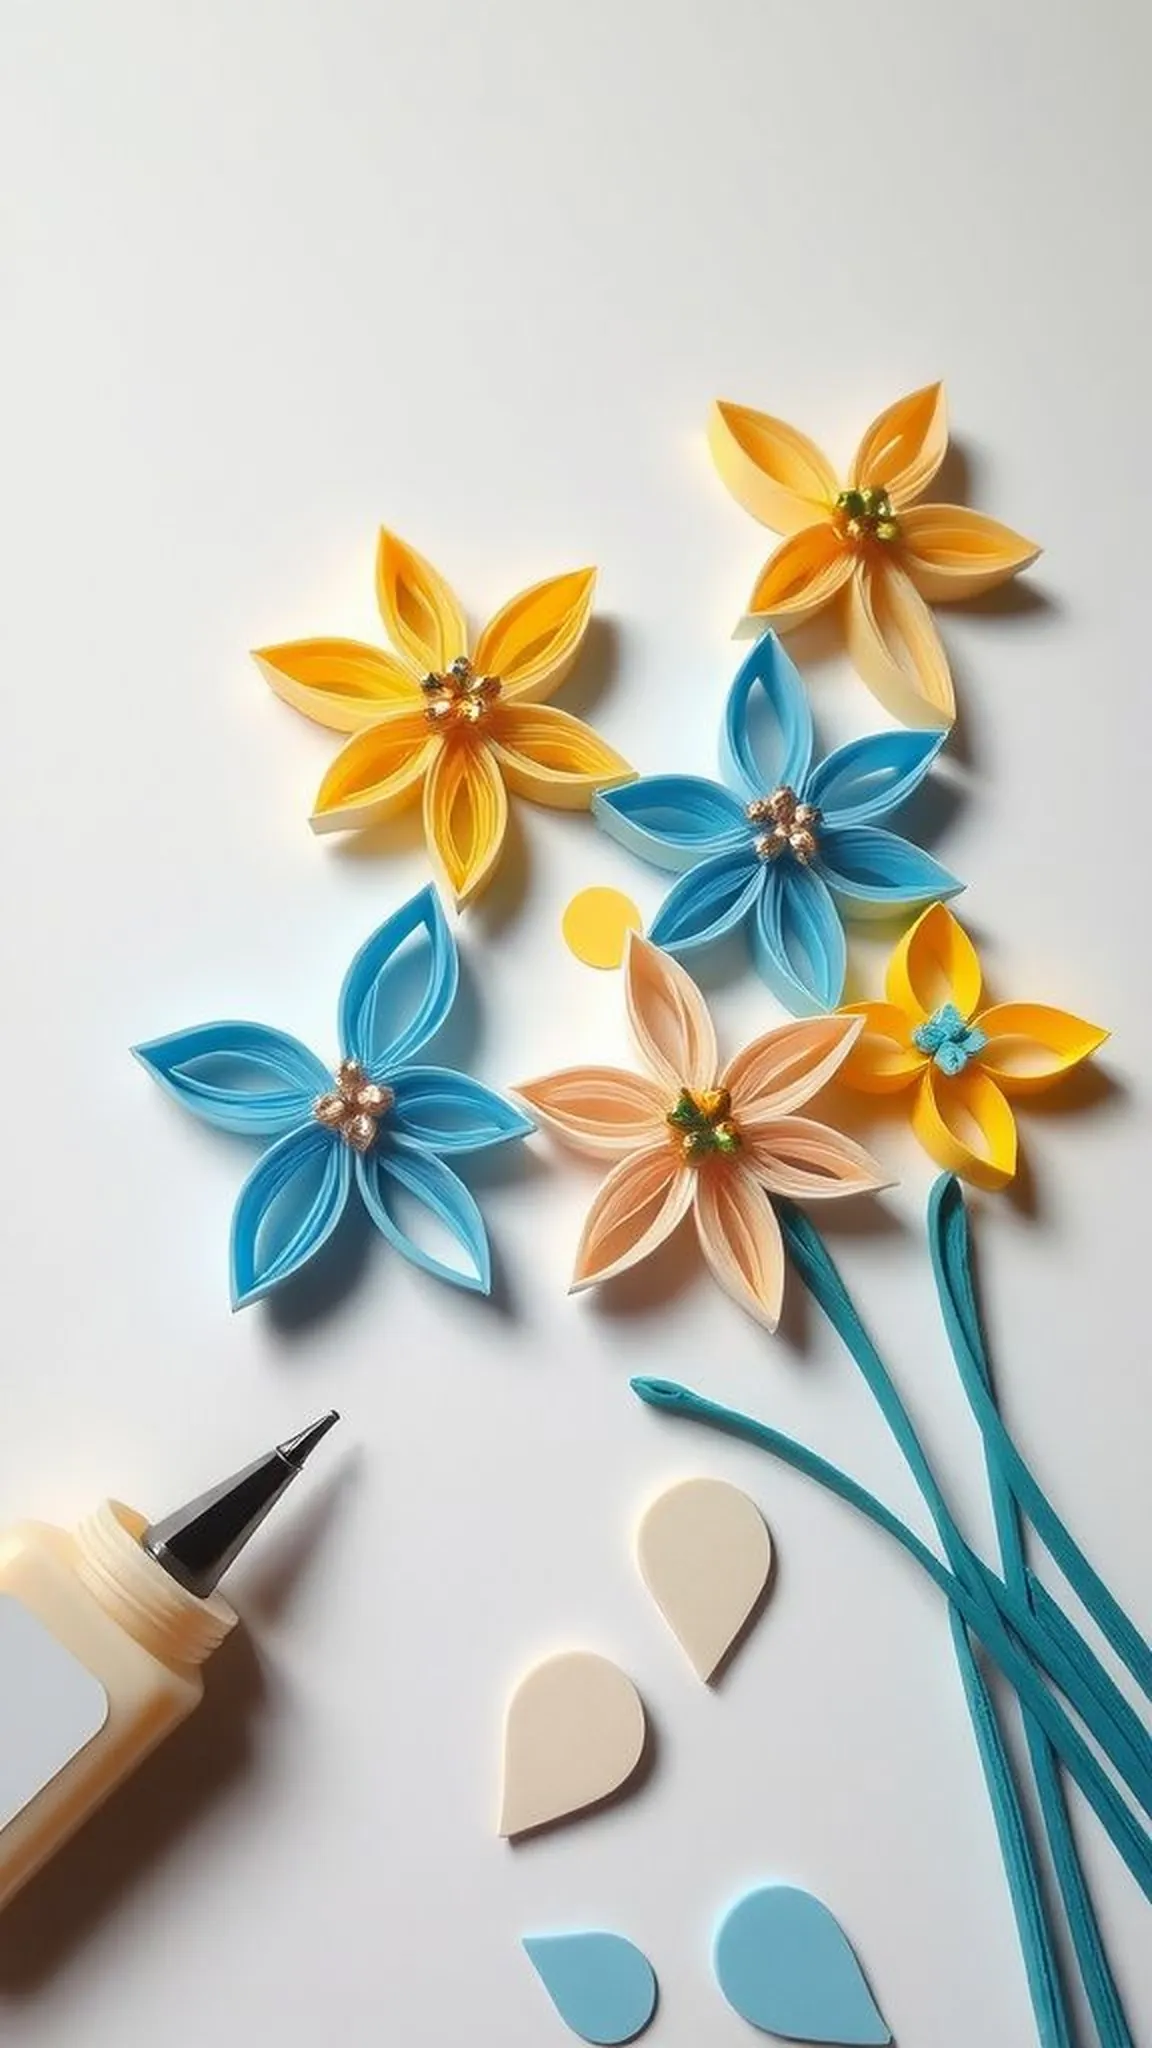
Quilled paper flowers feel like tiny, intricate laceworks that invite close inspection. Thin paper strips curl into tight coils and then expand into teardrop and marquise shapes that catch light on their edges. The resulting blooms have an architectural air, where negative space plays as big a role as color.
Fingertips often trace the raised contours, and the contrast between glossy quilling paper and matte cardstock backing adds a refined dimension. When grouped on a card, each blossom reads like a miniature sculpture with delicate linear rhythm.
📋 How to Make This ▶
- Wrap narrow paper strips around a quilling tool to form tight coils, then loosen slightly to desired size.
- Pinch one side of coils to create teardrop or marquise petal shapes and glue the tips to hold form.
- Arrange petals around a small central coil on cardstock, adhering each petal with a tiny drop of glue.
- Add leaves or stems from green strips to complete the floral motif.
⚠️ Avoid: Beginners sometimes over-tighten coils, which spring open unevenly when released and disrupt petal symmetry. Using inconsistent strip lengths can create lopsided blossoms.
🔄 Try Also: Try metallic quilling paper for a subtle sheen, create tiny buds for confetti, or assemble multiple rosettes into a framed bouquet.
🛒 Products & Materials ▶
Items Used
- quilling paper strips
- quilling tool
- craft glue
- cardstock
📌 “Tiny quilled flowers that look like delicate paper lace.”
• • •
Origami tulips with simple folded stems
⏱️ 20-40 min · 🟢 Beginner
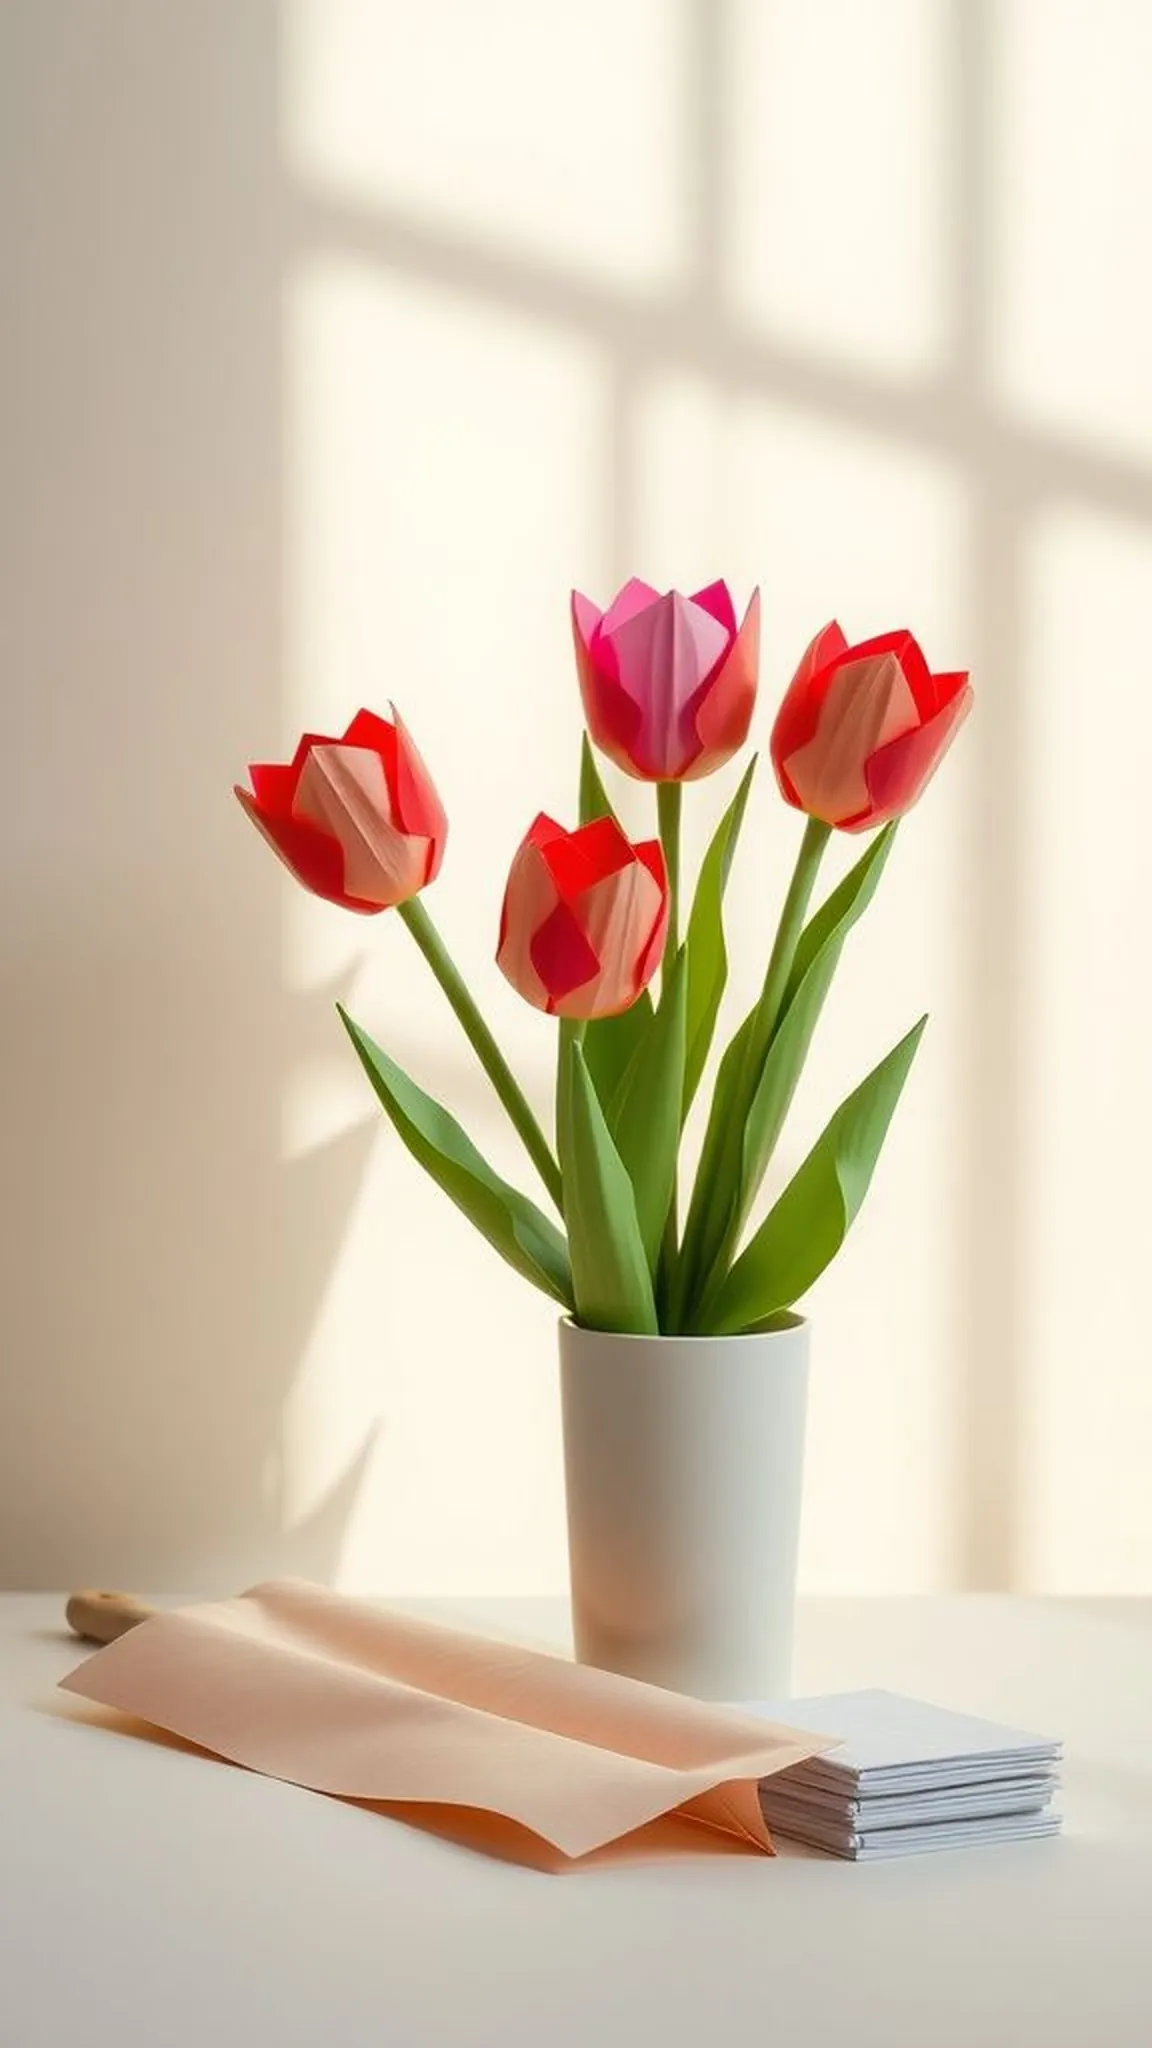
Origami tulips have a neat, geometric charm that feels both modern and placid. Crisp creases shape tulip cups that hold clear, angular lines, and the paired paper stems provide a minimal, almost Scandinavian silhouette. The tactile snap of folded corners and the slight memory of paper at the base give each bloom a handcrafted integrity.
When placed in a slim vase the composition reads calm and controlled, like a small study in color and form. The tactile reward of clean folds and a tidy base makes these calming to arrange.
📋 How to Make This ▶
- Fold a square of colored paper into a tulip cup using standard origami petal-fold techniques.
- Create a narrow tubular stem from green paper and insert the stem into the tulip base.
- Secure the stem within the flower base with a small drop of glue if needed and adjust the cup shape gently.
- Repeat for a small bouquet and arrange stems in a narrow vase.
⚠️ Avoid: Rough or imprecise folds can make the tulip cup lopsided and the stem fit poorly. Using paper that is too thick prevents neat creases.
🔄 Try Also: Make mini tulips from smaller squares for a tight cluster, or fold oversized tulips for a dramatic single-stem display.
🛒 Products & Materials ▶
Items Used
- origami paper squares
- bone folder
- craft glue
- green paper for stems
📌 “Crisp origami tulips with tidy folded stems for simple displays.”
• • •
Giant statement paper flowers for photo backdrops
⏱️ 3-5 hours · 🔴 Advanced
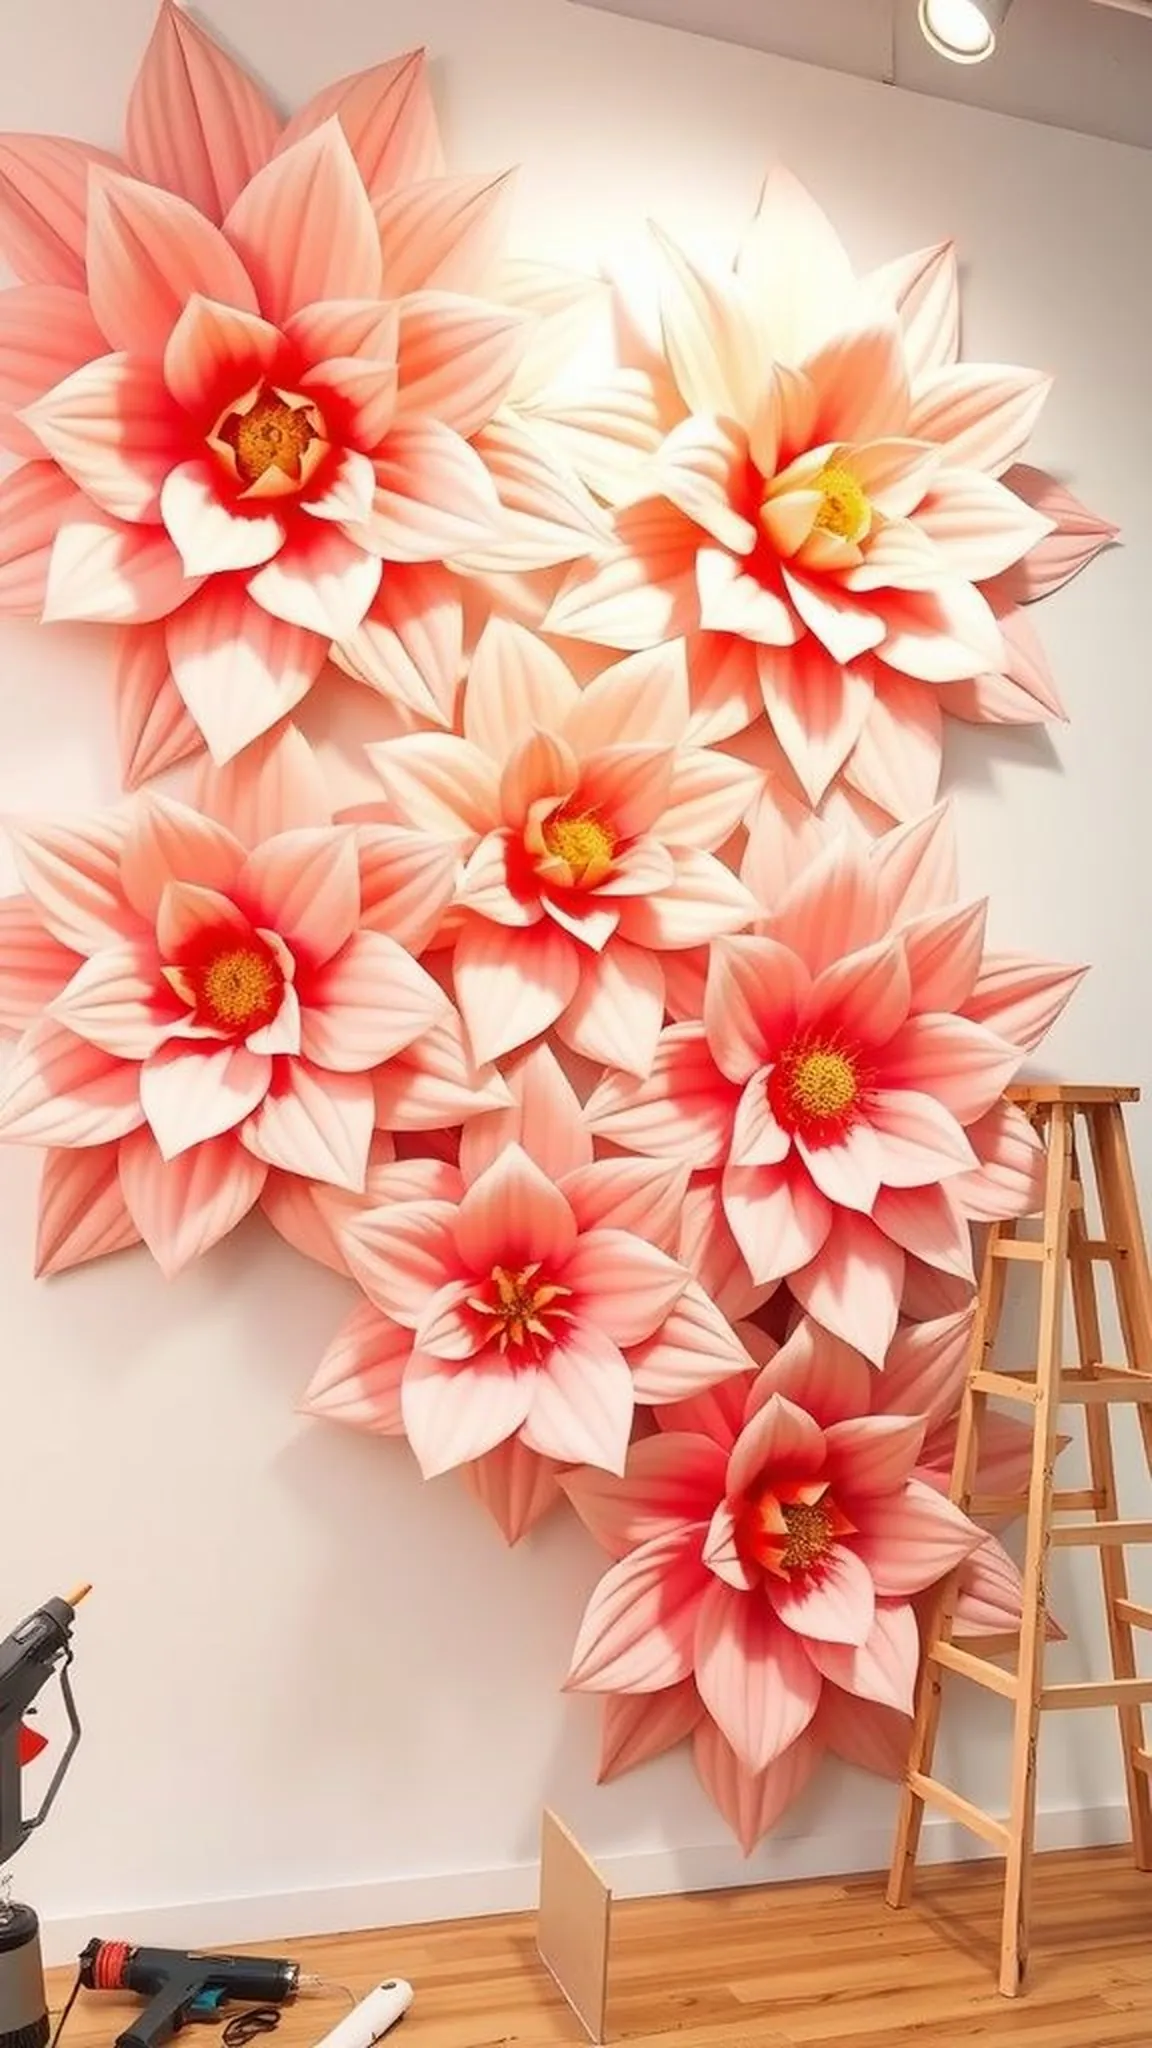
Giant paper flowers make an immersive, theatrical statement that transforms a wall into a bloom field. Oversized petals spread across a scale that invites viewers to pause and trace contours, and the broad surfaces reveal subtle paper textures that read like velvet from a few feet away. The interplay of shadow and overlap creates sculptural depth, and painted edges or blended tones add painterly dimension.
Mounted on a backdrop they command attention, shifting a space into an installation that feels handmade and carefully staged for impact.
📋 How to Make This ▶
- Trace petal templates onto heavyweight cardstock and cut multiple layers to achieve desired thickness.
- Shape each petal by gently curving with a dowel, then join layers at the base with strong adhesive.
- Mount petals onto a foam board or wooden backing in overlapping rows, securing each with hot glue or small brads.
- Finish edges with watercolor washes or ink for subtle depth and hang the assembled flowers on a wall.
⚠️ Avoid: A frequent error is under-supporting the large petals, which can droop and warp when mounted. Overloading a single backing point can lead to uneven display.
🔄 Try Also: Create a single oversized bloom as a focal point, cluster multiple medium flowers for a textured wall, or vary petal shapes for botanical diversity.
🛒 Products & Materials ▶
📌 “Oversized paper blooms that transform any wall into a floral backdrop.”
• • •
Mini paper flower bouquet in a mason jar
⏱️ 30-45 min · 🟢 Beginner
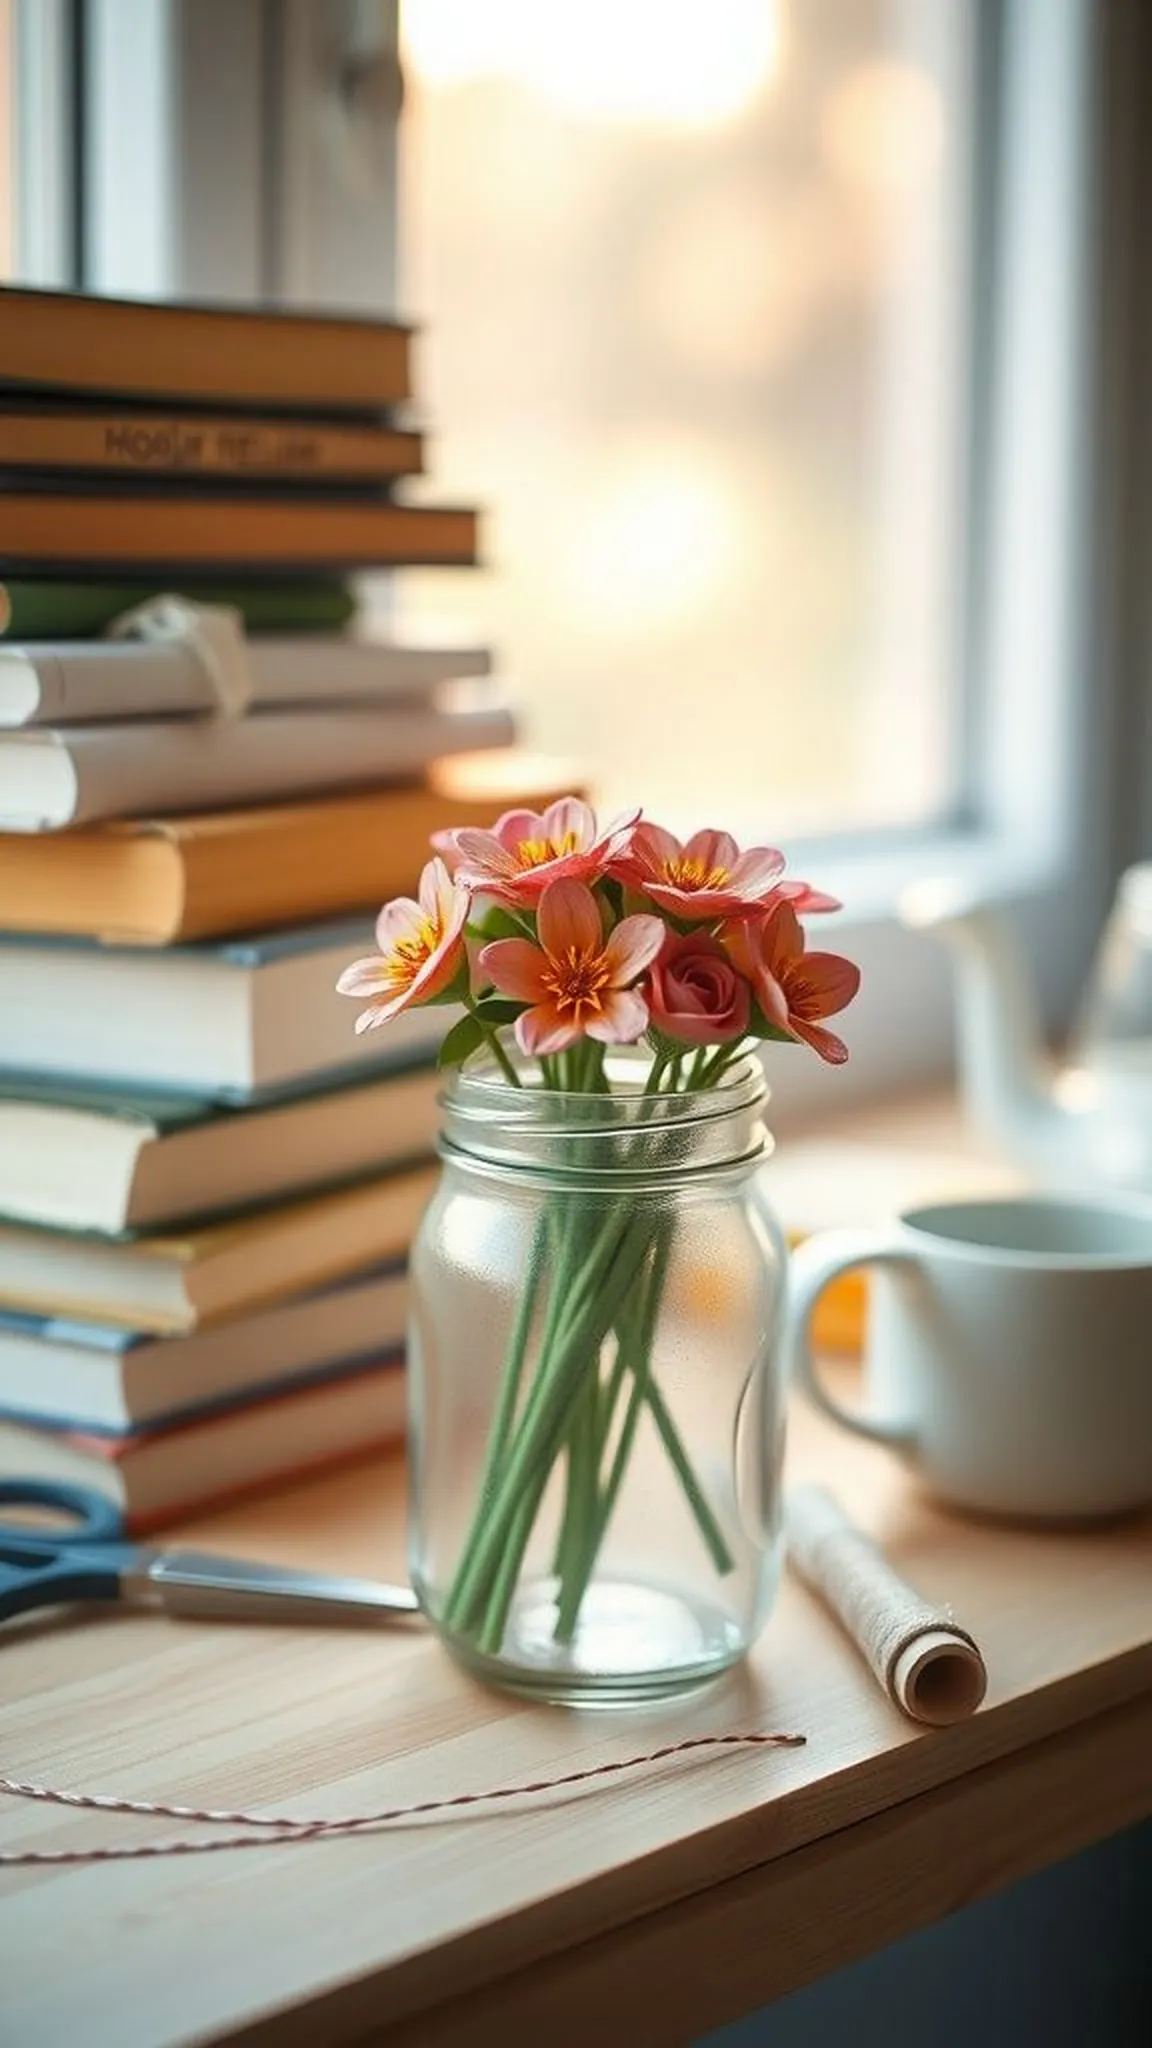
A mini paper flower bouquet in a mason jar reads cozy and casual, like a pocket-sized garden. Petite blooms cluster close, their paper edges peeking over tinted glass and catching light in tiny highlights. The jar’s ridged glass and simple mouth contrast with the handmade softness of the flowers, producing an inviting, homey vignette.
Tiny stems show wrapped green tape with a hint of floral wire peeking through. Placed on a windowsill the bouquet looks like a cheerful interruption to a surface of books and dishes.
📋 How to Make This ▶
- Create several small paper blossoms from cardstock or crepe, each attached to a short piece of floral wire.
- Arrange stems into a compact cluster and secure the base with floral tape.
- Place a small foam ball or crumpled paper inside a mason jar and insert stems until the bouquet sits snug.
- Add ribbon around the jar mouth for a finished touch if desired.
⚠️ Avoid: Beginners sometimes make stems too long, which causes the bouquet to slump low in the jar. Neglecting to secure stems at the base can allow the arrangement to tip.
🔄 Try Also: Mix paper leaves and dried sprigs for texture, or scale up for a larger jar centerpiece.
🛒 Products & Materials ▶
Items Used
- mason jar
- cardstock paper
- floral wire
- floral foam ball
- floral tape
📌 “Charming mini paper bouquet tucked in a mason jar.”
• • •
Paper succulent arrangements with folded leaves
⏱️ 1 hour · 🟠 Intermediate
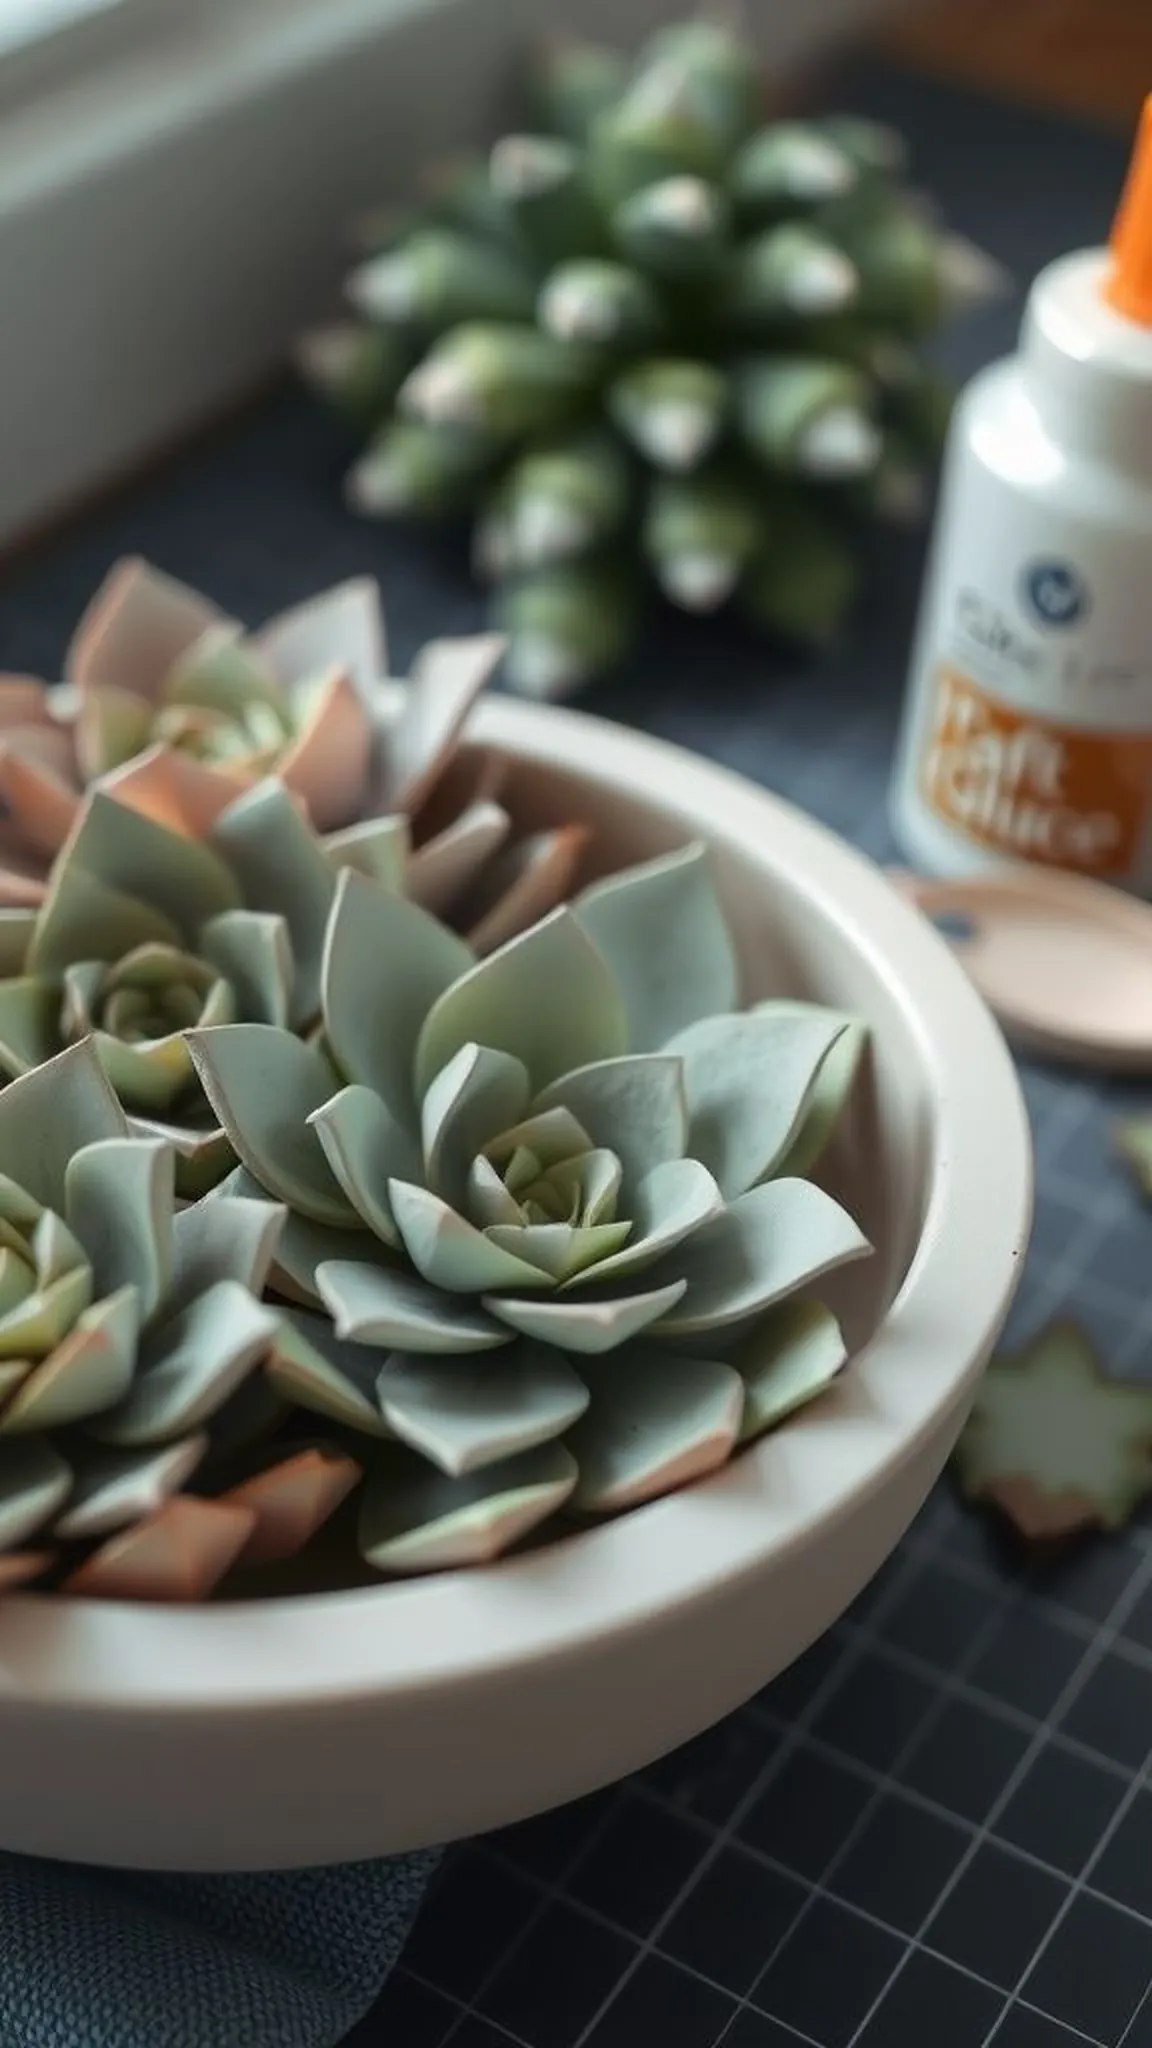
Paper succulents offer a fresh, sculptural take on desert plants that feels pleasantly tactile. Folded leaves sit in compact rosettes, and the paper edges carry a matte, satiny sheen that mimics living skin. The overall silhouette is tidy and architectural, with a satisfying weight to each petal-like leaf.
A touch of ink on the tips can simulate sun stress, and a shallow ceramic dish gives the arrangement a bonsai-like restraint. The cool greens and dusky tones make the cluster a calm, enduring accent on a desk.
📋 How to Make This ▶
- Cut leaf shapes from heavyweight paper and score or heat-shape bases for a subtle curve.
- Fold each leaf and attach bases to a small foam mound or cardboard disc using glue.
- Layer leaves in concentric circles to build a rosette, varying leaf sizes as layers expand.
- Place finished succulents into shallow dishes with decorative stones for a realistic display.
⚠️ Avoid: A frequent error is choosing paper that is too flimsy, which causes leaves to flop and rosettes to lose form. Overcrowding leaves at the same level flattens the sculptural effect.
🔄 Try Also: Make taller echeveria by increasing leaf size, or craft a mixed tray with folded paper air plants and painted rocks.
🛒 Products & Materials ▶
📌 “Architectural paper succulents with folded, plump leaves.”
• • •
Paper flower corsages for weddings and dances
⏱️ 45-60 min · 🟠 Intermediate
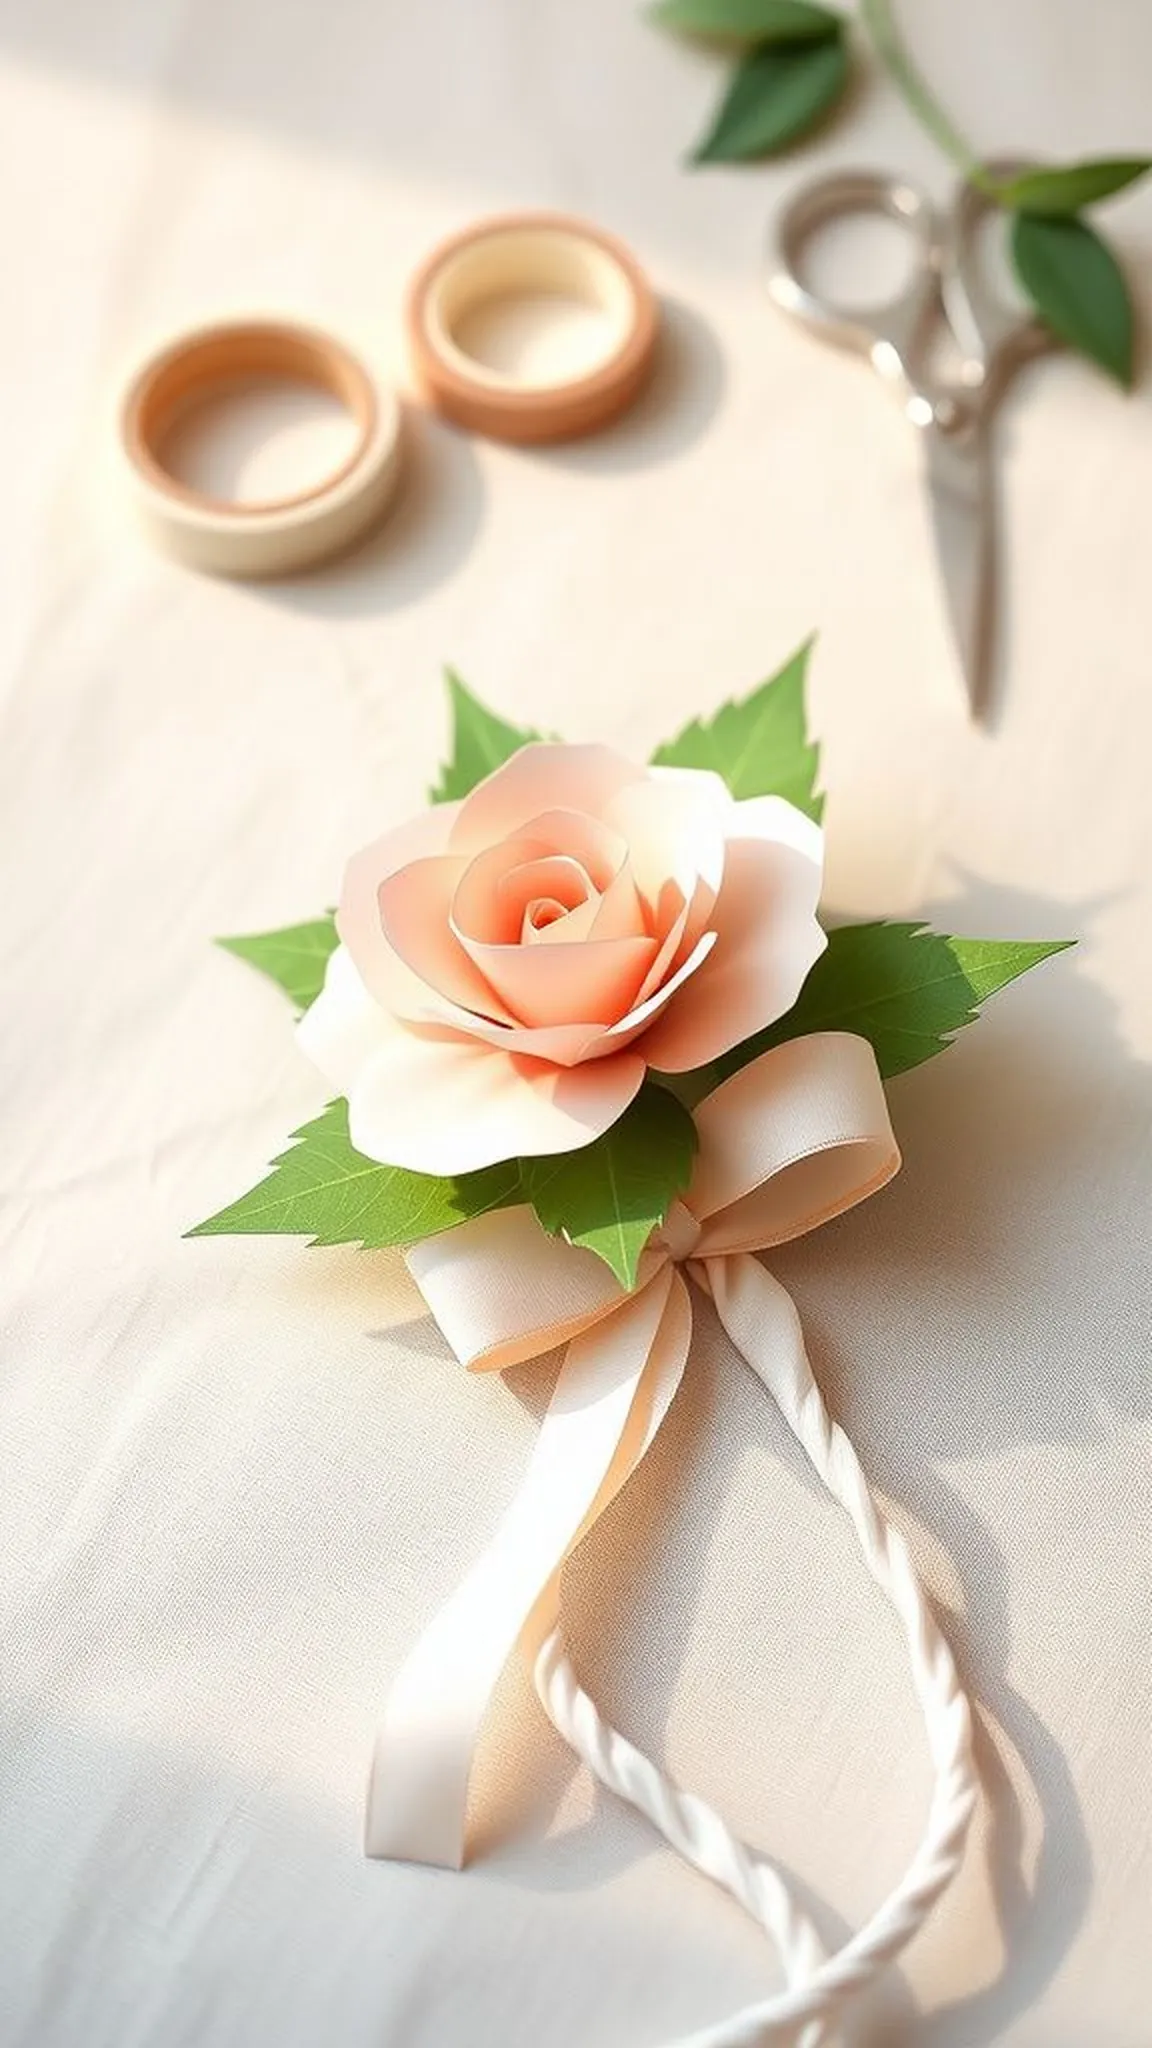
Paper flower corsages offer a lasting alternative to fresh blooms with a charming handcrafted touch. Compact and lightweight, the arrangement sits comfortably on a wrist or lapel, and the paper retains color throughout the event without wilting. The tactile quality of layered petals paired with ribbon and a small pin creates a composed accessory that feels intentional and wearable.
Close inspection reveals tiny overlaps and delicate bases that anchor each bloom. In soft event lighting the paper petals take on a subtle sheen and a refined handmade look.
📋 How to Make This ▶
- Assemble a small cluster of paper blooms and leaves sized to the wearer’s wrist or lapel.
- Attach blooms to a backing circle and bind stems together with floral tape for stability.
- Affix a wristband or pin to the backing, testing fit and comfort before finishing.
- Add a ribbon bow or bead accents and make final adjustments for balance.
⚠️ Avoid: Making the corsage too heavy with excess hardware can make it uncomfortable to wear and prone to slipping. Choosing overly large blooms can overpower the wristband.
🔄 Try Also: Create boutonnières with a single bloom, craft matching hair clips, or pair paper corsages with silk ribbons for texture contrast.
🛒 Products & Materials ▶
Items Used
- cardstock for blooms
- wristband base
- floral tape
- straight pins
- ribbon
📌 “Delicate paper corsages crafted to last through wedding celebrations.”
• • •
Paper flower garland to drape doorways
⏱️ 1.5-2 hours · 🟠 Intermediate
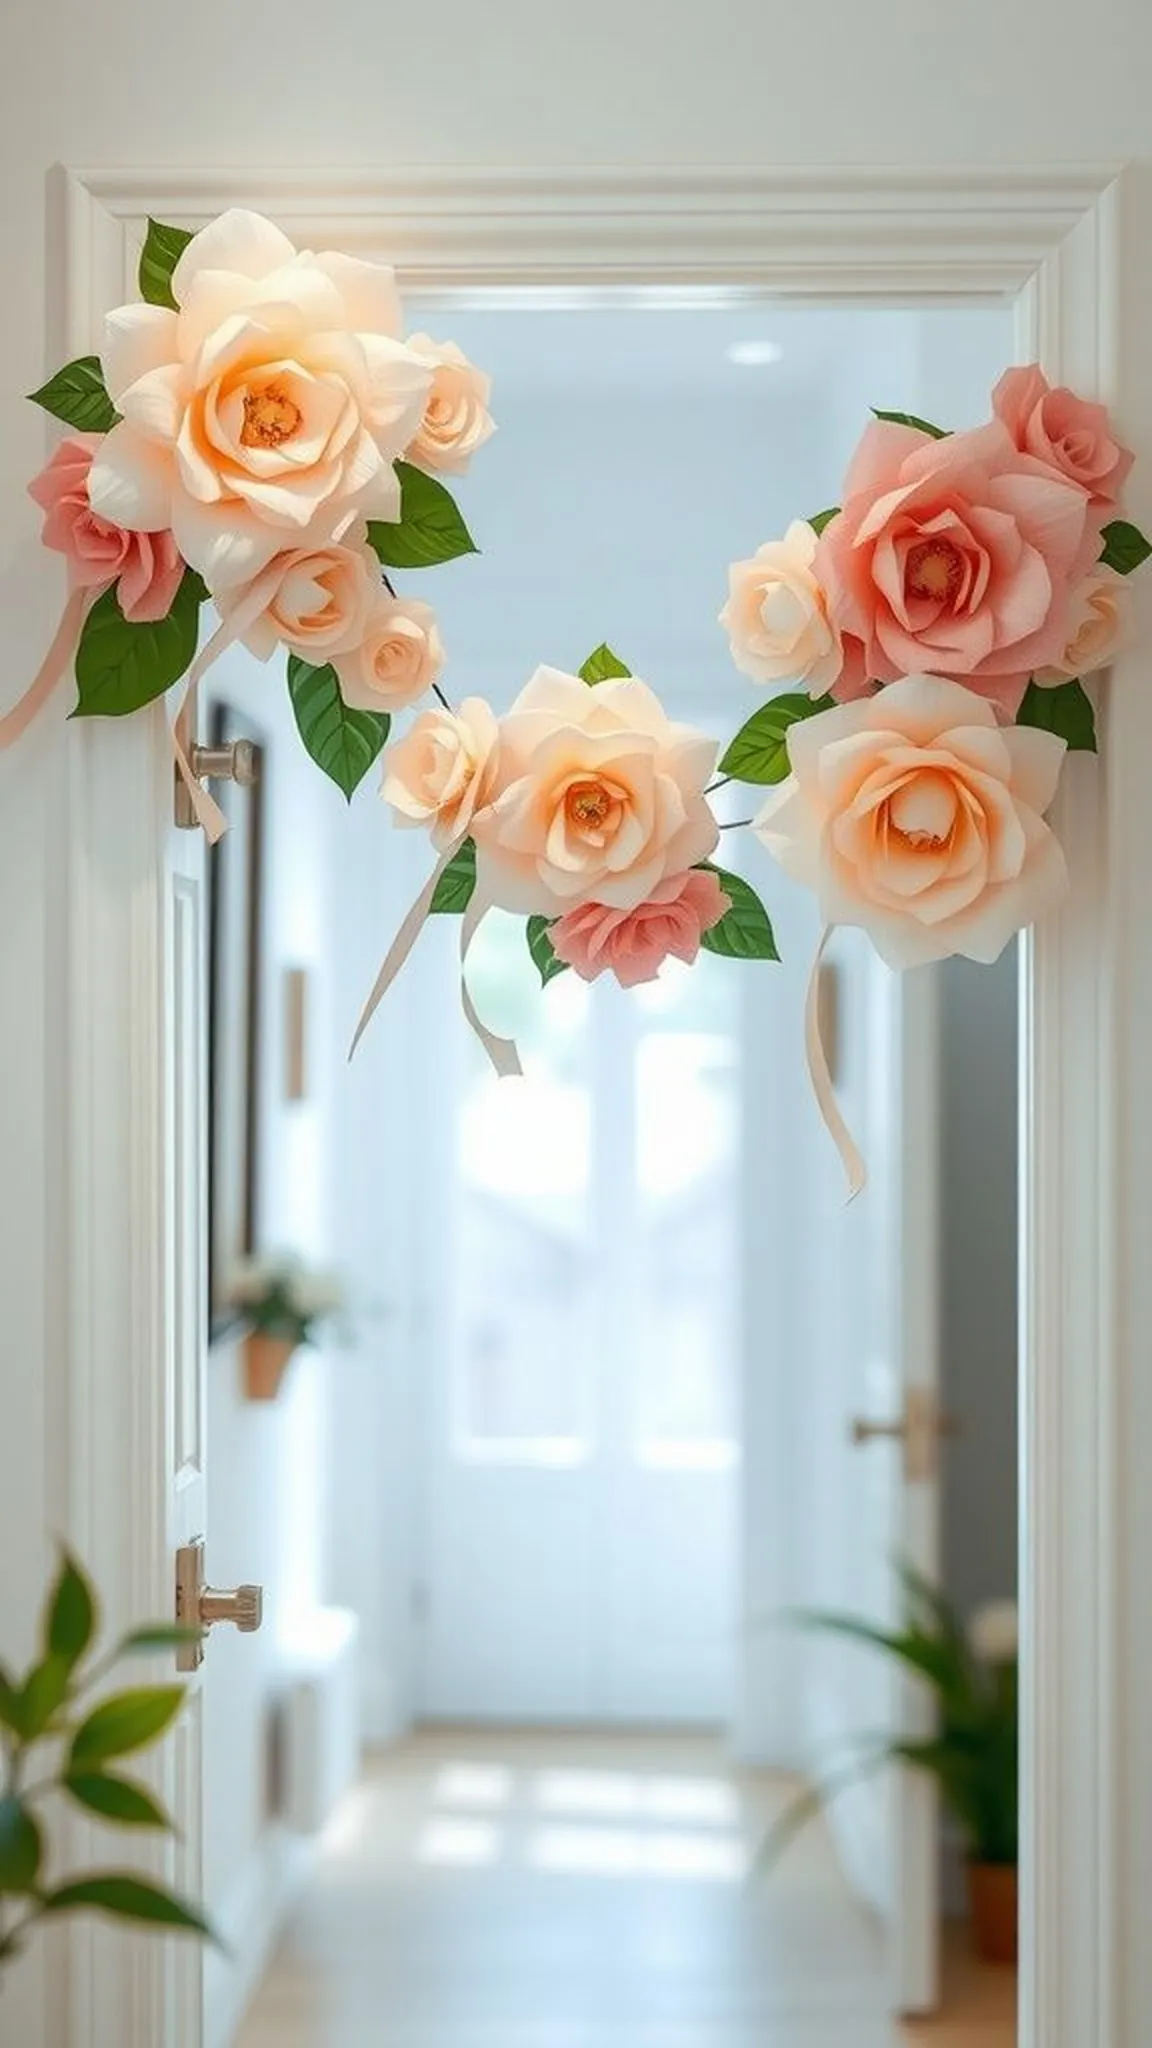
A paper flower garland draped across a doorway creates a warm, welcoming threshold that feels festive and casual. The connected blooms sway slightly when a door opens, adding motion and a handmade charm. Petal clusters vary in size and color, creating a rhythmic progression along the cord, while small leaves fill negative spaces and soften transitions.
The combination of suspended elements and dangling ribbon tails gives the garland a pleasantly asymmetric silhouette. From a short distance it reads like a continuous streamer of blooms, and up close the paper edges are delightfully textured.
📋 How to Make This ▶
- Prepare a series of paper flowers in multiple sizes and attach small loops or stems to each base.
- Thread the flowers onto a length of twine or ribbon, spacing them as desired and securing each with a knot or glue.
- Add paper leaves and ribbon tails between blooms for visual balance.
- Hang the garland across a doorway using small removable hooks or adhesive strips.
⚠️ Avoid: A frequent issue is placing blooms too close together, resulting in a heavy, cluttered garland that lacks visual rhythm. Using only identical flowers can look flat.
🔄 Try Also: Alternate circular blooms with leaf clusters, mix paper textures like crepe and tissue, or add small paper lanterns between flowers for evening events.
🛒 Products & Materials ▶
Items Used
- twine or ribbon
- tissue and crepe paper
- scissors
- adhesive hooks
- floral wire
📌 “Handmade paper flower garland that frames any doorway beautifully.”
• • •
Paper daisy chains with sunny centers
⏱️ 30-45 min · 🟢 Beginner
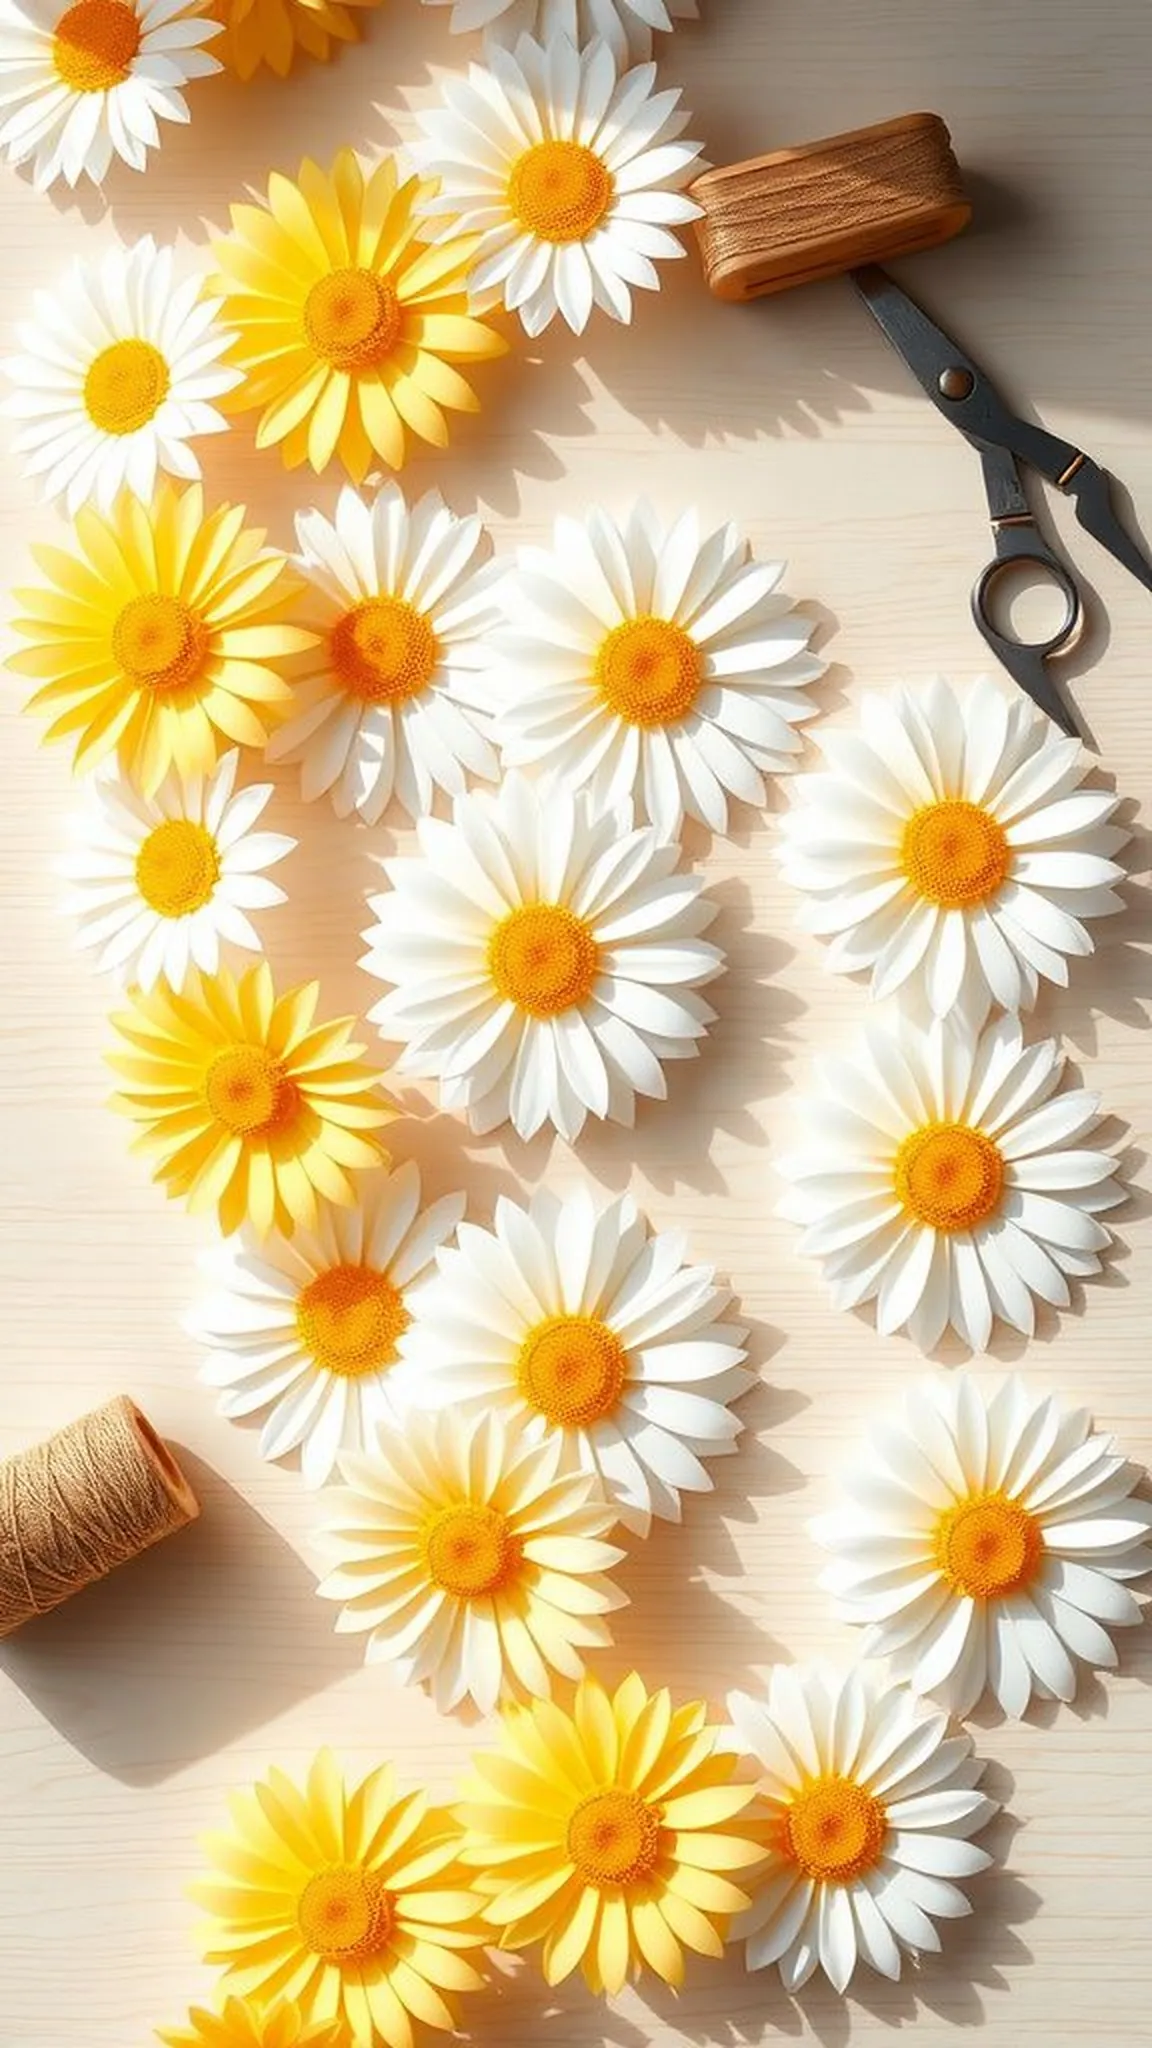
Paper daisy chains feel cheerful and straightforward, conjuring a simple garden mood. Bright white petals fan out from sunny yellow centers that pop against any background, and the contrast creates an instantly optimistic visual. The lightness of the chain allows it to drape casually over a shelf or frame a mirror without imposing.
Fingers often find the repetitive rhythm calming, and the small, round centers have a pleasing tactile density. Gathered loosely, they make a playful wreath alternative that keeps its charm indoors.
📋 How to Make This ▶
- Cut petal shapes from white cardstock and round yellow centers from contrasting paper.
- Layer petals around each center and secure with glue, leaving a small tab for threading.
- Thread the daisies onto a length of twine through the tabs to form a chain.
- Tie the ends of the twine and adjust spacing for a balanced look.
⚠️ Avoid: A frequent mistake is attaching centers off-center, which makes petals sit unevenly and the daisy look lopsided. Using thin paper for petals can cause drooping.
🔄 Try Also: Make mini chains for napkin rings, alternate daisy colors for a polka-dot effect, or cluster small daisies into a compact wreath.
🛒 Products & Materials ▶
Items Used
- white cardstock
- yellow paper
- twine
- craft glue
- scissors
📌 “Sunny paper daisy chains that bring instant cheer indoors.”
• • •
Textured paper anemones with dark centers
⏱️ 45-75 min · 🟠 Intermediate
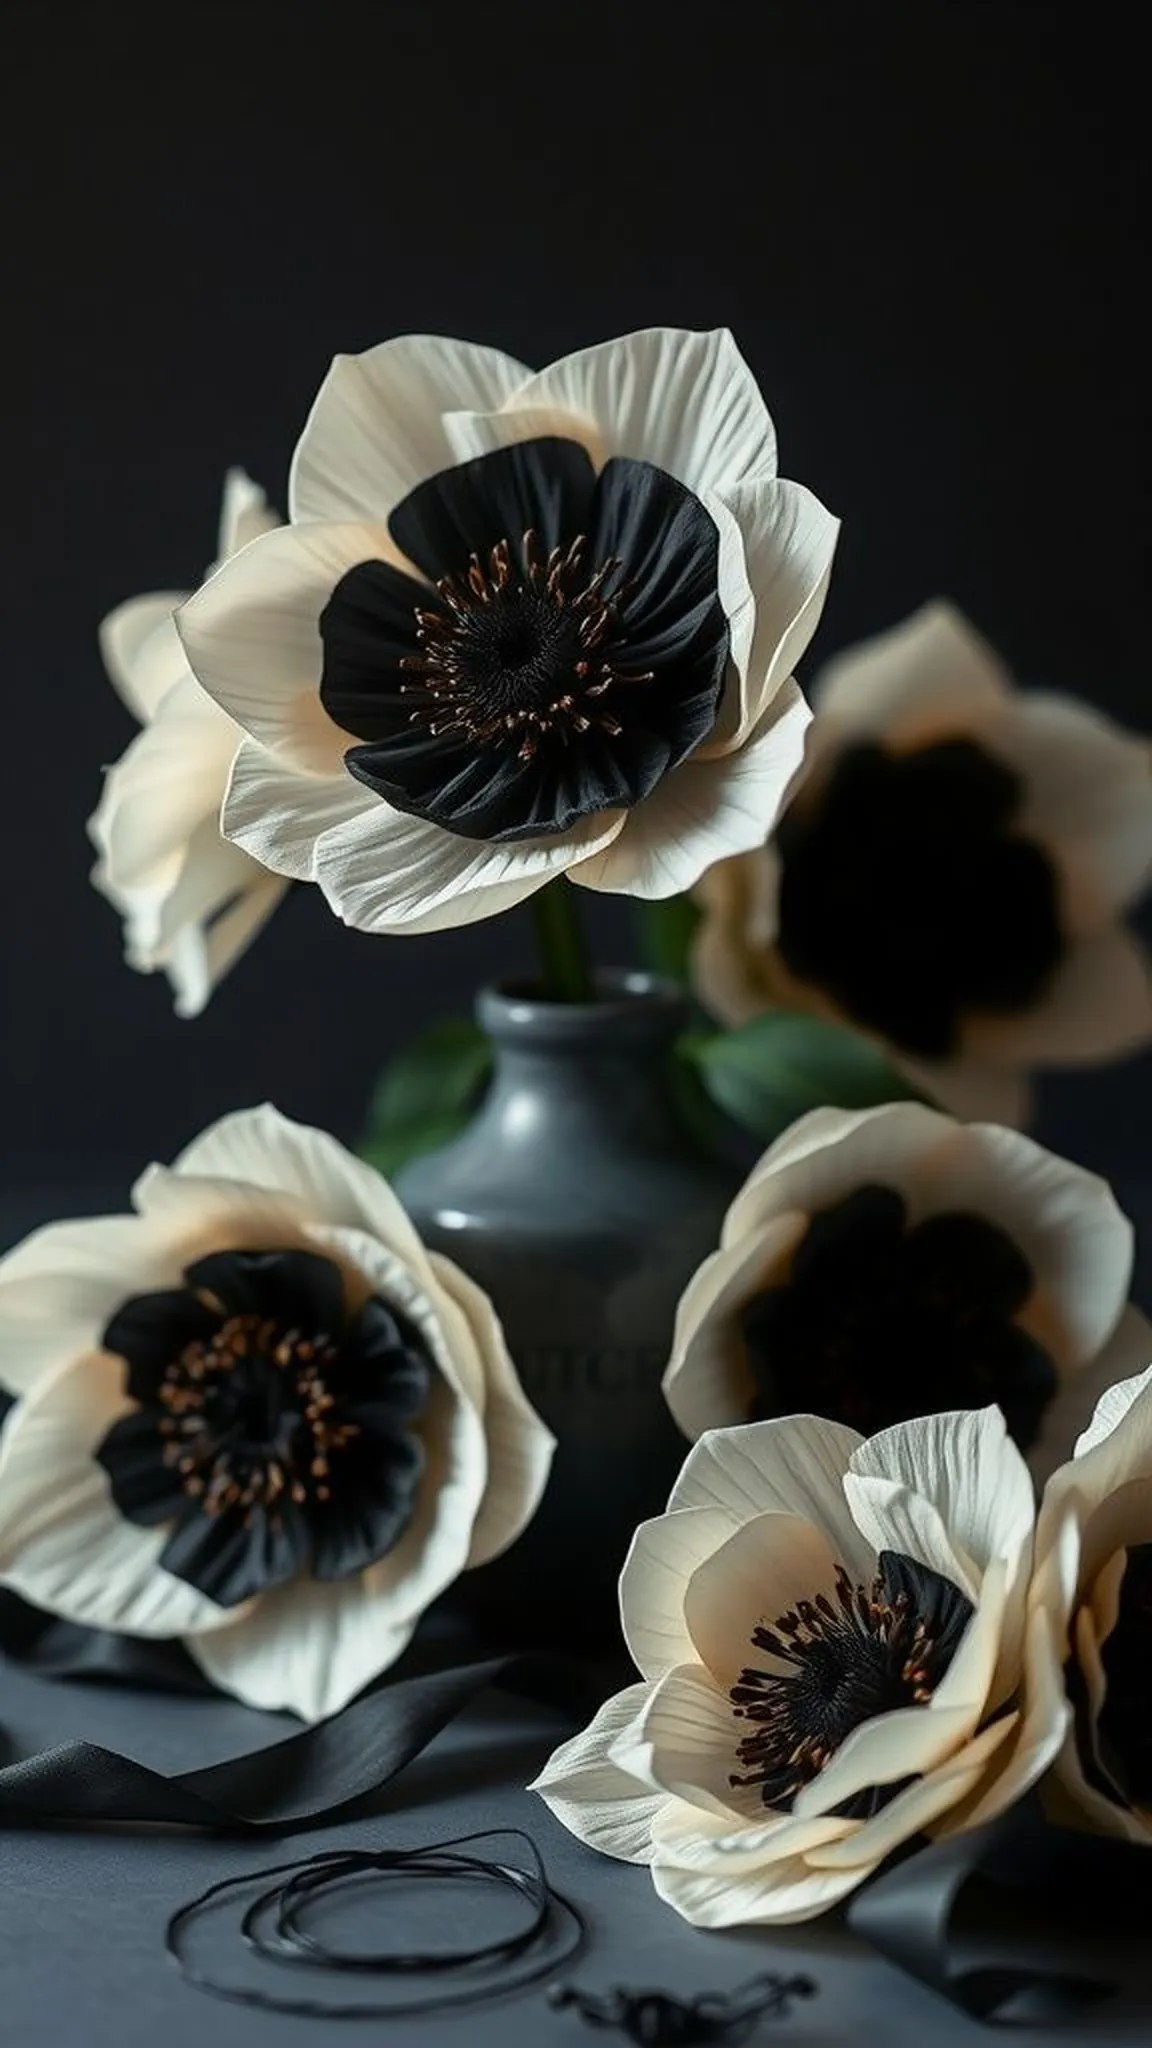
Paper anemones have a moody, high-contrast look with pale petals surrounding deep, textured centers. The dark heart anchors the bloom and draws the eye in, while the delicate paper petals fan outward in airy gestures. Petal edges can be slightly crinkled to mimic natural fragility, giving a tactile play between softness and the bold center.
When bunched, anemones introduce a sophisticated punctuation in a bouquet, and the contrast between center and petals makes each blossom read like a small, composed artwork.
📋 How to Make This ▶
- Cut rounded petals from thin cardstock and prepare a fringed disk for the center from dark paper.
- Layer petals around a small cone or disc base and secure them in place with glue.
- Affix the fringed dark center over the base, fluffing fringe for texture.
- Attach a floral wire stem and wrap with green tape for stability.
⚠️ Avoid: A frequent beginner error is making the center too flat, which reduces the striking contrast and dimensionality characteristic of anemones.
🔄 Try Also: Try soft blush petals with charcoal centers for a romantic palette, or metallic centers for an evening event flair.
🛒 Products & Materials ▶
Items Used
📌 “Moody paper anemones with striking dark textured centers.”
• • •
Paper cupcake toppers shaped like tiny blooms
⏱️ 20-30 min · 🟢 Beginner
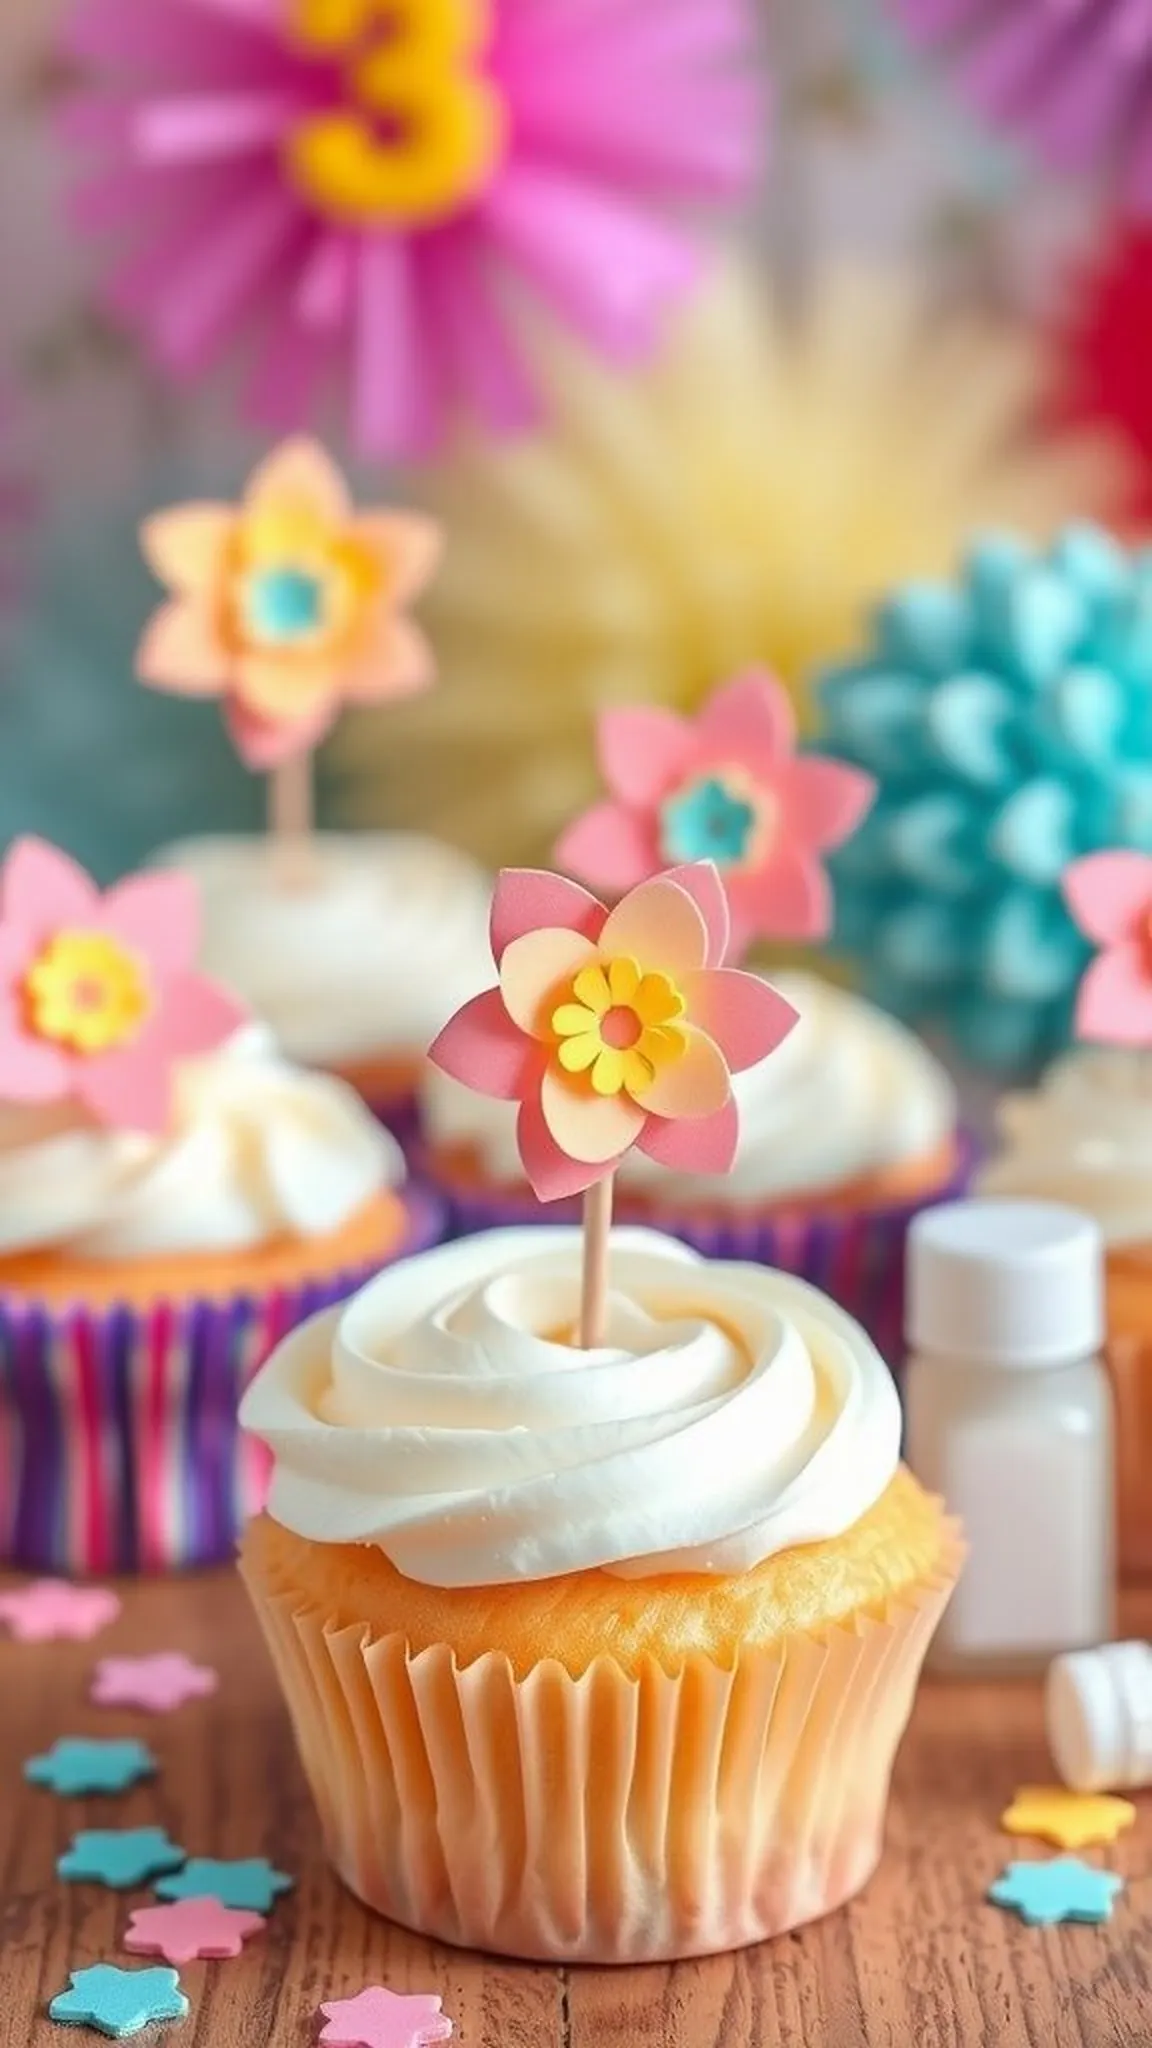
Paper cupcake toppers are small delights that add instant charm to any dessert. Petite petals and tiny centers scale perfectly to bite-sized treats, and the paper holds crisp silhouettes even under the warm hum of a party. Planted on toothpicks or small picks, the toppers give cupcakes a handcrafted detail that feels celebratory without fuss.
The tactile brightness of vivid paper colors contrasts with sweet frostings, and arranging a variety of toppers across a platter creates a festive, coordinated spread that reads thoughtfully put together.
📋 How to Make This ▶
- Cut or punch small flower shapes from colorful cardstock and layer with contrasting centers.
- Glue the layers together and affix each flower to a short food-safe toothpick or pick.
- Allow adhesive to dry fully, then insert toppers into cupcakes as a finishing flourish.
- Store toppers upright until use to keep shapes crisp.
⚠️ Avoid: A frequent issue is attaching toppers too deeply into frosting, which can smear icing and hide the flower. Using heavy paper can topple small picks.
🔄 Try Also: Mix tiny leaves with flowers for a natural look, create seasonal color palettes, or add glitter centers for celebration sparkle.
🛒 Products & Materials ▶
Items Used
- cardstock punch or paper shapes
- toothpicks or food-safe picks
- cardstock paper
- craft glue
📌 “Sweet paper cupcake toppers that make desserts feel handmade.”
• • •
Paper ranunculus with tightly packed petals
⏱️ 2-3 hours · 🔴 Advanced
Paper ranunculus blossoms boast a densely layered, almost millefeuille structure that looks luxuriously detailed. Narrow petals stack into a tight crown, and the slight irregularities at each petal edge give the bloom a charming, organic looseness. The finished flower has a pleasingly heavy look for paper, and the concentric layering creates captivating shadow play.
When clustered the ranunculus adds a refined, garden-like texture to arrangements, and hand-held bouquets with these blooms feel both elegant and thoughtfully crafted.
📋 How to Make This ▶
- Cut many narrow petal strips from crepe or thin cardstock and prepare a small central bud base.
- Attach petals in close, concentric rows around the base, slightly overlapping each row for density.
- Continue layering until the desired fullness is achieved, then secure the base and add a wired stem.
- Wrap the stem with floral tape and gently open outer petals for a soft finish.
⚠️ Avoid: Beginners often space petals too widely or add insufficient layers, which prevents the characteristic tightness and ruffled texture of a ranunculus.
🔄 Try Also: Make smaller ranunculus for boutonnieres, or color edges with ink for a watercolor effect.
🛒 Products & Materials ▶
Items Used
- crepe paper narrow strips
- floral wire 20 gauge
- hot glue
- floral tape
- scissors
📌 “Dense paper ranunculus with hundreds of ruffled petals.”
• • •
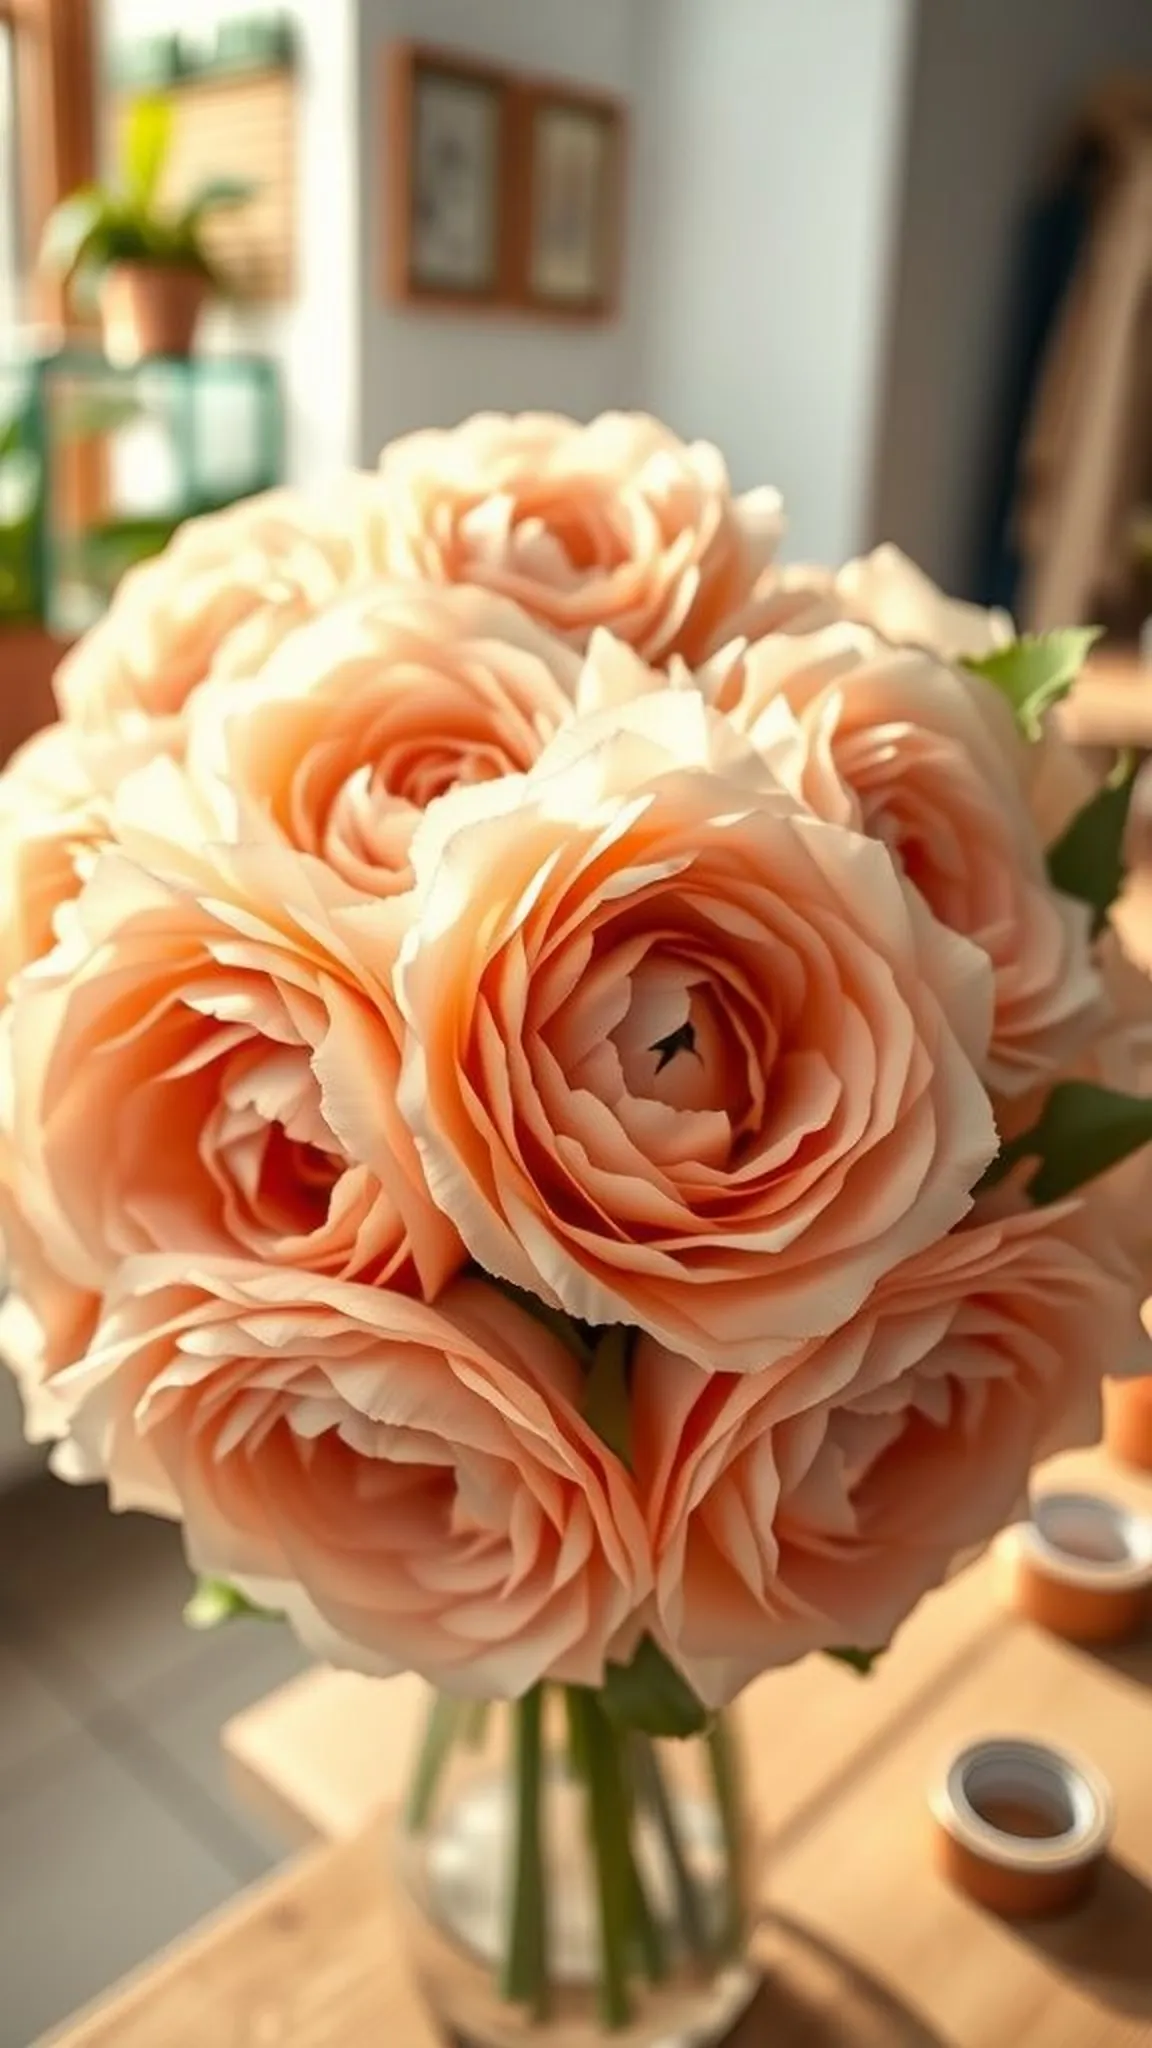
Vintage paper roses with inked edges
⏱️ 1-1.5 hours · 🟠 Intermediate
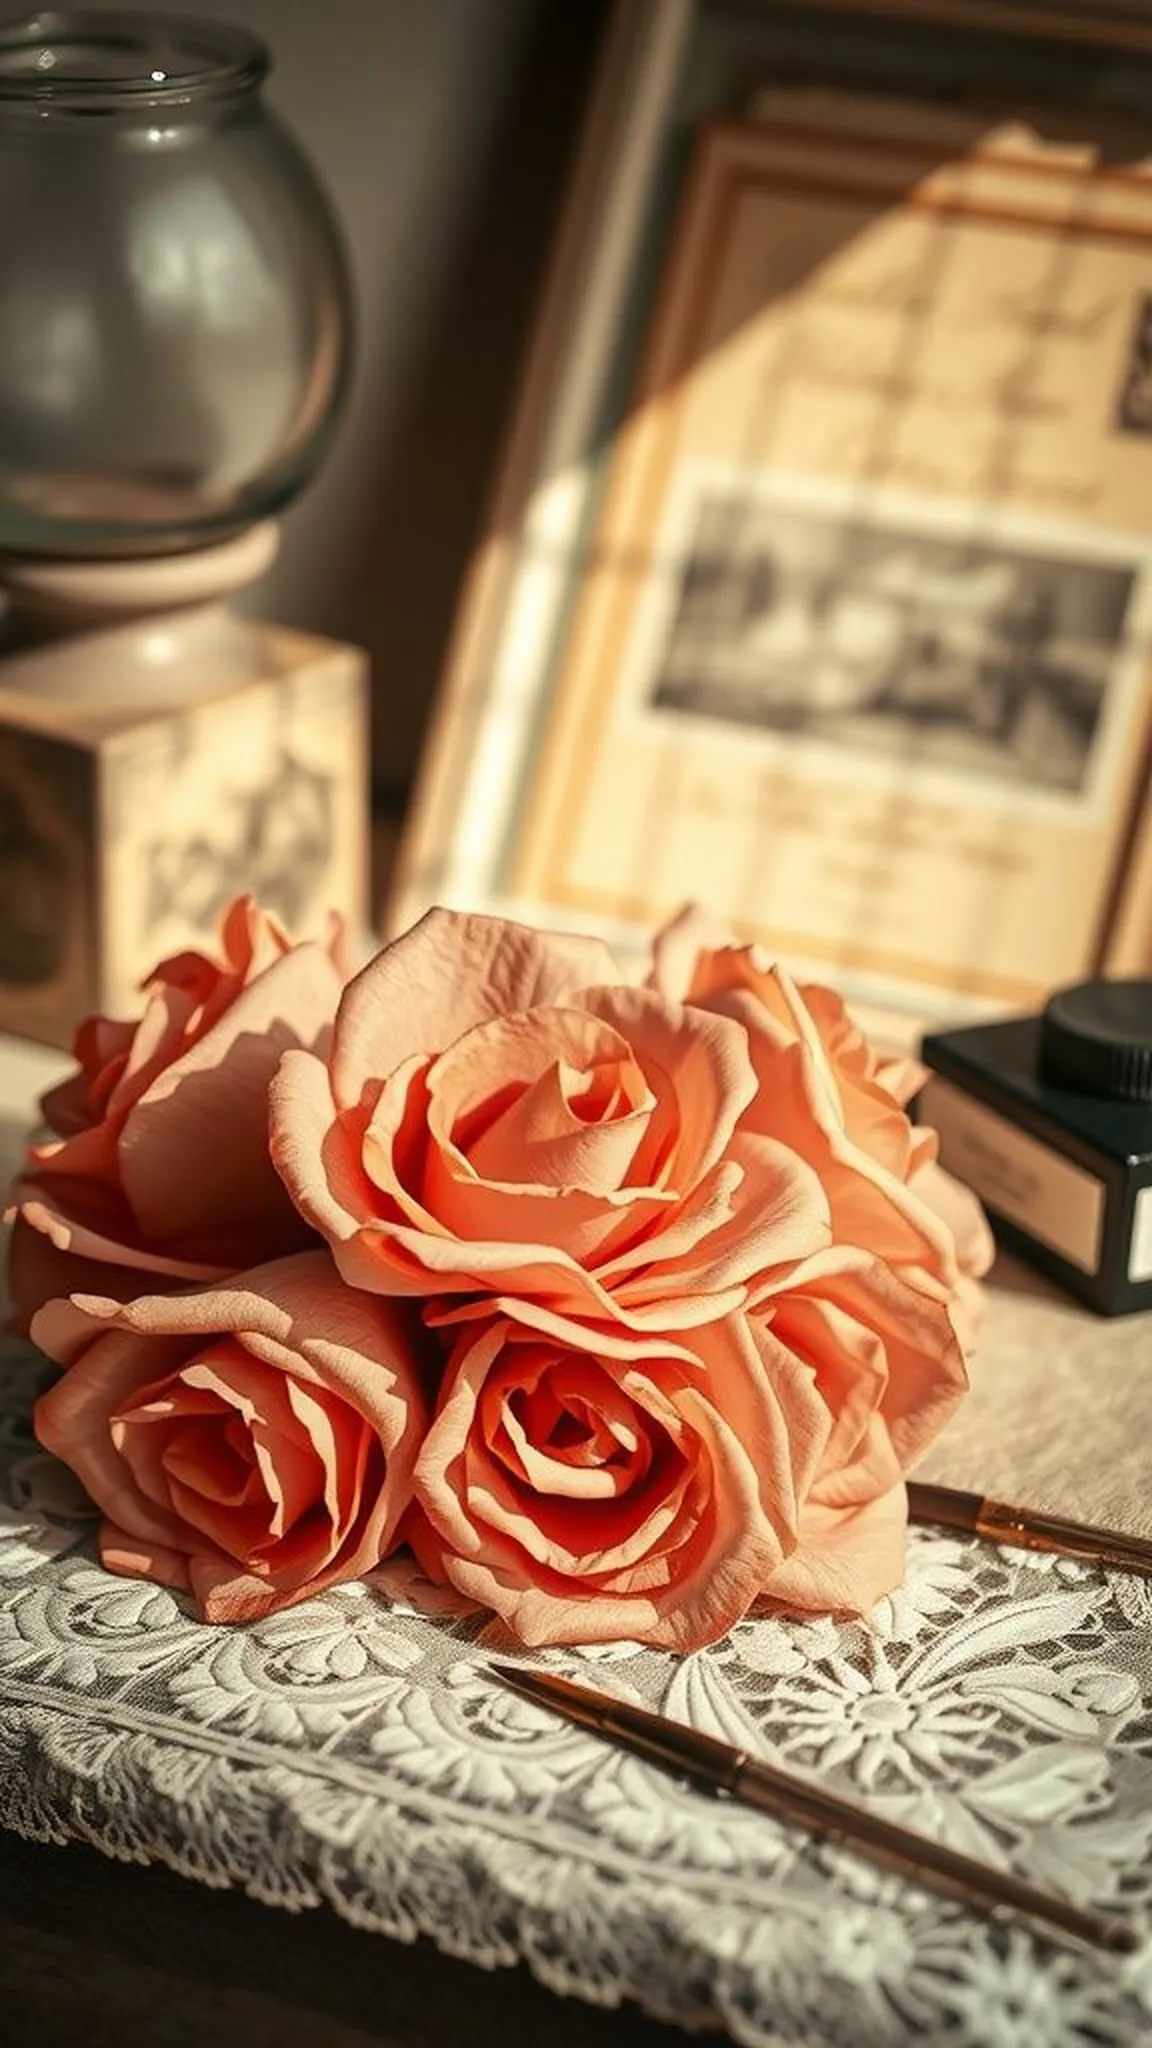
Vintage paper roses feel softly aged and romantic, especially when edges carry a faint ink wash or tea-stained hue. Subtle discoloration along petal rims suggests a timeworn patina, and this slight distressing lends depth to otherwise bright paper. The roses possess a nostalgic air, like pressed blooms in an old book, and their color palette leans toward muted pastels and sepia notes.
Paired with lace or an antique frame, they become heirloom-like accents that read like a small crafted relic with gentle sentiment.
📋 How to Make This ▶
- Cut rose petals from cardstock or crepe and lightly distress edges with ink or diluted paint.
- Layer petals around a small base, securing with glue while maintaining a soft, aged silhouette.
- Mount the finished rose on a vintage paper card or frame for display.
- Add a subtle dusting of powdered pigment if a more antique tone is desired.
⚠️ Avoid: Applying too much ink at once can overwhelm the base color and make the rose look artificially stained rather than gently aged.
🔄 Try Also: Pair with doilies for a Victorian feel, or create a shadow box of multiple vintage roses in complementary tones.
🛒 Products & Materials ▶
Items Used
📌 “Softly aged paper roses with inked, vintage edges.”
