
As an Amazon Associate I earn from qualifying purchases.
Easy Embroidery Hoop Crafts turn simple hoops into cheerful art, and easy embroidery hoop crafts make relaxing afternoons feel productive. These easy embroidery hoop craft ideas range from stitched florals to felt animal hoops, and easy embroidered hoop crafts mix fabric, lace, beads, and thread for gentle, giftable pieces. Whether assembling a quick bedroom accent or a personalized gift, easy hoop crafts and embroidery hoop crafts offer texture, color, and a handmade warmth that brightens any wall.
Stitched floral hoop wall hanging for beginners
⏱️ 1 hour · 🟢 Beginner
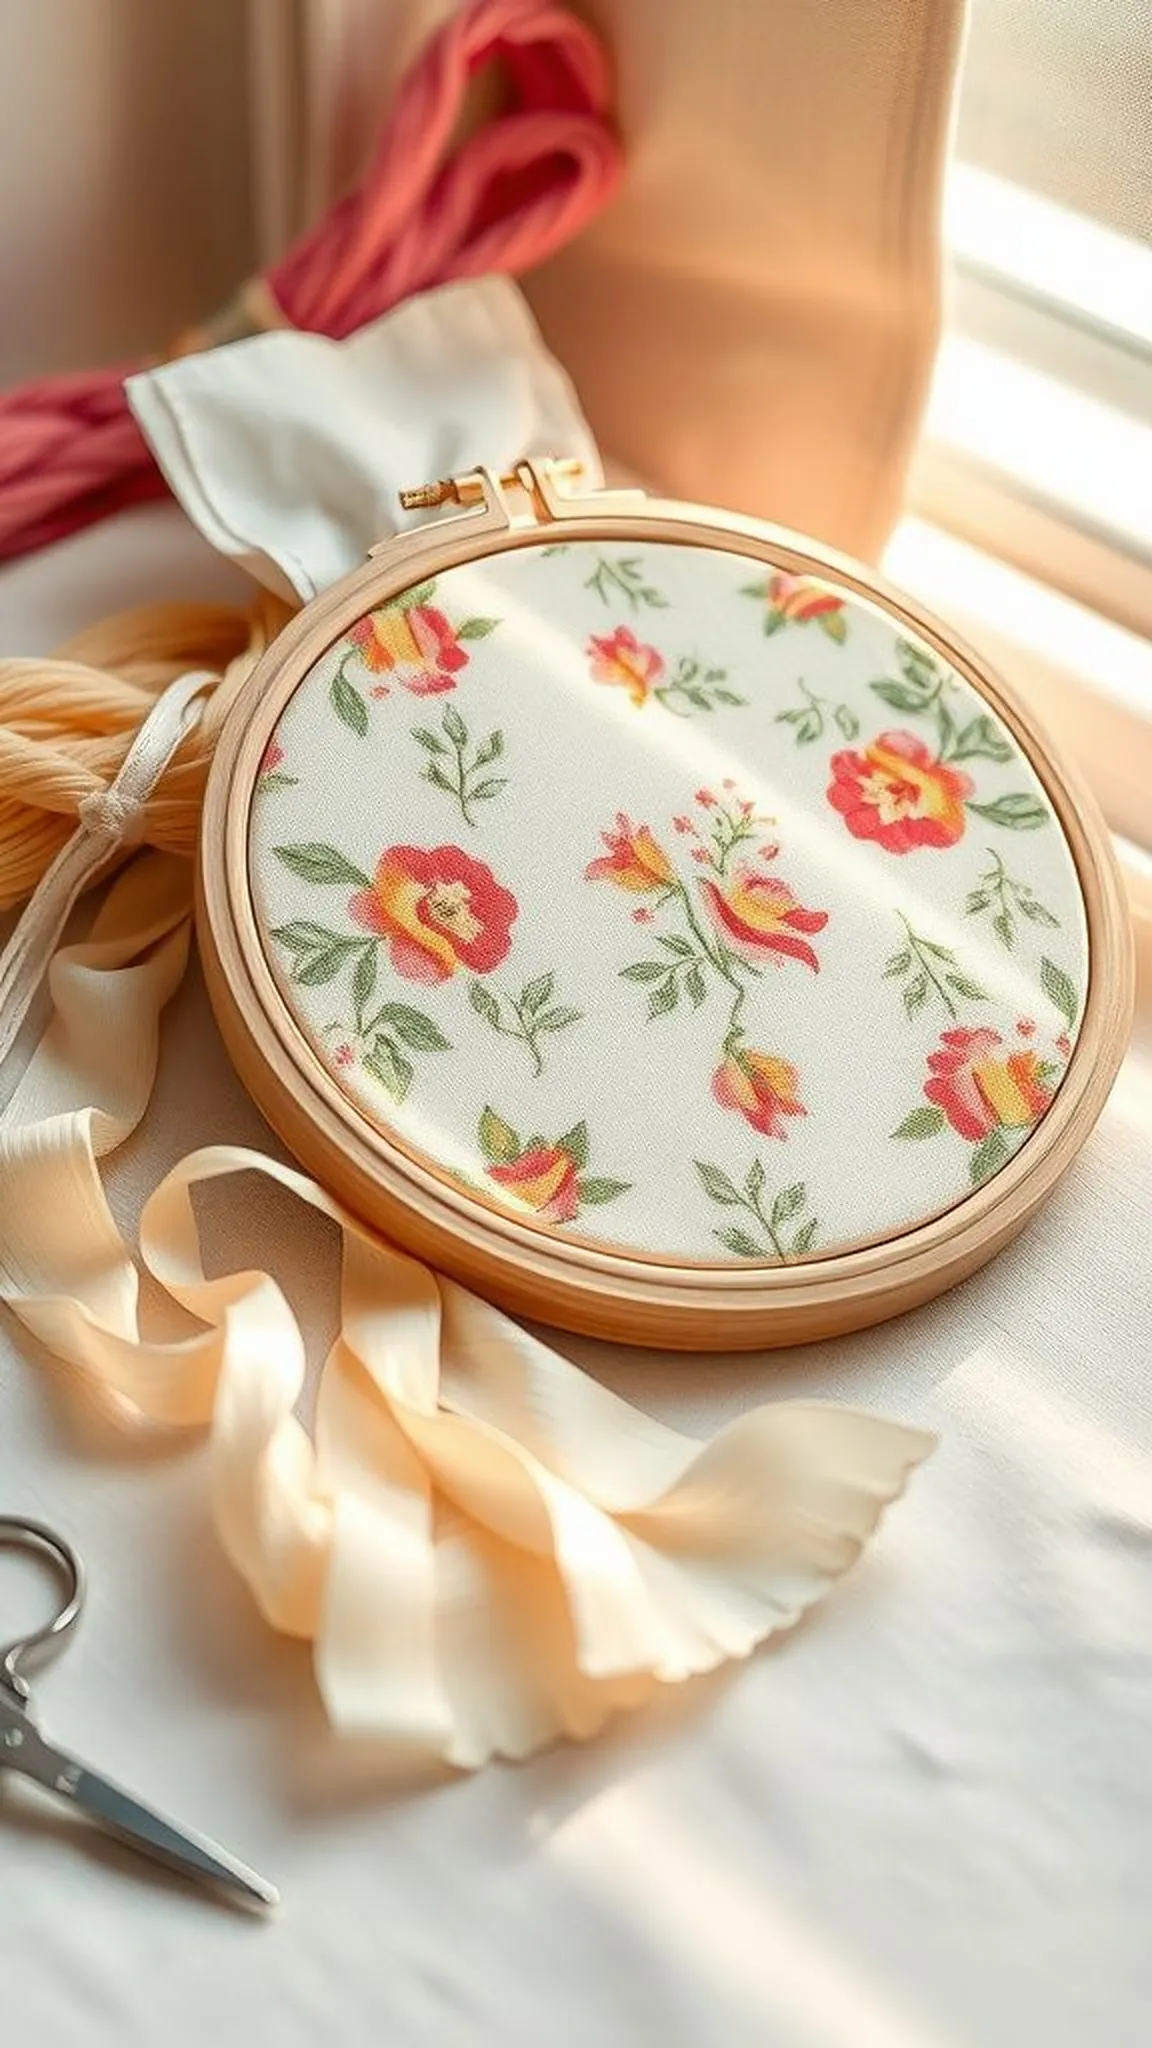
A small wooden hoop wrapped in soft cotton printed with scattered blooms feels like a pocket of spring. The texture of slightly puckered stitches and satin thread catches morning light, and a few seed beads add a faint, tactile sparkle. Observing the way color blends across tiny petals brings a quiet, satisfying rhythm.
The finished piece hangs with simple twine and breathes personality into a hallway, while the gentle scent of linen from the fabric adds another cozy layer.
📋 How to Make This ▶
- Place fabric over hoop and tighten until comfortably taut without distorting the print.
- Follow a simple floral outline using backstitch and satin stitch with embroidery floss.
- Add a few seed beads with a beading needle for sparkle and secure thread ends neatly at the back.
- Trim excess fabric around the hoop and finish the back with a small felt circle for a tidy look.
⚠️ Avoid: A frequent beginner mistake is pulling thread too tightly, which puckers the fabric and distorts the design.
🔄 Try Also: Swap the printed cotton for linen for a rustic vibe or choose bold, graphic fabric for a modern look; tiny pom-poms can replace beads for playful texture.
🛒 Products & Materials ▶
Items Used
- wooden embroidery hoop (6 inch)
- cotton floral fabric square
- embroidery floss pastel set
- embroidery needle pack
- small embroidery scissors
📌 “Bright floral hoop art that brings instant spring to any wall.”
• • •
Felt animal hoop art for nursery walls
⏱️ 45 min · 🟢 Beginner

A tiny felt fox nested inside a round hoop feels like a nursery whisper, with wool felt holding a plush but flat silhouette against smooth muslin. Soft edges of layered felt create subtle shadows and the felt’s matte surface eats light prettily, making colors read rich and calm. Little embroidered eyes and a stitched nose give quiet character without overwhelming detail.
The finished hoop reads like a playful story illustration and works well grouped with other animal hoops for a wall gallery.
📋 How to Make This ▶
- Trace a simple animal silhouette onto felt and cut matching layers for body and accents.
- Attach layers together with small whipstitches or fabric adhesive and add embroidered facial details.
- Stretch background fabric in the hoop and position the felt shape on top, sewing or gluing around edges to secure.
- Finish the back with a felt circle and add a loop for hanging.
⚠️ Avoid: A frequent beginner mistake is using thin felt that frays or sags, causing shapes to look limp.
🔄 Try Also: Create a fox, bunny, or whale silhouette and play with muted pastels for a baby room or bright primary tones for a playroom.
🛒 Products & Materials ▶
Items Used
- wooden embroidery hoop (4 inch)
- wool felt sheets assorted colors
- plain muslin fabric square
- sewing needles hand embroidery
- fabric glue (optional)
📌 “Sweet felt animal hoops that make charming nursery art.”
• • •
Mini hoop lavender sachet to scent drawers
⏱️ 30 min · 🟢 Beginner
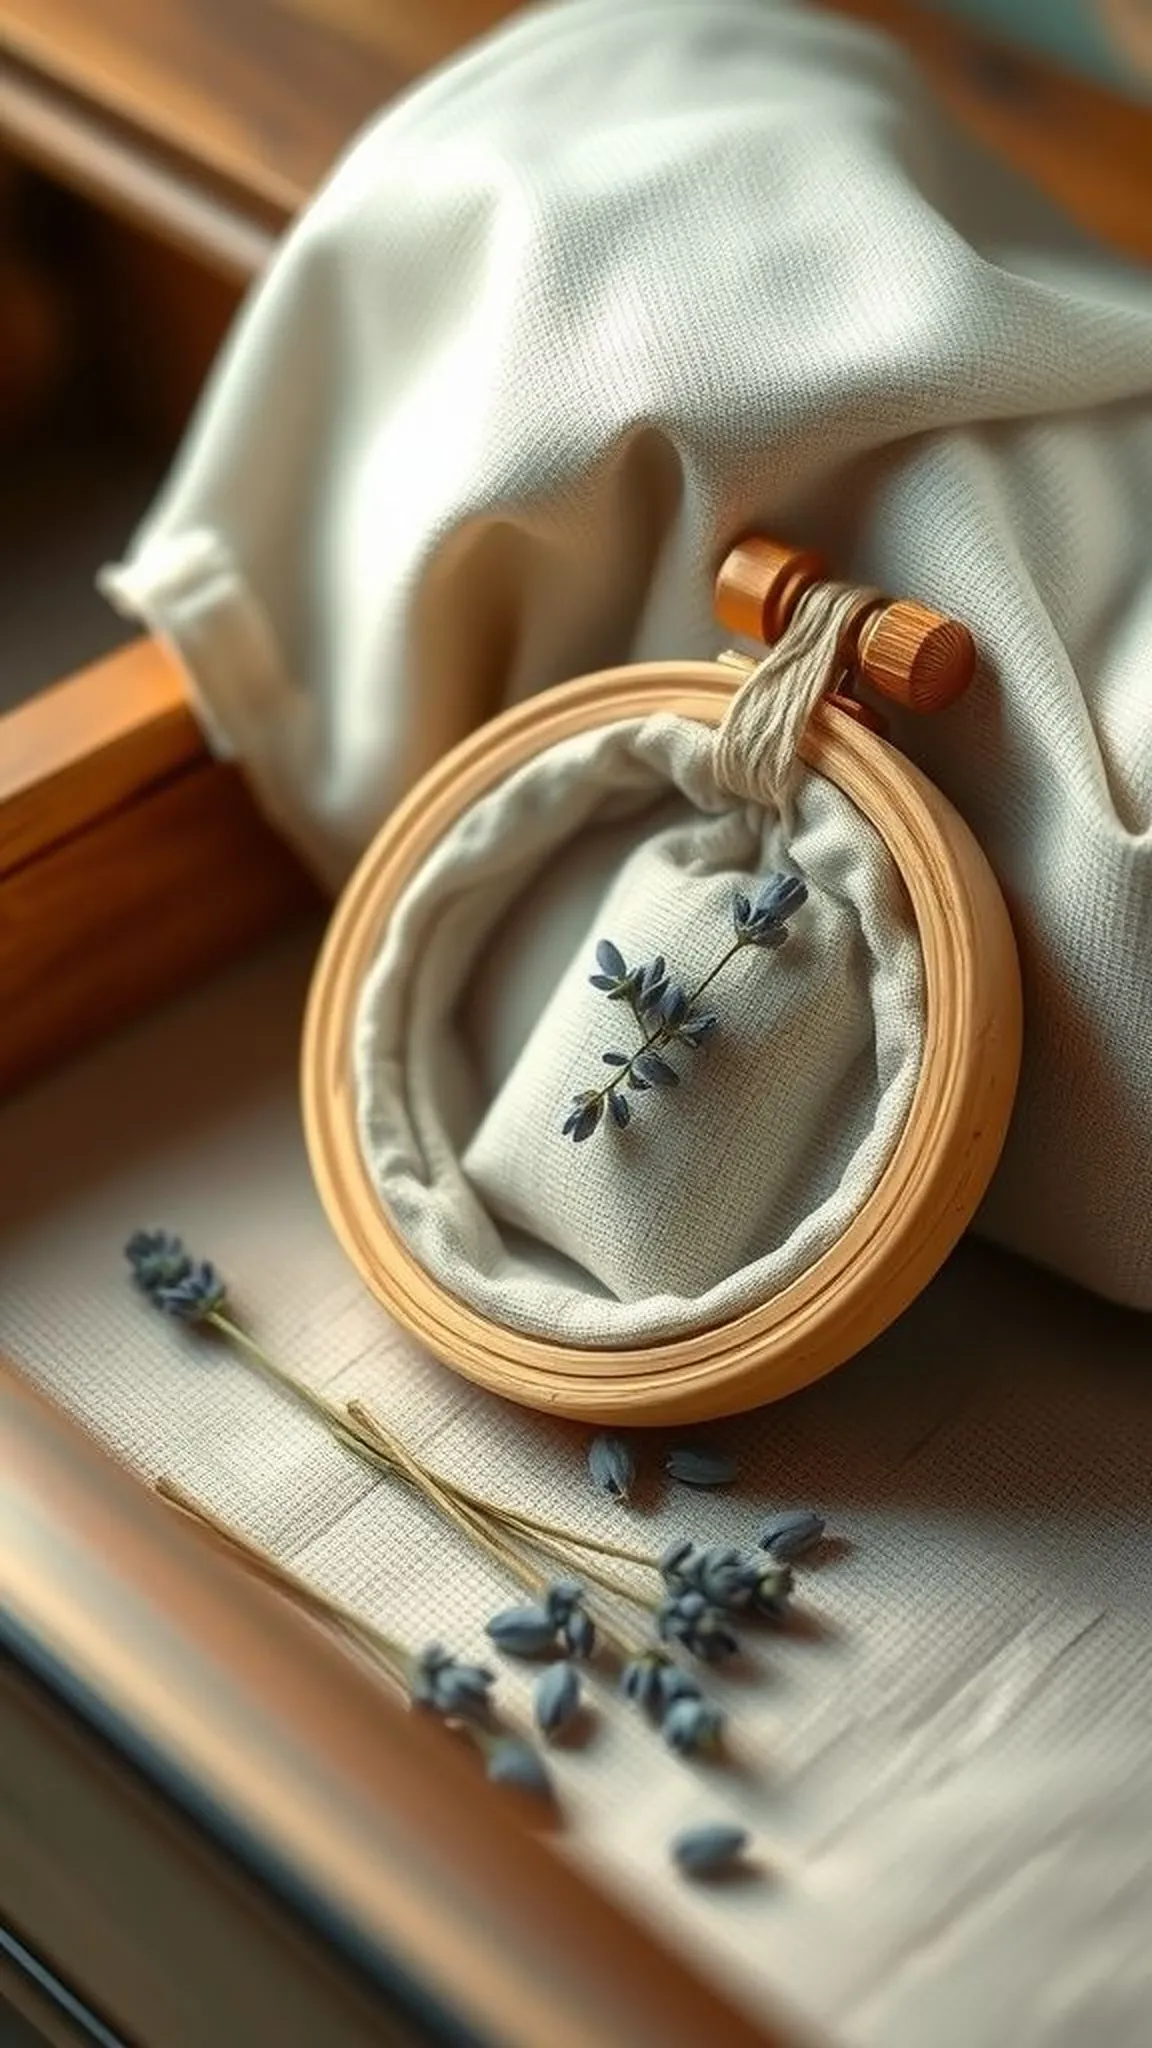
A tiny hoop filled with dried lavender looks like a jewel and emits a calm, herbal scent whenever a drawer opens. The linen background has a gentle weave that complements dried buds tucked beneath a stitched patch, and the small size encourages delicate, careful stitches. The dried lavender’s muted purple and straw tones create a soft palette that feels vintage and lived-in.
Tactile little knots and a felt backing add a snug, handcrafted charm that delights when discovered among clothing.
📋 How to Make This ▶
- Stretch linen fabric in a small hoop and position a tiny pouch of dried lavender on the center.
- Secure pouch edges with small running stitches or blanket stitch, leaving buds contained but scented.
- Cover the back with a small felt circle and add a hanging loop for drawers or hooks.
⚠️ Avoid: A frequent beginner mistake is overfilling the sachet, which creates lumps and stresses the hoop’s tension.
🔄 Try Also: Swap lavender for dried rosemary or rose petals, or add a tiny embroidered initial for personalization.
🛒 Products & Materials ▶
📌 “Tiny lavender hoop sachets that scent drawers beautifully.”
• • •
Save time and printer ink with 50+ printable templates and step-by-step instructions in one ad-free guide.

Just $19.99 — lifetime access
Lace and fabric hoop frame for photos
⏱️ 2 hours · 🟠 Intermediate
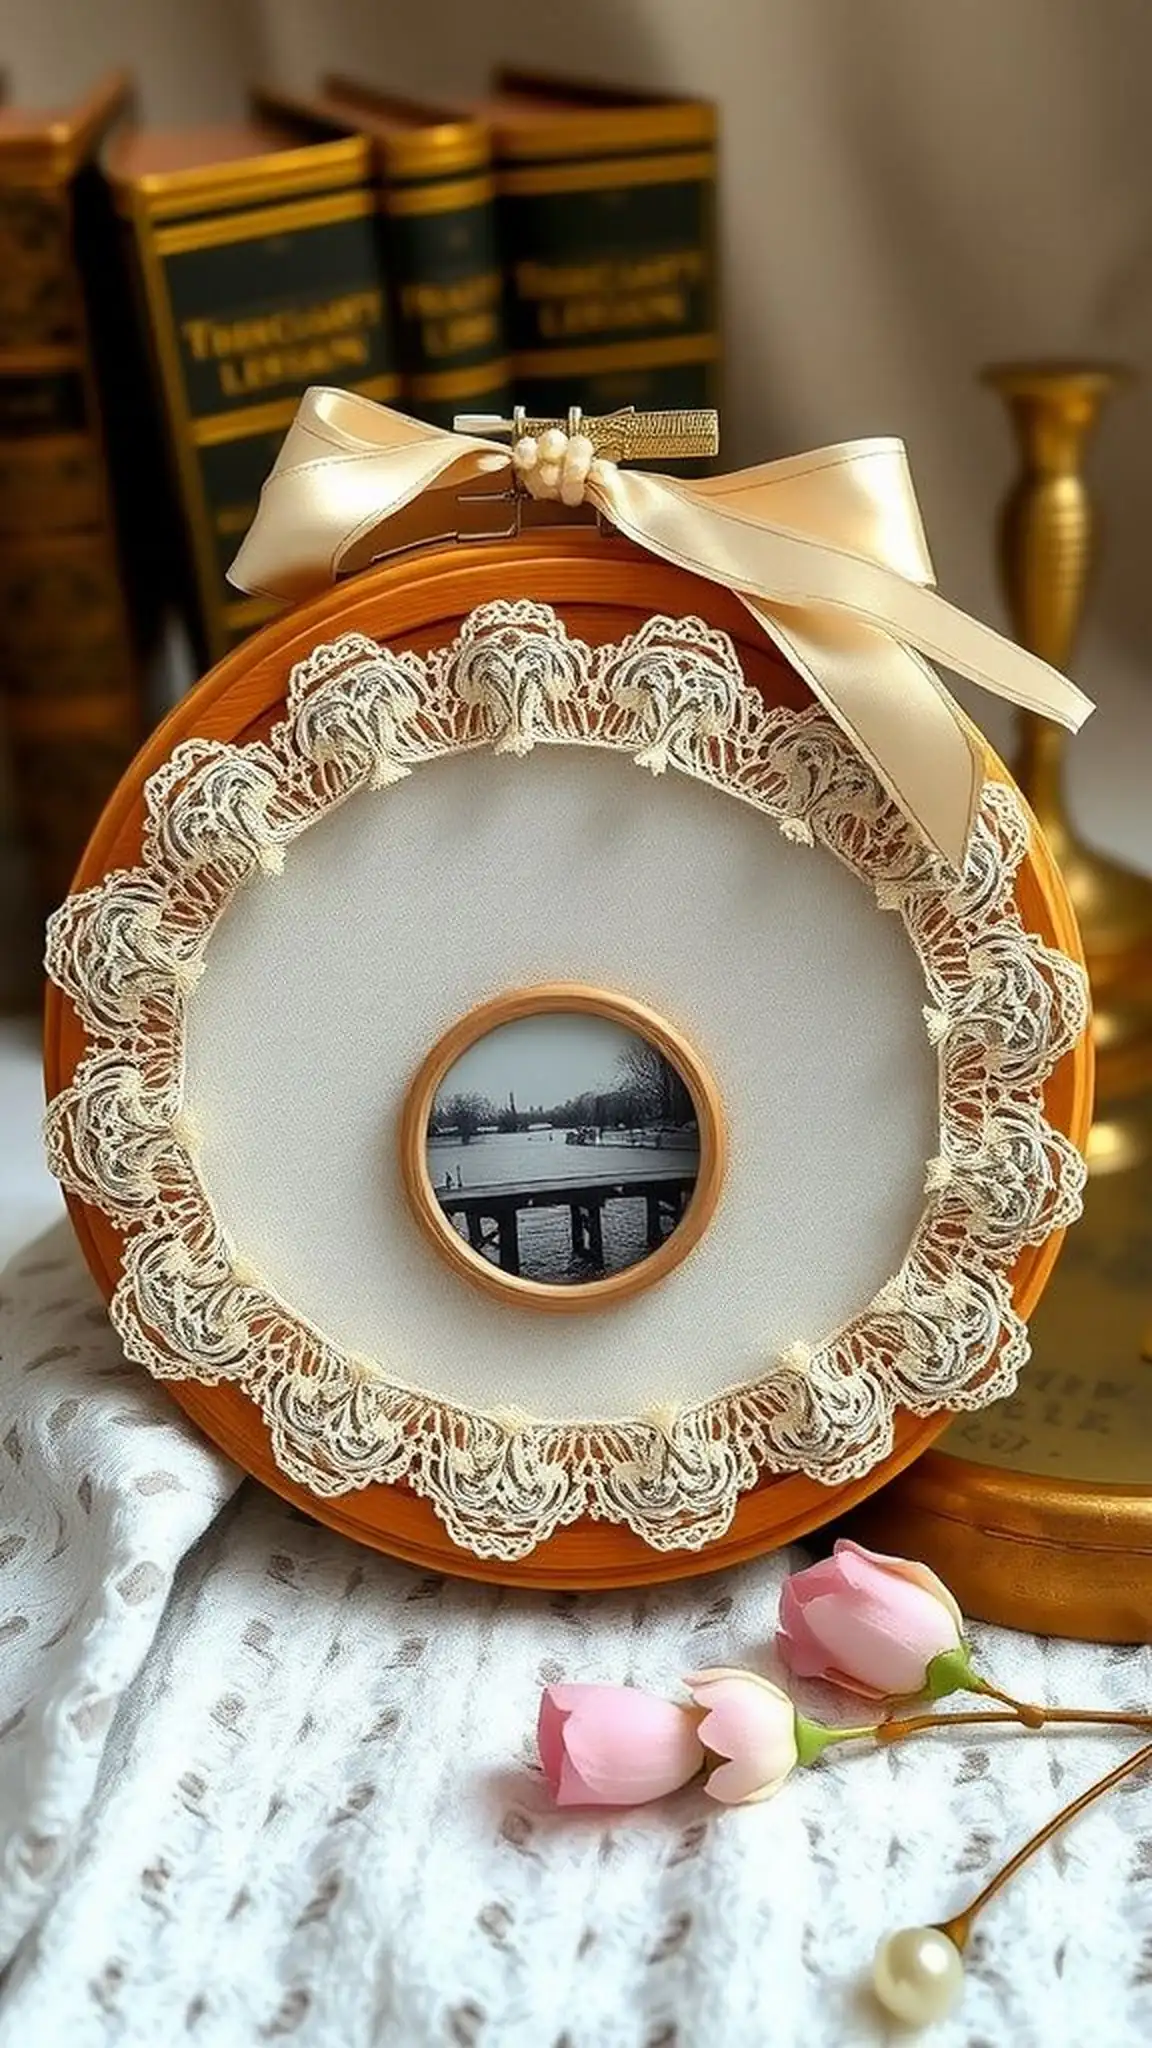
A hoop wrapped with vintage lace and layered fabric creates a frame that feels both delicate and substantive. The interplay between sheer lace and denser cotton gives depth, and the sheen of a silk ribbon trim reflects light softly. A mounted photo peeks through an inner ring, the edges cushioned by tiny stitches and ribbon tabs.
The frame sits on a mantel or leans against stacked books, adding an old-fashioned, romantic touch that invites closer inspection and brings small memories into everyday view.
📋 How to Make This ▶
- Attach photo to a round cardstock mat slightly smaller than the hoop diameter and layer backing fabrics behind it.
- Stretch base fabric in the outer hoop and position lace overlay and ribbon trim around the photo opening.
- Secure layers with tiny stitches or fabric adhesive, finish the back with felt and a hanging loop or easel support.
⚠️ Avoid: A frequent beginner mistake is choosing lace that is too fragile, which can tear during handling or mounting.
🔄 Try Also: Use burlap and twine for rustic charm or silk and pearl pins for a refined, vintage-inspired frame.
🛒 Products & Materials ▶
Items Used
- wooden embroidery hoop (8 inch)
- vintage lace trim
- cotton fabric for backing
- cardstock round photo mat
- silk ribbon narrow
📌 “Romantic lace hoop frames that turn photos into heirloom decor.”
• • •
Boho tassel fringe hoop with textured yarn
⏱️ 1.5 hours · 🟠 Intermediate
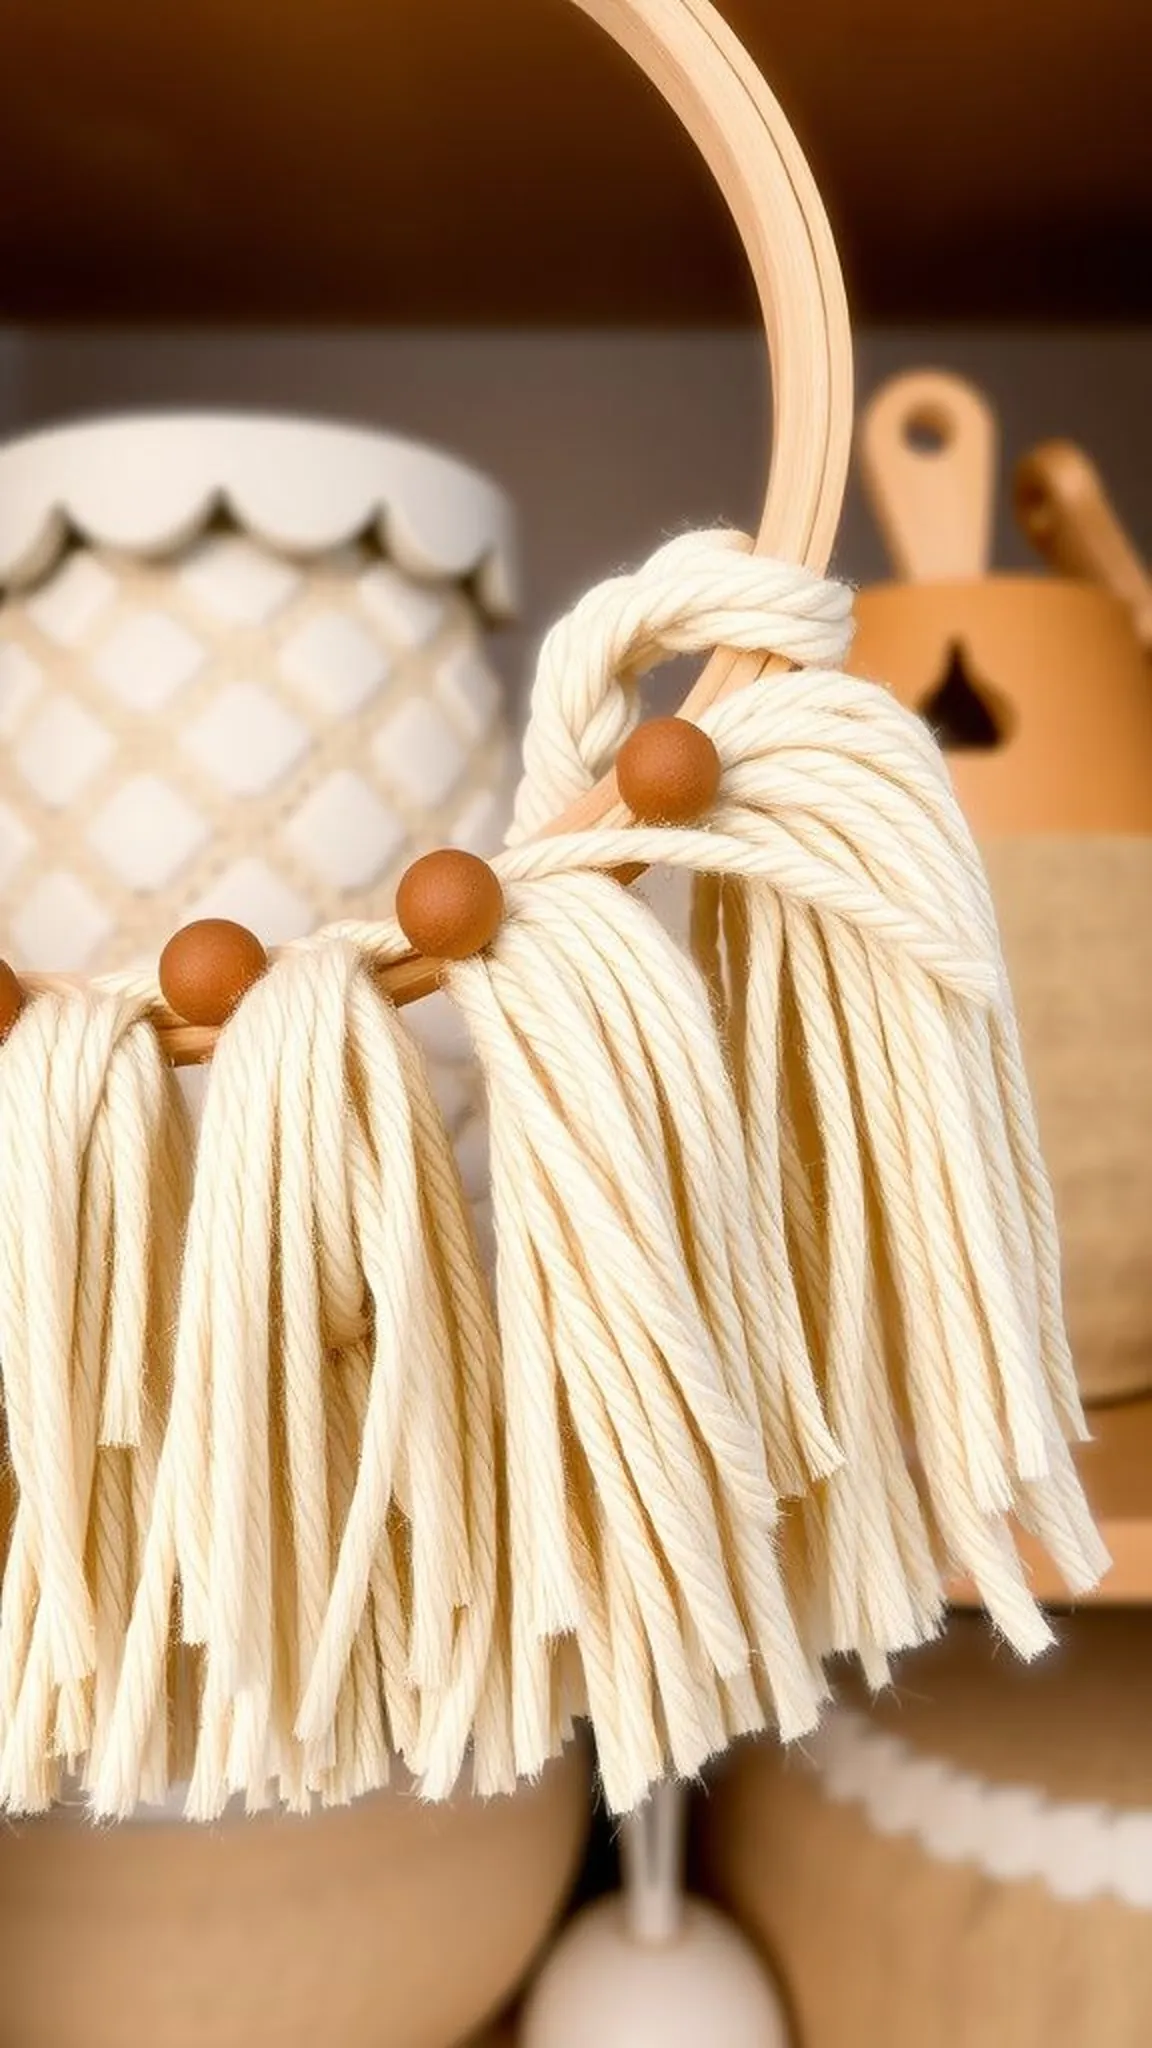
A hoop trimmed with dense tassel fringe reads lively and tactile, where cotton and jute yarns mingle in a neutral, boho palette. The fringe forms a halo of movement that rustles when touched, and thicker macramé-like knots offer a pleasing contrast against smooth hoop wood. Light plays off the yarn’s twist, highlighting fibers and small variations in tone.
Hung above a bedside or over a desk, the piece adds casual texture and a little motion that softens sharp corners and invites fingers to linger.
📋 How to Make This ▶
- Cut yarn pieces to equal lengths and fold each into a tassel bundle grouped by color.
- Attach tassel bundles around the hoop rim using lark’s head knots or small stitches, spacing for an even fringe.
- Trim the tassel ends for consistent length and add a wrapped top section or bead accents if desired.
⚠️ Avoid: A frequent beginner mistake is uneven tassel lengths that create a lop-sided look once the piece hangs.
🔄 Try Also: Use vibrant dyed yarns for a colorful statement or natural jute and hemp for a rustic, coastal-feel hoop.
🛒 Products & Materials ▶
Items Used
- wooden embroidery hoop (10 inch)
- cotton yarn skeins assorted
- jute twine small roll
- small wooden beads
📌 “Textured tassel hoop with boho fringe for relaxed walls.”
• • •
Dried flower mixed-media hoop with pressed blooms
⏱️ 2-3 hours · 🟠 Intermediate
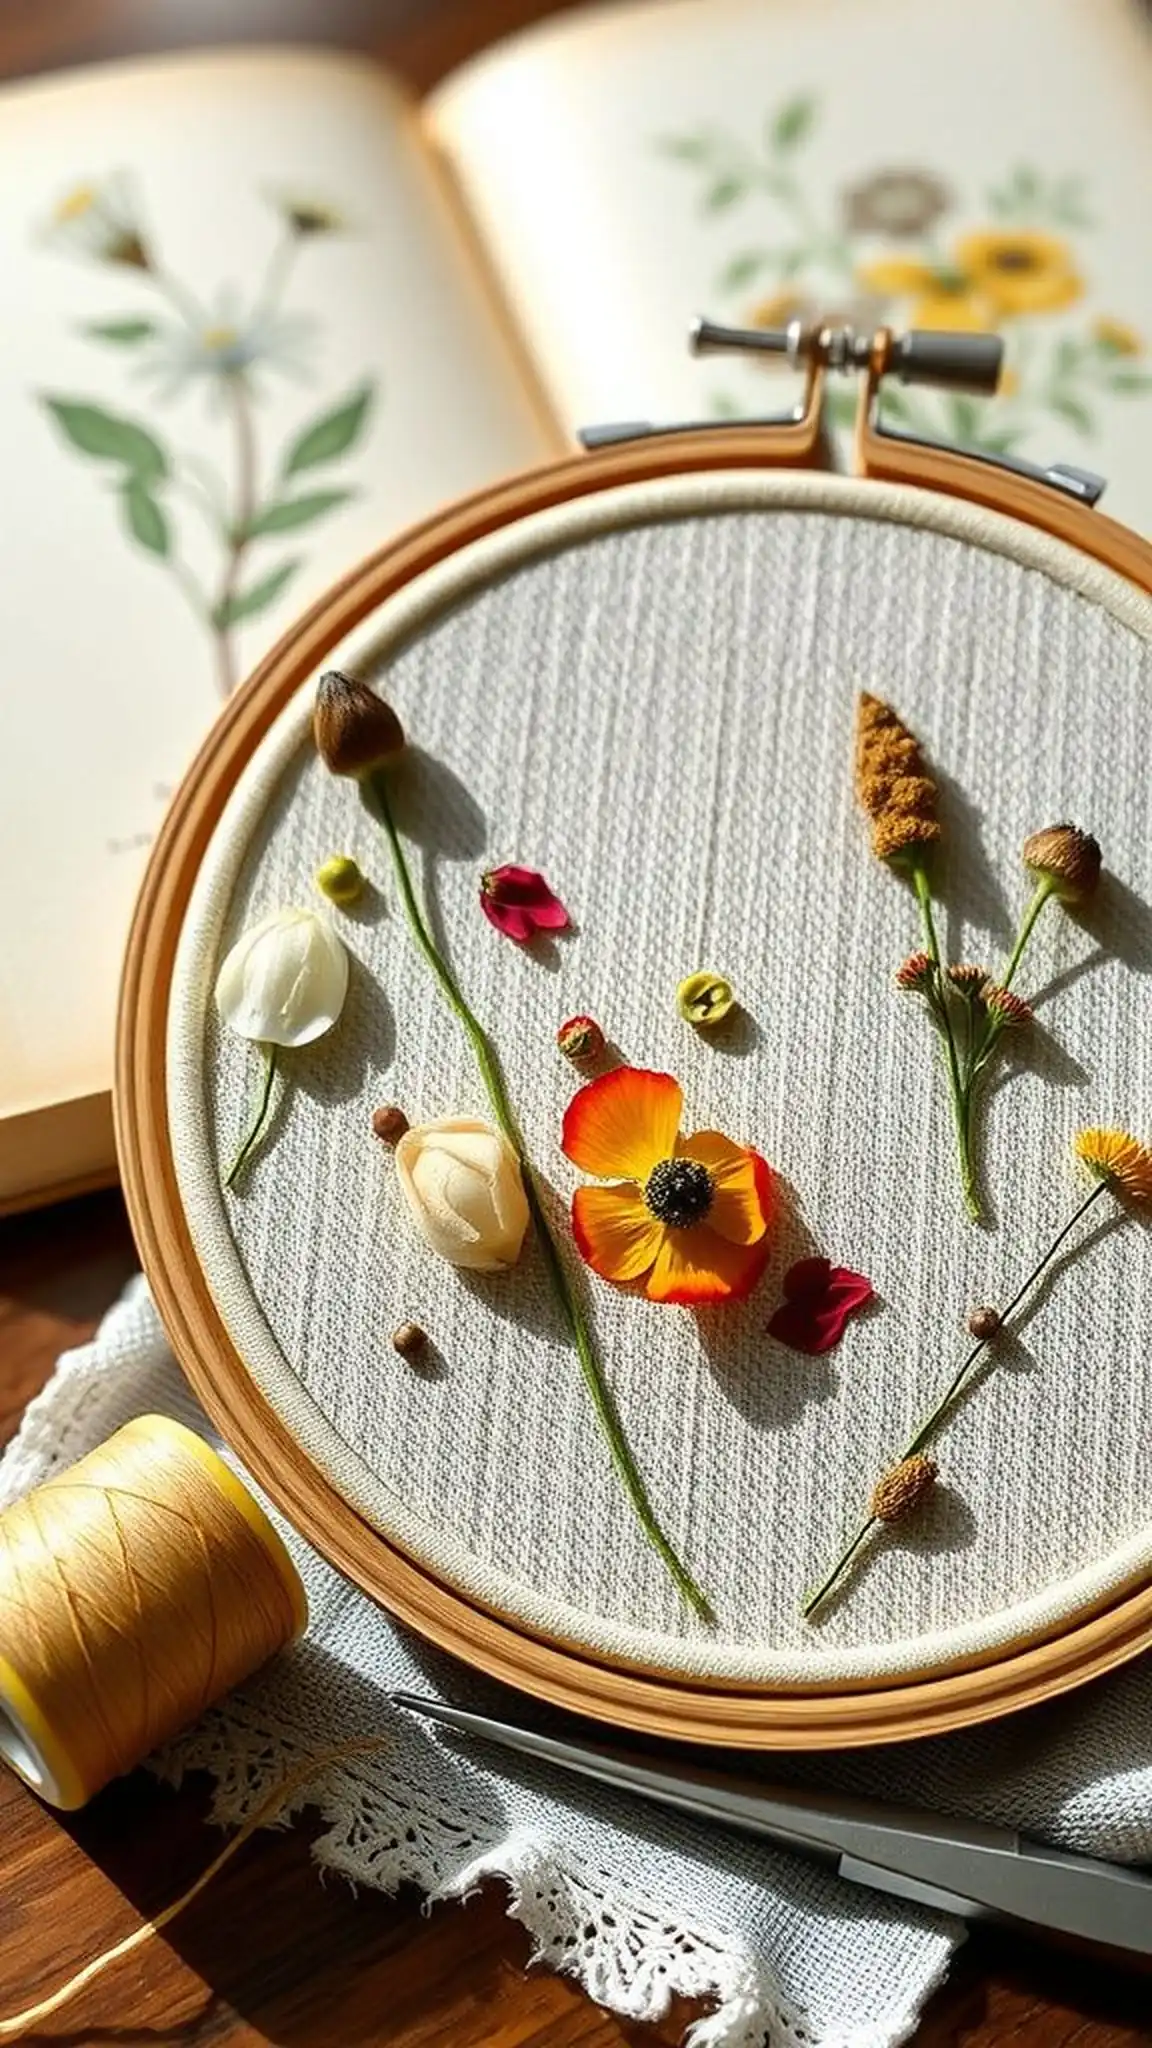
Pressed petals laid across a soft linen background read like a miniature botanical spread, their papery textures and muted pigments catching soft afternoon light. Tiny stems and seed pods cast delicate shadows, while a whisper of gold thread traces stems with a faint metallic glint. The hush of preserved blooms contrasts with the hoop’s smooth wood, making the piece feel both fragile and enduring.
When viewed up close, the subtle veins and faded edges of each petal reward slow appreciation and quiet smiles.
📋 How to Make This ▶
- Select fully dried, pressed floral elements and plan their layout on a linen or cotton background.
- Affix blooms with a small amount of archival adhesive or tiny tacking stitches to hold delicate pieces in place.
- Finish by securing fabric in the hoop and covering the back with felt to protect the arrangement.
⚠️ Avoid: A frequent beginner mistake is using flowers that retain moisture, which can wrinkle or discolor within the hoop.
🔄 Try Also: Create a seasonal hoop with autumn leaves and seed heads or a spring composition with pastel petals and baby branches.
🛒 Products & Materials ▶
📌 “Pressed flower hoop art that preserves seasonal beauty beautifully.”
• • •
Geometric metallic thread hoop for modern spaces
⏱️ 2-3 hours · 🔴 Advanced
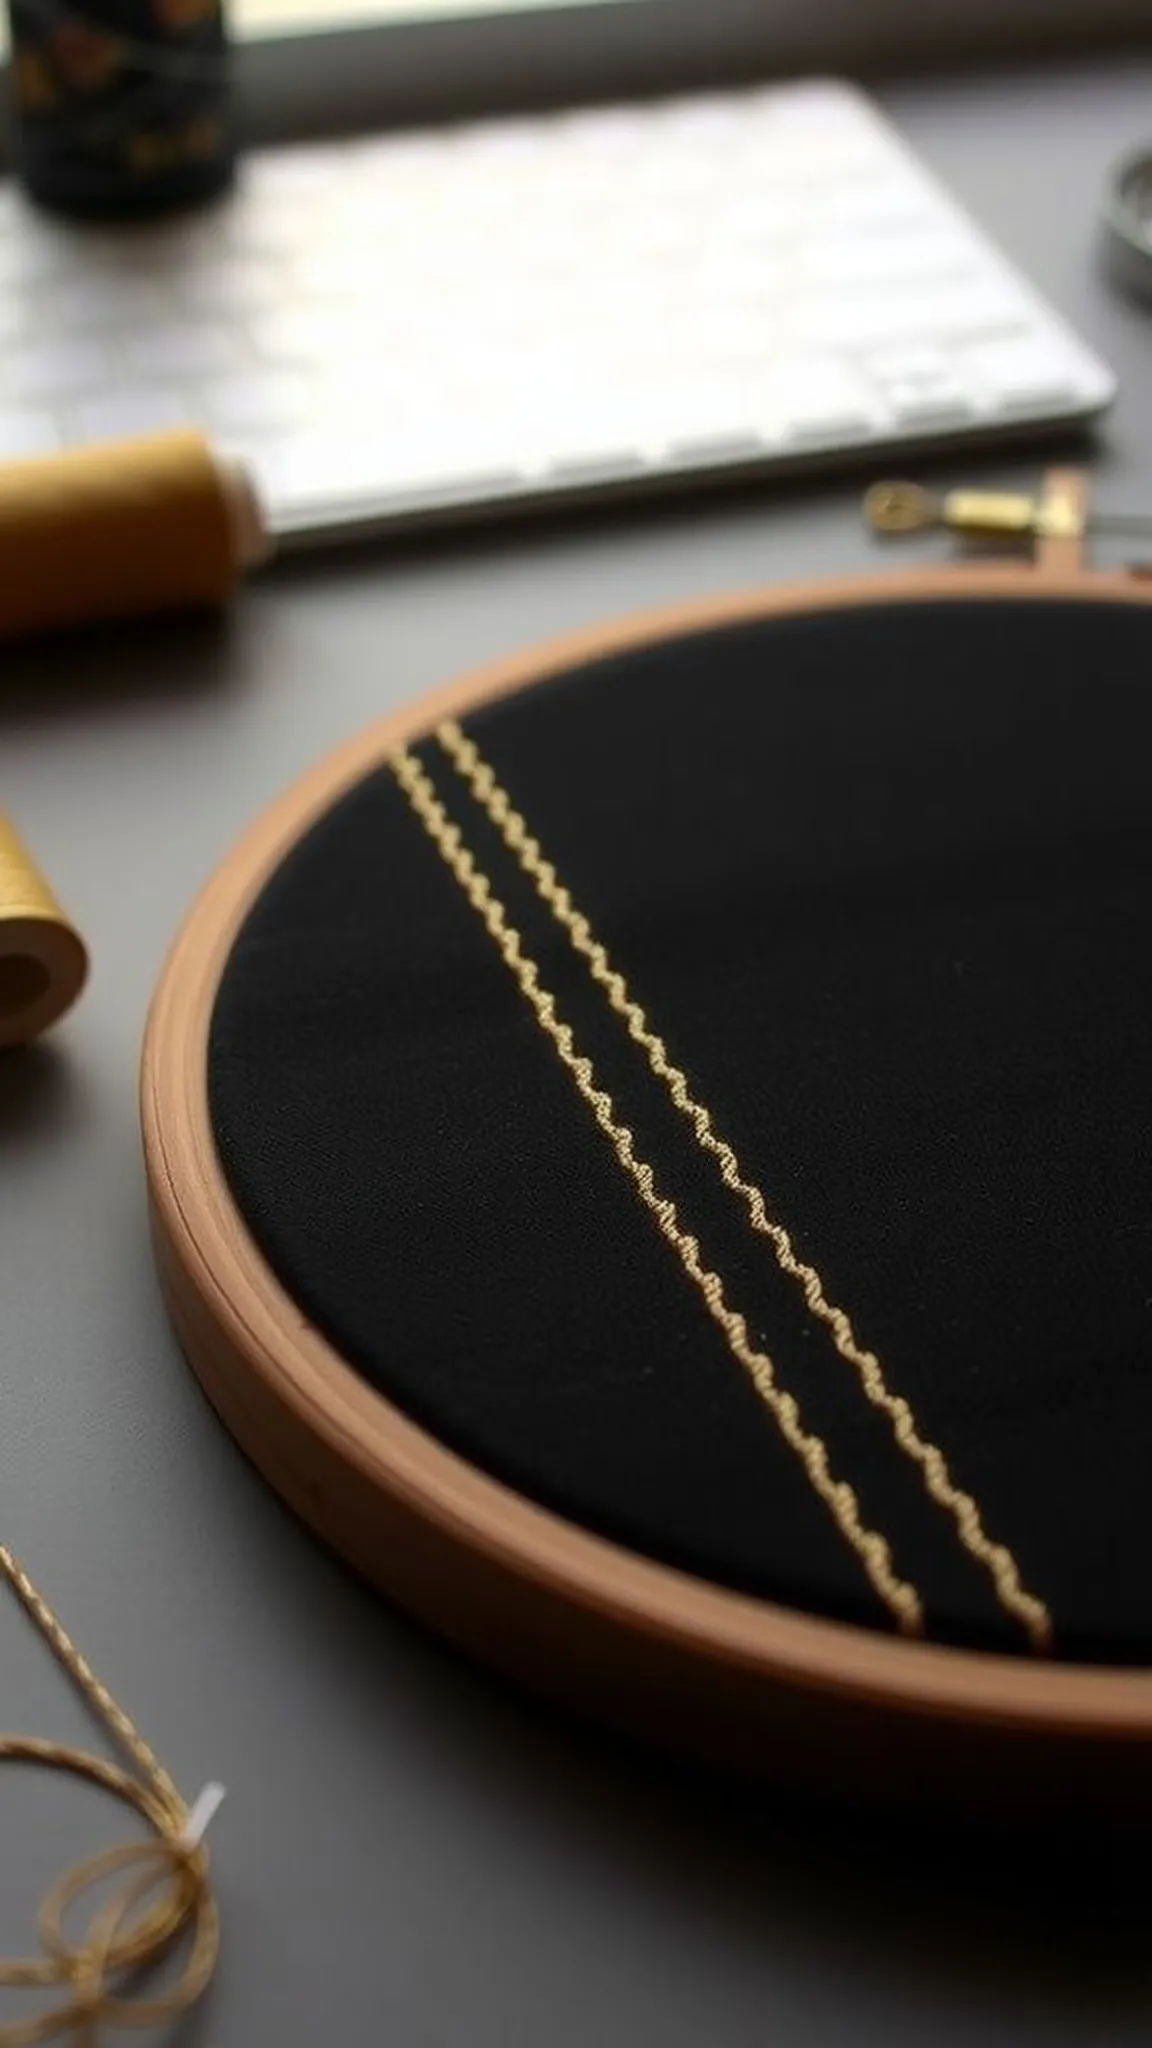
Crisp geometric lines stitched in metallic thread create a modern contrast against a dark cotton ground, the metallic’s reflective sheen catching light at different angles to produce a subtle, shifting glow. Tension in each stitch lends a taut, architectural feel, and the smoothness of the thread gives a cool, almost industrial quality. The design reads like miniature modern art, mapping triangles and polygons into a neat composition that plays well above a sleek desk or within a curated gallery wall.
📋 How to Make This ▶
- Transfer a geometric template onto stabilizer-backed fabric and mark intersection points for accuracy.
- Stitch straight lines with metallic thread using a length that resists fraying, maintaining even tension for clean edges.
- Trim stabilizer at the back and finish the hoop with a neat felt circle to hide thread tails.
⚠️ Avoid: A frequent beginner mistake is using long lengths of metallic thread, which can tangle and create uneven stitches.
🔄 Try Also: Mix metallic with matte floss for contrast or scale down to a mini hoop as a pendant or ornament.
🛒 Products & Materials ▶
Items Used
📌 “Sleek geometric hoop with metallic thread for modern walls.”
• • •
Personalized name monogram hoop for a nursery
⏱️ 1-2 hours · 🟠 Intermediate
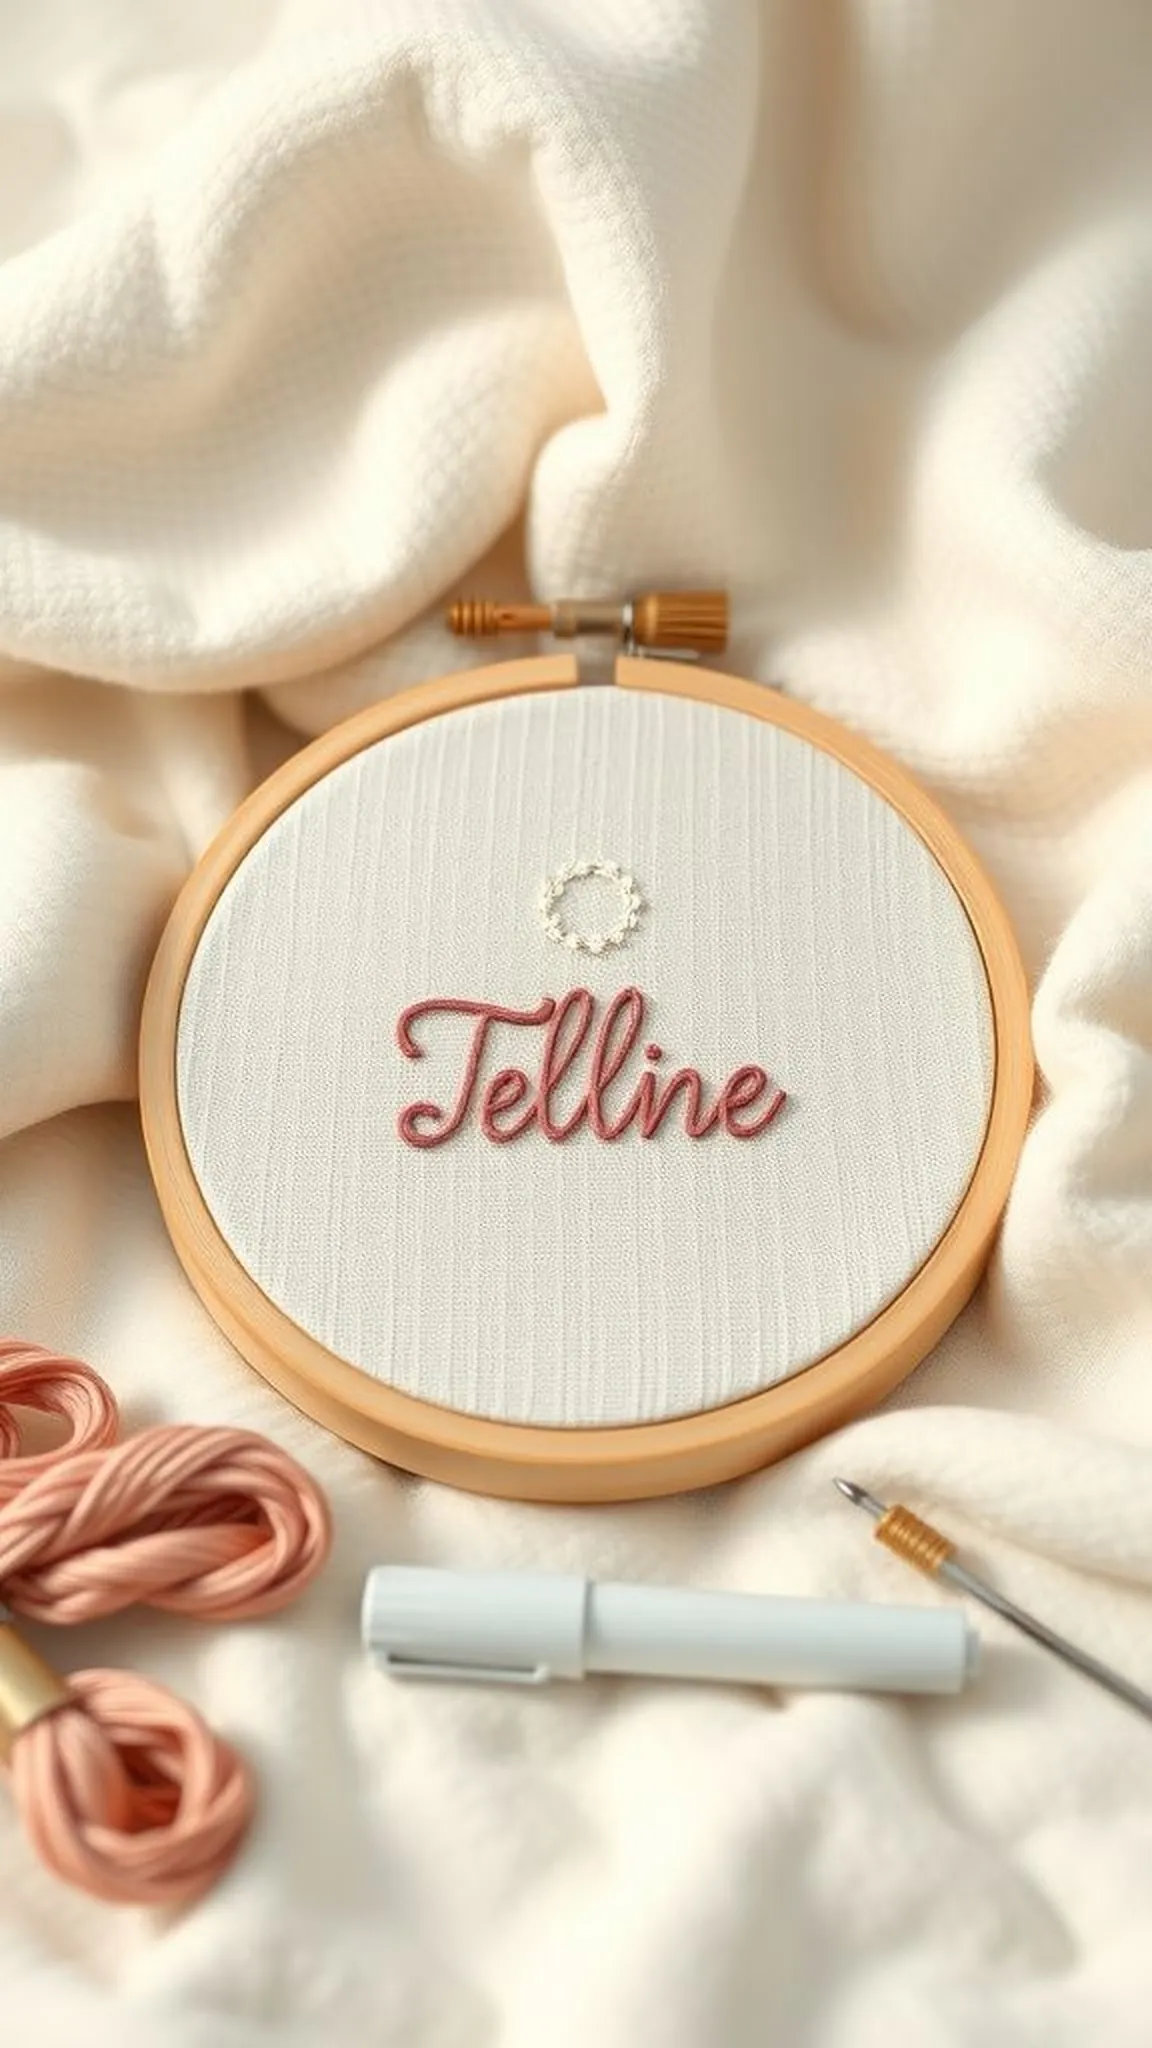
A hand-stitched monogram on soft muslin reads like a tiny proclamation of welcome, with careful satin stitches forming rounded letters that pop slightly above the fabric plane. The choice of color for the name thread sets the mood: dusty rose for sweetness, slate blue for calm, or warm ochre for cheer. A small wreath or leaf detail around the monogram frames the letters with organic softness.
Hangs easily at eye level in a nursery, giving a personal, tender accent that stays meaningful as the child grows.
📋 How to Make This ▶
- Lightly transfer the chosen name or initial onto muslin using a washable fabric marker or transfer method.
- Fill letter shapes with satin stitch or backstitch outlines, keeping stitches short for smooth curves.
- Add a simple embroidered wreath or tiny accents around the name and tidy thread ends on the back.
⚠️ Avoid: A frequent beginner mistake is using long satin stitches, which can snag and look uneven along curved letter edges.
🔄 Try Also: Use cursive script for a whimsical feel, block letters for a modern look, or add a small animal motif beside the name.
🛒 Products & Materials ▶
📌 “Sweet embroidered name hoops perfect for nurseries or baby gifts.”
• • •
Patchwork quilted hoop made from fabric scraps
⏱️ 2 hours · 🟠 Intermediate
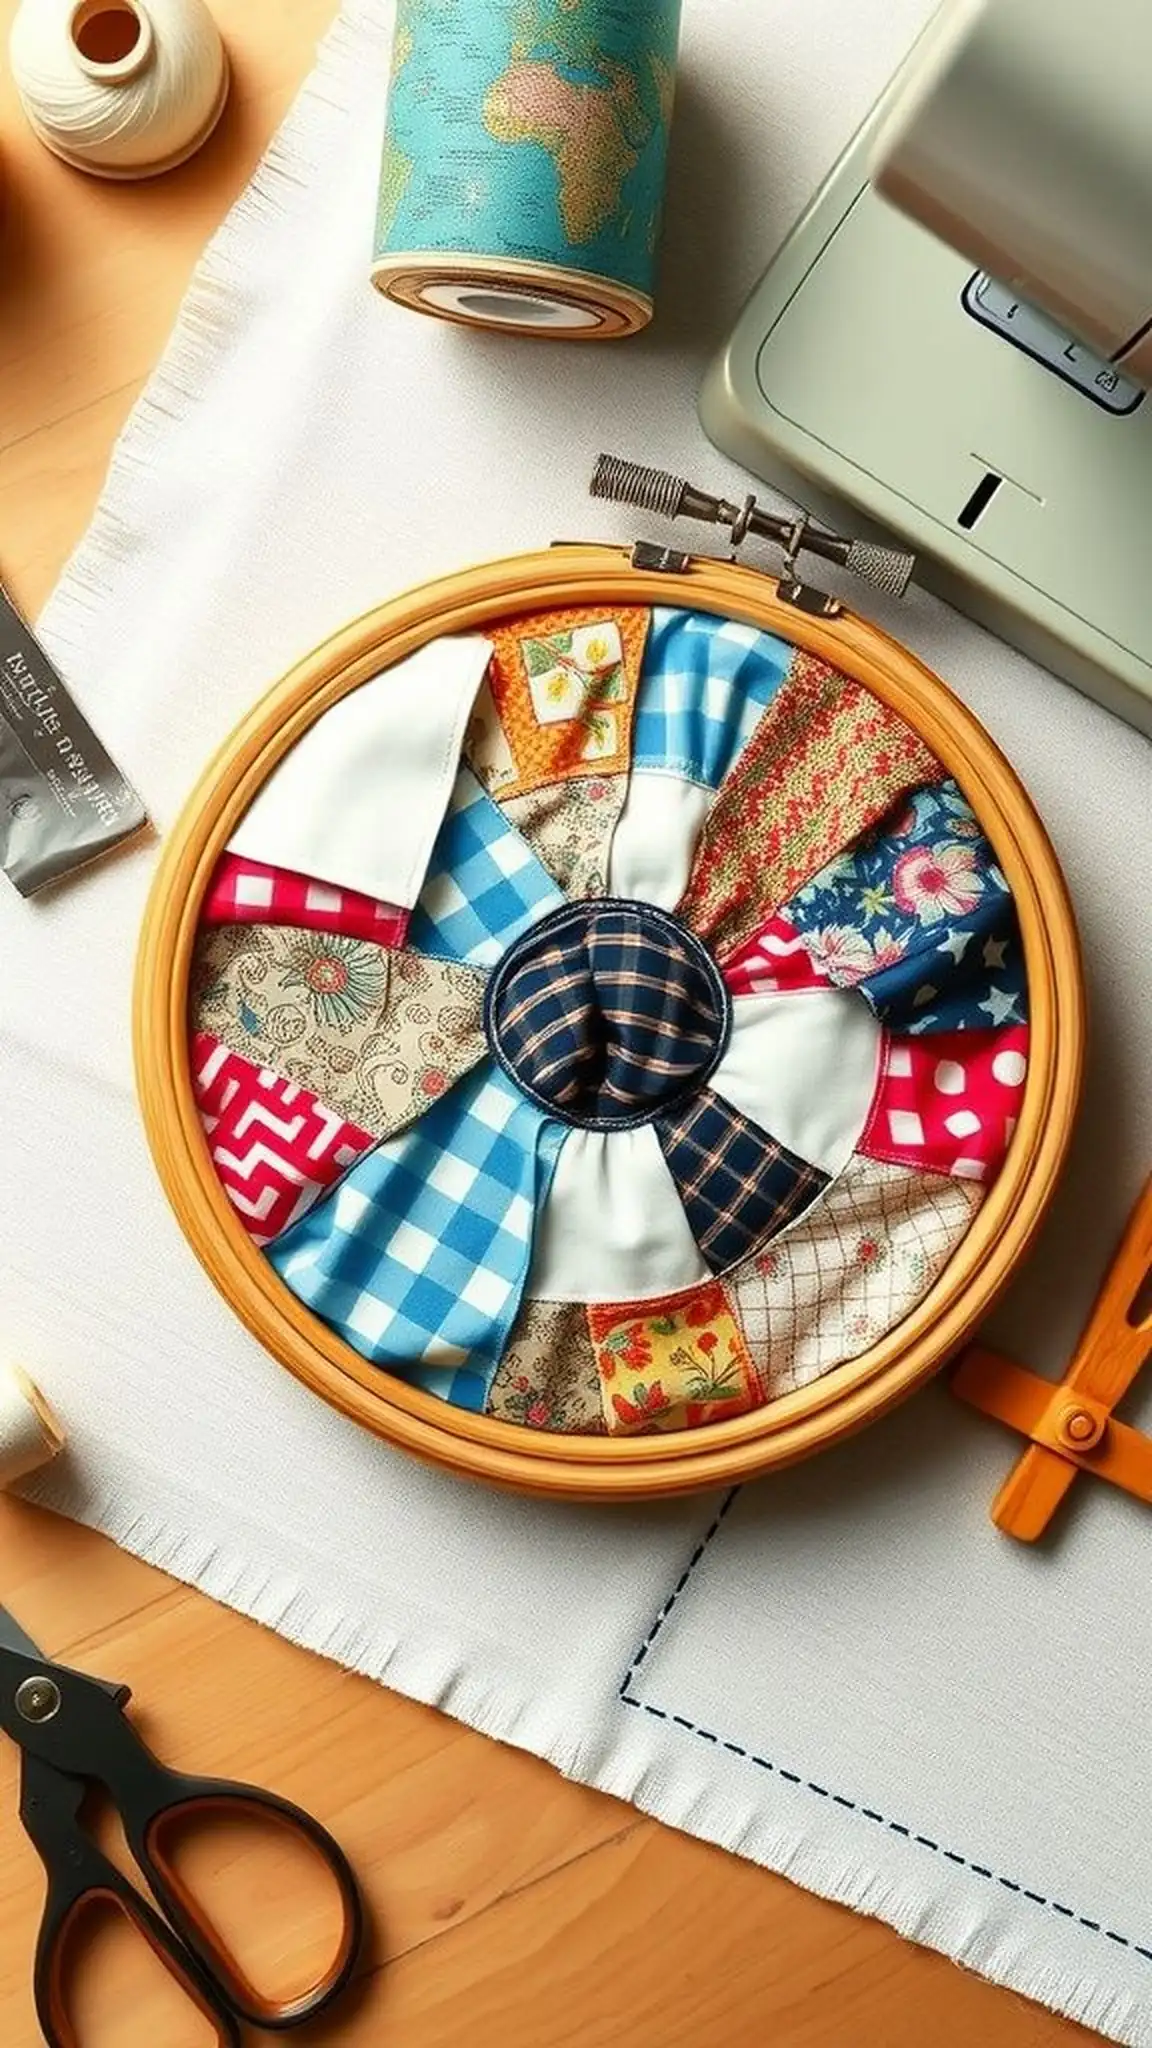
Small scraps of cotton and quilting fabric come together like a miniature quilt inside a hoop, each patch showing its own tiny print or stripe. The seams read as delicate ridges, and the quilted texture gives gentle relief under fingertip exploration. Tiny stitches along patch edges add tactile charm, and the mix of patterns creates a lively, homespun narrative.
The piece feels like a keepsake made from leftover favorites, carrying visual warmth and memory into a compact wall accent that invites closer inspection.
📋 How to Make This ▶
- Arrange small fabric scraps into a pleasing layout and join edges with small running stitches to create a patchwork square.
- Add a thin batting layer and quilt a few lines or motifs through all layers to secure the texture.
- Stretch the finished mini-quilt in the hoop and finish the back with felt or fabric to conceal raw edges.
⚠️ Avoid: A frequent beginner mistake is mixing fabric weights, which can cause uneven tension and puckering after quilting.
🔄 Try Also: Make a monochrome patchwork for subtle texture, or use bright scrap mixes for a lively, eclectic hoop.
🛒 Products & Materials ▶
Items Used
- wooden embroidery hoop (6 inch)
- assorted quilting fabric scraps
- thin cotton batting 12×12
- hand sewing needles pack
📌 “Mini patchwork hoops that turn scraps into cozy art.”
• • •
Hoop dreamcatcher with yarn and beads
⏱️ 1.5 hours · 🟠 Intermediate
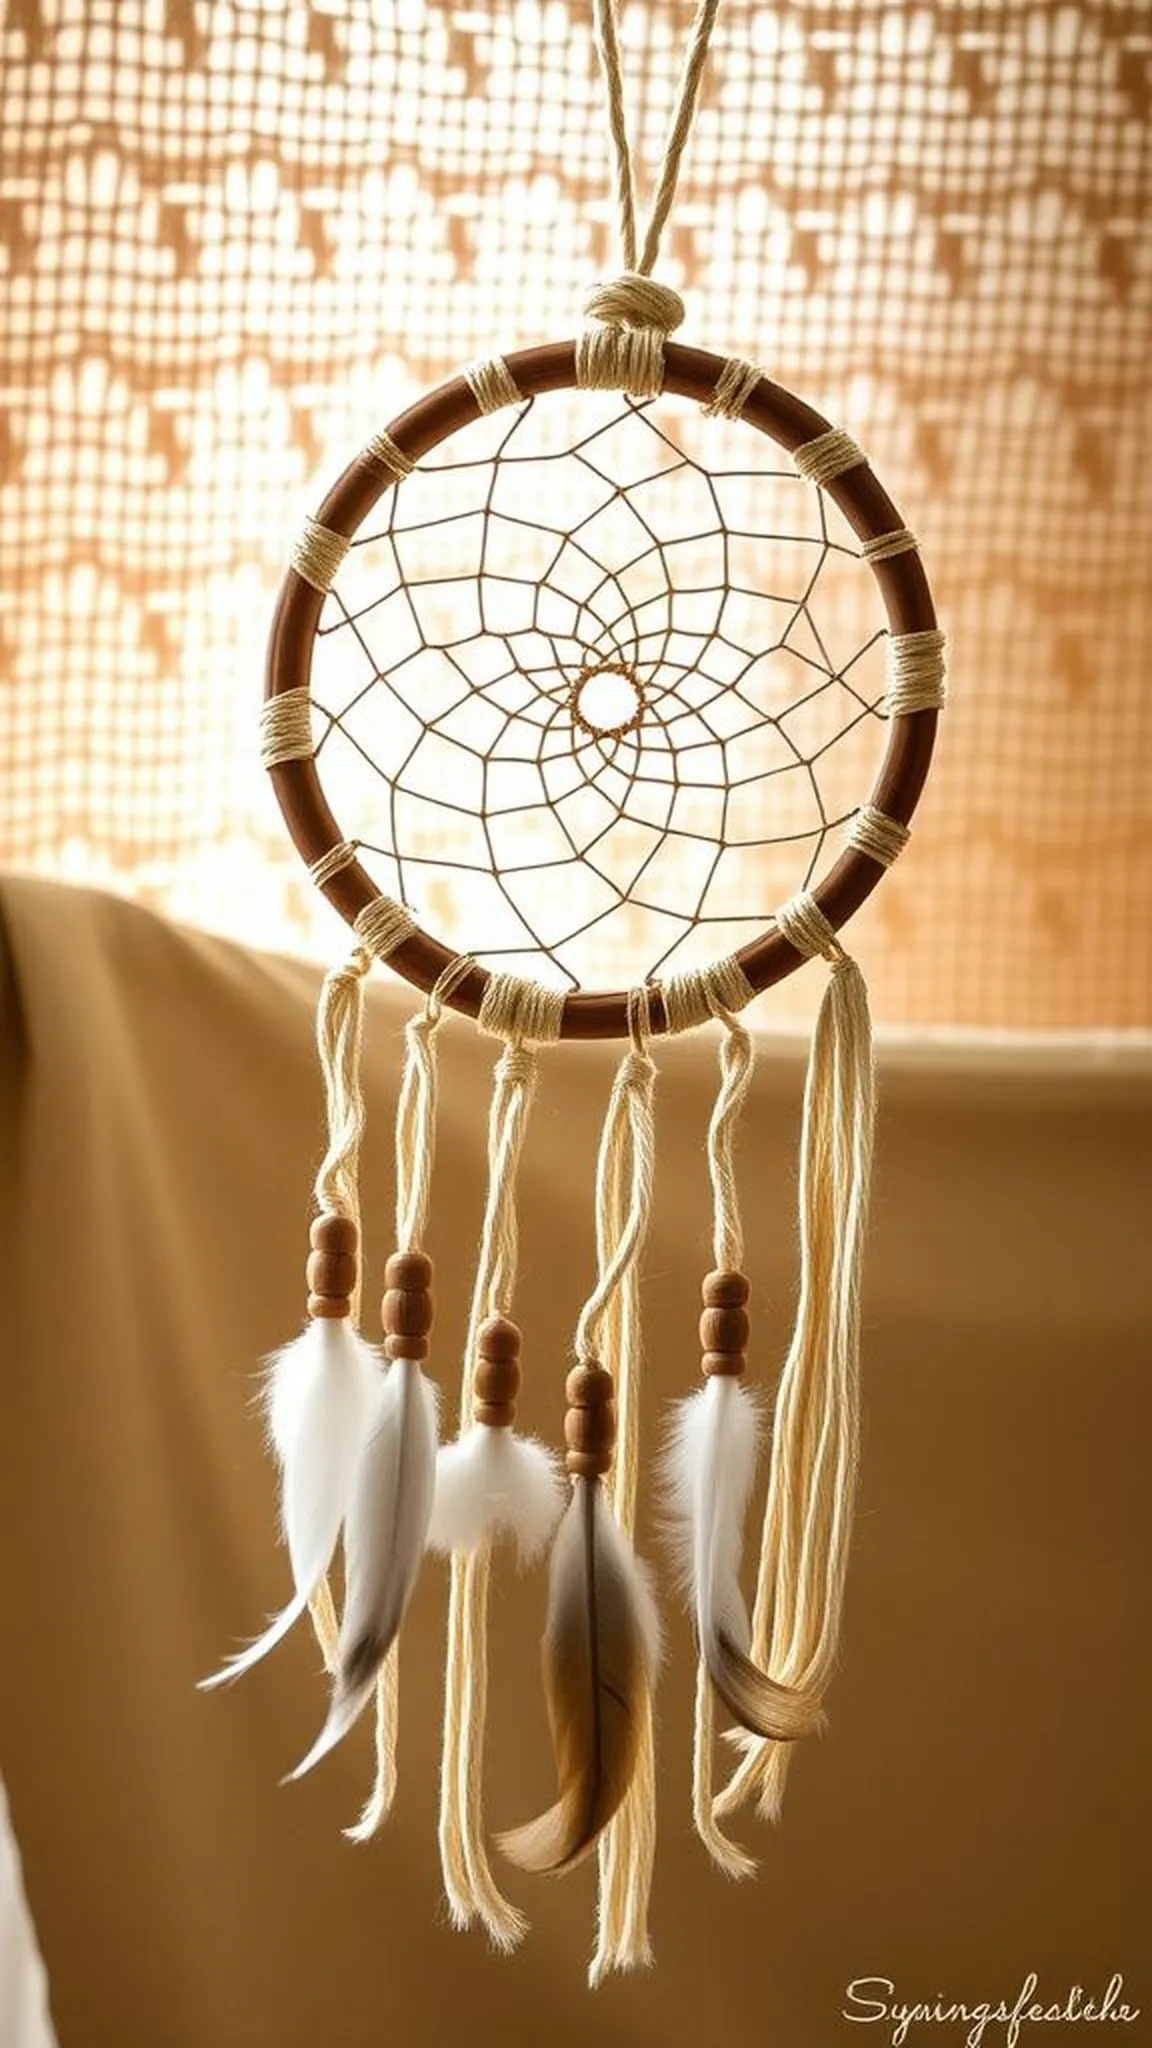
A hoop transformed into a dreamcatcher has rhythmic loops of yarn and beaded strands that sway with the smallest breeze. Soft cotton cord contrasts with glossy wooden beads and the occasional feather, and the tactile knotwork feels satisfying to inspect. The central web can feel airy or dense depending on yarn choice, and the long tail of strands creates a fringe that moves with life in the room.
Hung near a window, light filters through the web and catches beads, producing tiny reflections.
📋 How to Make This ▶
- Wrap the hoop with cotton cord for a tidy base and create an inner web with evenly spaced loops using stronger thread.
- Attach strands of yarn, cord, and beaded strings to the bottom edge, varying lengths for layered movement.
- Add feathers or wooden bead clusters to strand ends and secure all knots with a dab of clear glue if desired.
⚠️ Avoid: A frequent beginner mistake is uneven strand lengths that disturb the visual balance when the piece hangs.
🔄 Try Also: Use dyed yarns for colorful flair, metal beads for a modern twist, or natural feathers for an earthy look.
🛒 Products & Materials ▶
📌 “Boho hoop dreamcatcher with yarn, beads, and soft movement.”
• • •
Minimalist hoop with embroidered line art portrait
⏱️ 2-3 hours · 🔴 Advanced

A single continuous line sketched in thread creates a portrait with pared-back elegance, where negative space becomes as important as stitch. Fine thread contrasts with a neutral linen ground, and the slight raised ridge of a backstitch gives the line a drawn quality. The quiet restraint of the piece reads calm and sophisticated, and the viewer’s eye traces each contour slowly.
Hung in a compact cluster or solo, this hoop feels like a quiet statement piece that rewards careful looking and thoughtful placement.
📋 How to Make This ▶
- Trace or print a simplified single-line portrait onto transfer paper and position it over linen fabric.
- Stitch the line using backstitch or split stitch, keeping a steady rhythm and consistent stitch length.
- Secure thread ends discreetly at the back and mount the fabric tautly in the hoop.
⚠️ Avoid: A frequent beginner mistake is overcomplicating the line with extra curves, losing the clean, minimalist effect.
🔄 Try Also: Try profile silhouettes, animal line art, or paired portrait hoops for a complementary set.
🛒 Products & Materials ▶
📌 “Clean single-line embroidered portraits for a minimalist look.”
• • •
Seasonal holiday ornament hoop trio
⏱️ 45 min · 🟢 Beginner
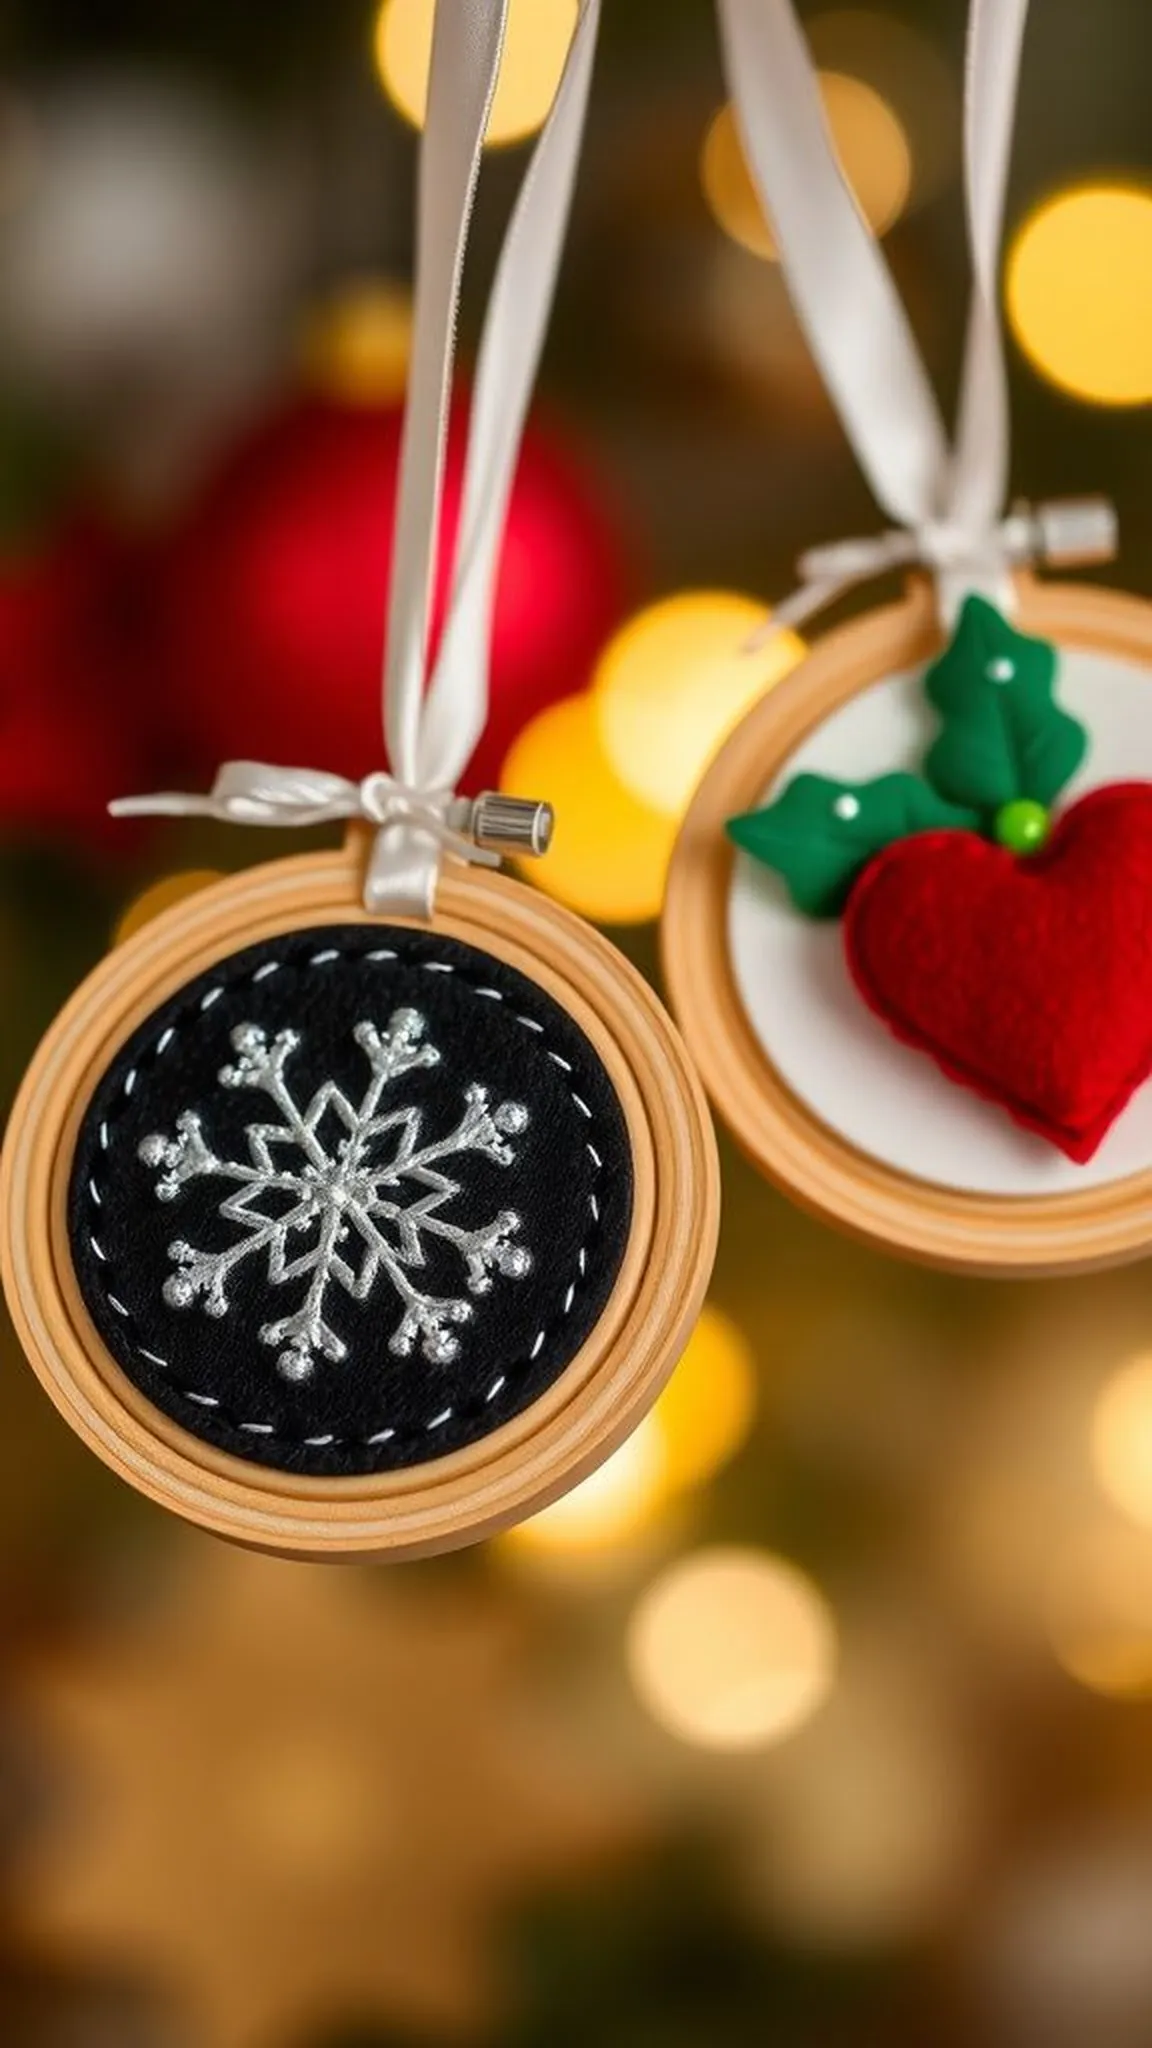
Tiny hoops dressed for the season hang like mini ornaments, each with its own personality: a snowflake stitched with silver floss, a velvet heart for warmth, and a sprig of holly made from felt. Their small size makes them delightful to handle and easy to group on a branch or wreath. The mix of textures—smooth velvet, matte felt, and shiny thread—creates a festive sensory mix that feels playful when clustered on a holiday tree or wrapped ribbon.
📋 How to Make This ▶
- Prepare three mini hoops with lightweight fabric bases suitable for each motif.
- Stitch or glue simple holiday motifs such as a snowflake, heart, and holly, keeping embellishments small.
- Finish each ornament with a ribbon loop for hanging and a neat backing circle.
⚠️ Avoid: A frequent beginner mistake is adding heavy embellishments that cause ornaments to tilt or pull on tree branches.
🔄 Try Also: Make a winter trio, autumn set with leaves and acorns, or bright spring trio with florals and eggs.
🛒 Products & Materials ▶
Items Used
📌 “Adorable mini hoop ornaments to celebrate every season.”
• • •
Macramé plant hanger with an embedded hoop
⏱️ 3 hours · 🔴 Advanced
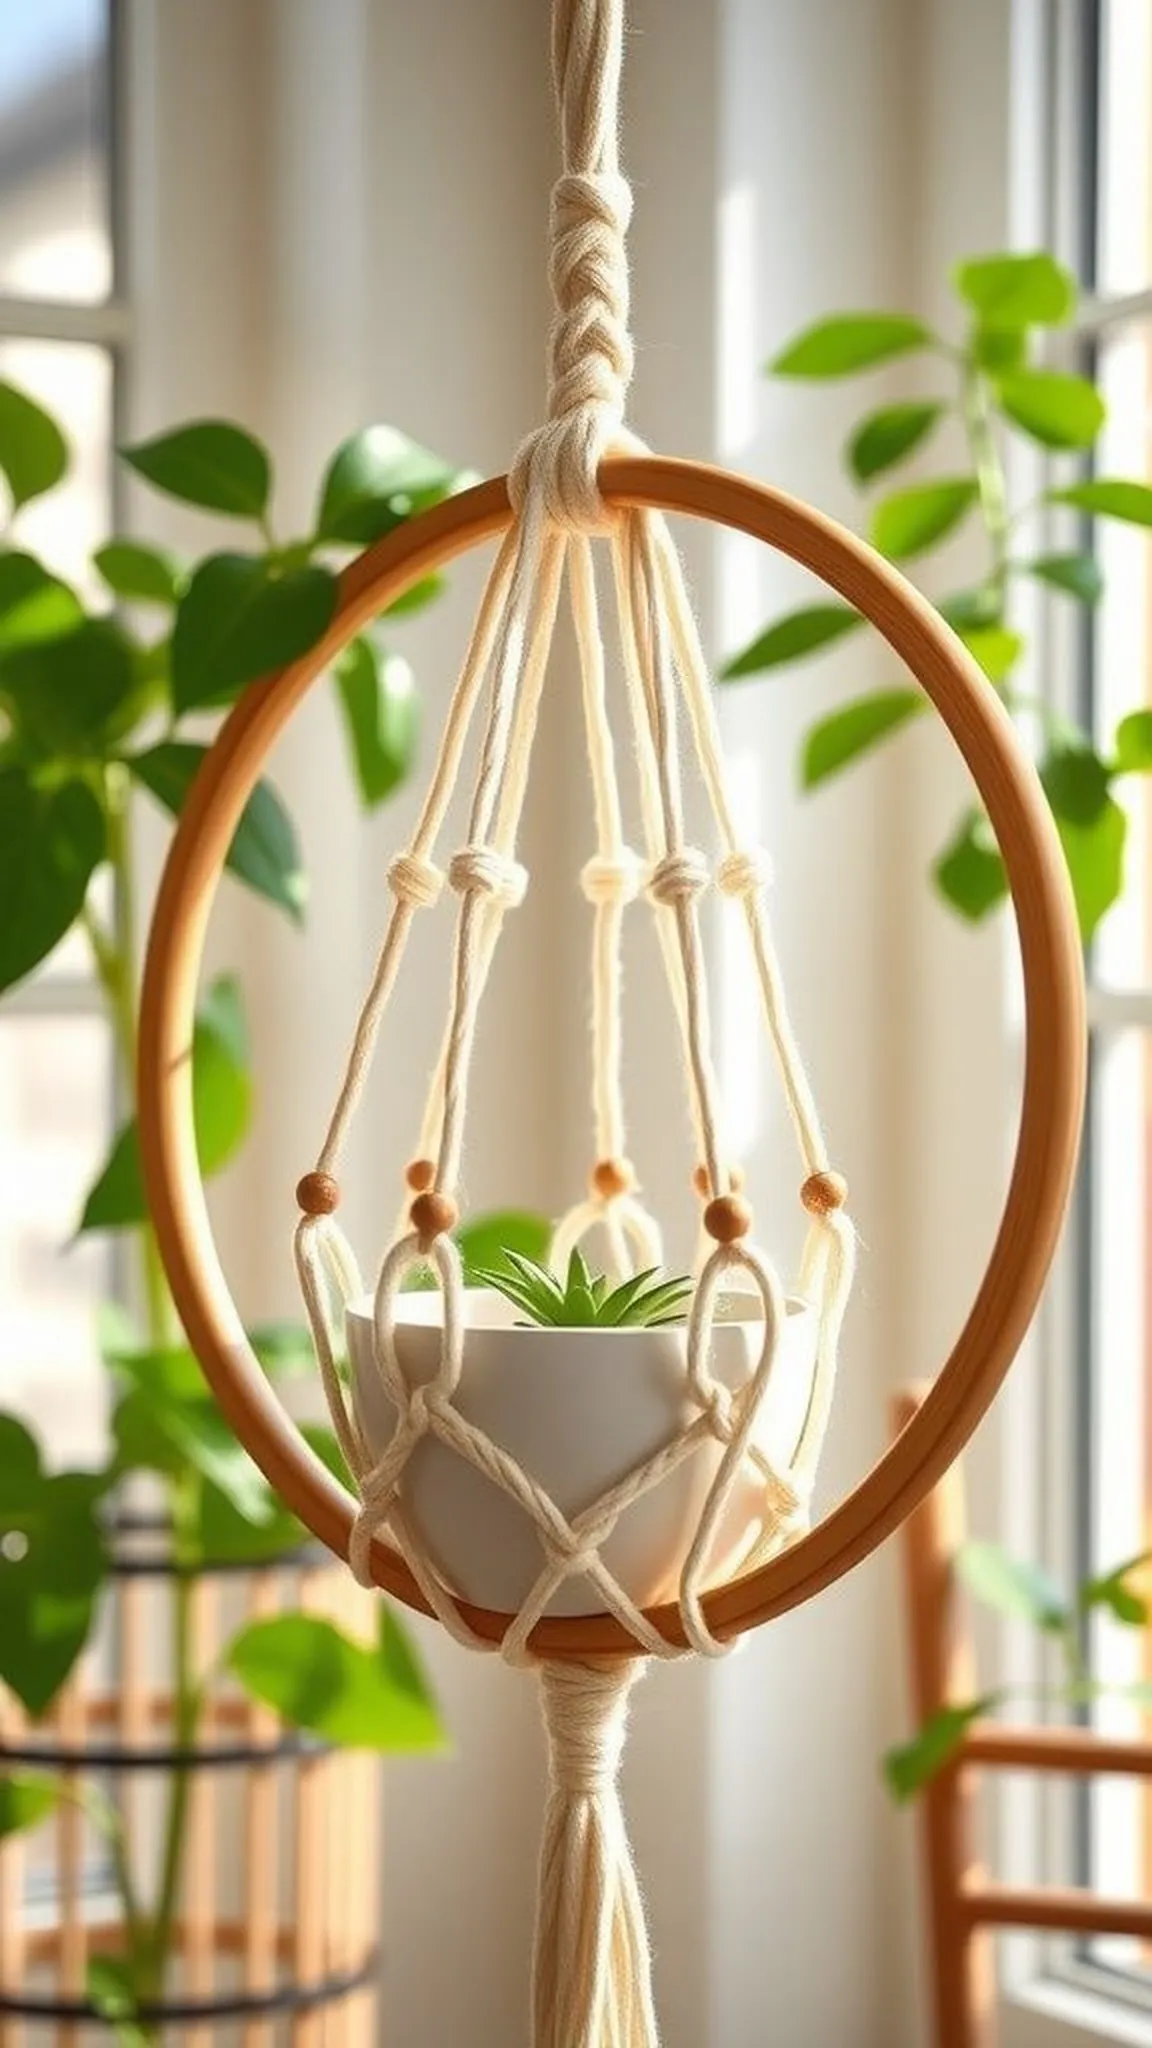
A sturdy hoop cradles a small planter amid a network of knotted macramé cords, where the knotted texture feels sculptural and pleasantly tactile. Natural cotton cord offers a soft, matte finish while wooden beads introduce small points of contrast. The planter sits suspended, rotating gently with air movement, and the interplay of round hoop and linear cords reads balanced and organic.
Hanging near a bright window, the arrangement becomes a living mobile that brings greenery and handmade structure into a sunny corner.
📋 How to Make This ▶
- Secure a wooden hoop as the central cradle and prepare equal lengths of cotton cord for knotting.
- Create a series of square knots, spiral knots, and gathering knots to form the cradle and decorative tails.
- Add wooden bead accents and finish with a gathering knot to hold a small planter securely in place.
⚠️ Avoid: A frequent beginner mistake is uneven cord lengths, which leads to a crooked planter and uneven knot patterns.
🔄 Try Also: Use dyed cords for a colorful statement or natural hemp for a rustic, outdoor-ready hanger.
🛒 Products & Materials ▶
Items Used
- wooden embroidery hoop (12 inch)
- cotton macrame cord 3mm
- wooden beads large
- small ceramic planter
📌 “Hanging macramé planter with a wooden hoop cradle for indoor greenery.”
• • •
Embroidery hoop clock with stitched numbers
⏱️ 2-3 hours · 🔴 Advanced

A functioning clock emerges when an embroidery hoop becomes a crisp face, with hand-stitched numerals lending warmth to mechanical hands. The interplay between tactile stitches and cool metal clock hands creates a contrast that feels thoughtful. The fabric face muffles sound slightly, and the small raised stitches around numbers provide a satisfying texture when the light grazes them.
Mounted in a kitchen or office, the piece combines utility and craft, offering a small, handmade rhythm to daily life.
📋 How to Make This ▶
- Stitch numerals or markers onto a taut fabric circle at cardinal points and ensure spacing is even for time accuracy.
- Mount the fabric in the hoop and cut a backing board to support a lightweight clock movement.
- Install the clock mechanism through the center and attach hands, testing for clearance over embroidery.
⚠️ Avoid: A frequent beginner mistake is using a heavy clock movement that warps the hoop or stresses stitched areas.
🔄 Try Also: Make a minimalist marker-only clock, a full numeric dial, or add a stitched motif at the center for decoration.
🛒 Products & Materials ▶
Items Used
- wooden embroidery hoop (8 inch)
- clock movement kit lightweight
- cotton fabric neutral
- embroidery floss dark color
- thin craft backing board
📌 “Functional embroidery hoop clock that merges craft with timekeeping.”
• • •
Playful hoop garland of mixed mini hoops
⏱️ 1 hour · 🟢 Beginner
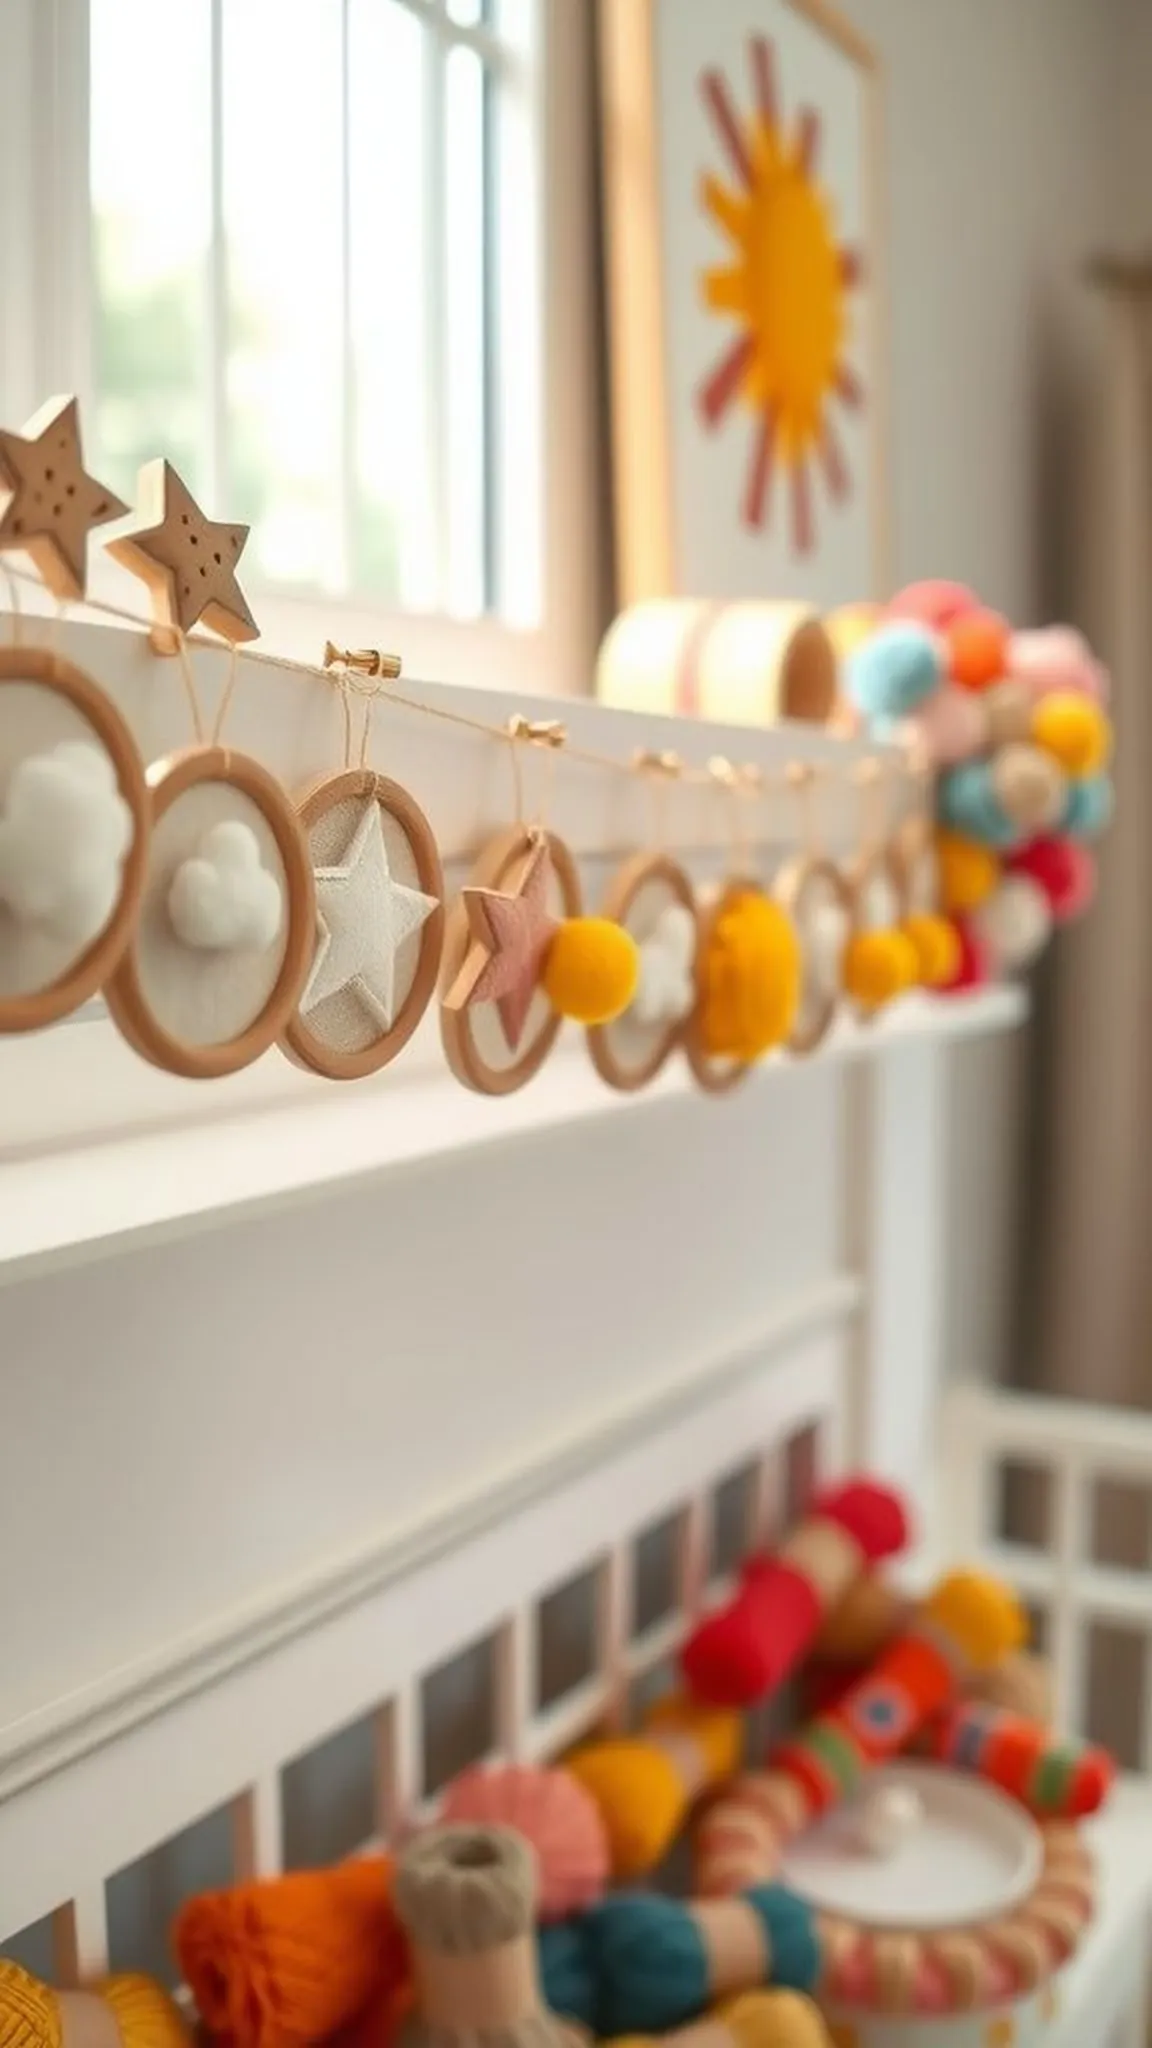
A string of mini hoops bounces gently across a mantel or child’s room, each hoop wearing its own tiny scene—embroidered stars, felt clouds, and pom-pom suns. The variety of textures and colors creates a festive procession that feels handcrafted and jaunty. Light catches the floss and beads, and the small scale makes the garland feel fragile and precious.
Hung low for little hands to admire or draped gracefully above a workspace, the garland adds a handcrafted sense of celebration and continuous small delights.
📋 How to Make This ▶
- Prepare several mini hoops with small motifs such as stars, clouds, or suns on lightweight fabric.
- Attach tiny loops or ribbon tabs to each hoop and thread them onto a single length of cord, spacing to taste.
- Secure ends with knots and add a hanging loop at each side for easy display.
⚠️ Avoid: A frequent beginner mistake is using uneven spacing, which makes the garland look lopsided when hung.
🔄 Try Also: Create a themed garland for holidays, a pastel nursery set, or colorful birthday streamers with numbers.
🛒 Products & Materials ▶
📌 “Charming mini hoop garland for playful, handcrafted decor.”
