
As an Amazon Associate I earn from qualifying purchases.
Dollar Tree Farmhouse Decor Crafts bring cozy farmhouse charm without spending much, and Dollar Tree farmhouse decor crafts transform basics into warm, rustic accents. These Dollar Tree Farmhouse Decor Crafts turn simple finds into layered farmhouse decor, from mason jar farmhouse projects to wooden sign farmhouse crafts. Dollar Tree farmhouse decor crafts make budget-friendly farmhouse decorating fun, with Dollar Tree farmhouse crafts offering approachable farmhouse decor ideas for every room and season.
Mason jar herb planter sconce for kitchen charm
⏱️ 45 min · 🟢 Beginner
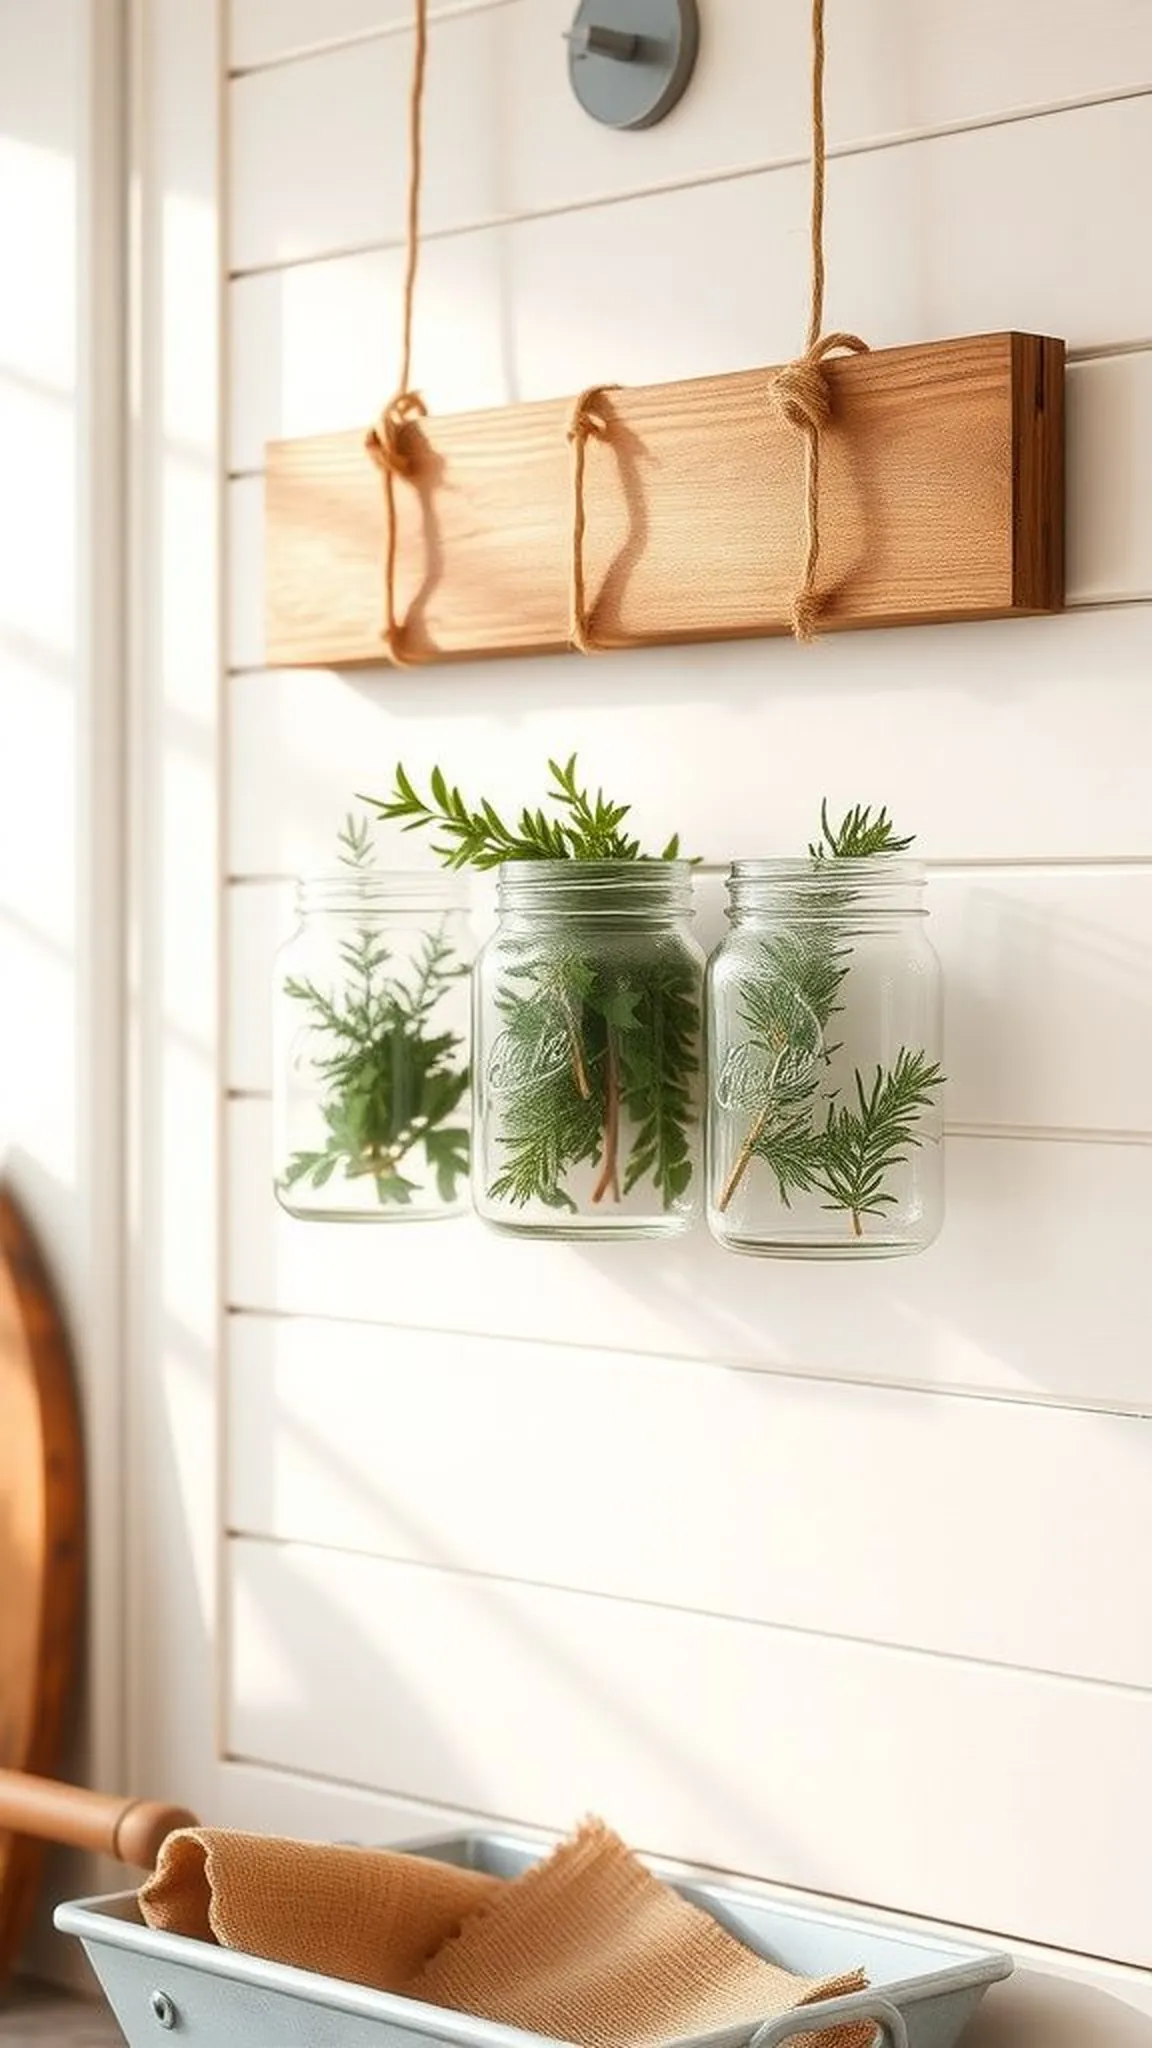
A sunlit stretch of counter became a tiny herb corner, with cool glass jars catching morning light and the faint green scent of faux thyme. The twine wrapped around jar necks added a tactile, rustic ribbon that felt homespun. Metal hooks had a soft metallic chill and provided just enough contrast against warm wood.
Looking at the row of jars hanging like little green lanterns brought a calm, lived-in mood that fit the farmhouse vibe without fuss.
📋 How to Make This ▶
- Gather three mason jars, faux herb stems, twine, metal cup hooks, and a small wooden board.
- Wind twine around each jar neck several times and knot it to create a hanging loop.
- Space cup hooks along the wooden board and screw them in firmly.
- Hang jars by their twine loops on the hooks and arrange faux herbs evenly for a pleasing look.
⚠️ Avoid: A common misstep is hanging jars too close together which makes the display feel crowded and off-balance. Avoid uneven spacing that draws attention to gaps.
🔄 Try Also: Swap faux herbs for dried lavender or small seasonal sprigs for a different scent and color. Try clear glass replaced by colored jars for a muted pop.
🛒 Products & Materials ▶
Items Used
- Glass mason jars
- Twine
- Faux herb stems
- Cup hooks
- Small wooden board
📌 “Rustic mason jar herb sconces for cozy kitchen corners.”
• • •
Distressed picture frame chalkboard sign, vintage vibe
⏱️ 1 hour · 🟠 Intermediate
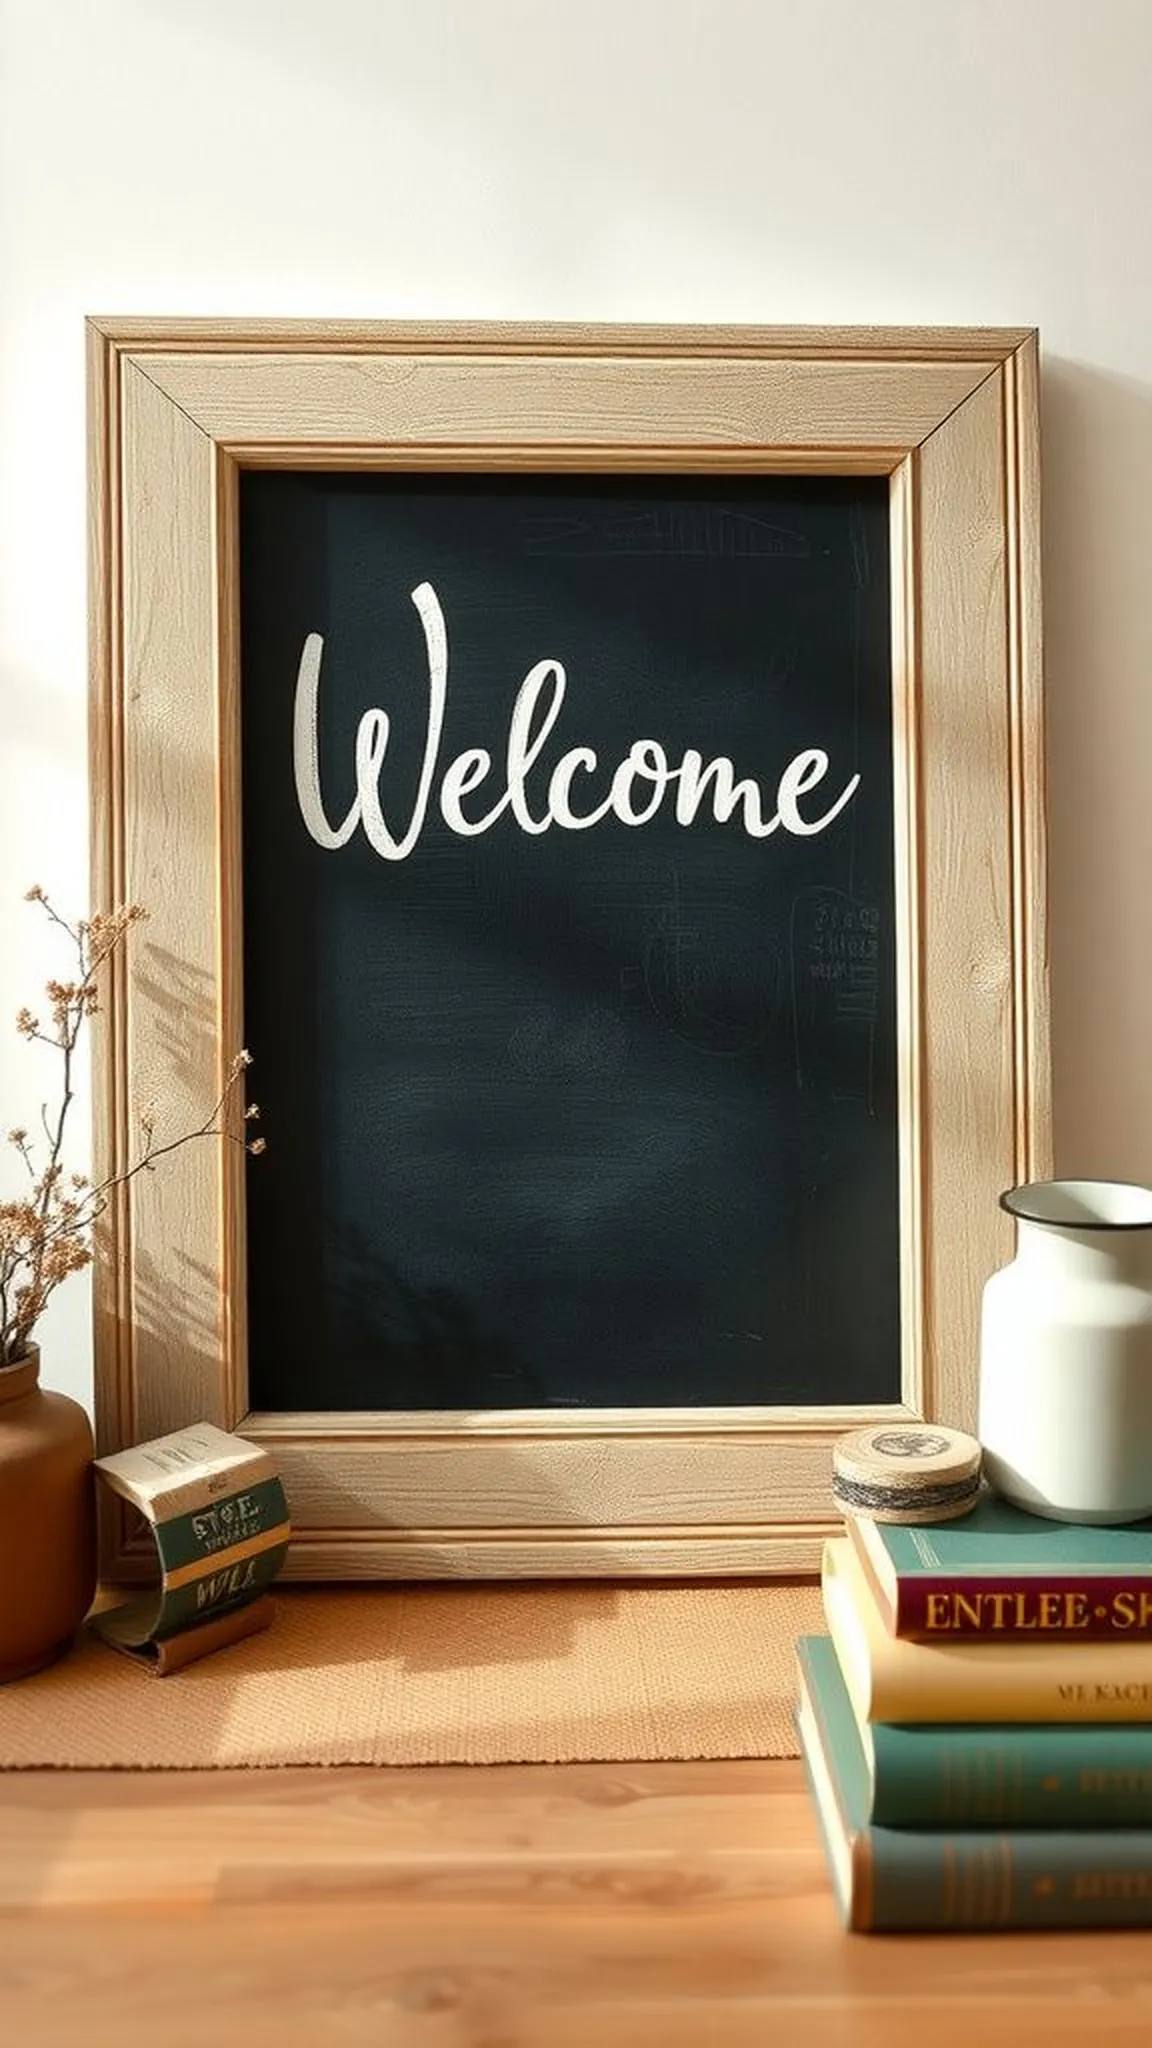
An old-frame look transformed a plain frame into a weathered farmhouse message board that felt lived-in and soft at the edges. The chalk surface had a dry powdery whisper under fingertips and lent itself to doodled grocery reminders or seasonal greetings. The wood grain peeked through in places, giving each frame a personality that didn’t try too hard.
Hung over a narrow console, the piece pulled a vignette together and invited quick sketches and warm words without fuss.
📋 How to Make This ▶
- Remove backing and glass from a plain picture frame and sand edges for a worn look.
- Apply chalkboard paint to the frame opening surface and allow full drying before handling.
- Lightly distress the frame edges with sandpaper and wipe away dust.
- Reassemble with the chalkboard panel inside and add twine for hanging.
⚠️ Avoid: Over-sanding the entire frame can erase desirable texture and make it look flat rather than gently aged. Leave some areas untouched for contrast.
🔄 Try Also: Try a small rectangle for pantry labels or a large square for weekly menu notes. Swap black chalkboard for a muted slate blue for a softer look.
🛒 Products & Materials ▶
📌 “Weathered frame turned farmhouse chalkboard for cozy notes.”
• • •
Tin can lanterns with wire handle and candle glow
⏱️ 30 min · 🟢 Beginner
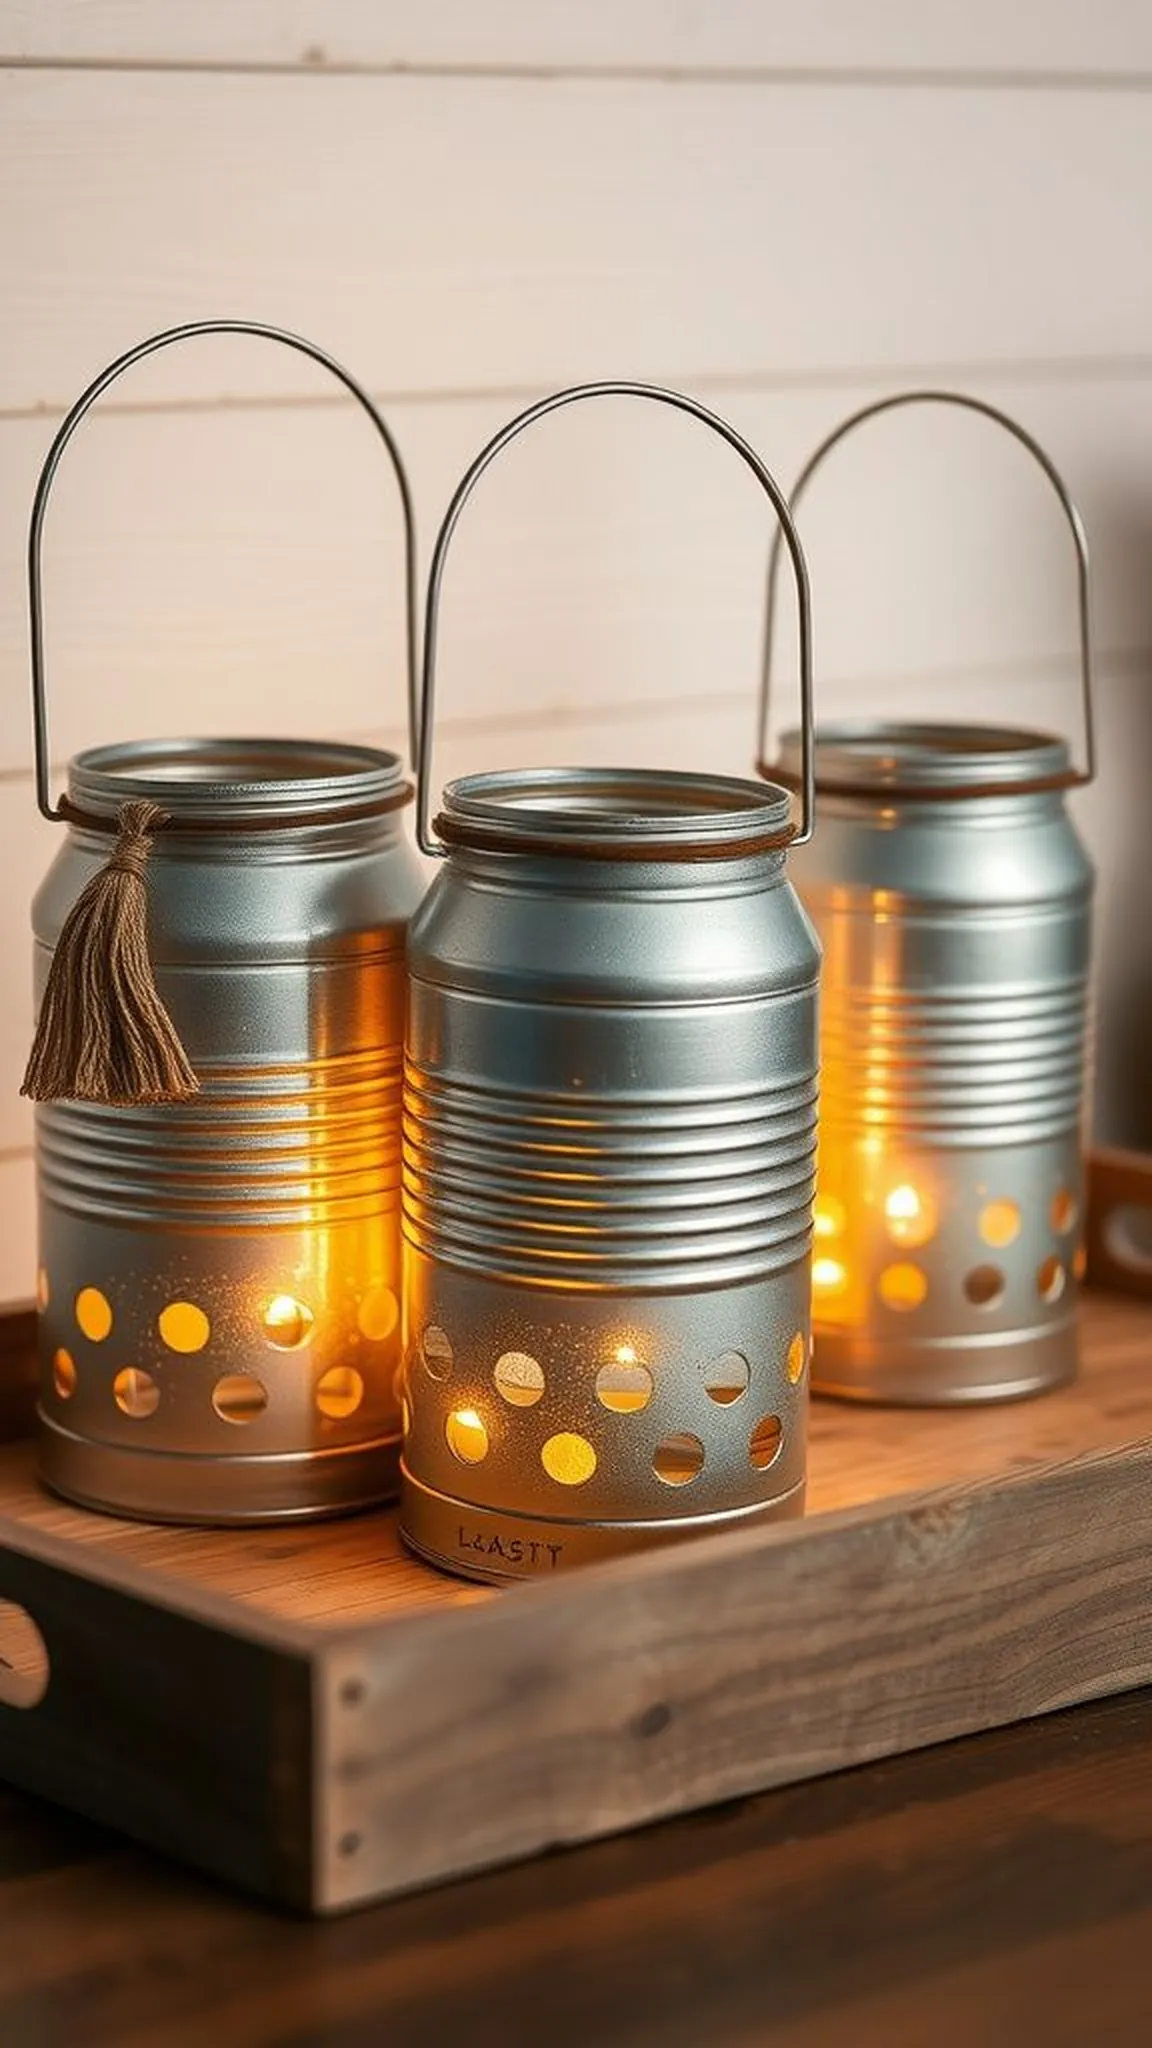
A row of recycled tin cans became little beacons when candlelight slipped through tiny pinprick patterns. The metal had a cool smooth rim and a faint metallic scent that mixed with wax and evening air. When lights were low, the punched holes cast playful speckles across nearby wood and fabric, turning a simple shelf into a soft, moody scene.
The wire handles gave a casual, collected feel and made the lanterns look like they’ve been part of the house for years.
📋 How to Make This ▶
- Clean empty tin cans and remove labels, then dry thoroughly.
- Use a nail and hammer to create a repeating pattern of holes around the can body.
- Thread thin gauge wire through holes near the rim and twist into a secure handle.
- Place a small candle or LED tealight inside and arrange on a tray or shelf.
⚠️ Avoid: Creating holes too close together can weaken the can rim and distort its shape, making the lantern look bent. Keep spacing even.
🔄 Try Also: Try tall cans with taller patterns for longer shadows, or paint the exterior in soft chalky tones for muted color. Use colored tissue inside for a warm tint.
🛒 Products & Materials ▶
Items Used
- Empty tin cans
- Thin gauge wire
- Tea lights
- Hammer and nail
📌 “Punched tin can lanterns casting cozy speckled light.”
• • •
Save time and printer ink with 50+ printable templates and step-by-step instructions in one ad-free guide.

Just $19.99 — lifetime access
Faux eucalyptus wreath on grapevine base for door
⏱️ 1 hour · 🟠 Intermediate
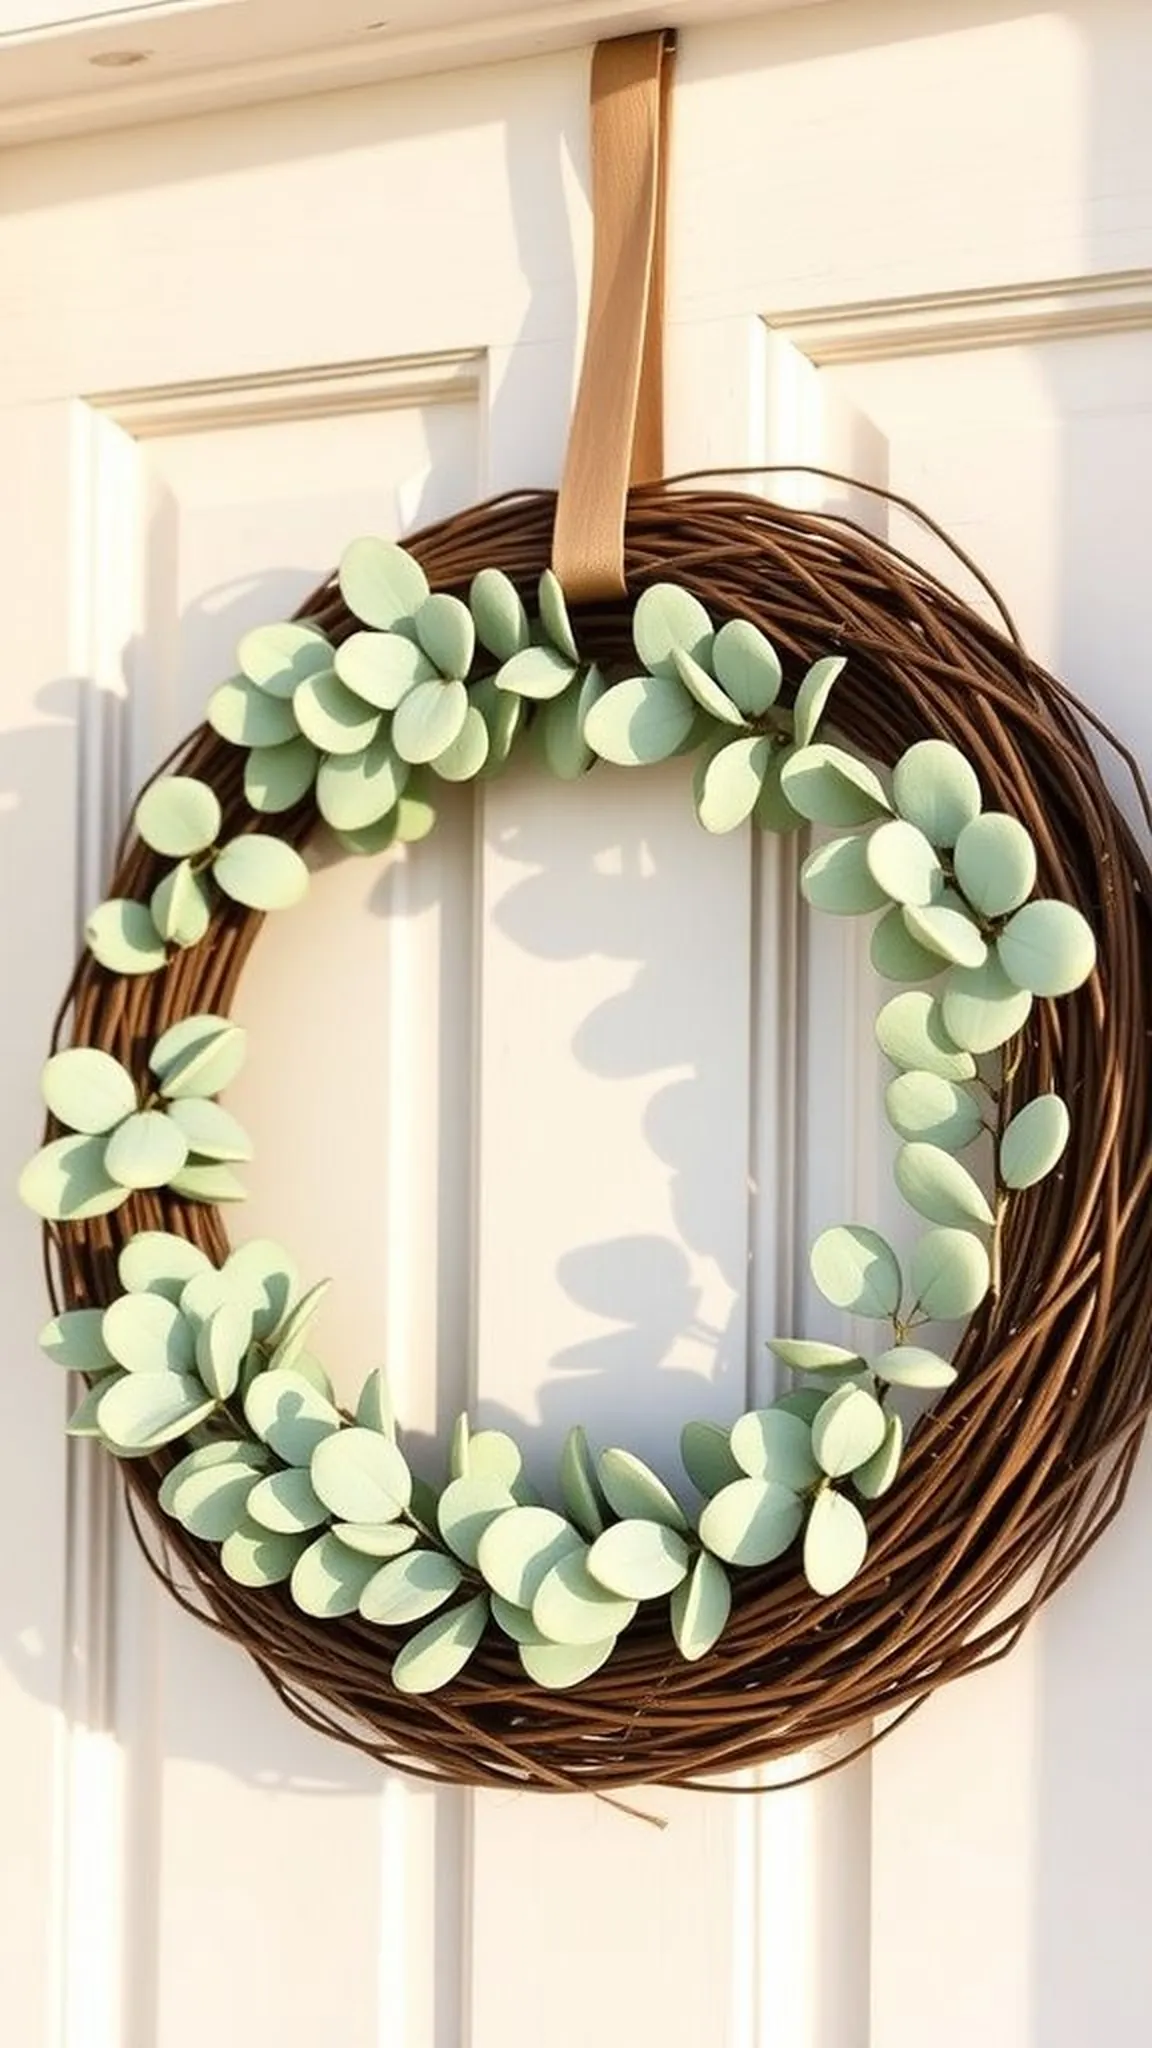
A round grapevine base carried the faint scent of dried wood and created a natural, imperfect frame for soft eucalyptus leaves that felt velvety at the edges. The muted green of the foliage sat beautifully against a weathered door, offering a calm, collected welcome. The weave of the grapevine peeked through in places, lending authenticity and contrast to the soft leaves.
Hung at eye level, the wreath brought a quiet seasonal mood that settled into the room without shouting.
📋 How to Make This ▶
- Lay out a grapevine wreath base and arrange faux eucalyptus stems to visualize placement.
- Secure stems by weaving their wire ends into the grapevine twists and anchoring with floral wire.
- Add a small cluster of contrasting sprigs at one side for a focal point.
- Fluff leaves outward and trim any excess wire for a tidy finish.
⚠️ Avoid: Pushing foliage only to the outer rim can make the wreath look flat and two-dimensional. Aim to build depth toward the center as well.
🔄 Try Also: Introduce small faux berries or dried wheat for a seasonal shift, or mix eucalyptus with dusty miller for softer texture. Use a painted hoop instead of grapevine for a modern twist.
🛒 Products & Materials ▶
Items Used
- Grapevine wreath base
- Faux eucalyptus stems
- Floral wire
📌 “Soft eucalyptus wreath, grapevine base, farmhouse front door charm.”
• • •
Wooden bead garland with handmade tassels, cozy shelf charm
⏱️ 40 min · 🟢 Beginner
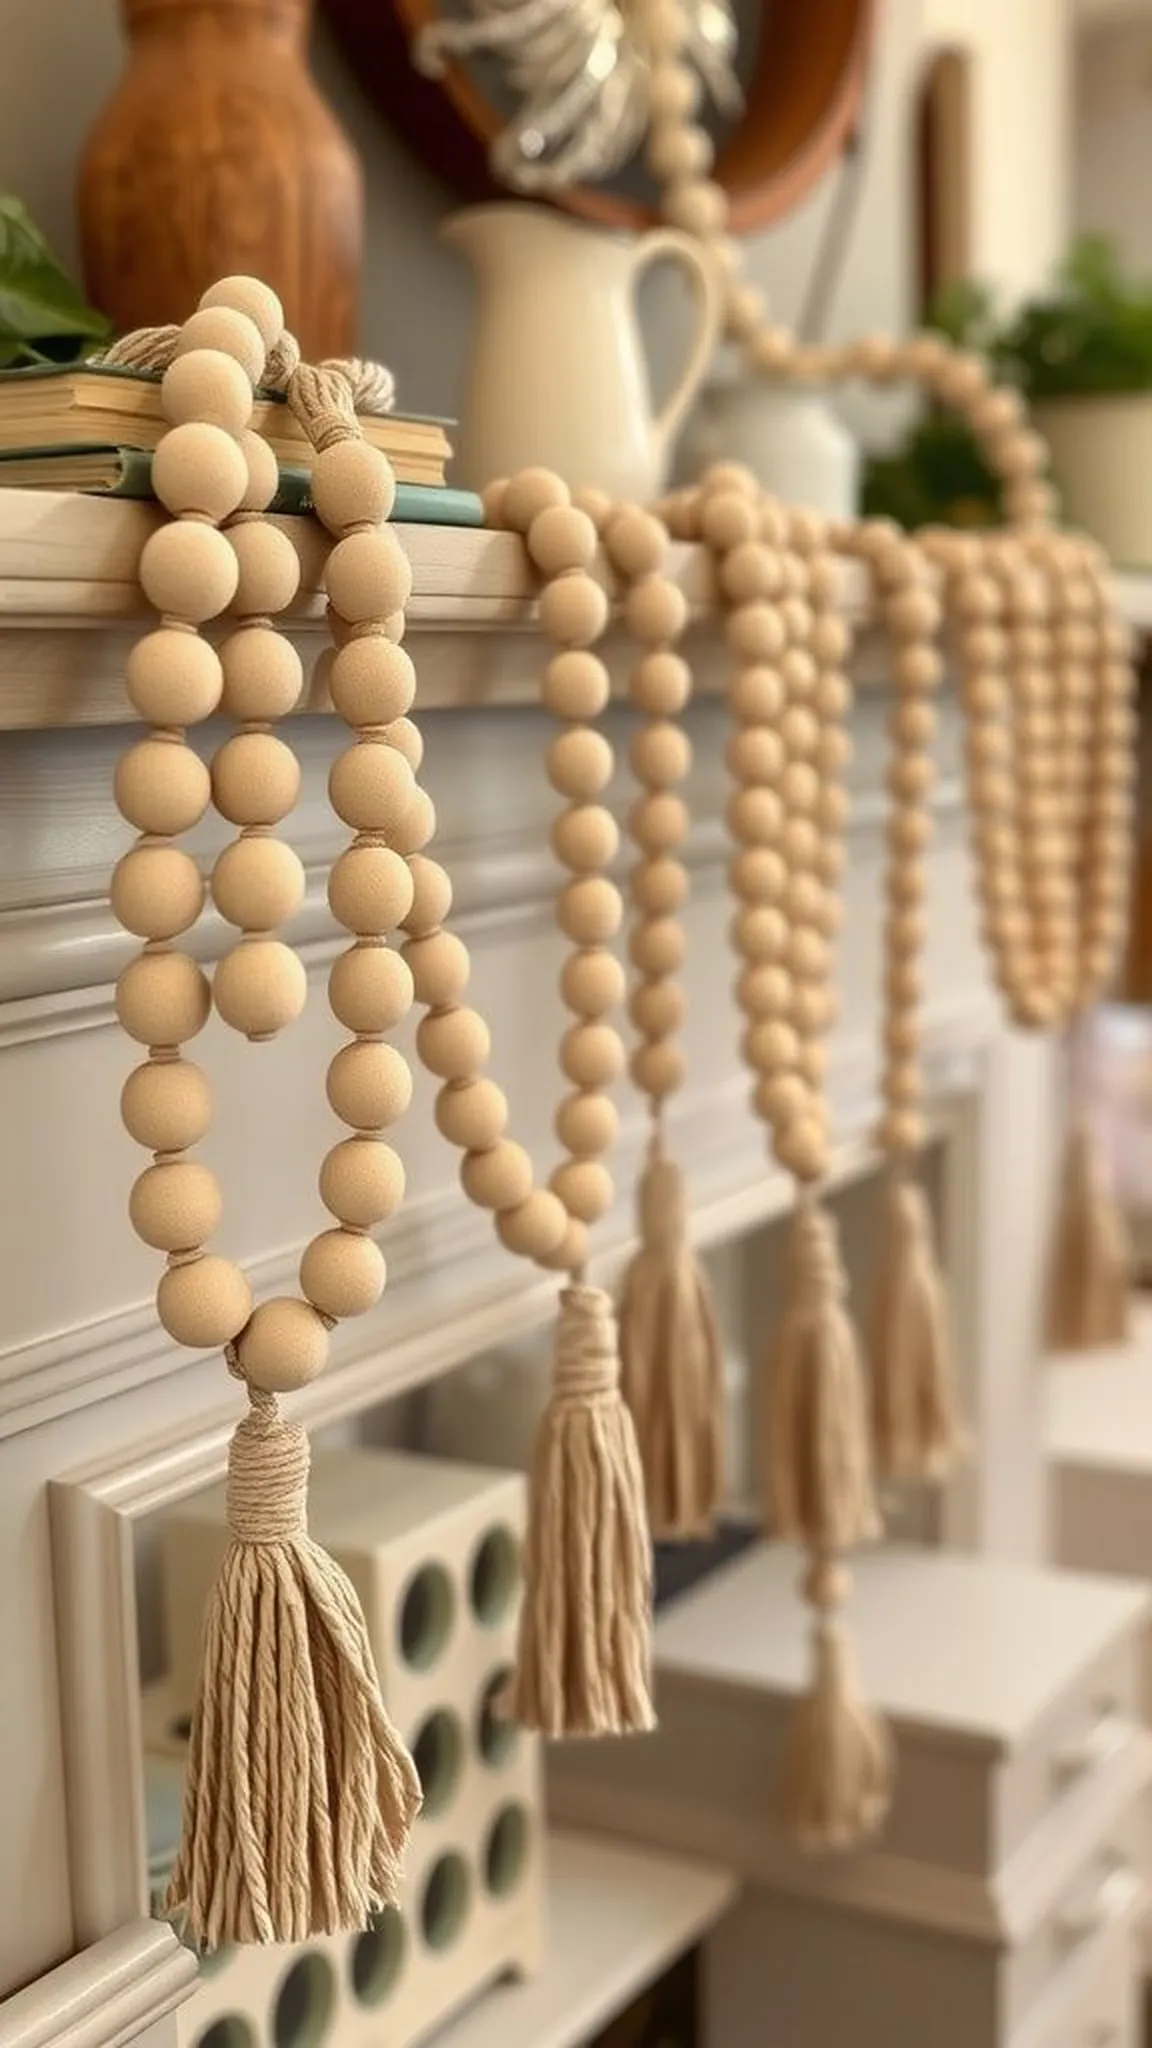
A string of sanded wooden beads felt smooth and slightly warm in hand, each bead carrying a tiny variation in grain that created a quietly interesting rhythm. The handmade tassels added flutter and softness, their fibers whispering against wood and linen. Draped across a mantle or looped on a tray, the garland introduced a relaxed cadence that made a shelf look curated without fuss.
The natural palette and small imperfections gave the piece an effortless, collected feeling.
📋 How to Make This ▶
- Thread wooden beads onto a length of cotton rope, leaving room at each end for knots.
- Tie secure knots at both ends to hold beads in place.
- Create tassels by wrapping yarn around a small cardboard template, tying at one end and trimming fringe.
- Attach tassels to the rope ends by knotting or wrapping with thin twine.
⚠️ Avoid: Trying to string too many beads without leaving slack can make the garland stiff and awkward to drape. Allow gentle sag for a casual look.
🔄 Try Also: Alternate painted and natural beads for contrast, or add small wooden letter beads to spell a short word. Replace tassels with small dried floral bunches.
🛒 Products & Materials ▶
Items Used
- Sanded wooden beads
- Cotton rope
- Yarn for tassels
📌 “Neutral wooden bead garland with soft yarn tassels.”
• • •
Mini pallet photo ledge for tiny farmhouse displays
⏱️ 2-3 hours · 🟠 Intermediate
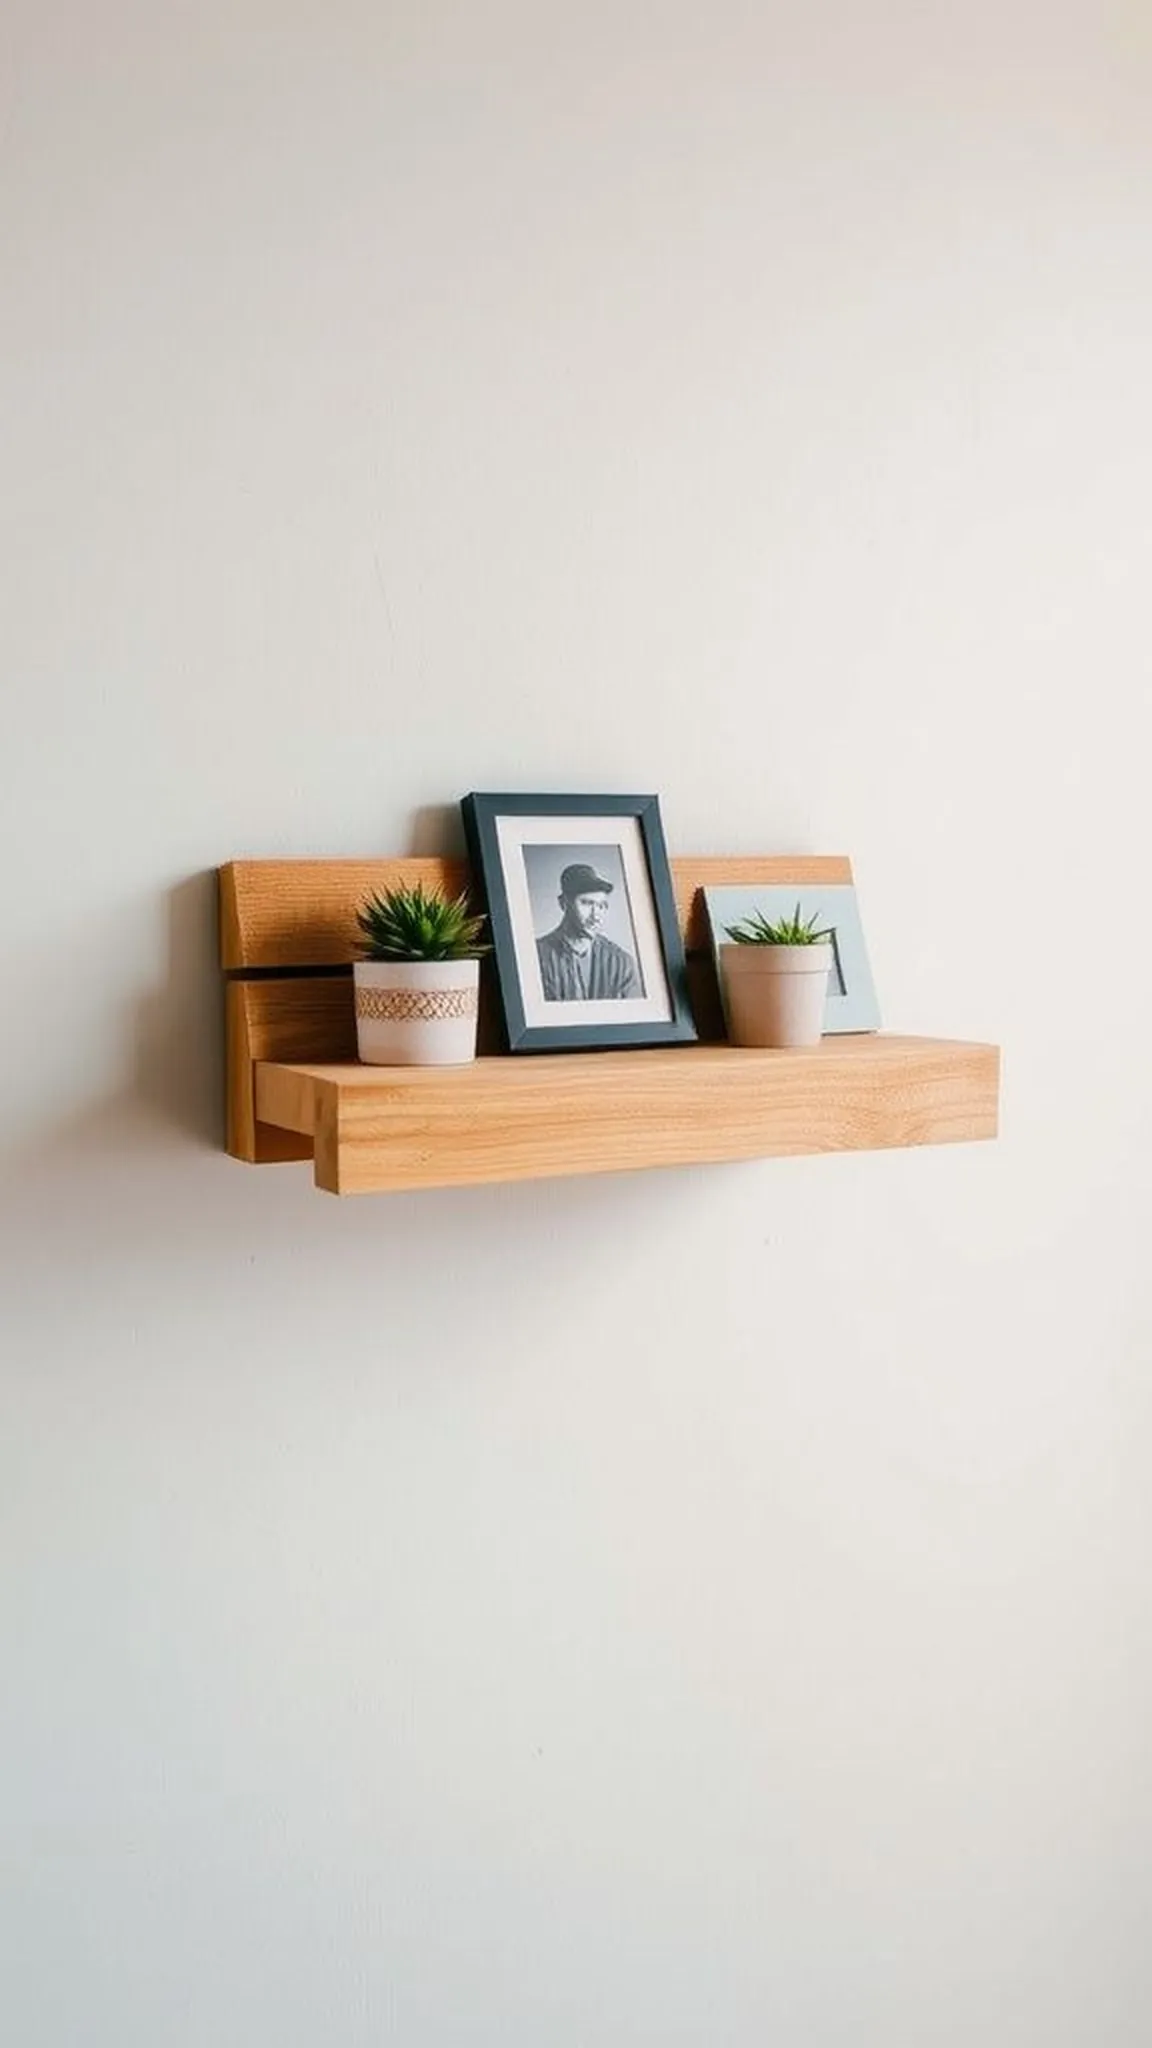
A tiny pallet shelf carried memories of old barns and slow afternoons, its rough-hewn slats whispering grainy textures and cool wood dust. Small frames rested against the backboard, leaning with casual ease, while a tiny succulent sat compact and glossy against the rustic wood. The scale felt perfect for a narrow wall or gallery nook where a full shelf would overpower.
Each notch and knot in the pallet told a low-key story that blended well with painted trim and woven textiles nearby.
📋 How to Make This ▶
- Arrange small wood slats into a mini pallet shape and secure with wood glue and small nails.
- Lightly sand surfaces and edges for a worn appearance.
- Stain or paint the pallet lightly to enhance grain and allow drying.
- Attach a picture ledge strip to the top and lean small photos and a tiny plant for display.
⚠️ Avoid: Gluing slats too close together can hide natural gaps that make a pallet feel authentic; leaving slight spacing keeps a rustic look. Avoid over-smoothing edges.
🔄 Try Also: Make a longer ledge for multiple photos or a shorter one to hold a candle and a mini sign. Swap stain tones for either cooler gray or warm honey.
🛒 Products & Materials ▶
Items Used
- Small wood slats
- Wood glue
- Mini picture ledge
- Sandpaper
📌 “Tiny pallet ledge for photos and small farmhouse finds.”
• • •
Burlap wrapped mason jar utensil holder, farmhouse rustic
⏱️ 20 min · 🟢 Beginner
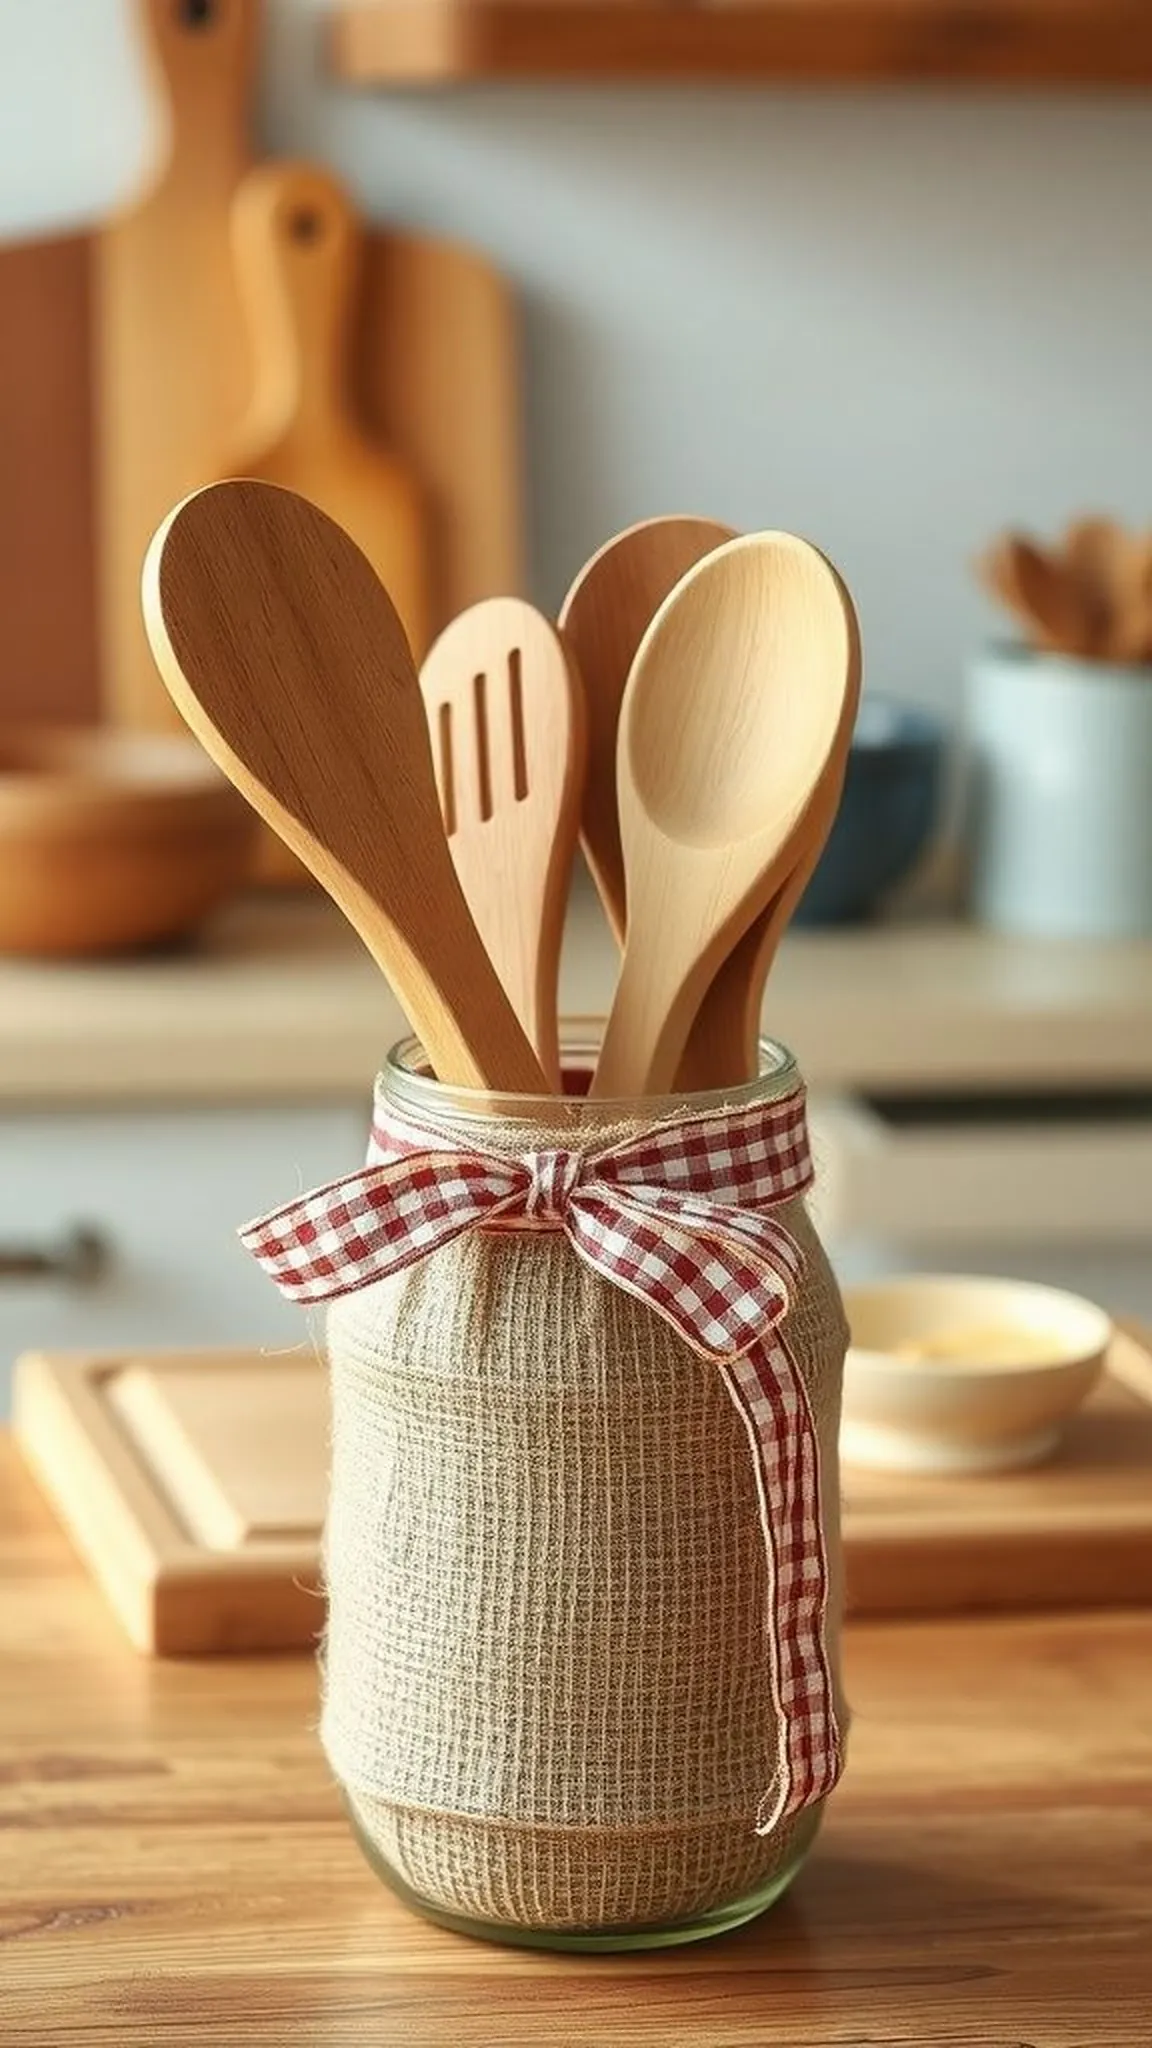
A mason jar hugged in burlap felt pleasantly rough and grounded, contrasting with smooth glass and the cool metal of serving utensils. The burlap had that faint earthy aroma and little stray fibers that lent authenticity. A scrap of gingham ribbon added a soft note against the coarse weave.
Resting beside a wooden cutting board, the jar suggested casual meals and homey afternoons, offering a small design moment that was both practical and quietly decorative.
📋 How to Make This ▶
- Measure burlap around a mason jar and trim to size, leaving overlap.
- Wrap burlap snugly and secure seam with hot glue or double-sided tape.
- Tie a ribbon or twine around the neck for added detail and tuck in utensils.
- Place on countertop as a handy, styled holder.
⚠️ Avoid: Wrapping burlap too loosely can make the holder look sloppy and cause utensils to tilt. Ensure a snug fit without crushing the jar.
🔄 Try Also: Use neutral linen instead of burlap for a softer feel, or add a small label tag for personalization. Cluster two jars for salt and utensil storage.
🛒 Products & Materials ▶
Items Used
- Mason jar
- Burlap fabric
- Ribbon or twine
- Hot glue sticks
📌 “Charming burlap-wrapped mason jar for farmhouse counters.”
• • •
Tiered tray vignette with seasonal finds and neutral tones
⏱️ 1 hour · 🟠 Intermediate
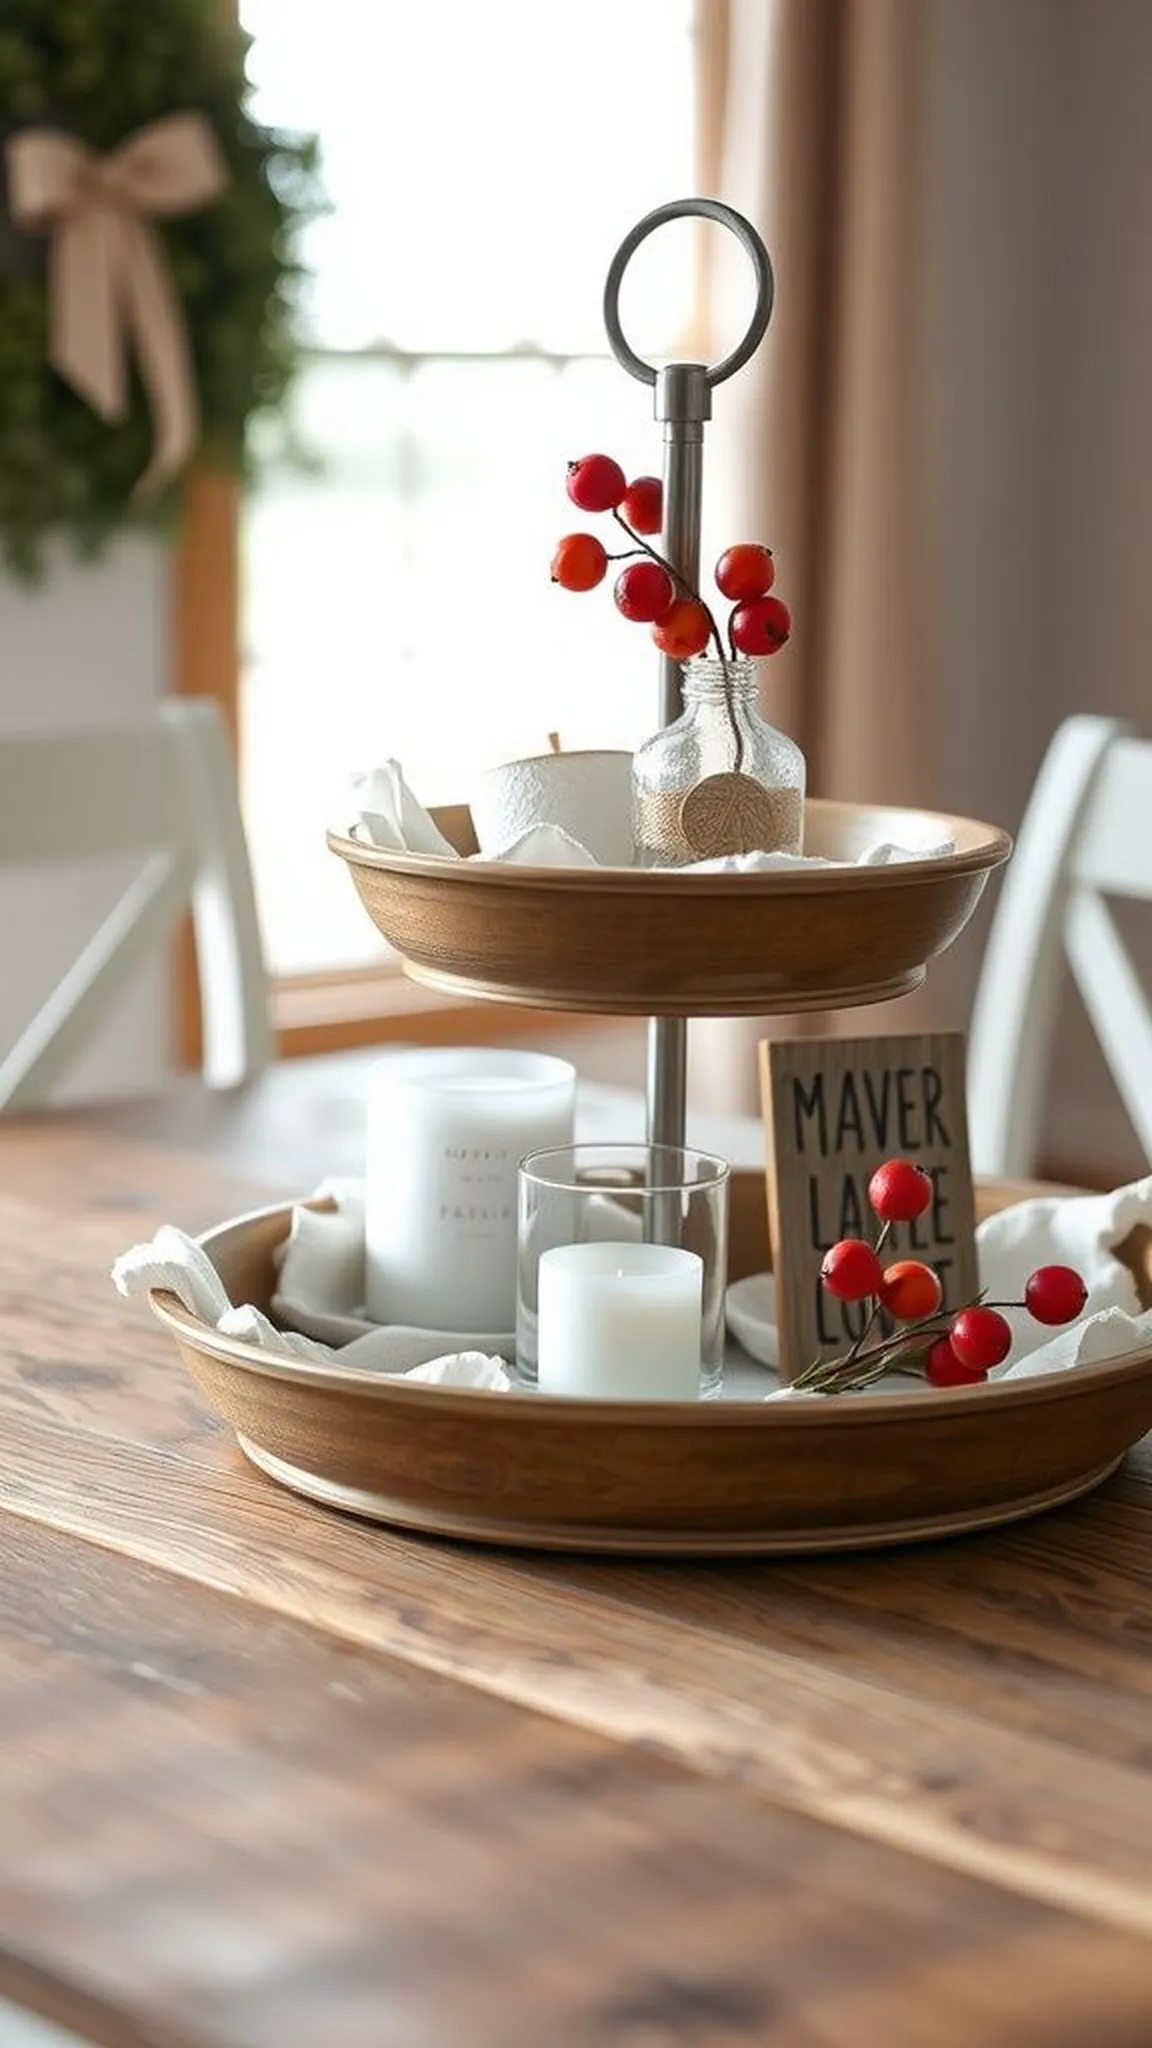
A tiered tray gathered small objects like a tiny weathered sign, a glass votive, and a cluster of faux berries into a little domestic scene. The stacked plates offered small stages where texture and color could play off one another: matte ceramics against glossy glass, soft linen against rough wood. Moving through the vignette invited small surprises and friendly contrasts, and changing a single element shifted the mood from autumn hush to spring freshness without losing cohesion.
📋 How to Make This ▶
- Assemble a two-tiered tray base and choose a neutral palette of decor pieces.
- Start with a focal item on each tier and build around it with smaller accents.
- Add natural elements like faux greenery and a small candle for texture and warmth.
- Step back and adjust spacing until the display feels balanced and airy.
⚠️ Avoid: Overfilling both tiers can make the arrangement feel chaotic; leaving breathing room allows each piece to shine. Avoid mirror-duplicating items on both tiers.
🔄 Try Also: Create a holiday-themed vignette with mini ornaments, or a breakfast tray with small jars and faux fruit. Swap color accents seasonally for a fresh look.
🛒 Products & Materials ▶
Items Used
- Two-tiered tray
- Small votive candles
- Faux berry stems
- Mini wooden sign
📌 “Layered tiered tray styling with simple farmhouse accents.”
• • •
Galvanized tray centerpiece with candles and greenery
⏱️ 25 min · 🟢 Beginner
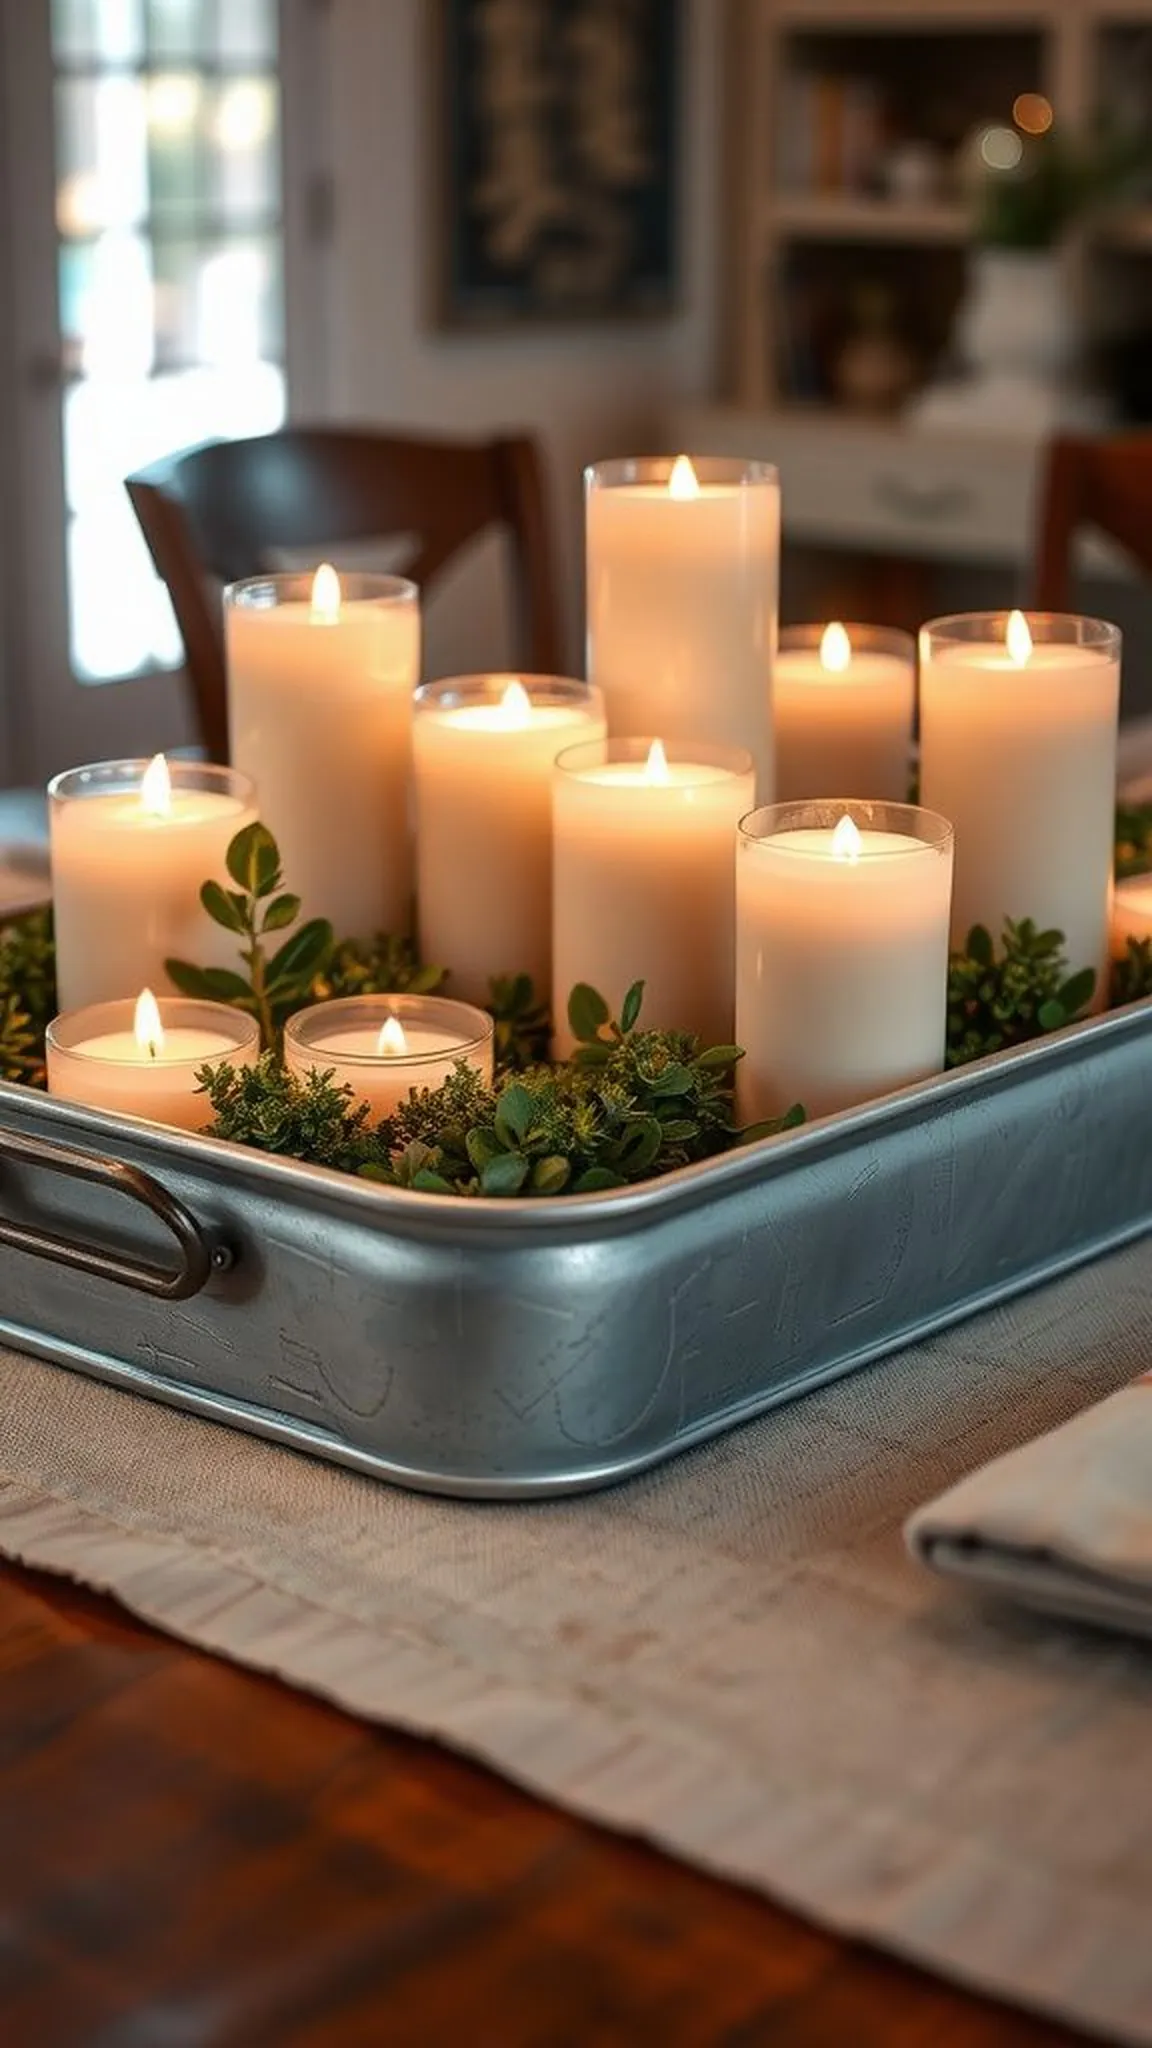
A shallow galvanized tray held a small collection of soft greenery and candlelight that felt quietly anchored and earthy. The tray’s cool metallic sheen contrasted nicely with matte leaves and the glow of candle flames, creating a balance between industrial and domestic. The overall smell was faintly of wax and fresh stems, and the arrangement sat low and unassuming at the table’s center.
It invited gentle conversation rather than demanding attention, which made dinner feel relaxed and welcoming.
📋 How to Make This ▶
- Choose a galvanized tray and gather candles of varying heights, faux greenery, and small pebbles or moss.
- Place candles on the tray and arrange greenery around them to soften edges.
- Add pebbles or moss to fill empty spaces and stabilize items.
- Light candles gently or substitute LED options for safe ambient glow.
⚠️ Avoid: Putting tall candles directly in the middle can block conversation across the table; aim for lower center pieces. Avoid overcrowding the tray’s surface.
🔄 Try Also: Swap in seasonal elements like mini pumpkins for autumn or sprigs of pine for winter. Use a wooden tray for a warmer feel.
🛒 Products & Materials ▶
Items Used
- Galvanized tray
- Pillar candles
- Faux greenery sprigs
- Decorative moss or pebbles
📌 “Simple galvanized tray centerpiece with soft greenery and candles.”
• • •
Rope-wrapped bottle vases for coastal farmhouse flair
⏱️ 35 min · 🟢 Beginner
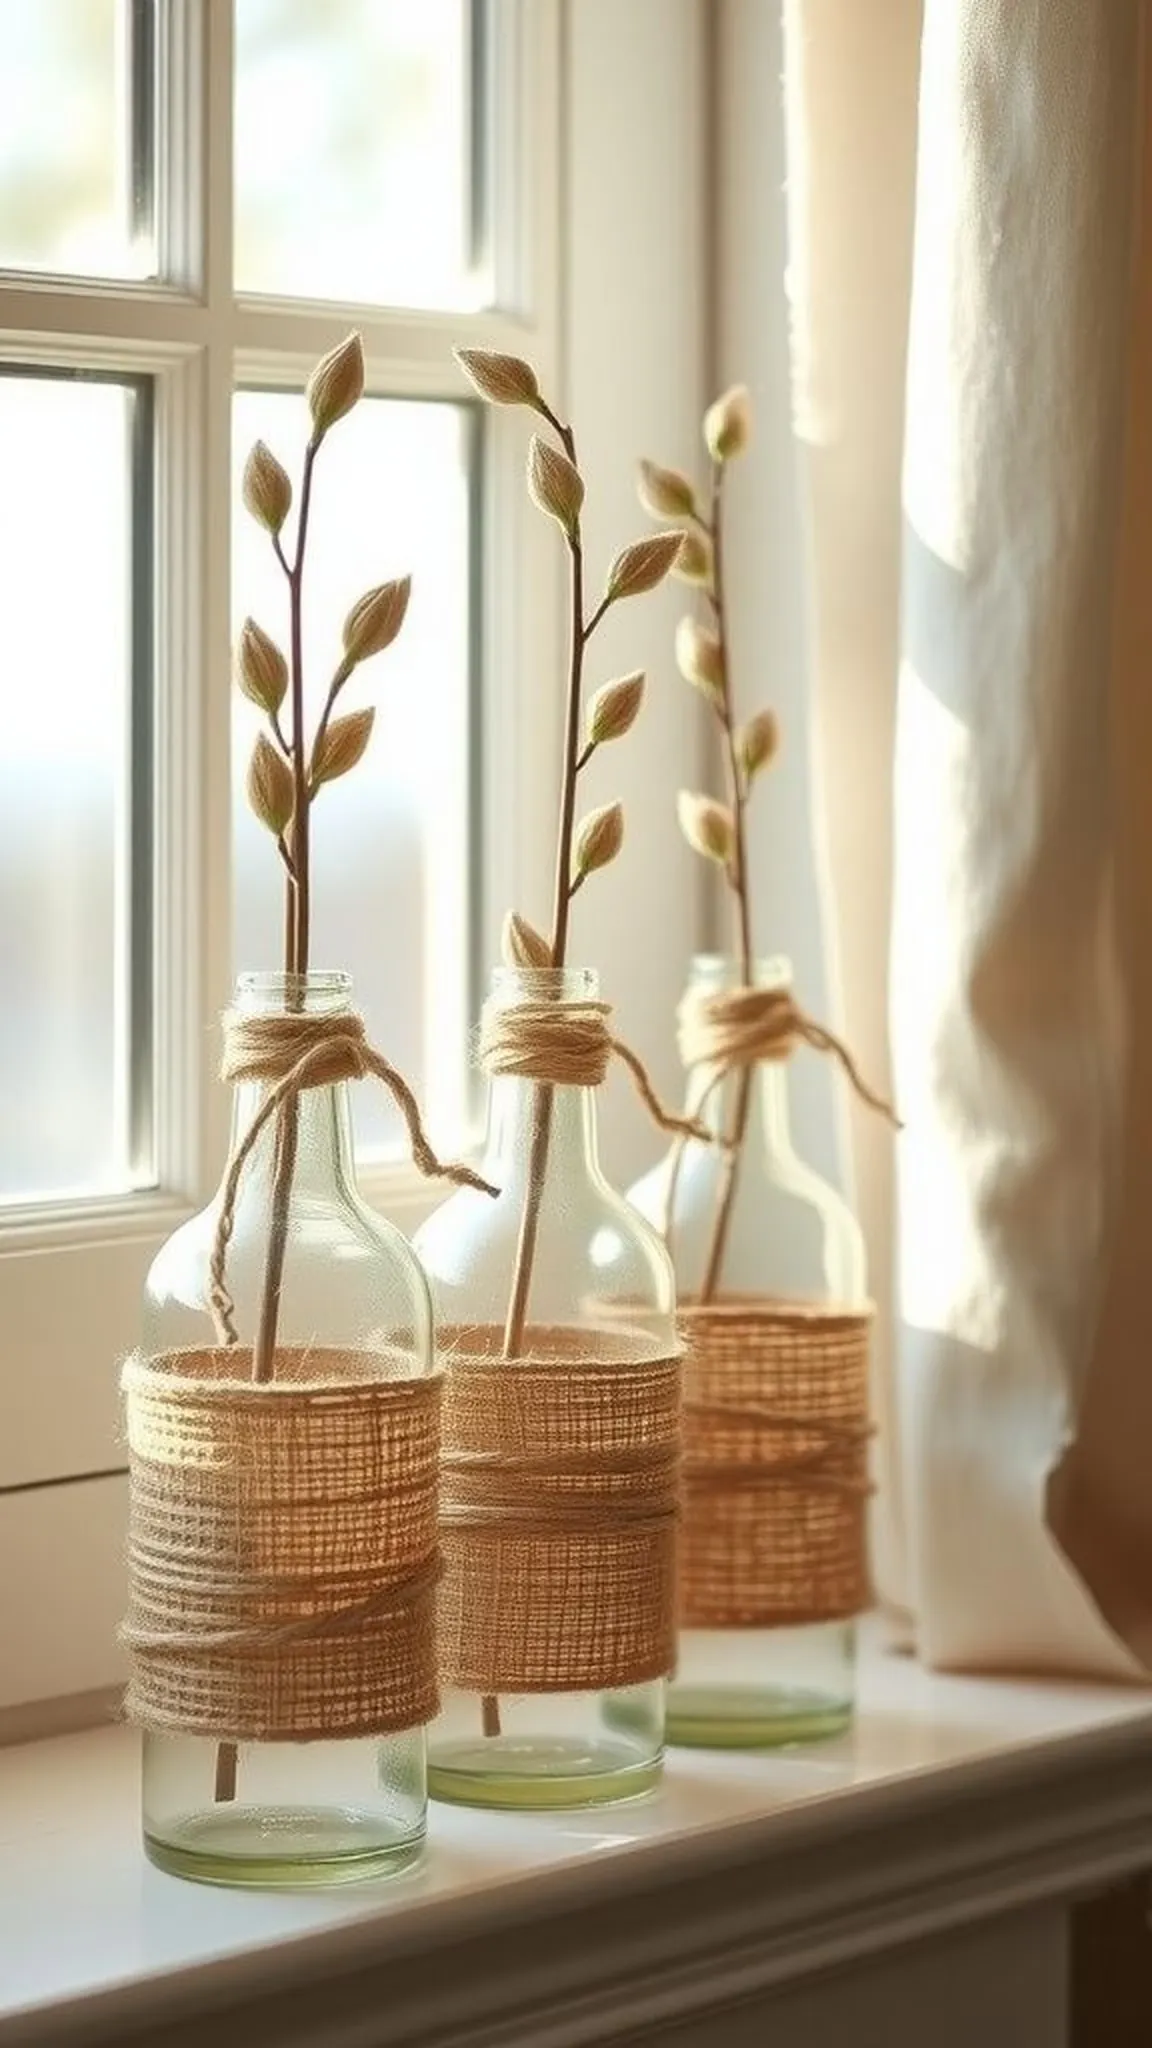
Old glass bottles took on an instant casual elegance when wrapped in natural rope, the coarse fibers contrasting with smooth glass and creating a tactile rhythm. The rope smelled faintly of sea breeze and sun-dried fibers, lending a subtle coastal note that paired well with pale blooms. Grouped on a windowsill, the bottles caught afternoon light and scattered warm highlights across a wooden sill.
The overall effect read relaxed and collected, like something gathered from a weekend trip.
📋 How to Make This ▶
- Clean glass bottles and gather natural sisal or jute rope and a hot glue gun.
- Apply a small line of hot glue near the bottle base and press rope in place, working upward.
- Continue wrapping rope tightly and secure the end with glue hidden at the back.
- Arrange bottles in a cluster and add single stems for a breezy look.
⚠️ Avoid: Wrapping rope too loosely creates visible gaps and a sloppy spiral; consistent tension is key. Avoid bunching at the neck which looks uneven.
🔄 Try Also: Leave a band of glass exposed near the top for contrast or paint the bottle base in a soft white before wrapping for a lighter look. Use colored twine for a subtle accent.
🛒 Products & Materials ▶
Items Used
- Glass bottles
- Natural jute rope
- Hot glue gun
- Faux single-stem flowers
📌 “Cozy rope-wrapped bottles for soft farmhouse coastal styling.”
• • •
Chicken wire memo board for notes and rustic character
⏱️ 1-2 hours · 🟠 Intermediate
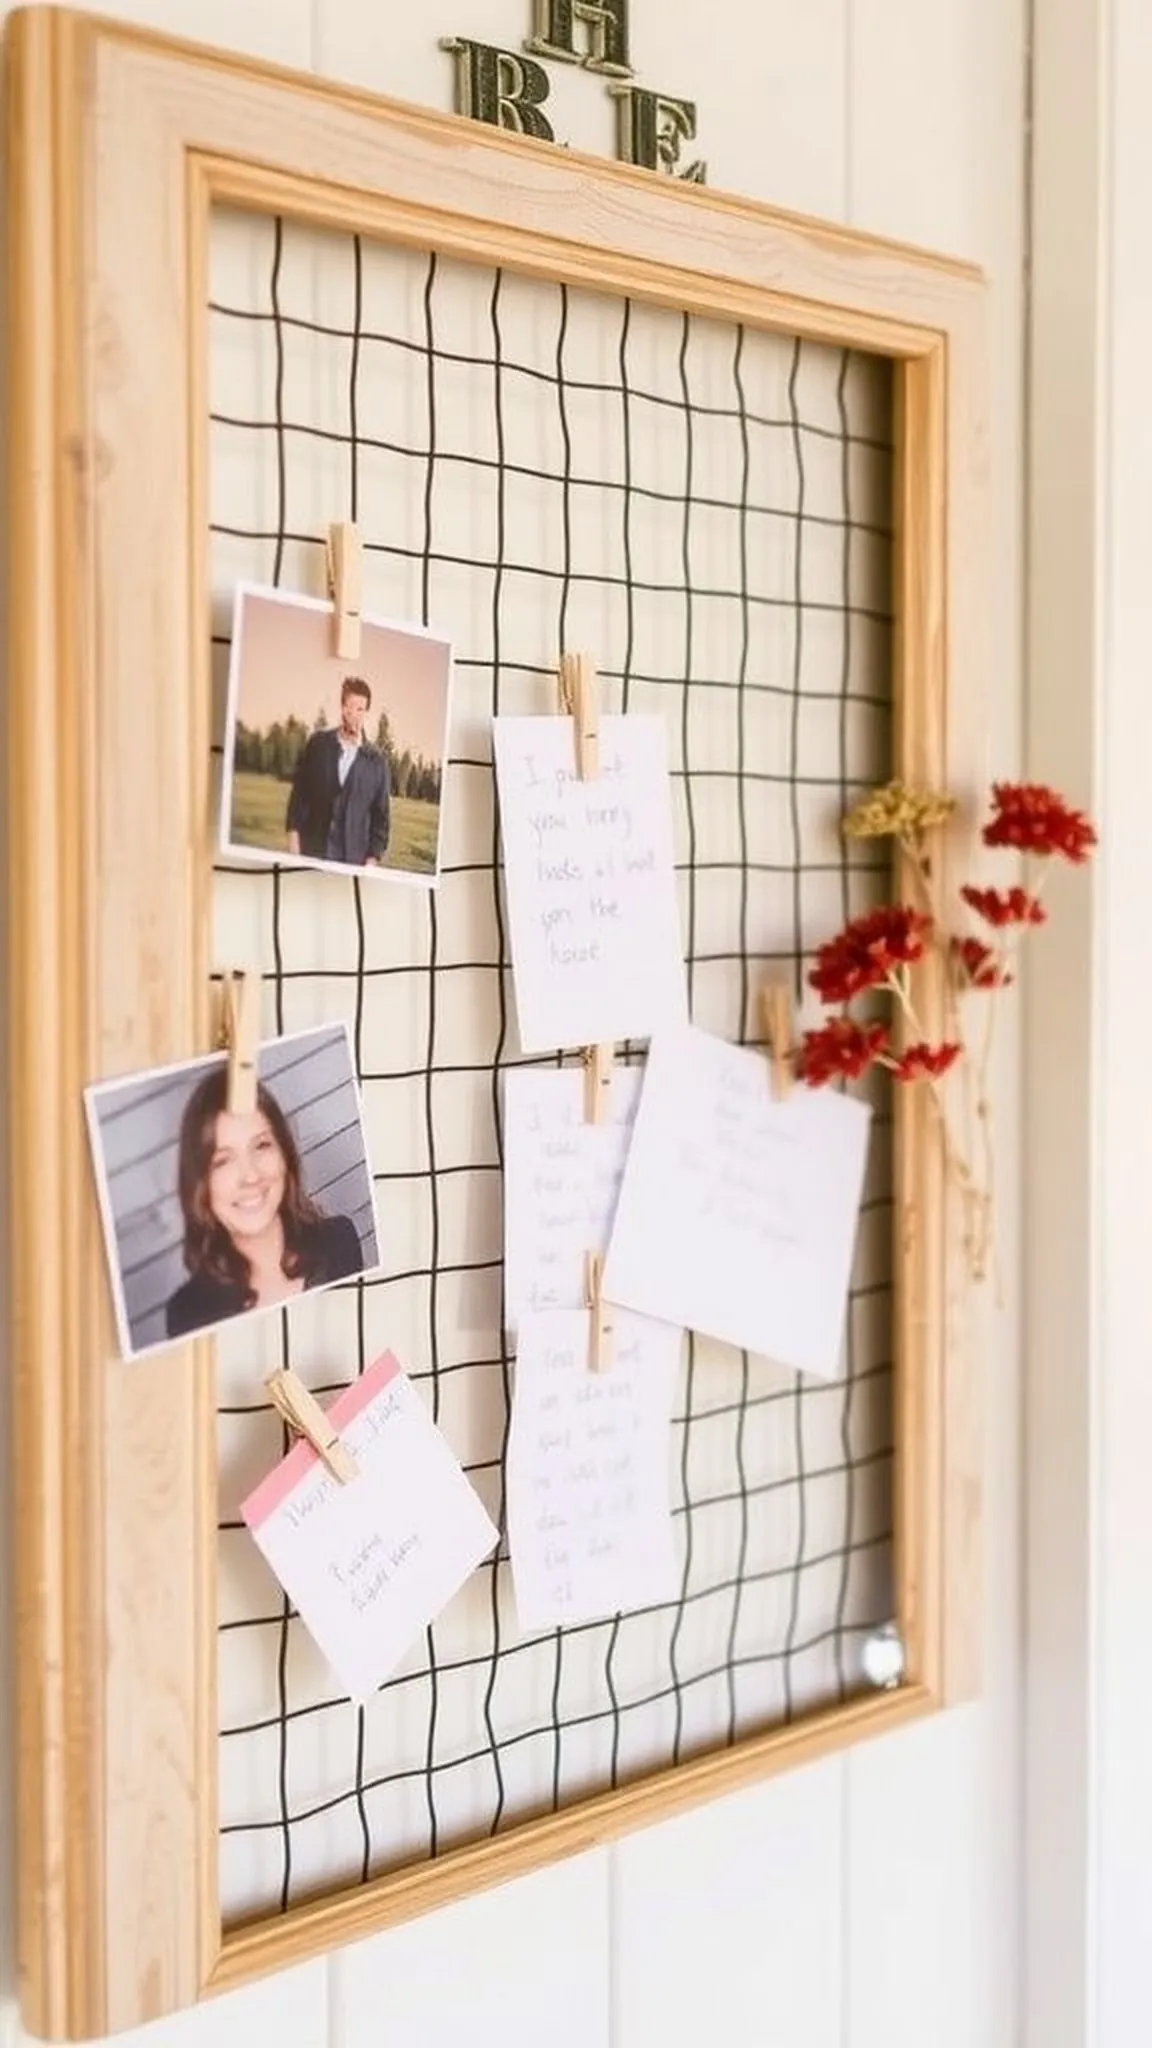
A shallow frame lined with chicken wire felt tactile and practical, the mesh creating a faint metallic whisper when cards were nudged into place. The frame edges wore a soft patina that made the piece feel like part of the house’s story. Clothespins held photos and notes at jaunty angles, while a small cluster of dried flowers pinned to one corner added a gentle softness.
The board turned ordinary reminders into part of a wall display, blending function and farmhouse personality.
📋 How to Make This ▶
- Cut chicken wire to fit the inner dimensions of a wood frame and bend edges inward for safety.
- Staple or secure the wire to the back of the frame evenly, pulling slightly to remove slack.
- Add small clothespins or binder clips to hold photos, notes, and small decor items.
- Attach a hanging method and mount on a wall at eye level for easy access.
⚠️ Avoid: Leaving chicken wire slack causes the grid to sag and makes pinning awkward; a taut surface keeps clips secure. Watch finger safety when handling cut wire.
🔄 Try Also: Paint the frame a soft color for contrast, or keep it raw wood for a rustic look. Swap clothespins for mini bulldog clips for a modern touch.
🛒 Products & Materials ▶
Items Used
📌 “Rustic chicken wire memo board for stylish reminders.”
• • •
Farmhouse utensil caddy from simple cutlery tray
⏱️ 30 min · 🟢 Beginner
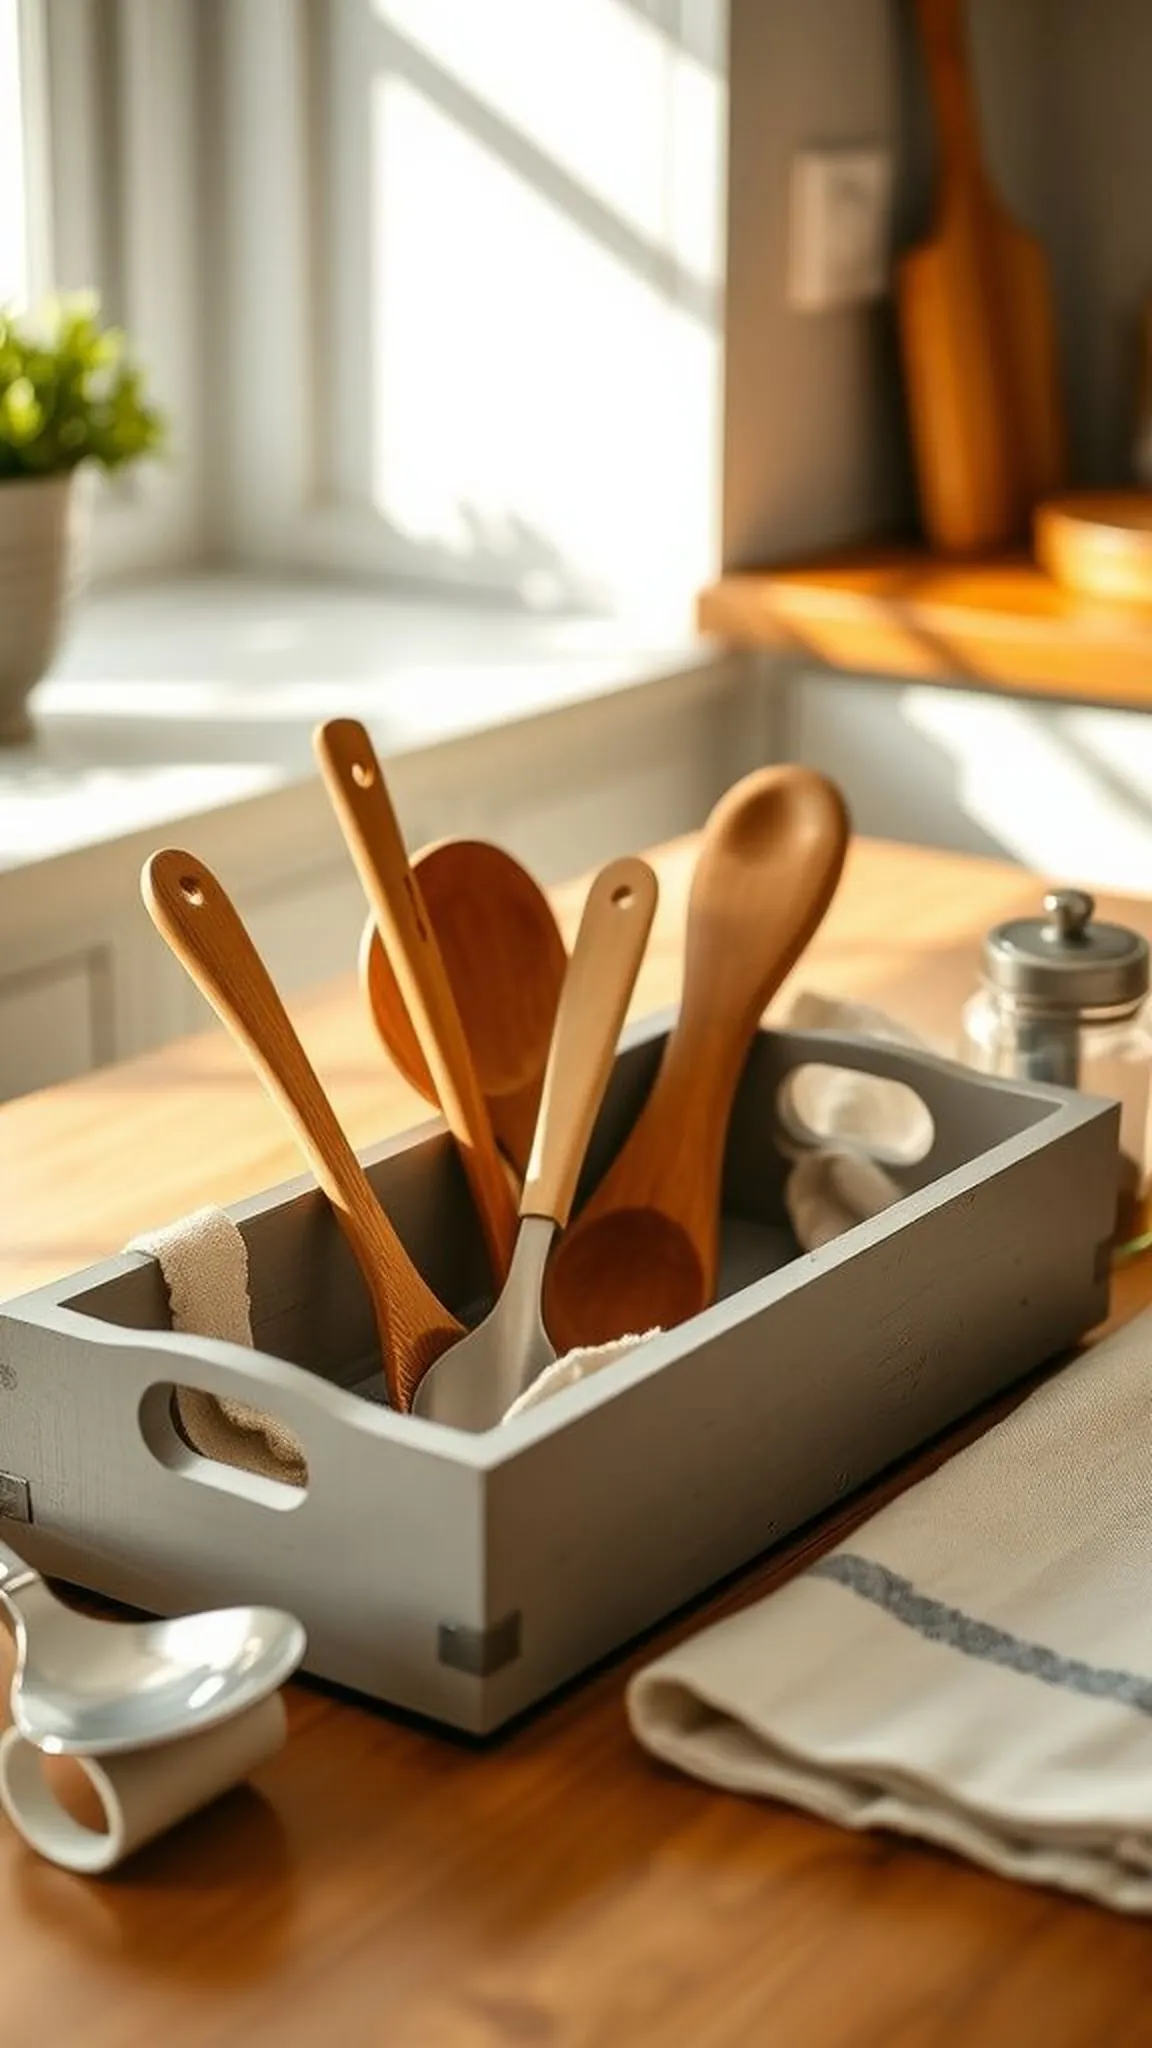
A lightweight cutlery tray became a quiet organizer that felt humble and helpful sitting by the stove. Compartments lent small pockets of order, with wooden spoons offering warm grain and metal spatulas gleaming coolly beside them. The tray’s finish had faint tool marks that made each nook feel handcrafted.
Placing herbs in a tiny jar nearby added a green note and connected the caddy to meal moments. The overall impression was tidy and approachable without feeling precious.
📋 How to Make This ▶
- Select a sturdy cutlery tray and clean all surfaces thoroughly.
- Arrange utensils by category into tray compartments for easy access.
- Add a small jar of salt or a tiny herb sprig to personalize the caddy.
- Place the caddy near the prep area for functional styling.
⚠️ Avoid: Overstuffing compartments makes finding tools harder and reduces visual calm; leaving a little space keeps the caddy practical and neat.
🔄 Try Also: Paint compartment interiors in a soft neutral for subtle contrast, or add a handle for portability. Use two trays side by side for baking tools.
🛒 Products & Materials ▶
📌 “Organized farmhouse utensil caddy from a simple tray.”
• • •
Stack of faux vintage books as a rustic decorator’s prop
⏱️ 20 min · 🟢 Beginner
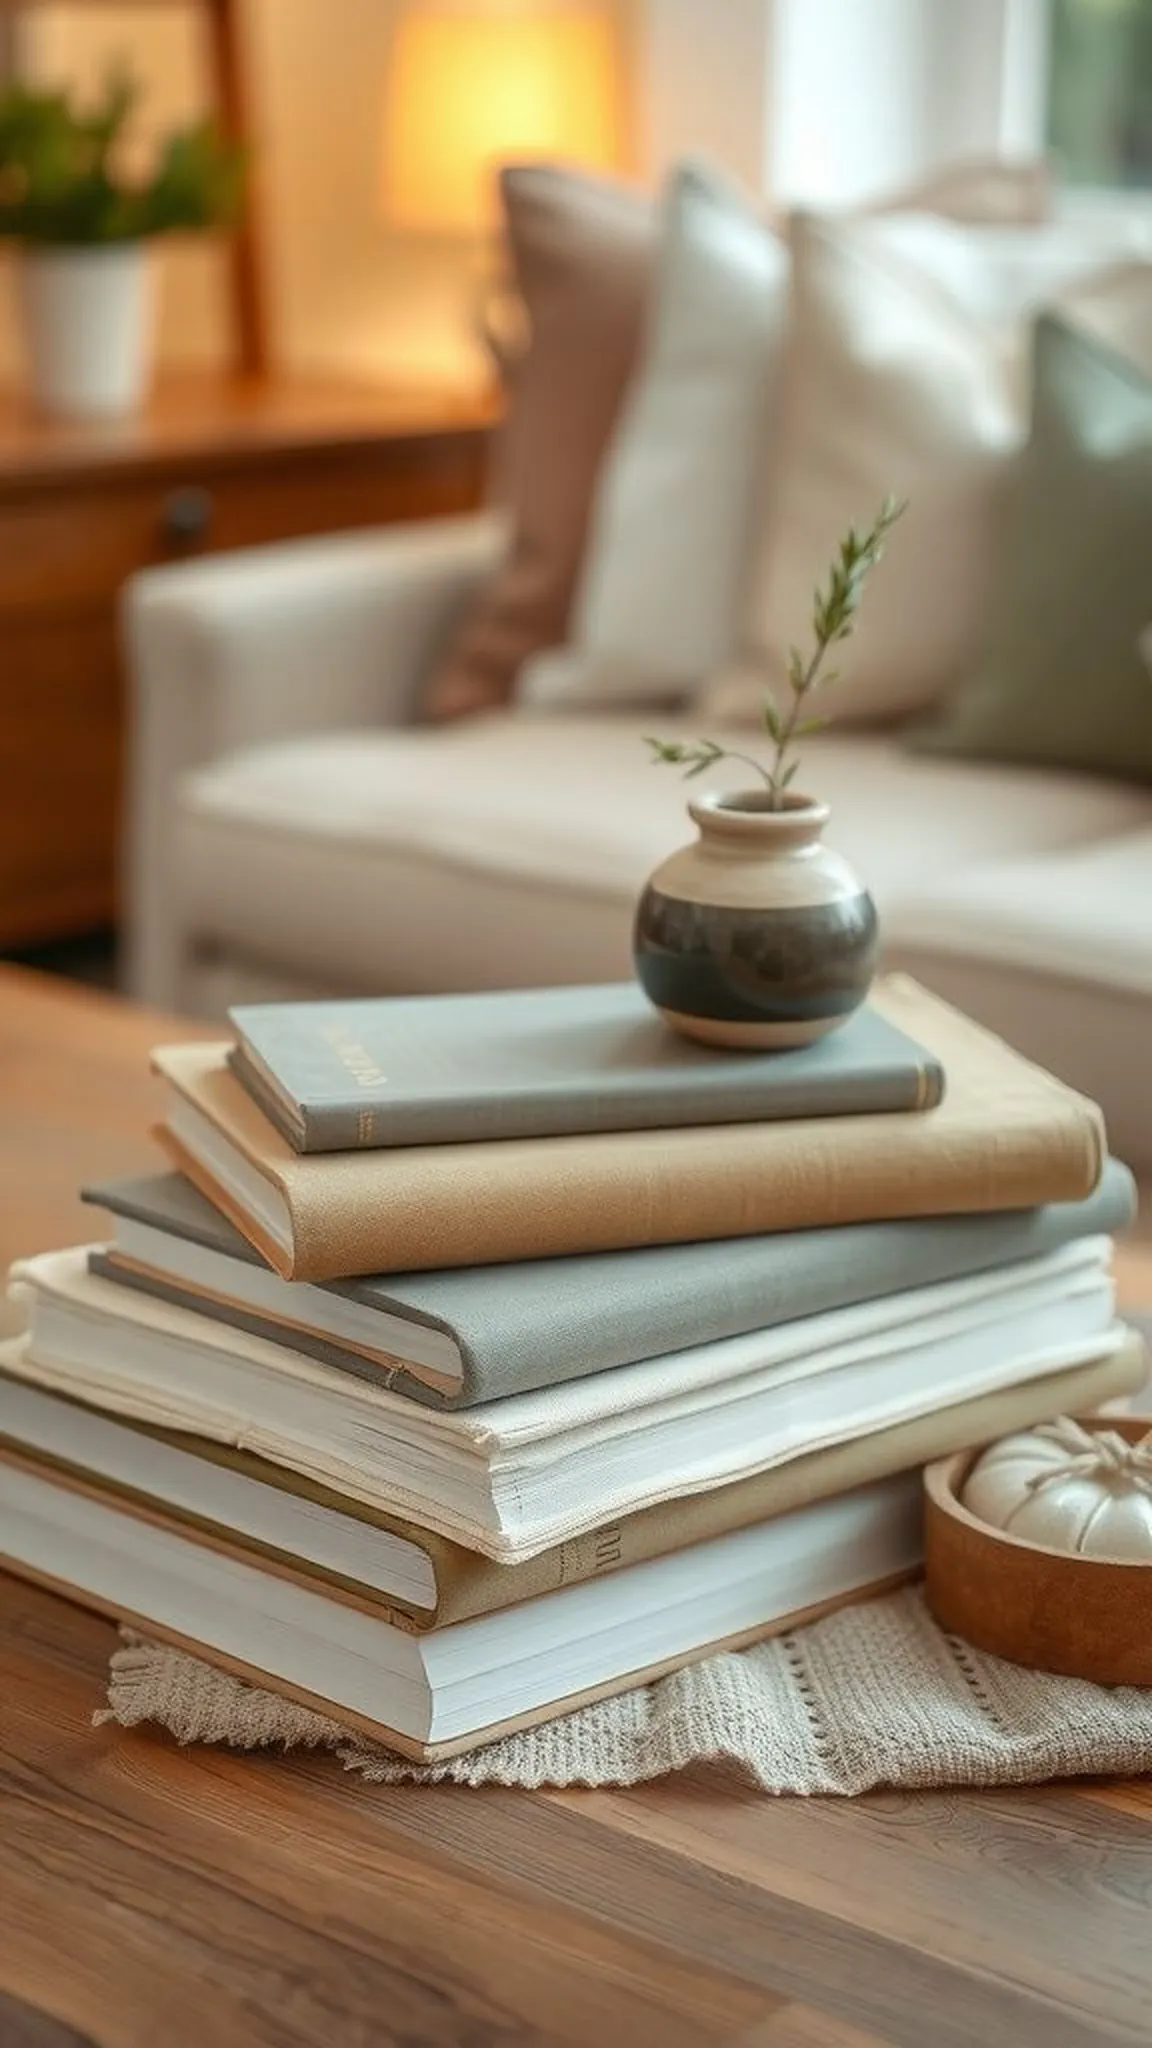
A small bundle of faux vintage books offered the patina of age without the worry of wear, their covers soft with muted colors and gentle scuffs that read like stories. The stacked pages had a faint paper dustiness, and the whole bundle felt like a quiet anchor for a lamp or a ceramic jug. Layering a single sprig or a tiny brass object on top created a tiny focal stage, lending an instant sense of history to a shelf or coffee table.
📋 How to Make This ▶
- Select several faux vintage books or recover old paperbacks with craft paper for a uniform look.
- Stack books with alternating spine patterns to create visual interest.
- Add a small decorative object or sprig on top to complete the vignette.
- Place the stack on a shelf or table as a low centerpiece.
⚠️ Avoid: Aligning every spine perfectly can look staged; a slight offset lends a relaxed, collected mood. Avoid overly glossy covers that clash with the vintage feel.
🔄 Try Also: Tie the stack with twine for a gift-wrapped look or layer a small tray on top for additional height and utility. Use tea-stained pages for extra antiqued charm.
🛒 Products & Materials ▶
Items Used
- Faux vintage books
- Decorative sprig
- Natural twine
📌 “Faux vintage book stack for timeless farmhouse styling.”
• • •
Shiplap-inspired picture frame collage for wall personality
⏱️ 2-3 hours · 🔴 Advanced
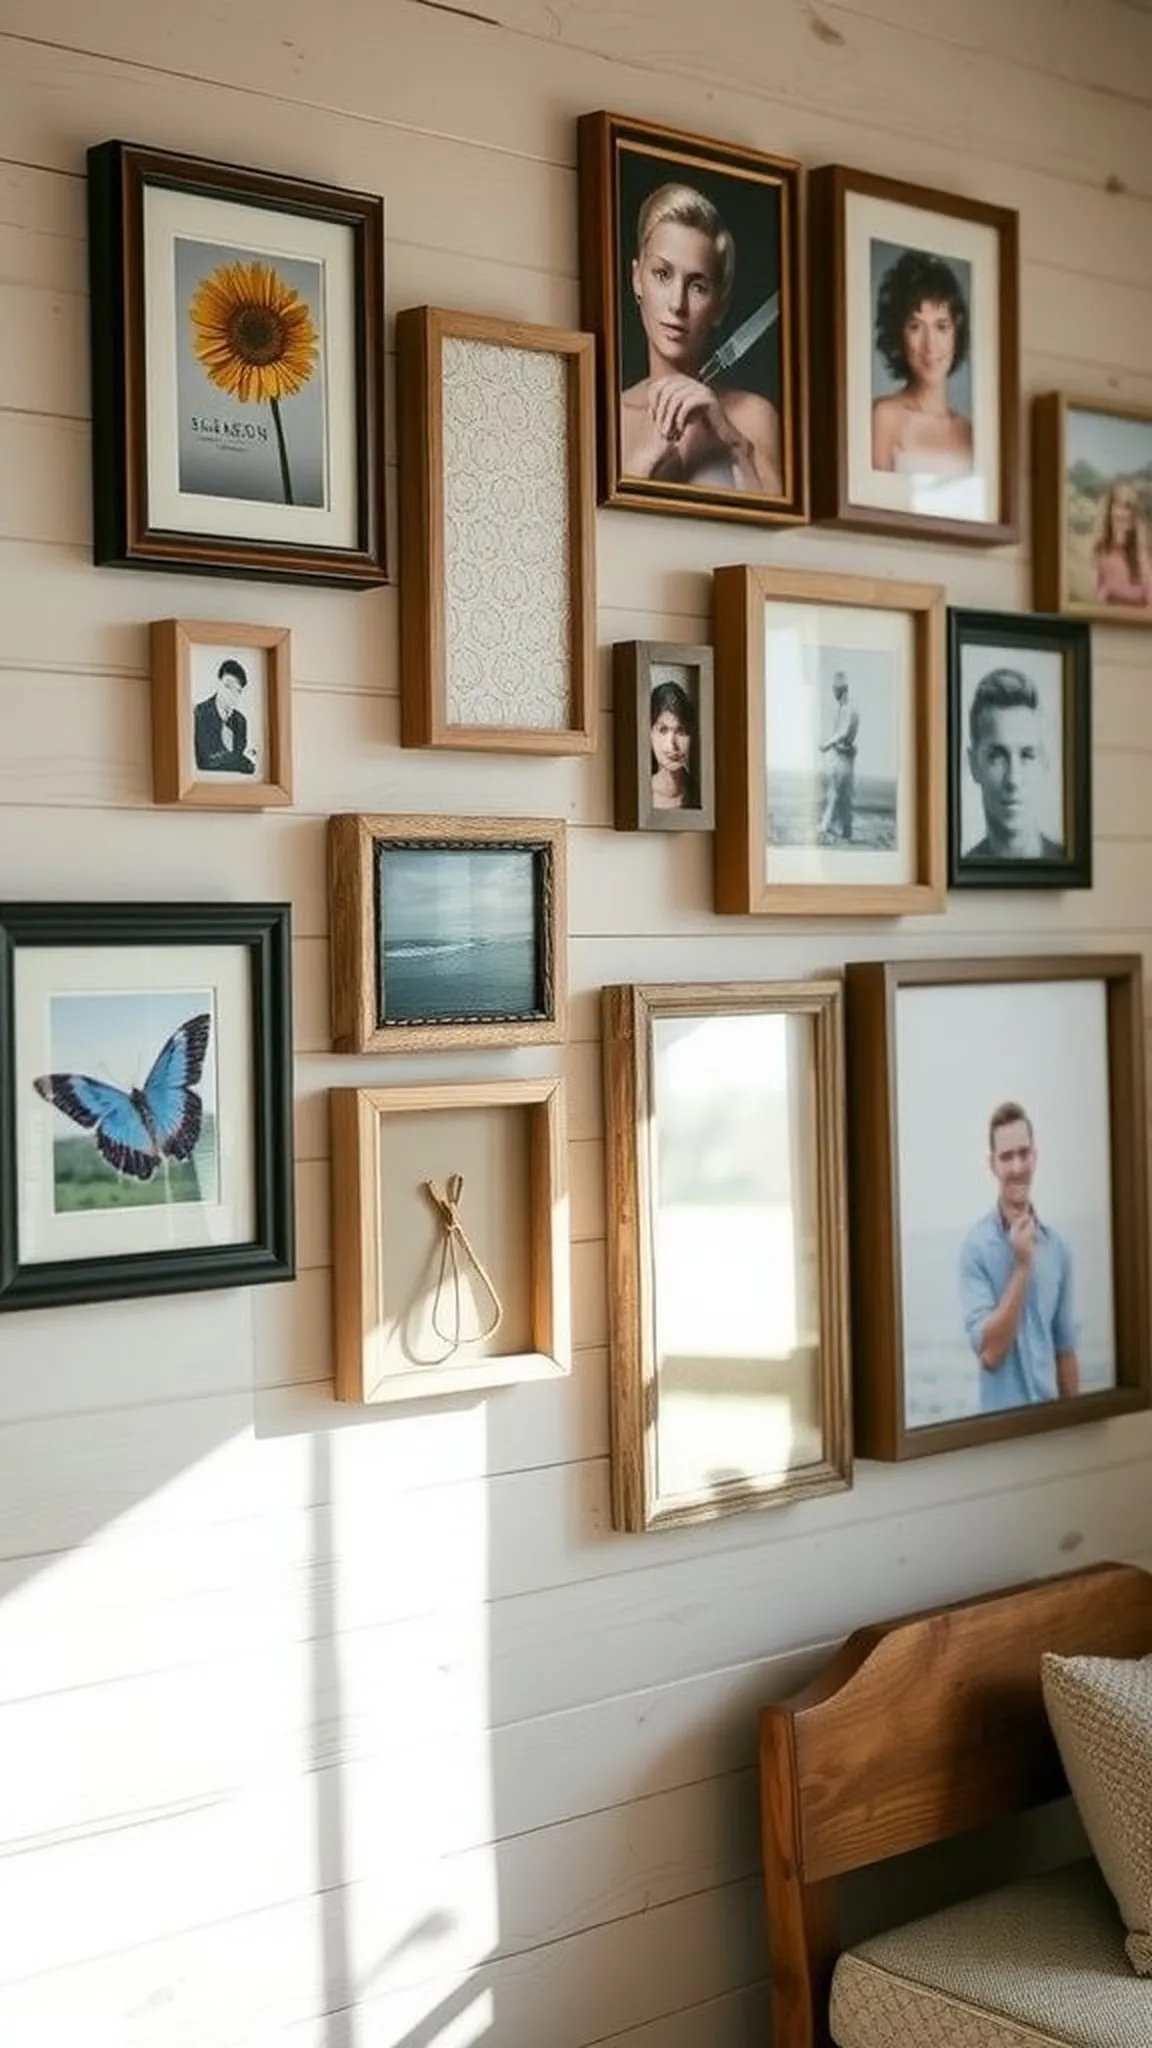
A gallery of frames mounted against a shiplap backdrop felt both structured and relaxed, with each frame’s edge creating a little pause in the rhythm. The shallow seams in the shiplap added soft shadow lines that emphasized each image without shouting. Mixed photos and small framed prints played with scale and gave the wall a friendly cadence.
Passing by, one noticed different textures and tones that suggested storytelling rather than strict symmetry, which fit the farmhouse mood nicely.
📋 How to Make This ▶
- Plan a collage layout on the floor using frames of varied sizes and shapes.
- Mark wall anchor points with a pencil based on the floor layout and mount hanging hardware.
- Install frames starting from the center outward to maintain balance and consistency.
- Step back to adjust spacing and alignment for a cohesive gallery look.
⚠️ Avoid: Hanging frames without a tested layout can lead to awkward spacing and misalignment; planning avoids uneven gaps and keeps the gallery cohesive.
🔄 Try Also: Include a small shelf within the collage for 3D objects, or swap some photos for simple typographic prints. Try a monochrome palette for a calmer wall.
🛒 Products & Materials ▶
📌 “Shiplap frame collage brings warm farmhouse wall style.”
• • •
Mini chalkboard clipboard signs for seasonal messages
⏱️ 15 min · 🟢 Beginner
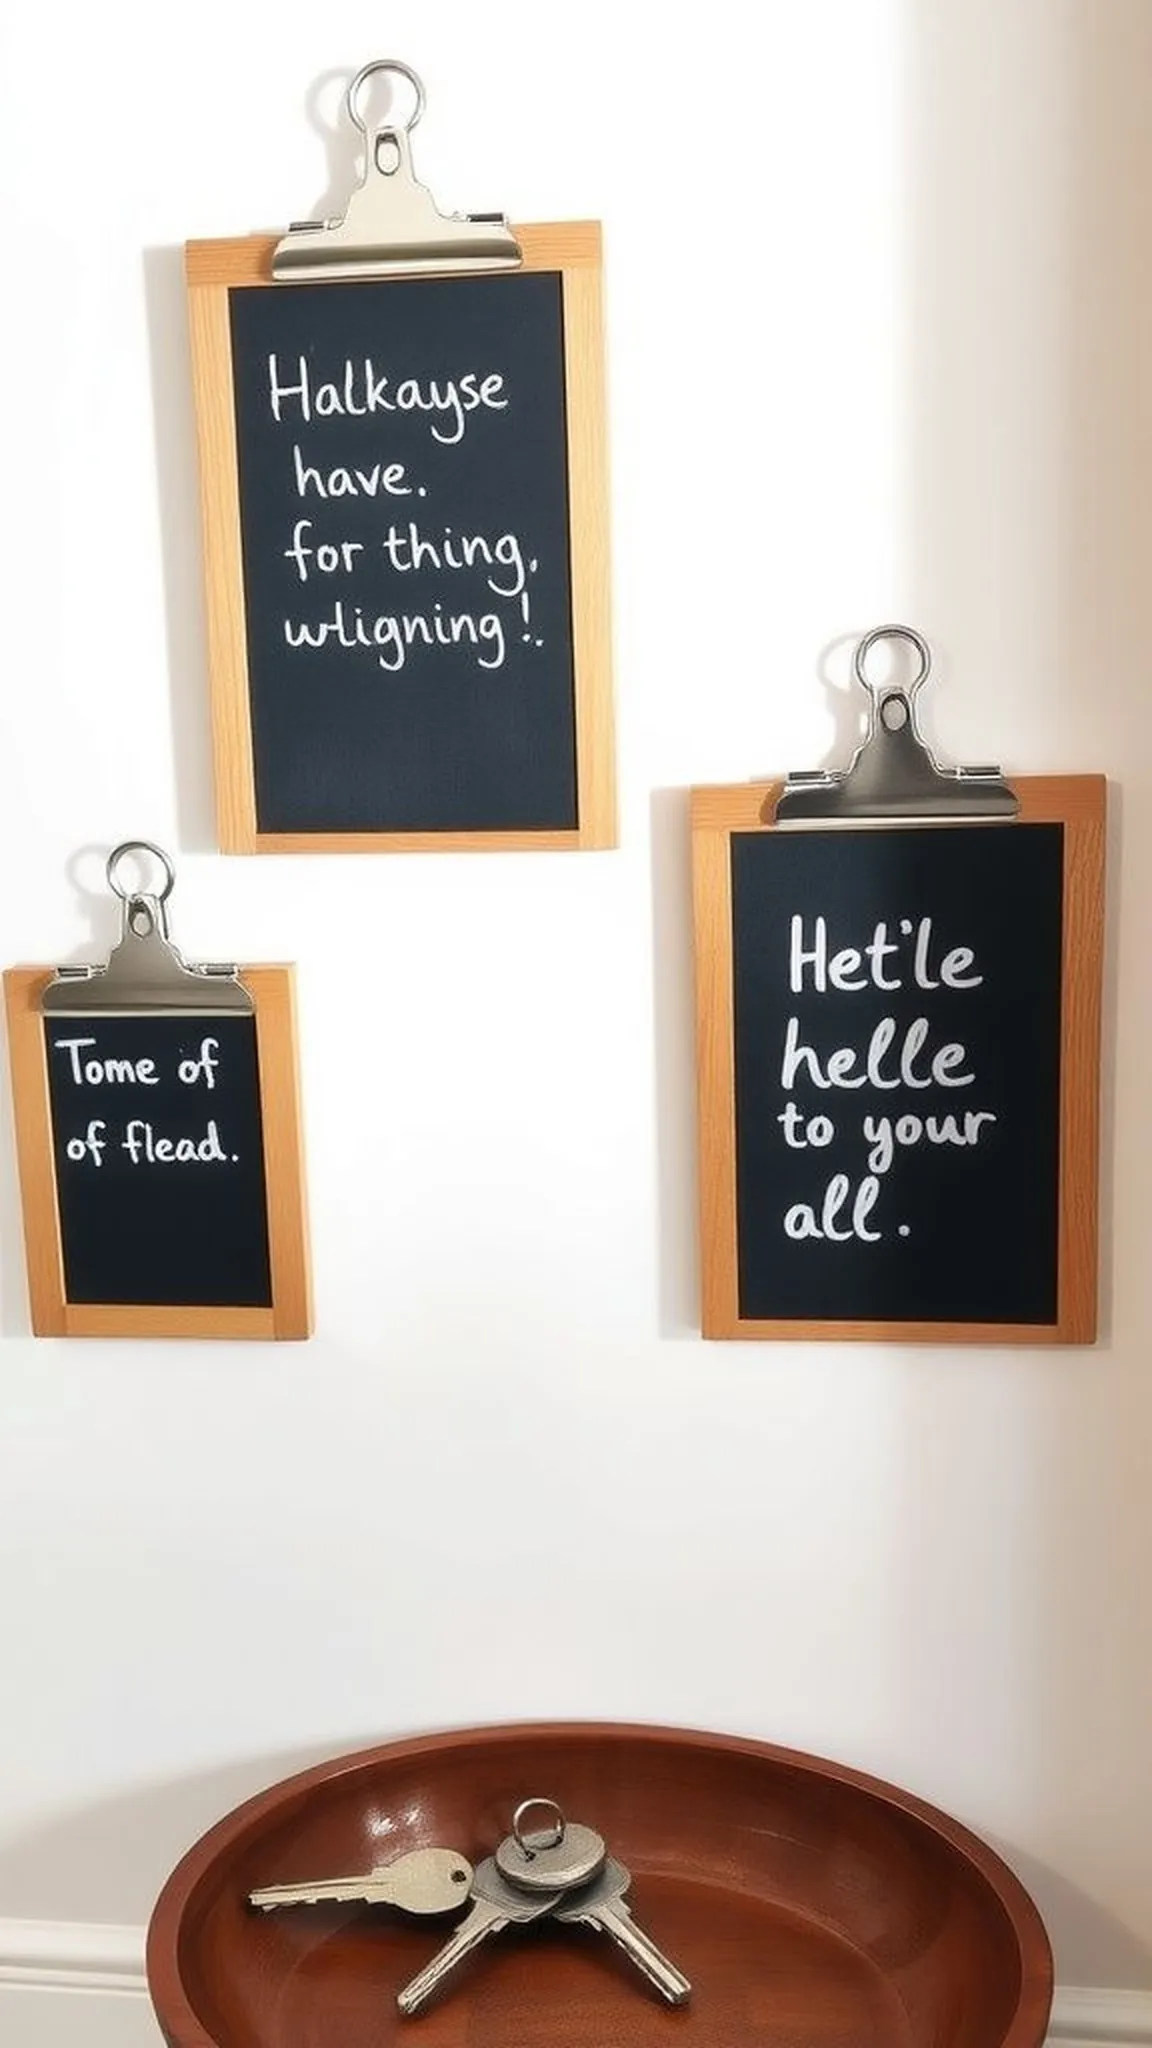
Small clipboards with chalkboard panels offered a playful way to switch messages with the season, their smooth writing surface inviting quick notes and tiny sketches. The wood clips had a modest weight and a cool touch, contrasting with the chalky matte board. Arranged in a cluster, the signs felt like a string of little announcements that could be rotated frequently.
There was a casual friendliness to them that made a shelf or entry feel welcoming and changeable.
📋 How to Make This ▶
- Remove a small clipboard backing and replace the panel with a pre-cut chalkboard sheet.
- Secure the clipboard clip back on and write a message using chalk or chalk markers.
- Hang or lean the clipboard on a small hook or shelf for display.
- Swap messages seasonally or for quick reminders.
⚠️ Avoid: Applying too much chalk pressure can leave ghosting that is hard to remove; lighter strokes clean more easily. Avoid wet chalk wipes without drying well.
🔄 Try Also: Add small seasonal stickers or miniature clothespins to hold a business card or photo. Create a set with different border paints for subtle variety.
🛒 Products & Materials ▶
Items Used
- Mini wooden clipboards
- Chalkboard sheets
- Chalk markers
📌 “Chalkboard clipboards for quick farmhouse notes and seasonal sayings.”
