
As an Amazon Associate I earn from qualifying purchases.
DIY Outdoor Candle Crafts bring a warm, flickering glow to evening patios and garden nooks with handcrafted charm. These outdoor candle projects blend wax, scent, and found objects to create mood, mosquito-friendly light, and weathered texture.
Each project idea focuses on approachable materials and approachable techniques to add soft illumination to porches, tables, and paths. Simple variations like citronella-infused jars, shell-set votives, or concrete candle bowls keep the outdoor candle theme fresh and adaptable to different yard styles.
The collection highlights garden candle projects that pair scent with shape for quiet nights beneath branches and string lights. Inspiration ranges from citronella lanterns to frozen ice luminaries that hold a gentle, cooling radiance on summer evenings.
Mason jar citronella lanterns for cozy patios
⏱️ 45 min · 🟢 Beginner
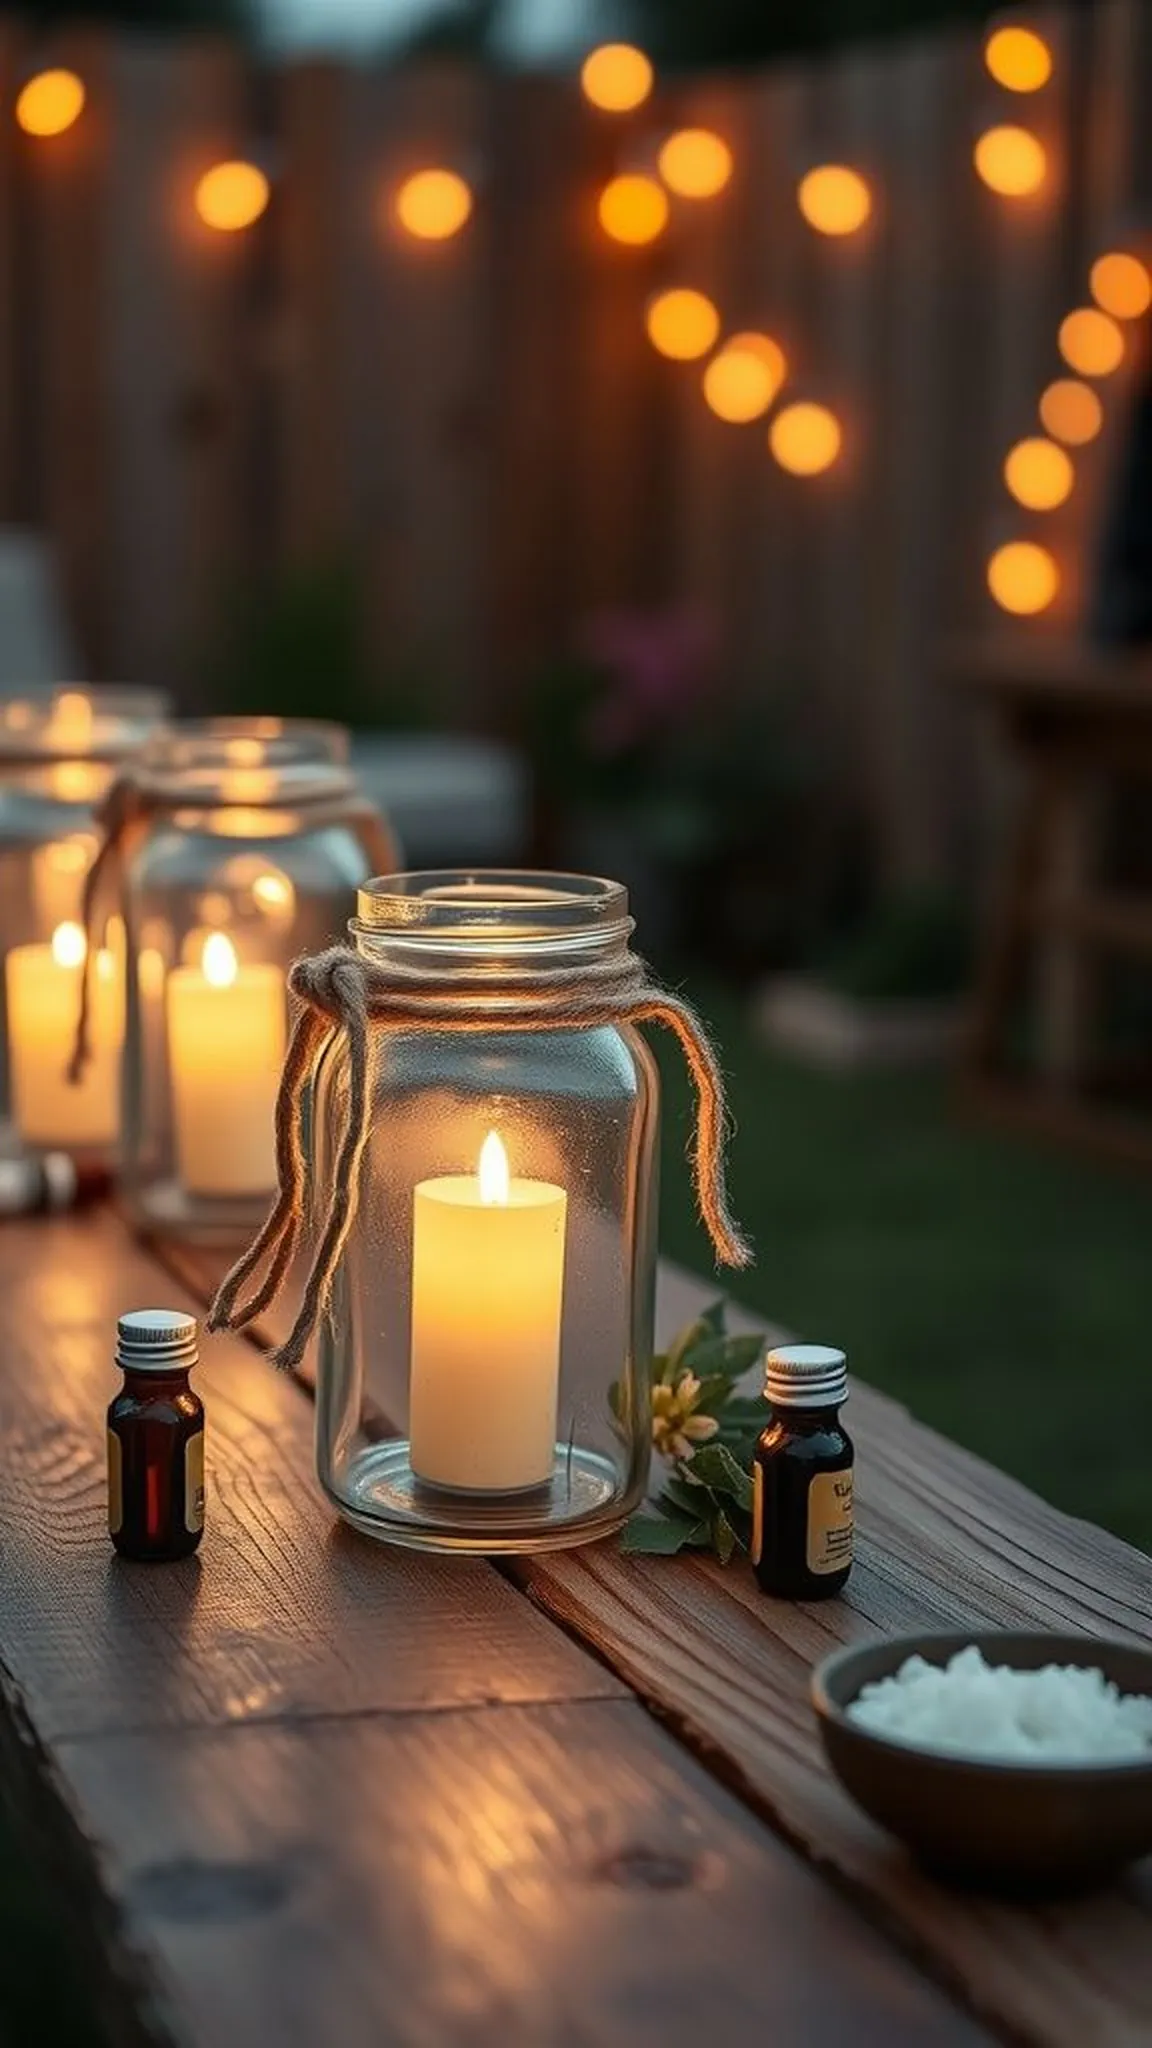
Glass mason jars glow with a soft golden core, the flame mirrored on cool glass walls and the lip catching light. A subtle citrus scent drifts from citronella wax, blending with evening air and distant grass sounds.
Rough twine and brass handles add a rustic silhouette against a wooden table and low amber bulbs overhead. Shadows stretch across weathered boards while the jars hum with a steady, insect-keeping fragrance that feels reassuring.
The jars present a familiar, homey profile that suits picnic benches and bistro settings alike. Warm wax pools reflect tiny dancing flames, inviting quiet conversation without overpowering the night.
Pro Tip: Select a firm wax blend and pre-waxed cotton wicks for cleaner burn and steadier citronella scent over longer evenings.
How to Make This
- Melt soy or paraffin wax in a double boiler until completely liquid and clear.
- Stir in citronella essential oil and pour a small amount into cooled mason jars to anchor the wick base.
- Center a pre-tabbed cotton wick and pour remaining scented wax, allowing glass warmth to cradle the wax as it firms.
- Trim the wick to a quarter inch before the first lighting for an even, smokeless flame.
Avoid: Choosing a very thin wick can cause tunneling and poor scent throw, while an oversized wick may smoke and shorten burn time. Not anchoring the wick securely often leads to off-center burning and uneven wax pools.
Try Also: Swap clear jars for colored glass jars to cast tinted light, or place coarse sand at the base for a beachy mood and added weight. Replace citronella with lavender or rosemary oils for a different scent profile that still reads as garden-friendly.
Products & Materials
Items Used
“Cozy citronella mason jar lanterns for breezy patio evenings.”
Citrus peel tealight bowls with fragrant zest
⏱️ 20 min · 🟢 Beginner
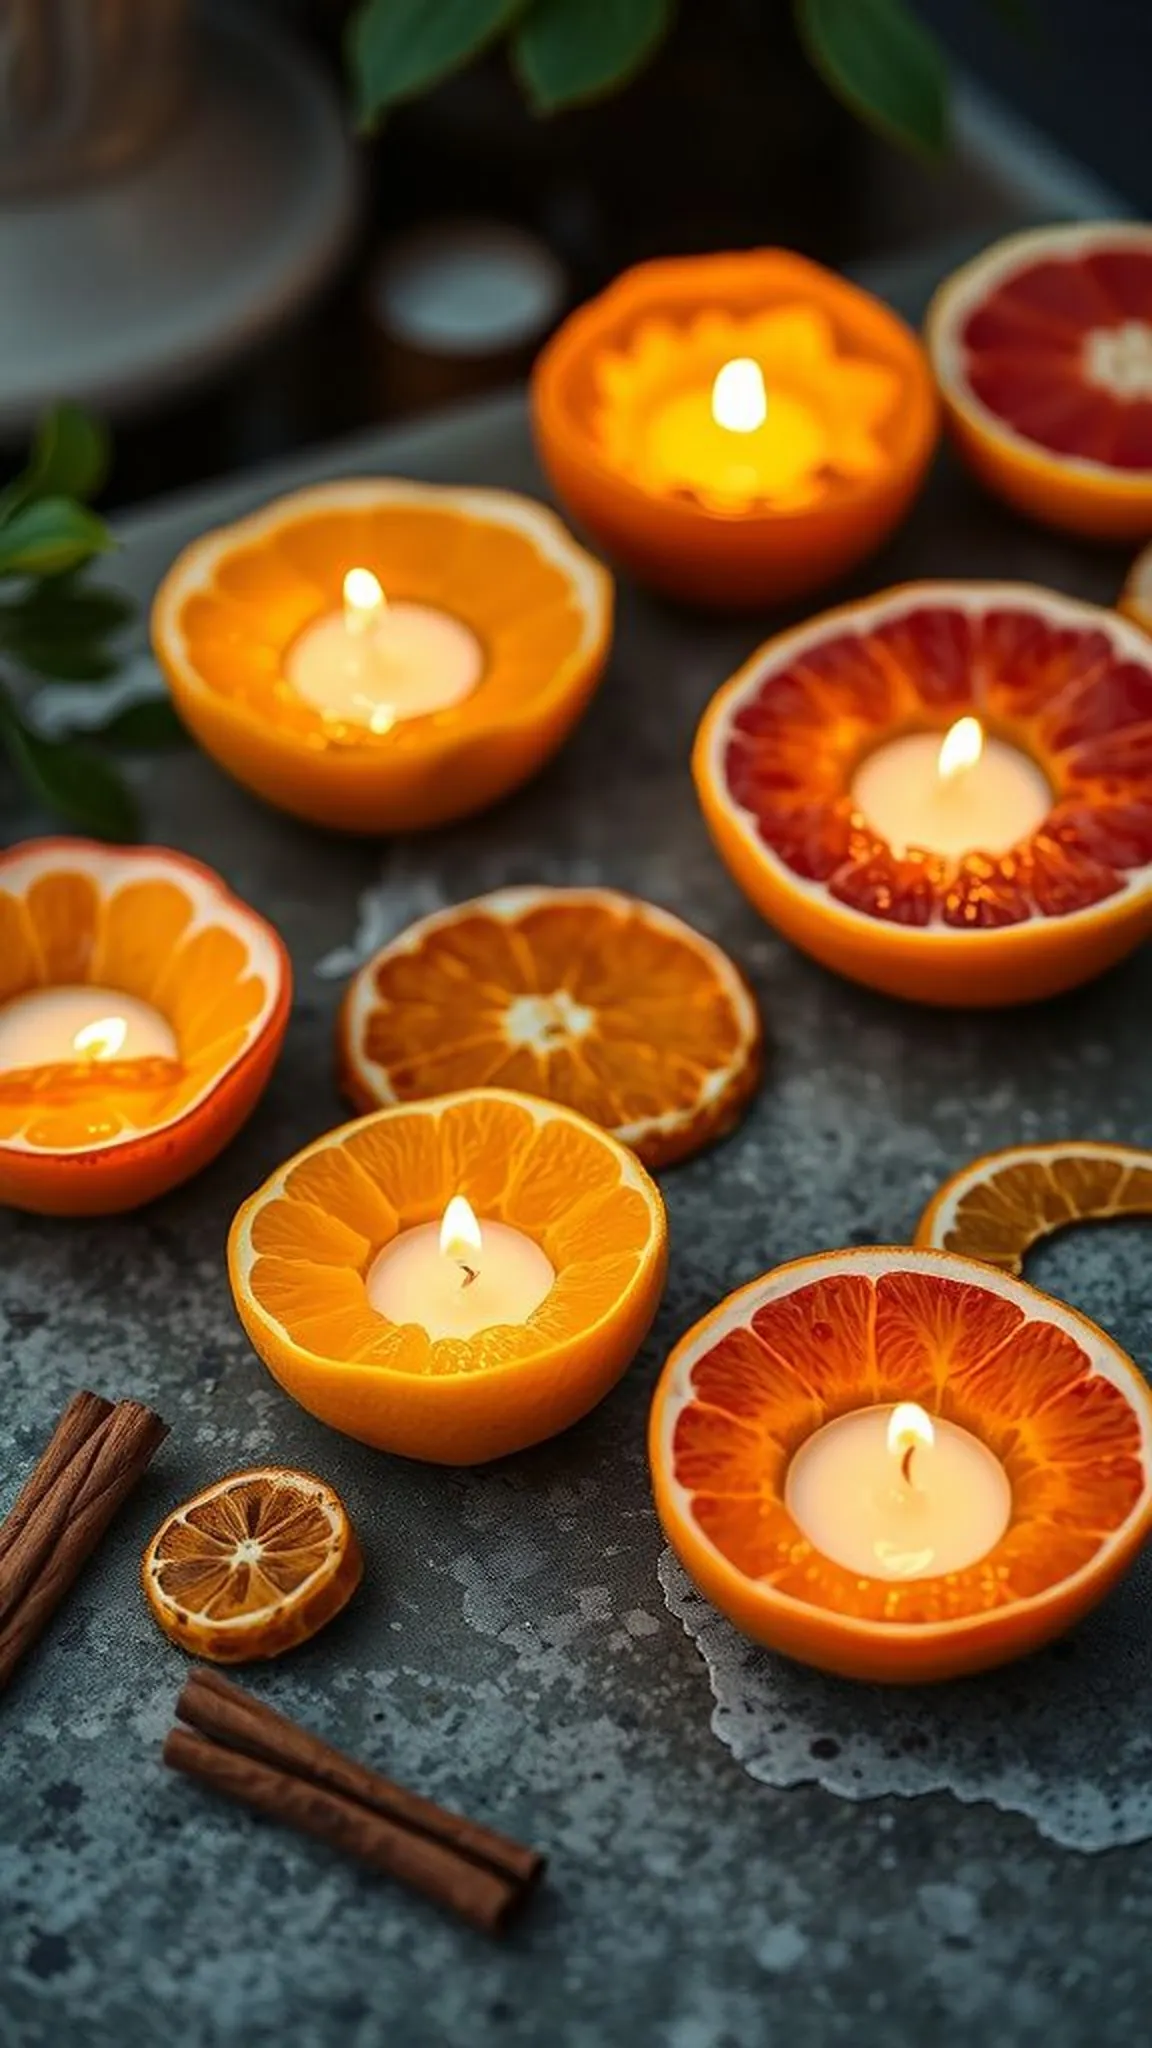
Bright citrus rinds cradle flickering tealight flames, releasing a fresh, zesty scent that mingles with warm wax and humid evening air. The hollowed shells show textured membranes and glossy citrus flesh that catch light in jewel-like patterns.
On a stone table the small bowls glint with oily sheen, each one carrying its citrus notes into close conversation circles. Their light is intimate and playful, conjuring images of sun-warmed orchards and sticky fingers after peeling fruit.
Petal edges and citrus zest create tiny flickers at the lip of each holder, adding a handcrafted whimsy. These bowls pair well with shallow trays and scattered leaves for a casual, summery display.
Pro Tip: Choose thicker citrus like oranges or grapefruits for sturdier shells and longer-lasting surfaces under candle heat.
How to Make This
- Cut the fruit in half and gently scoop out the interior to form a hollow bowl, leaving a curved rind shell intact.
- Dry the inside of the shell with paper towel and pour a small amount of melted wax to anchor a tealight or wick.
- Place a pre-made tealight or secured wick inside, allowing the citrus rind to cradle the flame safely on a heatproof tray.
Avoid: Using very thin-skinned fruit can lead to quick softening and leakage when heat is applied. Not drying the rind interior thoroughly tends to cause poor wax adhesion and uneven burning.
Try Also: Add a few cloves or cinnamon stick fragments to each rind for warm spice notes, or float slices of dried citrus in shallow water with small floating candles for a fresh aesthetic. Combine a cluster of mixed citrus bowls for a colorful, rustic centerpiece.
Products & Materials
Items Used
- Fresh oranges or grapefruits
- Tealight candles
- Small heatproof tray
“Bright citrus tealight bowls for fresh-scented outdoor glow.”
Seashell votives for beach-inspired nights
⏱️ 30 min · 🟢 Beginner

Polished seashells cradle flickering wax that reflects pearly interiors and tiny ridged patterns. The gentle saline tang of the shore seems to hover near each flame, while soft wind carries cooling breaths across the display.
A cluster of shells on driftwood or sand creates a delicate, coastal tableau that feels like a seaside walk at twilight. Light shimmers across nacreous surfaces and throws speckled highlights onto nearby boards and pebbles.
The tactile weight of heavier shells anchors small candles with a pleasing, organic heft. Expect subtle color shifts as wax meets shell, giving each votive an individual personality.
Pro Tip: Select deeper shells with concave interiors and pre-waxed tealights for stable burns and minimal wax seepage.
How to Make This
- Choose intact, concave shells and nest a pre-waxed tealight or a small spoonful of melted wax with a tabbed wick inside.
- Set the shells on a bed of sand or driftwood to stabilize them against gusts and to catch any small drips.
- Group multiple shell votives together on a shallow tray to create a cohesive coastal cluster that reads well from a distance.
Avoid: Using very flat or cracked shells leads to unstable candles and potential wax escape. Placing the shell votives directly on flammable surfaces can cause dangerous heat transfer and marks.
Try Also: Mix in small pieces of sea glass or polished pebbles for added color and texture, or set votives inside shallow glass bowls filled with sand for a tidier display. Try pastel shells with scented tealights for a gentle, aromatic beach scene.
Products & Materials
Items Used
- Large concave seashells
- Unscented tealight candles
- Shallow driftwood tray
“Delicate seashell votives for seaside-inspired outdoor ambiance.”
Save time and printer ink with 50+ printable templates and step-by-step instructions in one ad-free guide.

Just $19.99 — lifetime access
Concrete candle bowls with raw modern charm
⏱️ 2-3 hours · 🟠 Intermediate
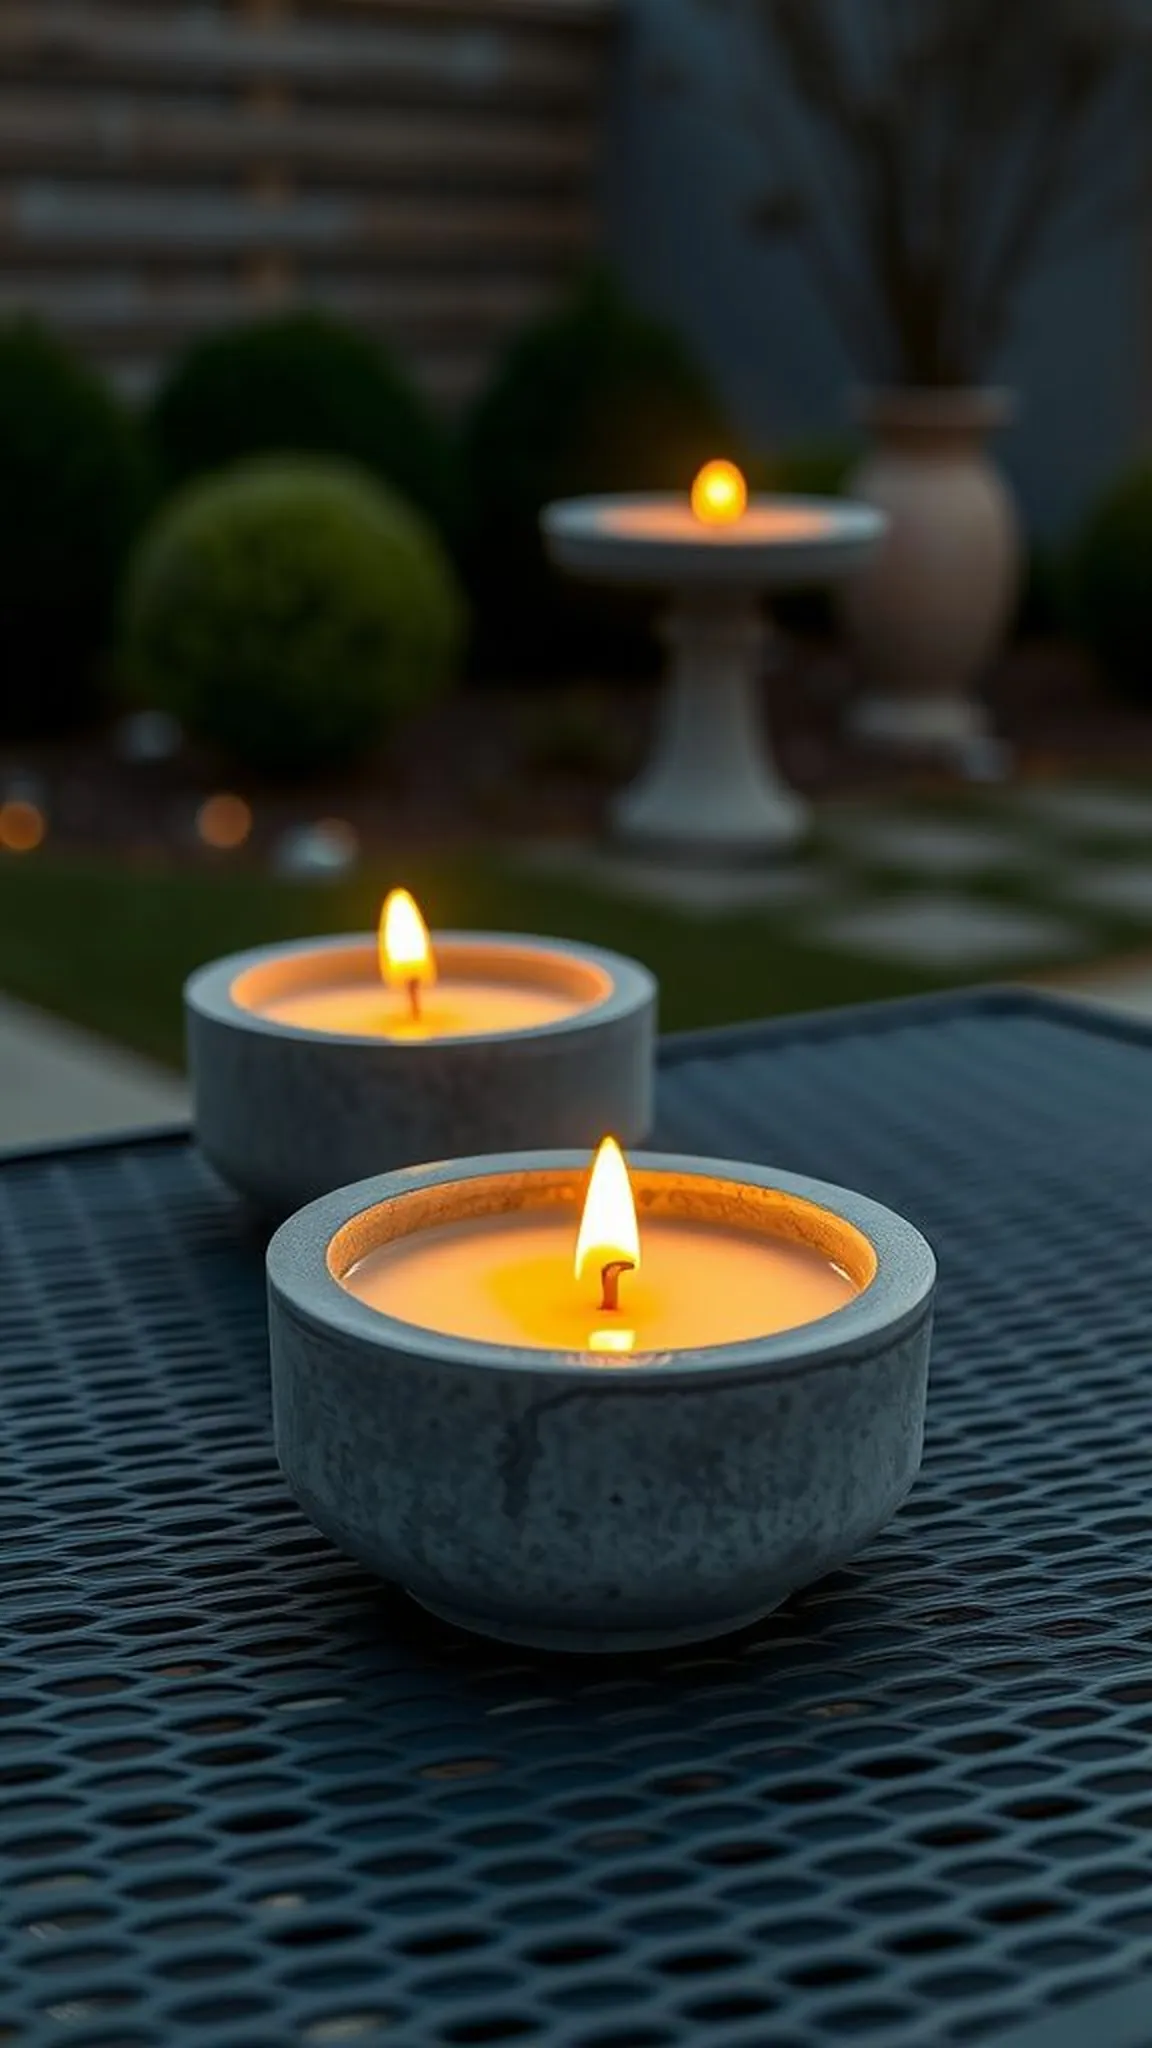
Low, matte concrete bowls hold warm pools of wax that contrast with the rough, industrial texture of the grey surface. Tiny air pockets and subtle veining speak of hand-formed molds and the tactile grain of cement.
Placed on a metal bistro or a stone ledge, the bowls offer minimalist light that reads well against trimmed hedges and steel planters. The cool, dry scent of concrete pairs unexpectedly with soft wax aromas, creating a composed outdoor atmosphere.
Edges show small chips and natural imperfections that add character rather than detract. When flames steady, reflections skim along micro-ridges and the concrete seems to drink the light, offering a restrained glow.
Pro Tip: Allow concrete to cure fully before adding hot wax to prevent steam bubbles and to maintain a clean, stable bowl interior.
How to Make This
- Mix a quick-setting concrete to a thick, pourable consistency and pour into silicone or plastic molds designed for shallow bowls.
- Vibrate or tap the mold gently to release trapped air, then allow the concrete to cure completely according to package directions.
- Sand any rough edges lightly with fine-grit sandpaper and place a metal or glass insert before pouring in wax and a centered wick.
Avoid: Pouring wax into damp or undercured concrete creates bubbling and uneven surfaces in the candle pool. Choosing overly thin concrete results in fragile bowls that chip easily when moved.
Try Also: Add pigment powders for subtle color or embed small pebbles for a textured rim, or invert a thinner concrete mold for taller, tapered vessels. Use metal inserts to protect concrete from prolonged heat exposure when planning long burn sessions.
Products & Materials
Items Used
- Quick-setting concrete mix
- Silicone bowl molds
- Fine-grit sandpaper
- Candle wax and wicks
“Minimal concrete candle bowls for modern outdoor settings.”
Recycled wine bottle torches for backyard paths
⏱️ 1 hour · 🟠 Intermediate
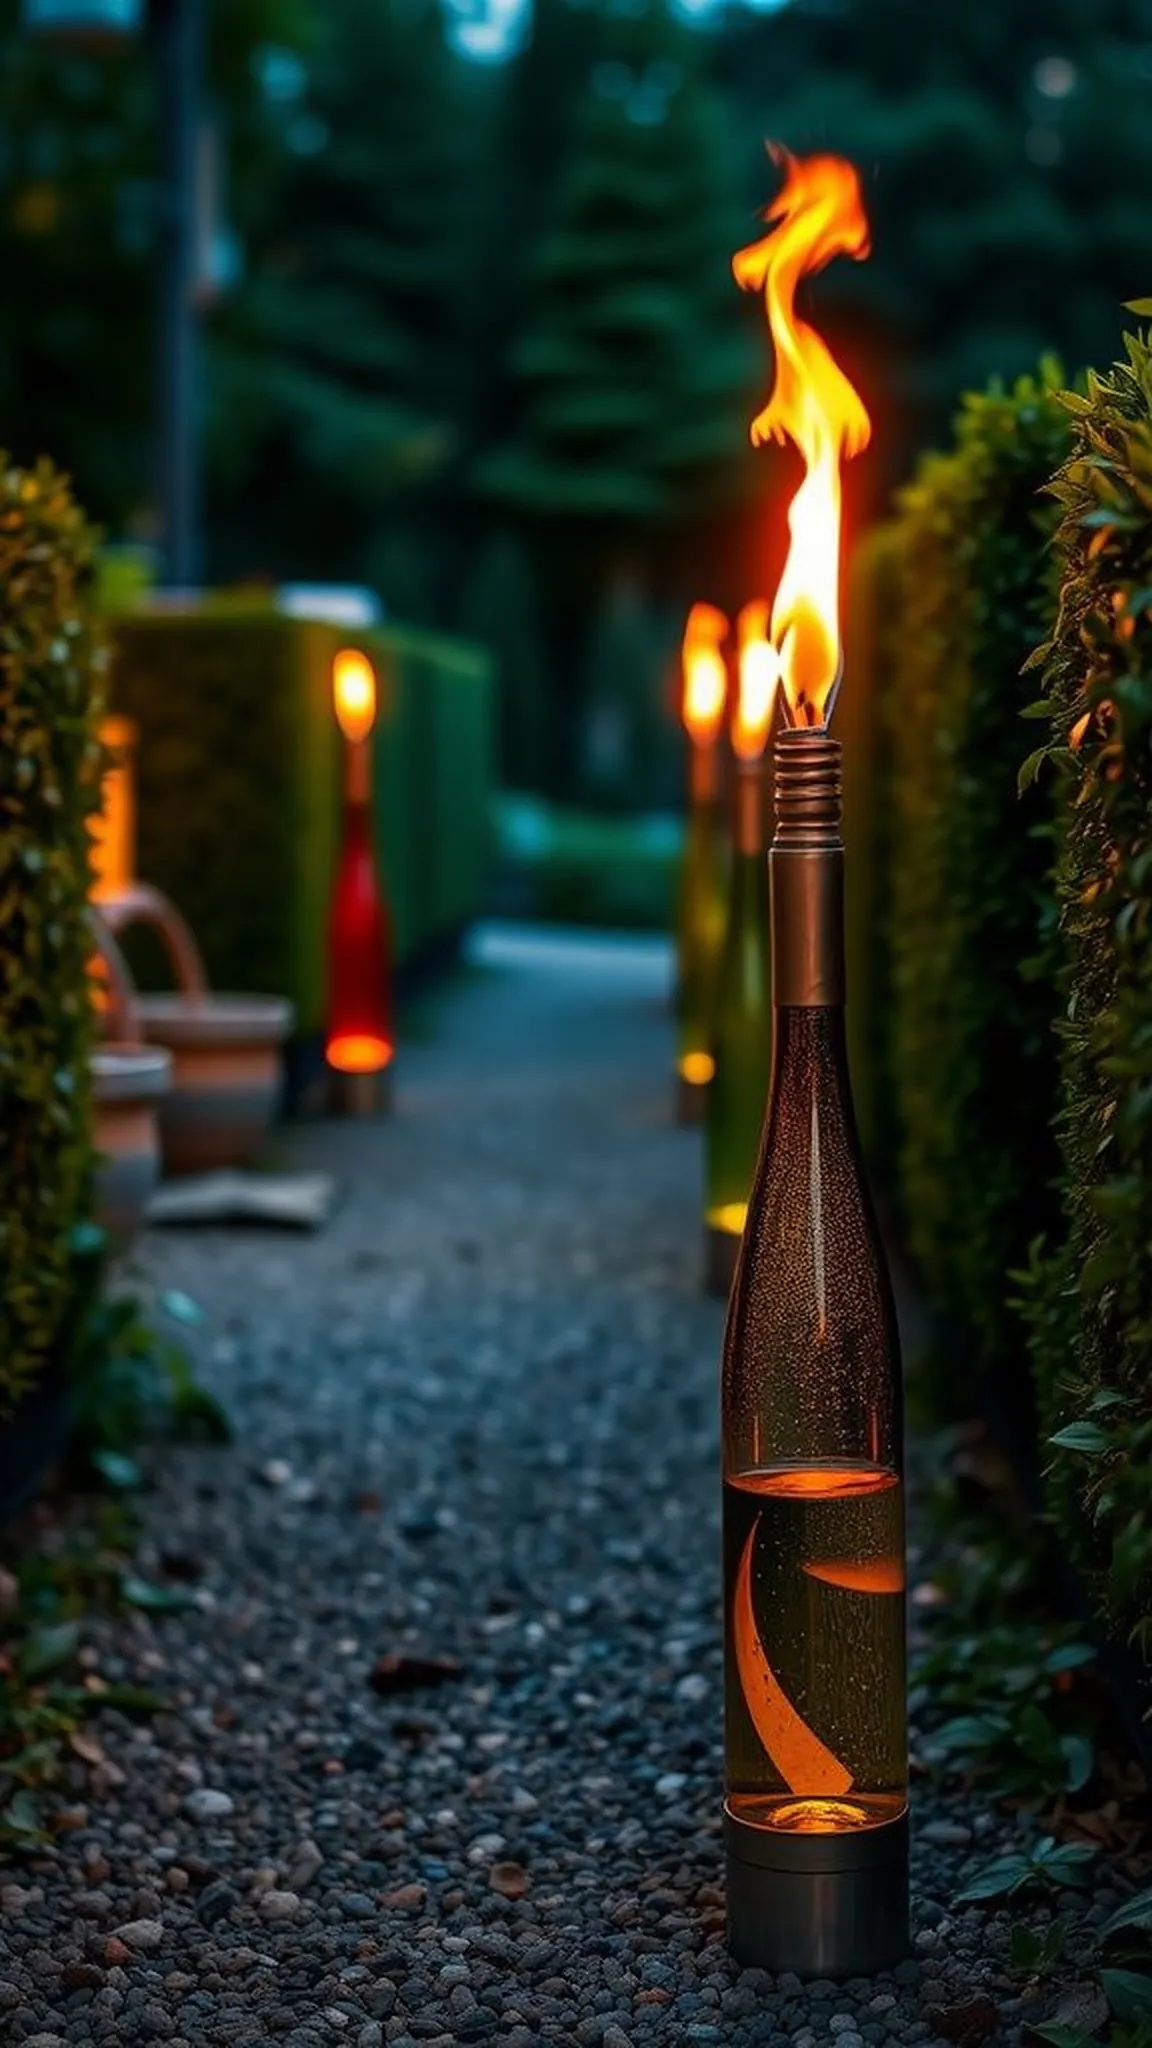
Tall glass bottles become slender torches that cast long, wavering flames along gravel walkways and garden beds. The amber and green glass throws elongated highlights and soft color into the surrounding foliage.
A steady wick and oil reservoir produce a baritone flicker that reads like a row of quiet beacons on summer nights. Reflections slide up the bottle necks while distant leaves rustle and the flame keeps its measured rhythm.
The effect is both ecological and sculptural, with each bottle carrying its own slight imperfection from past labels and residues. A drift of warm light leads visitors gently without demanding attention.
Pro Tip: Trim the torch wick to a modest length before lighting and keep a stable oil reservoir to ensure long, steady burn times on breezy evenings.
How to Make This
- Clean recycled wine bottles thoroughly and remove labels, ensuring a dry interior before adding fuel and a fiberglass wick assembly.
- Install a tapered torch wick with a metal or ceramic collar to stabilize flame height and secure it in the bottle neck.
- Top off the bottle with torch fuel, test outdoors in a sheltered spot, and place torches into weighted holders or soil along the path.
Avoid: Overfilling bottles with fuel can lead to spills and heavier smoke, while very short wicks produce weak, flickering flames. Placing torches too close to flammable plants risks scorching and accidental fires.
Try Also: Paint the lower bottle halves with weatherproof metallic paint for a festive look, or swap torch fuel for citronella oil blends to reduce insect presence. Line the path with alternating colored bottles for a playful, lantern-like effect.
Products & Materials
Items Used
“Upcycled wine bottle torches guide backyard strolls with gentle light.”
Herb-infused tin candles with garden aromas
⏱️ 1 hour · 🟢 Beginner
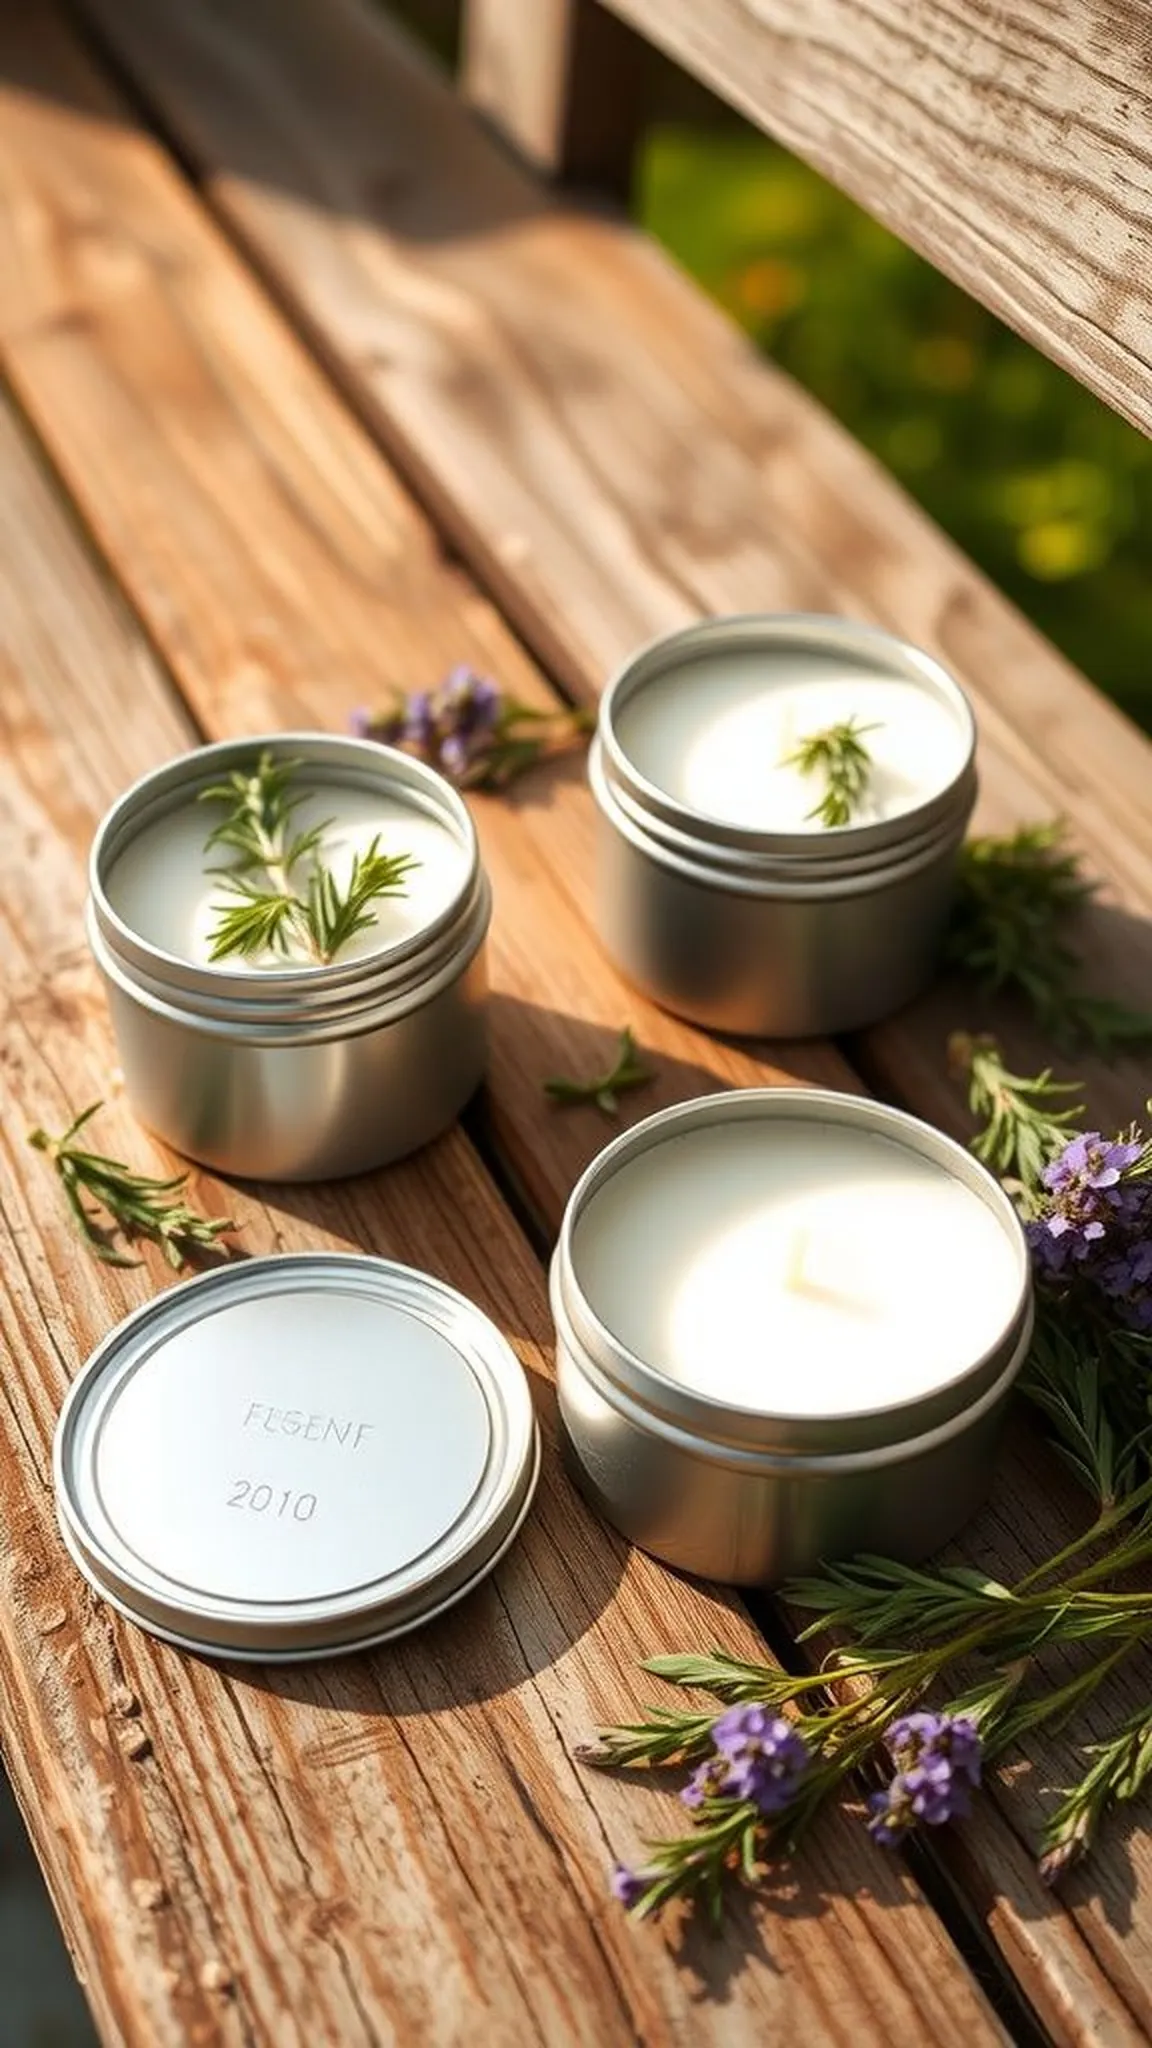
Small metal tins exhale layered herb scents as their wax cores burn and soften, releasing rosemary, lavender, or basil notes into lambent air. The metal lids rest nearby, catching tiny shards of wax and preserving the faint garden perfume between uses.
On a weathered windowsill or picnic bench these tins feel compact and friendly, lending an herbal crispness that complements grilled meals and tea-cooled evenings. Light plays across embossed tin surfaces while aromas drift in slow ribbons.
The tactile click of a lid and the low hum of flame make these candles easy companions for casual gatherings. Each scent carries a memory of soil and sun, anchored by steady, low flames.
Pro Tip: Blend dried garden herbs into the wax at a low temperature to protect volatile fragrance molecules and achieve a nuanced scent throw.
How to Make This
- Warm candle wax until fluid, then stir in finely crushed dried herbs and a measured amount of essential oil for boosting aroma.
- Pour the mixture into small metal tins with centered wicks, leaving slight headspace to allow for wax expansion.
- Allow the tins to cool on a flat surface and fit lids once fully solidified to preserve scent for future use.
Avoid: Adding herbs when the wax is too hot can scorch botanicals and produce a burnt scent. Overfilling tins risks wax spilling when softening in warmer outdoor temperatures.
Try Also: Create a culinary trio with thyme, basil, and oregano tins for dining areas, or craft floral blends of lavender and chamomile for a softer, evening aroma. Try copper-colored tins for a warmer visual effect.
Products & Materials
Items Used
“Small herb-infused tin candles for fresh garden scent outdoors.”
Floating petal candles in birdbath displays
⏱️ 1 hour · 🟠 Intermediate
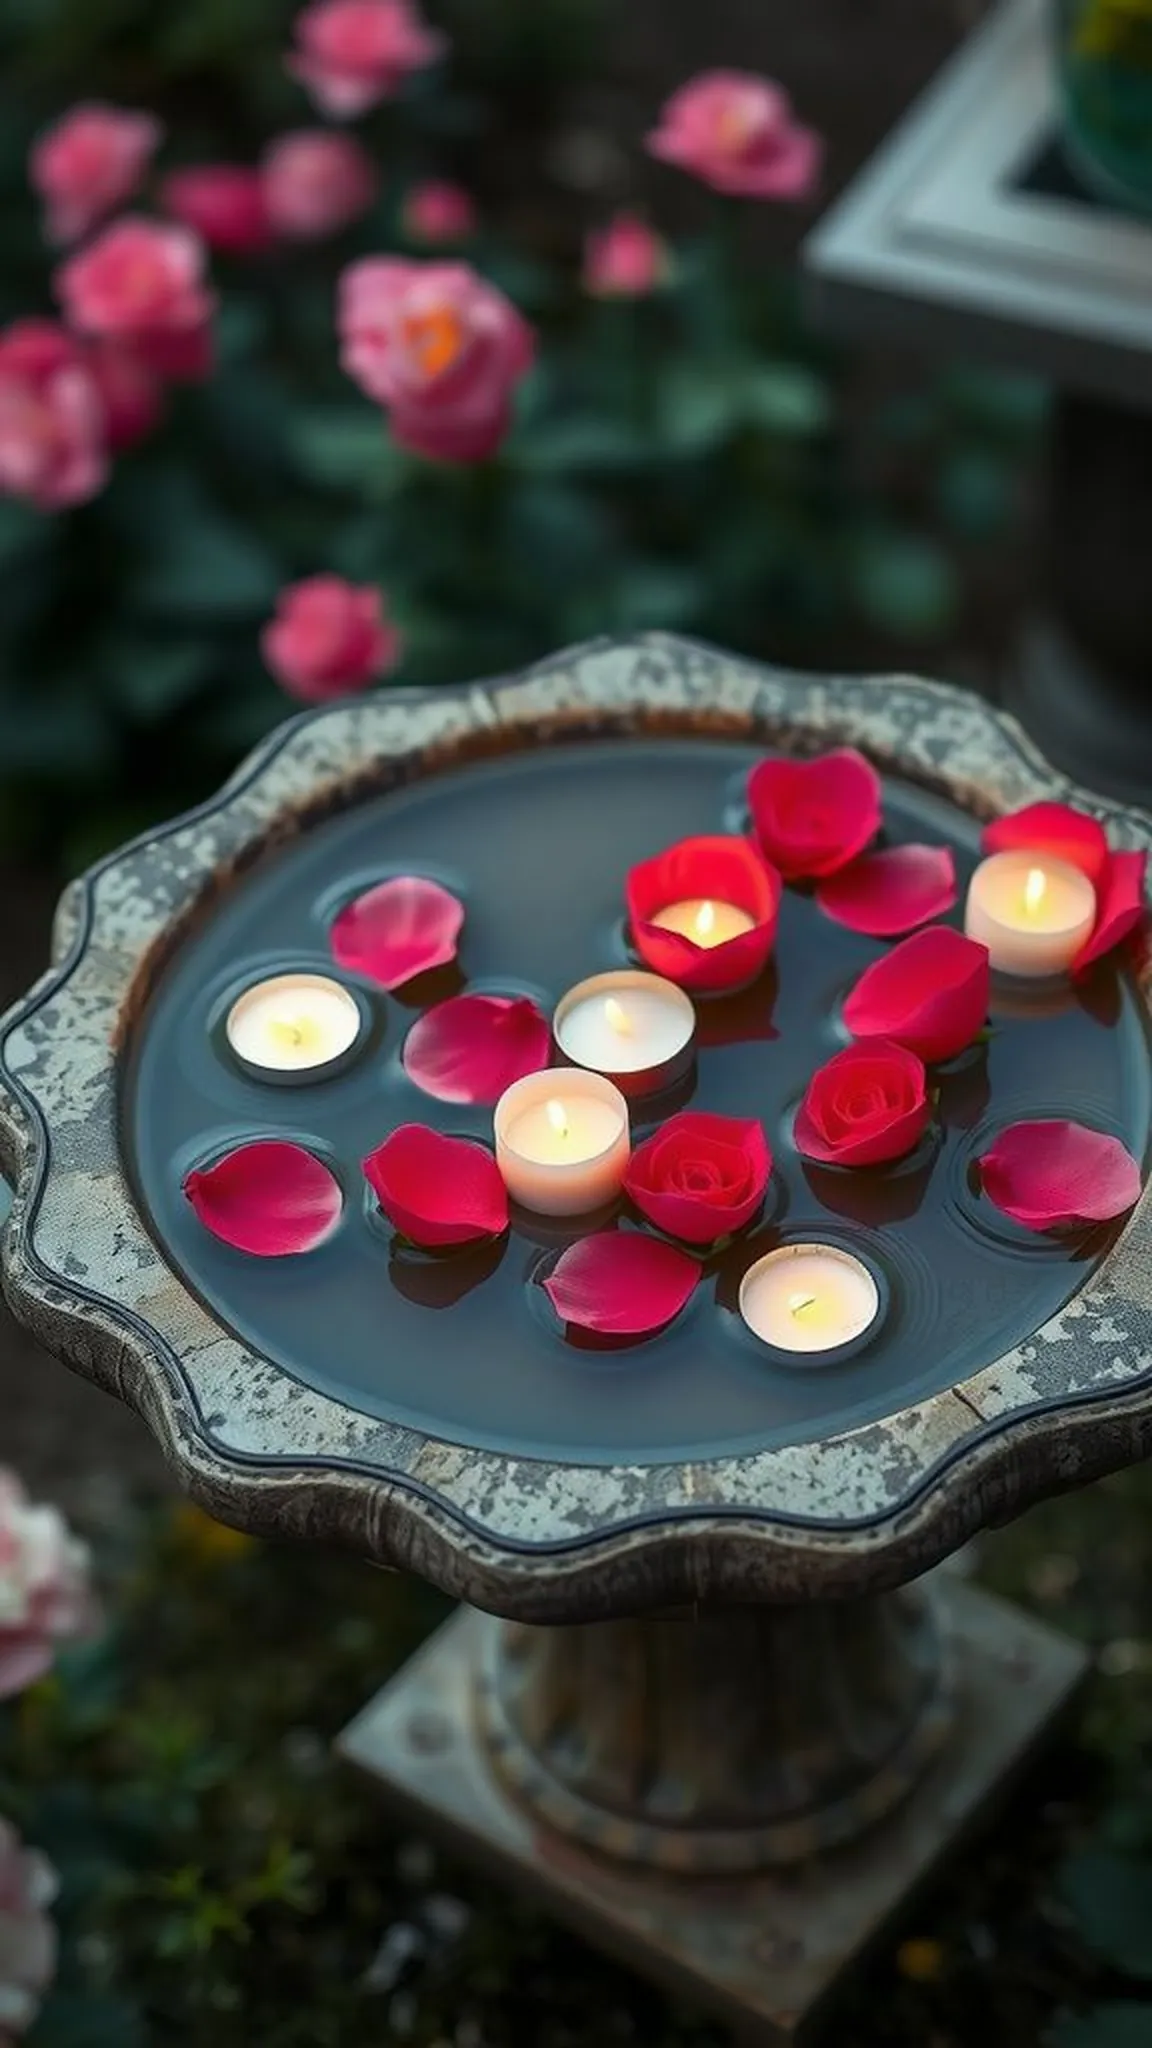
Delicate floating candles drift among loose petals on a shallow pool, their soft halos mirrored on a glassy water surface. Rose and geranium petals bob near the flame edges, adding scent and a kaleidoscope of color against stone basins.
The combination reads like a quiet festival on warm nights, with insects avoiding the scented edge while frogs chirp in the darkened margins. Reflections shimmy as a breeze skims the water, turning each votive into a small, moving lantern.
The display feels ephemeral and romantic, ideal for short outdoor gatherings where beauty is enjoyed up close. Gentle ripples and faint blossom fragrances make the scene feel both lush and intimate.
Pro Tip: Choose low-wax floating candles with wide bases for stability and pair them with fresh, sturdy petals to prevent sinking and early wilting.
How to Make This
- Fill a shallow birdbath or wide bowl with room-temperature water and scatter fresh flower petals across the surface.
- Gently place low-profile floating candles among the petals, ensuring each candle sits level and away from dense petal clusters.
- Light candles in calm conditions and monitor the display, refreshing petals if they begin to wilt during the evening.
Avoid: Overcrowding the surface with petals can smother candles and cause uneven floating. Using tall or top-heavy candles increases the chance of tipping and wax spilling into the water.
Try Also: Add citrus slices or floating herbs like mint for a citrus-herb aroma, or swap petals for tiny floating orbs made from translucent paper for a lantern-like effect. Line the basin with string lights below for added underglow.
Products & Materials
Items Used
- Floating candles
- Fresh flower petals
- Shallow birdbath or bowl
“Romantic floating petal candles for tranquil outdoor baths.”
Lanterns with sand and shell base for stability
⏱️ 30 min · 🟢 Beginner
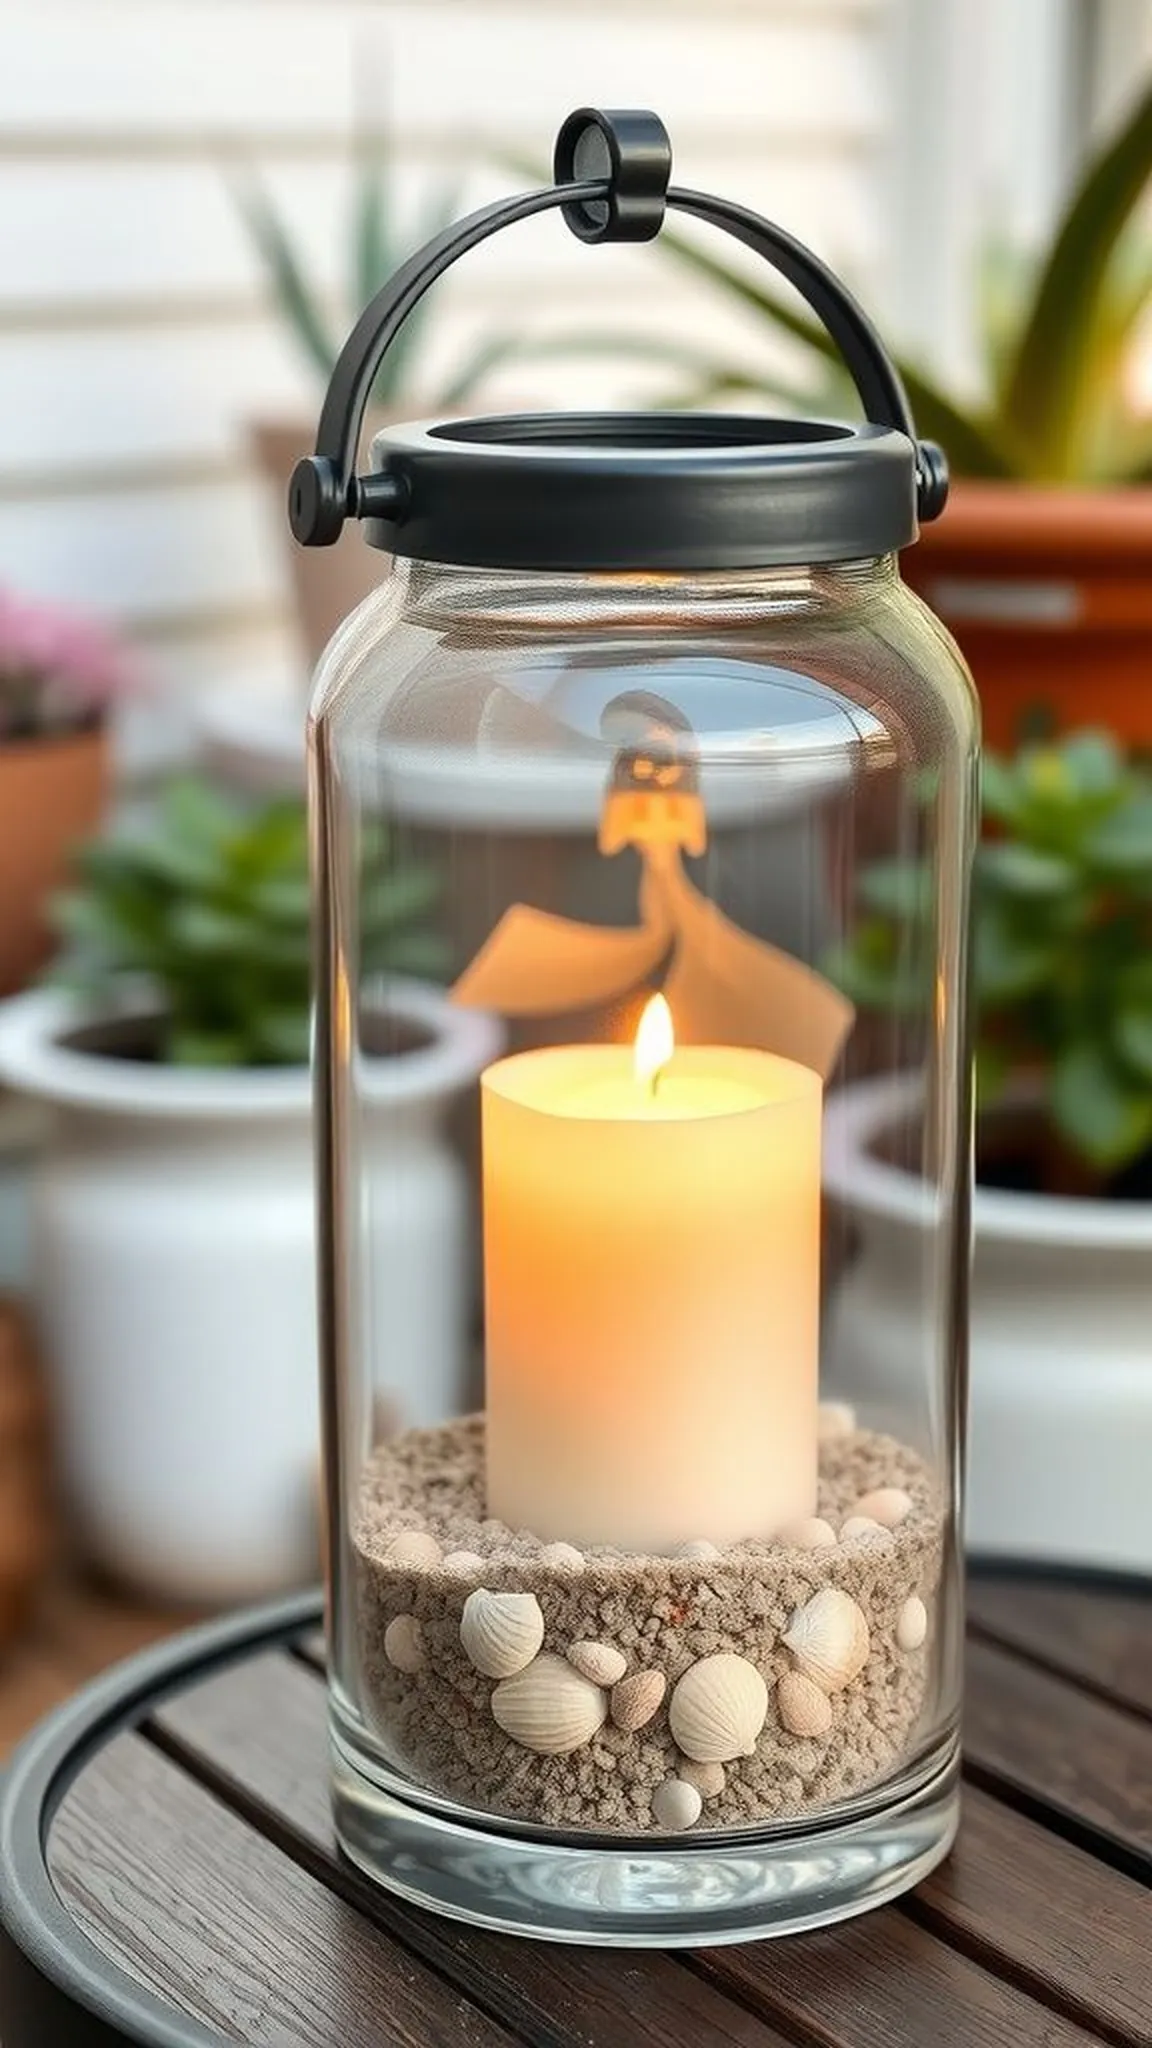
Clear lanterns reveal inner arrangements of coarse sand and small shells that cradle candles with natural stability. The sandy bed gives weight and a textured backdrop that catches falling wax in soft, granular drifts.
Light filters through the glass with a warm, sandy tint that pairs well with wooden decks and coastal planters. Tiny shell fragments sparkle like little stars when the flame dances, adding a delicate complexity to the radiance.
The result reads like a portable slice of beach placed amid shrubs or on a pergola table. Each lantern offers a contained seaside vignette with steady, reassuring light.
Pro Tip: Layer a thin base of coarse sand before adding a candle to stabilize it and prevent wax from sticking to the lantern floor.
How to Make This
- Fill the base of a clear outdoor lantern with a layer of coarse sand, pressing gently to create an even bed.
- Nestle a pillar or wide tealight into the sand so the candle sits upright and secure.
- Close the lantern and set it in a sheltered spot, ensuring vent holes allow heat to escape while the flame breathes.
Avoid: Using very fine sand can shift too easily and allow candles to lean or topple. Placing lanterns in completely enclosed spaces without ventilation leads to overheating and smoky flames.
Try Also: Mix in small stones or sea glass with the sand for color contrast, or swap sand for coffee beans to add a warm, roasted scent. Use tinted glass lanterns to change the mood of the light.
Products & Materials
Items Used
“Stable glass lanterns with sand and shells for coastal charm.”
Tin can hurricanes with punched star patterns
⏱️ 40 min · 🟢 Beginner
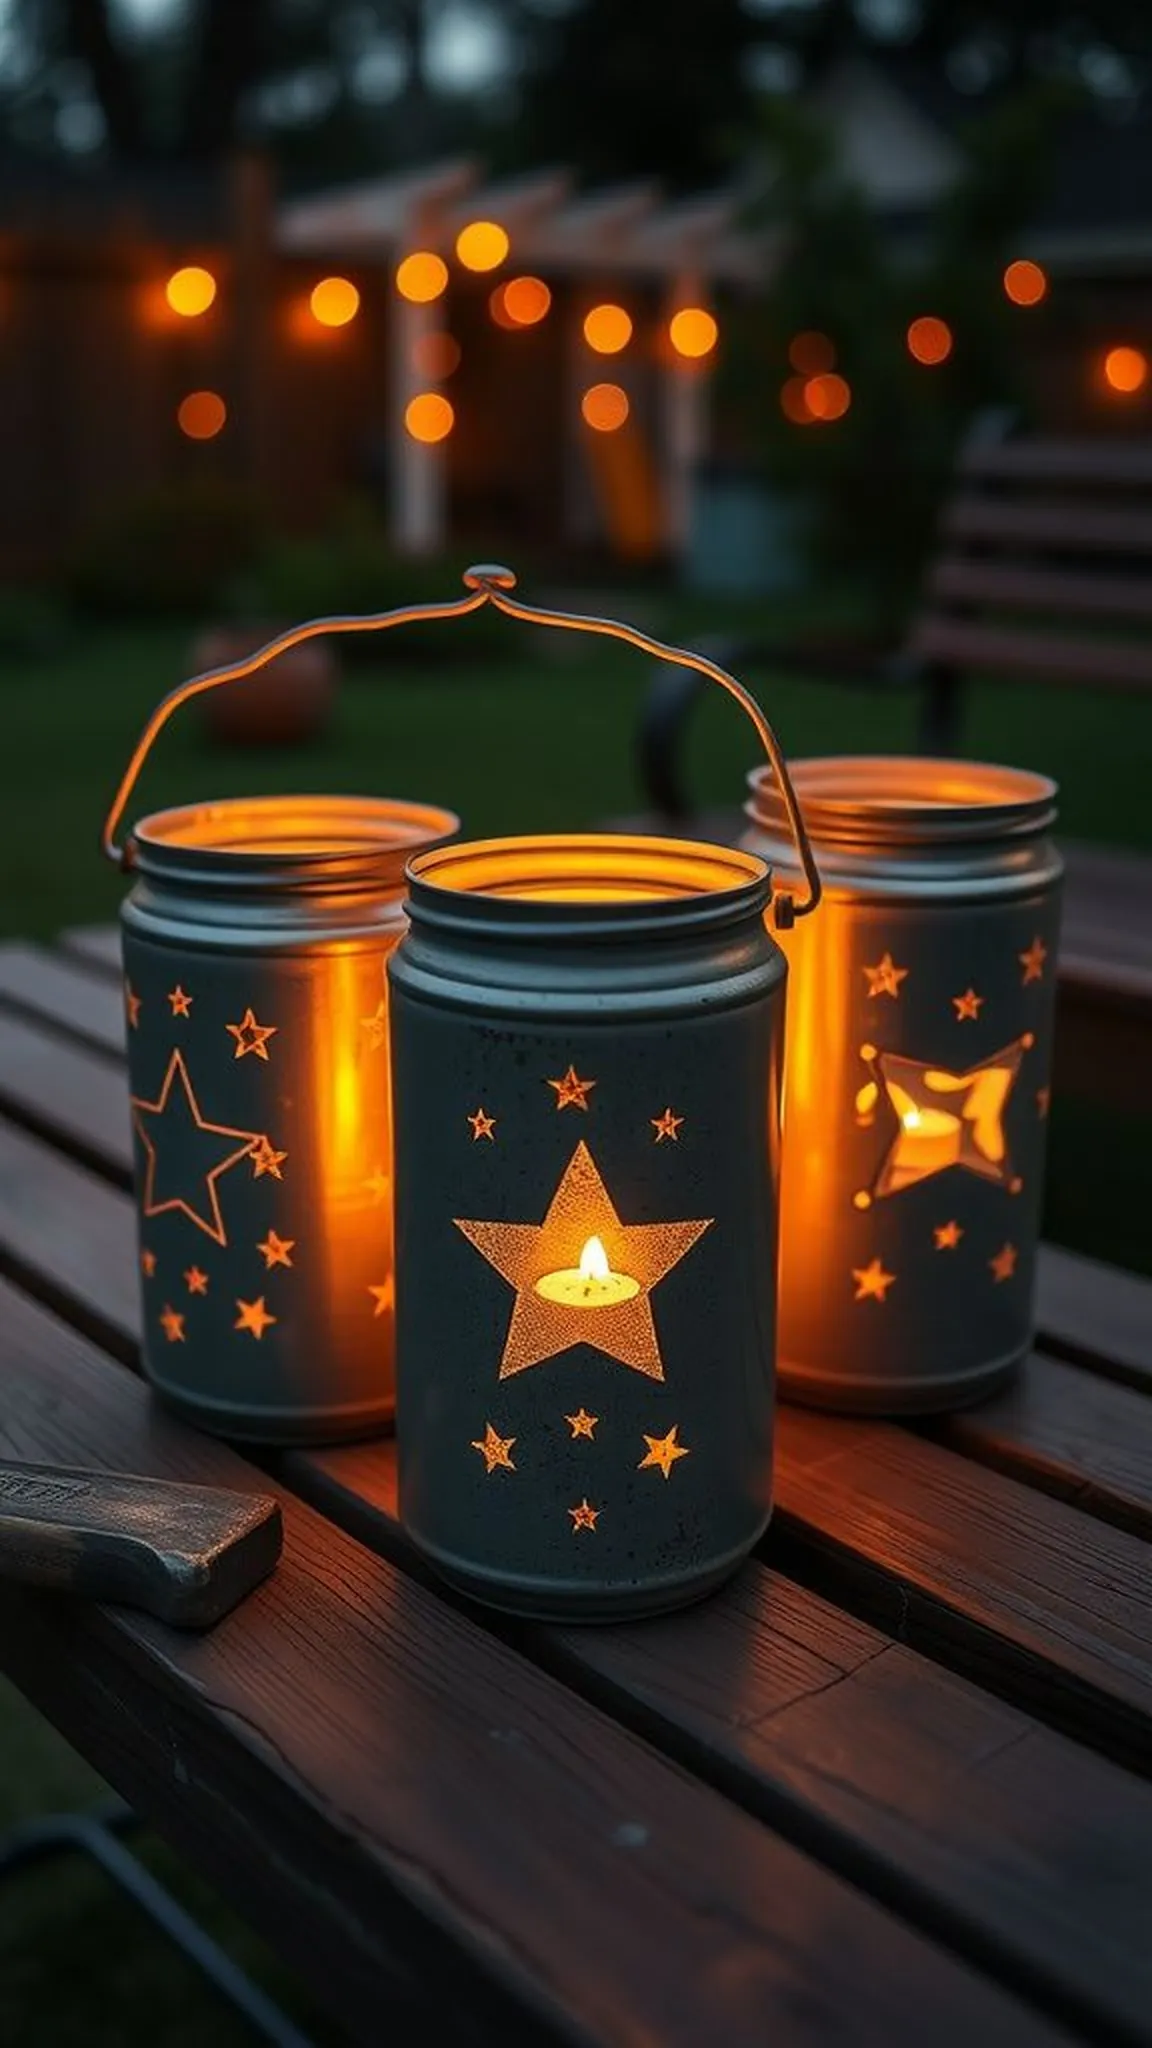
Recycled tin cans take on new life as hurricanes perforated with star and dot patterns that throw playful constellations. When lit, the pierced metal projects tiny points of light onto nearby walls and tabletops, creating an intimate celestial scene.
The cold metallic surface warms around the candle, radiating a soft heat that becomes part of the overall comfort on cool evenings. The sound of a faint breeze brushing past the can adds an atmospheric rustle to the visual display.
Each punched can has a handcrafted silhouette, ranging from crisp geometric holes to looser, organic shapes. Clusters of them make a neighborhood of glowing moons along railings and steps.
Pro Tip: Space the punched holes evenly and avoid very thin metal edges to ensure clean light patterns and reduce risk of sharp burrs.
How to Make This
- Clean empty tin cans and mark a simple pattern with a permanent marker, spacing holes for balanced light projection.
- Using a hammer and nail, punch holes through the can following the pattern, then file any rough edges for safety.
- Place a small candle inside the can and set the can on a heatproof surface, grouping several for a stronger visual effect.
Avoid: Punching too many clustered holes weakens the can structure and creates jagged ribs. Leaving sharp metal burrs unfiled risks small cuts when moving the hurricane.
Try Also: Create themed patterns like waves, leaves, or moons, or paint the cans in matte metallic tones for a softer glow. Suspend cans with wire handles for hanging lanterns among tree branches.
Products & Materials
Items Used
“Punched tin can hurricanes that cast charming starry patterns.”
Hollowed log candle display for woodland tables
⏱️ 2-3 hours · 🔴 Advanced
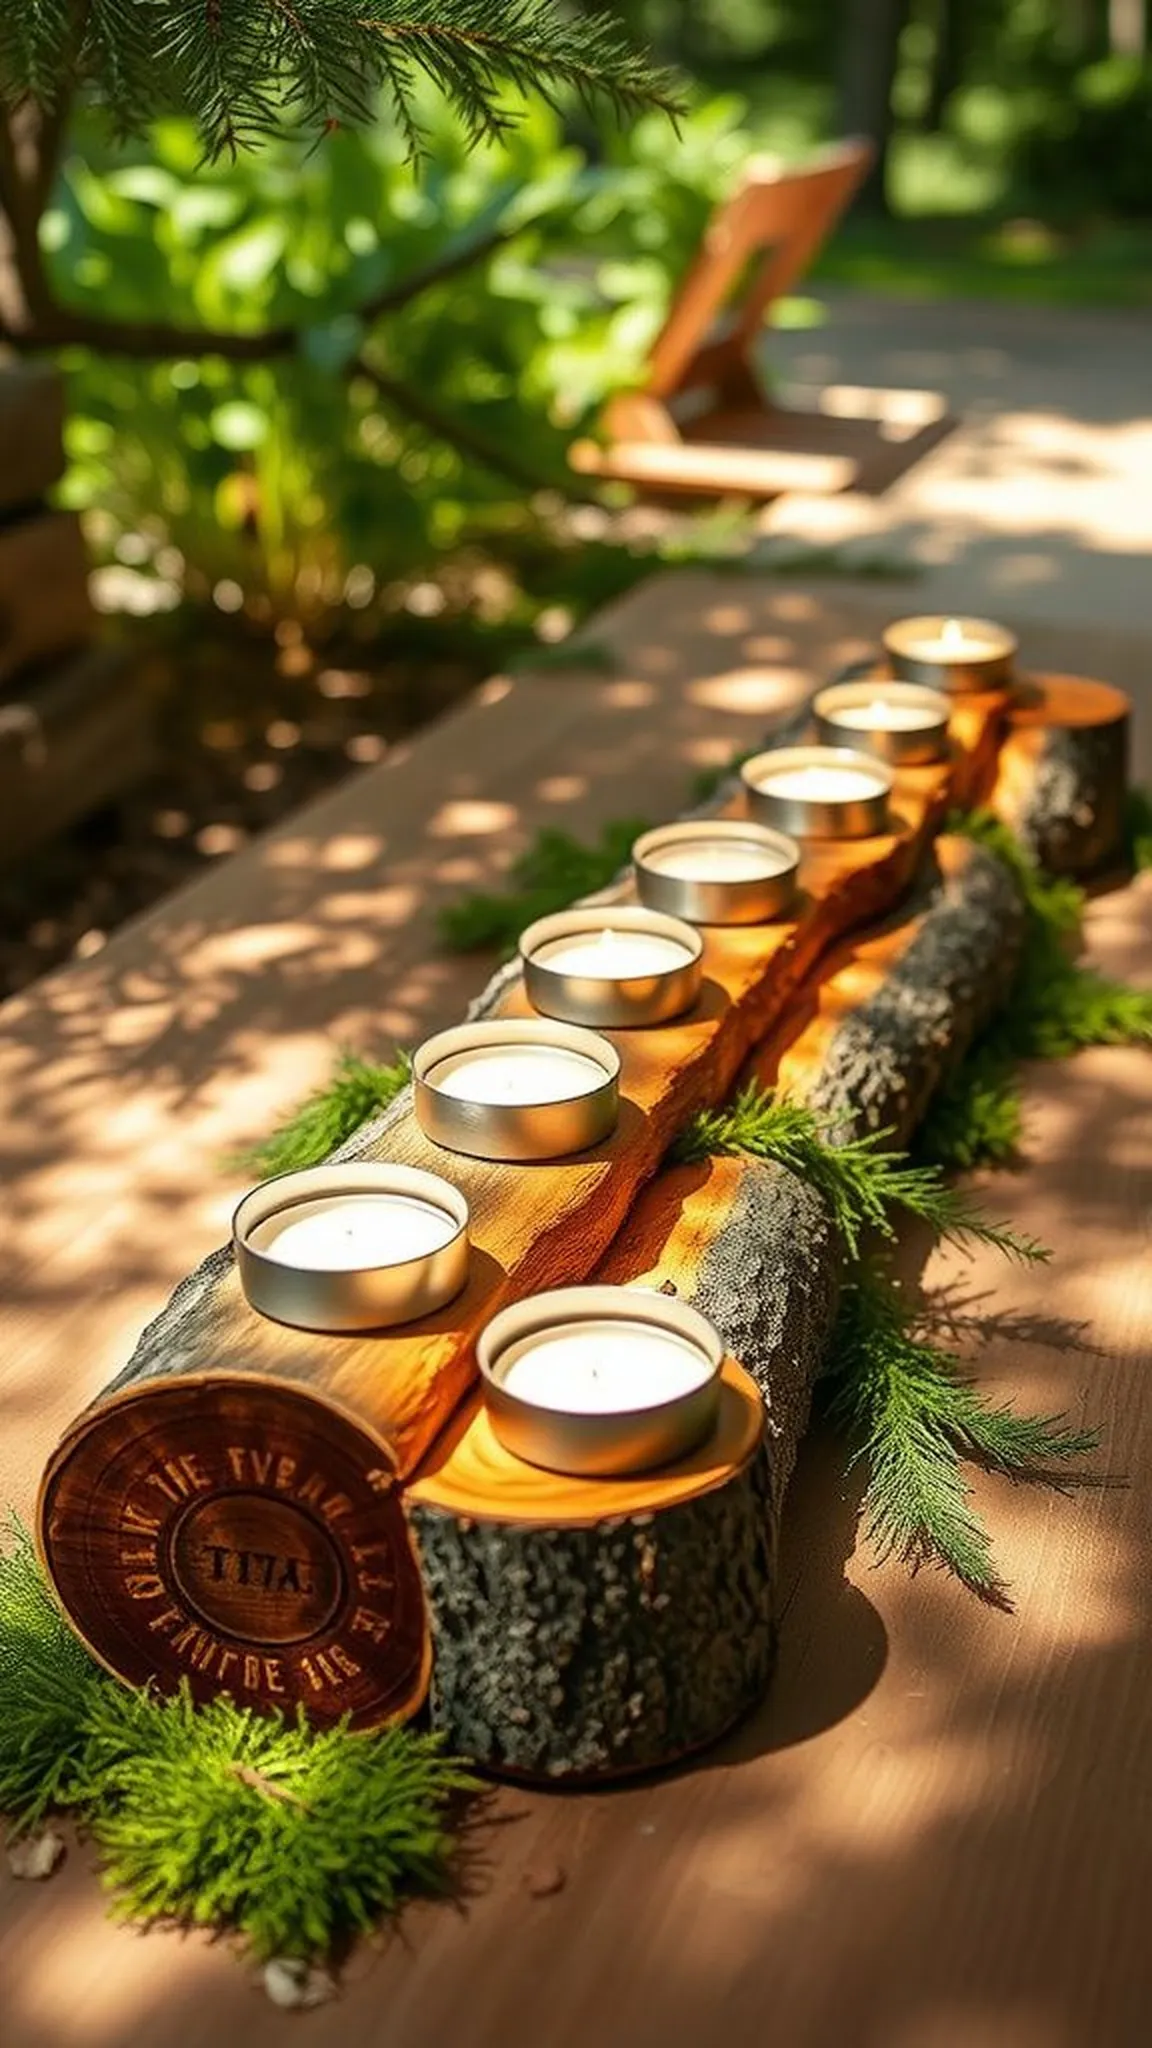
A length of hollowed log becomes a rustic, low candle trough whose rings and grain show a lived-in history. Warm wax pools sit within natural cavities, and the scent of sap and earth layers beneath the gentle flame.
Placed atop stumps or picnic benches, the log display feels rooted and grounded, harmonizing with leafy canopies and the scent of damp moss. Flickering light skims along the bark, revealing its rough texture and subtle color bands.
The arrangement conveys a forest table aesthetic that feels quiet and ancestral, inviting hushed conversation under low branches. Tiny chips of bark and wood dust nearby give a tactile, handcrafted finish to the scene.
Pro Tip: Select well-dried wood and coat inner cavities with a heat-resistant insert to protect the log and extend the display’s lifespan outdoors.
How to Make This
- Choose a dry log and bore out a shallow channel using a spade bit or carving tools, leaving a sturdy rim and base.
- Line the carved cavity with a thin metal or ceramic insert to protect the wood from direct heat and to catch molten wax.
- Pour wax and set wicks into the insert, allowing the warm surfaces and bark texture to frame the candle pools.
Avoid: Using green or damp wood can cause warping, cracking, and excess smoke when exposed to heat. Skimping on a protective insert risks charring the log and shortening its usable life.
Try Also: Create a long runner with several shallow cavities to hold multiple small candles, or pair logs of varying diameters for layered height and visual interest. Add small sprigs of evergreen or dried moss along the rim for seasonal touch.
Products & Materials
Items Used
- Dry hardwood log
- Metal candle insert trays
- Candle wax and wicks
“Rustic hollowed log candles that bring woodland charm to outdoor tables.”
Terracotta pot candles with rustic glaze touches
⏱️ 1-2 hours · 🟠 Intermediate
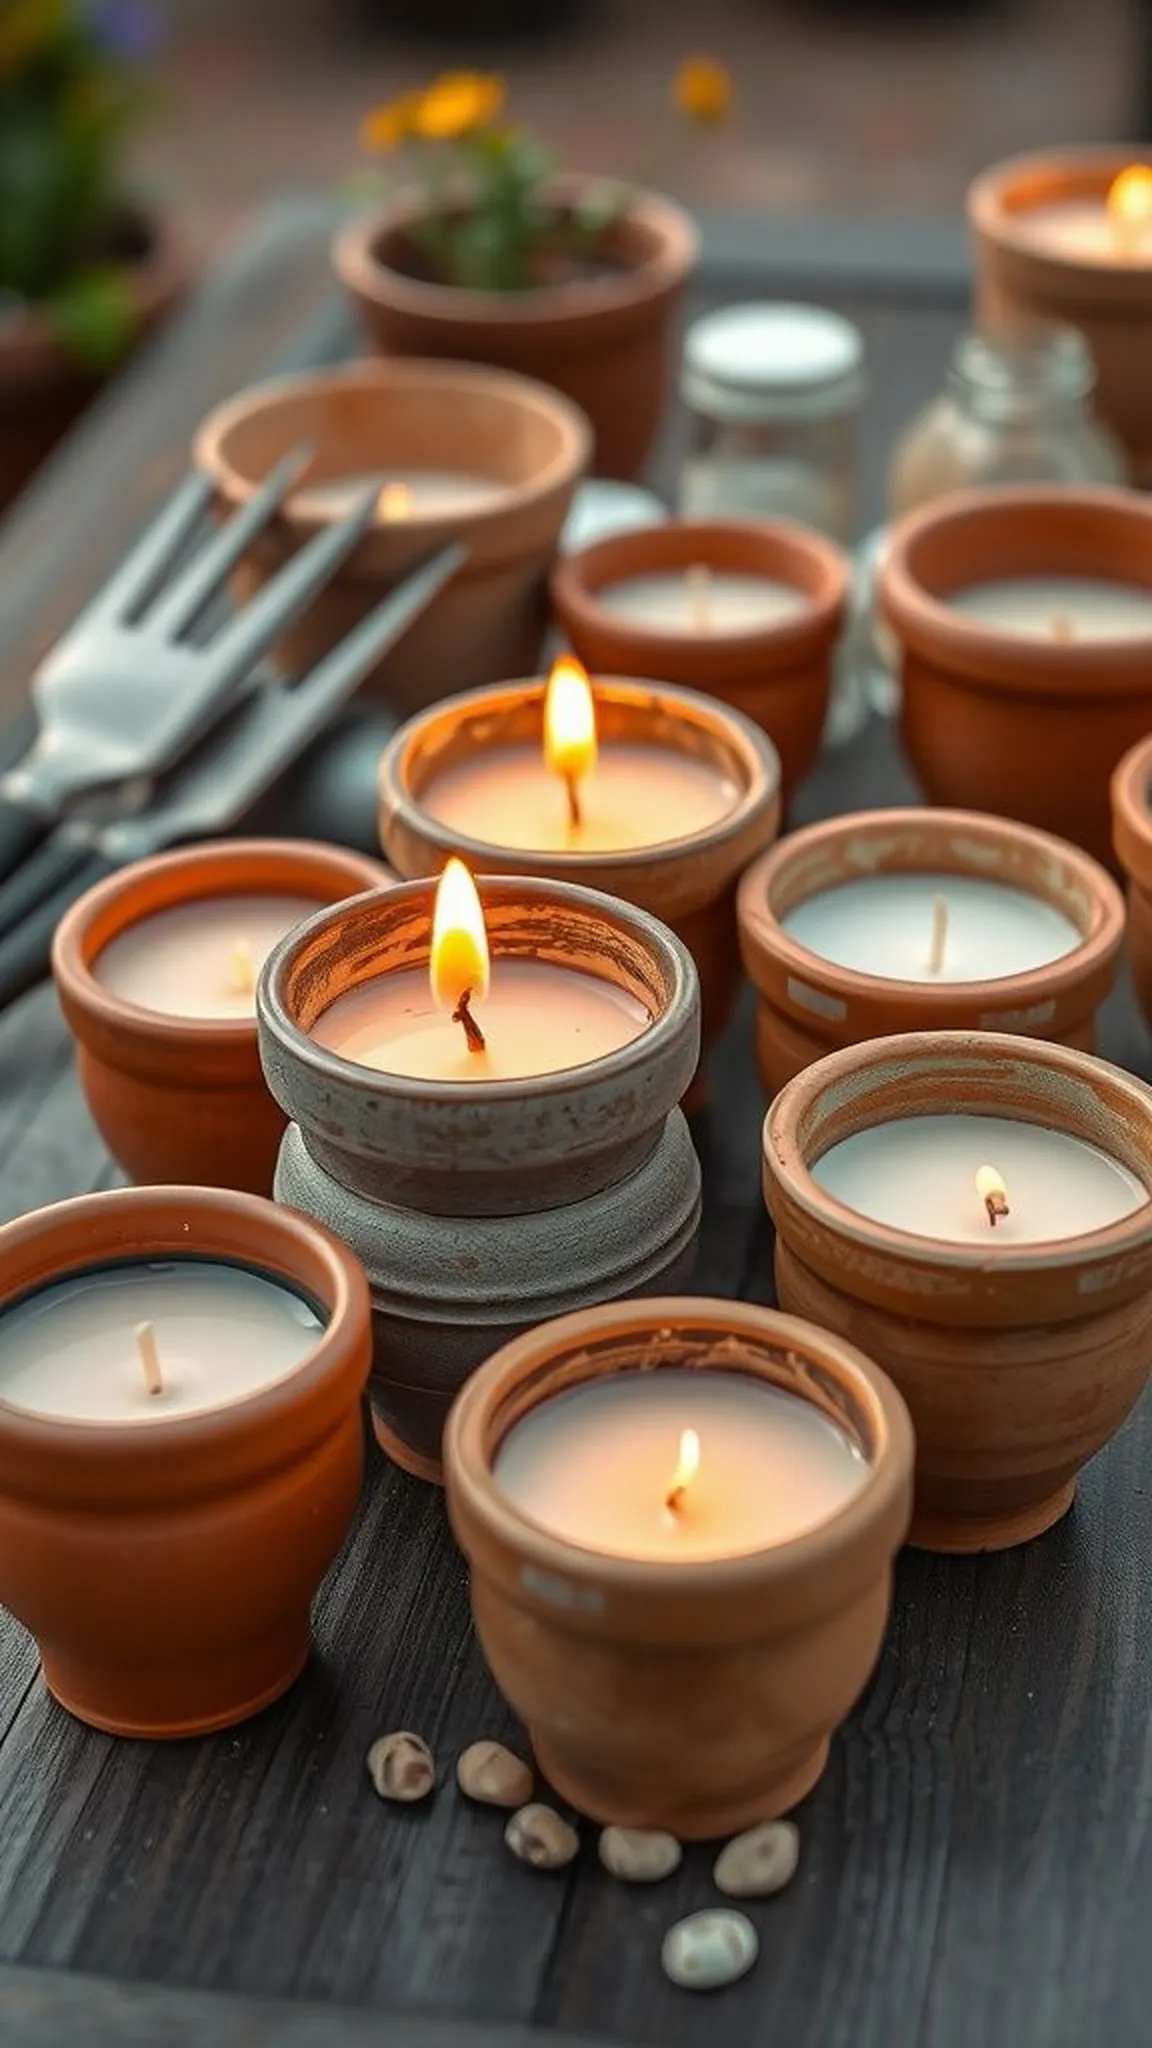
Small terracotta pots filled with warm wax show orange-brown rims that darken slightly near the flame, adding tactile color contrast. Glazed spots and kiln scuffs add a lived-in richness while the clay radiates gentle heat into the air.
Arranged on garden tables or steps, the pots look like tiny, earthen beacons that echo classic Mediterranean courtyards. The scent of heated clay mingles faintly with floral or citrus candle notes, creating layered sensory appeal.
Each pot bears small imperfections that contribute to its charm, from pinhole textures to subtle color variations. When several rest together, they form a pleasing, cottage-like cluster that feels handcrafted and approachable.
Pro Tip: Seal terracotta interiors with a thin layer of food-safe silicone or a metal insert before filling with hot wax to prevent absorption and cracking.
How to Make This
- Coat the interior of each terracotta pot with a thin, heat-resistant sealant or insert a small metal container to protect the clay.
- Anchor a centered wick and pour warmed wax into the prepared pot, leaving slight gap beneath the rim for heat expansion.
- Allow pots to cool undisturbed, then label or group them on trays for easy outdoor placement and movement.
Avoid: Pouring very hot wax into unsealed terracotta leads to rapid absorption and potential cracking. Overfilling pots too close to the rim increases risk of wax spilling when exposed to heat outdoors.
Try Also: Try painting the pot exteriors with chalky outdoor paint for a pastel garden look, or embed small pebbles around the wick for a textured rim. Use deeper pots for taller candle profiles when a stronger presence is desired.
Products & Materials
Items Used
“Earthy terracotta pot candles with warm, rustic personality.”
Ice luminaries for crisp winter evenings
⏱️ 2-3 hours · 🔴 Advanced
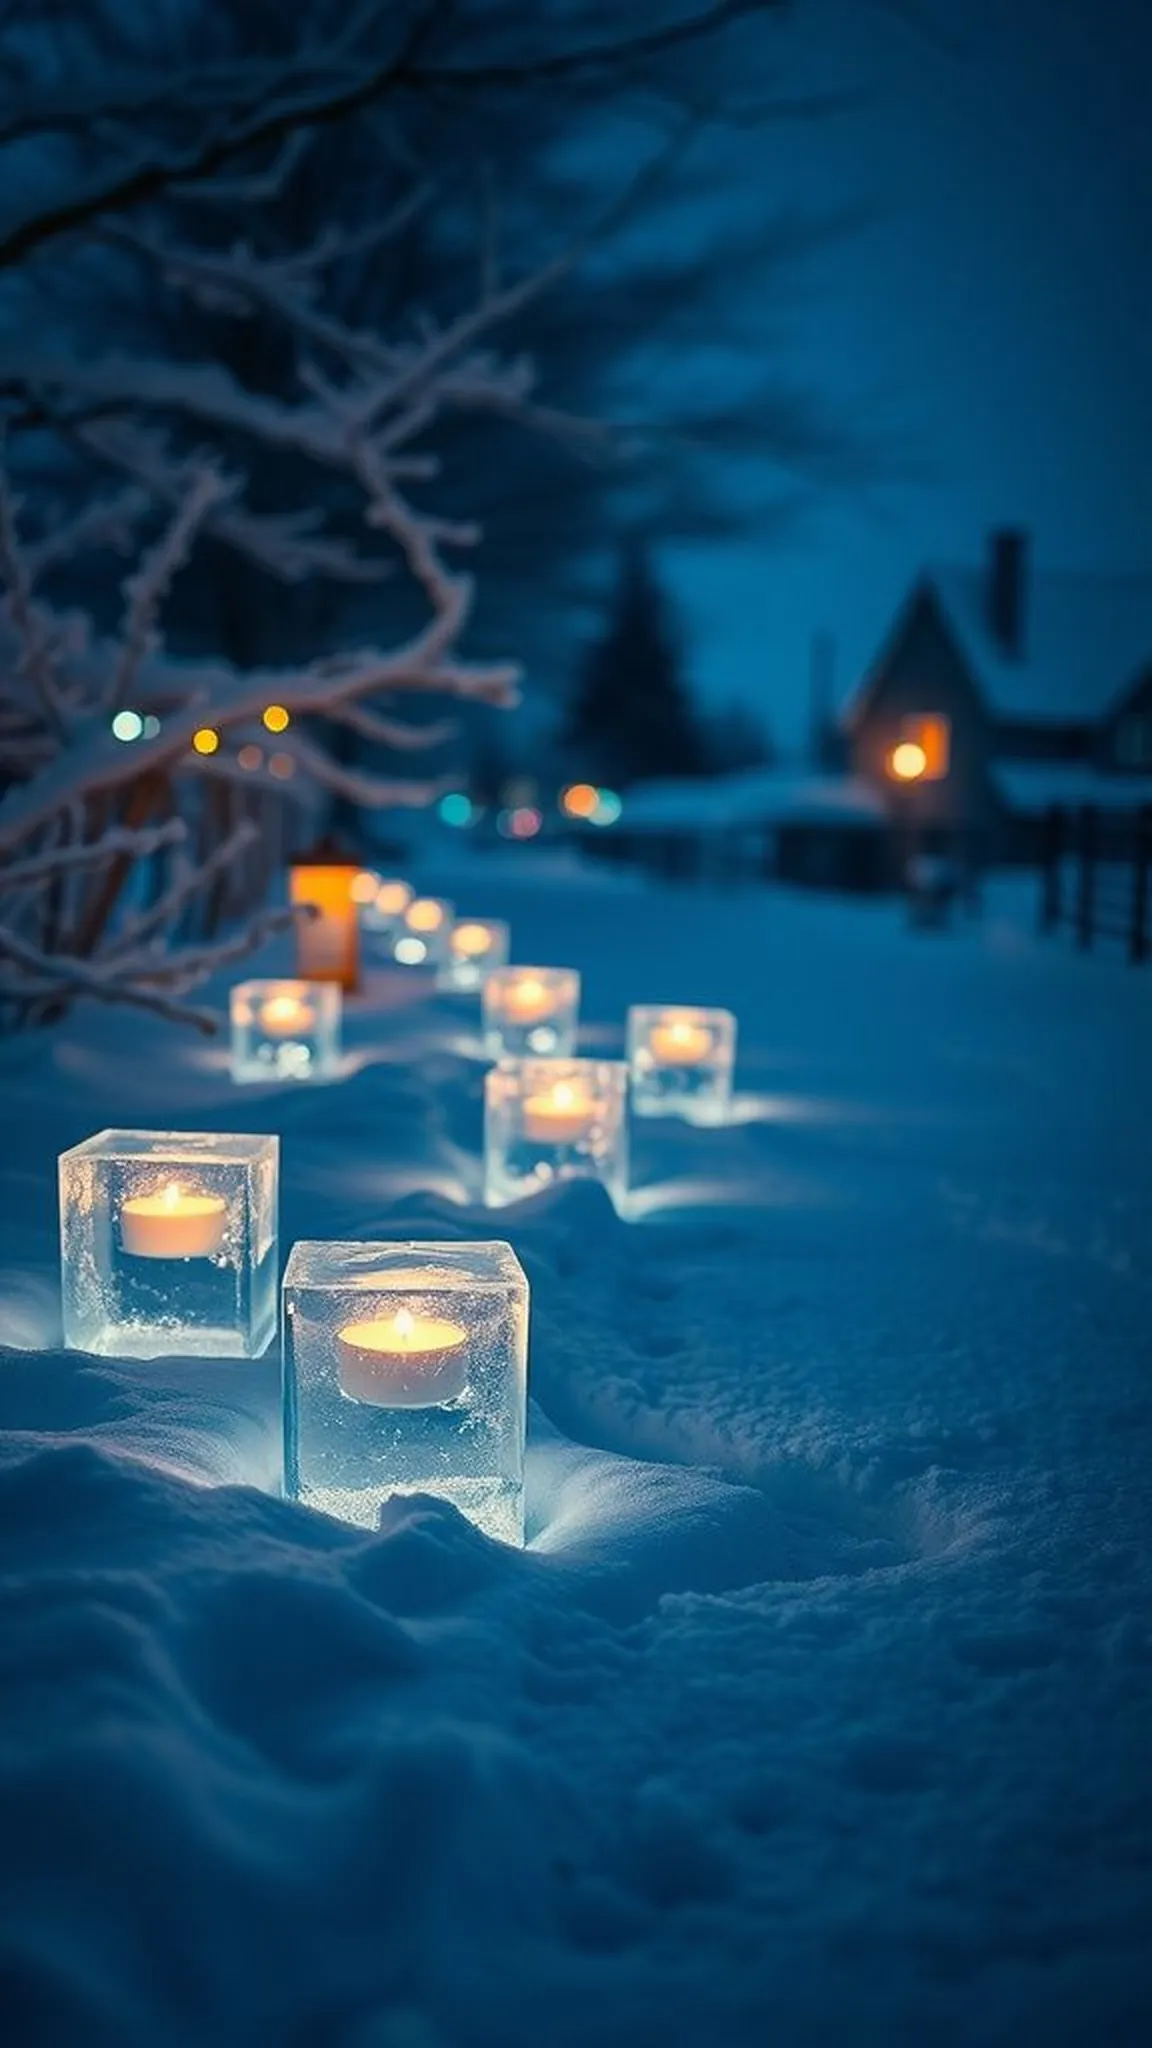
Translucent ice shells encase tealights, throwing crystal halos across snow and frosty lawns in a clear, chilly glow. The icy walls refract flame into prismatic shards, and each luminary clicks faintly as it warms and breathes under the flame.
Set along walkways, the luminaries feel ephemeral yet sculptural, offering a cold, pristine light that dances in short-lived brilliance. The air tastes of frost with each inhale, underscoring the contrast between warm flame and hard, cold ice.
Textures range from glassy smoothness to bubbly, clouded pockets that catch light unpredictably, making every piece singular. When sun rises, the scene softens into beads of melting water that glint like tiny jewels.
Pro Tip: Freeze slowly in clear molds to reduce cloudiness and store luminaries in a cool place until ready to display for best clarity.
How to Make This
- Fill a sturdy plastic or metal mold with water and freeze until solid, removing excess air bubbles for clearer ice.
- Carve or cut a shallow cavity into the frozen block to seat a small tealight securely without exposing flame to heavy wind.
- Place luminaries on a snow bed or cold surface outdoors, lighting them only in calm conditions and monitoring as they slowly melt.
Avoid: Rapid freezing traps many air bubbles, yielding cloudy, fragile ice that cracks easily. Lighting luminaries in windy conditions causes quick melting and potential safety hazards.
Try Also: Embed small evergreen sprigs or berries in the ice for color, or tint water slightly with food-safe dye for colored effects. Use larger molds for taller lanterns or stack smaller luminaries for a tiered look.
Products & Materials
Items Used
- Large plastic molds for ice
- Tealight candles
- Freezer space or chest freezer
“Crystal-clear ice luminaries for magical winter walkways.”
Beach glass embedded pillar candles
⏱️ 1-2 hours · 🟠 Intermediate
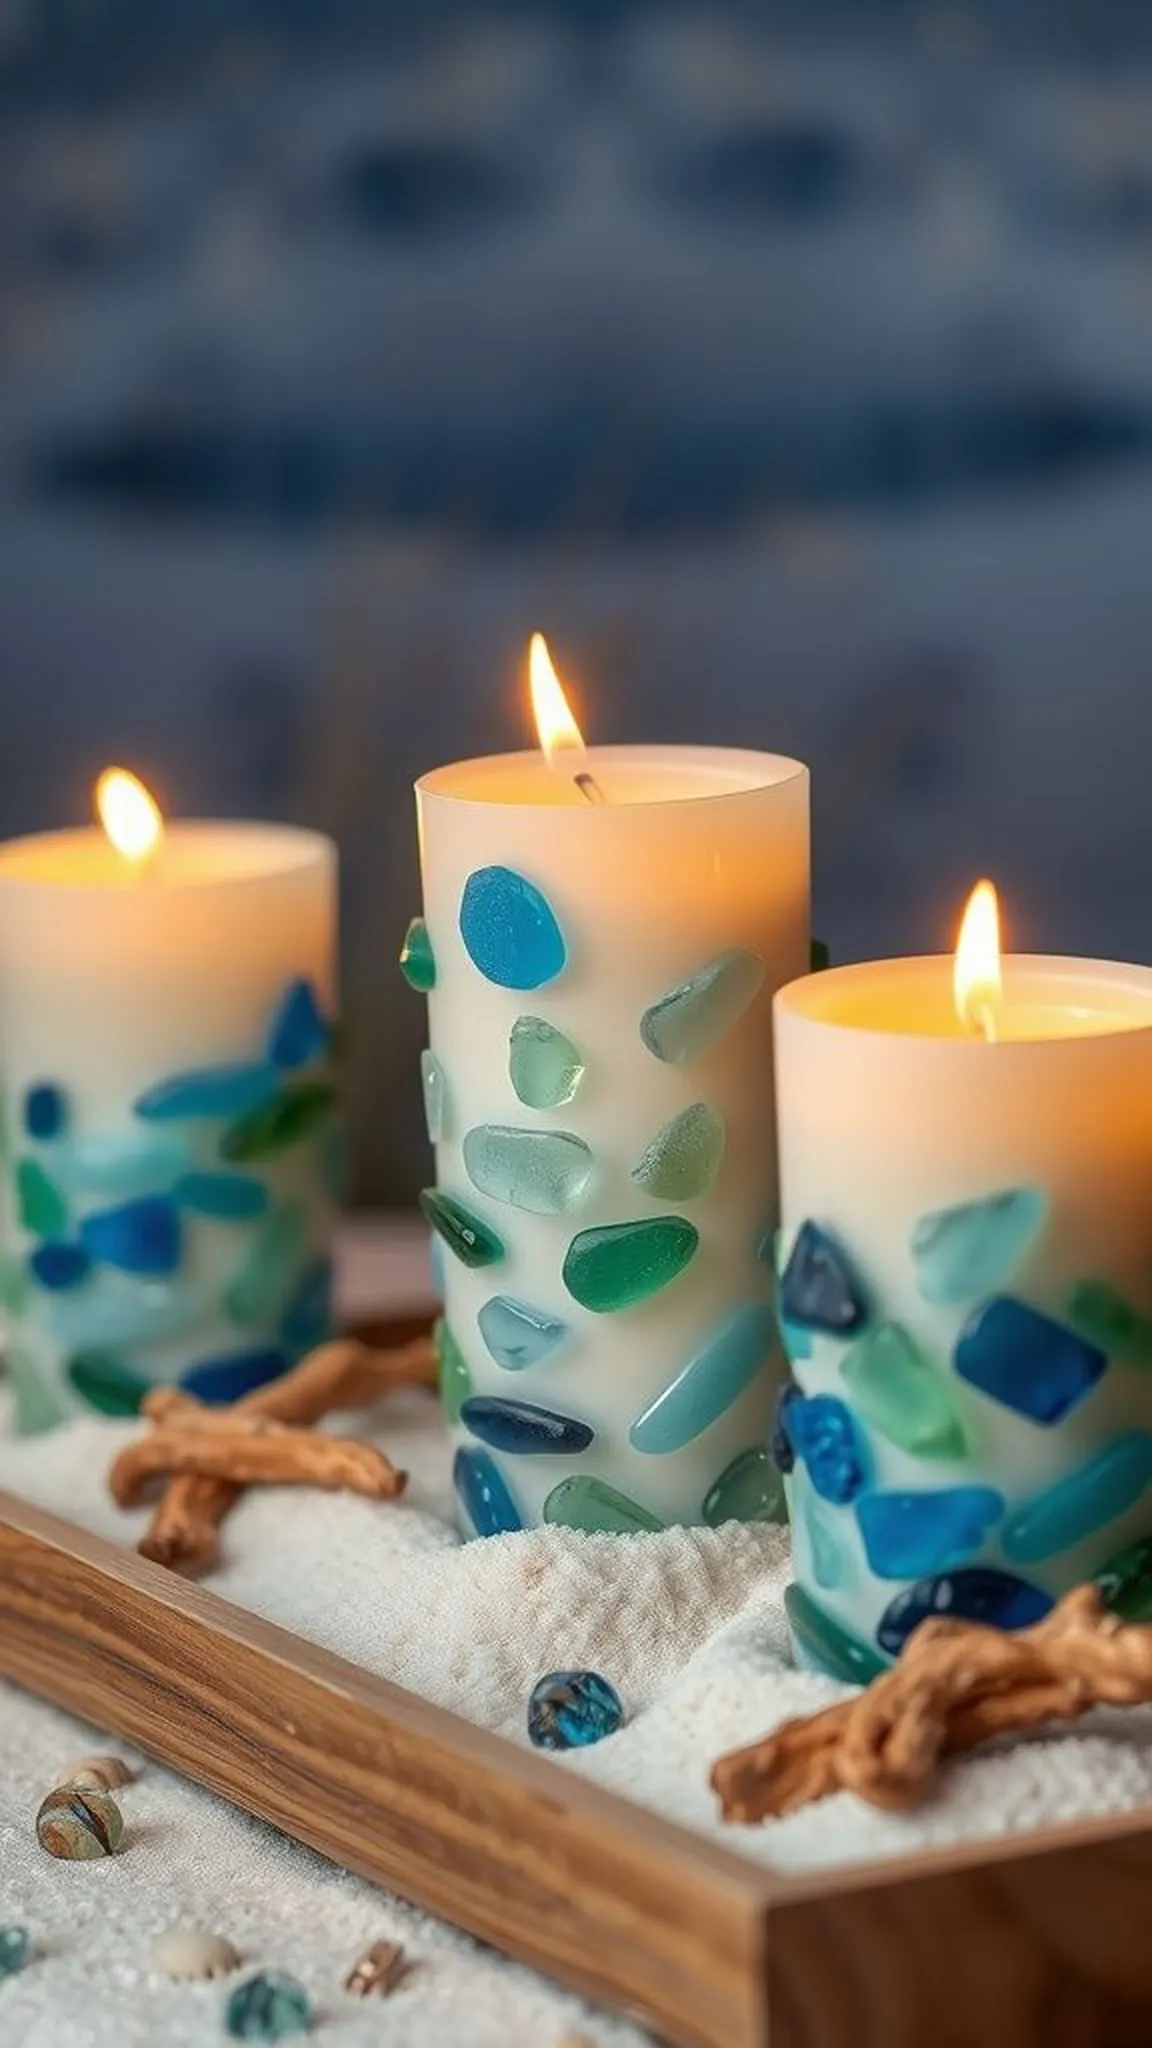
Pillar candles studded with tumbled beach glass show muted jewel tones that catch light beneath a smooth wax surface. Each shard sits like a polished gem, scattering little color flashes as the flame moves.
When clustered on low trays or sand-filled dishes the decorated pillars read like coastal stones warmed by lantern light. The glass gives tactile contrast to creamy wax and complements driftwood accents and sea-scented breezes.
Edges are softened and embedded shallowly so that the surface remains pleasingly smooth but textured where shards peek through. The overall look is both handcrafted and quietly elegant, evoking shoreline memories.
Pro Tip: Press beach glass into slightly cooled wax for secure embedding and to prevent glass pieces from shifting as the candle firms.
How to Make This
- Melt wax and pour a small initial layer into a pillar mold to form a sticky base.
- Arrange beach glass pieces on the tacky surface, then pour additional wax slowly to encapsulate the gems without displacing them.
- Allow the pillar to cool fully before unmolding and trimming the wick for an even burn.
Avoid: Adding glass to very hot, fluid wax causes pieces to drift and clump rather than stay where intended. Pressing shards too deep can expose sharp edges when the candle burns down.
Try Also: Use sea-toned glass in gradients for an ombré effect or mix in small shells and sand near the base for a stronger beach motif. Make thinner pillar sizes for groupings and taller pillars for central focus.
Products & Materials
Items Used
- Pillar candle molds
- Tumbled beach glass
- Candle wax flakes
- Pre-tabbed wicks
“Coastal pillar candles embedded with shimmering beach glass.”
Citronella rope-wrapped pillar candles for patios
⏱️ 30 min · 🟢 Beginner
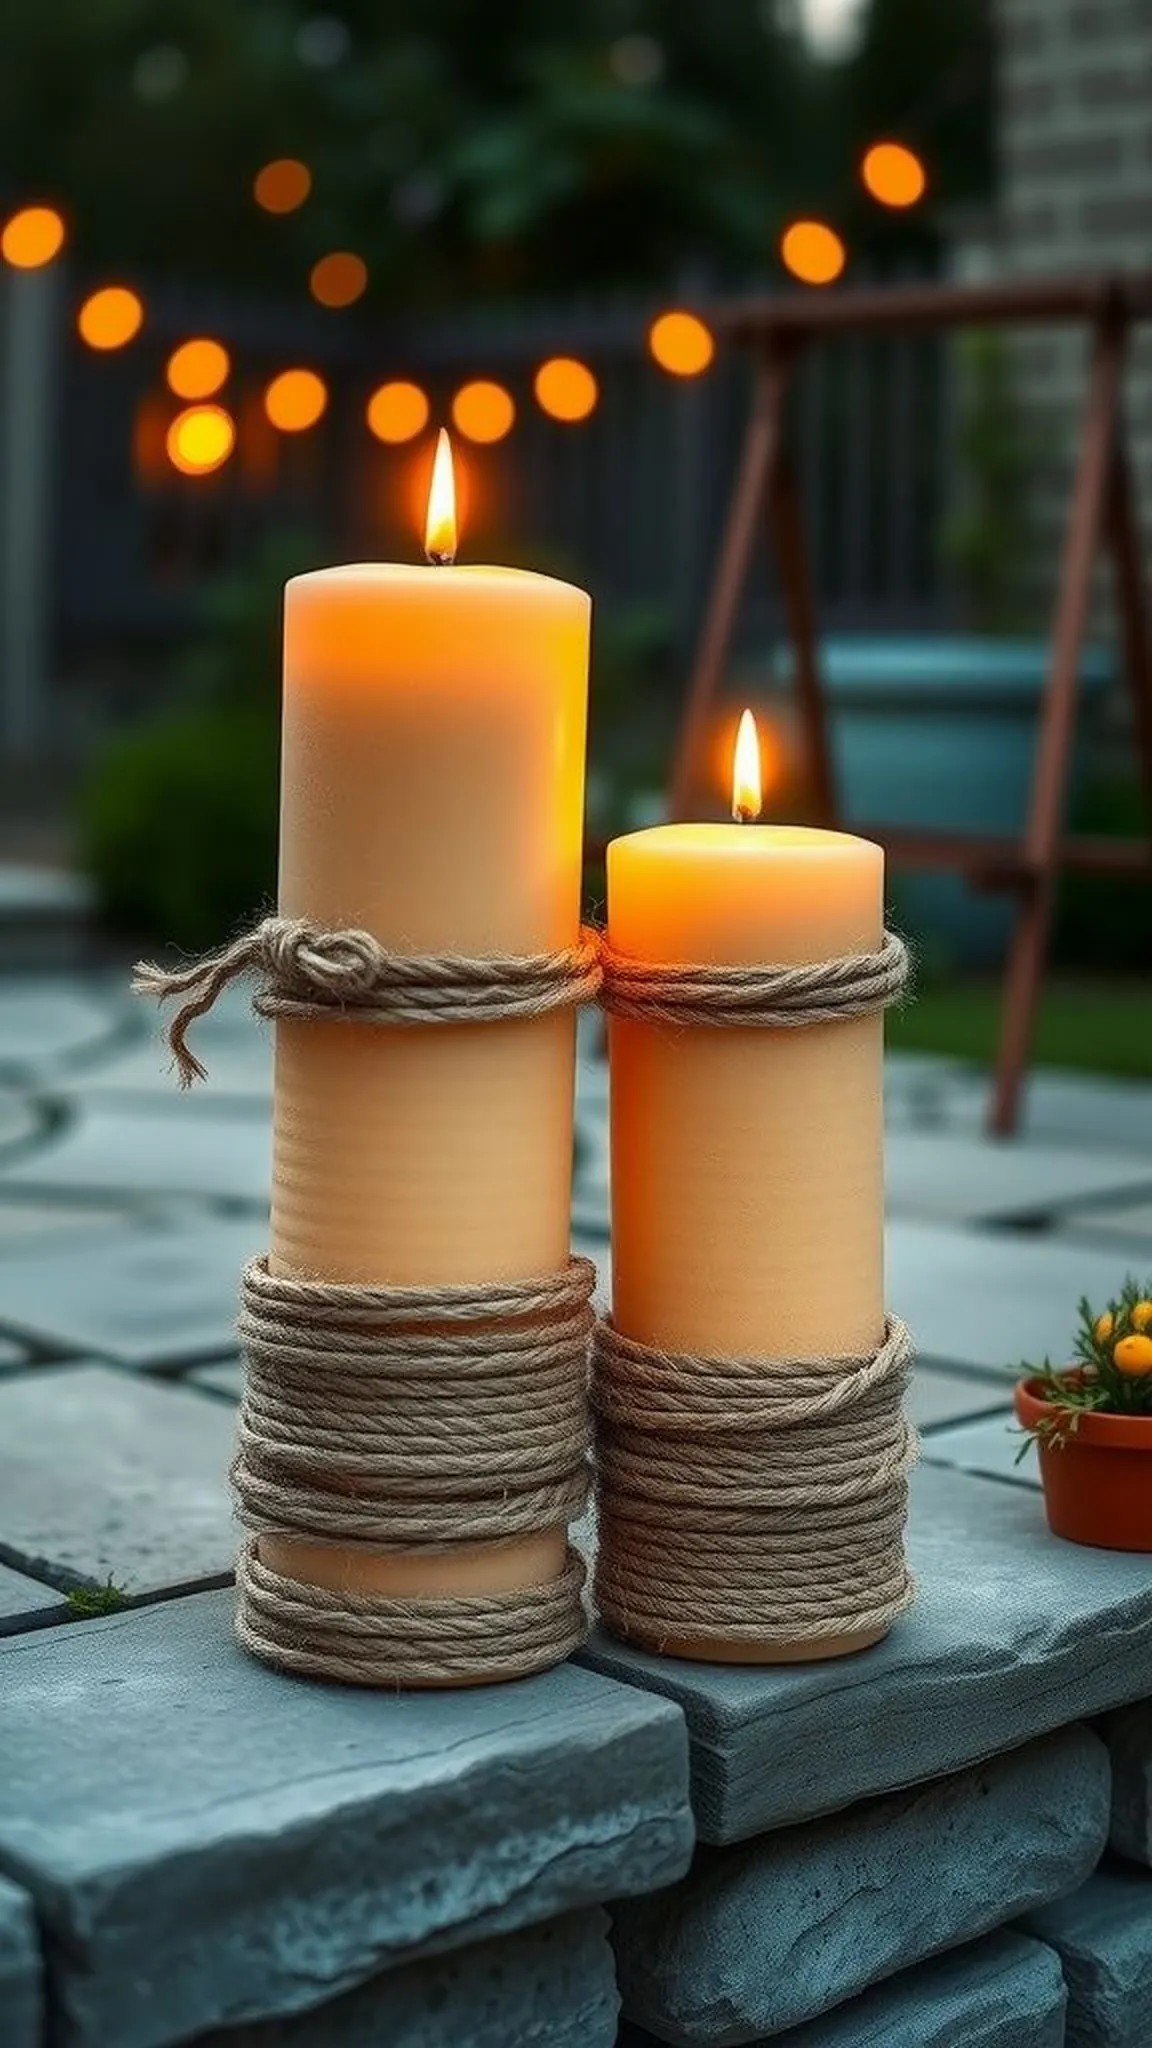
Tall pillar candles wrapped in coarse rope exude a nautical, textured presence while releasing citronella fragrance when warmed. The rope fibers darken slightly near the base, picking up soft shadow and heat in tactile contrast to smooth wax.
Grouped on a stone hearth or wide step they read as both practical and decorative, offering steady light framed by fibrous halos. The scent drifts outward in a broad sweep that harmonizes with herb gardens and evening breezes.
Knotted ends and frayed rope tips add a casual, lived-in detail that suits relaxed gatherings. The overall silhouette is bold yet approachable, perfect next to lanterns or potted herbs.
Pro Tip: Choose natural fiber rope and secure it loosely so air flows between the fibers, reducing risk of scorching and allowing scent to disperse evenly.
How to Make This
- Wrap a length of natural jute rope around the pillar candle, leaving an even gap between coils for air circulation.
- Anchor rope ends with a small dab of heat-resistant adhesive or tuck them beneath the final coil for a neat finish.
- Place the wrapped candle on a nonflammable tray and light in a calm outdoor area to test burn behavior.
Avoid: Wrapping rope too tightly restricts airflow and can cause excessive heat buildup and scorching. Using synthetic rope materials can melt or release odors when exposed to flame.
Try Also: Combine rope-wrapped pillars with small shells or metal charms tucked into the coils for a seaside motif, or dye the rope lightly for a muted color contrast. Use shorter ropes for tea-light wraps on small votives.
Products & Materials
Items Used
- Large pillar candles
- Natural jute rope
- Heat-resistant adhesive
“Nautical rope-wrapped citronella pillars for relaxed patios.”
Solar candle lanterns for low-maintenance glow
⏱️ 15 min · 🟢 Beginner

Solar-powered candle lanterns mimic the look of flame with gentle LED flicker, perfect for nights when open flame is less convenient. The small solar panel glints in daylight while the lanterns quietly recharge for evening illumination.
Placed along raised beds and balcony railings, they provide consistent soft light without tending or fuel refills, blending technology with candlelike aesthetics. Surfaces show simulated wax texture and warm color that reads pleasantly from a distance.
The overall effect keeps the mood relaxed and safe, with automatic dusk activation for carefree evenings. Rows of them create a steady pathway of light without the need for windproofing or fuel storage.
Pro Tip: Position solar lanterns in direct daylight for several hours to ensure full charge and maximum runtime after dusk.
How to Make This
- Unpack solar candle lanterns and charge them in direct sunlight for a full day before first use.
- Place lanterns on flat surfaces or hang them where they will receive daily sun exposure and avoid shaded corners.
- Enable the dusk-to-dawn setting if available so the LED flicker activates automatically each evening.
Avoid: Placing solar lanterns in shaded locations results in short run times and weak light. Relying solely on intermittent light sources like narrow balconies often leads to inconsistent charging.
Try Also: Choose warm-white LED flicker options to mimic real flame more closely, or pair solar lanterns with real candles for mixed lighting effects. Select lanterns with adjustable brightness for different moods.
Products & Materials
Items Used
- Solar LED candle lanterns
- Hanging shepherd hooks
“Carefree solar candle lanterns for consistent outdoor ambiance.”
