
As an Amazon Associate I earn from qualifying purchases.
Cute Tin Can Upcycle Crafts bring ordinary kitchen tins back to life with sweet, playful designs and useful personality. These projects turn recycled tins into tiny planters, cozy lanterns, and tidy desk caddies with soft finishes and handcrafted details.
Tin can upcycle ideas highlight simple materials and everyday textures to create charming décor and storage. Upcycled tin cans can be dressed with paint, fabric, twine, or punched patterns to fit many moods and rooms.
Each idea focuses on approachable charm rather than complex tools, so a few minutes can translate into a cheerful object. Cute tin can upcycle crafts are perfect for gifting, tabletop styling, or adding small bursts of color around the house.
Painted herb planter with chalk label panels
⏱️ 45 min · 🟢 Beginner
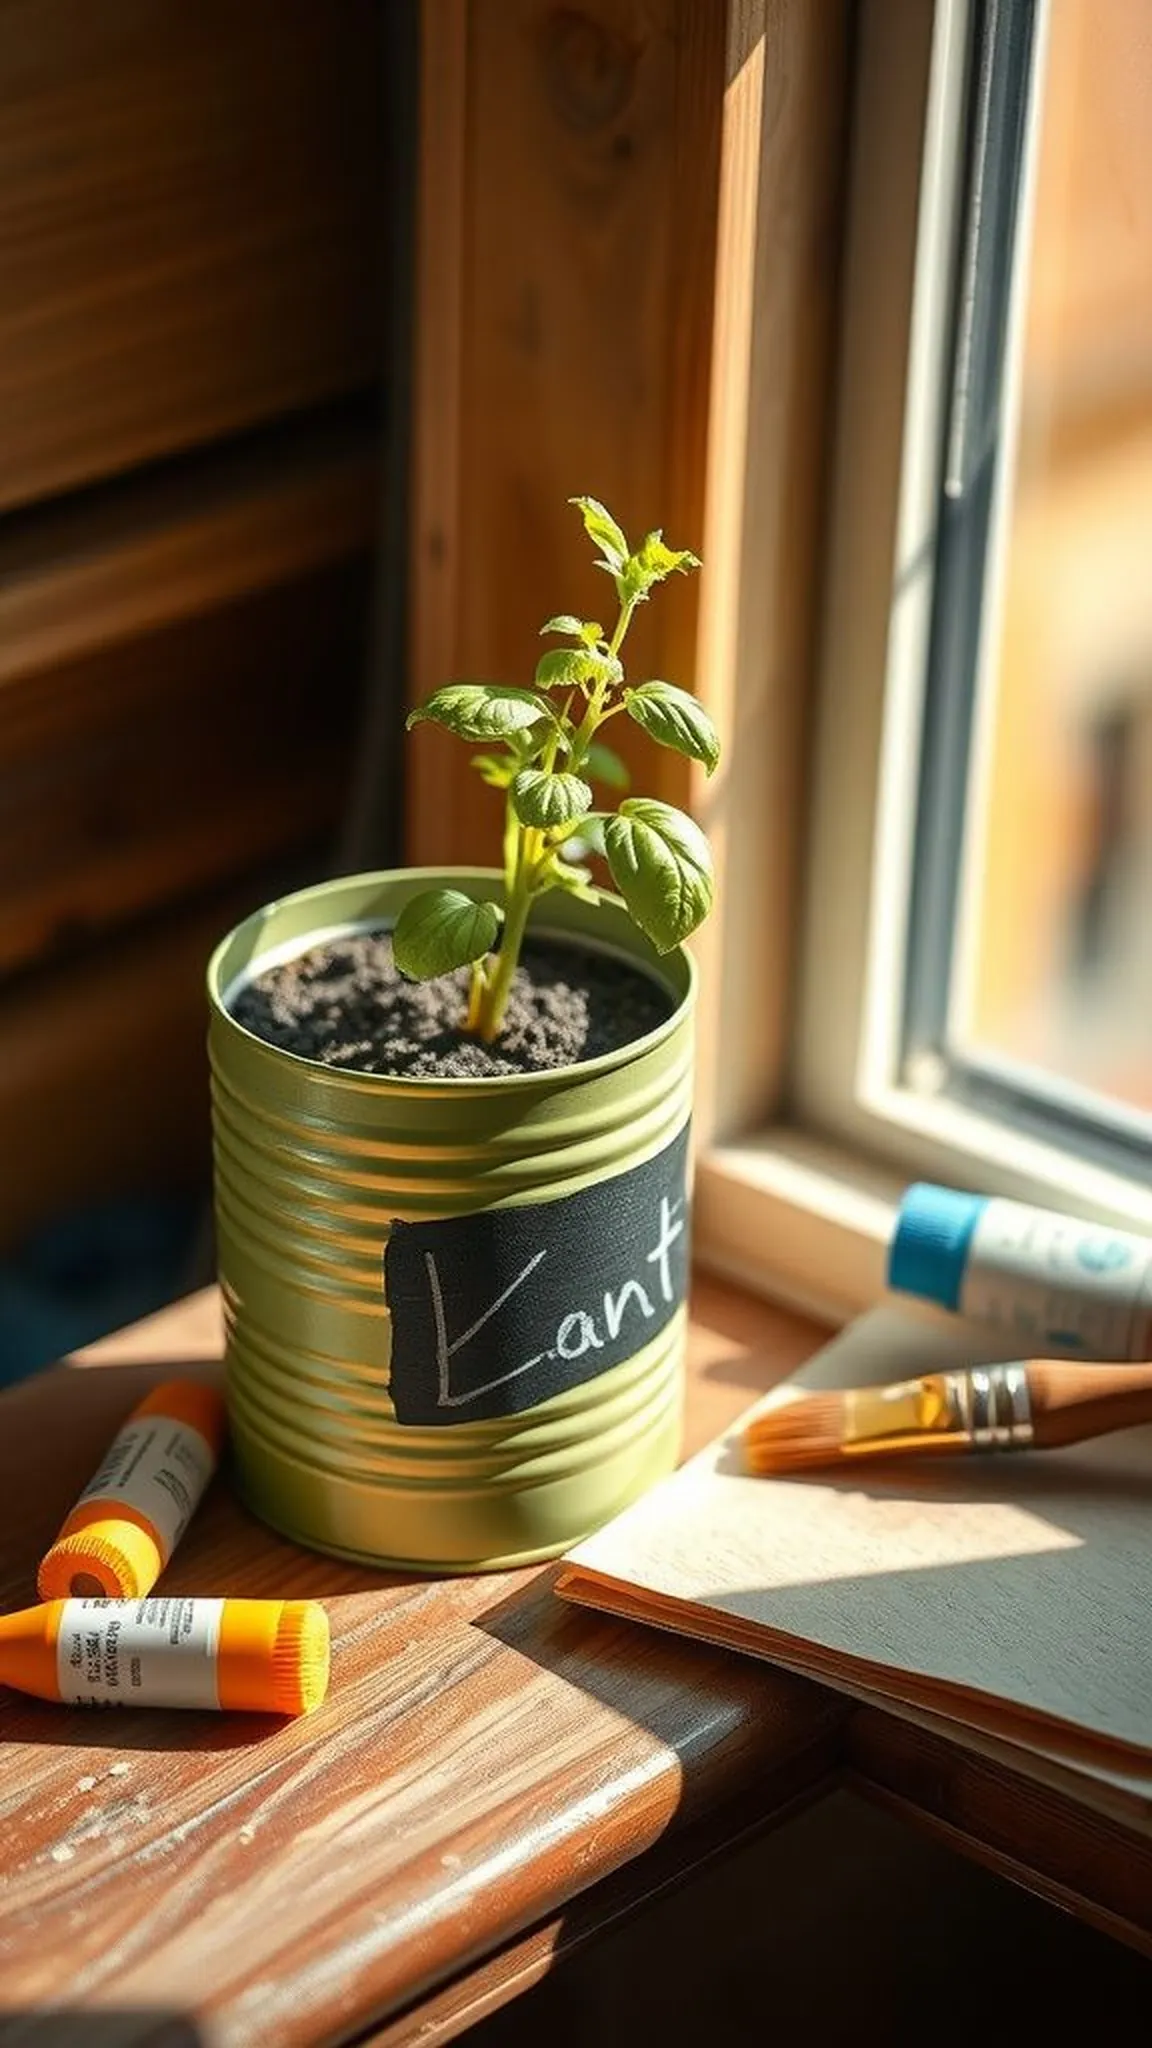
A painted herb planter turns an empty tin into a small green pocket of life with homey appeal. Matte paint skins the metal with soft color while chalkboard panels add a velvety writable surface for plant names.
The scent of potting soil and sweet basil blends with faint metallic echoes when the tin is handled. Sunlight picks out tiny brush strokes and the chalk rectangle provides a tactile contrast to the leaf edges.
The finished piece sits on a sunny sill, edged with damp soil and tiny roots peeking out. It feels friendly and tidy, a cute tin can upcycle that livens a kitchen corner gently and quietly.
Pro Tip: Lightly roughen the can’s exterior before painting to improve paint grip and prevent early flaking and peeling.
How to Make This
- Remove any label adhesive and wash the tin thoroughly, then let it dry completely.
- Sand the outside lightly to create a surface the paint can adhere to evenly.
- Brush on two thin coats of acrylic paint, allowing surface drying between applications.
- Apply a rectangle of chalkboard paint for a label area and fill with potting soil and an herb.
Avoid: A frequent beginner mistake is painting over greasy residue, which causes peeling and poor adhesion. Thorough cleaning and drying help the finish last through watering and handling.
Try Also: Swap chalk panels for kraft tags tied with twine or go ombré by blending two soft paint shades for a subtle gradient. Tiny ceramic plant stakes or hand-lettered paper tags offer alternative labeling looks.
Products & Materials
Items Used
- empty cleaned tin can
- acrylic craft paint
- chalkboard paint
- fine grit sandpaper
- small herb plant
“Chalk-labeled painted tin herb planter for sunny windowsill charm”
Punched hole fairy lantern with warm glow
⏱️ 30 min · 🟢 Beginner
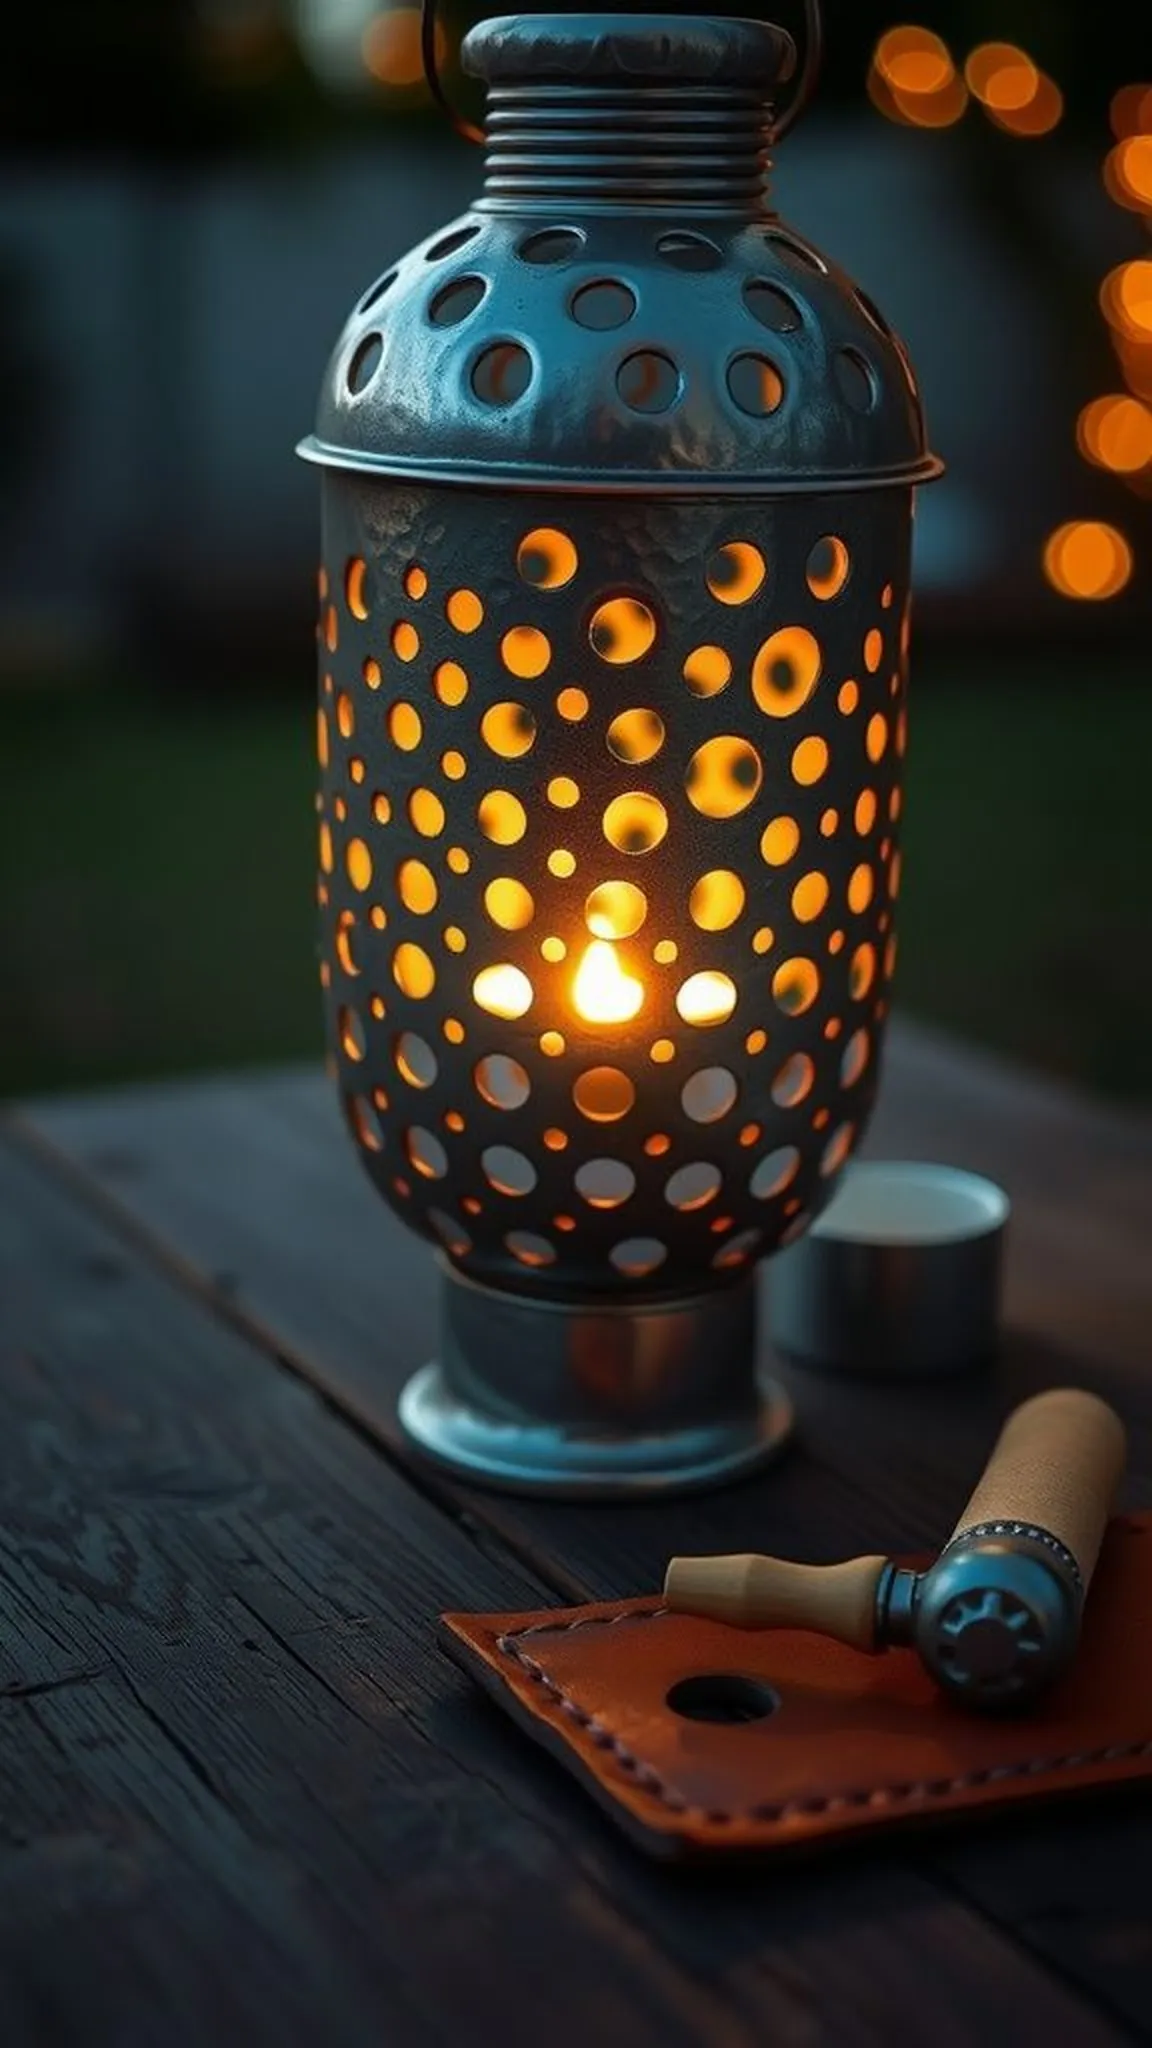
A punched hole lantern captures light like a handful of tiny stars in a reclaimed tin. Small perforations create patterns that scatter a warm candlelike glow and cast dancing shadows across tabletops.
The metal edges hum faintly when handled and the interior holds a warm reflective sheen that amplifies soft light. A gentle finger run over the hammered dots reveals their tactile rhythm and the warmth of the flame contrasts with cool metal.
This little lantern feels intimate when used on a porch or shelf, offering cozy pools of light for evening chats. It reads like a handcrafted constellation, a sweet tin can upcycle that invites quiet moments.
Pro Tip: Use a sturdy leather pad under the can while punching to protect surfaces and keep holes crisp and even.
How to Make This
- Clean and dry the tin, then layer it on a leather or rubber mat for punching.
- Use a small metal punch or nail with a hammer to create a pattern of holes across the can.
- Nestle a battery tea light or LED candle inside for a safe warm glow.
Avoid: A frequent error is punching too close to the rim, which can warp the can and weaken the pattern. Leaving a stable unpunched band near the top helps maintain structural integrity.
Try Also: Create clustered star patterns for a night-sky effect or scatter random holes for a firefly impression. Painting the exterior with metallic hues adds reflected warmth when lit.
Products & Materials
Items Used
- empty tin can
- metal punch or nail
- battery tea light
- leather pad
“Tiny star-pattern tin lantern that glows like fireflies”
Yarn-wrapped tin cup with colorful textured bands
⏱️ 1 hour · 🟢 Beginner
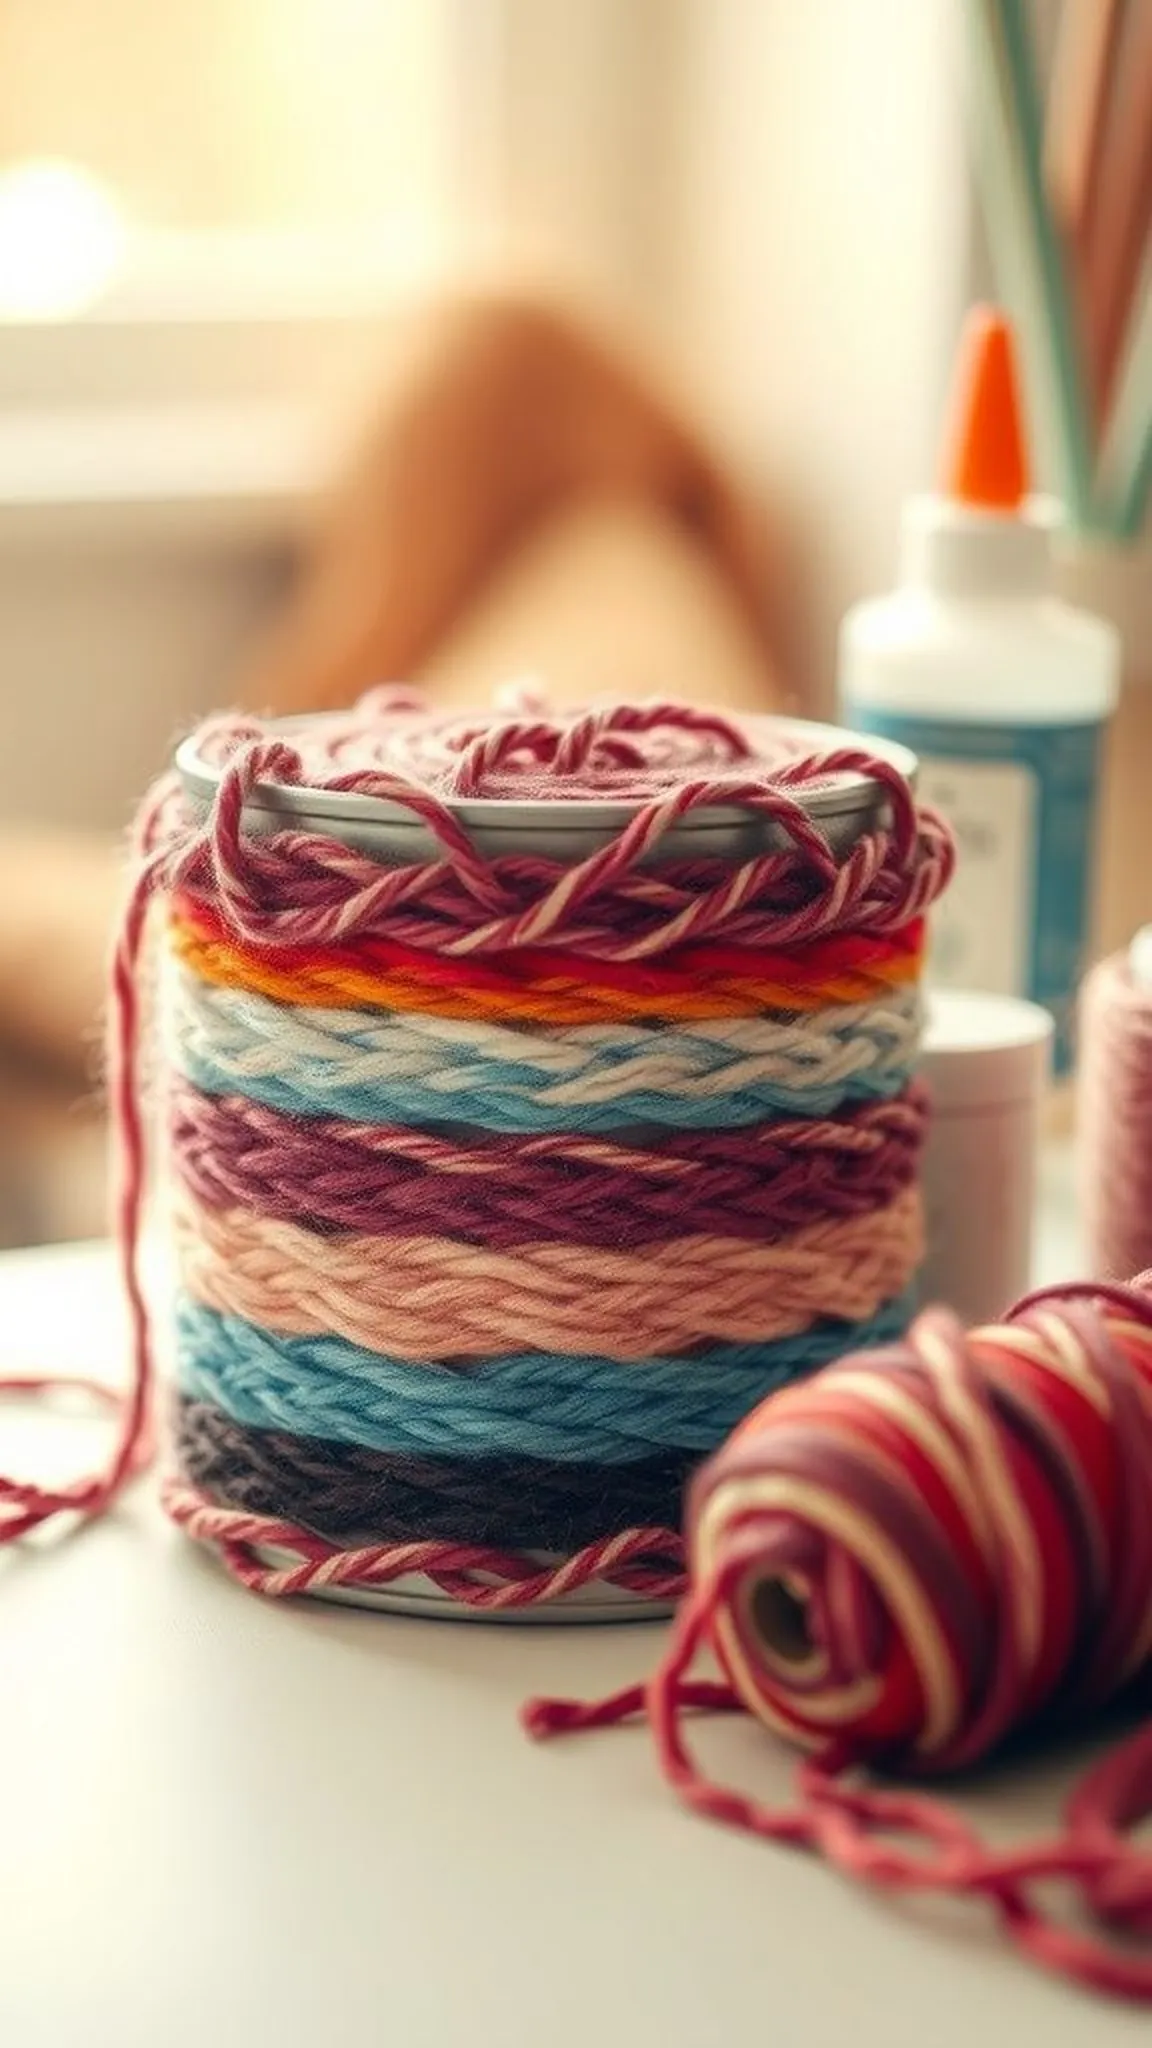
A yarn-wrapped tin cup blooms into a cheerful holder when layers of fiber are wound around its body. The tactile bands add a plush, cozy surface that contrasts with the metal’s cool sheen.
The yarn brings soft color pops and a gentle fuzz under the fingertips, while the exposed rim keeps a hint of industrial edge. Light catches tiny fibers, producing a lived-in, handmade feel that invites tactile attention.
This piece sits well on a craft table or desk, full of pencils, makeup brushes, or floral stems. It reads as a simple upcycle that softens the room with texture and playful hues.
Pro Tip: Start yarn wrapping at the can’s base and maintain even tension to prevent loose loops and visible gaps.
How to Make This
- Clean and dry the tin, then secure an end of yarn to the inside base with strong glue.
- Wrap yarn snugly around the tin, changing colors at chosen intervals and securing ends discreetly.
- Finish by tucking or gluing the final tail inside the rim for a tidy look.
Avoid: A frequent issue is loose wrapping that creates uneven gaps and slippage. Keeping steady tension while winding helps the yarn sit flush and look polished.
Try Also: Try thin metallic yarn for a subtle shimmer or alternate thick and thin yarns for a boho texture mix. Small pom poms glued near the rim add playful accents.
Products & Materials
Items Used
- clean metal tin can
- assorted craft yarn
- clear craft glue
“Cozy yarn-wrapped tin cup with cheerful colored bands”
Save time and printer ink with 50+ printable templates and step-by-step instructions in one ad-free guide.

Just $19.99 — lifetime access
Decoupage floral pencil holder with fabric scraps
⏱️ 1-2 hours · 🟠 Intermediate
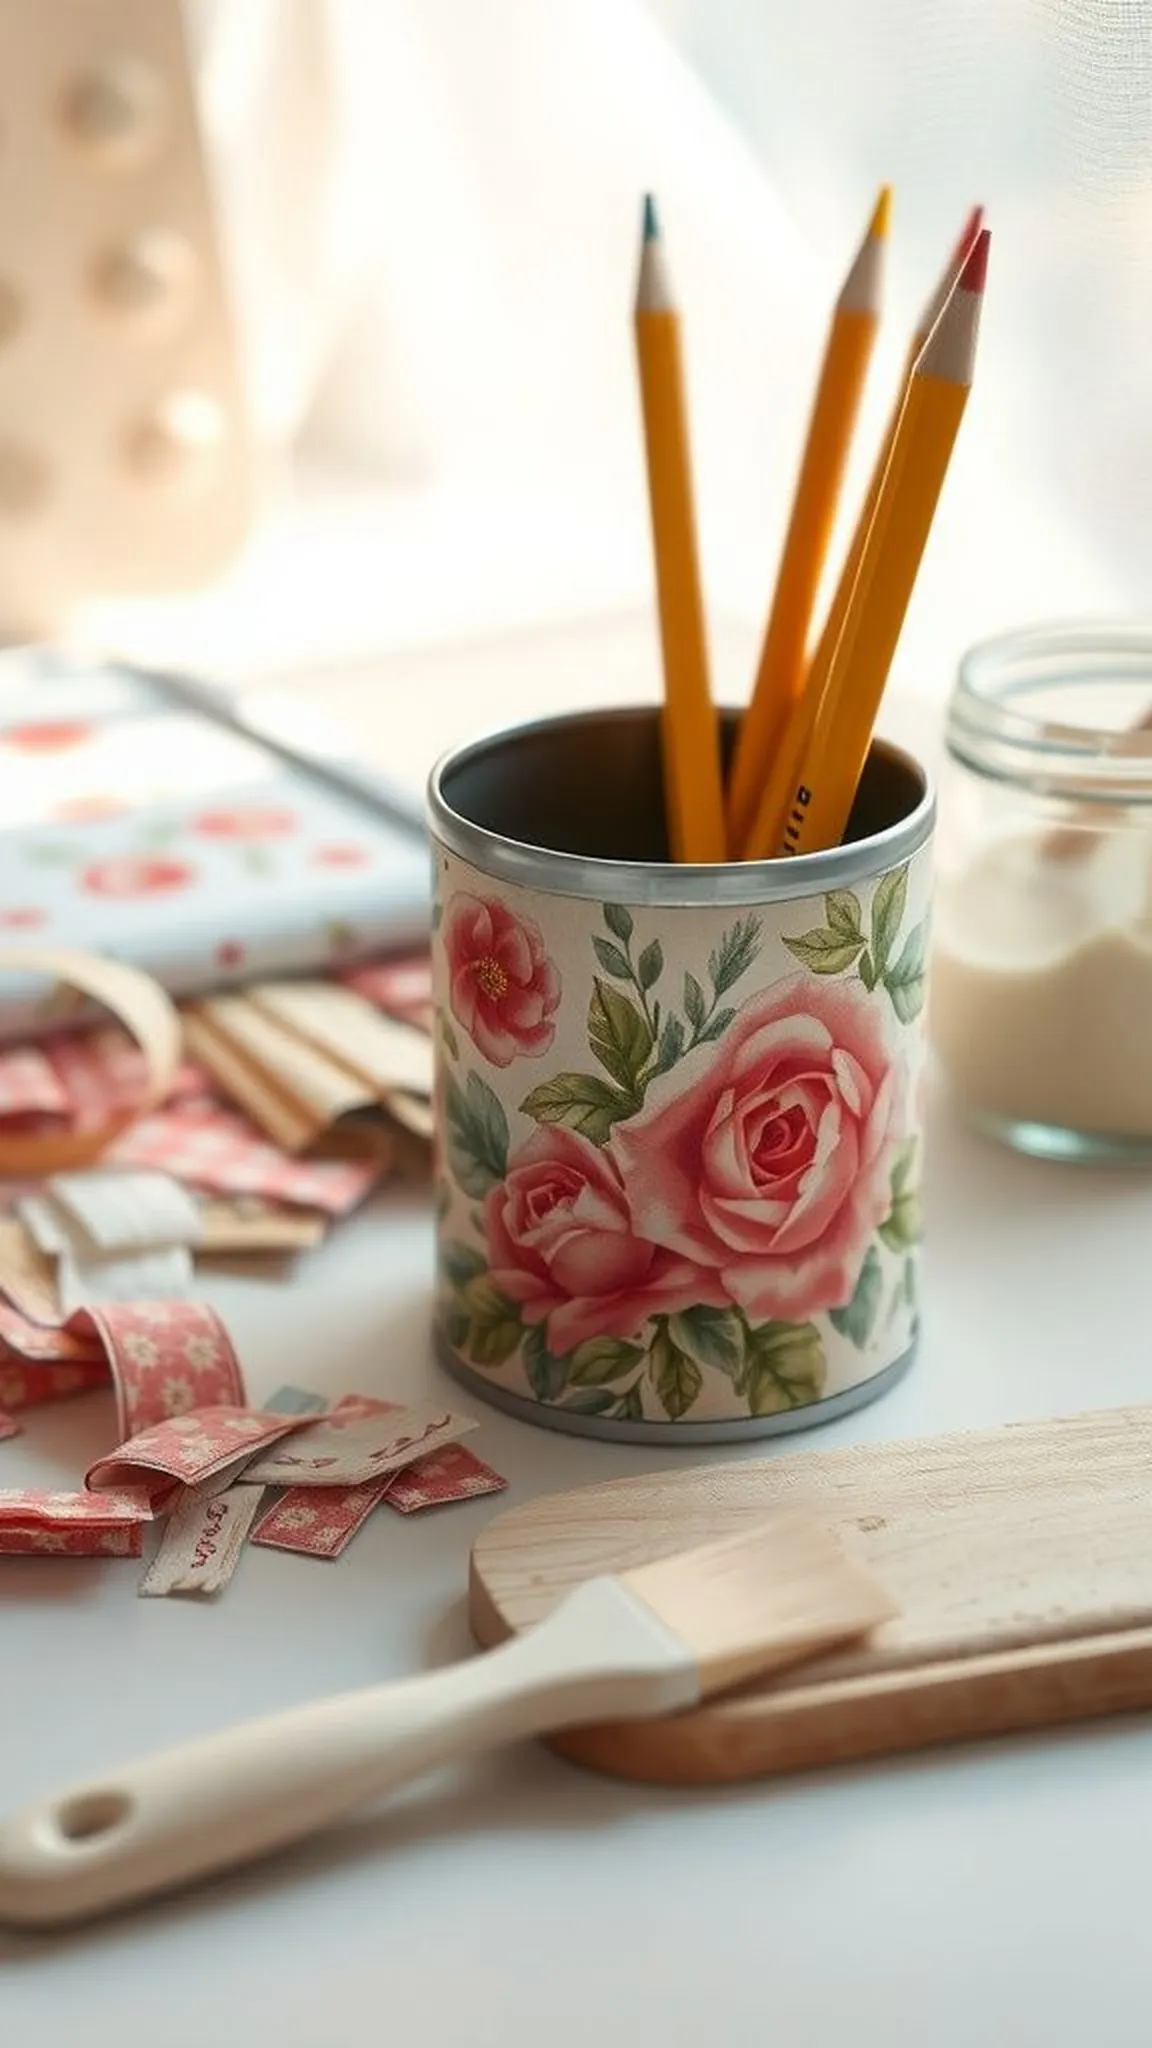
A decoupage floral holder transforms a plain can into a collage of soft patterns and worn edges. Layers of fabric and paper matte down into an image-rich surface that feels like a small vintage find.
The texture carries slight ridges where materials overlap, and light reveals faint seams and glossy varnish highlights. Hands brush across floral petals and inked type, sensing both cloth fibers and smooth sealed finish.
Sitting on a desk it reads as a little curated object, full of color and layered memories. The finished tin is equal parts utility and decorative charm, perfect for pencils, brushes, or small scissors.
Pro Tip: Soak thinner fabric scraps before smoothing to reduce bubbling and create seamless edges under the decoupage medium.
How to Make This
- Trim fabric or paper scraps into desired shapes and arrange them loosely on the clean can surface.
- Apply decoupage medium in thin layers while smoothing each piece to avoid bubbles and wrinkles.
- Seal the entire surface with additional medium or varnish for durability and gentle sheen.
Avoid: A frequent setback is overloading the surface with thick layers that dry cloudy and sticky. Thin, patient layers prevent bubbling and preserve colors.
Try Also: Combine vintage book pages with pressed leaves for a rustic collage or use bright patterned scraps for a modern patchwork effect. Edge with metallic pen accents for subtle shimmer.
Products & Materials
Items Used
“Floral decoupage tin pencil holder with layered fabric charm”
Succulent planter with drainage stones and moss
⏱️ 2-3 hours · 🟠 Intermediate
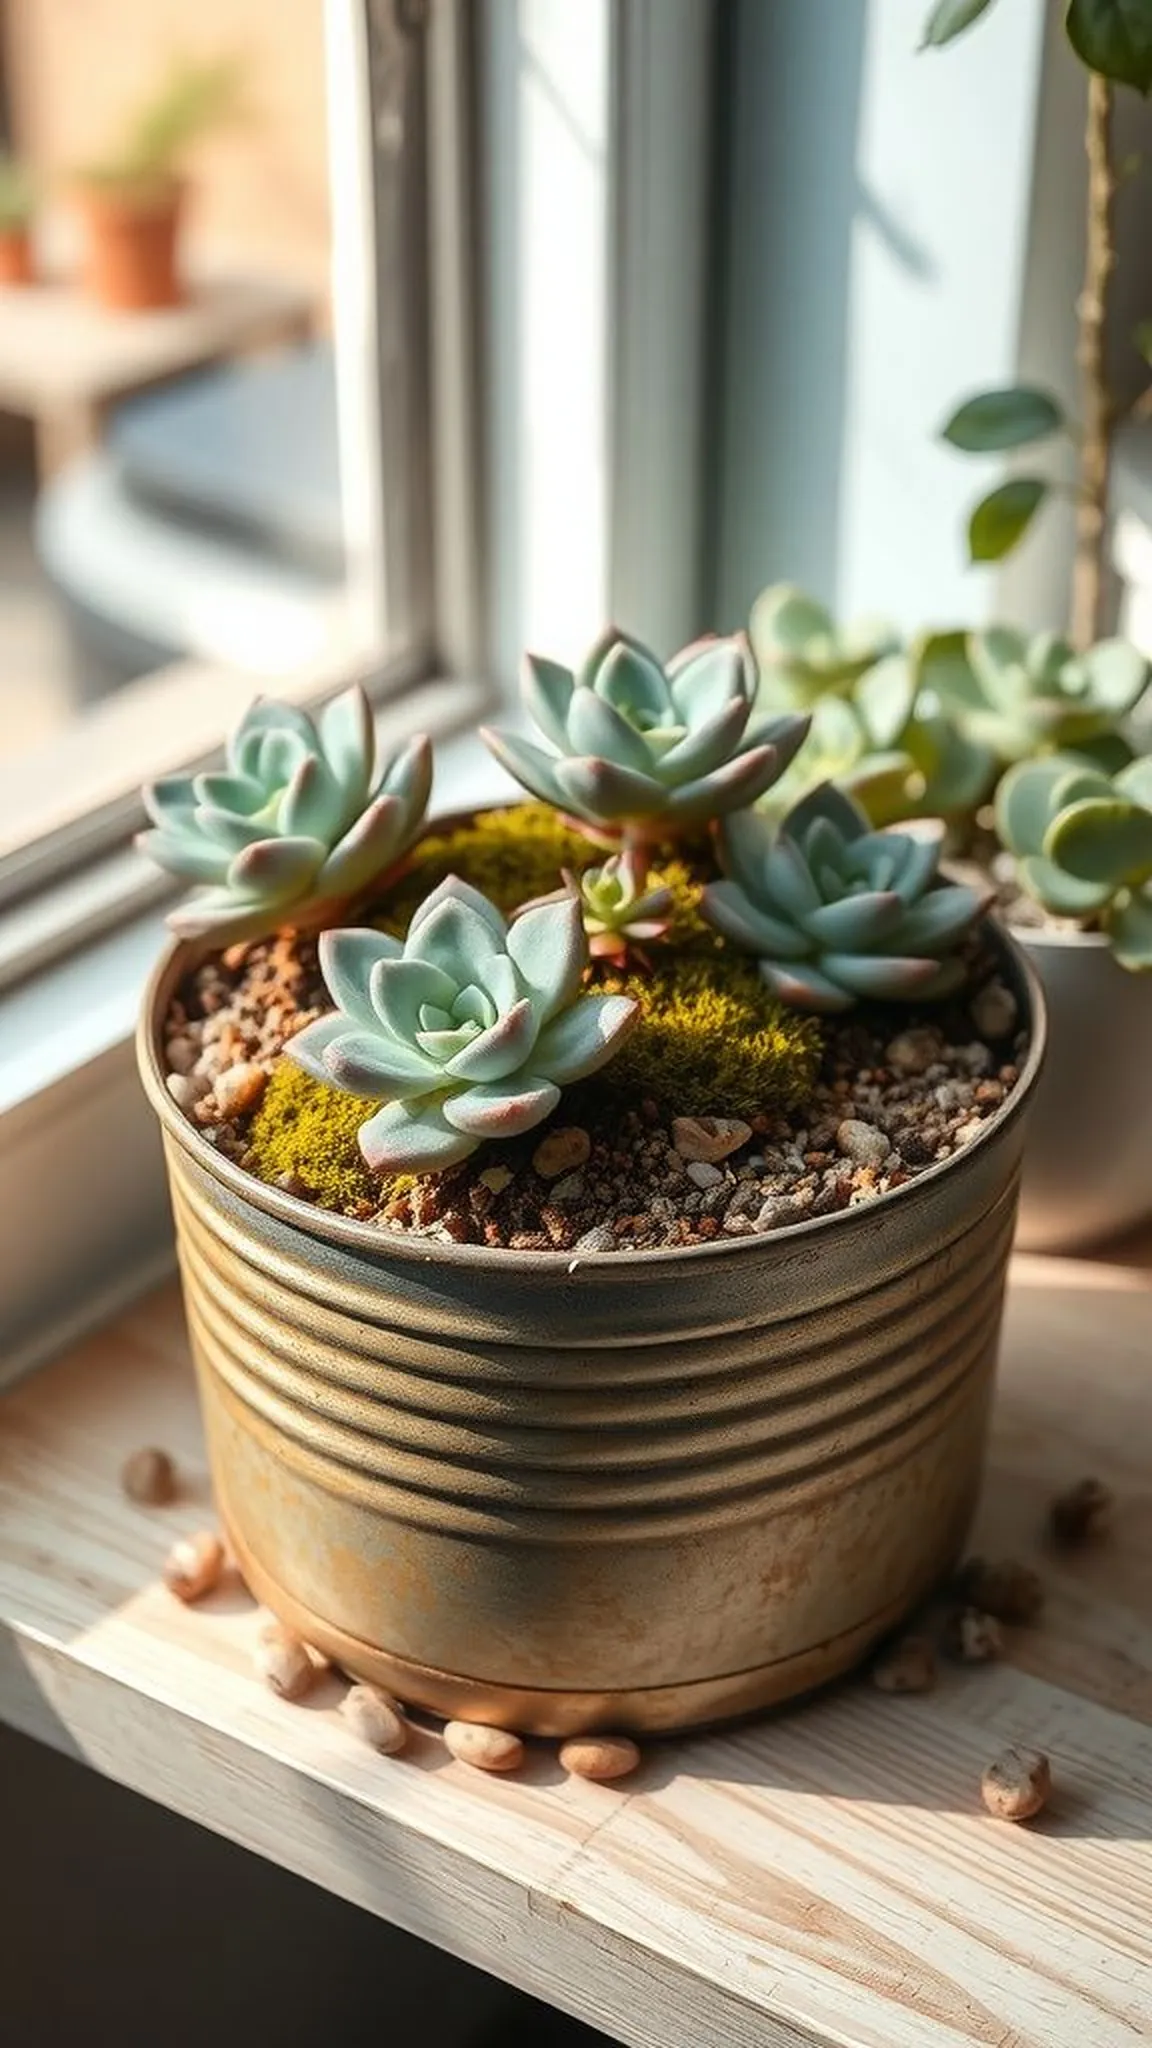
A succulent planter uses a reclaimed tin to cradle miniature arid greens and pebbled texture. The contrast between smooth metal, gritty stones, and plush moss creates an appealing mix of tactile notes.
Sunlight highlights glossy leaf tips while dry soil and cool metal hint at desert calm. Tiny grains of sand and speckled stones add contrast against the succulents’ fleshy leaves, making each plant pop.
This arrangement suits a windowsill or shelf, small and sculptural with quiet presence. It turns a humble tin can upcycle into a tiny low-water garden that feels collected and intentional.
Pro Tip: Create a little drainage layer with small pebbles before adding soil to keep roots from sitting in moisture for extended periods.
How to Make This
- Place a breathable fabric or layer of small pebbles at the bottom of the clean can to assist drainage.
- Add gritty succulent potting mix and nestle plants gently, filling gaps with tiny stones and moss accents.
- Mist sparingly and place the planter in bright indirect light suitable for succulents.
Avoid: A frequent error is using regular potting soil that retains too much moisture, which stresses succulents. Choosing a fast-draining mix prevents root rot and keeps plants plump.
Try Also: Group several tiny succulents of different leaf shapes for a textured mini landscape or use air plants with decorative sand for a low-maintenance display. Tiny ceramic figures can add a whimsical focal point.
Products & Materials
Items Used
- empty tin can
- succulent potting mix
- small pebbles
- succulent plants
“Tiny succulent tin planter with pebbles and moss accents”
Hanging wall organizer cluster with painted tins
⏱️ 2 hours · 🟠 Intermediate
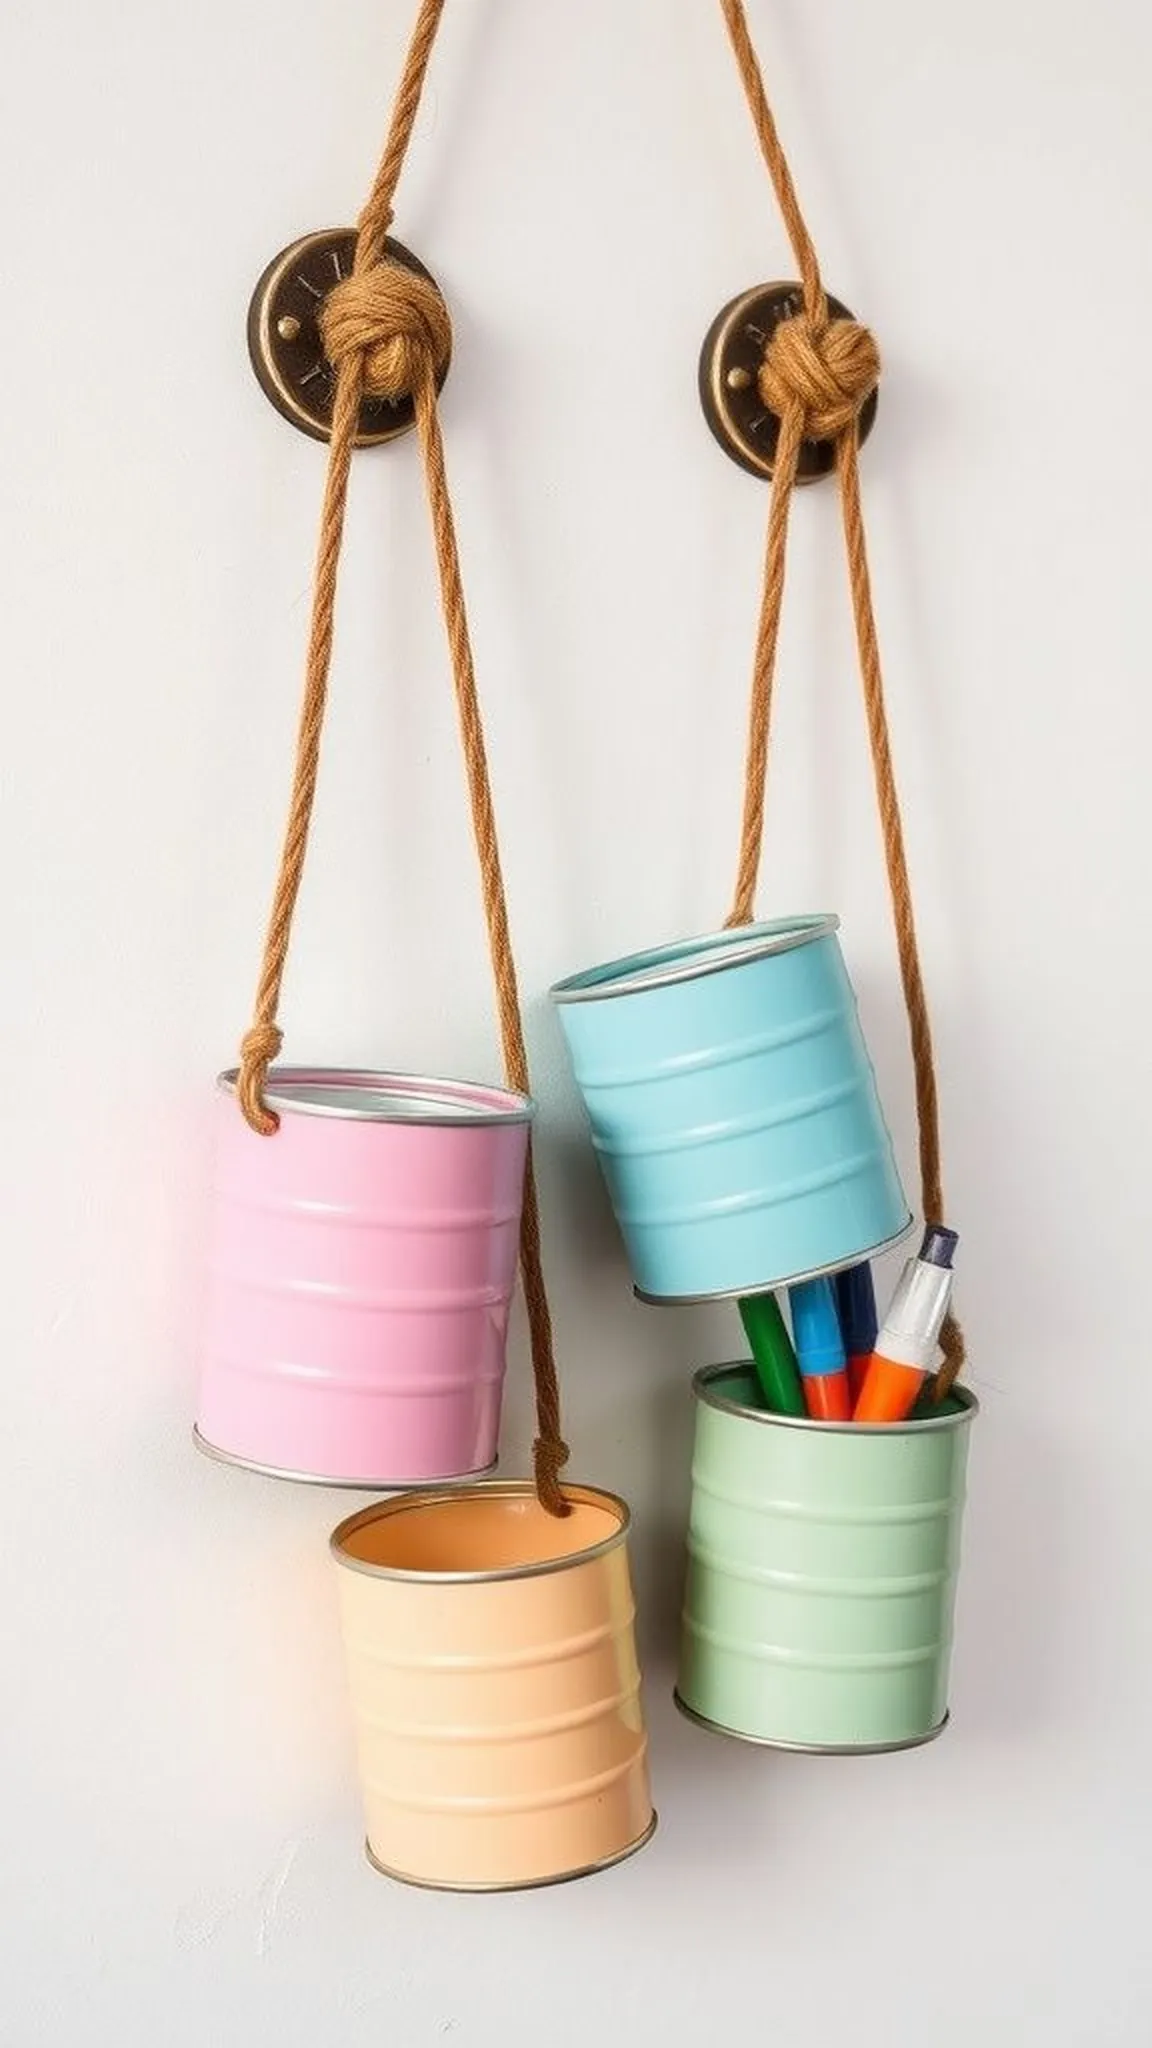
A hanging wall cluster turns several tins into a vertical storage vignette that keeps small items within arm’s reach. Painted finishes and staggered heights give the arrangement a rhythmic, sculptural quality on a gallery wall.
The cans hum softly against the wall when nudged, and their painted skins show brush trails and tiny drips that read as handcrafted. Rope or leather loops add a tactile contrast to the metal and create pleasing shadows behind each piece.
This display functions as both art and utility, holding markers, kitchen utensils, or floral clippings. It reads like a living wall of little pockets, each tin contributing color and texture to the whole.
Pro Tip: Space hanging loops evenly and test weight distribution on a temporary hook before final mounting to prevent sagging or swing.
How to Make This
- Paint or finish multiple clean tins in coordinating colors and allow them to dry thoroughly.
- Attach strong hanging loops of rope or leather to the can rims or backs with rivets or clamps.
- Arrange and hang the tins at varied heights on wall hooks, checking alignment and sturdiness.
Avoid: A frequent problem is attaching flimsy loops that stretch under load and cause tins to tilt. Selecting sturdy rope or hardware avoids slanting and maintains a tidy cluster.
Try Also: Create a vertical herb garden by filling tins with soil and herbs, or make a craft station to hold scissors and tapes. Swap leather loops for colorful ribbon for a softer look.
Products & Materials
Items Used
“Vertical painted tin cluster for stylish hanging storage”
Rustic bird feeder with wooden perch and charm
⏱️ 1-2 hours · 🟠 Intermediate
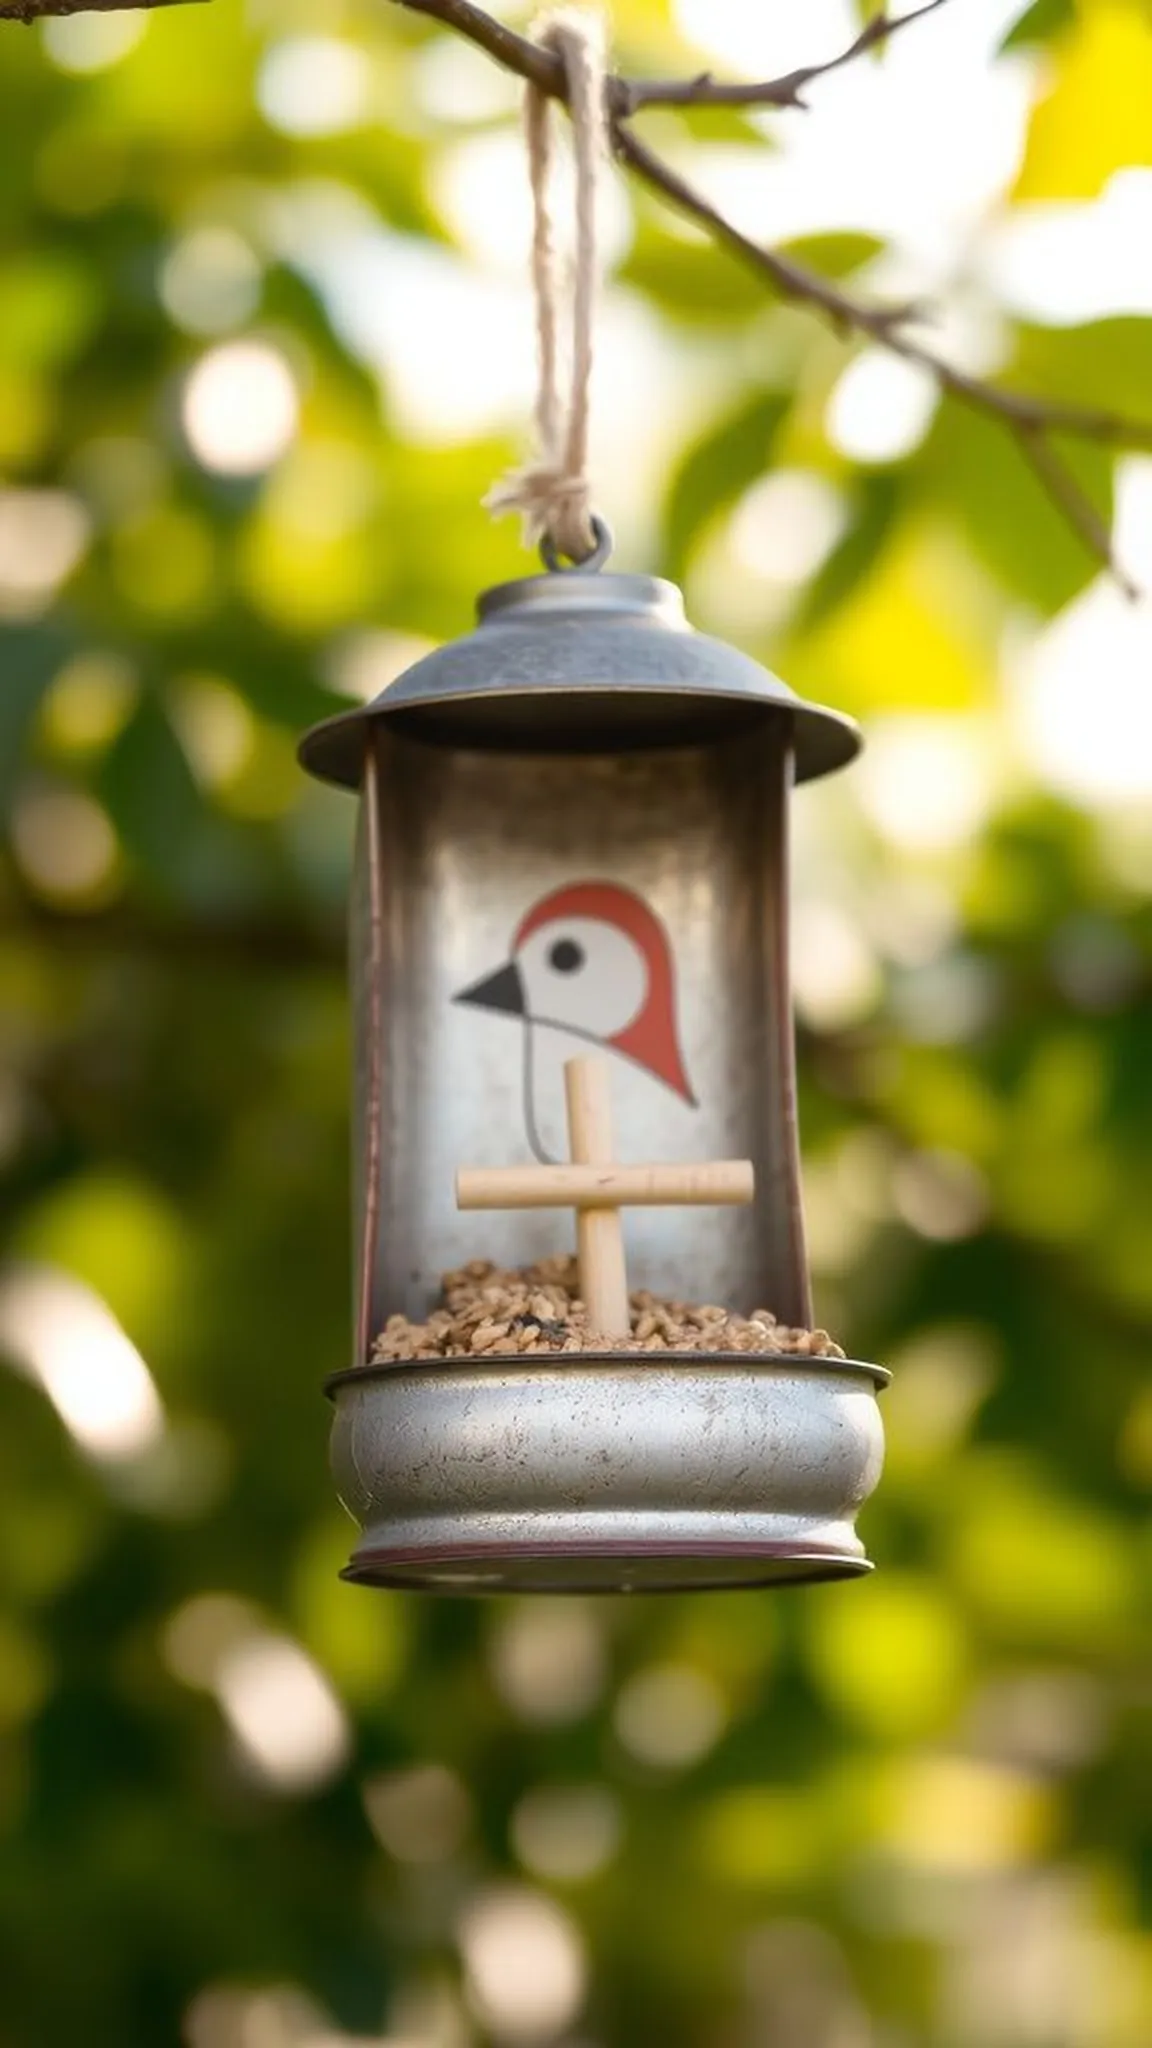
A rustic bird feeder adapts a tin into a tiny dining spot that balances metal shine with wood warmth. A crafted perch and small roof detail give it shelterlike comfort that invites feathered visitors.
The tin’s rim provides a polished edge while seed spills glint when sunlight hits, creating a small glitter among bark and leaves. The wood perch wears fingerprints and grain, adding natural texture to the metal container.
From a branch it gently sways, offering friendly bursts of movement and bird song to a yard or balcony. The project reads as a humble upcycle that supports wildlife and brightens outdoor corners.
Pro Tip: Drill a few drainage holes and choose untreated wood for the perch to avoid chemicals near bird food and nesting areas.
How to Make This
- Create drainage holes in the tin bottom and smooth any sharp edges for safety.
- Attach a small wooden dowel through the tin wall to form a perch and secure it firmly.
- Add hanging twine or wire to suspend the feeder from a branch and fill with birdseed.
Avoid: A frequent issue is failing to provide drainage, which can cause seed to rot and attract pests. Simple bottom holes and periodic cleaning keep the feeder fresh.
Try Also: Make a tray-style feeder by cutting a wider opening or hang several small feeders at different heights for variety. Paint the exterior in muted tones to blend with garden foliage.
Products & Materials
Items Used
- clean tin can
- wooden dowel perch
- twine for hanging
- birdseed mix
“Charming rustic tin bird feeder with wooden perch”
Mosaic tiled candle holder with grout detail
⏱️ 3-4 hours · 🔴 Advanced
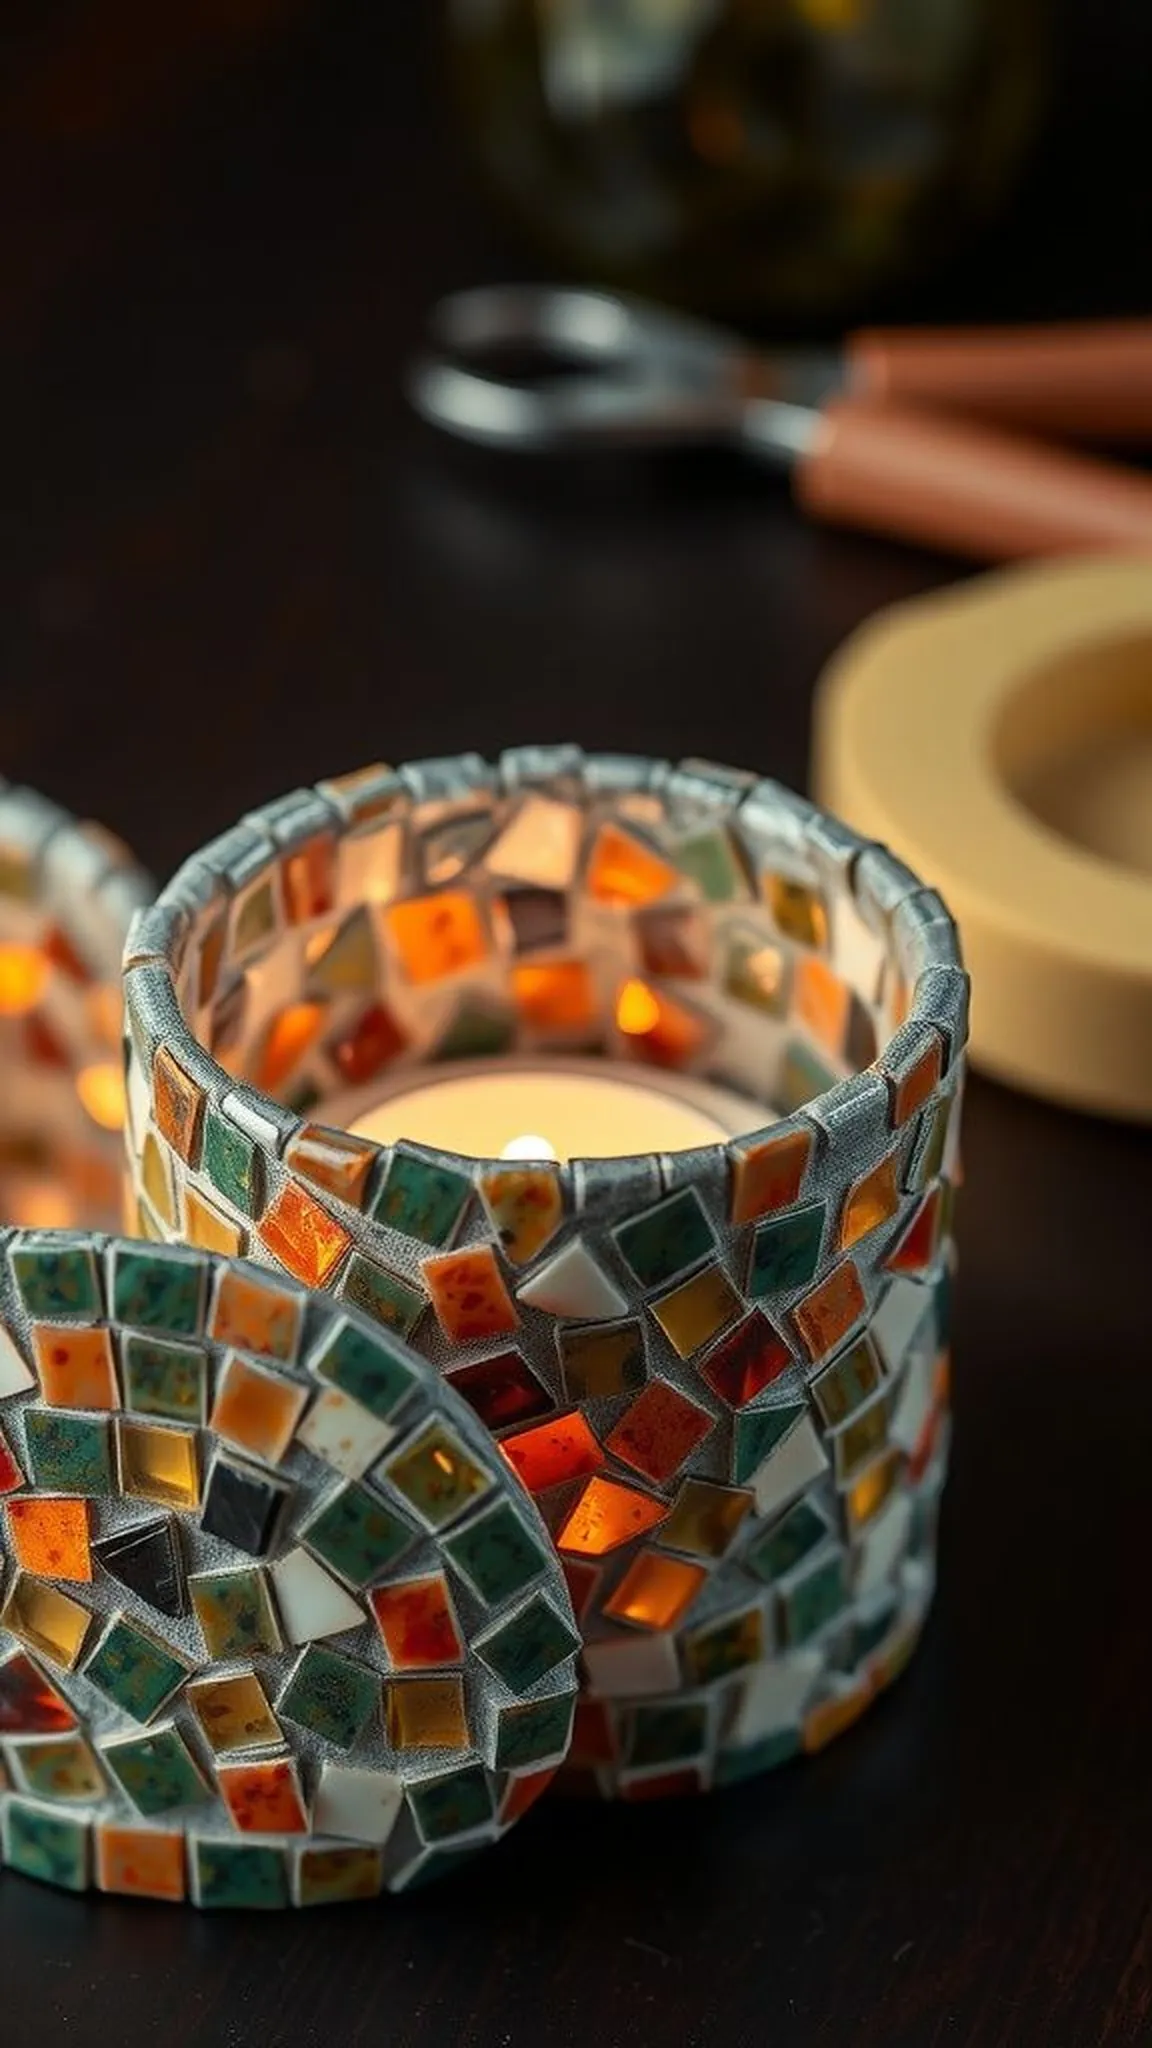
A mosaic candle holder covers a tin in tiny tiles and grout, creating a jewel-like exterior that catches candlelight. Each fragment reflects light differently, producing a shimmering mosaic that feels gallery-made.
The grout adds a tactile crevice between chips, cool to the touch and dusted with a soft powdery contrast. Flickering flames send tiny sparkles through colored glass or ceramic pieces, and the surface invites close inspection of pattern and hue.
This piece becomes a glowing sculptural object on a table, both decorative and atmospheric. The project reads as a careful upcycle that elevates metal into a small luminous artwork.
Pro Tip: Use a fine tooth mosaic nipper for neat tile edges and press grout into gaps thoroughly for a clean professional finish.
How to Make This
- Adhere small glass or ceramic mosaic pieces to the clean tin surface with strong mosaic glue.
- Once set, spread grout over the tiles and wipe excess with a damp sponge, revealing the mosaic pattern.
- Allow full curing and place a candle or LED inside for a glowing effect.
Avoid: A frequent mistake is using oversized tiles that make grout application difficult and produce uneven surfaces. Choosing small uniform pieces maintains a smooth silhouette.
Try Also: Combine mirrored tiles for extra sparkle or pick a monochrome palette for a modern, minimalist look. Try thin ceramic shards for a rustic, textured impression.
Products & Materials
Items Used
- tin can base
- mosaic tiles
- mosaic grout
- mosaic nippers
“Glowing mosaic tin candle holder with grout texture”
Rope-wrapped nautical utensil caddy for patios
⏱️ 45 min · 🟢 Beginner

A rope-wrapped tin takes on seaside charm when thick jute cord is spiraled up its sides. The natural fibers add rugged texture that contrasts with the can’s smooth rim and gleam.
Salt air and sun-warmed rope come to mind as the coarse strands catch light and shadow. The tactile spiral invites fingers to trace the rows while the top edge retains a metallic glint.
This caddy fits outdoor dining or beachy kitchens, holding utensils and napkins with casual ease. The result is a durable tin can upcycle with a relaxed, coastal personality.
Pro Tip: Apply small dots of waterproof adhesive beneath the rope as you wrap to secure each pass and prevent slippage outdoors.
How to Make This
- Secure the rope end inside the tin base with a bead of waterproof glue.
- Wrap the rope tightly around the can, pressing each coil snugly against the last.
- Trim and glue the final rope tail inside the rim for a clean finish.
Avoid: A frequent slip is leaving loose coils that unwind over time in high use. Tensioned wrapping with occasional adhesive spots ensures longevity.
Try Also: Add a painted stripe or use colored nautical rope for a coastal pop. Attach a small rope handle to one side for carry convenience.
Products & Materials
Items Used
- clean tin can
- natural jute rope
- waterproof craft glue
“Coastal rope-wrapped tin utensil caddy for outdoor dining”
Chalkboard party favor tins with handwritten tags
⏱️ 30 min · 🟢 Beginner
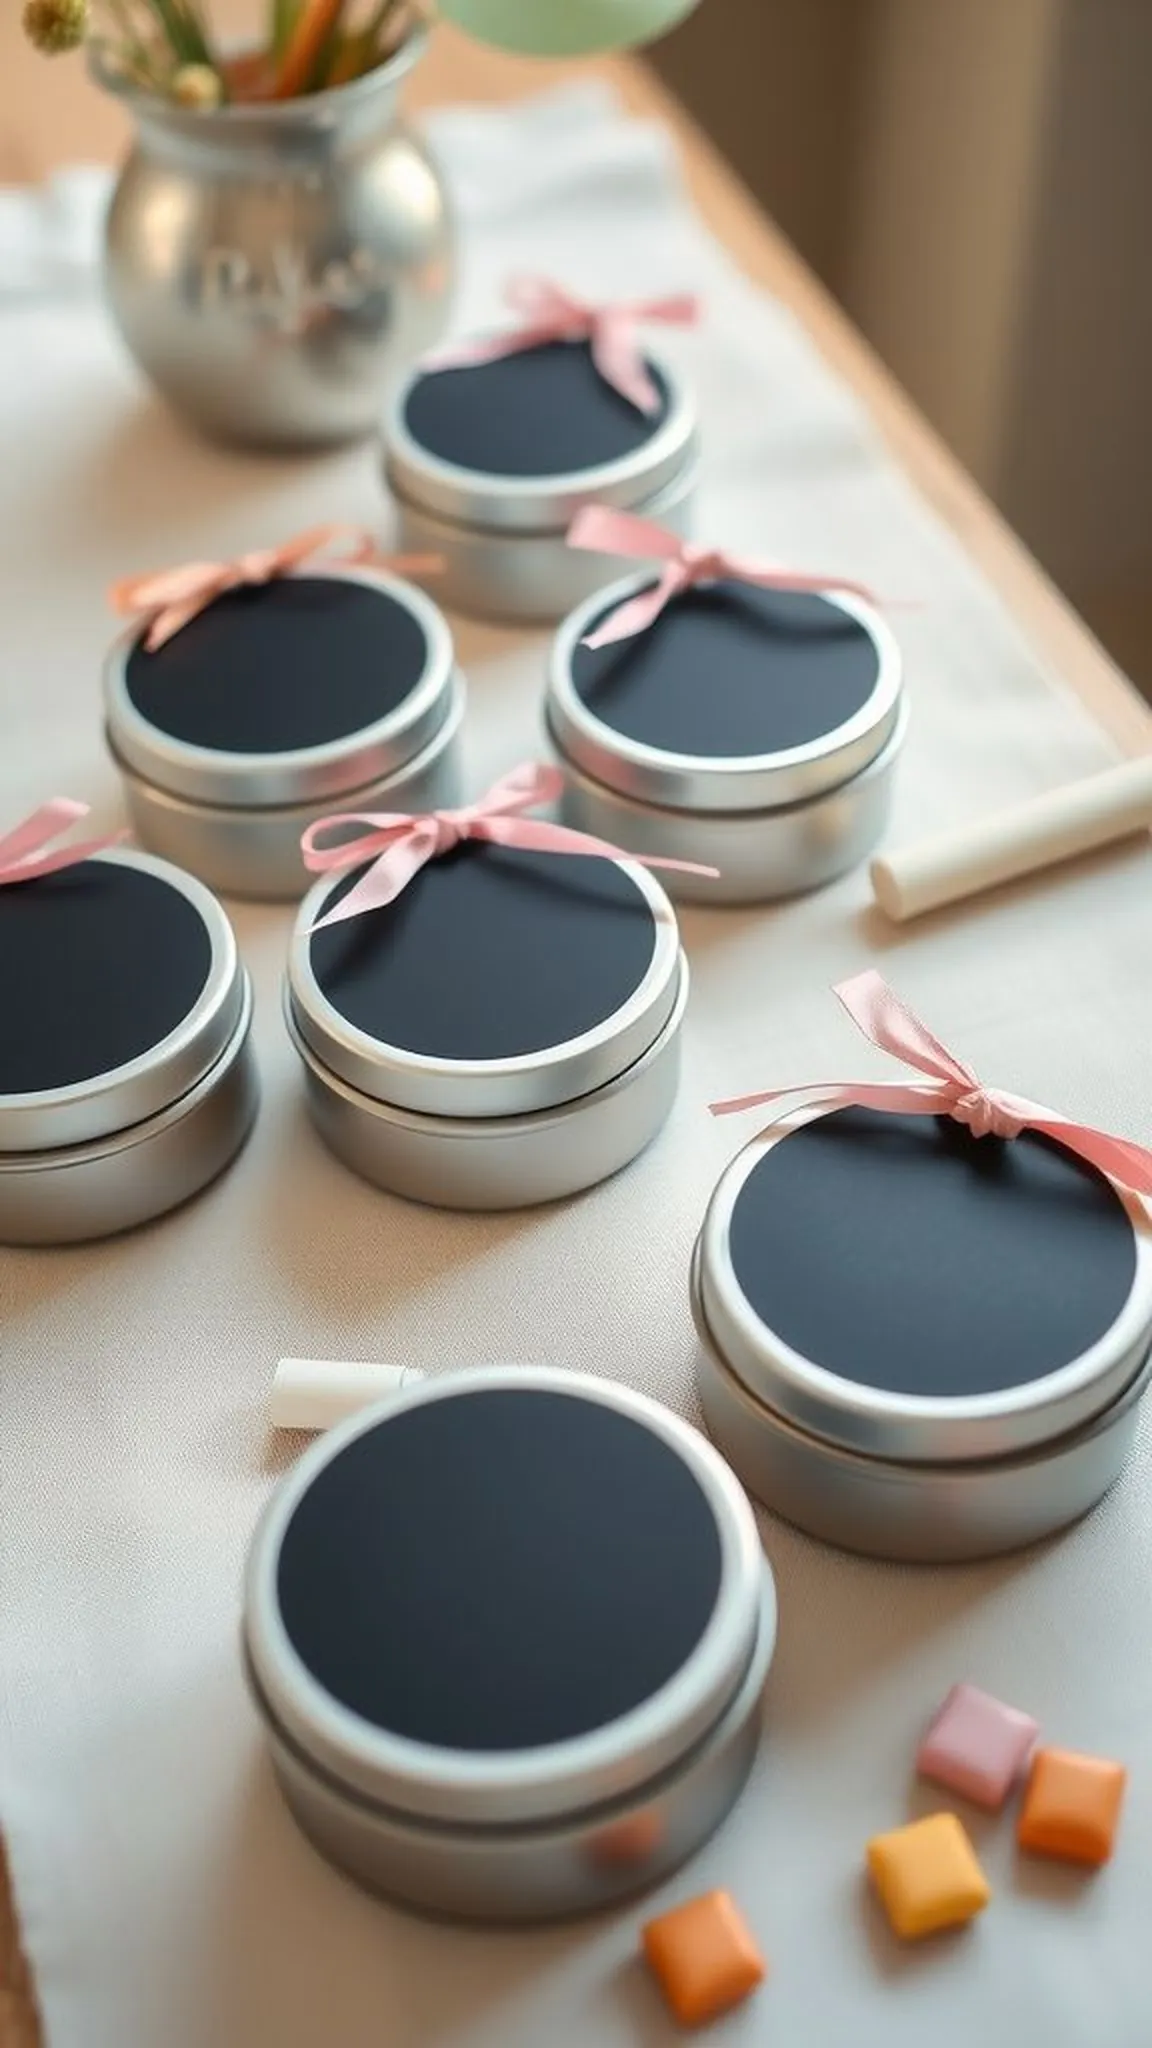
Chalkboard party tins become charming favor containers with a writable surface for guest names or notes. The matte black panel contrasts with bright paint rims and ribbon, making labels pop at a glance.
Chalk dust leaves a soft talc trail when a name is written, and the texture invites a quick wipe and rewrite for personalization. Little bows and bits of twine add a festive fluff that balances the tin’s cool metallic edge.
These favors feel intimate and handmade when arranged along a table runner or gift shelf. They offer a pleasant mix of craft simplicity and thoughtful presentation for gatherings.
Pro Tip: Allow chalkboard paint to cure fully before writing and condition the surface by rubbing with the side of a chalk stick first.
How to Make This
- Paint a rectangular section of the clean tin with chalkboard paint and let it cure fully.
- Decorate the remaining rim with colorful paint or ribbon accents and allow them to dry.
- Fill tins with small treats and write guest names on the chalk panel for personalization.
Avoid: A frequent oversight is writing on chalkboard paint too soon, which leads to smudging and dull marks. Letting the paint cure makes writing crisper and easier to erase cleanly.
Try Also: Use metallic pens for a permanent metallic nameplate or attach kraft tags tied with twine for a rustic sitter look. Small stamped paper labels offer another personal touch.
Products & Materials
Items Used
“Personalized chalkboard tin favors for sweet celebration details”
Tin can wind chime with jingling metal charms
⏱️ 1-2 hours · 🟠 Intermediate
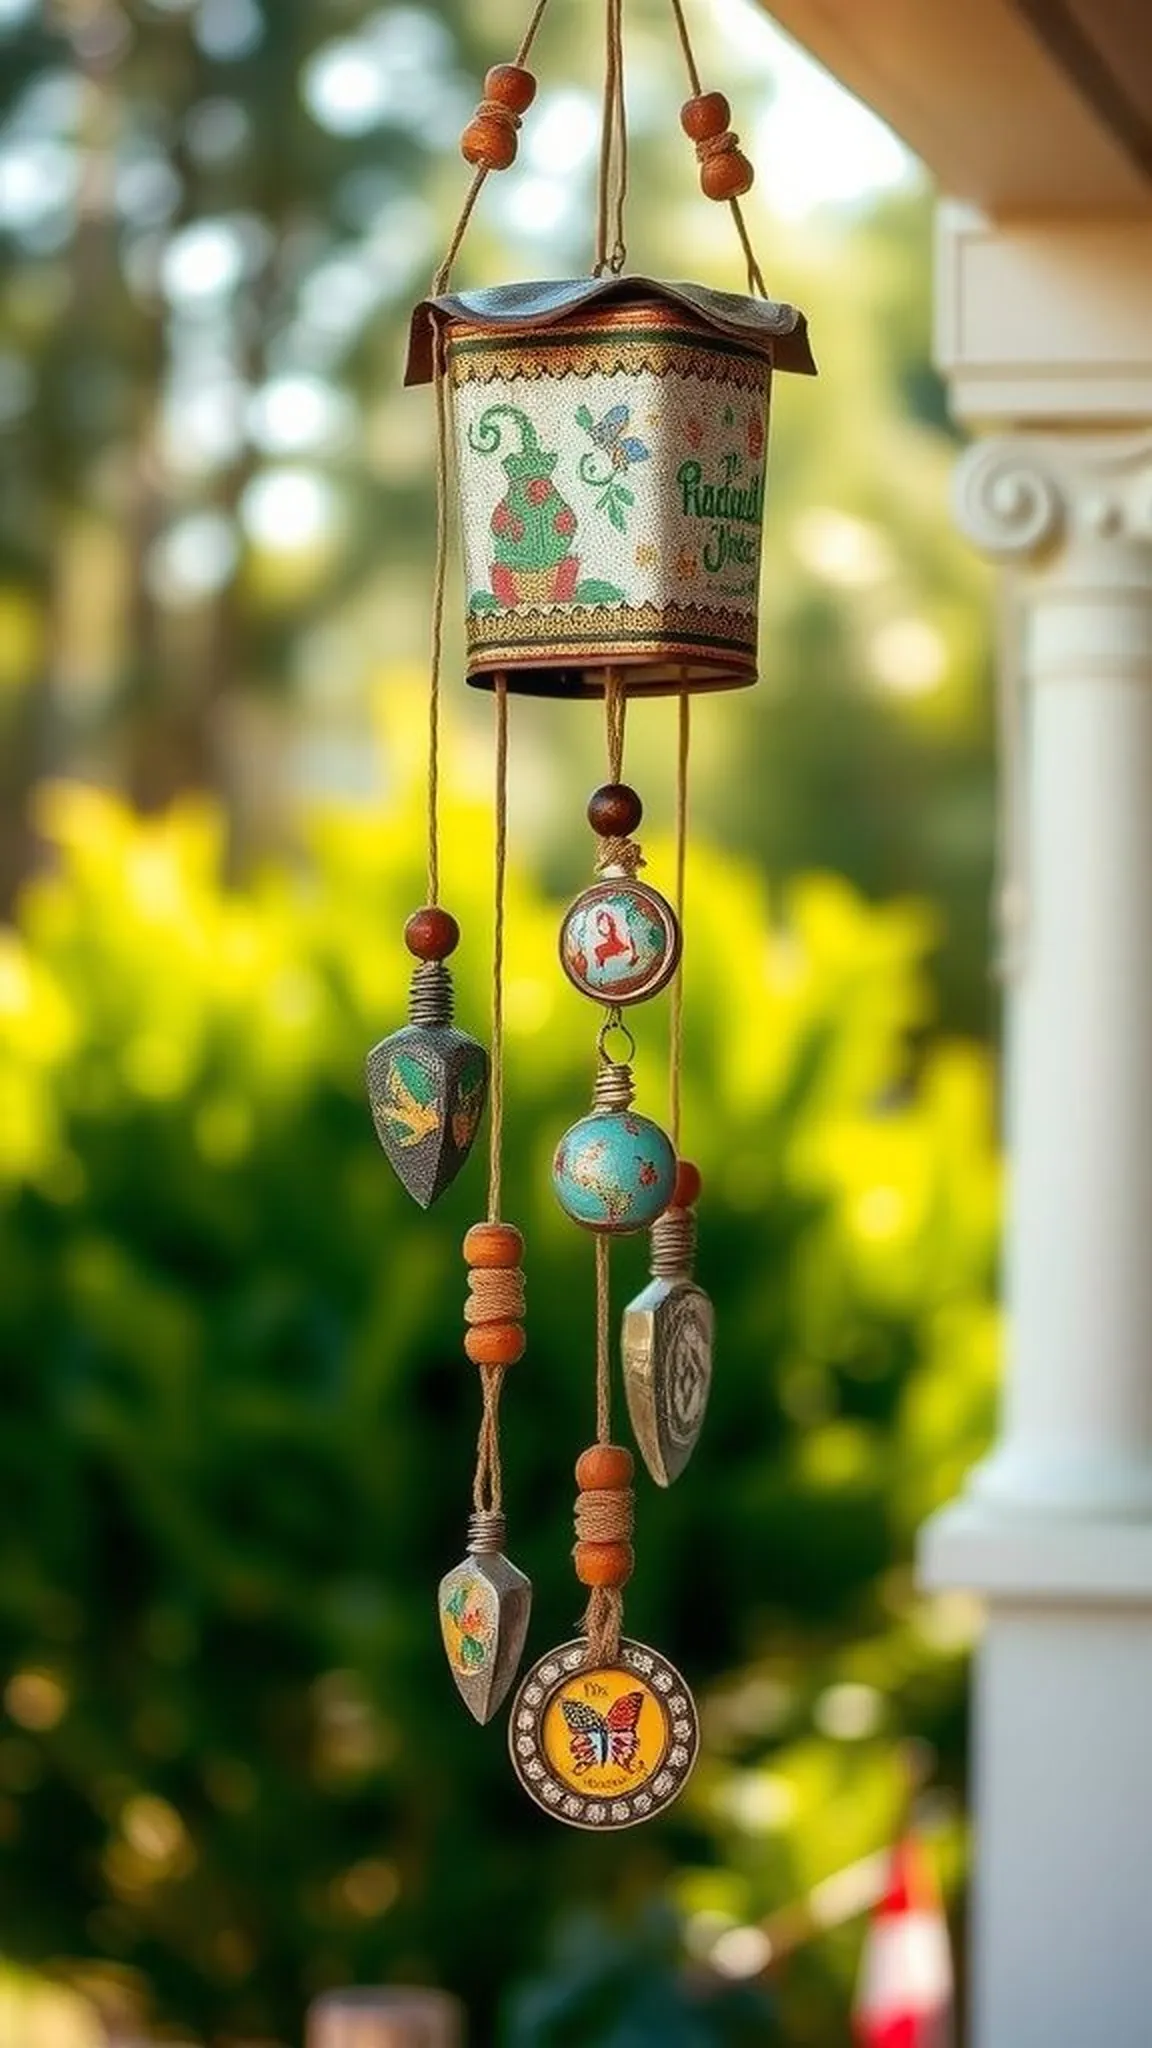
A tin wind chime produces a gentle chime when hung where breezes find it, merging metal tones and tinkling charm. Strung charms and discs create layered sounds that shift with each gust.
The cans carry a metallic ring that blends with softer wooden beads and painted discs, producing a chorus of textures and notes. Sunlight highlights patina and paint while shadows dance across nearby walls when the chime spins.
This piece livens a porch or balcony with moving light and sound that feels casual and welcoming. The finished chime reads as a playful repurpose of simple materials into airy music.
Pro Tip: Balance charm lengths during assembly to avoid tangled strands and to achieve a clear, pleasant range of tones when the chime moves.
How to Make This
- Decorate clean tins and charms with paint or patina, then drill small holes for hanging points.
- Thread cords through the holes and attach beads or metal charms at staggered lengths.
- Tie the cords to a central hoop or branch and hang the chime where breezes can play it.
Avoid: A frequent snag is letting cords knot together, which muffles movement and sound. Staggering lengths and testing swing prevents tangling and keeps notes clear.
Try Also: Mix shells for a coastal jingle or use recycled keys and washers for an industrial percussion set. Add glass beads for visual sparkle when sunlight hits.
Products & Materials
Items Used
“Airy tin wind chime with mixed charms and gentle music”
Fabric-lined gift tin with ribbon and interior cushion
⏱️ 1 hour · 🟢 Beginner
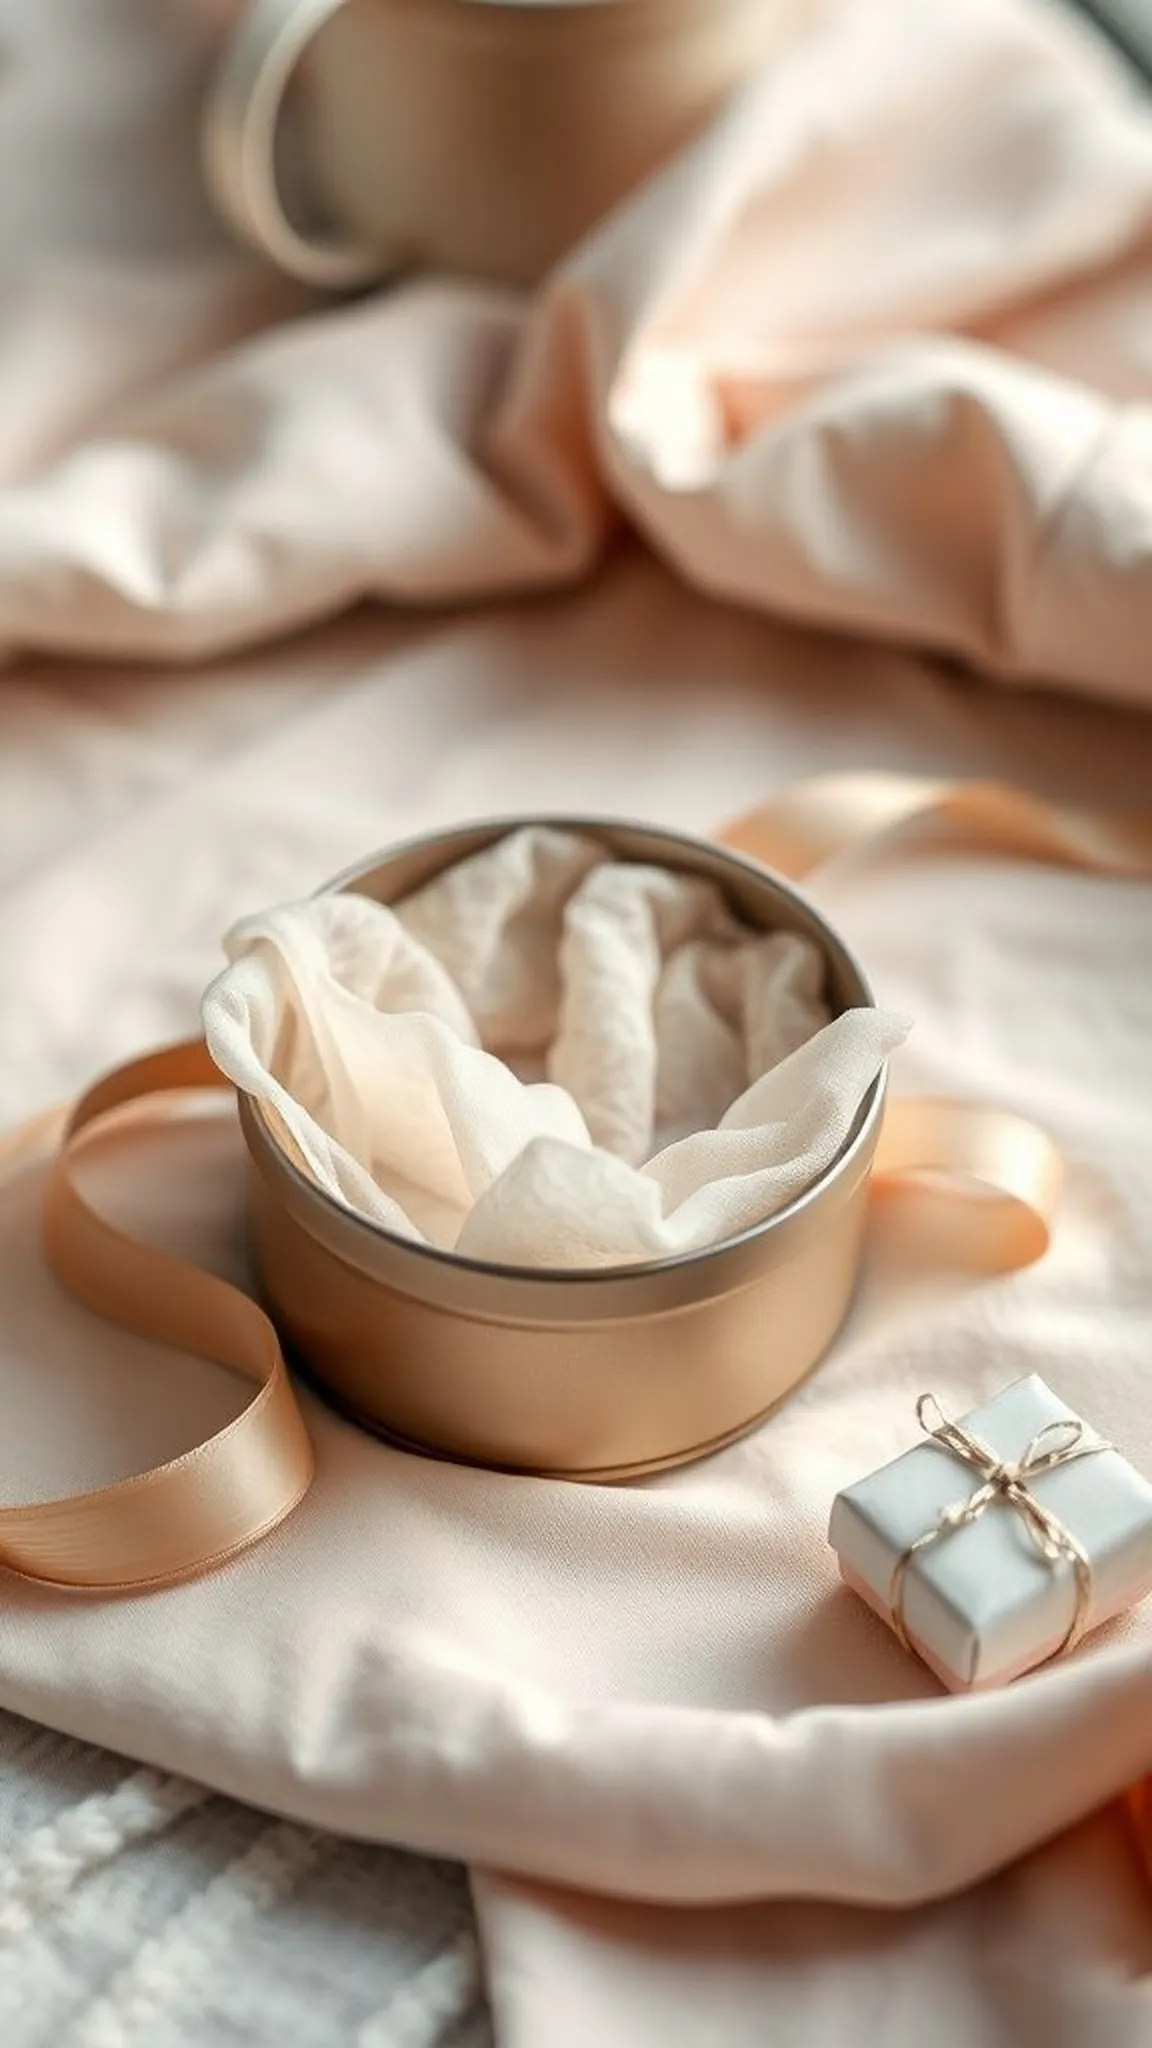
A fabric-lined gift tin becomes a small keepsake box with a plush interior and ribbon closure. The soft lining contrasts with the cool metal and offers a polished presentation for tiny treasures.
Textile sheen and the muffled thud of a gift tucked inside give a pleasant unwrapping rhythm. The ribbon tail and neatly folded fabric edges create tidy little folds that catch the eye and invite gentle handling.
Placed on a shelf or given as a present, the tin reads as a thoughtful container rather than simple packaging. It offers a handcrafted touch that elevates even small tokens into memorable keepsakes.
Pro Tip: Measure fabric to fit snugly and add a thin batting layer inside for soft cushioning and a premium feel.
How to Make This
- Cut fabric and thin batting to fit the can interior and press them into place with a small amount of craft glue.
- Trim excess and fold edges for a neat seam, securing with glue under the lip.
- Tie a decorative ribbon around the exterior and place the gift on the cushioned base.
Avoid: A frequent slip is using too-large fabric pieces that bunch and wrinkle inside the tin. Precise cutting and small amounts of adhesive keep the lining smooth.
Try Also: Use velvet for a luxe look or printed linen for a casual vibe and swap ribbon for waxed twine for a rustic finish. Add a tiny dried flower under the bow for natural charm.
Products & Materials
Items Used
- small tin with lid
- fabric squares
- thin batting
- decorative ribbon
“Velvet-lined gift tin with ribbon for delicate keepsakes”
Stenciled geometric pen jar with metallic accents
⏱️ 45 min · 🟢 Beginner
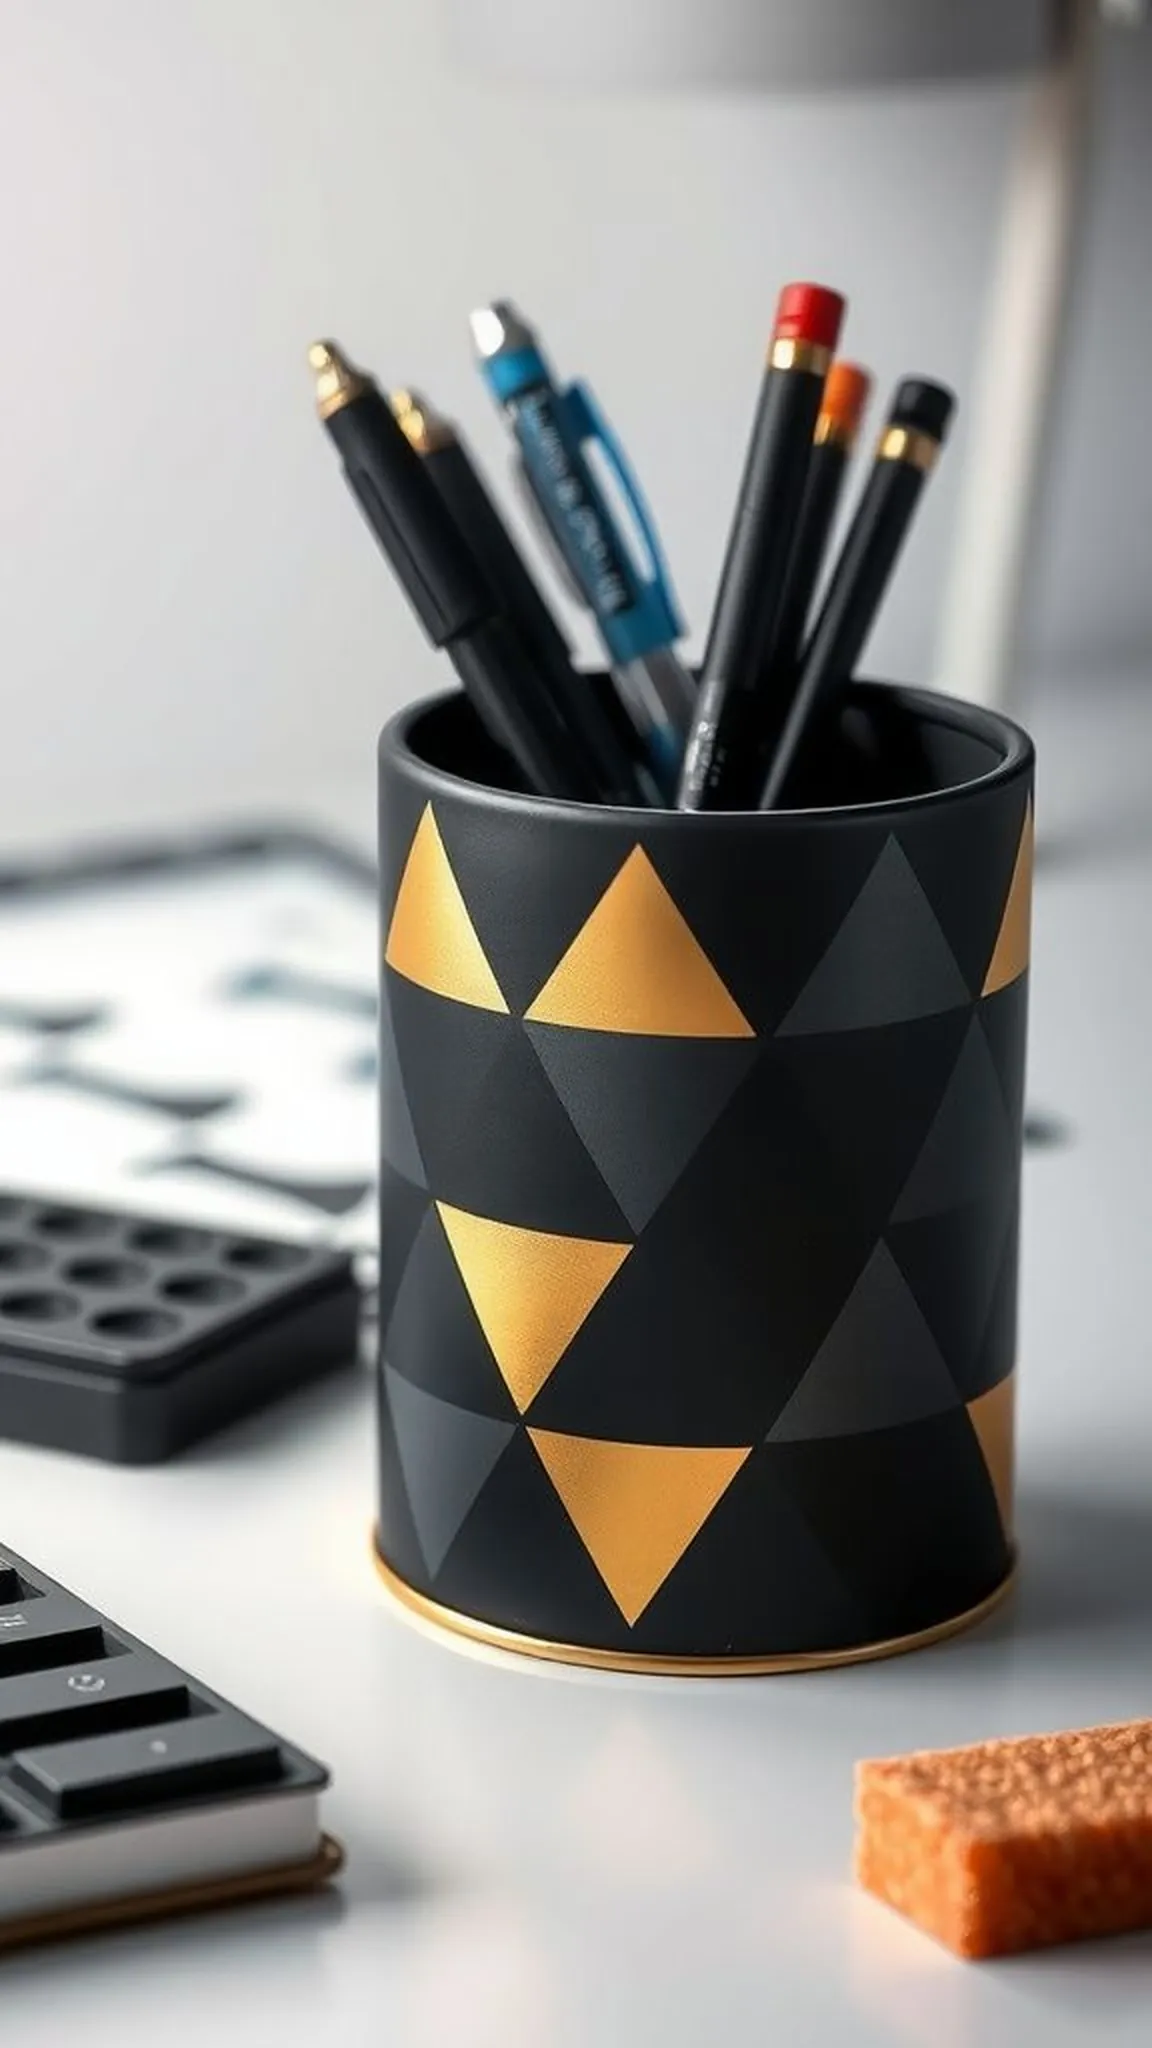
A stenciled geometric jar gives a tin a clean, modern makeover with crisp shapes and metallic highlights. The contrast between matte base and shining accents creates a contemporary vibe that reads tidy on a desk.
The stencil edge leaves a slight ridge where paint layers meet, and metallic flecks catch light when pens move. The finished surface feels balanced, cool metal peeking through precise shapes and a faint brush texture visible up close.
This piece organizes writing tools with stylish restraint and a little sparkle. It pairs well with minimalist desks and colorful stationery sets alike as a practical accent.
Pro Tip: Secure stencils firmly with low-tack tape and dab paint with a sponge to prevent bleed under the edges for crisp lines.
How to Make This
- Paint the can with a matte base color and allow it to dry completely.
- Tape stencil in place and apply metallic paint in light dabs until the pattern is filled.
- Remove the stencil carefully and seal the surface if desired for durability.
Avoid: A frequent problem is applying paint too heavily through the stencil, which causes seepage and fuzzy edges. Light, layered dabbing keeps lines sharp and clean.
Try Also: Try angular gold accents on a dark base for high contrast or soft pastel stencils on white for a gentle look. Use multiple stencils for layered patterns.
Products & Materials
Items Used
- tin can
- stencil sheets
- metallic craft paint
- low tack painter’s tape
“Minimalist stenciled tin pen jar with metallic highlights”
Mini greenhouse seed starter with clear lid
⏱️ 2 hours · 🟠 Intermediate

A mini greenhouse seed starter converts a tin into a tiny propagation station topped with a clear lid. The glasslike cover traps humidity and warmth, encouraging delicate seedlings to sprout within the small sheltered space.
The interior fogs with gentle condensation while soil texture and seed shapes sit close to the glass. Tiny green tips push through surface crust, and the environment feels microclimatic and promising under soft light.
Placed on a sunny sill the tiny greenhouse offers a focused spot for early growth and observation. The tin can upcycle becomes a compact botanical lab with everyday materials and a calm presence.
Pro Tip: Choose a clear plastic or recycled jar lid that fits snugly over the tin to maintain humidity while still allowing air exchange occasionally.
How to Make This
- Fill the clean tin with a fine seed-starting mix and sow seeds according to packet depth.
- Cover the tin with a clear plastic or glass lid to trap humidity and place in bright indirect light.
- Vent the lid briefly every few days to prevent mold and monitor moisture levels.
Avoid: A frequent issue is keeping the lid sealed without venting, which can cause mold growth and seed rot. Brief daily airing maintains a healthy balance.
Try Also: Use translucent plastic wrap with toothpick-supported vents for a budget lid or line tins with peat pellets for easy transplanting. Label each tin with seed variety on a small tag.
Products & Materials
Items Used
“Tiny tin greenhouse for cozy seed starting and sprout watching”
Upcycled tin shaker instrument with colorful beads
⏱️ 30 min · 🟢 Beginner

A tin shaker becomes a cheerful instrument when filled with beads or seeds and capped for rhythm. The sound is bright and quick, a playful clack that invites tapping fingers or gentle shaking.
The beads rattle against the metal interior with crisp punctuation while decorative tape and paint soften the can’s industrial look. The surface feels lightweight and portable, ready to move with a child’s small hands or an adult’s playful flourish.
This little instrument provides sound and tactile engagement, great for story time or impromptu music. It celebrates a simple tin can upcycle that makes noise and sparks easy smiles.
Pro Tip: Test different fillings like rice, dried beans, or small beads to find the preferred sound before sealing the lid permanently.
How to Make This
- Fill a clean tin with chosen filler material to achieve the desired sound.
- Secure the lid tightly and reinforce the seam with decorative tape or glue for safety.
- Decorate the exterior with paint or tape for a playful finish.
Avoid: A frequent oversight is leaving the lid loose, which can spill filler and create a mess. Reinforcing the closure ensures the shaker stays intact during play.
Try Also: Create a set of shakers with different fillers for pitched rhythm or wrap one in felt for muffled tones. Small bells add a brighter chime.
Products & Materials
Items Used
- small tin can with lid
- filler beads or dried beans
- decorative washi tape
“Fun tin shaker instrument filled with colorful beads for rhythm”
