
As an Amazon Associate I earn from qualifying purchases.
Bright buttons of varying sizes and colors spill onto a wooden craft table, each waiting to become part of a cheerful design. The tactile sensation of smooth plastic and glossy finishes invites curious fingers to explore them. In children’s bedrooms, where imagination flows freely, button art creates unique wall decorations that add personality and playfulness.
DIY button art projects for kids’ bedrooms can transform plain walls into vibrant stories full of texture and color. These projects bring together creativity and hands-on fun, resulting in charming creations that capture youthful spirit. Buttons offer endless possibilities from animals to abstract shapes, making every piece special and tactile.
Create a Colorful Button Tree Wall Hanging
⏱️ 1 hour · 🟢 Beginner
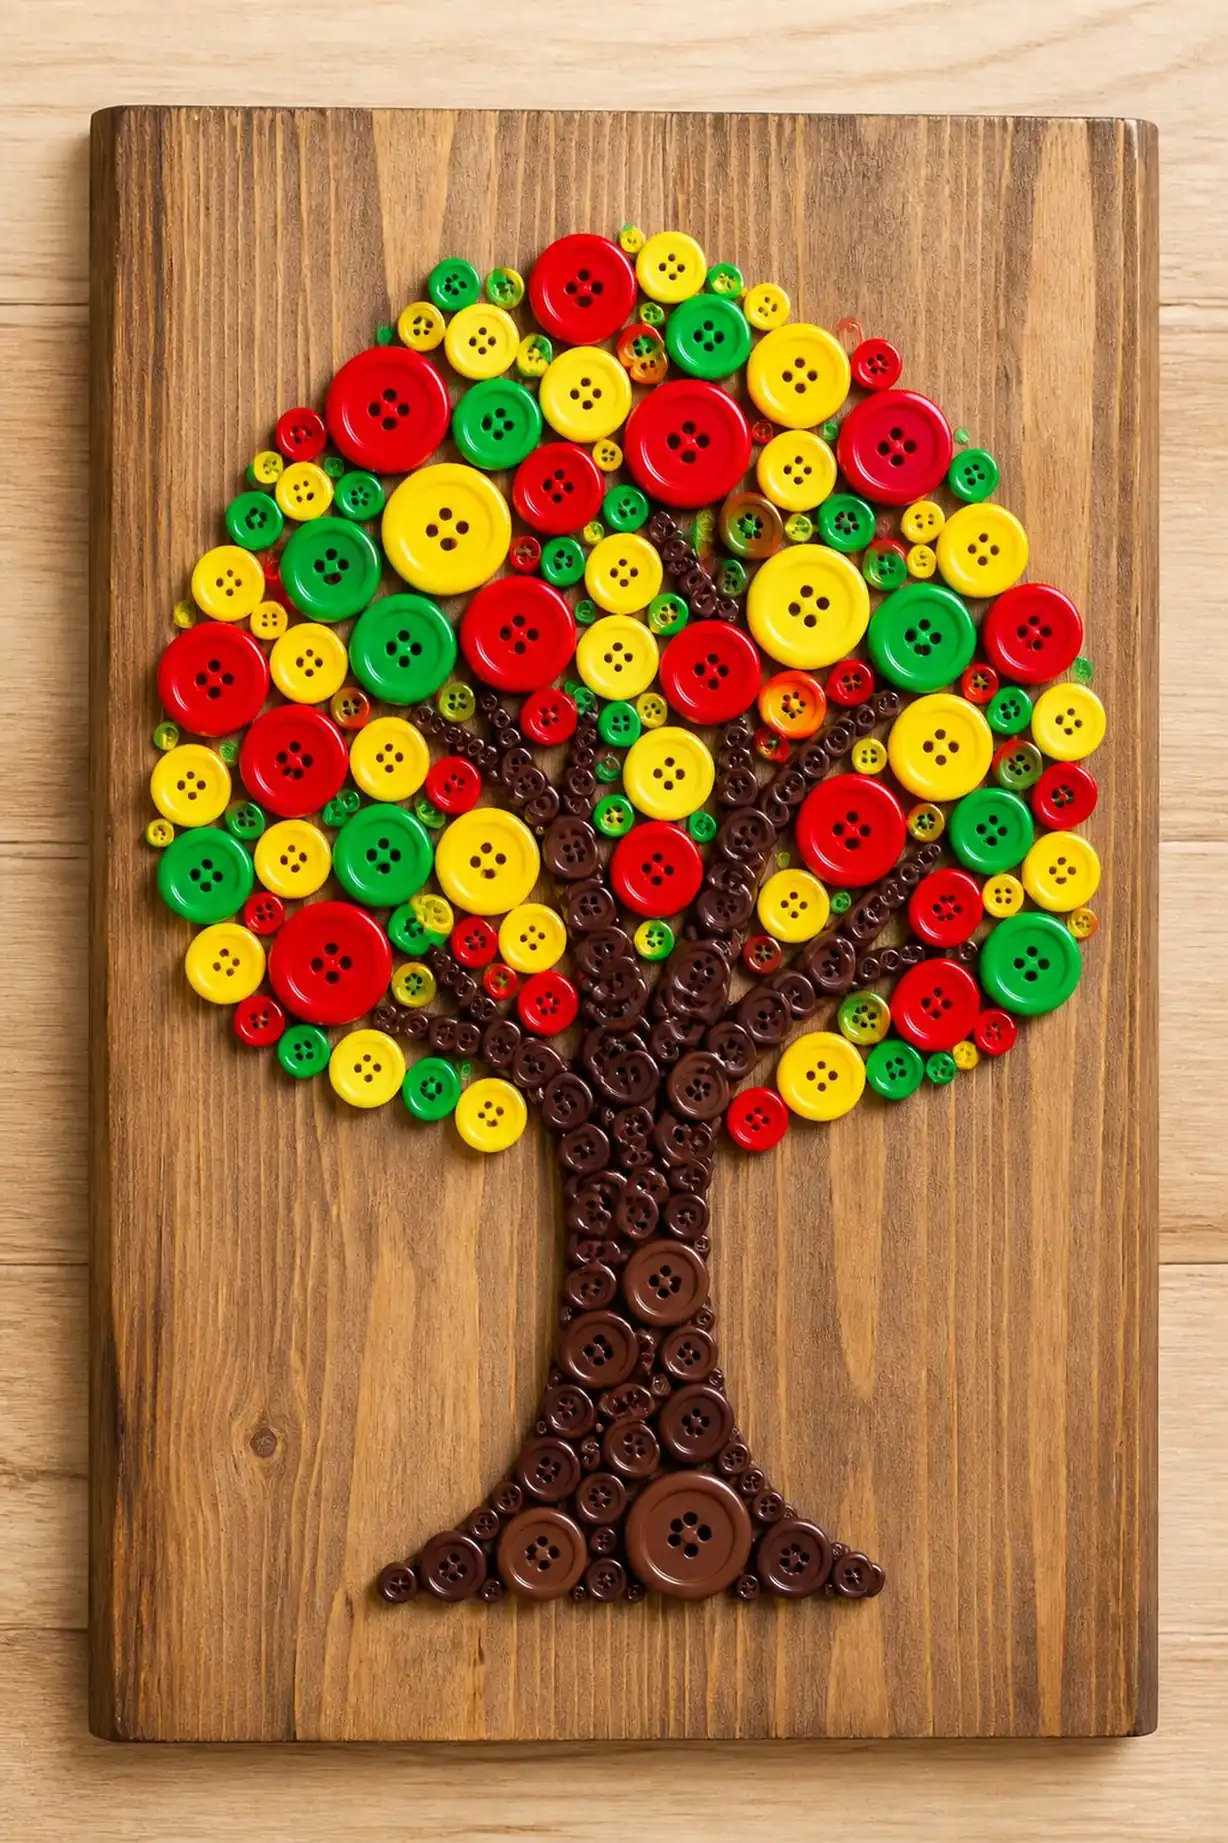
A wooden plaque serves as the base for an enchanting tree shape outlined with glue dots. Bright red, yellow, and green buttons, around 50 in total, fill the tree canopy, creating a textured contrast against the smooth natural wood. Each button’s glossy sheen reflects light, adding warmth.
Approximately 18 inches tall, this art piece introduces a lively splash of nature-inspired hues to a bedroom wall. The variety in button sizes—some as small as half an inch and others larger—adds depth and invites tactile exploration.
Pro Tip: Select buttons with slightly varying thicknesses to introduce subtle layering effects and more visual interest to the tree canopy.
How to Make This
- Outline the tree trunk and branches on the wooden plaque with pencil.
- Apply glue dots along the branches and canopy area.
- Press buttons onto the glued areas to form the tree leaves.
- Fill in empty spaces with smaller buttons for texture.
- Allow the glue to dry completely before hanging.
Avoid: A common issue is using too much glue, which can cause buttons to shift or not adhere well due to excess residue.
Try Also: Try using pastel-colored buttons for a softer look or metallic buttons for a shiny, modern effect; a seasonal theme with autumn shades adds variety.
Products & Materials
Items Used
“Lively button tree brimming with texture and vibrant color for kids’ walls.”
Make a Button Alphabet Name Plaque
⏱️ 2 hours · 🟠 Intermediate
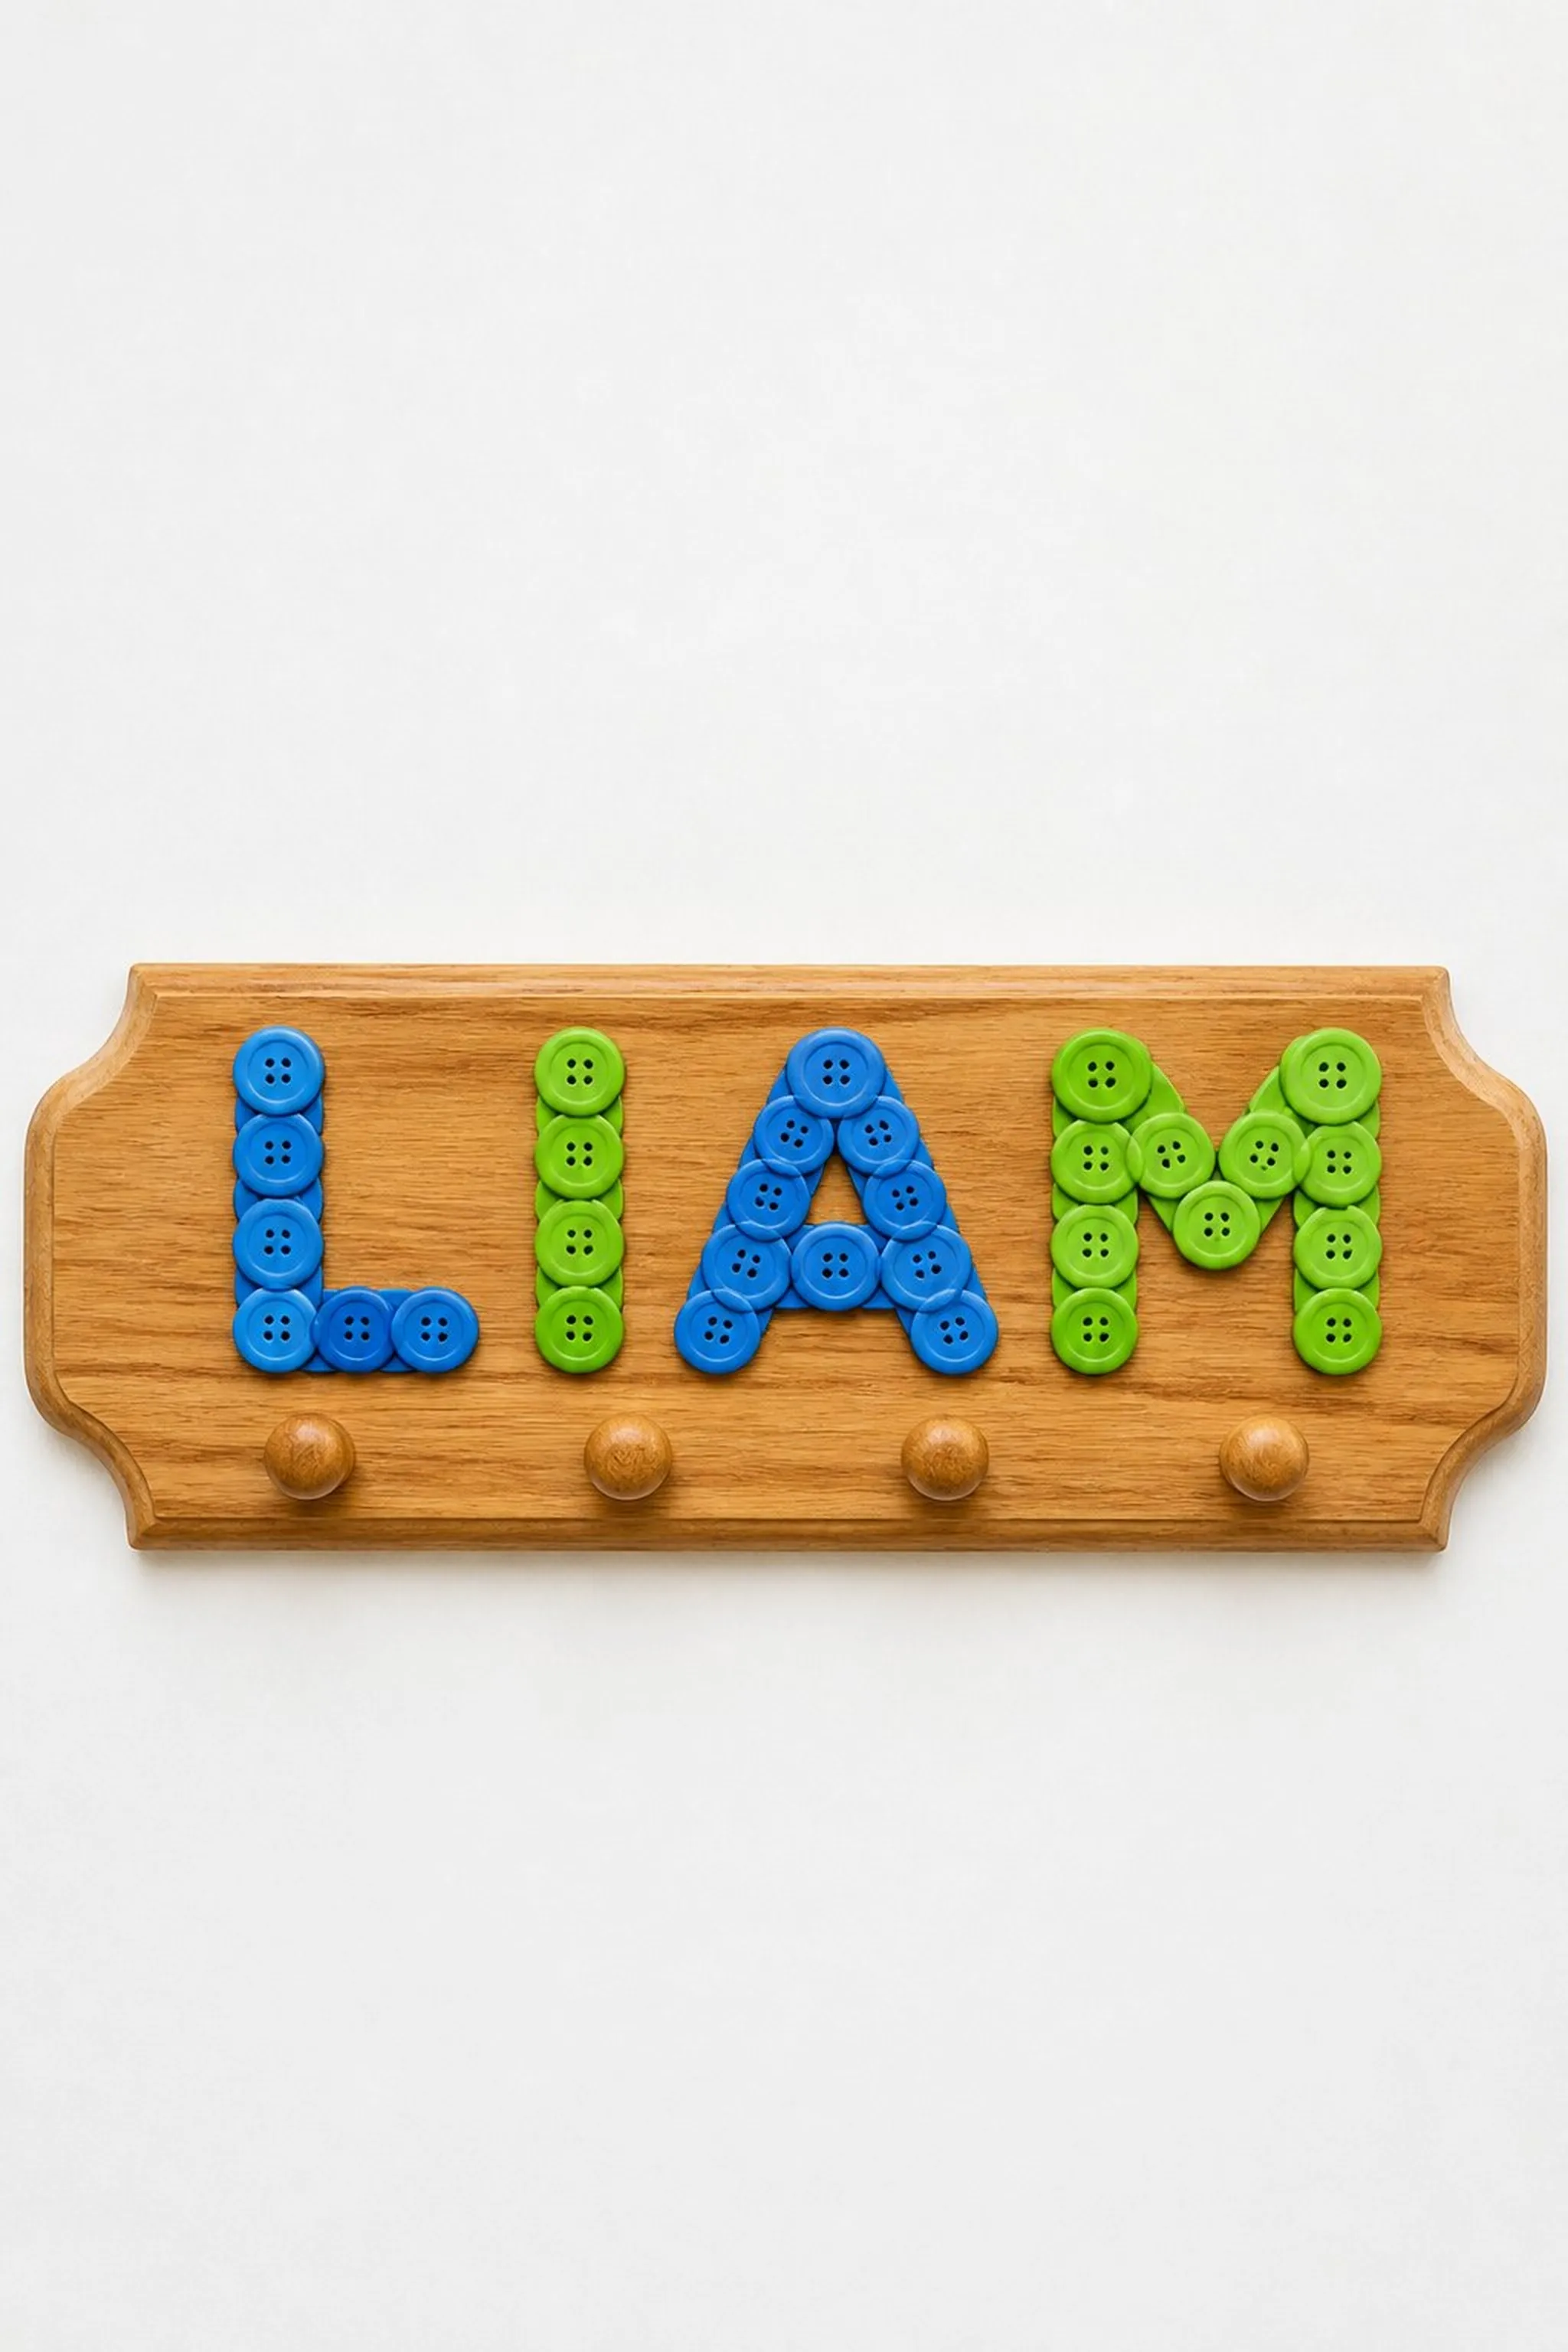
The plaque measures 15 by 8 inches and displays a child’s name spelled out entirely with buttons. Bold blue and green buttons of various diameters fill each letter, roughly 3 to 4 inches tall, while a matte white background creates crisp contrast. The button placement curves slightly to mimic handwritten lettering.
Glossy buttons with smooth and ridged edges create a playful texture for fingers, while the baseboard’s sturdy, sanded wood ensures durability. This project blends personal identity with tactile art, brightening any bedroom corner.
Pro Tip: Opting for larger buttons for the main letter bodies and smaller accent buttons for curves keeps the text clear and appealing.
How to Make This
- Sketch the name on the baseboard with pencil in large, rounded letters.
- Select buttons matching the colors chosen for the name.
- Apply craft glue on individual letters in sections.
- Press buttons closely to fill each letter shape completely.
- Leave to dry before displaying.
Avoid: Not spacing buttons closely enough can make the letters appear fragmented and less legible from a distance.
Try Also: Use a two-tone gradient with buttons for a color fade, try seasonal colors like orange and black for Halloween, or incorporate sparkly buttons for festive flair.
Products & Materials
Items Used
- wooden baseboard
- blue and green assorted buttons
- craft glue
“Personalized button art spells out names with vibrant texture and color.”
Button Flower Bouquet on Canvas
⏱️ 1.5 hours · 🟠 Intermediate
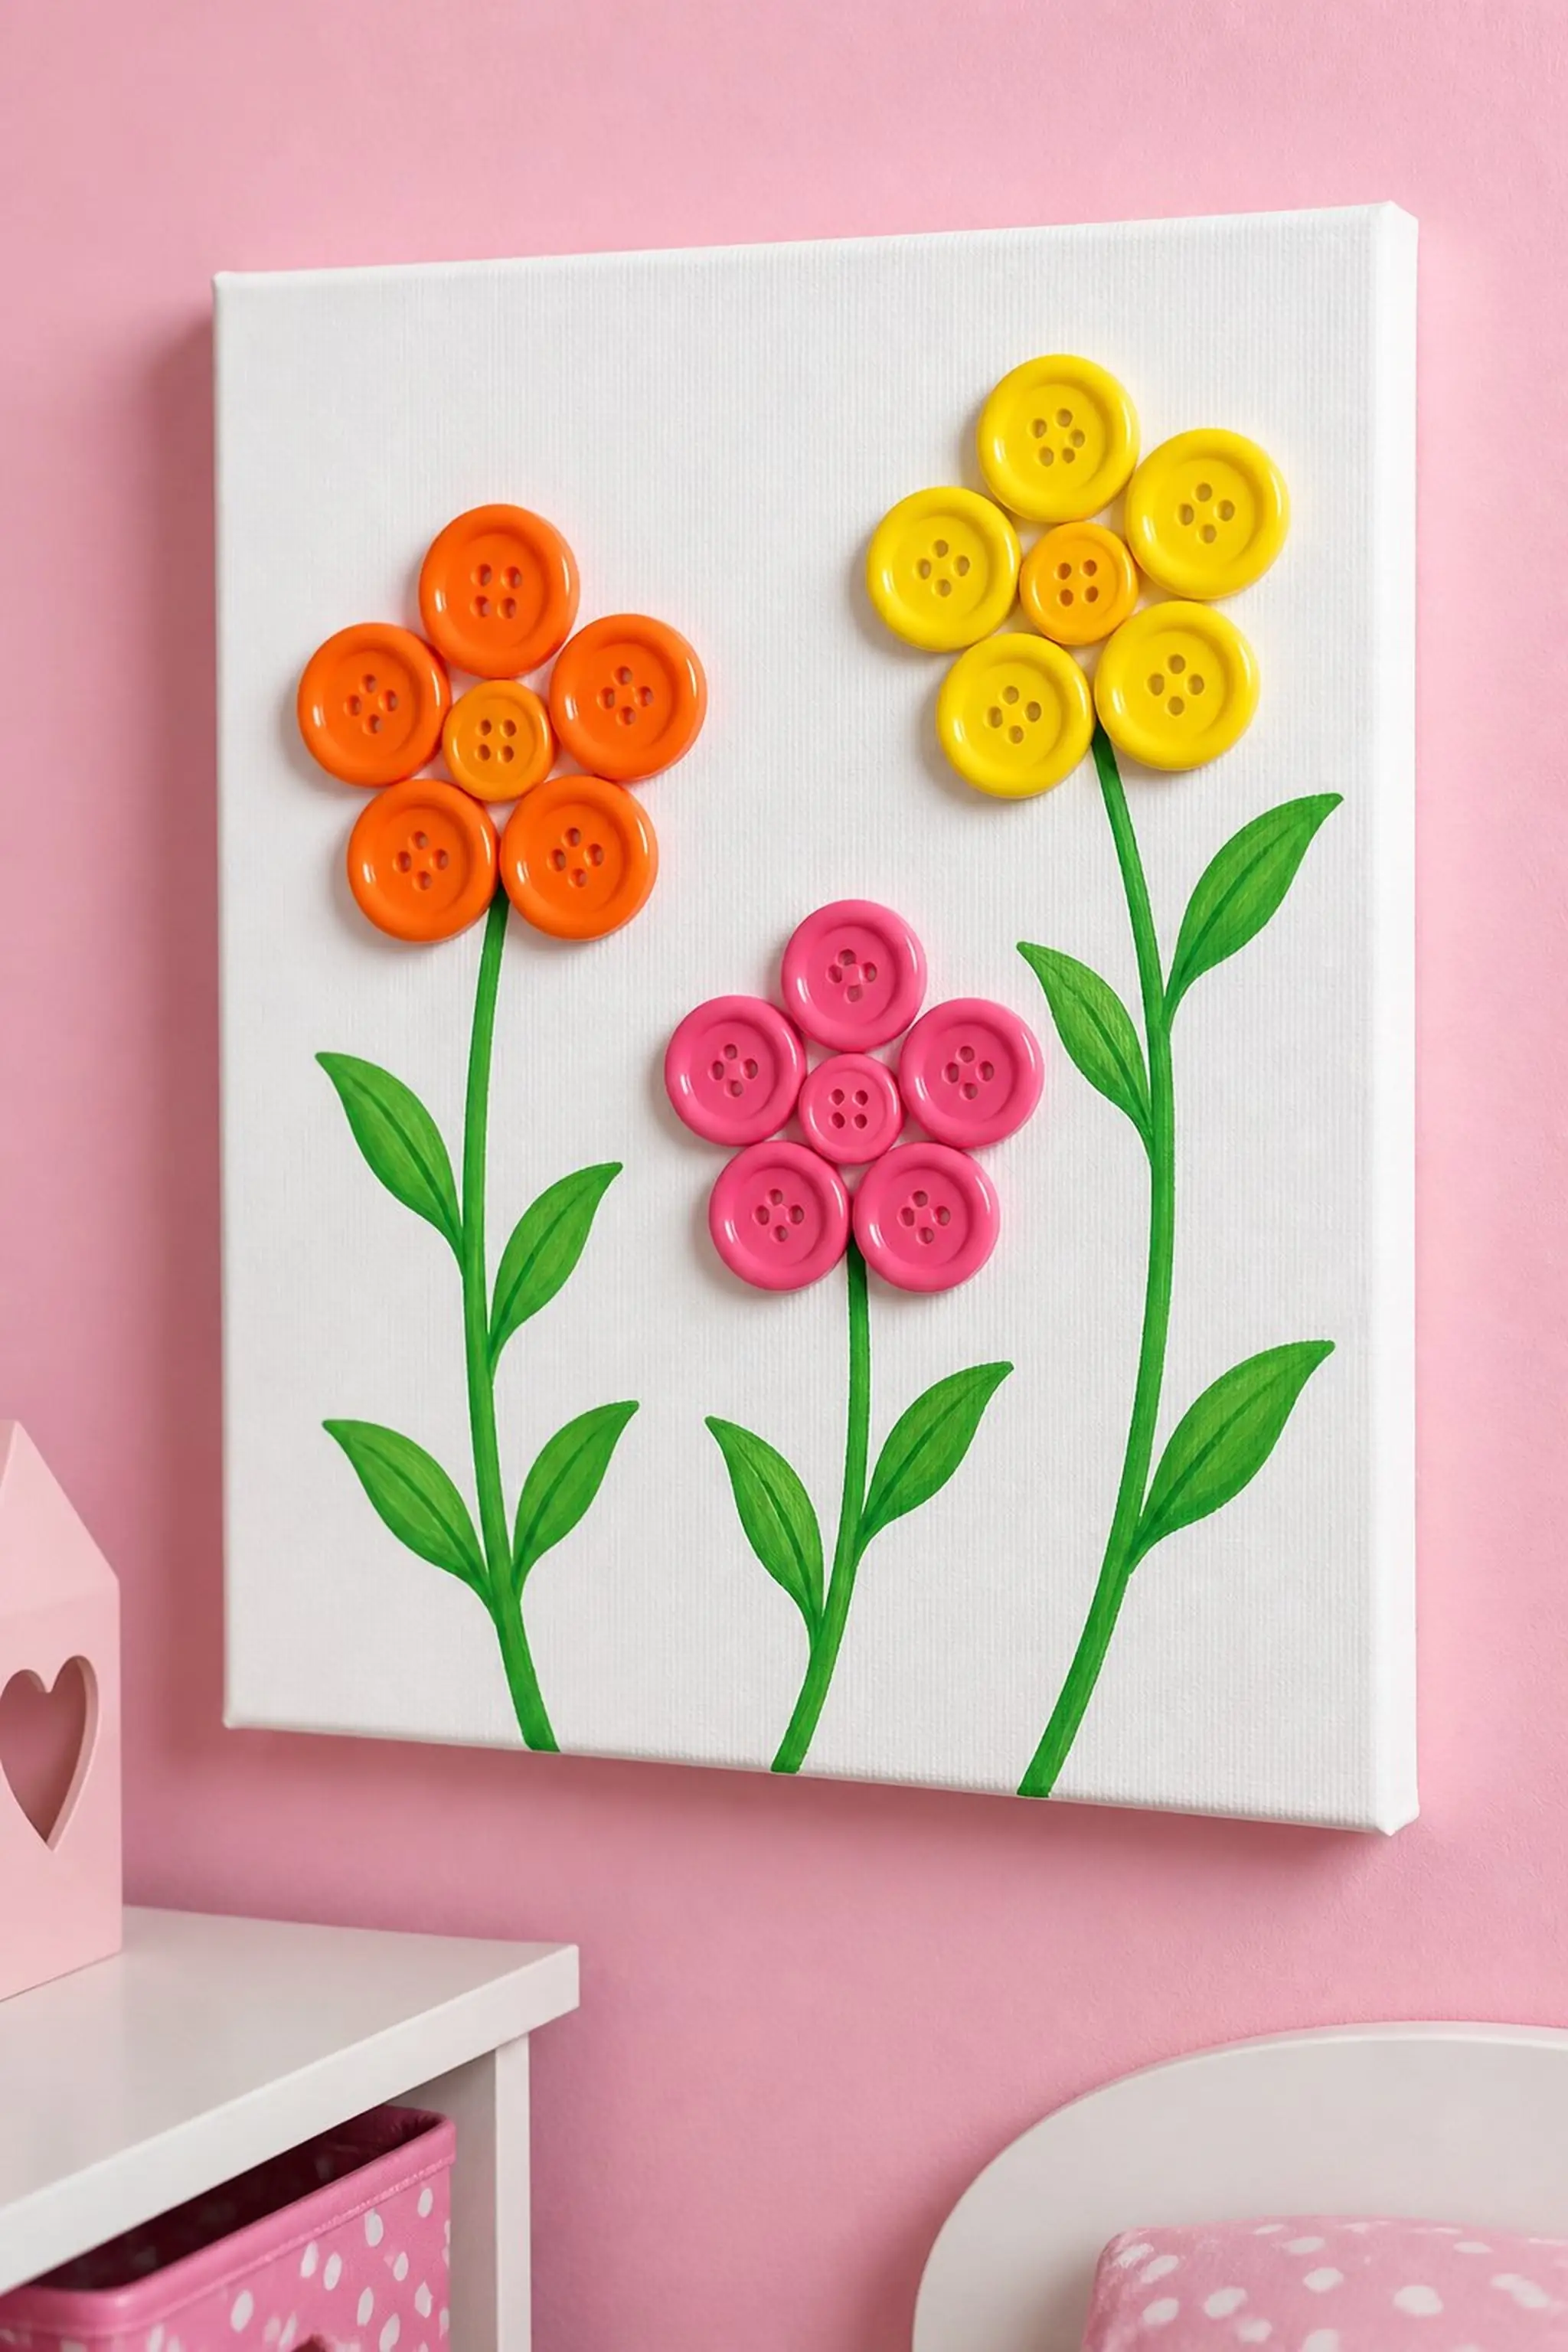
Set against a 12-by-12 inch white canvas, a vivid bouquet blooms with bright orange, pink, and yellow buttons as flower heads. The stems and leaves are painted in rich forest green, contrasting with the round, glossy buttons that vary from 0.5 to 1 inch in diameter. Button clusters mimic petals and add charming dimensionality.
A subtle shadow cast by the raised buttons emphasizes the depth, while the textured canvas weave adds a tactile layer beneath the shiny surfaces. This piece brings a burst of garden cheer to any kid’s room.
Pro Tip: Buttons in odd numbers, like groups of three or five, naturally emulate petal arrangements and feel more organic visually.
How to Make This
- Paint slender green stems and leaves on the canvas and allow to dry.
- Select buttons in warm colors for flower heads.
- Attach buttons closely in clusters along the painted stems.
- Fill spaces with smaller buttons or beads if desired.
- Allow to dry fully before hanging.
Avoid: Applying buttons before the painted stems are completely dry can cause smudging and uneven texture.
Try Also: Mix in some pearl or wooden buttons for alternating textures; change flower colors to cooler tones like blues and purples; add button bees for an adorable touch.
Products & Materials
Items Used
- canvas panel
- acrylic paint
- orange pink yellow buttons
- craft glue
“Bright button flower bouquet blooms with vivid color and tactile charm.”
Save time and printer ink with 50+ printable templates and step-by-step instructions in one ad-free guide.

Just $19.99 — lifetime access
Craft a Button Mosaic Shape Frame
⏱️ 3-4 hours · 🔴 Advanced
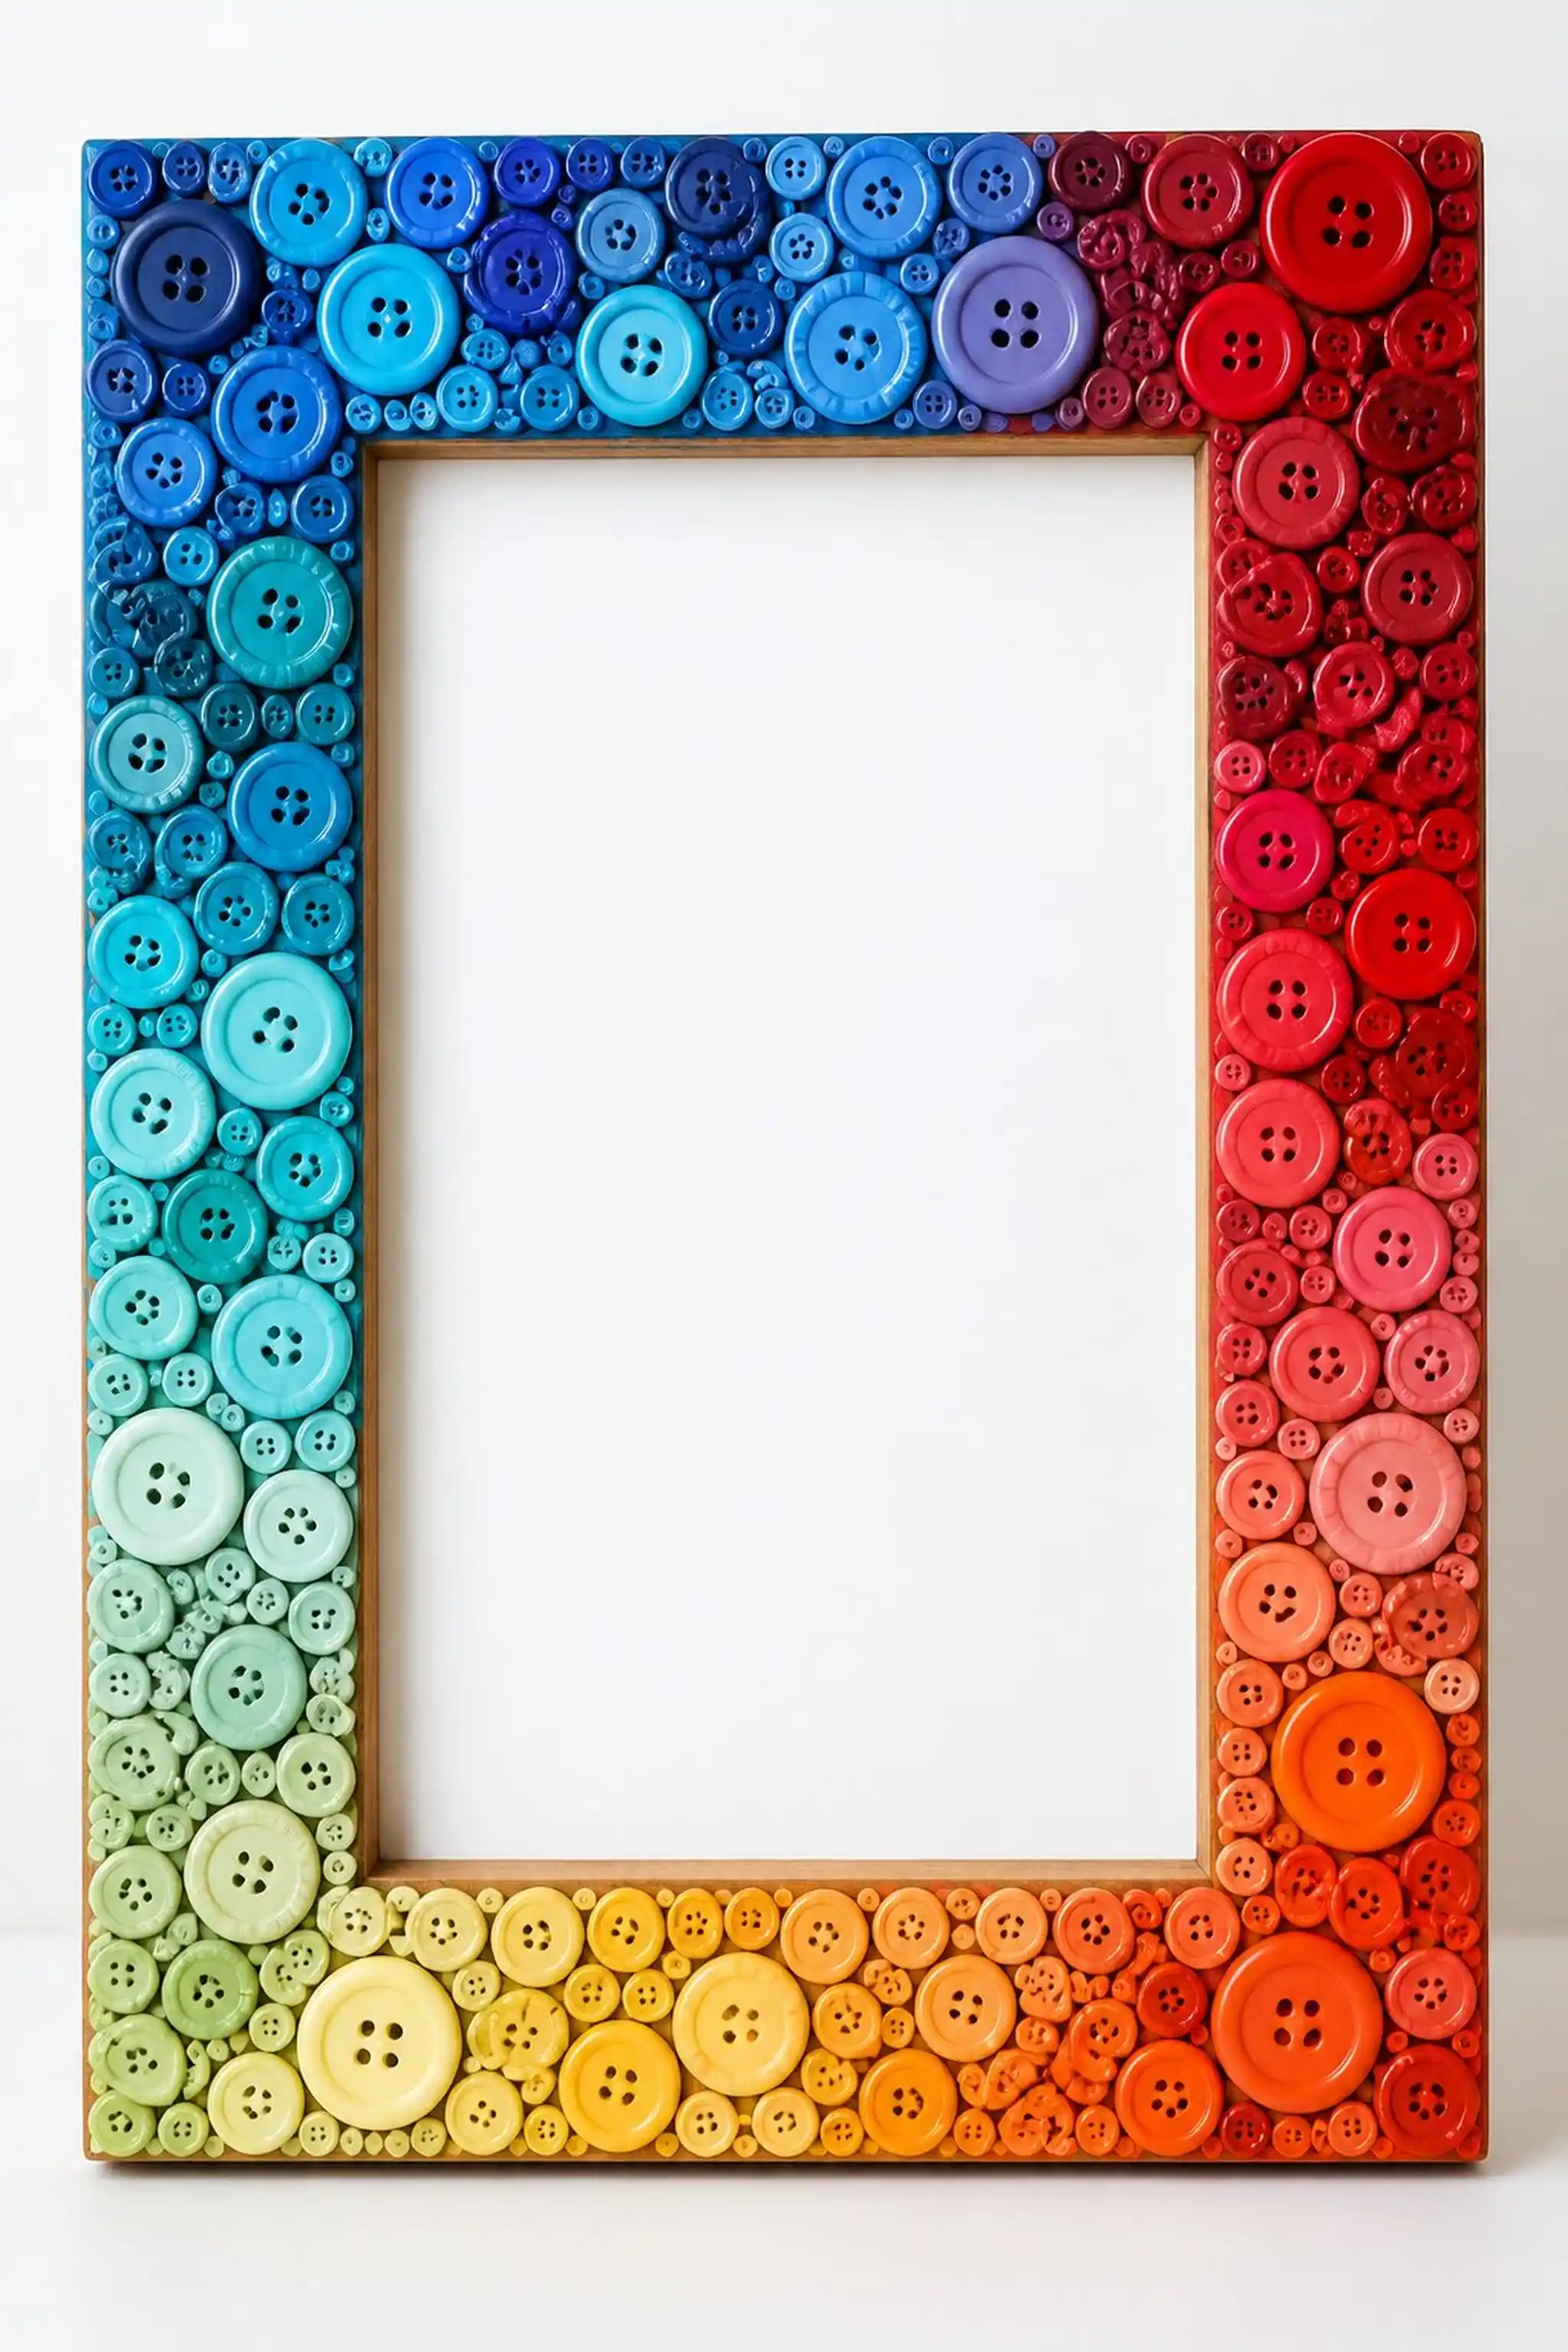
A rectangular wooden frame, 10 by 14 inches, transforms into a vivid mosaic through hundreds of tiny buttons meticulously sorted by size and color. The color palette switches gradually from cool blues to warm reds, blending seamlessly across the frame. The button pattern mimics stained glass technique, with slight elevation differences adding a textured puzzle-like feel.
Each button is carefully placed to maintain consistent spacing of about 2 millimeters, creating an intricate surface that begs to be touched. This addition brightens up reading nooks or play areas with its handcrafted allure.
Pro Tip: Consistent button spacing is crucial to maintain the mosaic appearance and prevent clumping or uneven texture.
How to Make This
- Remove glass from the frame for easier button placement.
- Sort buttons by color and size for gradient effect.
- Apply glue in small sections inside the frame edges.
- Place buttons tightly with minimal gaps for mosaic effect.
- Allow to dry completely before reinstalling glass or hanging.
Avoid: Spacing buttons inconsistently often disrupts the mosaic flow and makes the pattern look uneven or messy.
Try Also: Try creating a letter or symbol mosaic using button colors; incorporate clear or translucent buttons for light-catching effects; vary shapes by mixing round and square buttons.
Products & Materials
Items Used
- wooden photo frame
- assorted small buttons
- craft glue
“Intricate button mosaic frame dazzles with a smooth color gradient finish.”
Design a Playful Button Animal Portrait
⏱️ 2 hours · 🟠 Intermediate
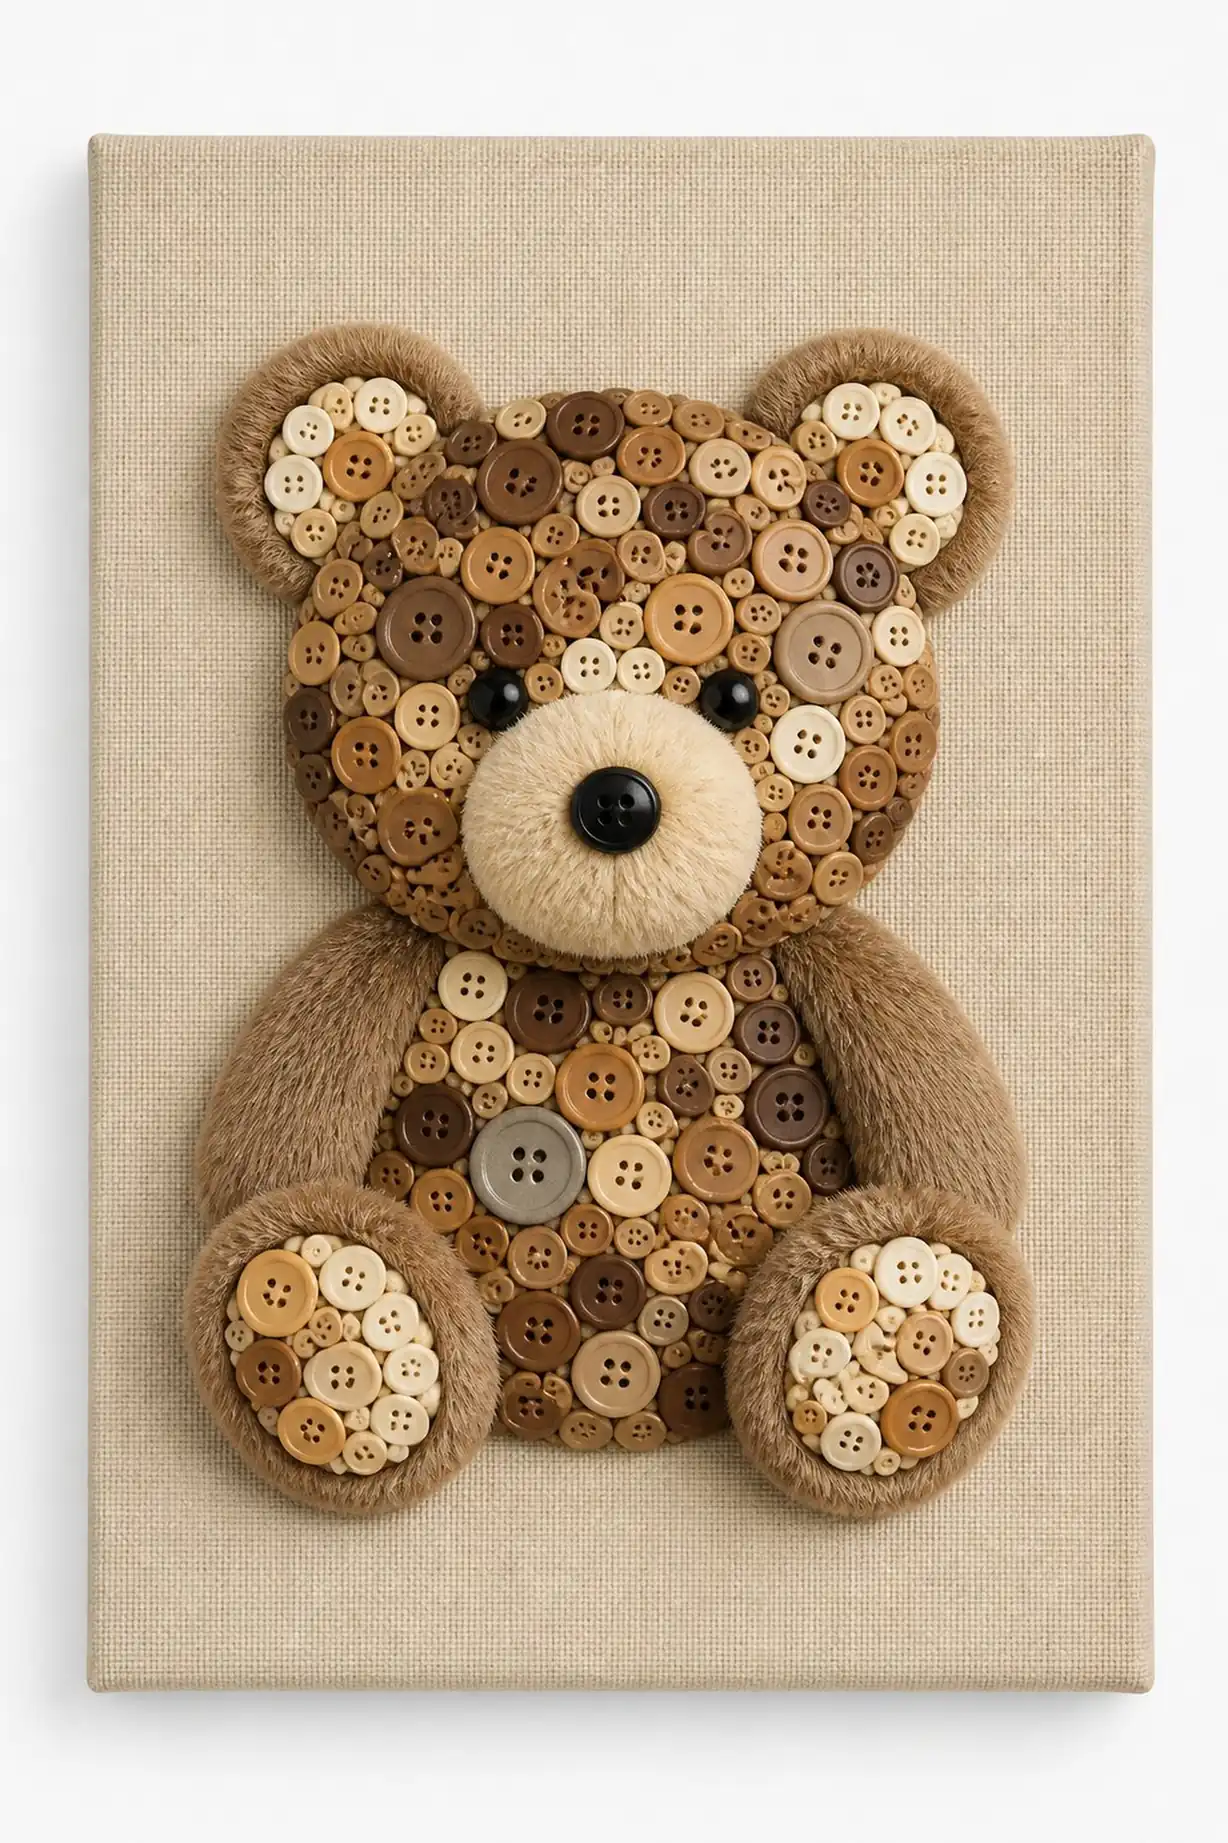
A charming animal face, roughly 12 inches in diameter, is formed on a canvas with buttons in earth tones and pastels. Buttons compose the fur and facial features, with smaller black buttons used for detailed eyes and nose. Texture varies from matte to glossy finishes, creating a lifelike expression and inviting exploration.
The background consists of a pale beige fabric stretched tightly, which contrasts gently with the vibrant buttons. This piece adds warmth and whimsy to a child’s room setting.
Pro Tip: Using buttons with different finishes creates contrast and depth, highlighting key facial features naturally.
How to Make This
- Select an animal silhouette and trace it on the canvas.
- Choose buttons in natural, earthy hues for most of the design.
- Apply buttons densely to form the fur and main features.
- Use tiny black buttons for eyes, nose, and accents.
- Wait for glue to cure before displaying.
Avoid: Crowding buttons too closely can result in an indistinct shape and lost detail, especially in facial features.
Try Also: Experiment with animals like cats, owls, or foxes; alter button colors for fantasy creatures; add fabric or felt patches for mixed textures.
Products & Materials
Items Used
- canvas panel
- earth tone buttons
- fabric background
- craft glue
“Adorable button animal portraits add color and texture to kid spaces.”
Construct button-covered picture frames
⏱️ 45 min · 🟢 Beginner
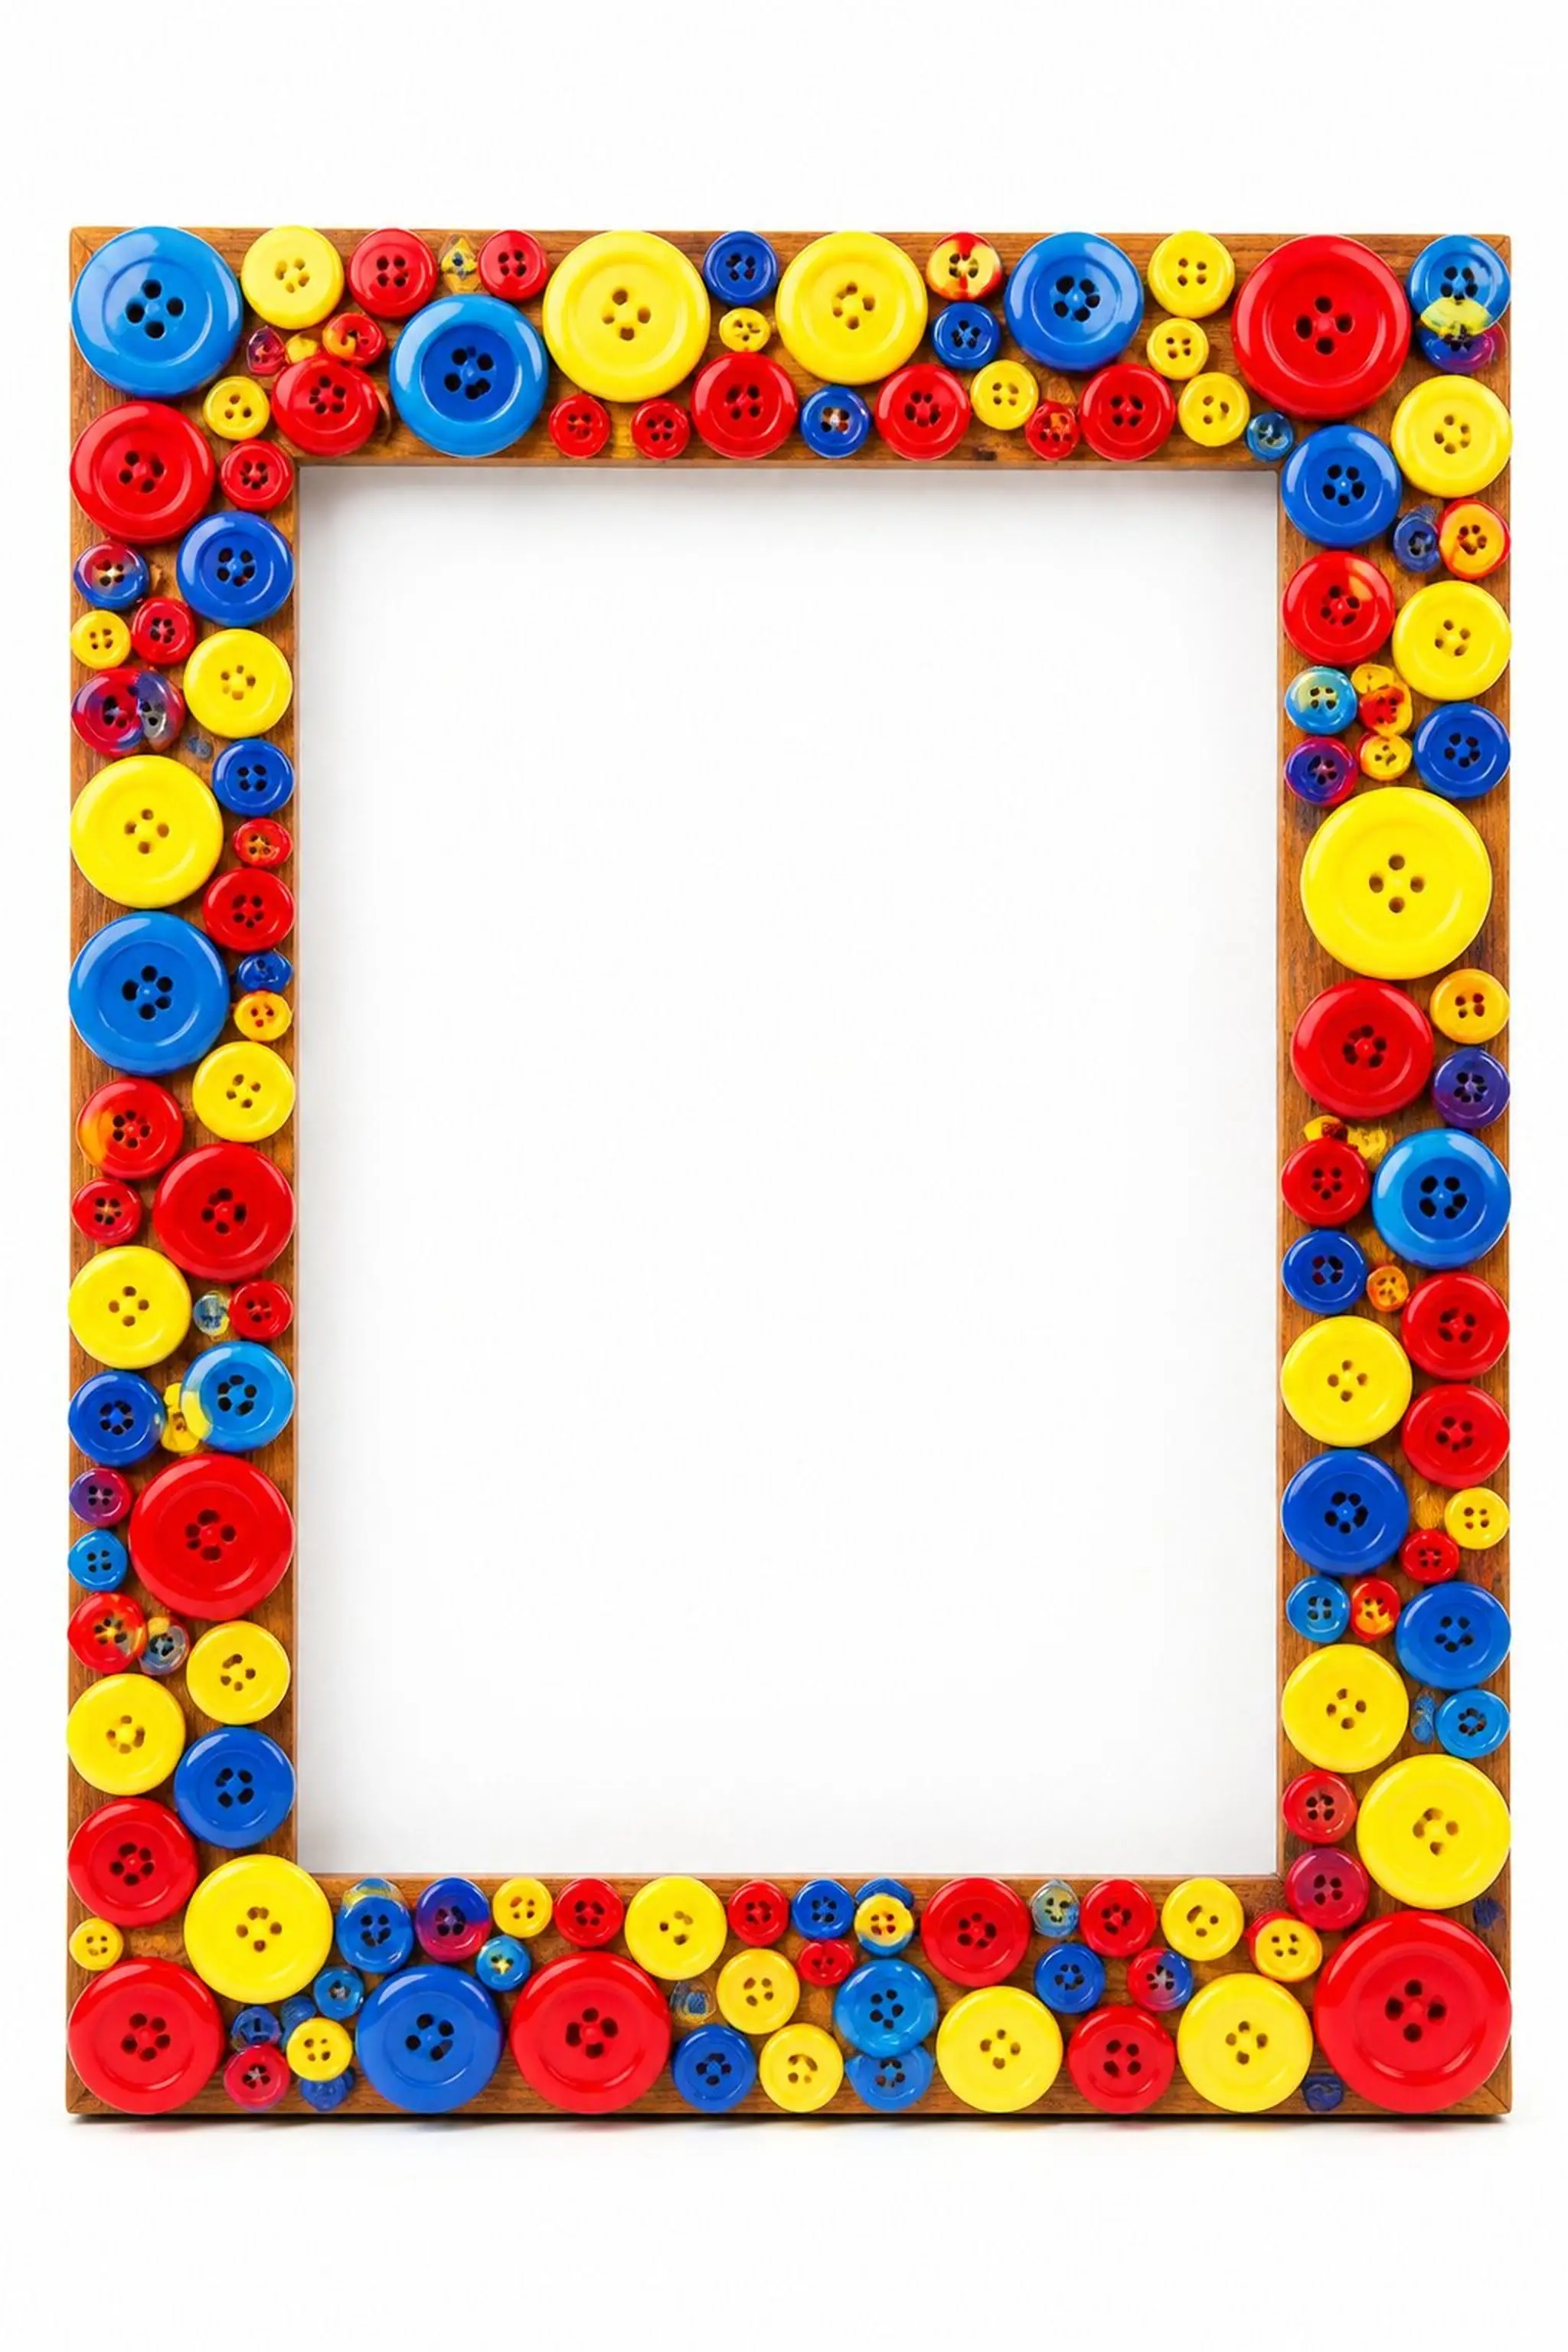
A simple wooden picture frame about 8 by 10 inches brightens with colorful buttons glued closely along the edges. Buttons of various colors—red, yellow, blue—form a playful border. Their smooth plastic surfaces contrast nicely against the raw wood grain visible between them.
This frame holds pictures or drawings, turning everyday photos into whimsical wall art. The ease of placement and quick drying times mean it can brighten spaces swiftly.
Pro Tip: Choose buttons uniformly sized around 0.75 inches for a tidier edge and more consistent texture along the frame border.
How to Make This
- Lay out buttons around the frame to plan placement.
- Apply glue to a section of the frame’s edge.
- Press buttons along the glued area sequentially.
- Fill any gaps with smaller buttons for coverage.
- Let dry before displaying pictures.
Avoid: Not planning the button arrangement beforehand may cause uneven gaps or color clustering.
Try Also: Use all one color for a more sophisticated look; mix in wooden buttons for organic texture; paint the frame before gluing buttons for color coordination.
Products & Materials
Items Used
“Bright button borders make picture frames pop with personality.”
Piecing a button heart wall decal
⏱️ 1.5 hours · 🟠 Intermediate
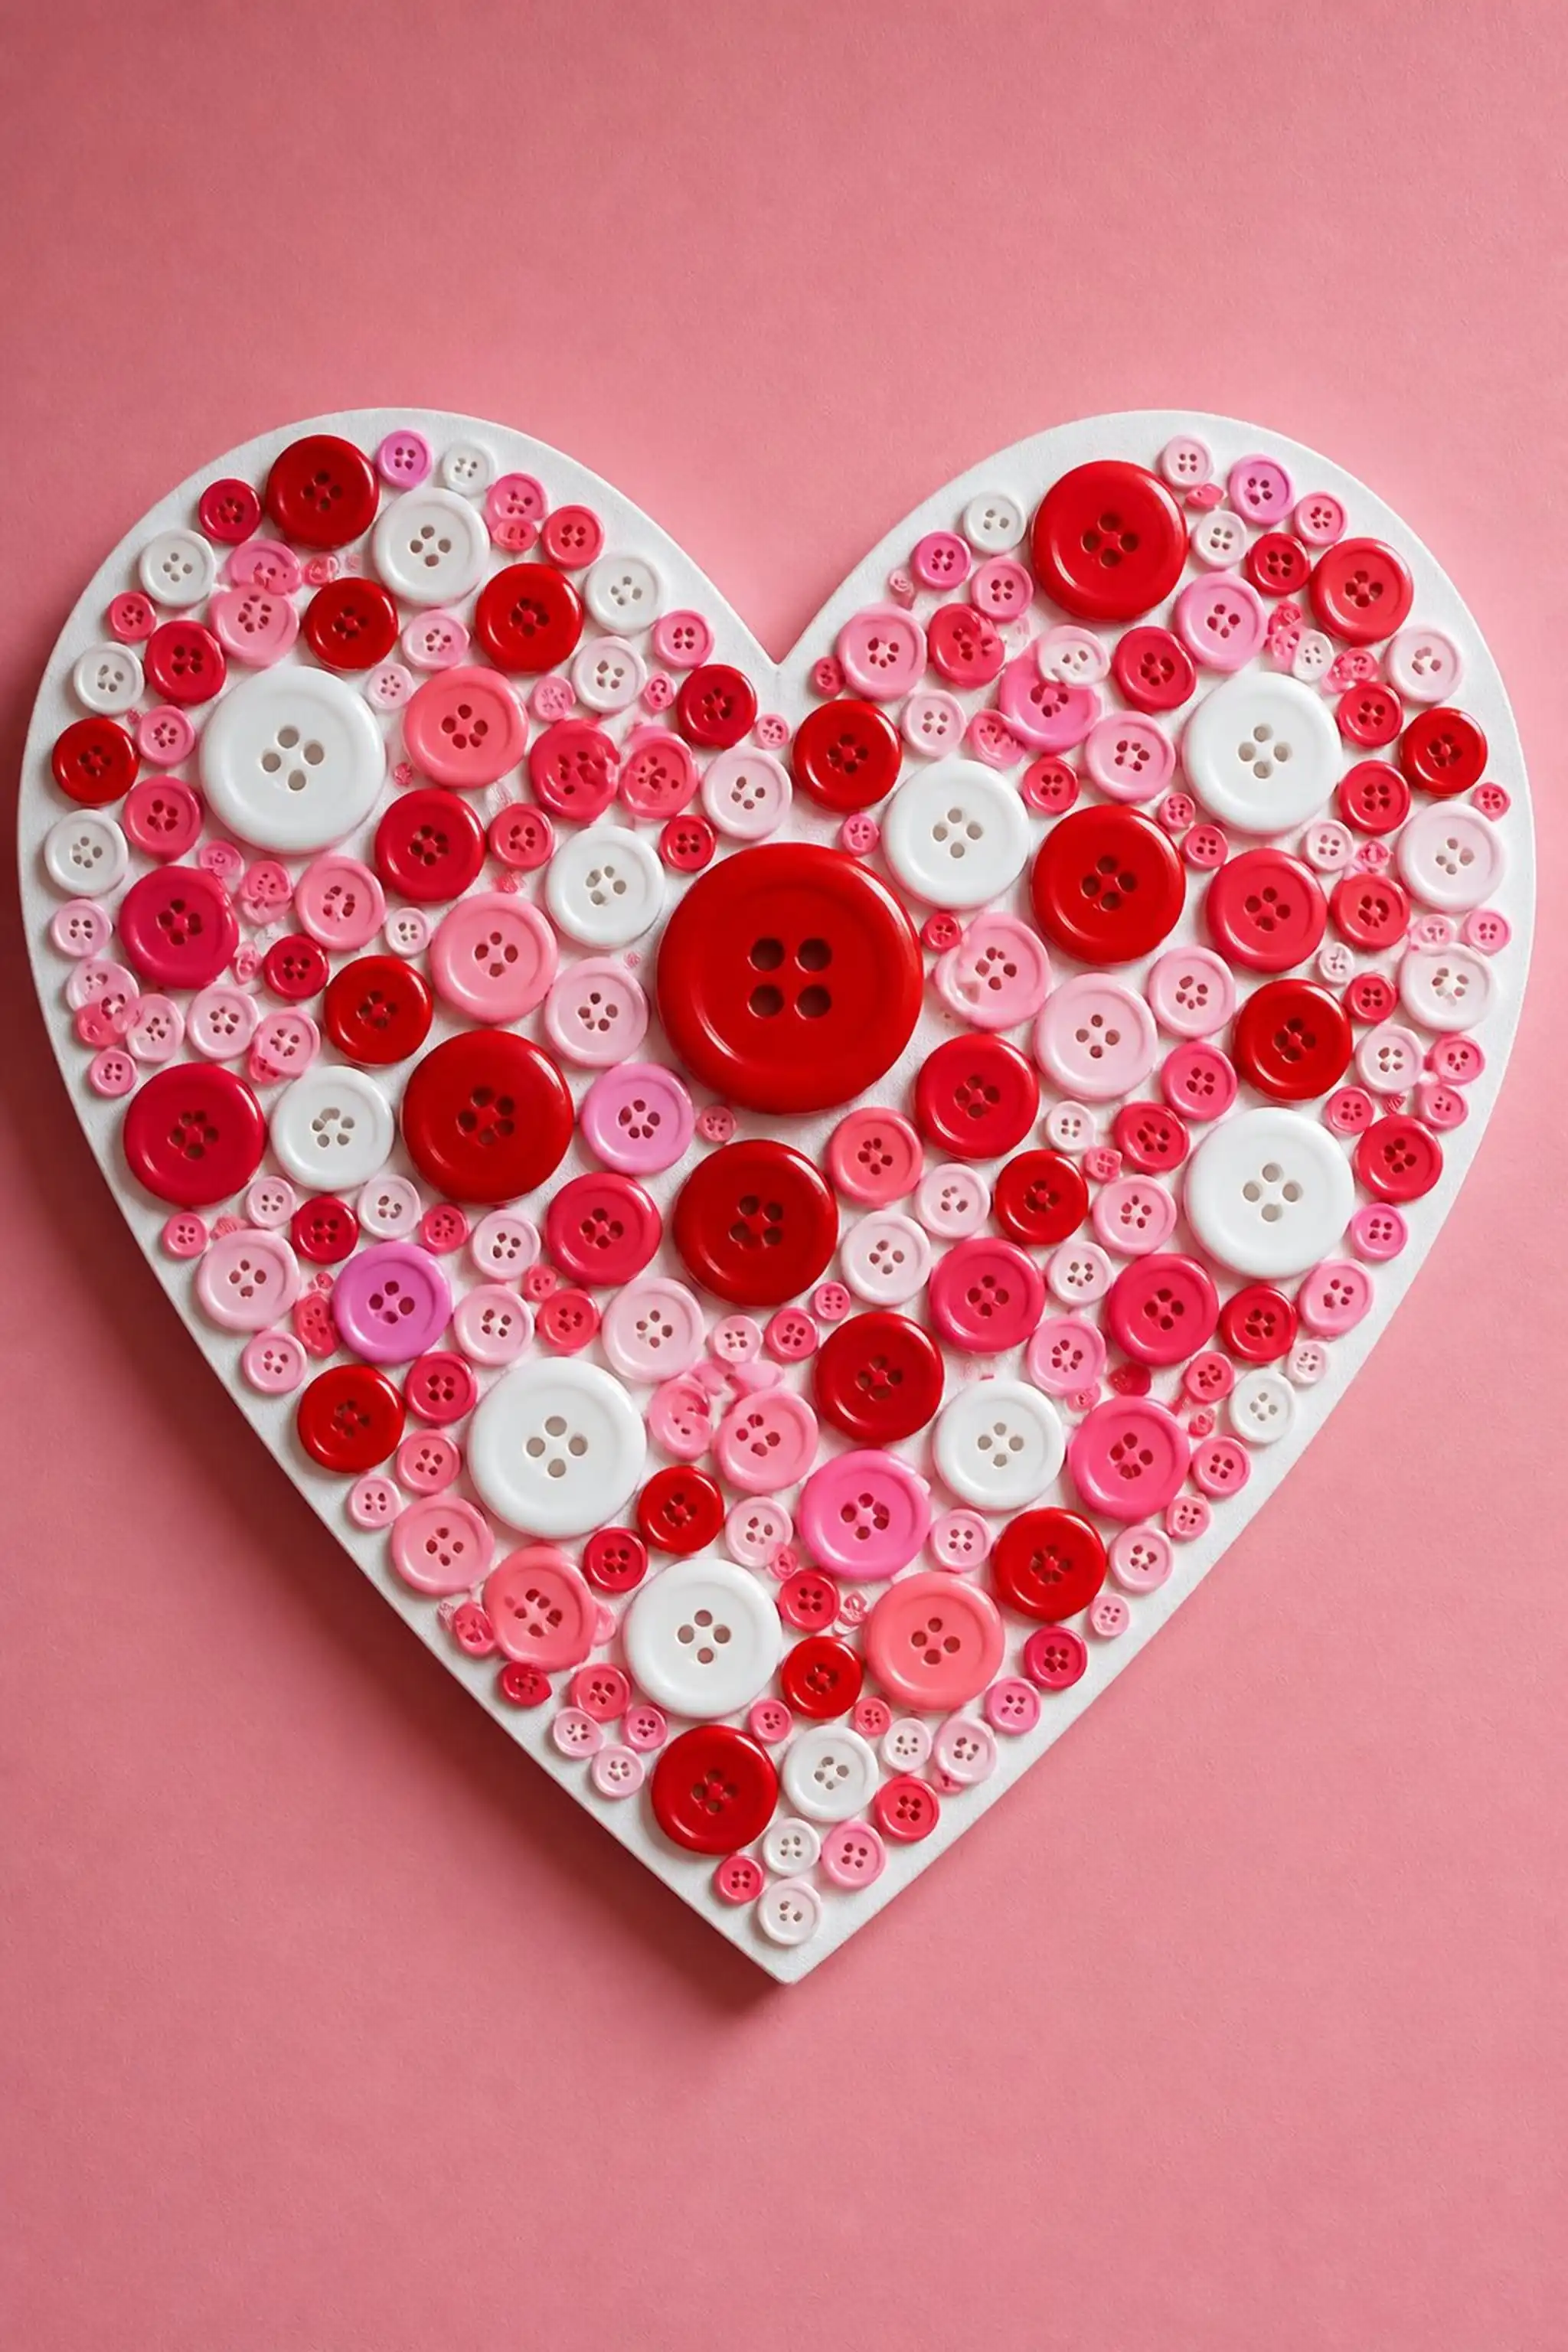
About 10 inches wide, a heart shape formed from red, pink, and white buttons resting on a lightweight foam board creates a tactile wall decal. The buttons range from 0.5 to 1 inch in diameter and are arranged densely with minimal gaps. A glossy red button cluster shines prominently near the center, reinforcing the heart’s focal zone.
The foam backing is painted matte white, reducing glare and ensuring the vibrant buttons command attention. This heart decal adds a warm glow to bedroom walls.
Pro Tip: Using a foam board backing keeps the piece light enough for easy hanging while providing firm support to the button layout.
How to Make This
- Draw a heart outline on a foam board sheet.
- Apply glue within sections of the heart shape.
- Attach buttons packed tightly following the color pattern.
- Fill in smaller gaps with tiny buttons or beads.
- Let glue set before mounting on the wall.
Avoid: Spacing buttons too loosely can weaken the cohesive shape and reduce tactile impact.
Try Also: Create other shapes like stars or animals; use ombré effect with button colors; add glitter paint on foam edges for extra sparkle.
Products & Materials
Items Used
“Glossy button heart creates charming tactile décor with bold colors.”
Compose a decorative button butterfly
⏱️ 2 hours · 🟠 Intermediate
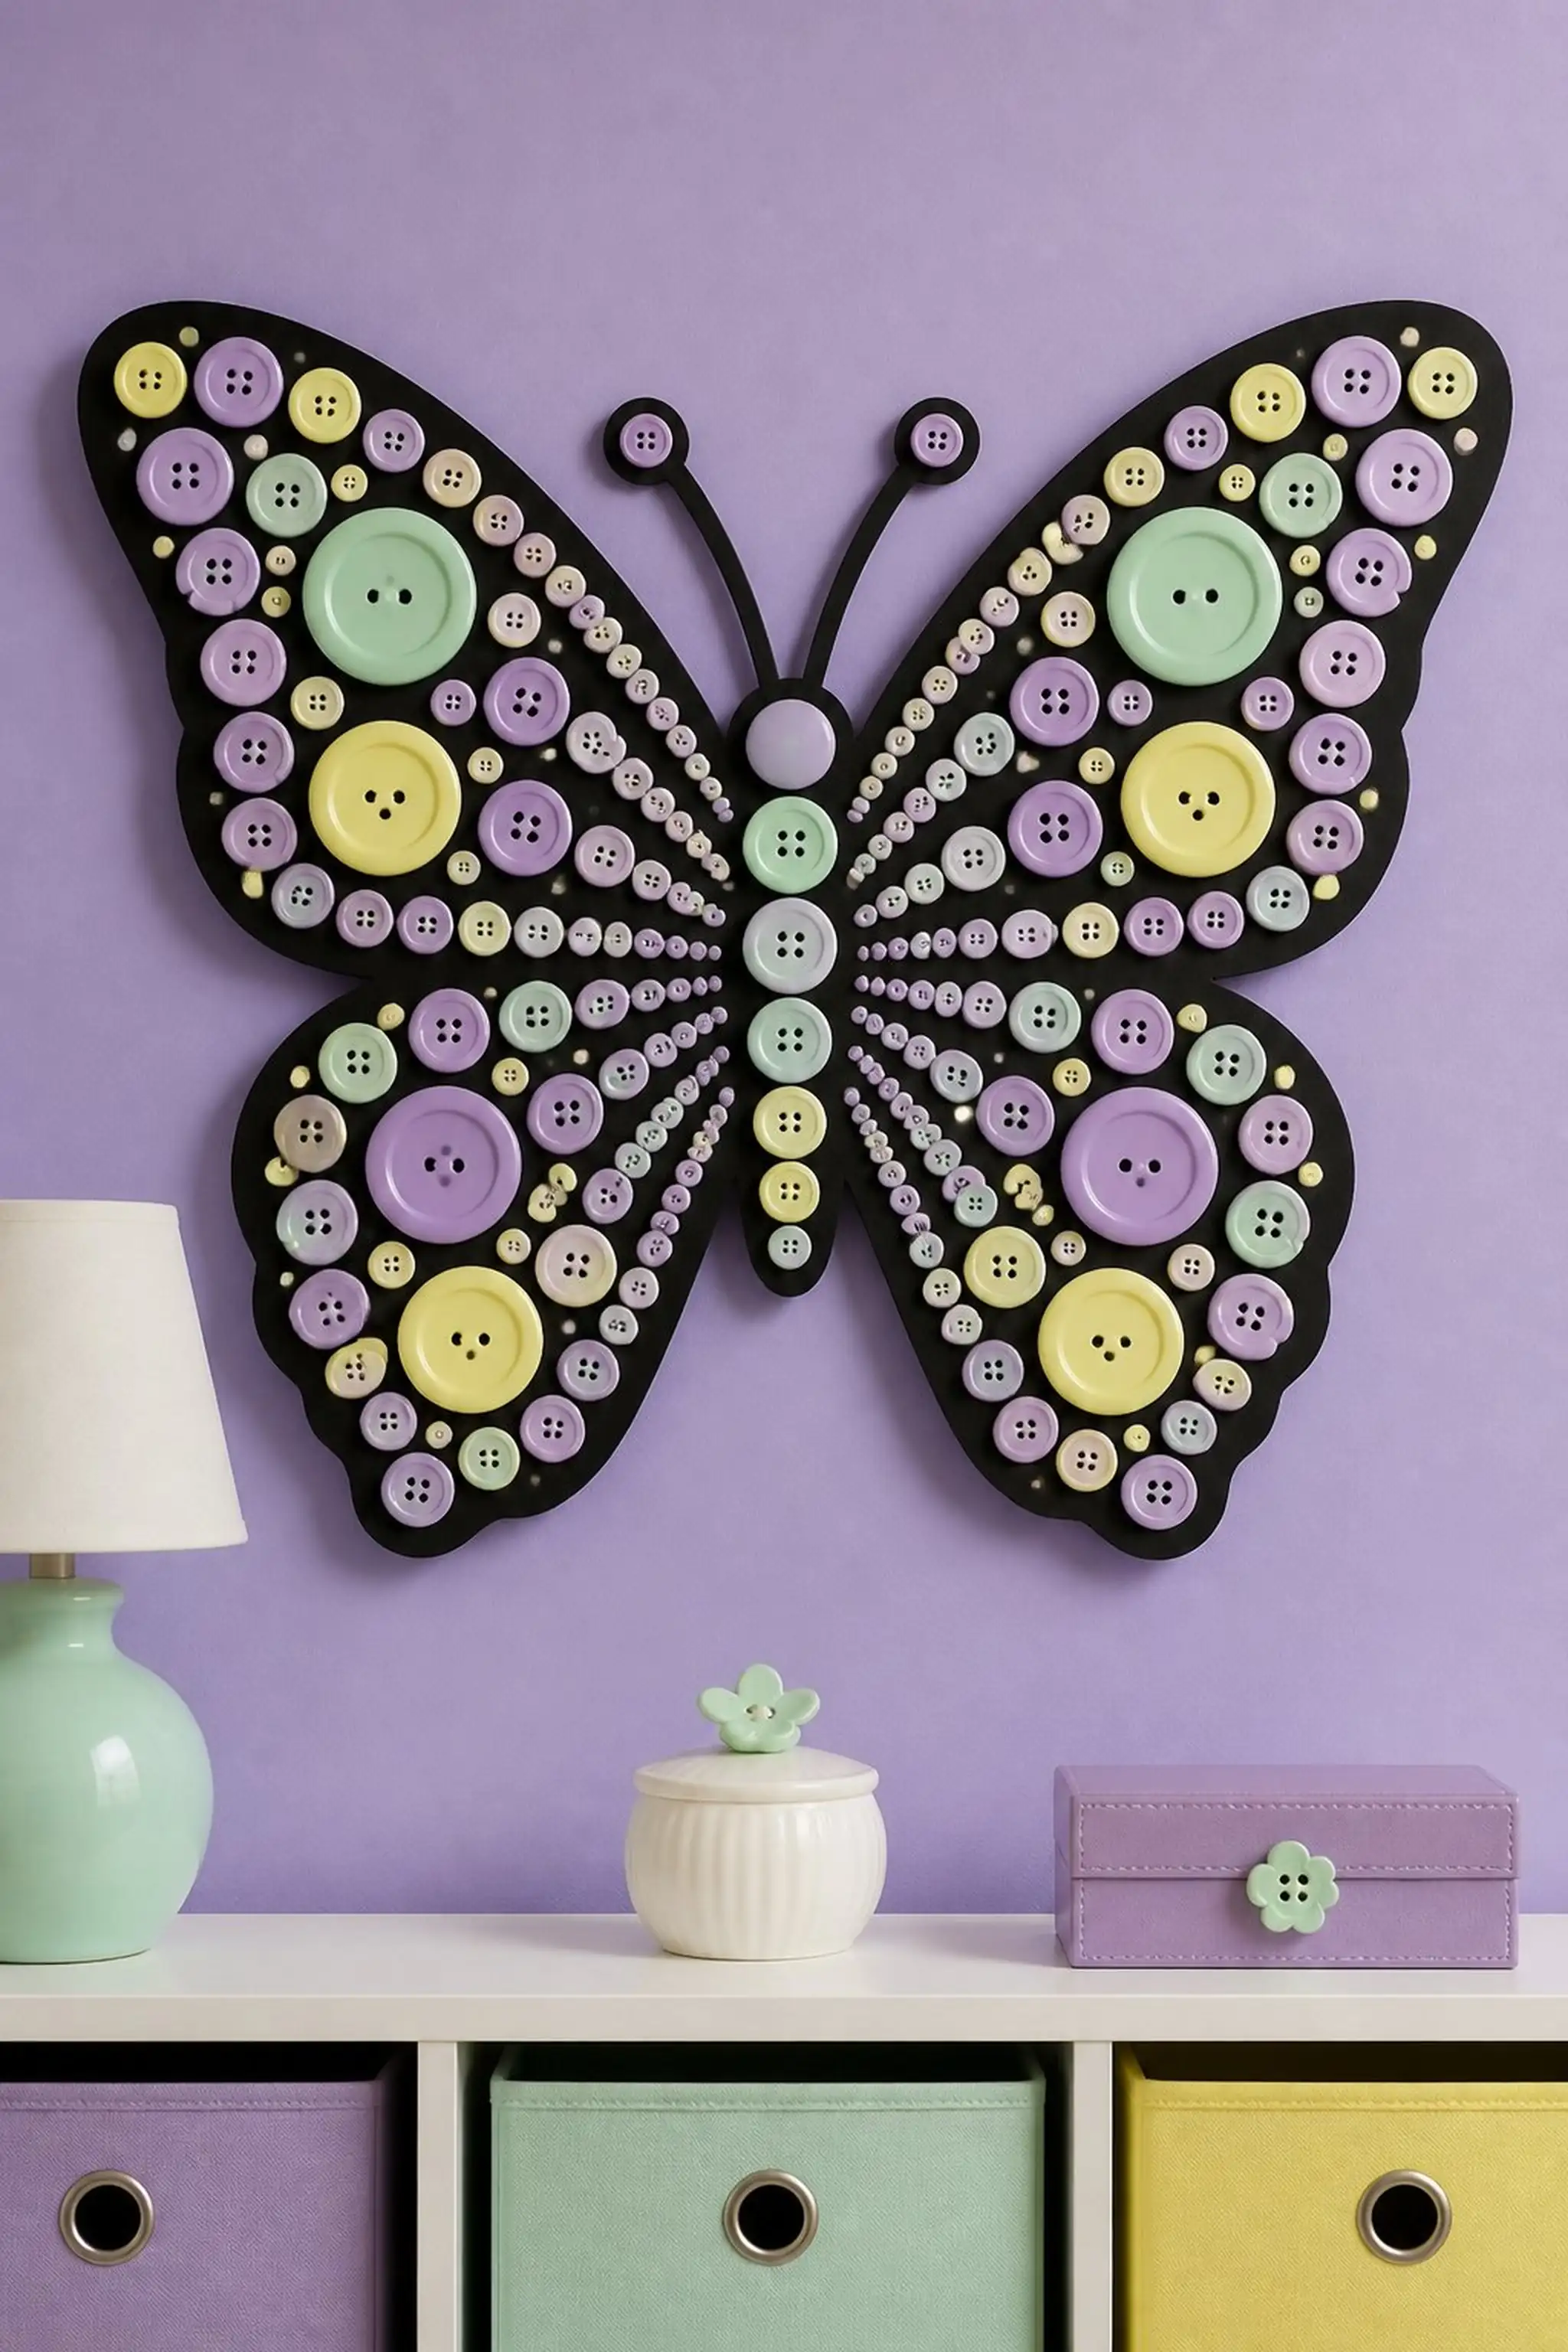
A 14-inch wide butterfly silhouette on black cardstock contrasts vividly with pastel buttons in lavender, mint green, and pale yellow. Buttons range from 0.5 to 1.2 inches, with subtle matte and satin finishes accentuating the delicate wing outlines. The wing pattern uses button shapes to mimic veins and spots.
Raised buttons create a slight 3D effect, and the thin cardstock backing keeps the piece lightweight for easy hanging. This butterfly adds whimsy and gentle hues perfect for playful decoration.
Pro Tip: Varying button finishes across the wings tricks the eye into seeing natural patterns and depth within the design.
How to Make This
- Trace or print butterfly shape on black cardstock.
- Gather pastel buttons sorted by size and shade.
- Use glue sparingly to fix buttons within outlined areas.
- Arrange buttons to highlight wing vein patterns.
- Allow paint or glue to dry before displaying.
Avoid: Using too much glue on thin cardstock can cause warping or soaking through, compromising the base.
Try Also: Switch pastel tones for brighter primary colors; use buttons mixed with small beads for intricate detail; add wire antennae for 3D effect.
Products & Materials
Items Used
- black cardstock
- pastel buttons
- craft glue
“Pastel button butterfly offers delicate, textured wall charm.”
Craft a button-covered letters wall art
⏱️ 1 hour · 🟢 Beginner
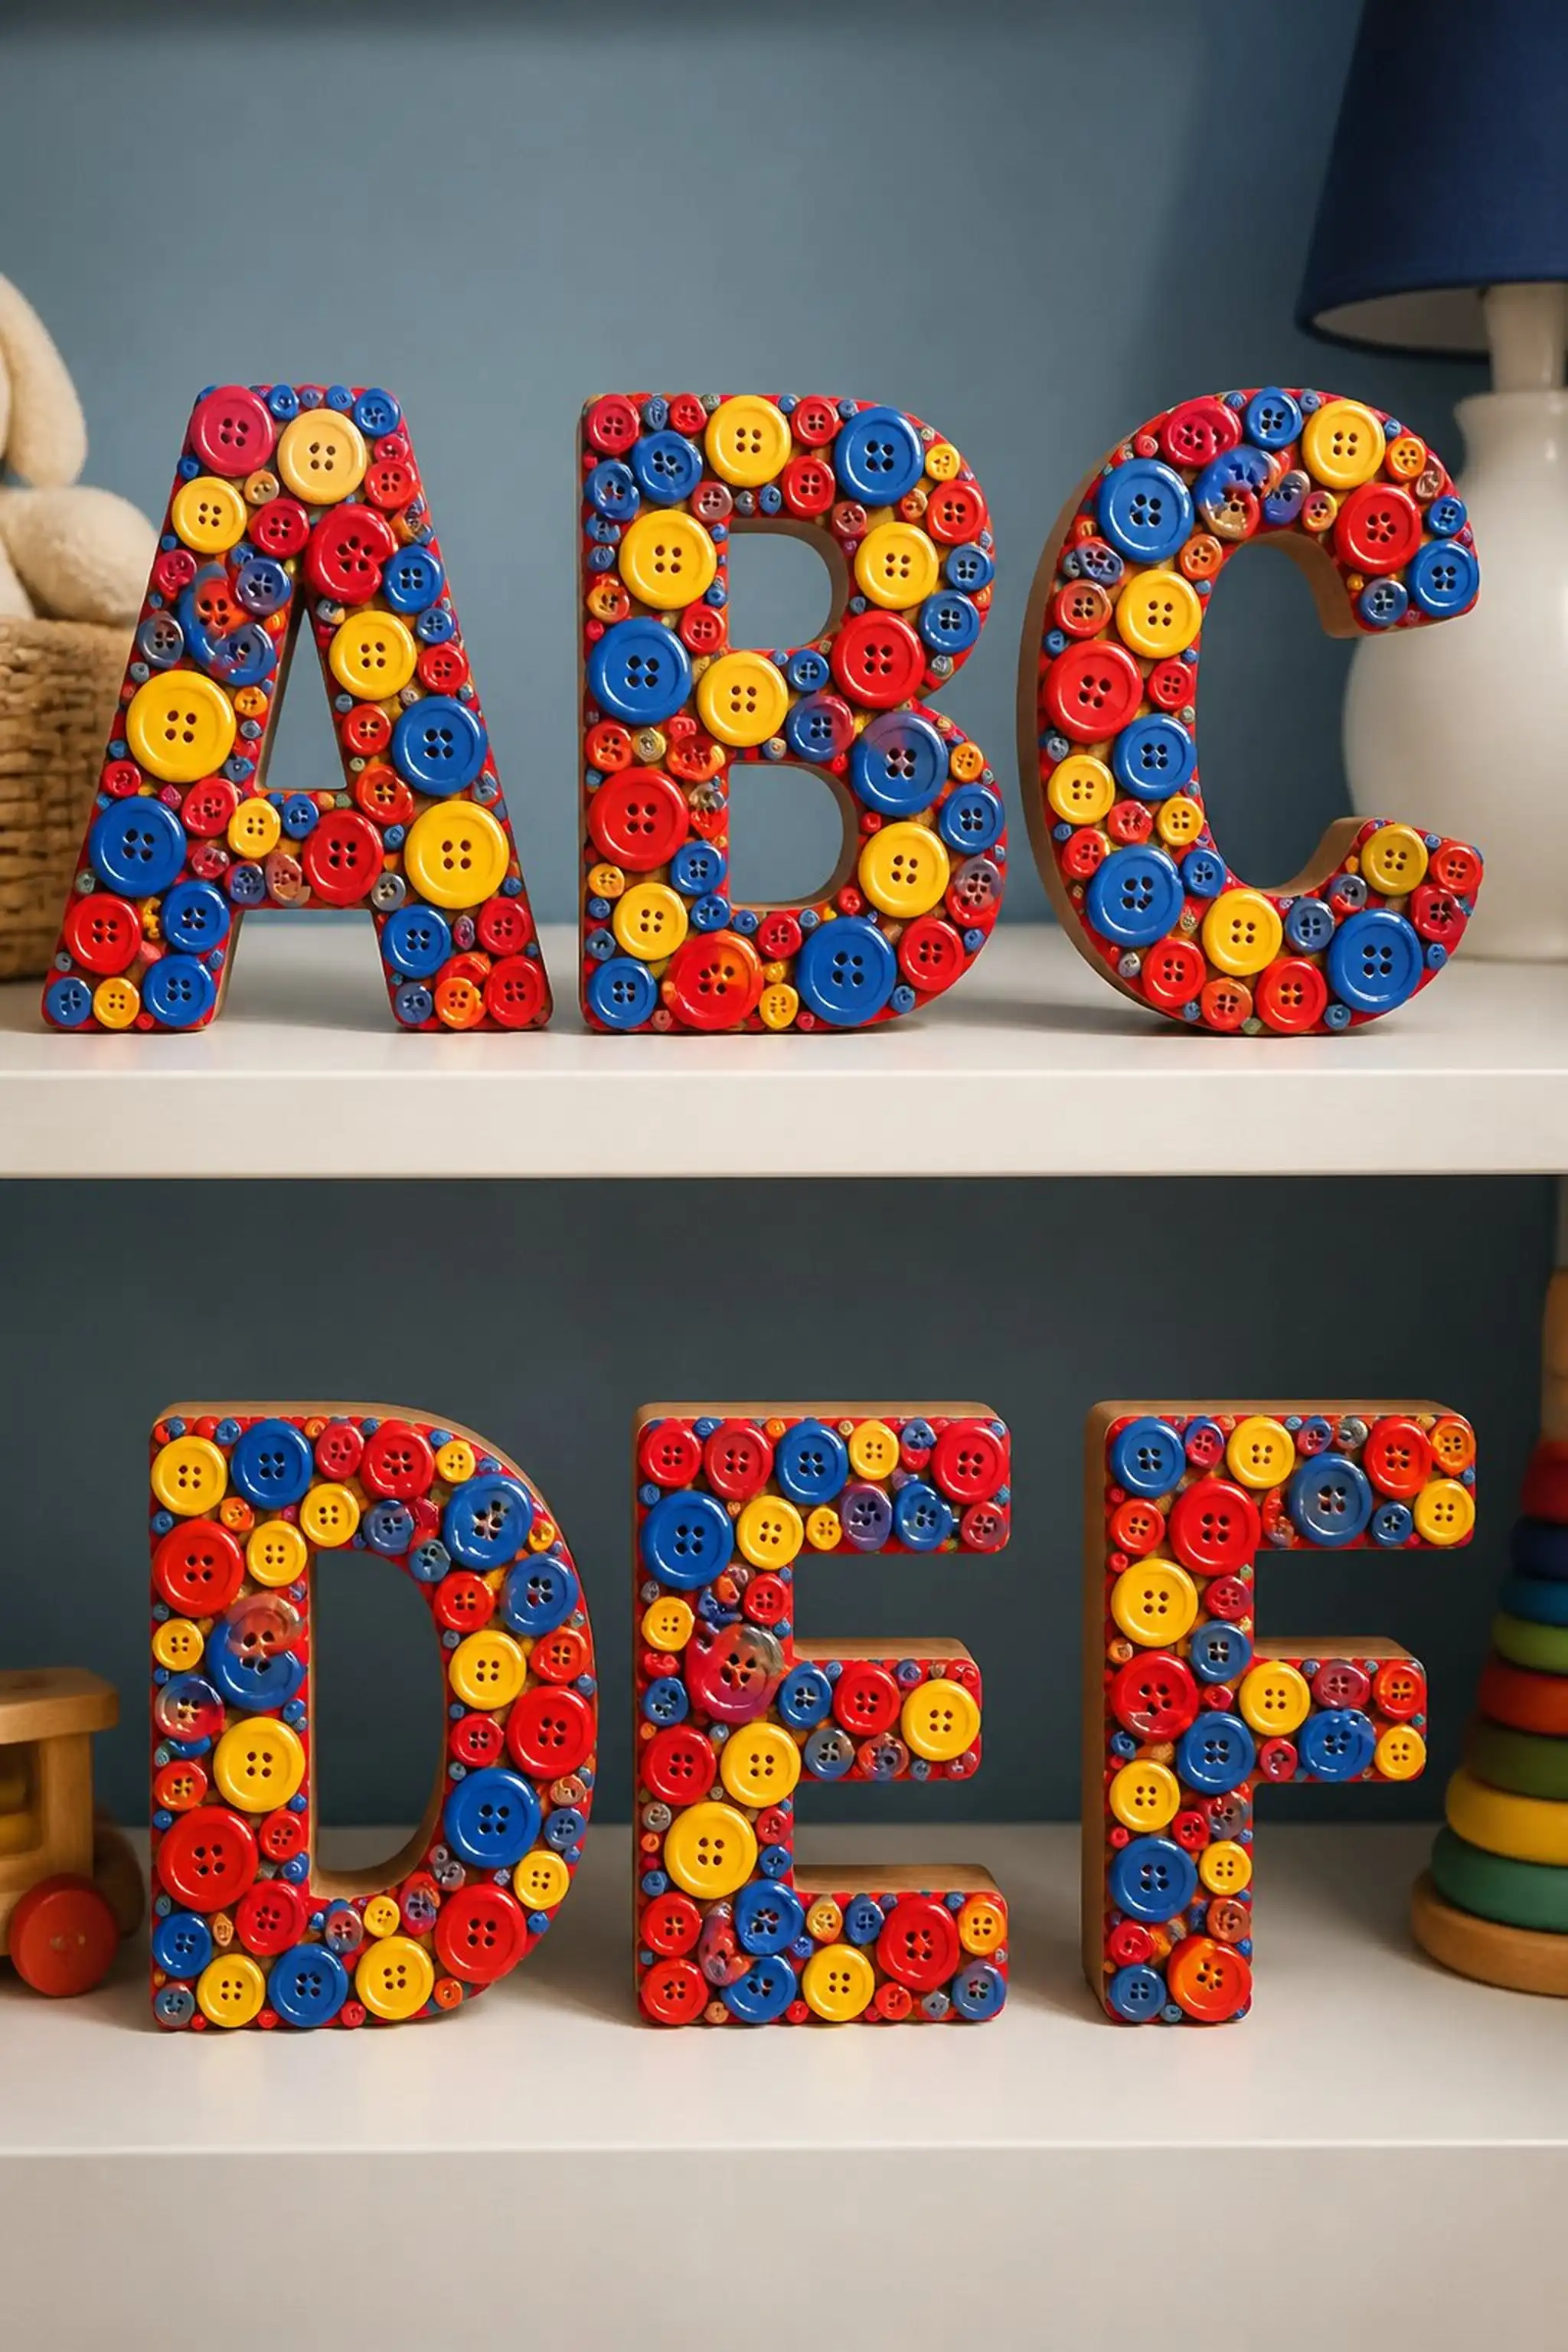
Large 6-inch wooden or foam letters serve as bases for gluing brightly colored buttons covering every surface. Buttons cluster tightly, measure up to 0.8 inches in diameter, and range in glossy reds, blues, and yellows. The letters stand out with a playful vibrancy on shelves or mounted directly.
The letters’ depth is about 1 inch, allowing button layers to create raised, rounded surfaces catching light dynamically. This project adds personalized flair and tactile decoration simultaneously.
Pro Tip: Applying buttons fully around edges ensures a polished 3D look visible from all angles.
How to Make This
- Select letters spelling out a name or word.
- Arrange buttons on a flat surface to estimate coverage.
- Glue buttons carefully over all visible letter surfaces.
- Fill gaps with smaller buttons to ensure full coverage.
- Let the letters dry before placing or hanging.
Avoid: Overlapping buttons unevenly causes an unbalanced surface that can snag or peel off over time.
Try Also: Try monochrome buttons for a sleek look, or mix textures like wood and plastic; paint letters before applying buttons for added background color.
Products & Materials
Items Used
“Button-covered letters bring bold color and texture to kid rooms.”
Form a button sunburst mirror frame
⏱️ 3 hours · 🔴 Advanced

A 20-inch diameter round mirror becomes the centerpiece of a dazzling sunburst frame formed by concentric button rings extending outward. Bright yellow, orange, and gold buttons radiate in sequences up to 2 inches long, catching sunlight to create reflections that shift throughout the day.
The frame uses a sturdy wooden base painted matte black to provide contrast. Buttons of varied diameters—from 0.5 to 1.5 inches—add dimensionality, creating shadows that emphasize the sunburst pattern.
Pro Tip: Carefully spacing the button rows with precise measurements supports the optical illusion of radiant sunbeams.
How to Make This
- Remove any outer frame or protective covering from the mirror.
- Measure concentric rings radiating from the mirror edge.
- Glue buttons in organized rows following the radiating pattern.
- Allow all glue to dry before rehanging.
- Handle gently due to button protrusions.
Avoid: Failing to measure button placement distances leads to asymmetrical patterns that break the sunburst effect.
Try Also: Use cooler colors like blues and silvers for a moonburst effect; add metallic spray paint on buttons for shimmer; mix button sizes unevenly for textured rays.
Products & Materials
Items Used
“Button sunburst mirror frame creates radiant, colorful reflections and texture.”
Assemble a button-themed clock face
⏱️ 3 hours · 🔴 Advanced
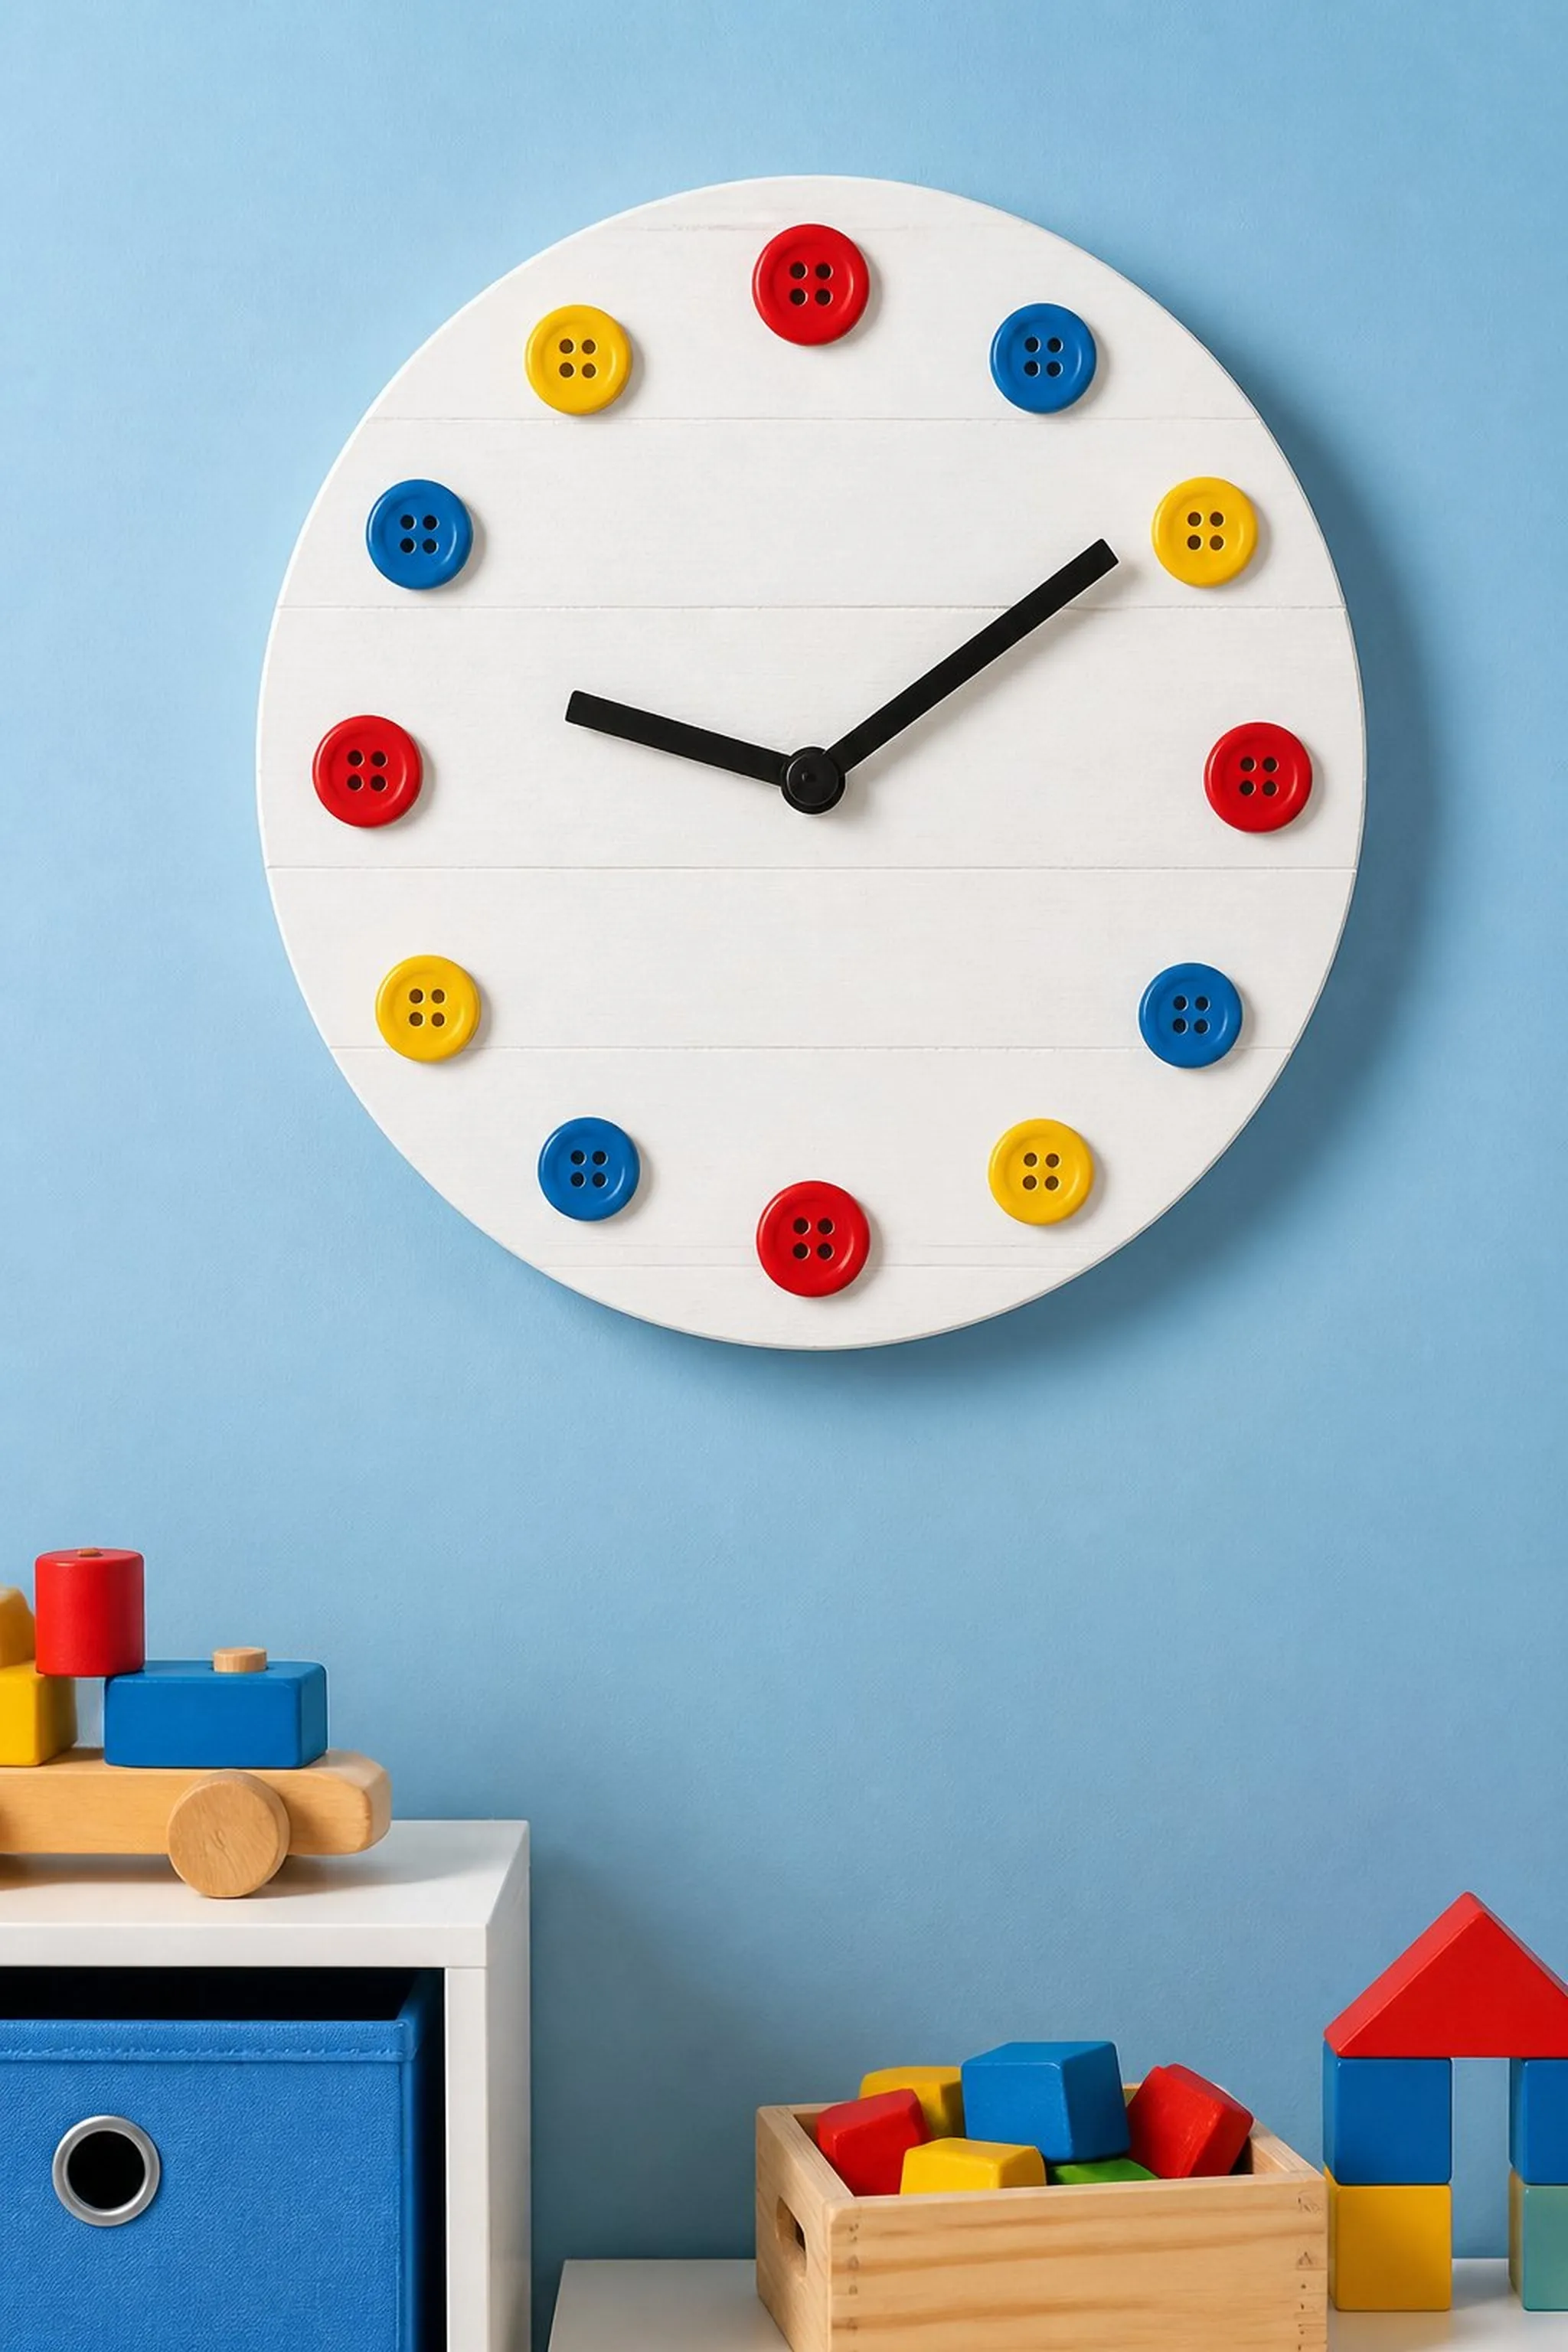
A 12-inch round clock face is enhanced with colorful buttons denoting each hour marker around its edge. Buttons vary in diameter from 0.8 to 1 inch and alternate between reds, blues, and yellows. The clock hands swivel above a wooden base painted crisp white, ensuring button colors pop distinctly.
Each button is embedded with subtle texture differences, ensuring that the hour markers are distinguishable even in dim lighting. The total diameter of the clock face enhances visibility for small spaces.
Pro Tip: Positioning buttons symmetrically around the clock face supports readability and aesthetic balance.
How to Make This
- Paint the clock face base white and let dry.
- Mark 12 equally spaced hour points around the face.
- Place buttons at each point using strong adhesive.
- Attach clock mechanism and hands over the center.
- Test function before wall mounting.
Avoid: Misaligning hour buttons causes the clock to appear crooked and makes time reading harder.
Try Also: Use all one color for a minimalist look; add numbers inside buttons with paint; swap buttons for other shapes such as stars for variety.
Products & Materials
Items Used
- round wooden clock base
- colored craft buttons
- clock mechanism
- white paint
- strong adhesive
“Colorful button hour markers brighten up a functional wall clock.”
Create a button rainbow wall hanging
⏱️ 2 hours · 🟠 Intermediate
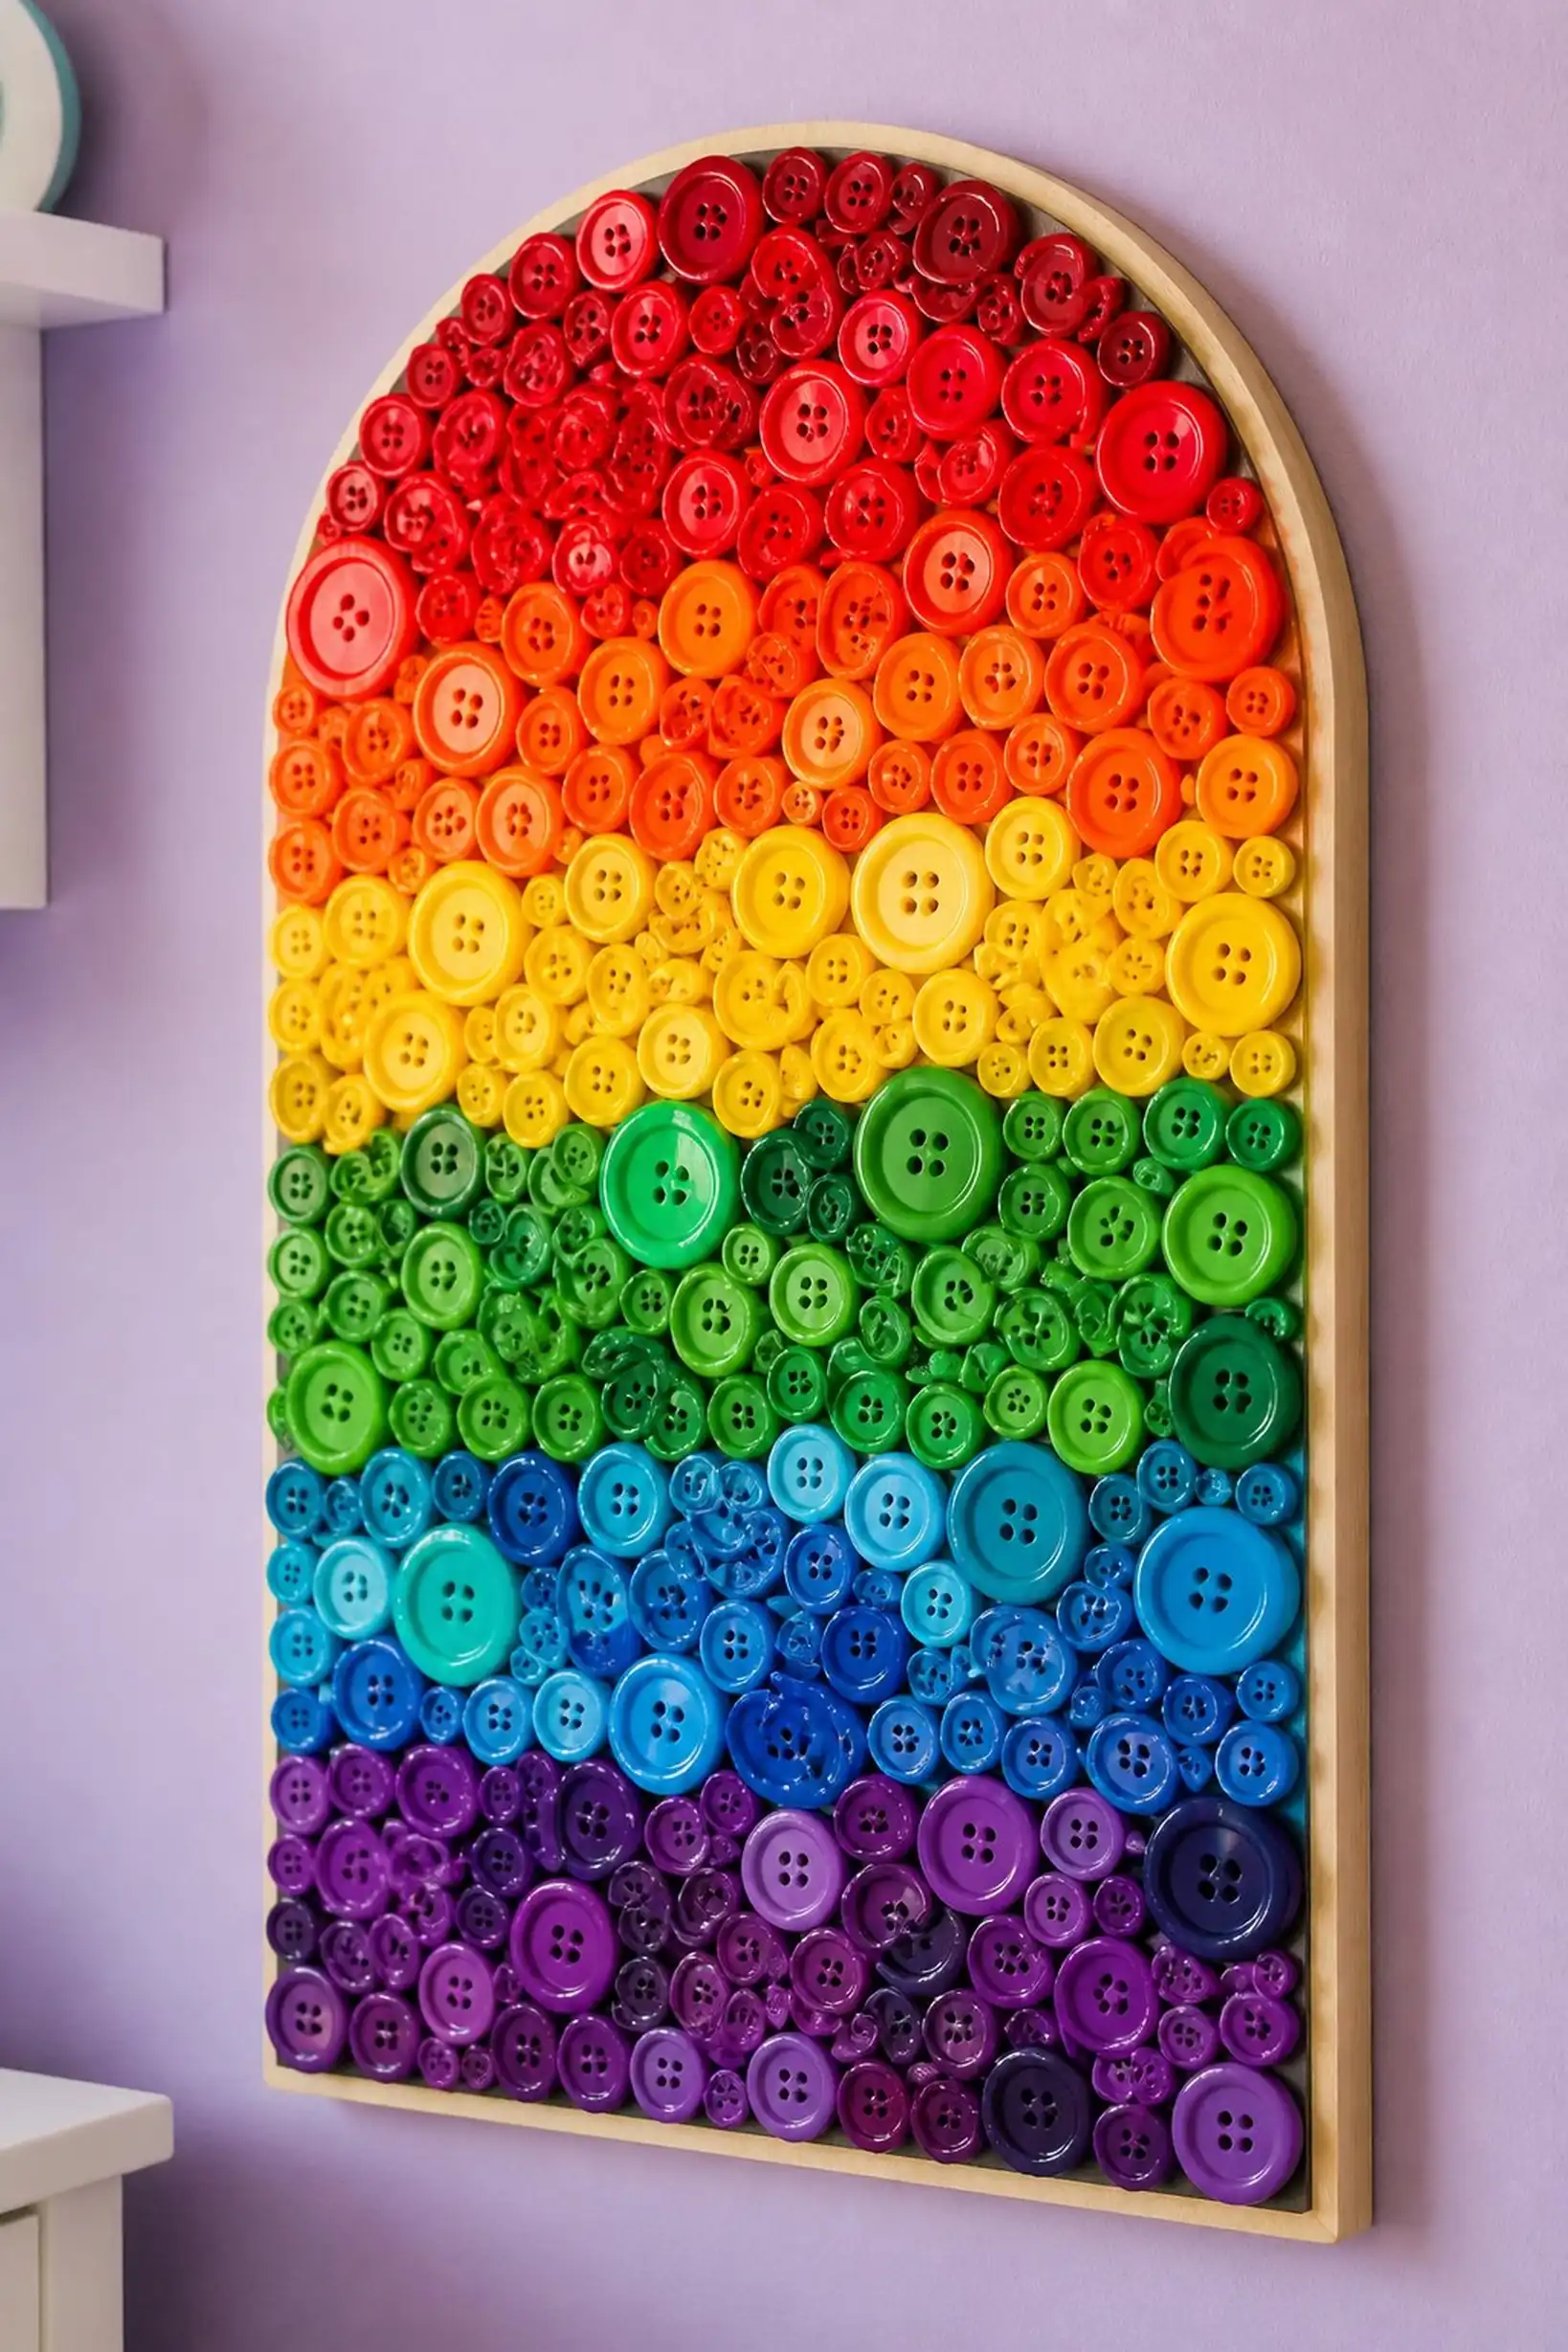
A 16-inch wide arched wooden base displays a cheerful rainbow pattern fully covered in buttons. Each color band is composed of buttons varying from 0.5 to 1 inch in diameter, tightly arranged to resemble a real rainbow’s shape. Colors progress smoothly from purple to red, creating a vibrant spectrum.
The wood is left unfinished, adding a natural frame warmth beneath the densely laid glossy buttons. This piece introduces joyful color and texture balanced with rustic simplicity.
Pro Tip: Using slightly larger buttons toward the center arches adds subtle dimension to the handmade rainbow shape.
How to Make This
- Outline arches on the wooden base in rainbow order.
- Sort buttons by color bands to prepare placement.
- Glue buttons tightly within each colored arch.
- Fill gaps with smaller buttons for a solid look.
- Allow glue to set fully before hanging.
Avoid: Uneven button sizes within the same color band can disrupt the smoothness of the rainbow arc.
Try Also: Use pastel or neon buttons for different moods; add cloud shapes on ends using white buttons; paint wood base before button application for extra contrast.
Products & Materials
Items Used
- arched wooden base
- buttons in rainbow colors
- craft glue
“Button rainbow adds a glossy, vibrant spectrum of color and texture.”
Construct button butterflies mobiles
⏱️ 3 hours · 🔴 Advanced
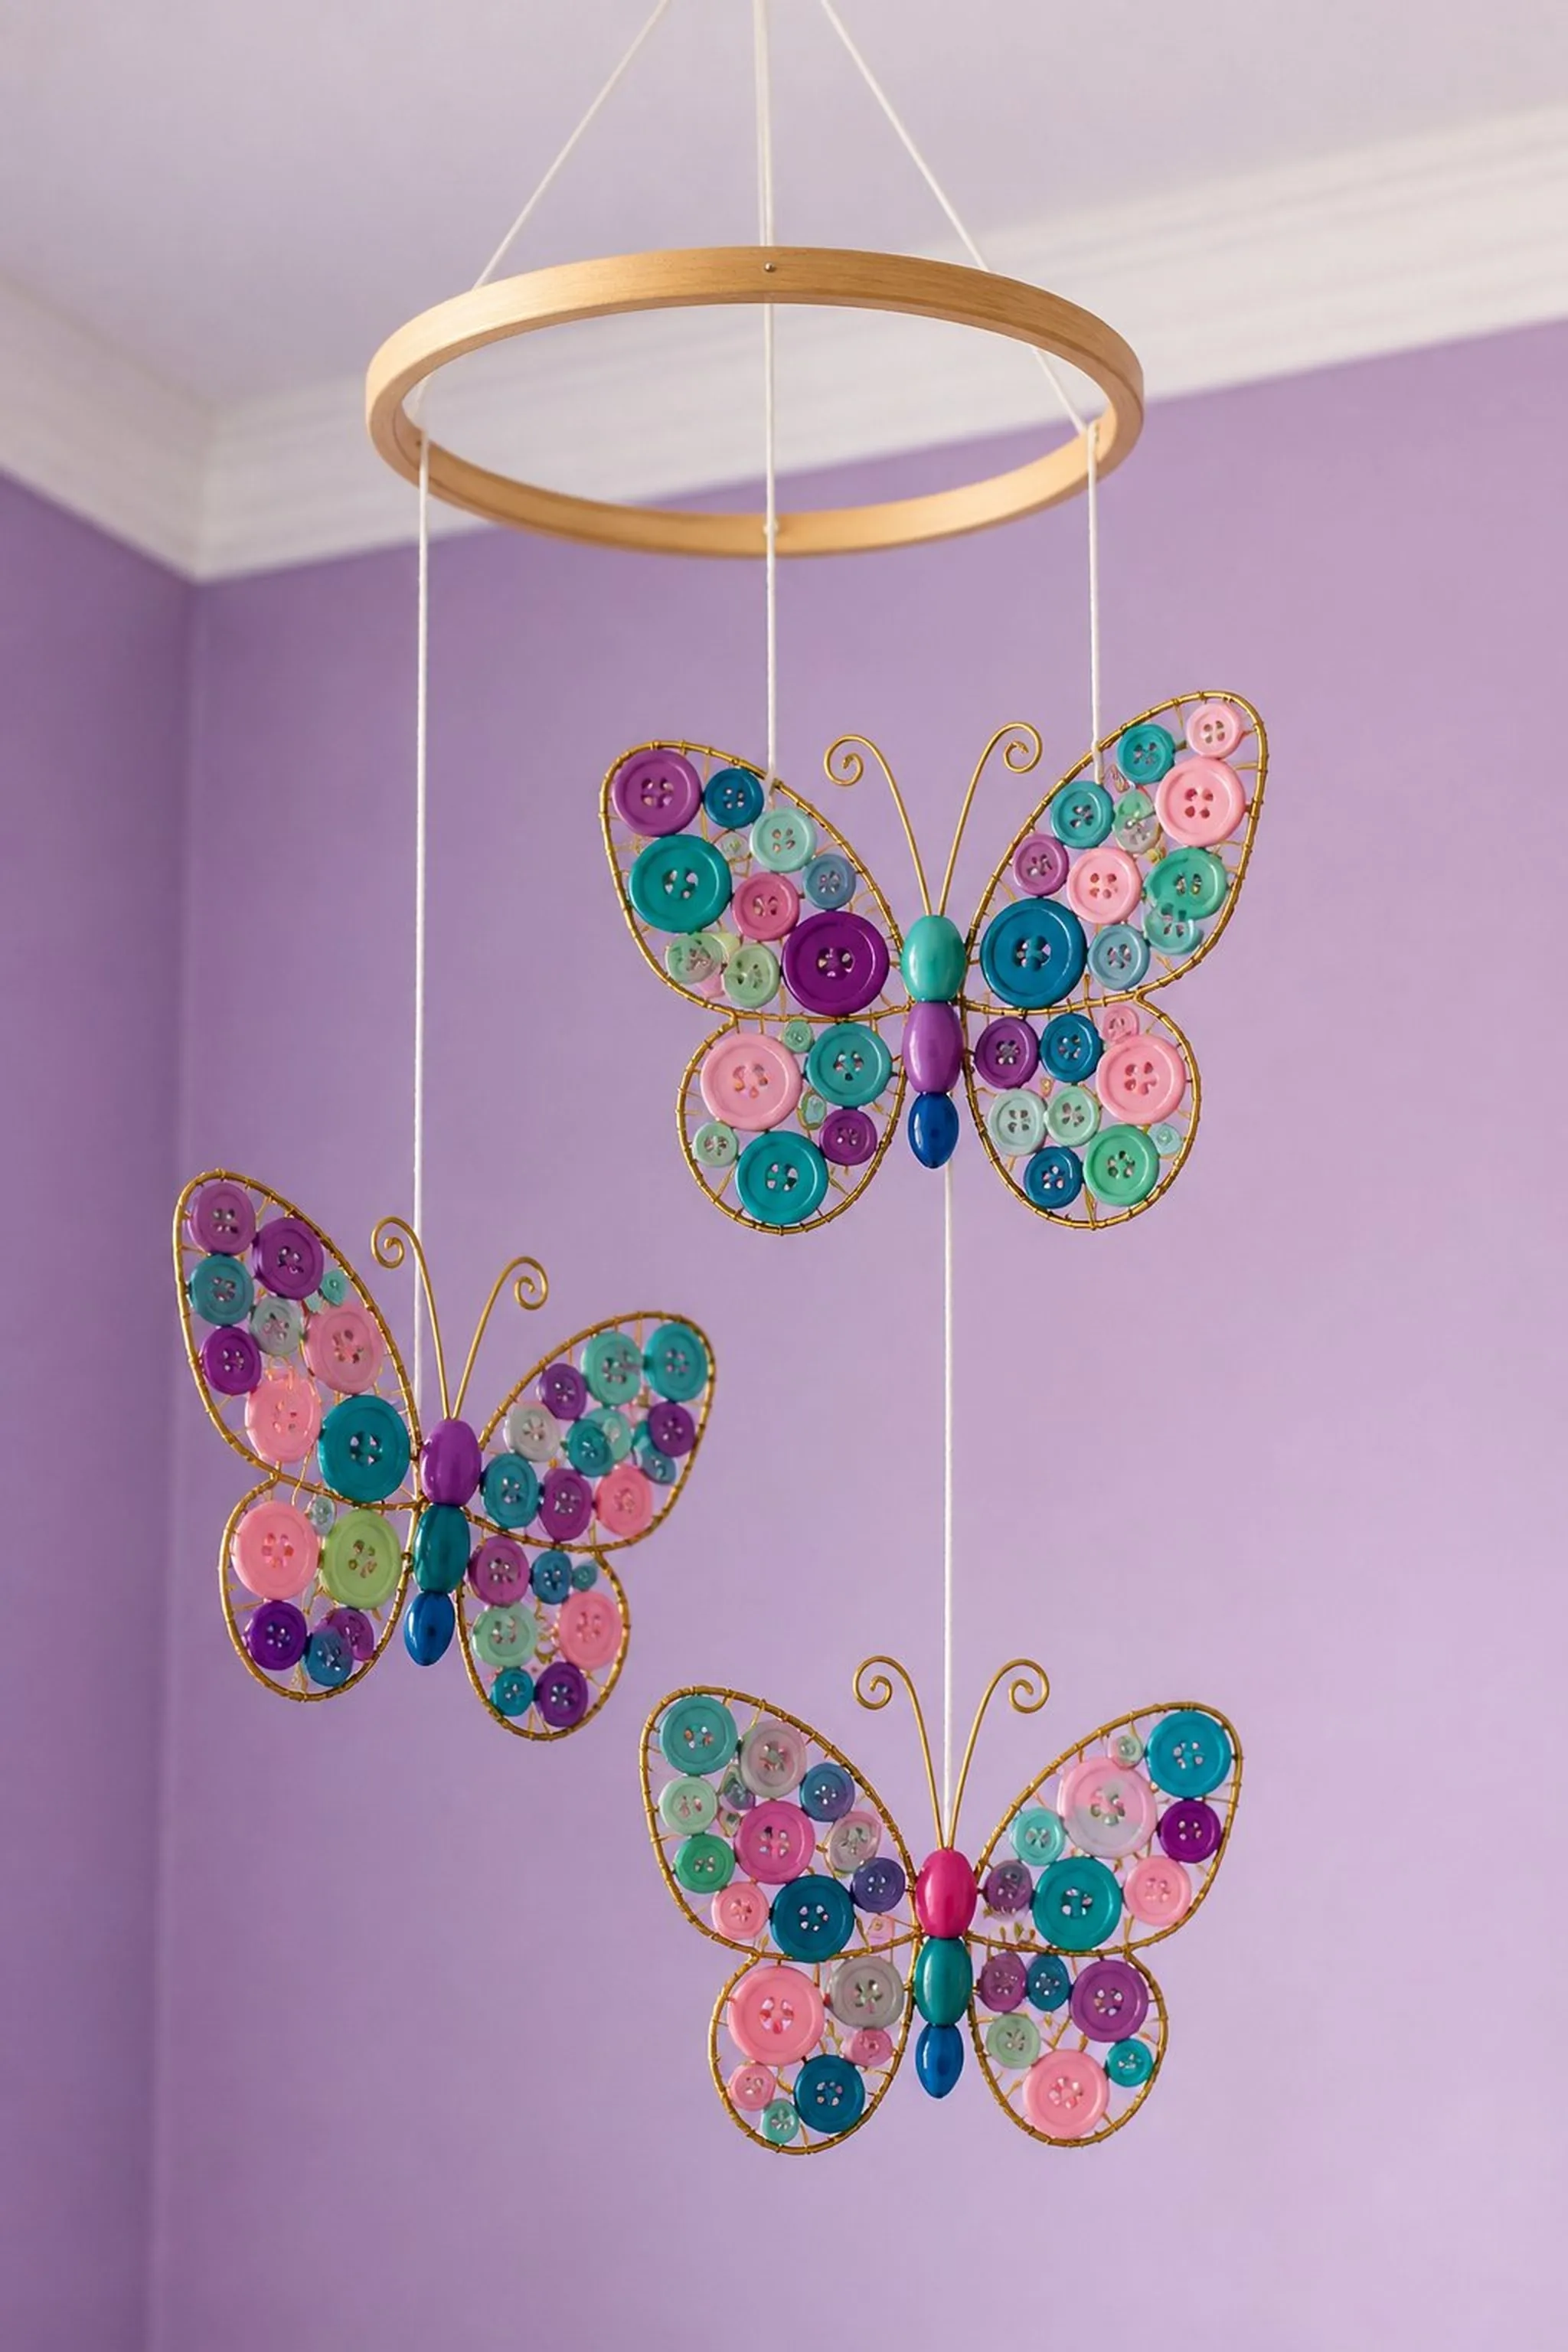
Three delicate butterflies, each 6 to 8 inches wide, are crafted from wire frames wrapped and filled with buttons in pastel and jewel tones. Buttons of varying sizes form wing patches resembling stained glass, with translucent buttons adding light filtering effects. Thin metal wires create antennae curling gently upwards.
The entire mobile is suspended from a wooden hoop 12 inches in diameter, balanced for gentle rotation. This kinetic button art adds movement and color play above beds or reading nooks.
Pro Tip: Balancing the mobile carefully with equal butterfly weights ensures smooth and stable rotation.
How to Make This
- Bend thin wire into butterfly wing shapes and body.
- Attach buttons to wire frames with thin wire or glue.
- Connect three butterflies to a wooden hoop using wires.
- Adjust balance points to enable smooth spinning.
- Hang mobile where gentle breezes catch movement.
Avoid: Unequal butterfly weights cause the mobile to tilt or spin unevenly, reducing visual appeal.
Try Also: Use all pastel buttons for a soft look; swap butterflies for dragonflies or flowers; add small bells or beads for sound effects.
Products & Materials
Items Used
“Delicate button butterfly mobile creates colorful kinetic charm in kid rooms.”
Design a button caterpillar garland
⏱️ 1 hour · 🟢 Beginner
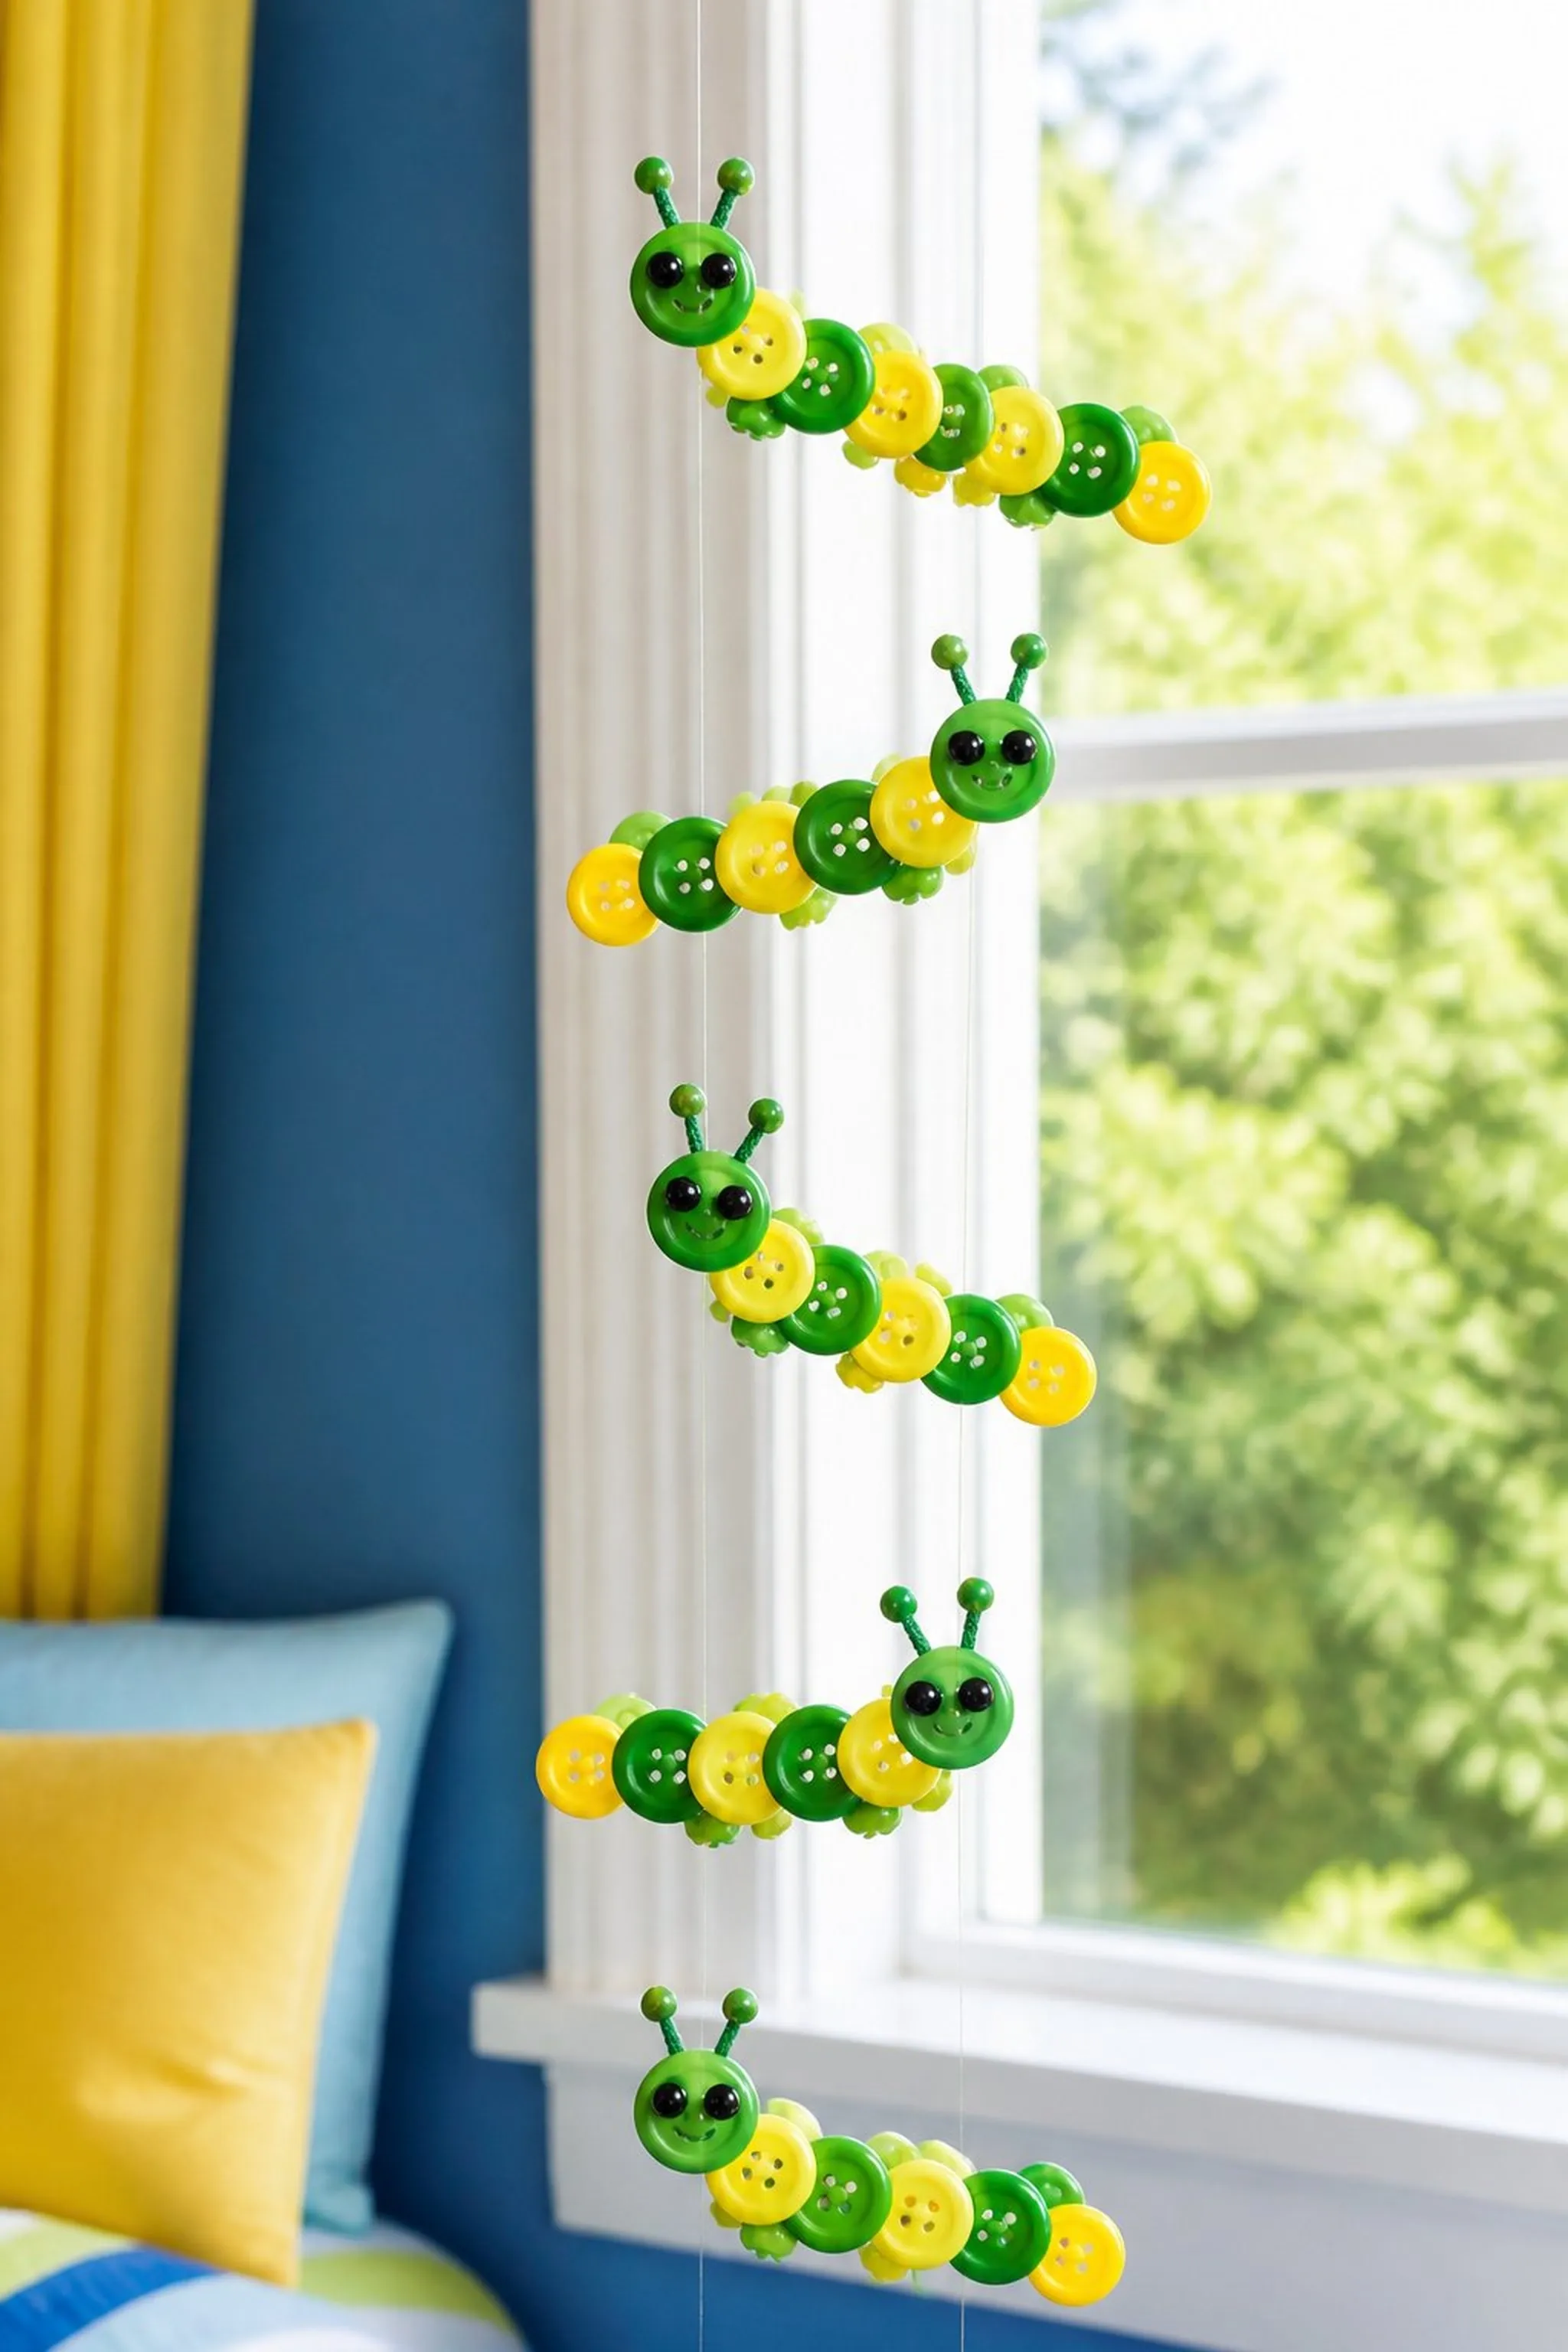
A string garland features a cute caterpillar of round buttons measuring about 10 inches in length overall. Buttons in greens and yellows form the segmented body, with glossy black buttons for eyes. The string passes through holes in the buttons gently, creating flexibility and subtle movement.
This lightweight garland hangs easily across a child’s bedroom window or wall, offering cheerful, handcrafted decor with gentle color contrast and tactile variance.
Pro Tip: Selecting buttons with pre-made holes facilitates stringing and ensures even spacing along the garland.
How to Make This
- Choose buttons with central holes for the caterpillar segments.
- Thread string through buttons in segmented pattern.
- Tie knots between buttons to keep spacing consistent.
- Add eye buttons at the head section.
- Hang garland securely where desired.
Avoid: Ignoring knot spacing causes buttons to bunch together or slide, making the caterpillar look uneven.
Try Also: Combine different shades of green for a color gradient; add tiny felt antennae; make other insects using similar stringed buttons.
Products & Materials
Items Used
- buttons with holes
- craft string
“Cute button caterpillar garland adds playful movement and color.”
Assemble button seashell collage
⏱️ 2 hours · 🟠 Intermediate
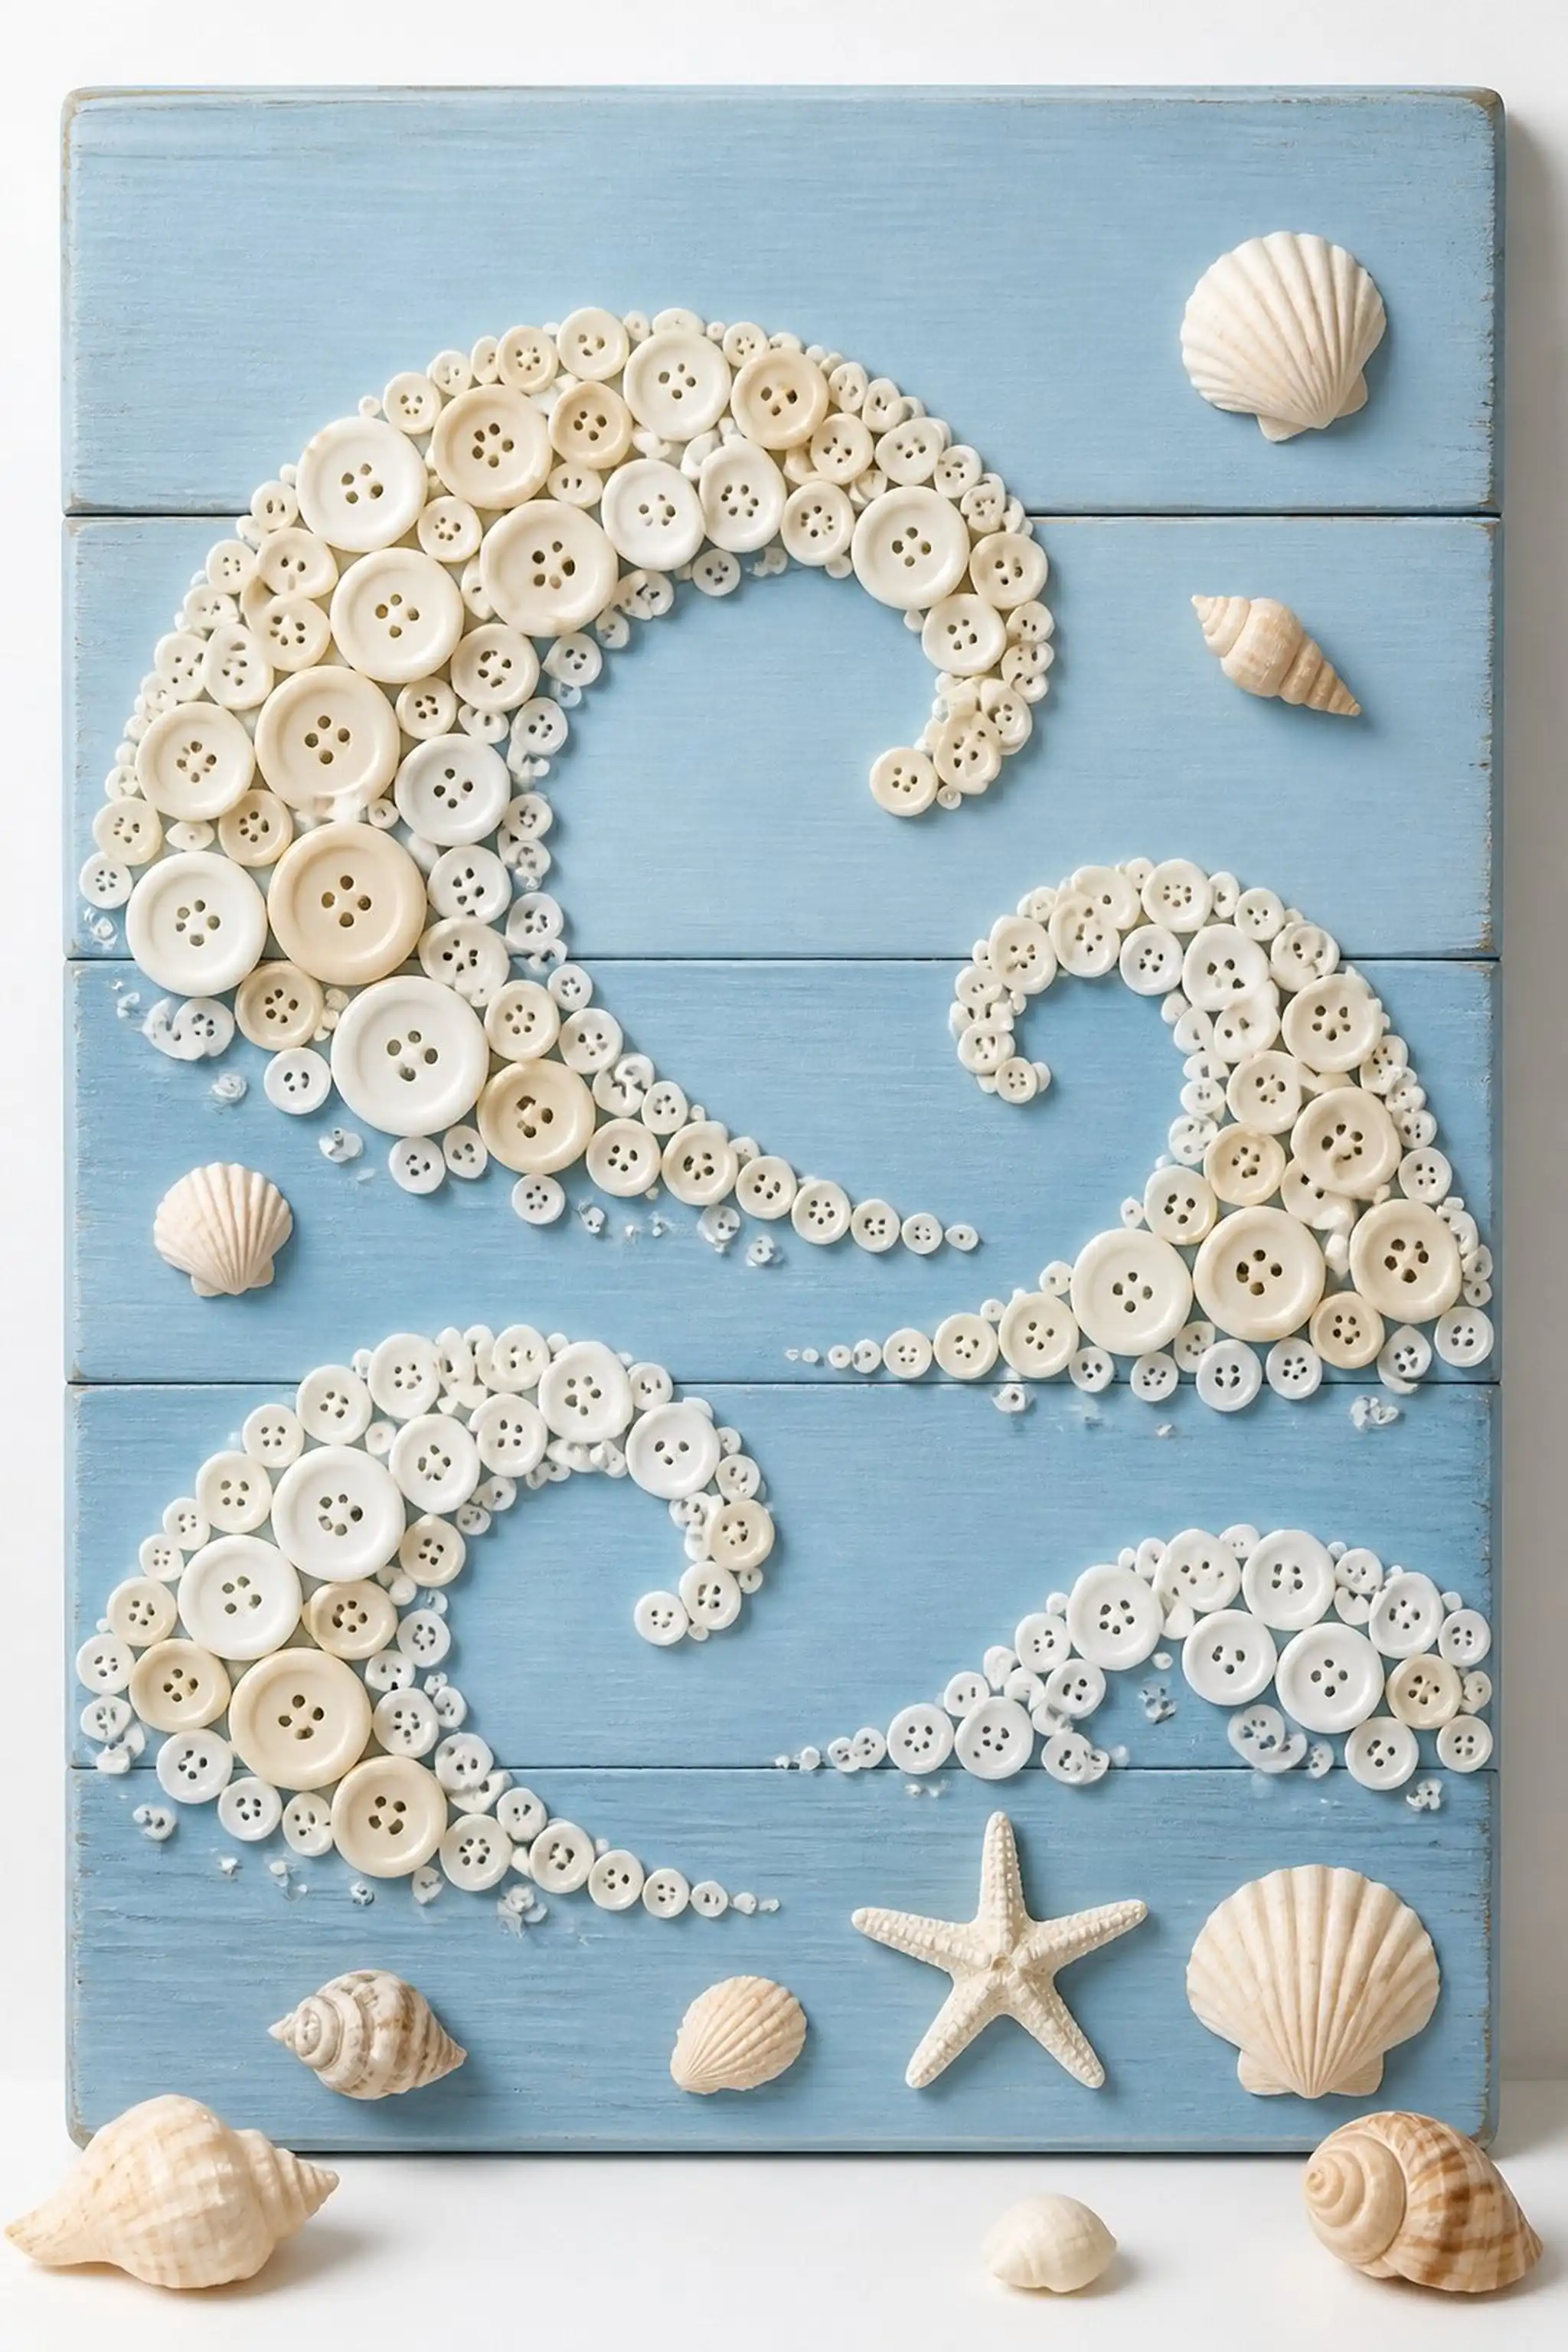
A beach-inspired collage on a 14 by 11 inch wooden board mixes buttons and real small seashells. White, cream, and sandy beige buttons cluster in wave-like patterns alongside delicate spiral shells measuring 1 inch or less. The button shine contrasts gently with the rough shell textures, creating an oceanic mosaic.
A light blue background paint represents sea and sky, enhancing the natural tones of the buttons and shells. This coastal art adds a serene vibe while encouraging tactile curiosity.
Pro Tip: Using varied button sizes and shell shapes introduces natural movement and complexity to the design’s surface texture.
How to Make This
- Paint the wooden board light blue and let dry.
- Arrange buttons and shells in a wave pattern.
- Glue pieces densely to secure all parts firmly.
- Allow the collage to dry overnight.
- Display on bedroom shelf or wall.
Avoid: Applying uneven glue amounts can cause shells to loosen or fall off over time.
Try Also: Incorporate small pieces of smooth sea glass; add sand or glitter accents; create other beach shapes like starfish or boats.
Products & Materials
Items Used
- wooden craft board
- assorted beach colors buttons
- small seashells
- light blue paint
- strong craft glue
“Ocean-inspired button and seashell collage brings tactile coastal charm.”
