
As an Amazon Associate I earn from qualifying purchases.
Cardboard Loom Weaving Crafts for Rainy Weekend Afternoons brings quiet color and tactile rhythm to gray days spent indoors. These cardboard loom weaving projects offer small, satisfying results that pair well with a mug and soft music.
Each cardboard loom weaving idea is designed for cozy supplies and gentle concentration, turning leftover yarn into textured keepsakes. The collection balances quick mug rug projects, tiny wall hangings, and playful bookmarks suited for rainy weekend afternoons.
Simple cardboard loom weaving patterns make a handful of supplies feel surprisingly versatile and rewarding. Expect warm fibers, slow hand motion, and small finished pieces that brighten windowsills and tabletops after a rainy afternoon.
Striped mug rug on a small cardboard loom
⏱️ 45 min · 🟢 Beginner
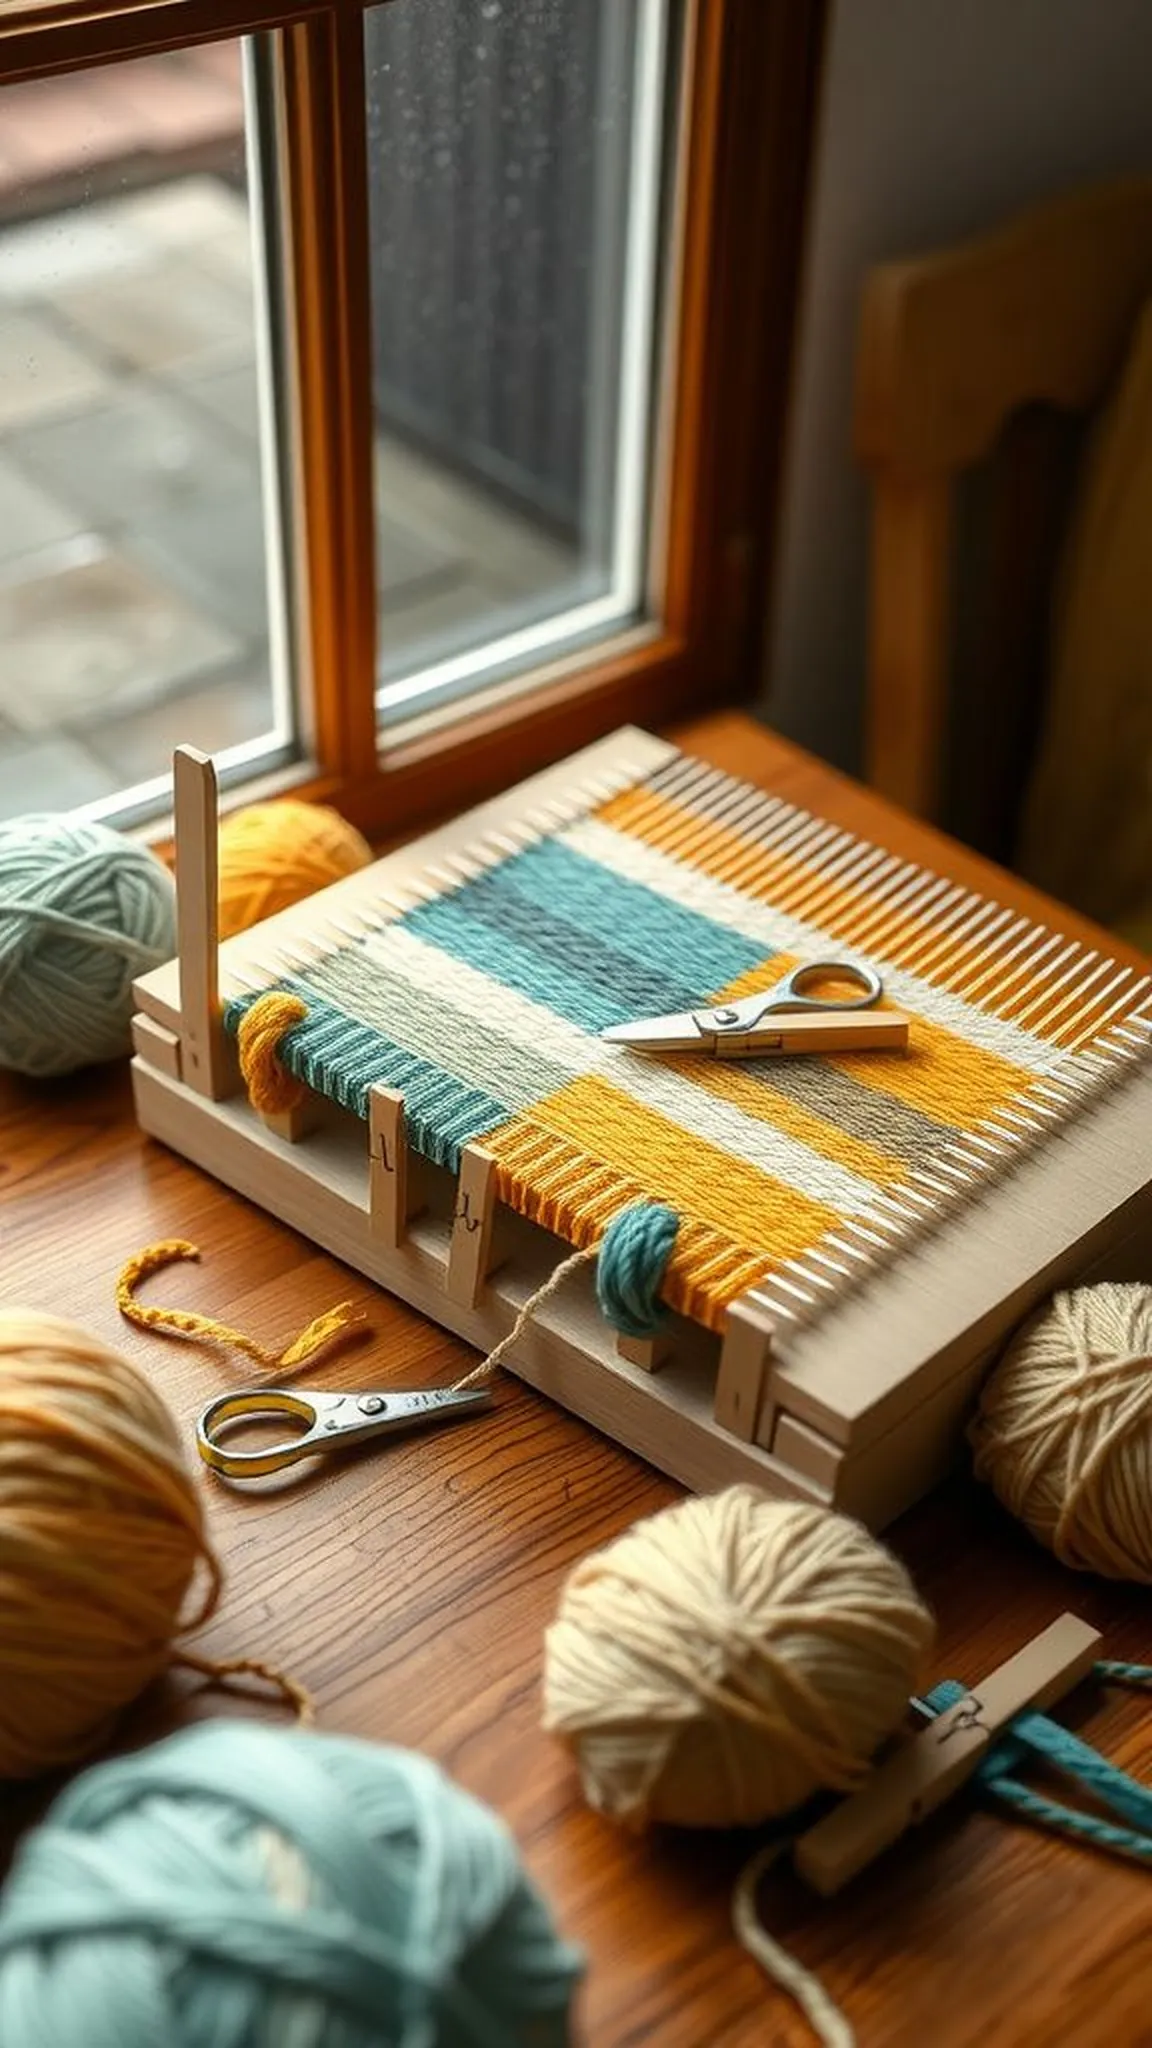
The striped mug rug offers a squishy pile of yarn that looks both tidy and handwrought. Close-up, the rows show contrast between matte wool and a slightly glossy cotton strand, with a gentle ridge along each color change.
Textures play a starring role as fingers find the rhythm of warp and weft, while the cardboard teeth hold a steady tempo. A finished rug sits warm under a mug, the woven surface humming with cozy domestic detail and soft edges.
Color stripes can be bold or hushed and they settle into a pleasant irregularity that feels homemade. The small scale makes it tempting to arrange a stack of finished rugs as a cheerful tabletop vignette.
Pro Tip: Keep a spare tapestry needle nearby to ease long yarn passes and tuck loose ends neatly into the weave later.
How to Make This
- Measure and mark cardboard to create evenly spaced loom notches and cut a rectangular loom shape.
- Wrap the warp yarn vertically around the loom notches to create parallel tensioned strands.
- Use a shuttle or yarn end to weave horizontal rows over and under the warp until the piece reaches the desired length.
- Finish by securing weft ends into the weave and remove the piece from the cardboard loom carefully.
Avoid: A frequent beginner mistake is wrapping the warp too tightly, which makes the woven fabric curl and feel stiff. Allowing a little slack in the warp produces a more flexible finished rug with softer edges.
Try Also: Try alternating thick and thin yarn for a ribbed texture or swap colors every few rows for a candy-striped effect. A narrow palette of two tones will read as a modern stripe while many colors yield a playful patchwork stripe look.
Products & Materials
Items Used
“Cozy striped mug rug woven on a tiny cardboard loom.”
How to make a tasseled bookmark with texture
⏱️ 30 min · 🟢 Beginner
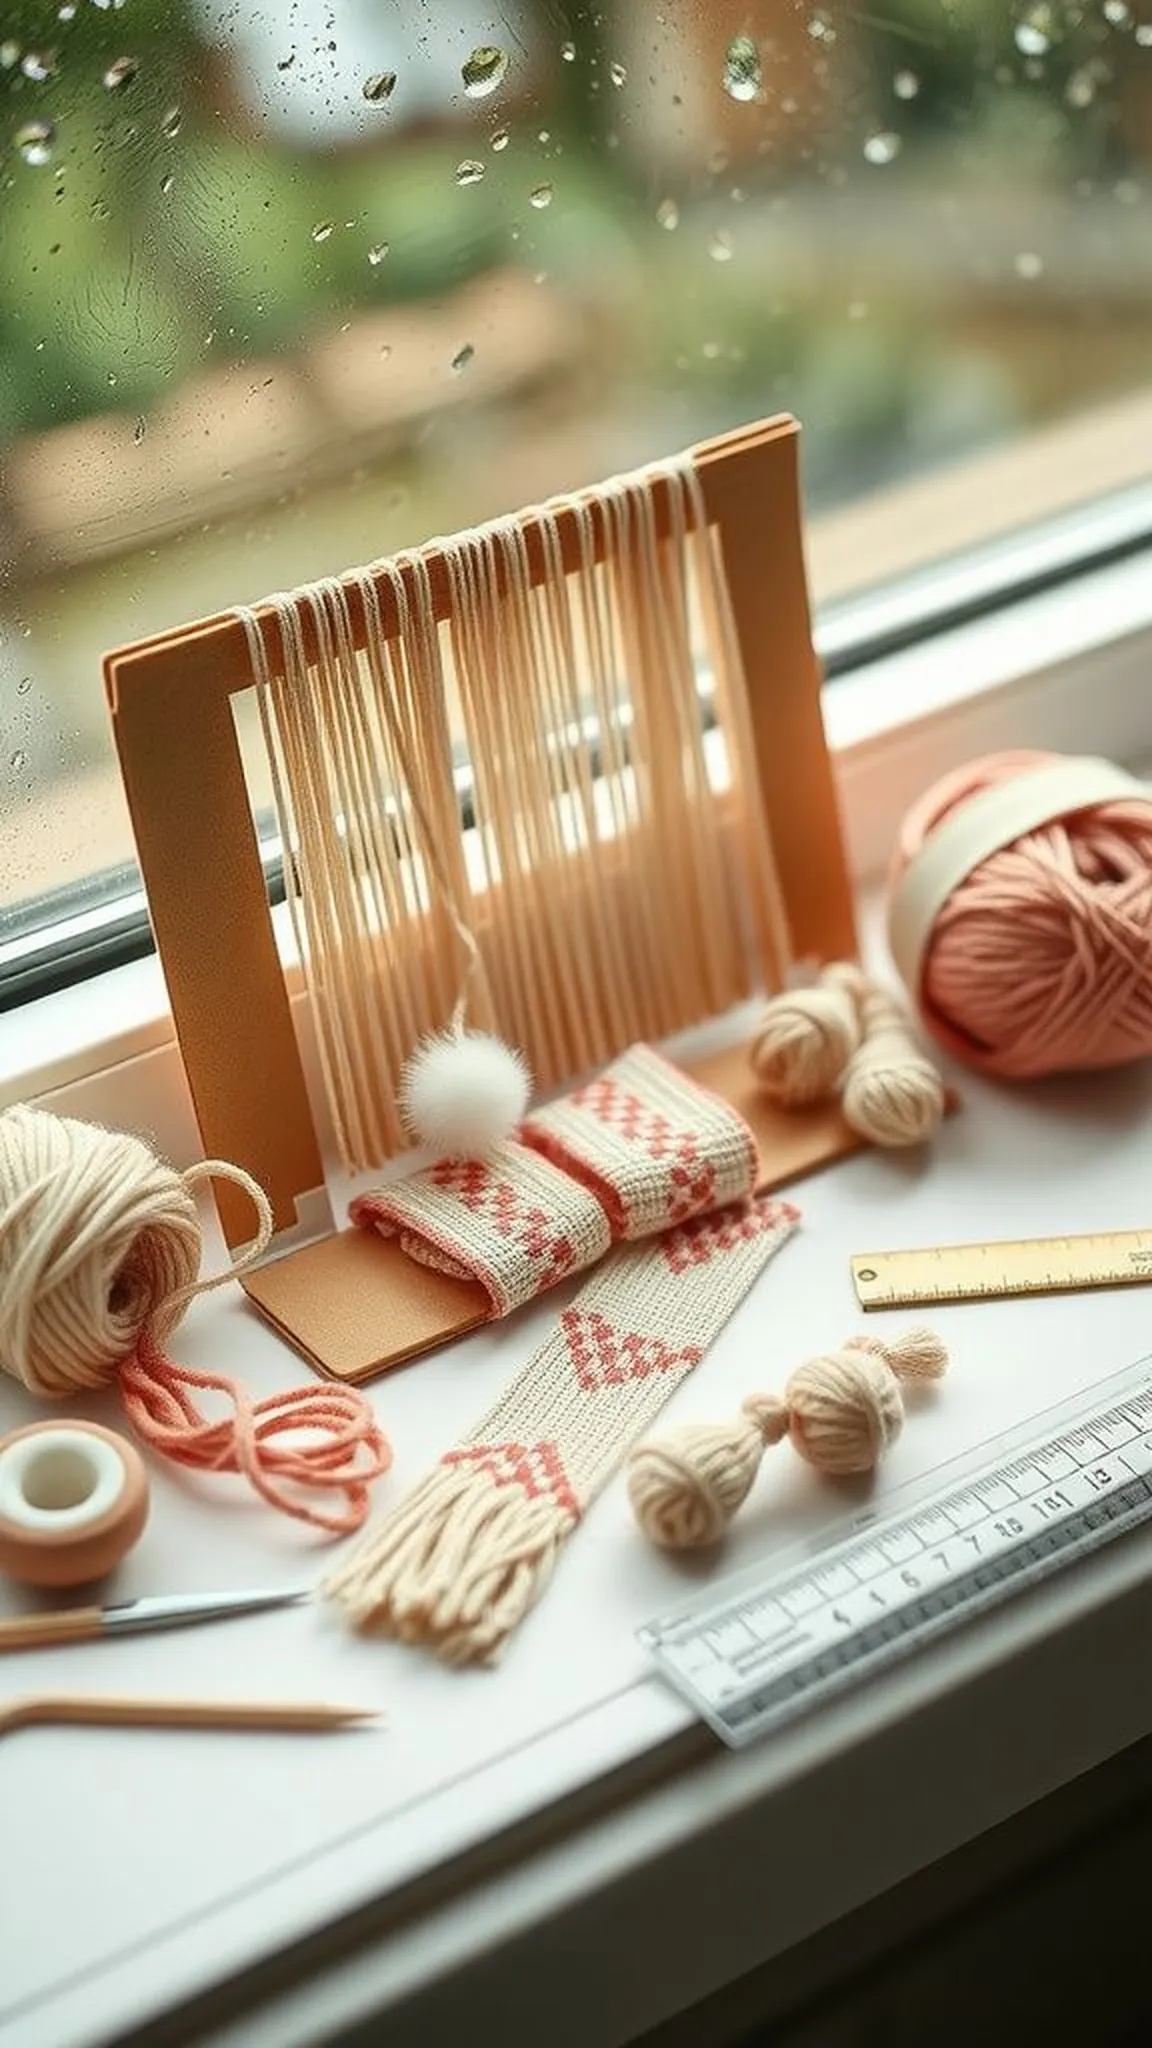
A tasseled bookmark offers both a slim woven strip and a playful fringe that peeks from book pages. The cardboard loom keeps the warp straight while yarn choices create a ribbon of color with occasional pops of boucle or metallic thread.
Fingers trace the little ridges and soft loops, and the finished bookmark feels like a miniature textile ribbon that slides easily between pages. The tassel adds a swinging, tactile counterpoint that catches light and movement when the book is opened.
Thin yarns yield a delicate bookmark that slips unobtrusively into a novel, while thicker strands create a more substantial presence. A few contrasting knots or slipped threads offer subtle hand-stitched personality along the edge.
Pro Tip: Trim tassel ends evenly by folding and aligning before a single careful snip for a neat fluttering finish.
How to Make This
- Cut a long, narrow cardboard loom and mark evenly spaced notches for warp placement.
- Warp the loom with a smooth cotton or acrylic yarn and secure the ends with clothespins.
- Weave narrow rows with a thin weft yarn to build a flat strip, adding textured yarns intermittently.
- Make a tassel by winding yarn around a small card, tying a bundle, and attaching it to one end.
Avoid: Beginners often pick yarn that is too thick for a slim bookmark, giving a bulky result that resists sliding between pages. Choosing a smoother, finer yarn keeps the bookmark elegant and book-friendly.
Try Also: Experiment with a contrasting tassel color or a looped fringe for a boho look, or weave in a metallic thread for subtle shine. A shorter strip can double as a plant marker tied to a pot handle.
Products & Materials
Items Used
- cardboard loom (narrow)
- fine cotton yarn
- scissors
- wooden clothespins
“Slim woven bookmark with a soft tassel and textured weave.”
Mini wall hanging with moodier jewel tones
⏱️ 2 hours · 🟠 Intermediate
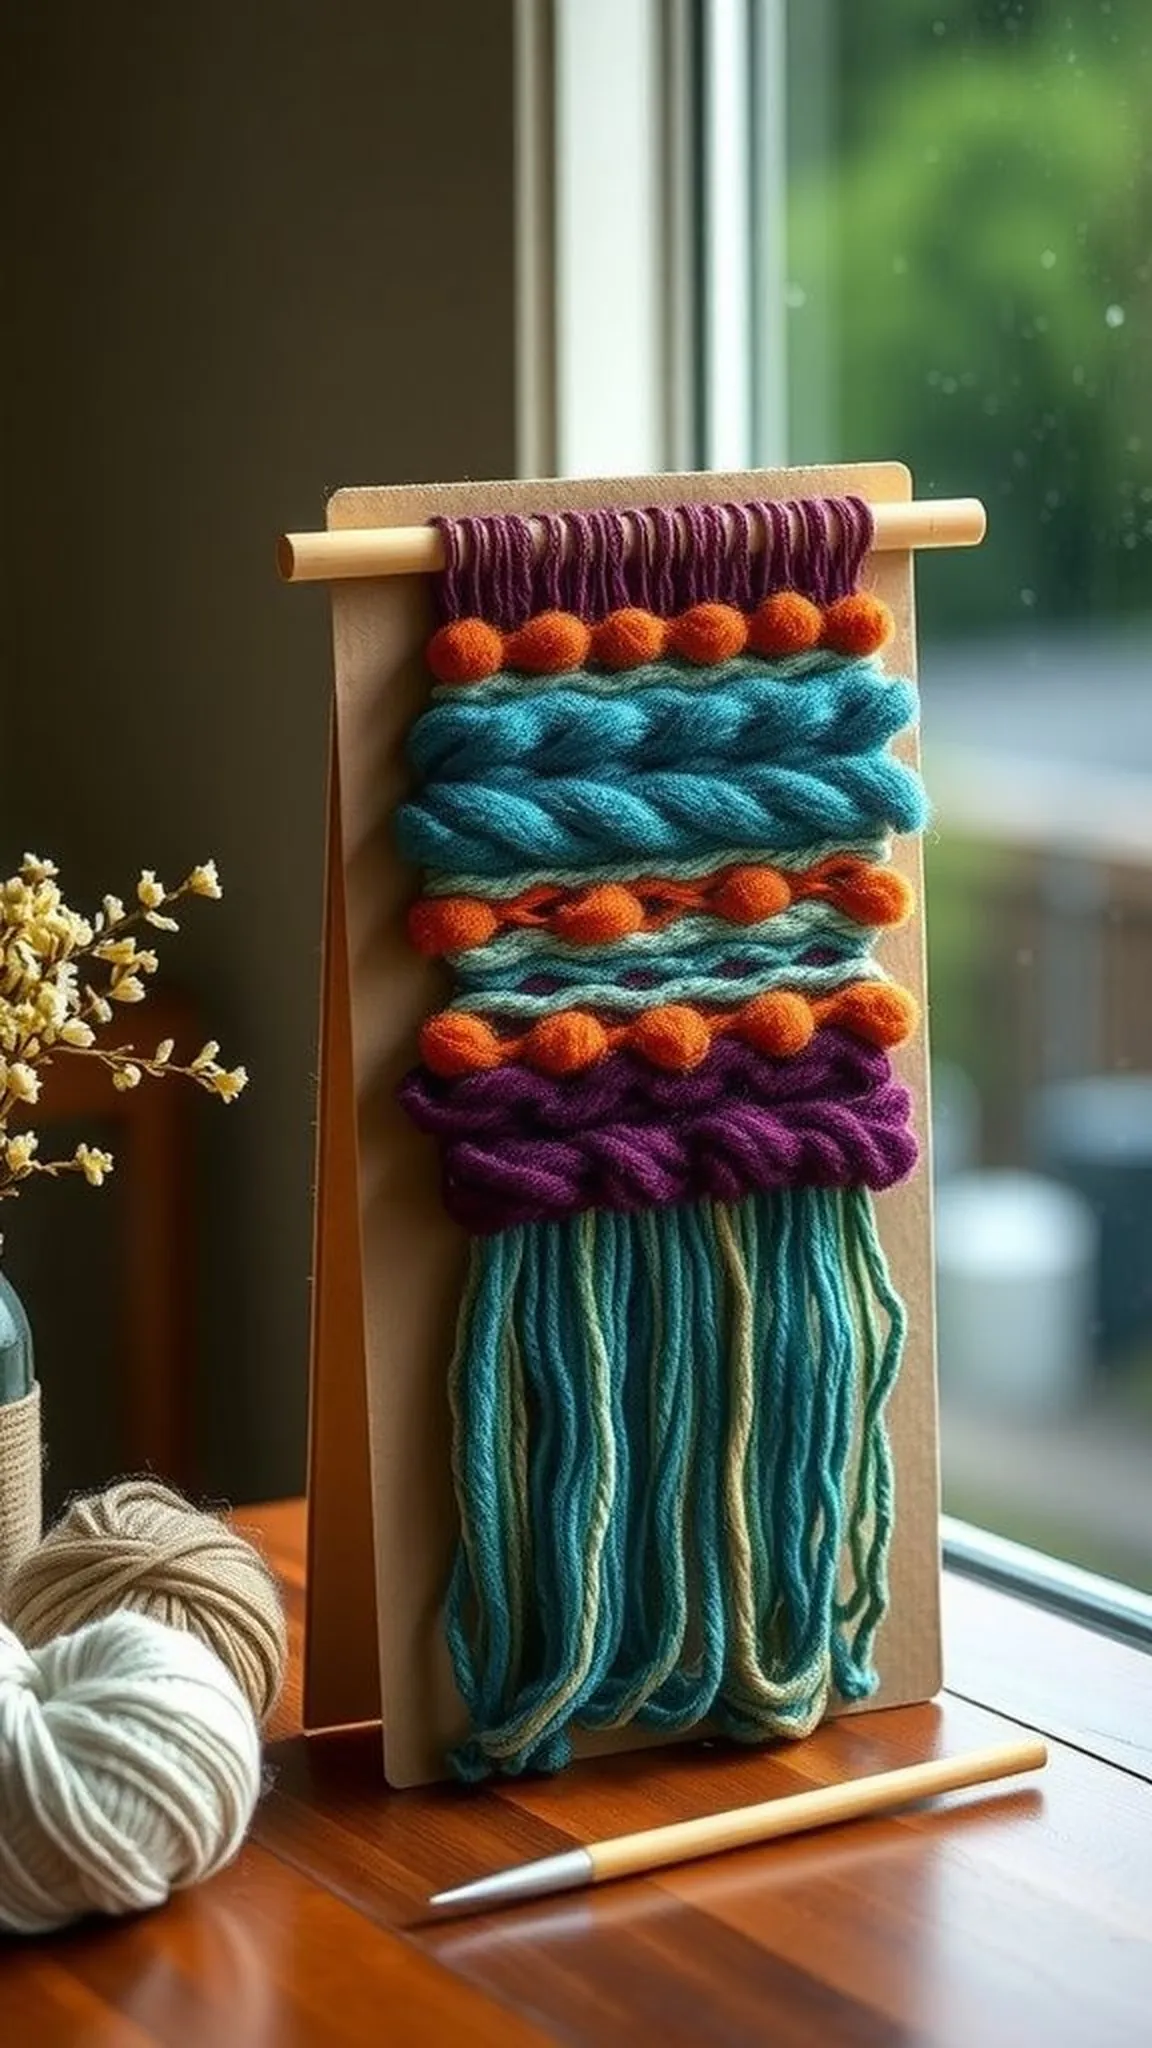
The mini wall hanging balances jewel-toned yarns with a short fringe that catches indoor light. The cardboard loom creates tidy verticals while alternating row textures lend a layered, slightly sculptural surface.
There is a satisfying contrast between plush boucle and slick cotton that invites fingers to explore. When hung, the piece reads like a pocket tapestry, its shadows and highlights shifting with the angle of the light.
A copper rod or dowel pairs especially well with deep teal, plum, and rust hues to complete the display. The finished scale is compact enough for narrow walls or grouped gallery arrangements.
Pro Tip: Weave a few short, dense rows of boucle or roving in alternating bands to add plush depth without adding heavy weight.
How to Make This
- Create a wider cardboard loom with stable notches and warp it with strong cotton or cord for sturdy verticals.
- Alternate plain weft rows with textured yarns such as boucle and roving to build dimensional bands across the loom.
- Add a top loop by leaving extra warp strands for hanging and secure the bottom with a simple binding technique.
- Trim the fringe to a graduated shape and attach a slim dowel for display.
Avoid: A frequent beginner mistake is combining too many heavy yarns, resulting in a drooping hanging that loses shape. Balancing lighter yarns between dense bands preserves structure while keeping visual richness intact.
Try Also: Try a neutral palette with one bright accent stripe for modern contrast, or swap the fringe for knotted tassel clusters for a bohemian flare. A longer narrow version suits a doorframe or stairwell instead of a gallery wall.
Products & Materials
Items Used
“Compact jewel-toned wall hanging with layered texture and fringe.”
Save time and printer ink with 50+ printable templates and step-by-step instructions in one ad-free guide.

Just $19.99 — lifetime access
Playful pom-pom coaster duo for a rainy table
⏱️ 1 hour · 🟢 Beginner
The playful pom-pom coaster set feels tactile and bright on a damp afternoon table, the little bobbles catching beads of condensation. The cardboard loom provides a firm base for alternating flat weaving and pom rows that nod to cheerful cottagecraft.
Close inspection reveals soft, rounded pom textures that contrast with the smoother weave bands, offering a pleasing touch under fingers. A pair of matching coasters creates a small ritual of placing a cup on a cushioned surface that muffles clink and absorbs drizzle.
Color choices lend either a vintage feel or a modern pop, depending on contrast and saturation. The finished diameter stays compact and portable, making storage easy when the table needs a clear surface again.
Pro Tip: Make slightly loose pom-poms so they remain fluffy after a light squeeze and retain their rounded silhouette on the coaster.
How to Make This
- Warp a small circular or square cardboard loom to define the coaster boundary and prepare to alternate flat weaving with pom formation.
- Create pom rows by wrapping yarn loops densely and tying off bundles before securing them as a textured band within the weave.
- Continue alternating plain weft rows with pom sections until the coaster reaches a compact size and finish the edges neatly.
- Trim stray loops on pom surfaces to achieve a uniform bobble appearance before removing from the loom.
Avoid: A frequent beginner oversight is making pom loops uneven, which produces lopsided bobbles that read as messy. Uniform wrapping and careful trimming help ensure balanced pom texture across the coaster surface.
Try Also: Make one coaster plush and one flatter for a tactile pair, or use a neutral base with a single bright pom color for contrast. Tiny felt shapes glued at the center of each pom create a stitched medallion effect.
Products & Materials
Items Used
“Bright pom-pom coaster duo with a soft, tactile surface.”
Textured key fob with leather loop and fringe
⏱️ 1 hour · 🟠 Intermediate
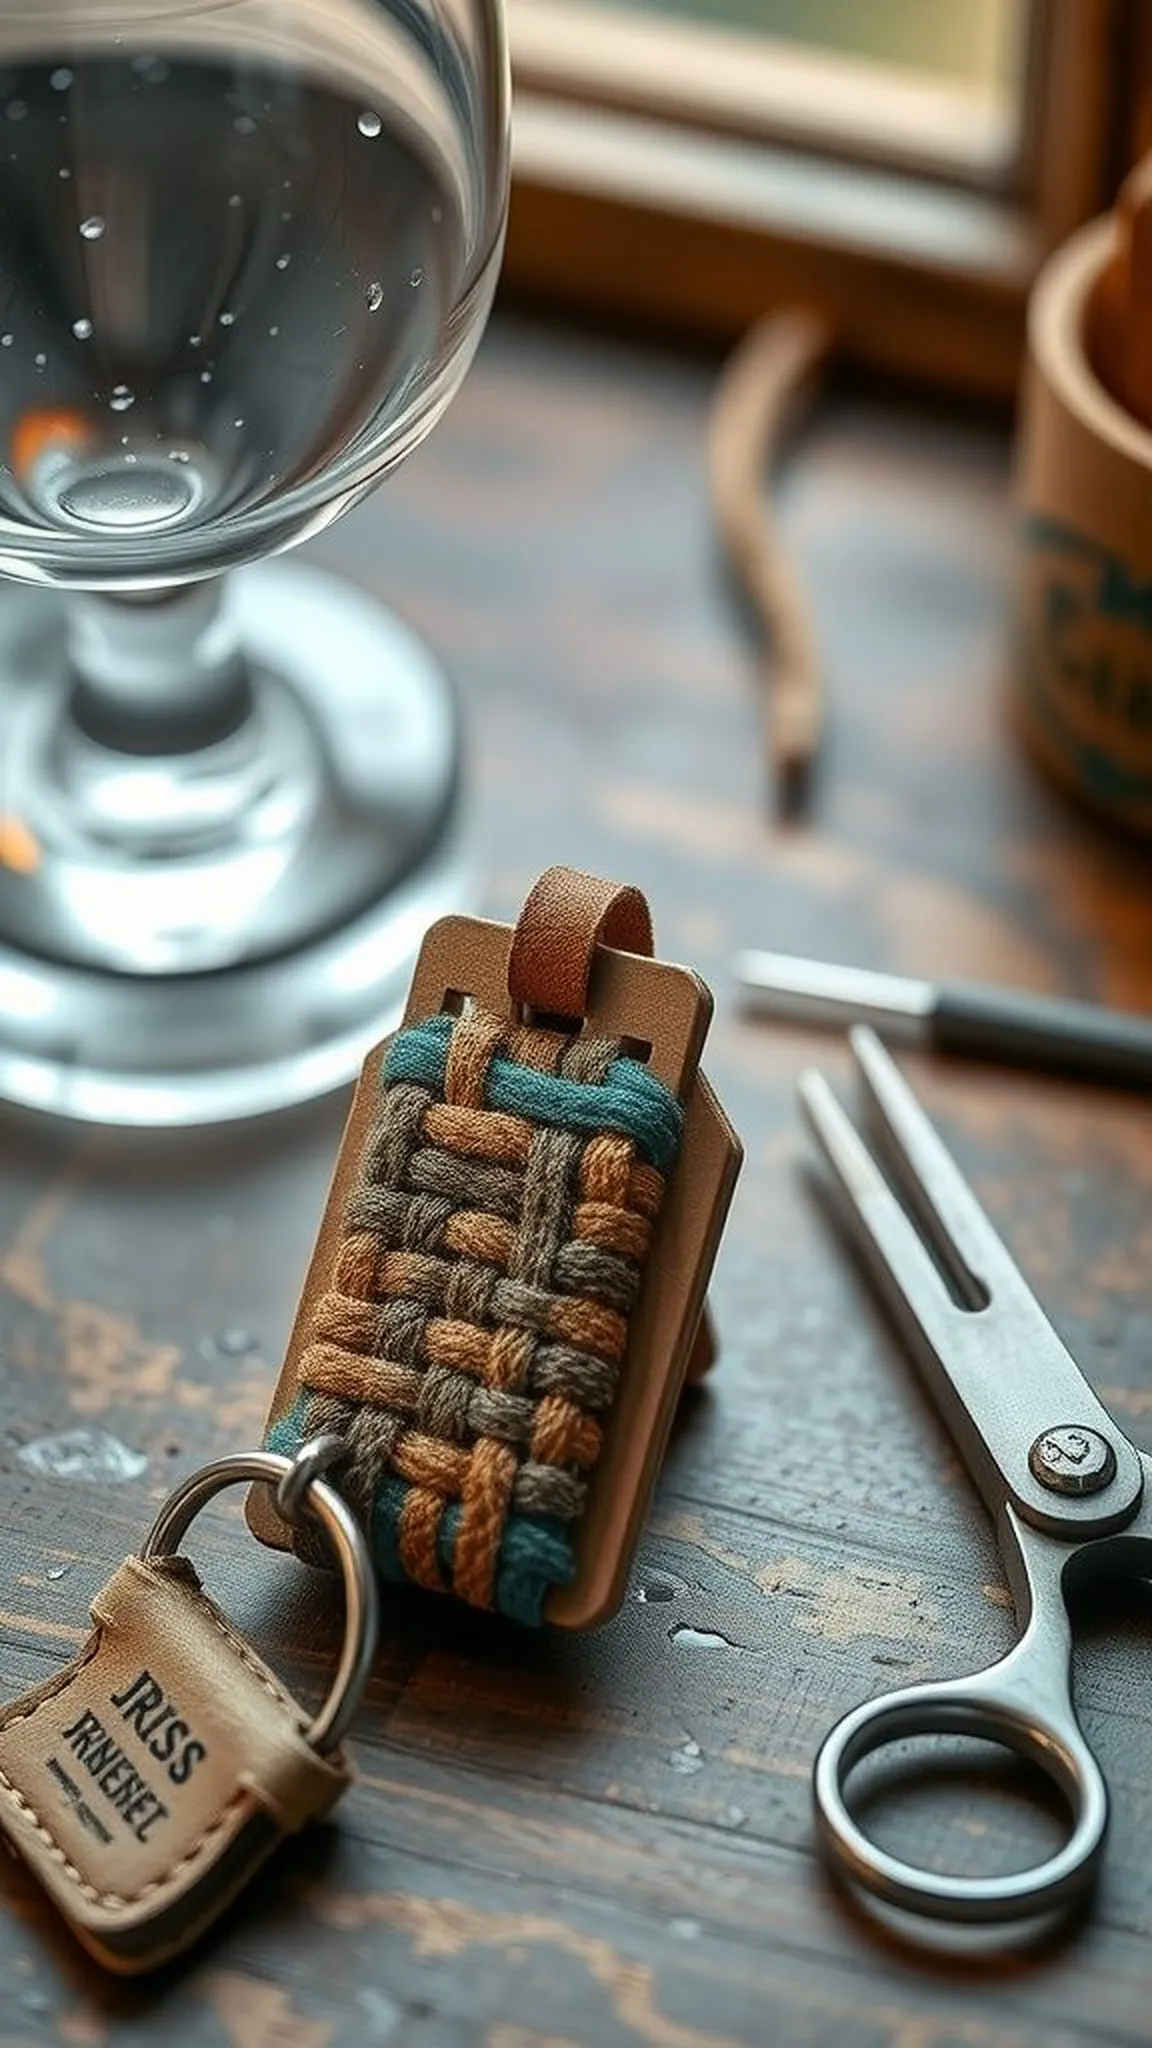
The textured key fob pairs a short woven panel with a leather loop to withstand daily handling. Close-view textures reveal tight soumak-like ridges and a small fringe that softens the metallic jingle of keys.
The cardboard loom keeps the piece compact while dense weaving yields a sturdy, pocket-friendly tag. Subtle color changes in the yarn create a lived-in patina that harmonizes with leather and metal hardware.
A finished fob feels sculptural and reassuring in the palm, small enough to slip into a coin pocket without fuss. The combination of fiber and leather lends a restrained craft aesthetic suited to everyday wear.
Pro Tip: Choose a short dense weft sequence and tuck ends into the weave to produce a durable key fob that resists fraying under constant handling.
How to Make This
- Make a narrow cardboard loom and warp with a strong cord to create a compact base for the key fob.
- Weave dense rows with sturdy yarn, incorporating a tighter tension to build a firm fabric suitable for keys.
- Attach a small leather loop or tab at the top by threading warp strands through the loop and securing them.
- Finish the bottom edge with a short fringe or folded hem and trim ends for a neat silhouette.
Avoid: A frequent beginner blunder is leaving weft tension too loose, resulting in a floppy fob that distorts with use. A firmer weave creates a crisp, long-lasting tag that ages well in pockets.
Try Also: Use a metal lobster clasp instead of a leather loop for a more industrial look, or weave a tricolor stripe for a playful accent. Tiny beads threaded into the final rows add understated shine.
Products & Materials
Items Used
“Durable woven key fob with leather loop and soft fringe.”
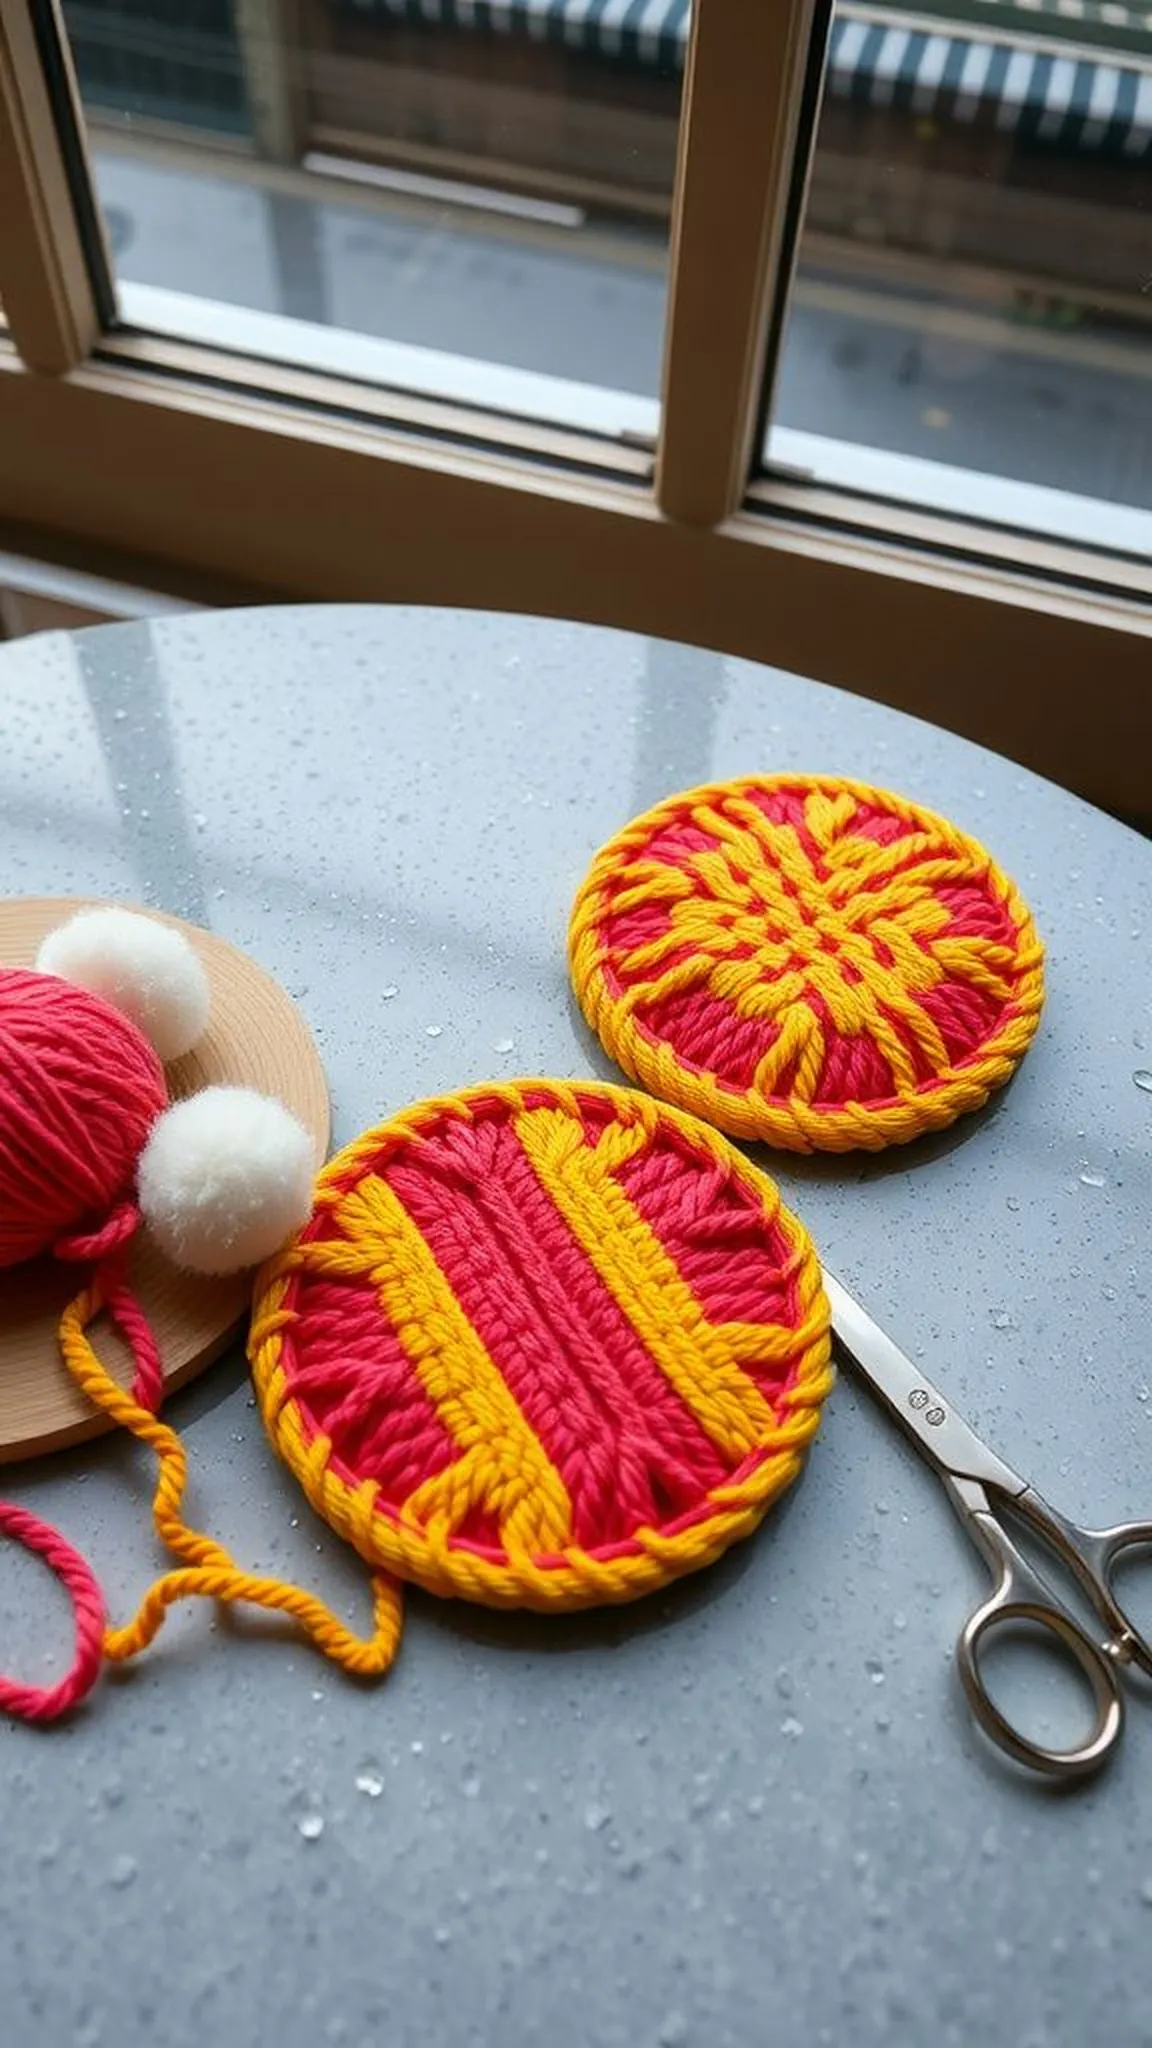
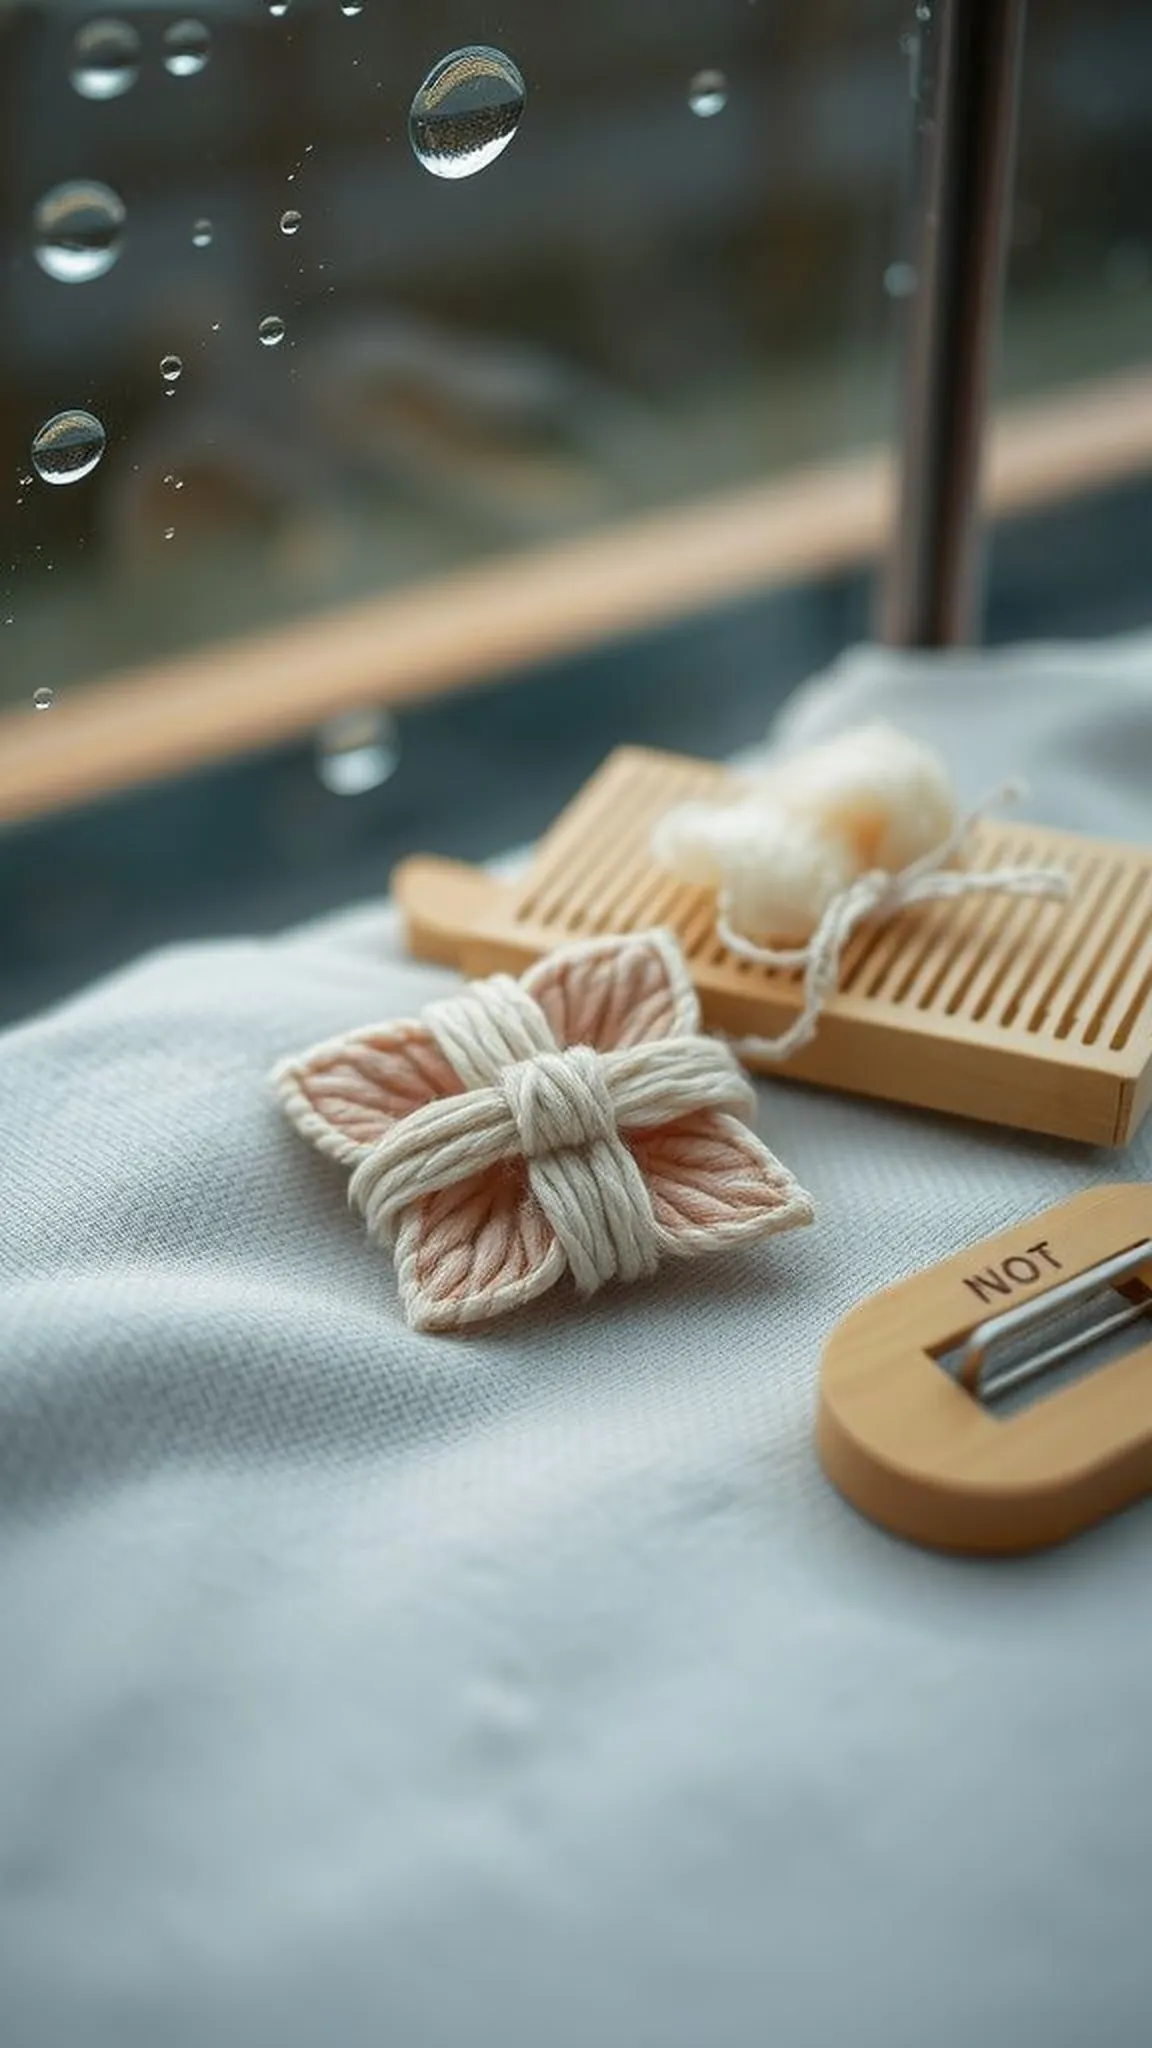
Cheerful circular coaster with sunburst motif
⏱️ 1 hour · 🟠 Intermediate
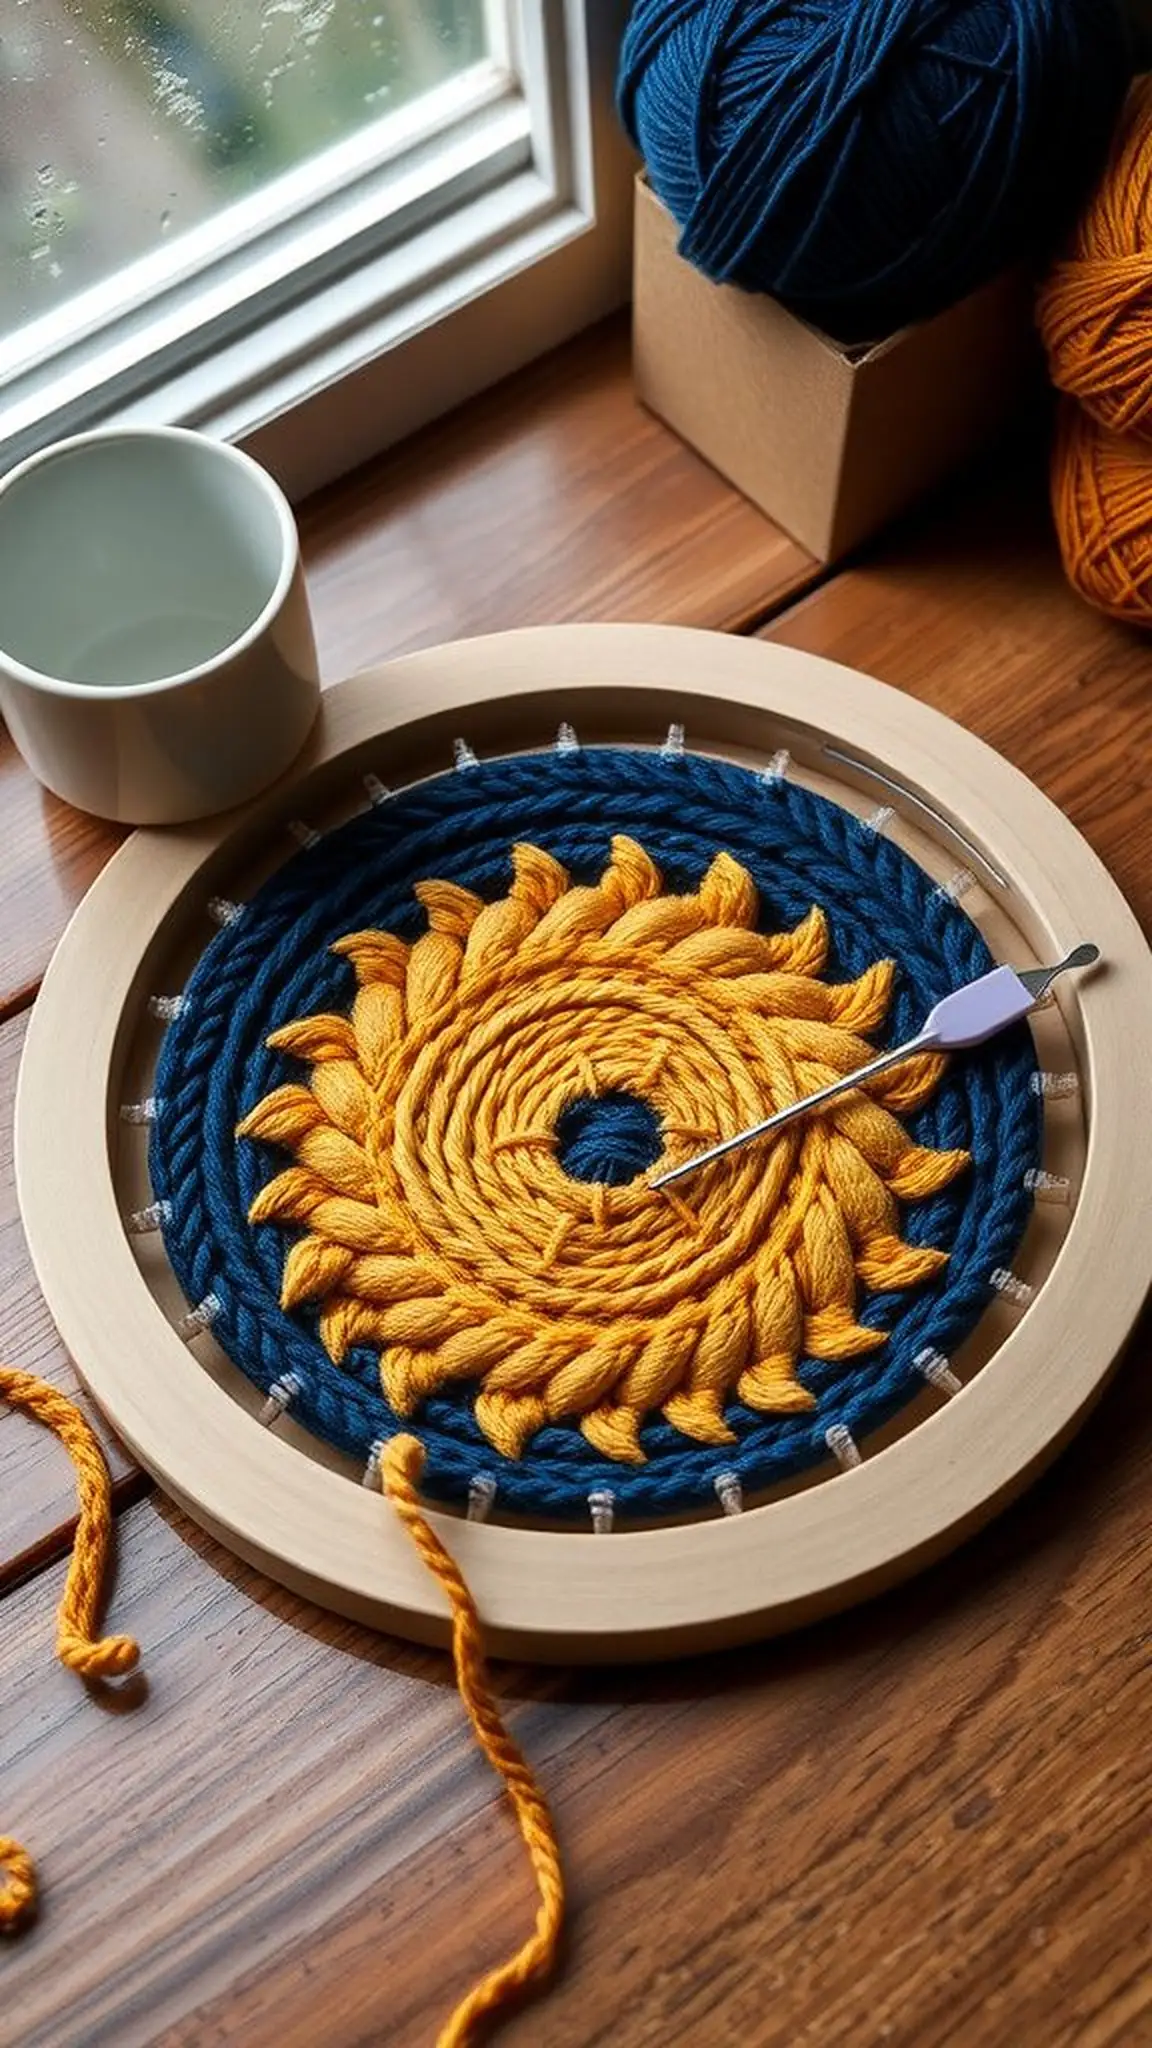
The circular coaster presents a sunburst motif that radiates from a stitched center, its edges soft and rounded. The cardboard loom has been trimmed to a ring form, creating a frame for concentric color and texture shifts.
Thread choices alternate between matte wool and glossy cotton to catch light differently across the rays. Fingertips notice the slight ridges where color bands meet, giving the coaster a lively, handcrafted energy.
The finished piece feels comfortable under a glass and sings in warm color when set against a wooden tabletop. A tiny woven circle has the ability to brighten a rainy afternoon with compact cheer.
Pro Tip: When working a circular form, maintain even warp spacing and rotate the loom occasionally to keep tension balanced around the ring.
How to Make This
- Trace and cut a circular cardboard loom with evenly spaced notches around the circumference for warp threads.
- Warp the ring and weave concentric rounds, alternating yarns to form the sunburst pattern from the center outward.
- Use tighter weft passes near the center to create a defined focal point, then loosen slightly toward the edge.
- Secure the final row and trim the outer edge for a neat rounded coaster finish.
Avoid: A frequent issue is uneven warp spacing on the ring, which leads to lopsided concentric bands. Careful marking of notches before warping helps the coaster keep a true circular rhythm.
Try Also: Try a two-tone sunrise palette with soft pastels or a high-contrast black and ochre look for a modern graphic feel. A central button or bead can become a stitched focal point for extra interest.
Products & Materials
Items Used
- cardboard loom (circular)
- wool yarn
- cotton yarn
- small scissors
“Round sunburst coaster woven on a circular cardboard loom.”
Rainy-afternoon pocket mirror cozy with loop
⏱️ 35 min · 🟢 Beginner
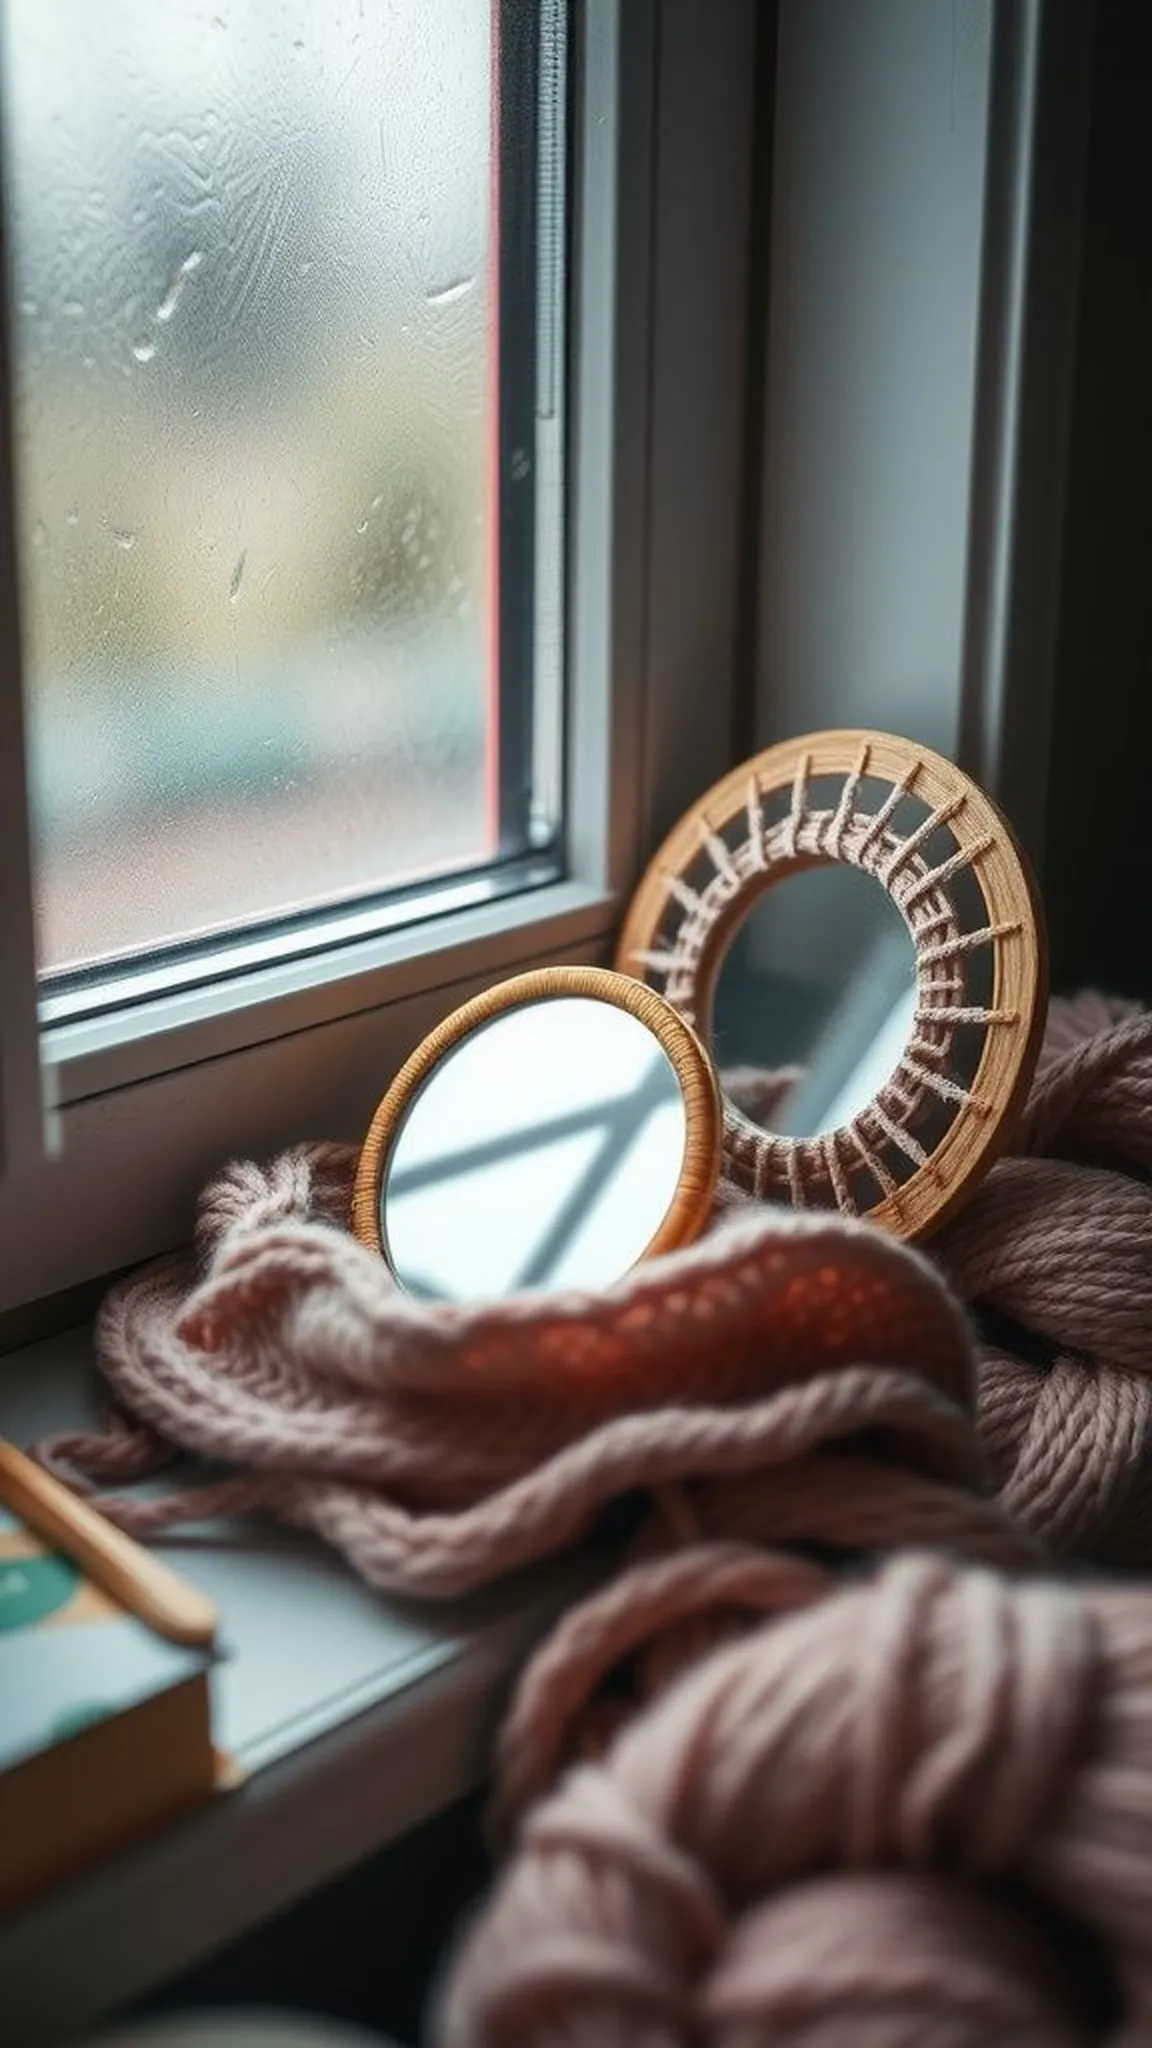
The pocket mirror cozy wraps a small round mirror in a snug, textured cover that warms the metal with yarn. The cardboard loom supports tight weaving so the mirror slips into a cushioned nest that feels soft to the touch.
Color and texture choices transform a plain mirror into a tiny handmade object, edged with a loop to slide on a bag or key ring. The cozy muffles cold metal and adds a personal note when taken out on a damp commute.
A few rows of plush yarn around the perimeter create a soft guard against bumps and scratches. The overall scale is delightfully small and carries well in a pocket or purse.
Pro Tip: Weave a slightly oversized outer diameter so the cozy hugs the mirror without puckering and retains shape after repeated use.
How to Make This
- Cut a small circular cardboard loom and mark evenly spaced notches to form the warp circumference.
- Warp the loom and weave in tight rounds, increasing the diameter slightly to accommodate the mirror thickness.
- Create a small loop at the top by leaving extra warp strands and securing them into a loop before finishing.
- Remove the woven piece and fit the mirror into the woven pocket, adjusting the edge for a snug fit.
Avoid: A frequent beginner habit is weaving too tightly, which can prevent the mirror from slipping into the cozy. Allowing a touch more room in the circumference ensures an easy fit without strain.
Try Also: Add a tiny button closure across the loop for extra security or weave a small pocket on the back for a folded tissue. Using velvet-like yarn yields a more luxurious, plush finish.
Products & Materials
Items Used
- cardboard loom (small round)
- soft plush yarn
- small handheld mirror
- tapestry needle
“Soft pocket mirror cozy with handy loop for on-the-go charm.”
Holiday ornament tiny tapestry with sparkles
⏱️ 1 hour · 🟠 Intermediate
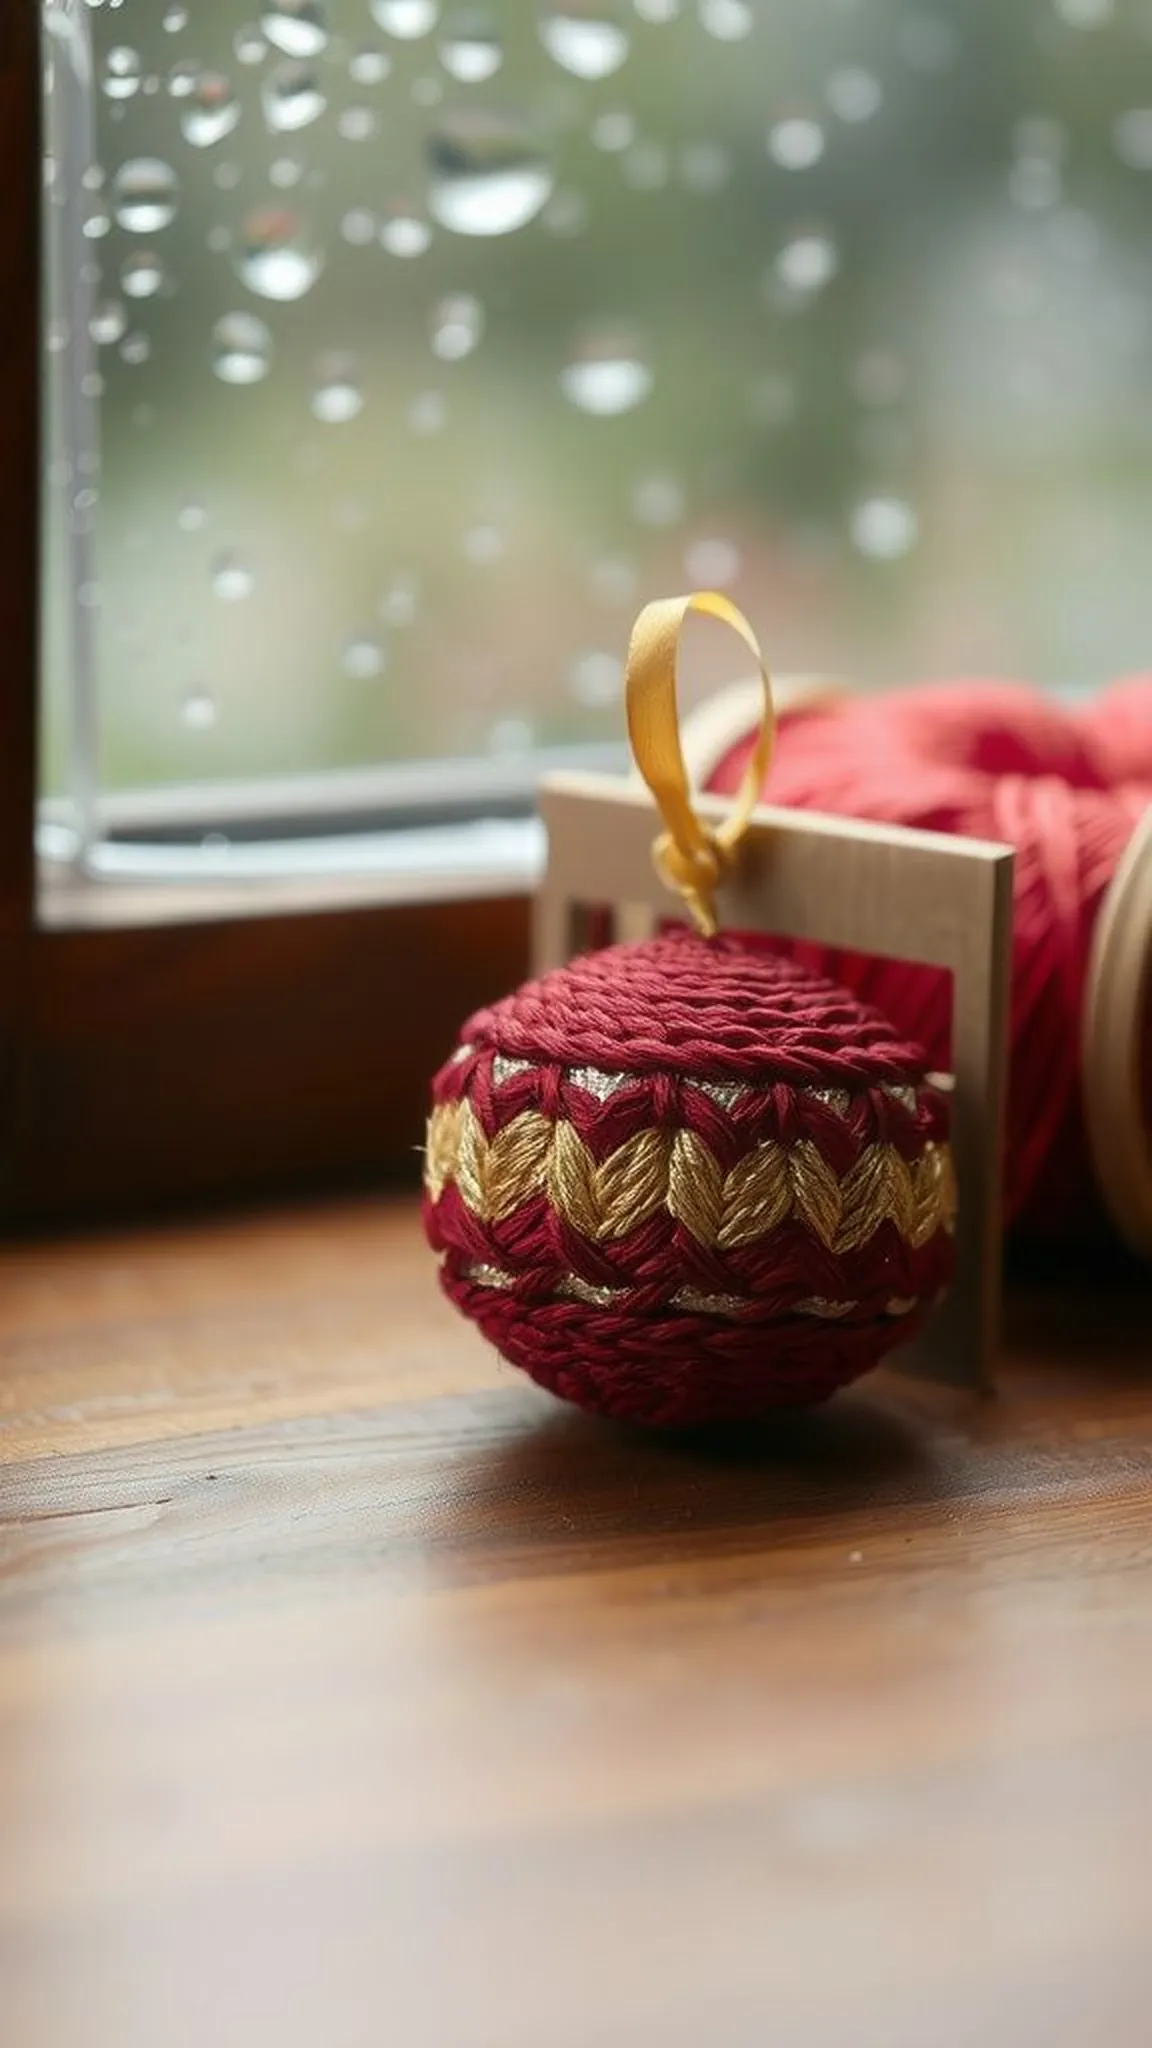
The tiny tapestry ornament gleams with a thread of metallic woven into a delicate motif suited for a branch or knob. The cardboard loom holds a compact grid where small color fields and a hint of shimmer play against matte yarns.
Close inspection shows fine ridges and subtle color shifts, almost like a miniature landscape caught in fiber. A loop of sturdy ribbon or cord gives a tidy attachment point that complements the woven motif.
When a string of these ornaments hangs near a window, raindrops and light catch the metallic thread for a soft celebratory shimmer. The ornaments remain pleasantly small and intimate, ideal for clustered displays on hooks or branches.
Pro Tip: Weave a narrow strip and fold it around a small backing to create a neat ornament with a reinforced hanging loop.
How to Make This
- Construct a tiny rectangular cardboard loom and warp it with a strong thread to define the ornament width.
- Weave small color blocks and introduce a metallic thread sparingly to add sparkle without stiffness.
- Create a reinforced hanging loop by leaving extra warp strands at the top and knotting them securely.
- Attach a small backing if desired and trim edges for a clean finished ornament.
Avoid: A frequent mistake is overusing metallic thread, which can make the piece stiff and less cozy. Sparing use of shimmer balances visual interest with pleasant handfeel.
Try Also: Create a set with wintery blues and silver, or a warm red and gold pair for a classic palette. Small stitched beads sewn onto the final rows give an heirloom look.
Products & Materials
Items Used
- cardboard loom (tiny rectangle)
- metallic thread
- fine yarn
- ribbon for loop
- small beads
“Sparkling tiny tapestry ornament woven on a cardboard loom.”
Dainty floral brooch woven on cardboard loom
⏱️ 2-3 hours · 🔴 Advanced
The dainty floral brooch layers tiny woven petals into a compact, sculpted badge that sits lightly on fabric. The cardboard loom supports careful shaping and close packing of yarn bands to suggest petal edges and a soft center.
Textures are nuanced, moving from velvety roving to crisp cotton for definition that reads as botanical in miniature. The finished pin carries a subtle depth that becomes more interesting with each tilt and shift of light.
A metal pin back anchors the piece so the brooch can accessorize a coat or a bag, lending a handcrafted accent to outerwear. The scale invites close admiration, a small sculptural statement born of patient weaving.
Pro Tip: Layer shorter, tapered weft sections for petal definition and secure the brooch to a sturdy backing before attaching the pin hardware for durability.
How to Make This
- Prepare a small square or circular cardboard loom and warp it tightly to create a compact base for petal weaving.
- Weave short, tapered weft sections in concentric arrangements to form individual petal shapes layered toward the center.
- Affix a felt backing and stitch the woven flower securely, then sew on a metal pin back for wearing.
- Trim stray fibers and shape the petals gently for a refined floral silhouette.
Avoid: A frequent beginner tendency is weaving petals too long, which flattens the floral shape and reduces dimensionality. Shorter, tapered sections maintain a sculptural petal form and improve overall silhouette.
Try Also: Make a trio of tiny buds clustered on one backing for a boutonniere effect or weave a single larger bloom in pastel hues for a romantic look. Subtle bead centers add vintage charm.
Products & Materials
Items Used
- cardboard loom (very small)
- wool roving
- felt backing circles
- pin back hardware
- tapestry needle
“Tiny sculpted floral brooch woven with layered petal textures.”
Chunky potholder-style square with bright blocks
⏱️ 2-3 hours · 🔴 Advanced
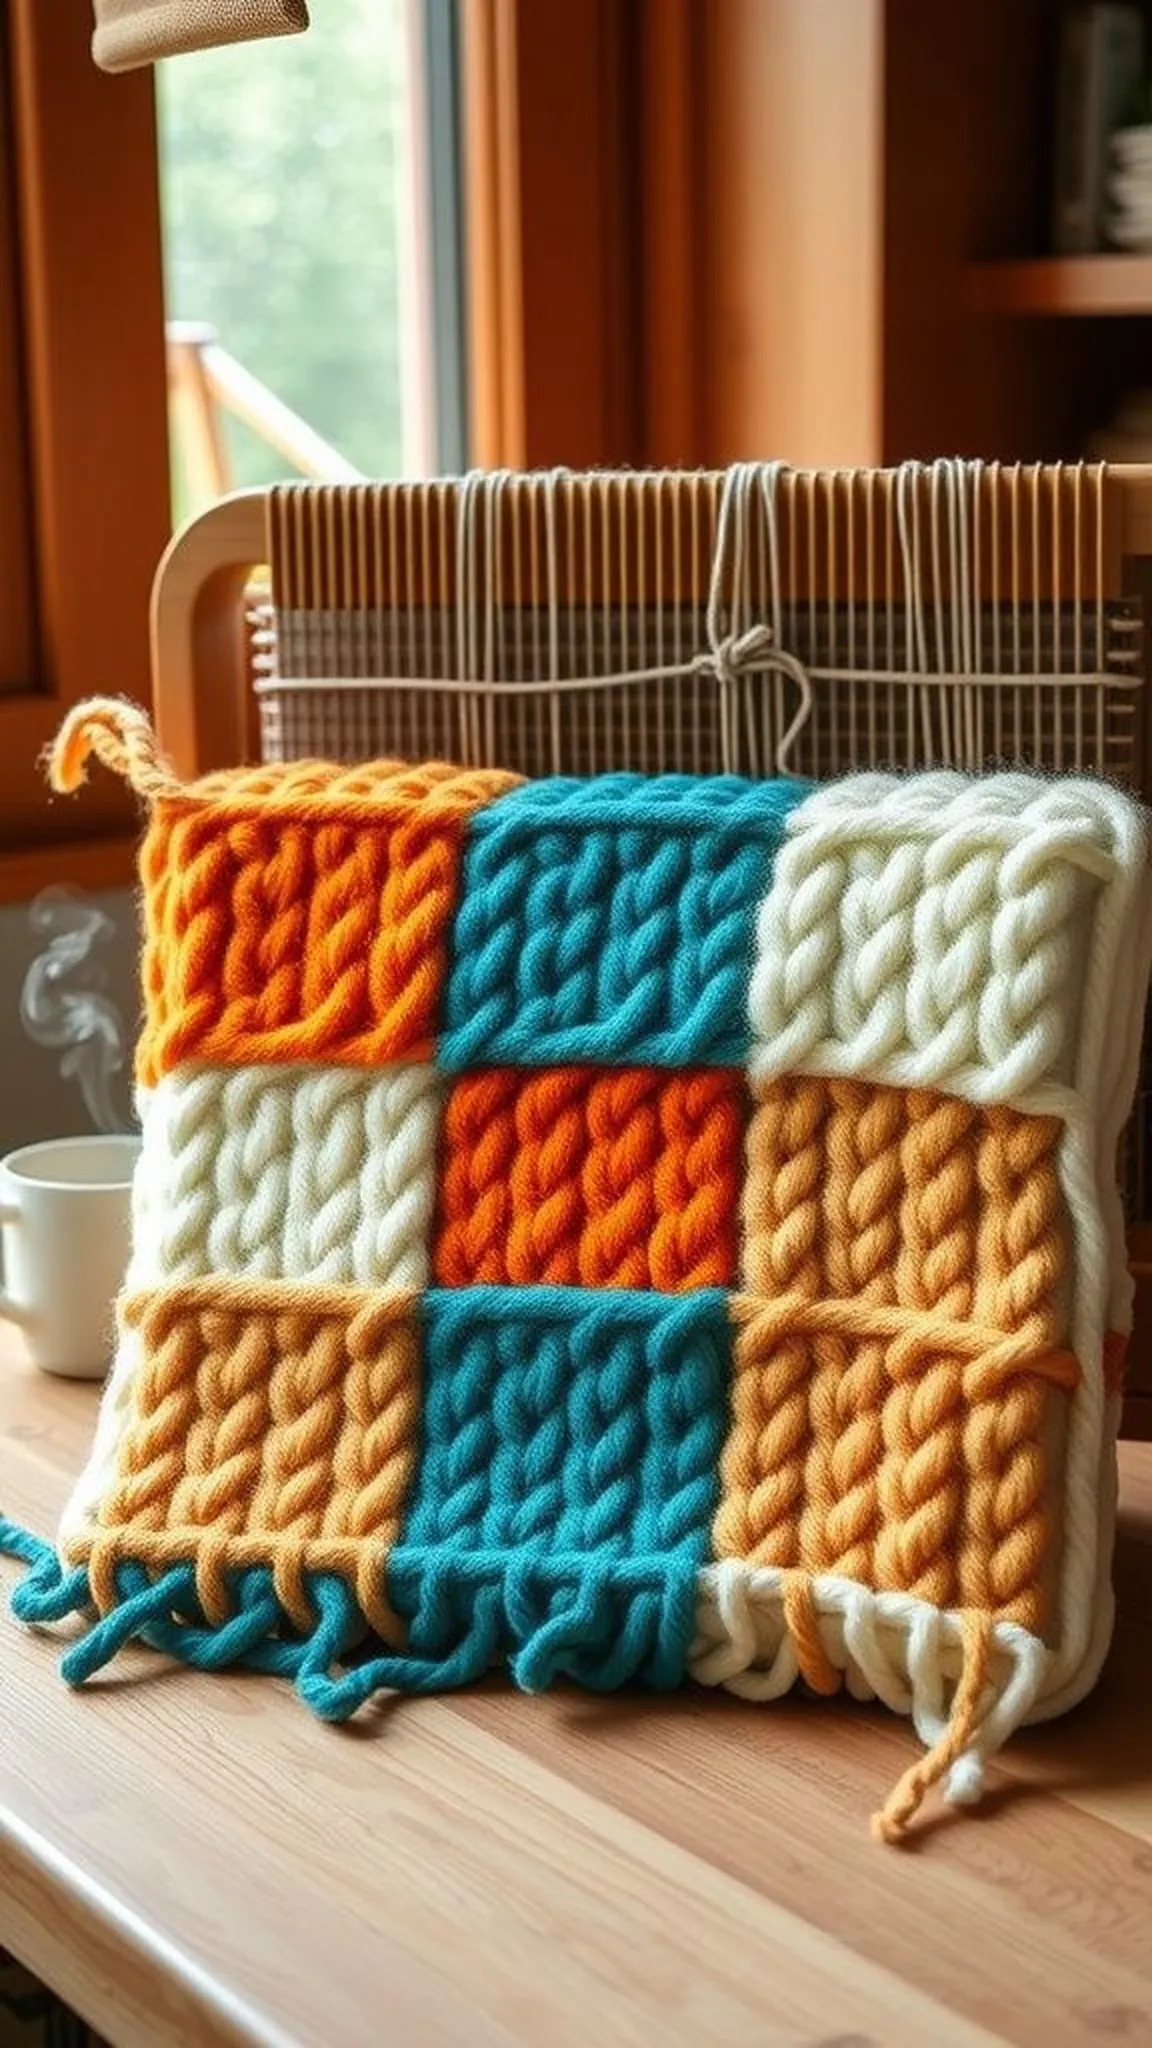
The chunky square reads like a potholder in heft and color blocks, thick enough to buffer heat from warm mugs. A sturdy cardboard loom and robust yarns create a dense, tactile fabric with visible stitch definition.
Color blocking gives the piece a graphic energy while the thick yarns provide a soft but substantial hand that feels protective under hot surfaces. The surface shows clear ridges and valley textures where rows meet, inviting a tactile inspection.
Edges are substantial and the overall piece sits flat and confident on a table, absorbing moisture and insulating against warmth. The heft and thickness make it a satisfying project for someone who enjoys texture and a more substantial finished object.
Pro Tip: Alternate the thickest yarn with a sturdy cotton strand to maintain structure while preserving plush, insulating bulk in the fabric.
How to Make This
- Build a firm cardboard loom suitable for a square and warp it with heavy cotton or cord for strength.
- Weave with chunky yarn, alternating color blocks and using tight weft passes to compress the fabric.
- Continue until the square reaches a heat-resistant thickness, then bind the edges securely.
- Finish by trimming stray ends and testing flexibility before removing from the loom.
Avoid: A frequent error is using too soft or stretchy yarn exclusively, which yields a floppy piece that doesn’t insulate well. Mixing a sturdier cotton or cord with plush yarn keeps the potholder functional and robust.
Try Also: Make two smaller squares for matching sets, or add a hanging loop at one corner for kitchen storage. A checkerboard of two contrasting colors reads as modern and lively.
Products & Materials
Items Used
- cardboard loom (large square)
- chunky yarn
- cotton cord
- tapestry needle
- scissors
“Thick woven square with bold color blocks for tabletop warmth.”
Tiny dollhouse rug with soft vintage palette
⏱️ 1 hour · 🟠 Intermediate
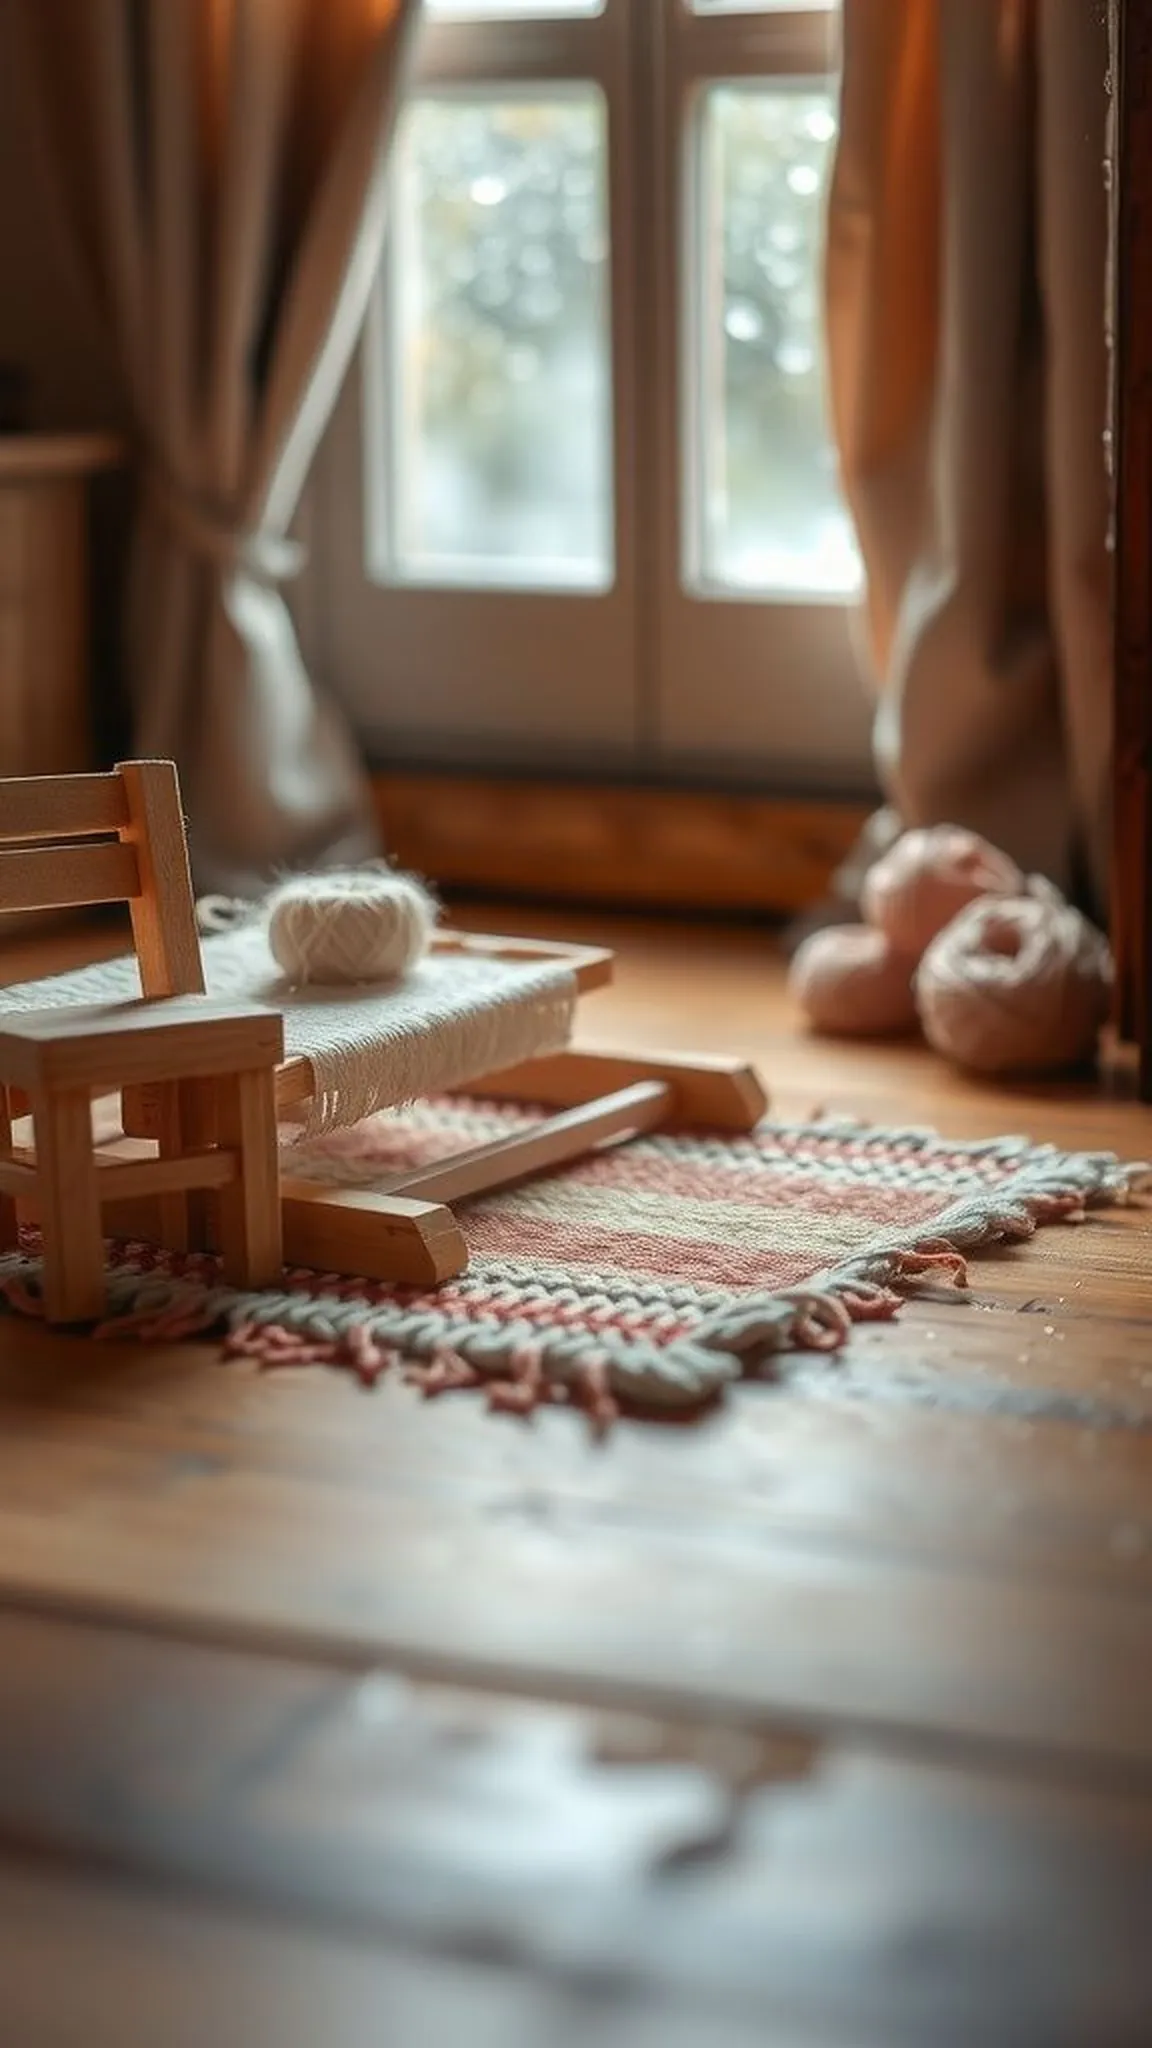
The tiny dollhouse rug unfolds like a miniature heirloom, its faded palette suggesting age and care. The cardboard loom holds delicate warps while small yarns create tight, scaled rows that feel surprisingly textile-like at a miniature scale.
Textures are gently worn and the rug sits low and flat, offering a hint of lived-in warmth inside a dollhouse room or a display box. Close viewing reveals careful color blending and subtly frayed edges that mimic vintage softness.
Its small presence has an outsized charm and invites tabletop storytelling on rainy afternoons. The rug pairs beautifully with tiny furniture and a sliver of sunlight across a miniature floorboard.
Pro Tip: Weave with the finest yarn available and keep weft tension steady to achieve miniature scale without bulky distortion in the tiny rug.
How to Make This
- Construct a small rectangular cardboard loom scaled to the intended dollhouse rug dimensions and mark fine notches.
- Warp the loom with thin thread or fine yarn and weave closely spaced rows with very fine weft yarn.
- Blend adjacent colors by alternating short passes to achieve a gently faded, vintage look.
- Remove the finished rug carefully and soften edges by lightly teasing fibers if desired.
Avoid: A frequent snag is choosing yarn that is too thick for the scale, which overwhelms the miniature proportions. Fine yarn and patient close weaving preserve the dollhouse rug’s delicate appeal.
Try Also: Create a runner by elongating the loom, or weave a round medallion-style rug for a parlor feel. Add tiny tassels on each short end for a more antique look.
Products & Materials
Items Used
“Miniature vintage-style dollhouse rug woven on a tiny loom.”
Color-block eyeglass case with soft lining
⏱️ 1 hour · 🟠 Intermediate
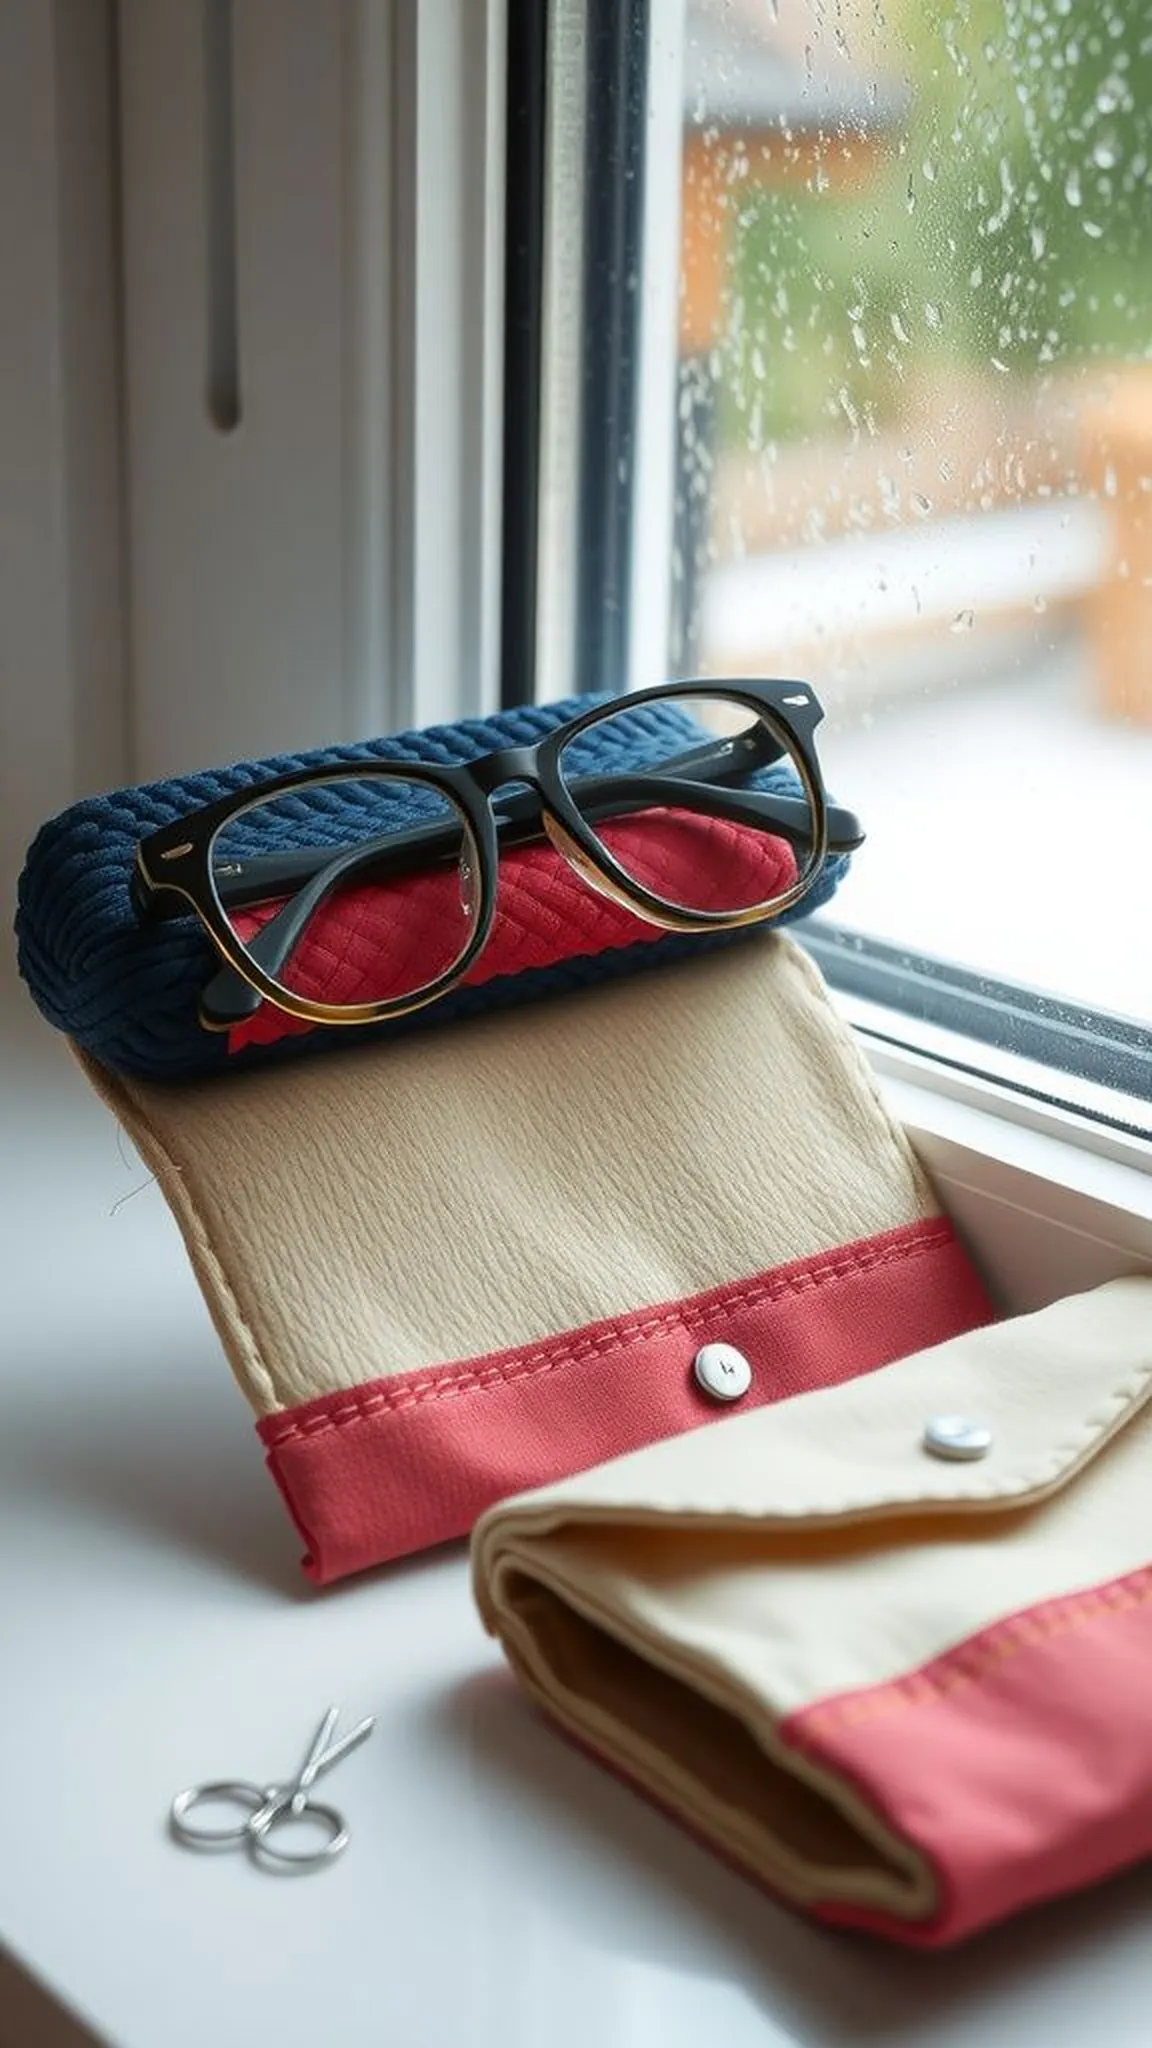
The color-block eyeglass case combines flat woven panels with a soft inner lining that protects lenses during rainy commutes. The cardboard loom keeps the outer fabric smooth while alternating color bands produce a sleek, modern silhouette.
Surface textures vary subtly, with the woven side showing faint ridges against the yielding interior lining. The finished case slips into a bag easily and presents a calm pop of color when retrieved.
A narrow loop or snap closure holds the case shut and keeps glasses from slipping out when jostled. The overall result balances protection with portable handcrafted charm.
Pro Tip: Line the woven panel with a soft fabric backing and stitch the edges securely for a snug eyeglass pouch that resists wear.
How to Make This
- Warp a rectangular cardboard loom to the width of the eyeglass case and weave flat panels in bold color blocks.
- Sew a soft fabric lining to the woven piece, aligning edges and leaving an opening for turning.
- Fold the woven panel into a pouch shape, sew sides closed, and add a snap or loop closure at the top.
- Trim edges and weave in loose ends to finish a neat, protective case.
Avoid: A frequent oversight is skipping a lining, which can allow lenses to catch on rough weft ends. Adding a soft fabric backing preserves both the glasses and the woven exterior.
Try Also: Use a single graduated color for an ombré effect or create geometric blocks with three contrasting hues. A leather tab at the closure adds a refined touch.
Products & Materials
Items Used
- cardboard loom (rectangular)
- cotton yarn
- fabric for lining
- snap closure
- sewing needle
“Sleek color-block eyeglass case with soft protective lining.”
Narrow guitar strap accent with woven panel
⏱️ 2 hours · 🔴 Advanced
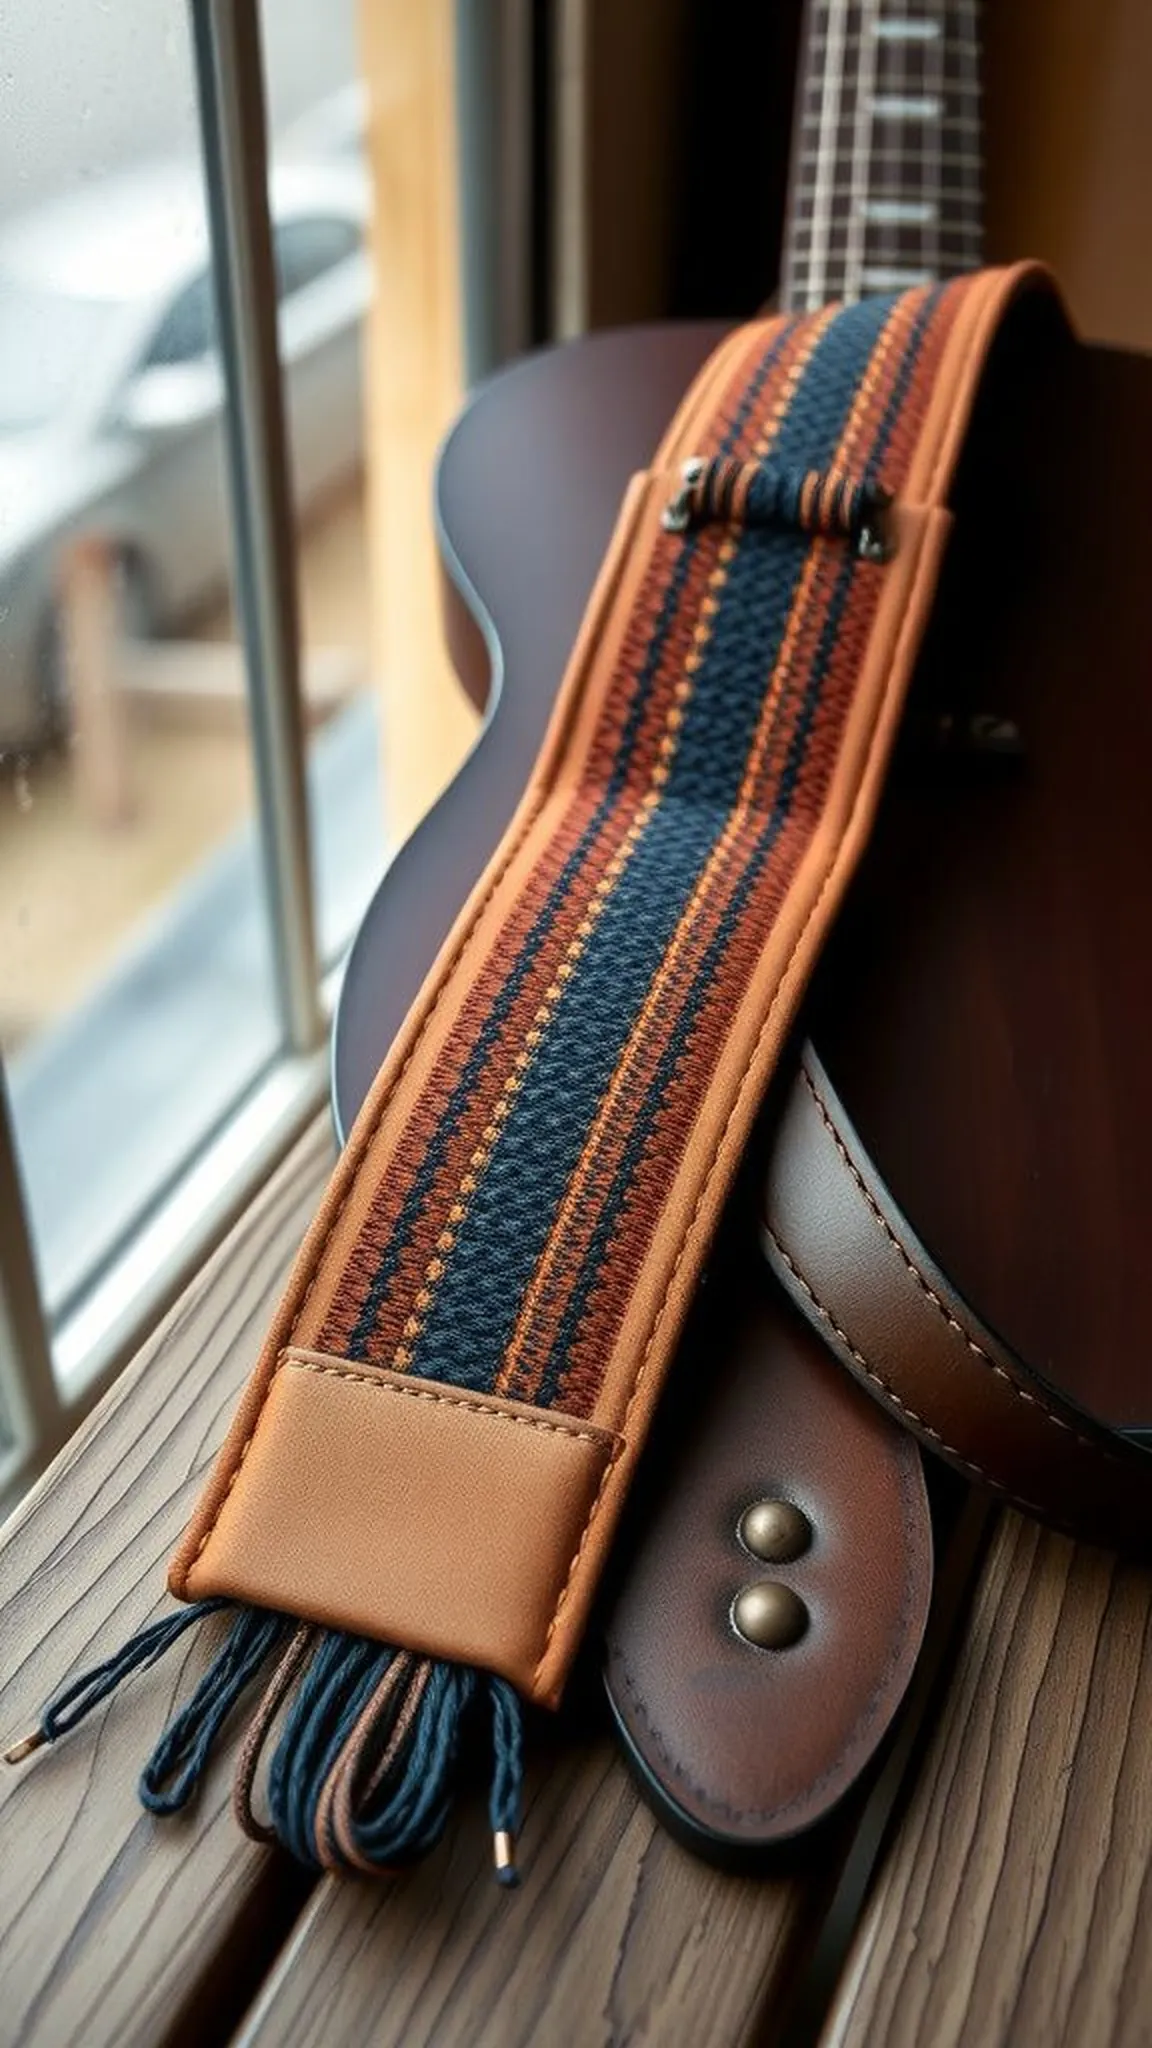
The narrow guitar strap accent adds a woven panel to an existing strap for a handmade touch. The cardboard loom produces a firm, decorative strip whose color and texture harmonize with strap leather and metal hardware.
Textures range from flat bands to slight piled areas that catch candlelight or stage lamps, lending an artisanal feel to the instrument. The strip feels snug and durable when attached, and the tactile weave offers a comfortable surface against the shoulder.
A few well-chosen hues can make the instrument feel personalized without overwhelming its finish. The woven accent reads as a subtle detail that rewards close inspection on rainy evenings and long practice sessions alike.
Pro Tip: Weave a slightly narrower panel than the strap width so the woven strip sits flush and avoids rubbing at attachment points.
How to Make This
- Prepare a narrow cardboard loom sized to the width of the guitar strap and warp it with sturdy cord for strength.
- Weave decorative bands and textured sections to achieve the desired pattern, keeping tension even for durability.
- Back the woven strip with a leather or fabric piece and stitch securely to distribute wear.
- Attach the finished accent to the strap using rivets or stitching at the ends for a stable connection.
Avoid: A frequent issue is choosing a strip width equal to the strap, which can create rubbing at the edges when the instrument is played. Slightly undersizing the panel prevents friction and improves comfort.
Try Also: Make a matching wrist cuff or camera strap in the same palette for coordinated accessories, or weave a second reversible panel for a two-sided look. Embroidered motifs over the woven surface add an extra decorative layer.
Products & Materials
Items Used
- cardboard loom (narrow)
- strong yarn or cord
- leather backing strip
- rivet set or stitching hardware
- tapestry needle
“Handwoven accent panel for a guitar strap with subtle texture.”
Pocket-sized camera strap pad for comfort
⏱️ 1 hour · 🟠 Intermediate
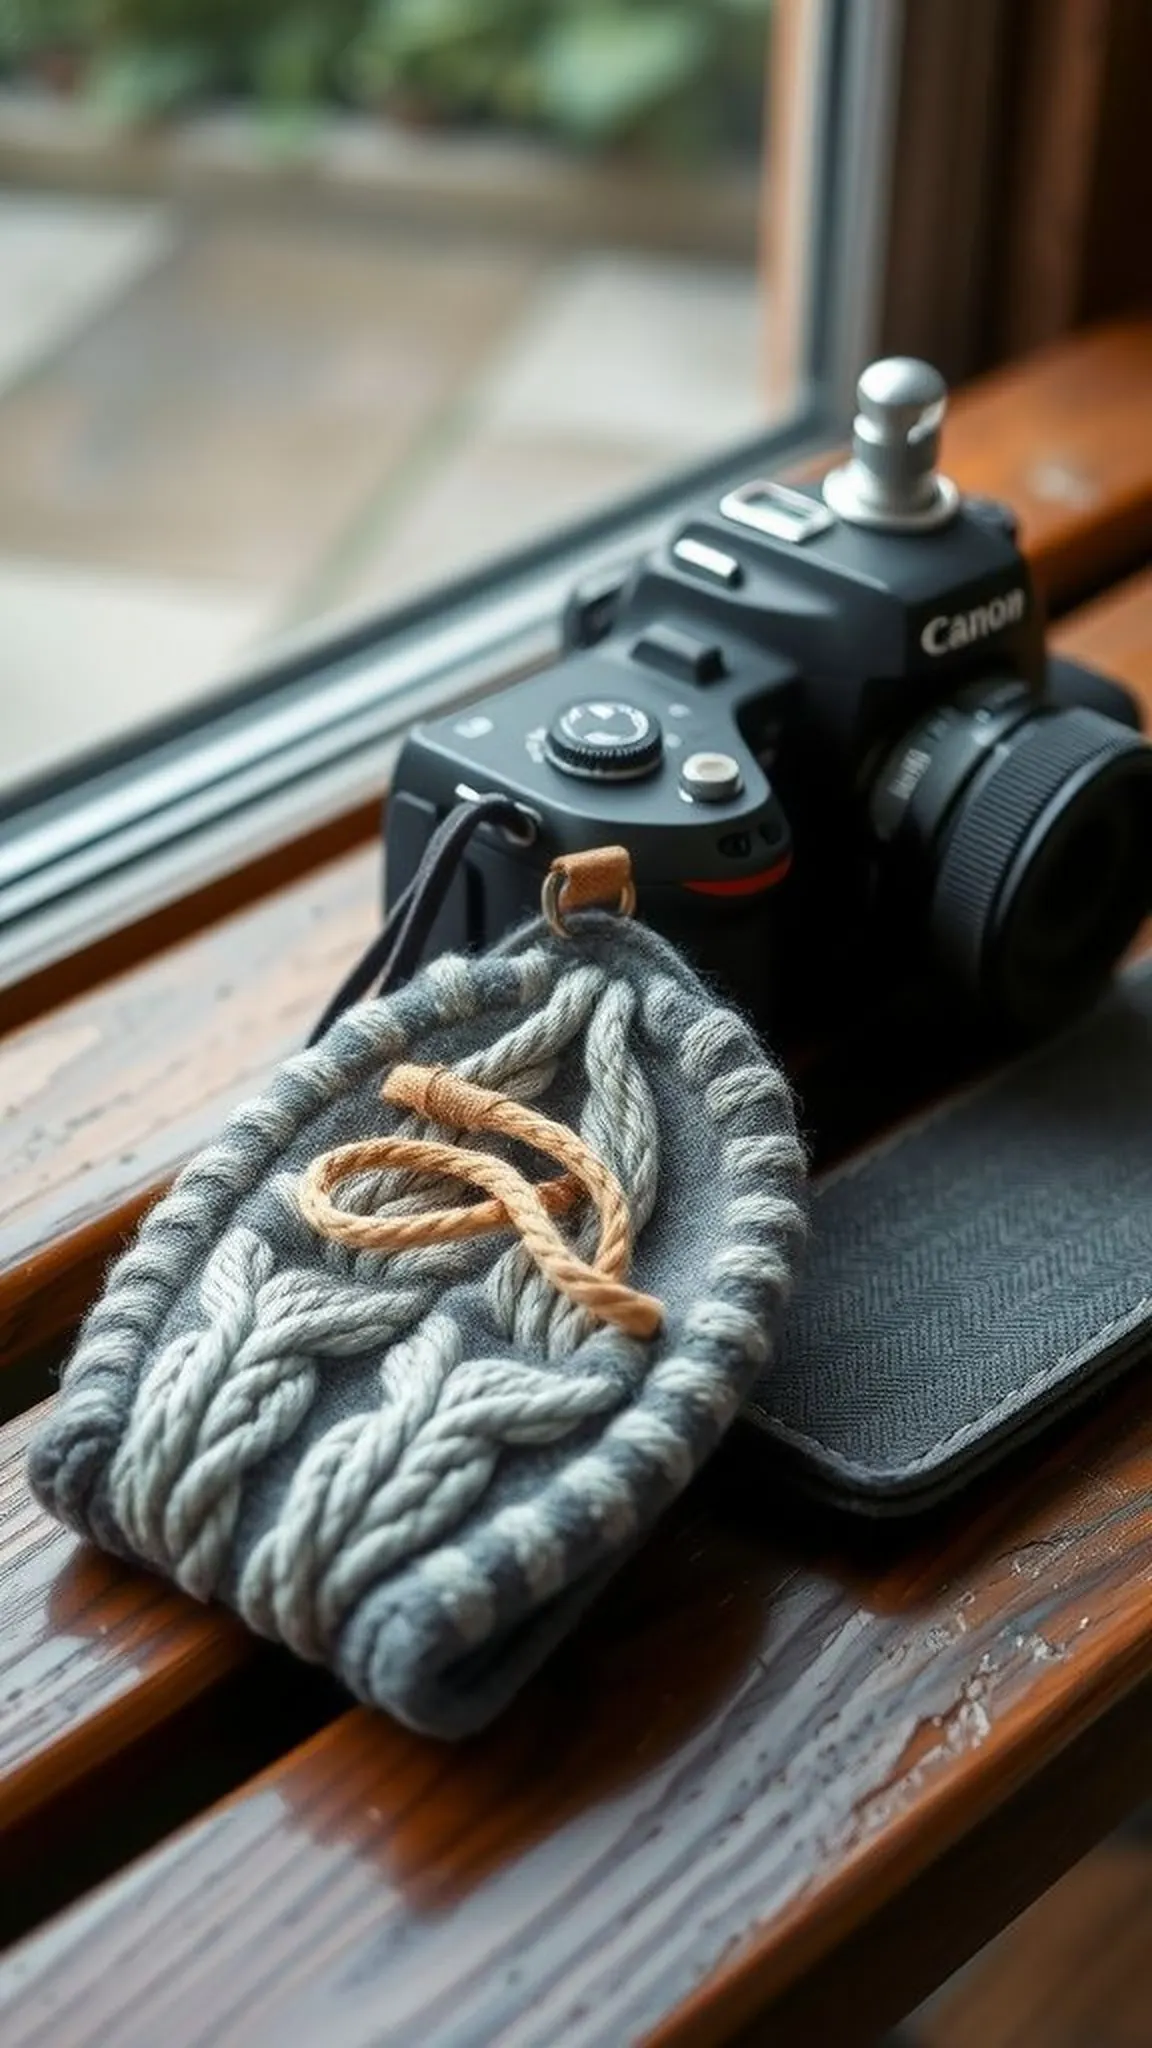
The pocket-sized camera strap pad offers cushioned comfort with a short woven panel that slips over a strap. The cardboard loom yields a compact piece that blends plush yarns and firmer bands for balanced support.
Textures alternate between pillowy roving and firm cotton so the pad feels soft yet stable on the shoulder. A finished pad reads like a small textile cushion with subtle handcrafted personality that brightens equipment on gray days.
The pad attaches discreetly and carries the same hand-made warmth as larger woven accessories, making gear feel friendlier to shoulder and hand. The compact scale is easy to stash in a camera bag between shoots.
Pro Tip: Incorporate a short inner sleeve of fabric on the back to protect the strap and distribute pressure for long-wearing comfort.
How to Make This
- Weave a short, wider panel on a cardboard loom using alternating plush and firm yarns to build cushioning.
- Sew a fabric sleeve to the back edge of the woven panel sized to slip over the camera strap.
- Fold the woven piece around the strap sleeve and stitch the sides closed for a snug fit.
- Trim loose ends and test movement to ensure the pad stays put during use.
Avoid: A frequent misstep is weaving a panel that’s too narrow to cover the strap seam, causing the pad to shift. Ensure the finished width fully seats over the strap for stable comfort.
Try Also: Make a matching wrist strap wrap in the same palette for a coordinated kit or add a small zip pocket on the inner lining for SD cards. Contrast piping along the edges adds a polished touch.
Products & Materials
Items Used
“Compact woven camera strap pad for cushioned comfort and style.”
Fringed curtain tieback with boho flair
⏱️ 1-2 hours · 🟠 Intermediate
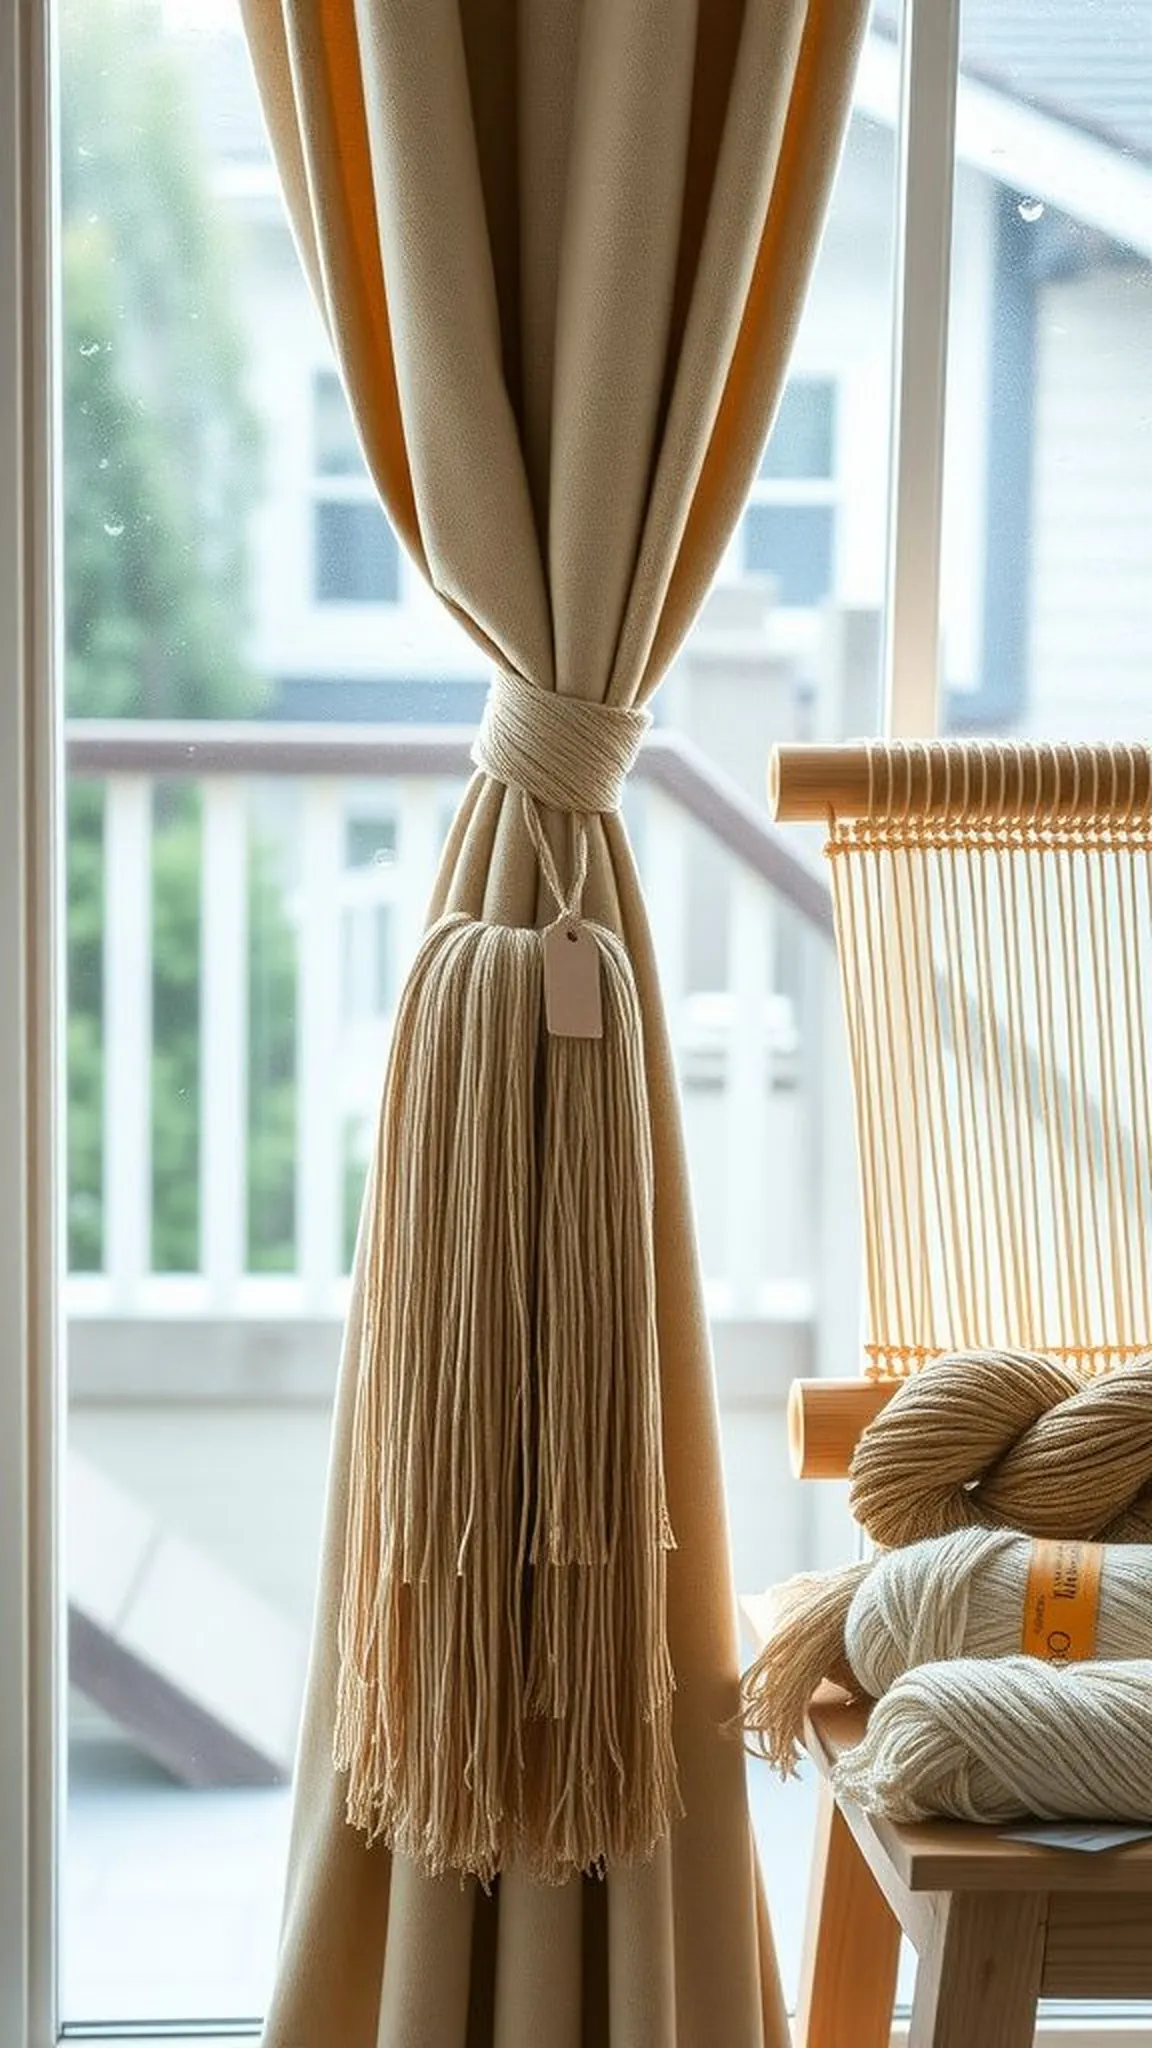
The fringed curtain tieback adds handcrafted charm to a damp, dim room by gathering fabric in a soft loop. A cardboard loom supports a moderately wide panel that culminates in generous fringe which swings with each window breeze.
Yarn choices set the mood; neutral cotton creates quiet elegance while colorful wool leans playful and cozy. The fringe texture frames the panel like a halo, and the repeated rows build a satisfying density where hands passed over the piece left a gentle impression.
When drawn around curtain fabric, the tieback lends a tactile counterpoint to smooth drapery and softens window light. It feels layered and domestic, exactly the sort of small upgrade that lifts a room on a rainy afternoon.
Pro Tip: Tie fringe bundles evenly and comb them gently to achieve a soft, cohesive drape that complements the woven panel.
How to Make This
- Warp a wide cardboard loom to the desired tieback width and weave a sturdy panel with strong yarn.
- Leave extra warp strands at each end to form the fringe and secure the weft ends into the panel.
- Knot or bind fringe bundles for neatness and trim to a uniform length for balanced drape.
- Attach loops or leather tabs to the back for a simple curtain fastening method.
Avoid: A frequent issue is uneven fringe bundle spacing, which produces an imbalanced hang and an amateur finish. Evenly grouping and measuring fringe bundles before trimming ensures a tidy drape.
Try Also: Create a pair in matching neutrals for a calm look or mix jewel tones for richer contrast. Swap the fringe for tasseled clusters for a different boho accent.
Products & Materials
Items Used
- cardboard loom (wide)
- cotton and wool yarn mix
- leather tab or loop
- scissors
“Boho fringed curtain tieback woven with a plush panel and drape.”
