
As an Amazon Associate I earn from qualifying purchases.
Hurricane Season Travel Preparedness Essentials guides travelers toward smarter storm-ready planning for trips during peak weather months. Clear checklists and focused packing keep key items reachable when flights change or shelters fill.
Hurricane season travel planning means arranging documents, power backups, and quick-access kits for coastal routes and last-minute reroutes. Weather-monitoring habits and compact gear choices help reduce stress while on the move.
Travel preparedness for hurricanes covers communication plans, waterproof storage, and simple evacuation options near accommodations. Practical routines and a small go-bag make changes to itineraries faster and more manageable during storm threats.
Compact carry-on emergency kit for quick evacuations
⏱️ 15 min · 🟢 Beginner
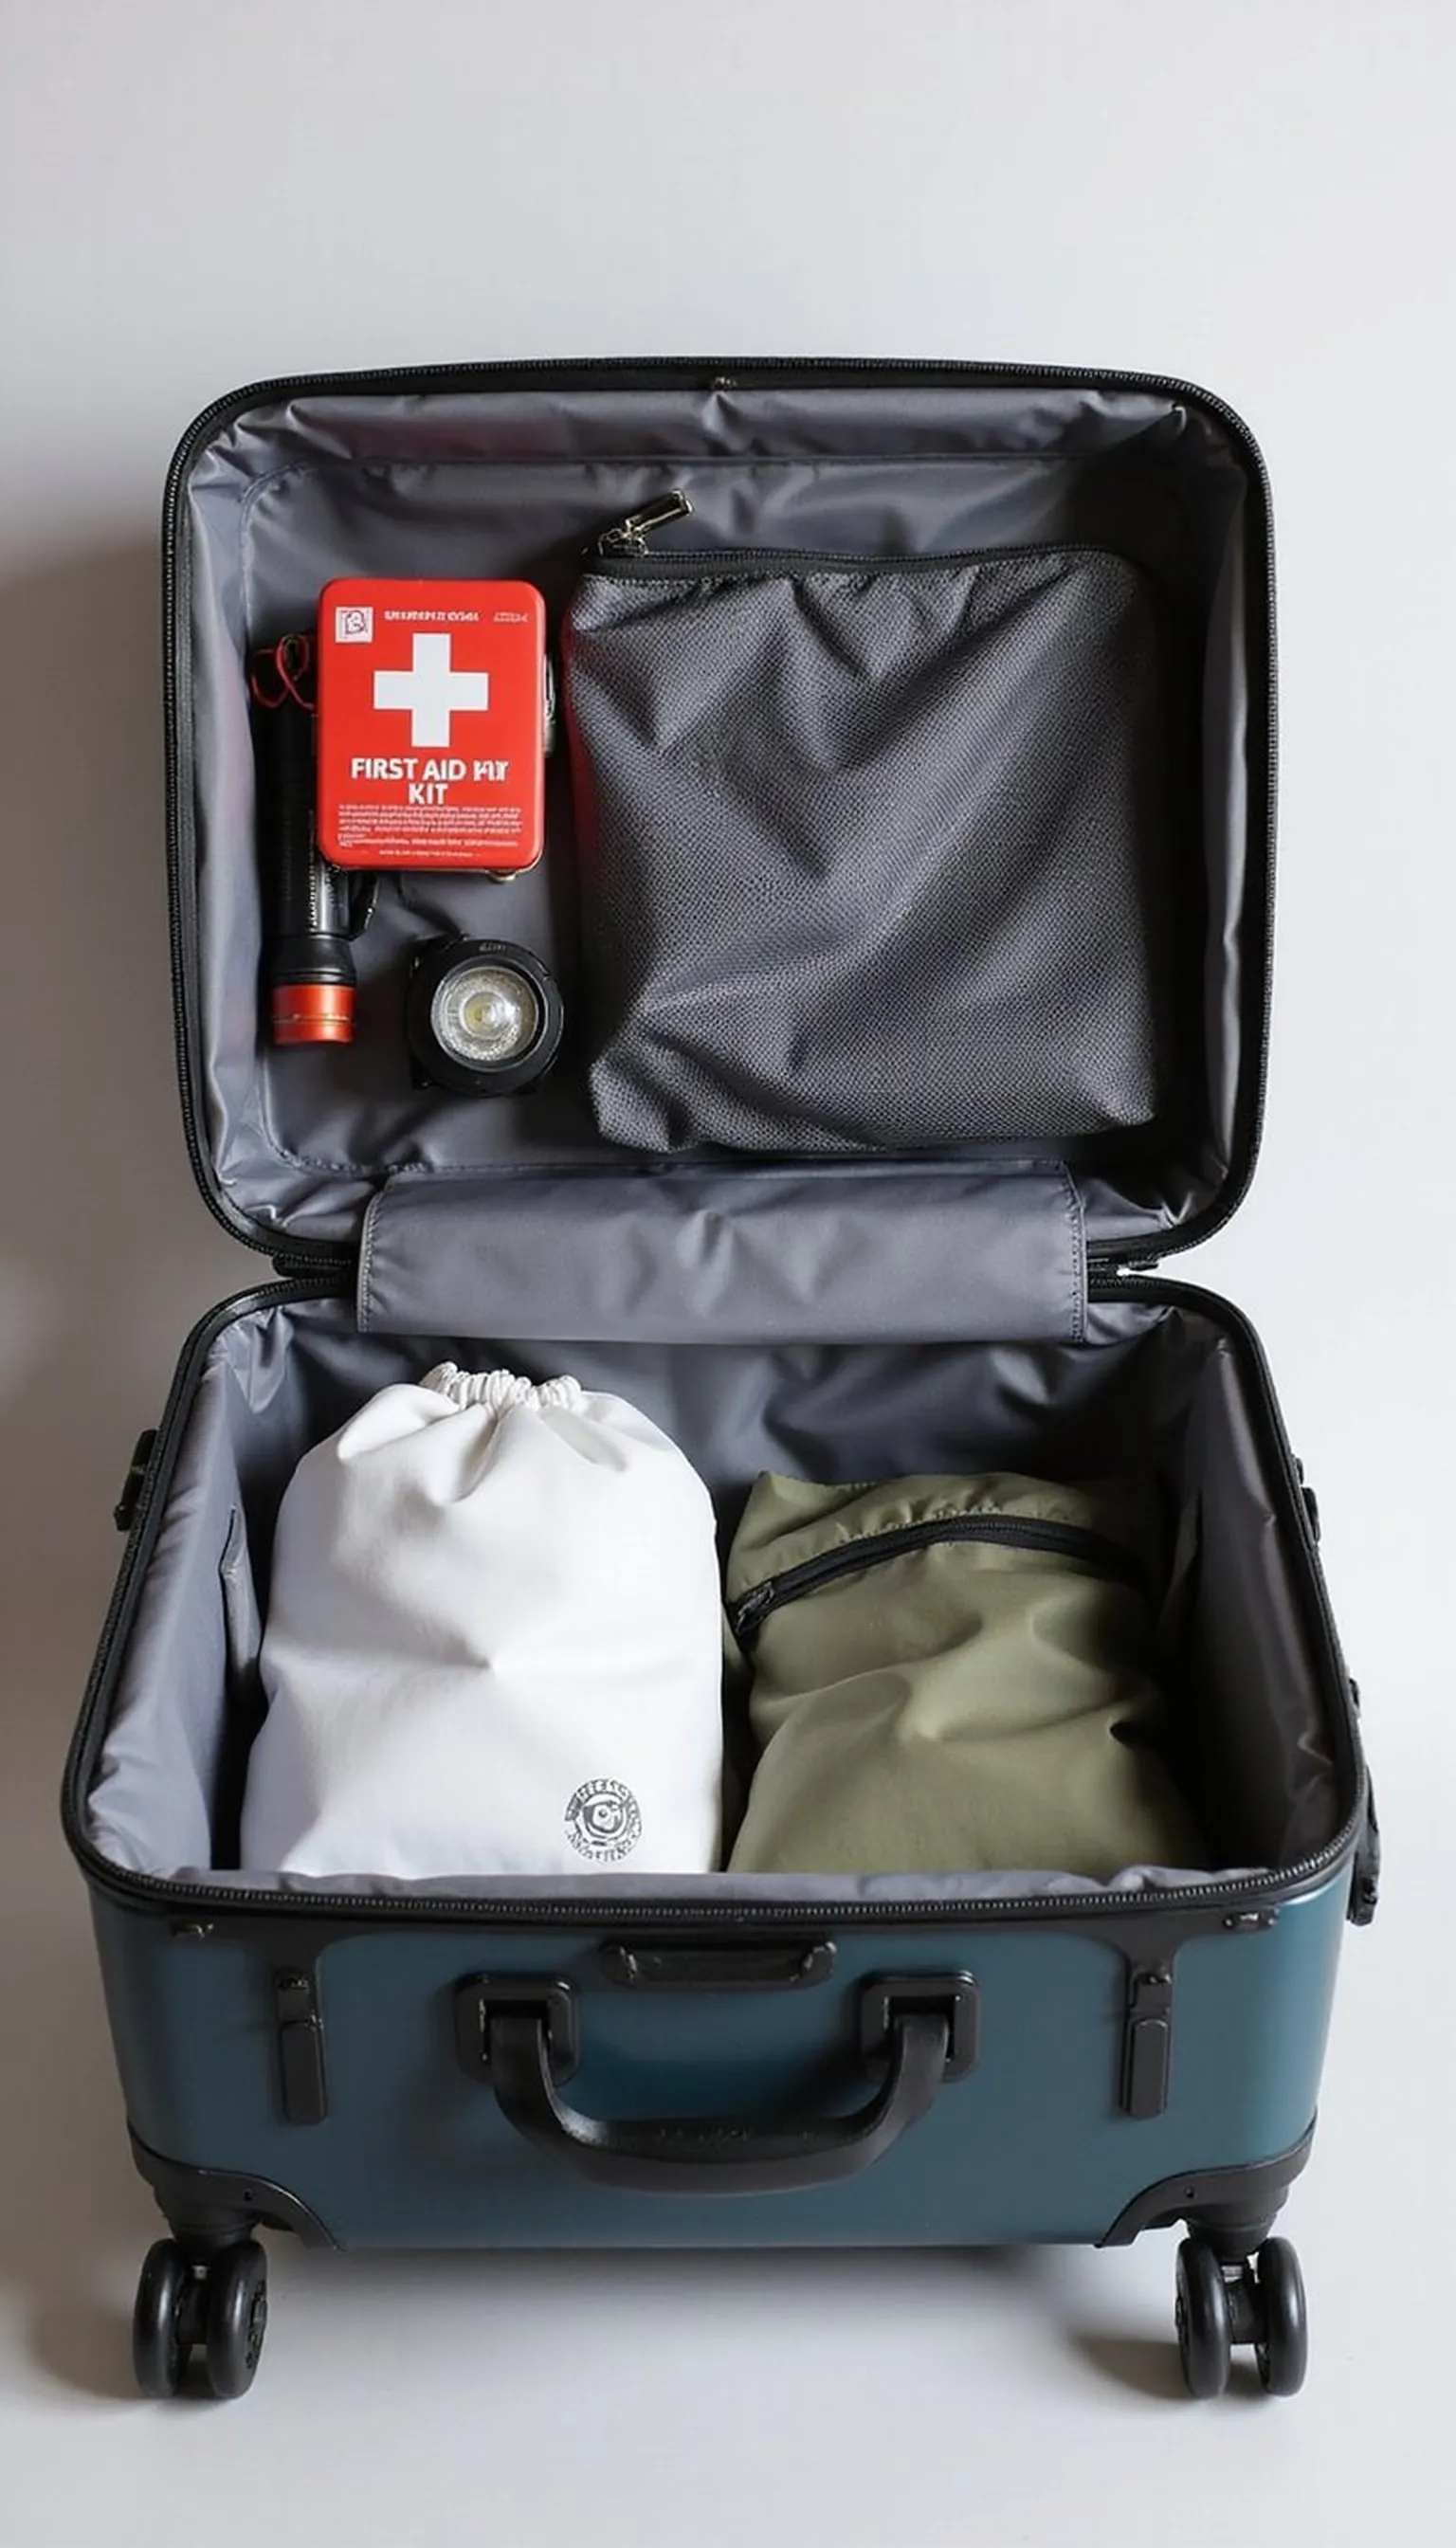
A compact emergency kit fits inside a carry-on so needed items stay within reach during sudden evacuations. Lightweight gear like a first aid kit, a compact flashlight, and zip bags save time when weather forces a quick move.
Waterproofing matters, so a resealable dry bag protects paper documents, medications, and small electronics from storm spray or leaks. Stash an emergency blanket, a small whistle, and a few high-calorie snacks to handle power outages or delays at shelters.
Organize items in clear pouches for fast checks at security and quicker retrieval at checkpoints. Keep the kit pared down to move faster if roads become congested during an evacuation.
Travel Tips
- Keep the kit in your carry-on top pocket for instant access.
- Rotate batteries and snacks every six months to stay fresh.
- Label pouches with contents to avoid rummaging under stress.
Pro Tip: Store the kit in an easy-access compartment of your carry-on for immediate reach during airport delays or sudden departures.
Avoid: Overpacking bulky items makes the carry-on heavy and harder to move during an evacuation. Avoid duplicate items that add weight without real usefulness.
Try Also: Swap the compact flashlight for a headlamp for hands-free light, or replace snacks with electrolyte tablets and ready-to-eat meal pouches. Consider a soft dry bag or a rigid small kit box based on space.
Products & Materials
Items Used
- first aid kit
- compact flashlight
- resealable dry bag
- carry-on suitcase
“Carry-on kit that keeps storm essentials within reach fast.”
Waterproof phone pouch plus backup power solutions
⏱️ 10 min · 🟢 Beginner
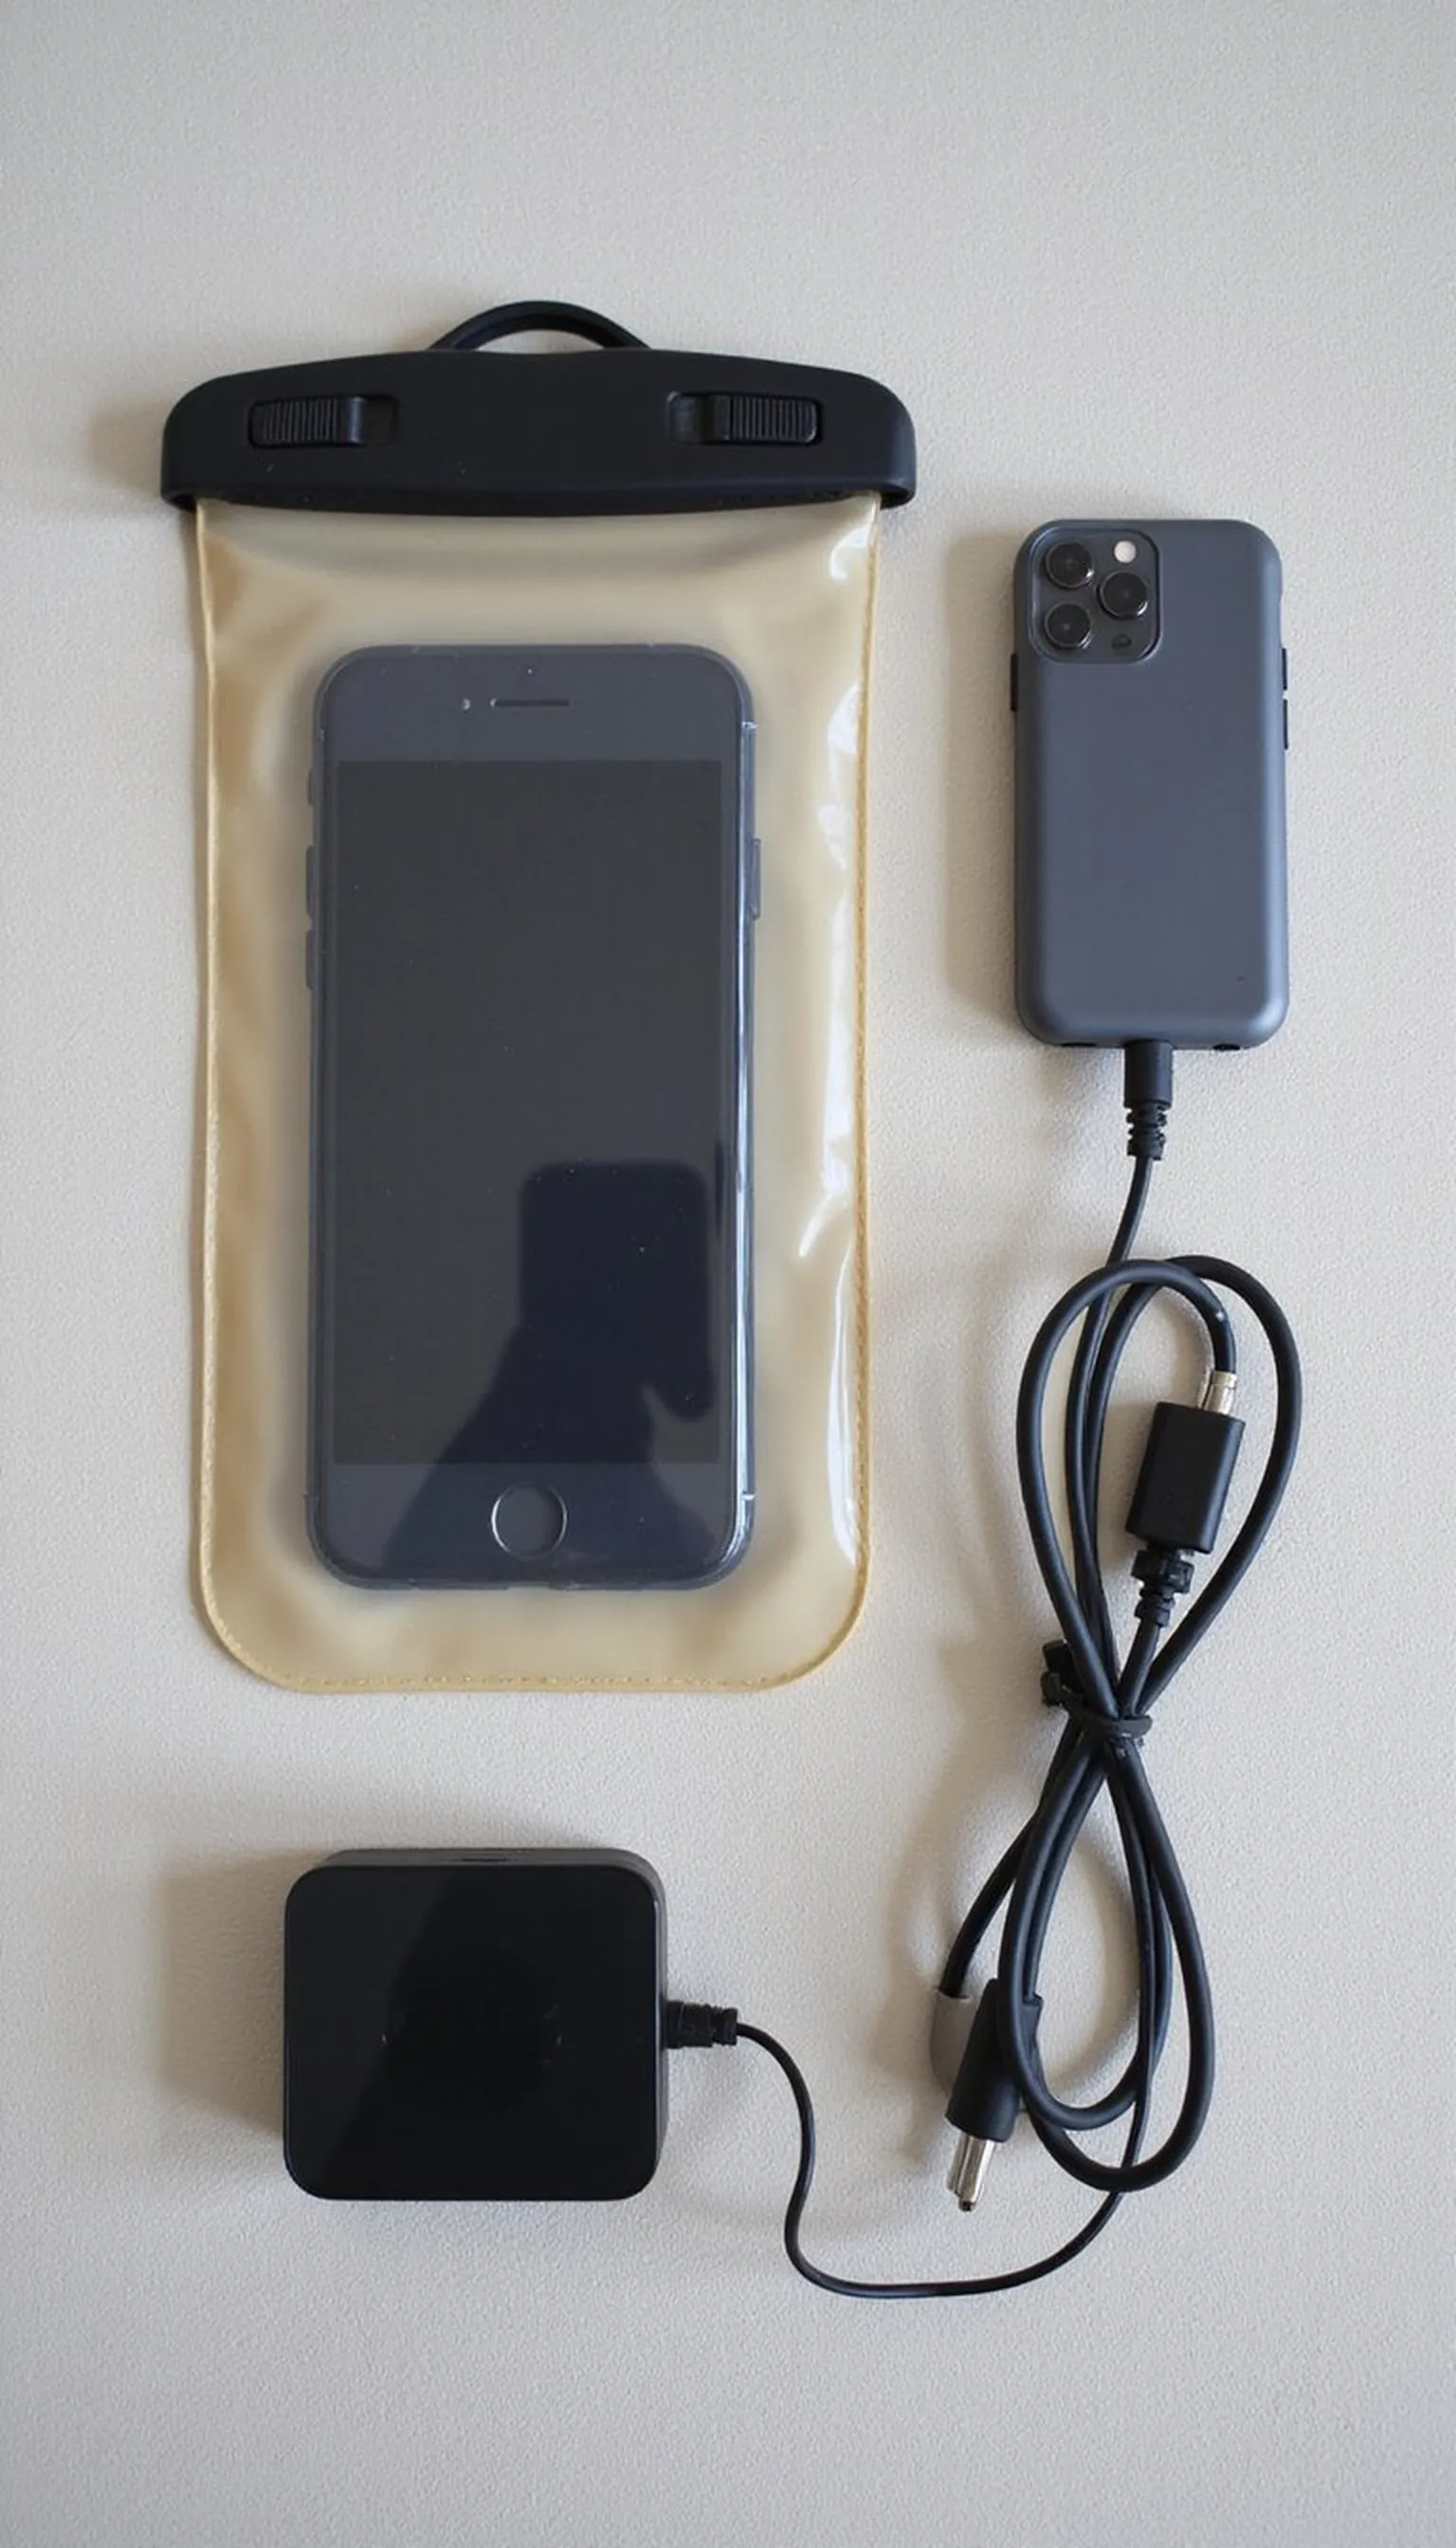
A waterproof phone pouch keeps a smartphone usable while protecting it from rain, spray, and unexpected splashes. Pair it with a portable charger and spare cable to maintain communication during power outages or delayed transport.
Select a pouch with a clear front for touchscreen access and a secure seal to prevent leaks into ports. A small, fast-charging power bank and a short cable save space and reduce tangle in crowded bags.
Keep the pouch and bank near the top of a daypack for quick access during shelter runs or beachside storms. Test charging compatibility before travel so adapters don’t become a last-minute scramble.
Travel Tips
- Place phone pouch in an outer pocket for quick weather checks.
- Pack one short cable and one multi-tip adapter to cover devices.
- Top up the power bank before boarding or driving out of town.
Pro Tip: Keep a charged portable power bank and a waterproof phone pouch together in an outer pocket for instant access during storms.
Avoid: Relying on hotel chargers or public outlets can be risky during outages. Avoid forgetting cables that match your phone and backup bank.
Try Also: Use a solar charger with a power bank for extended outages, or choose a waterproof case that doubles as a dry wallet for cards and cash. Consider a small wall-to-USB charger if outlets are available.
Products & Materials
Items Used
- waterproof phone pouch
- portable charger
- charging cable
“Waterproof phone pouch paired with portable power bank for storm-ready communication.”
Waterproof passport holder and document protection
⏱️ 20 min · 🟠 Intermediate
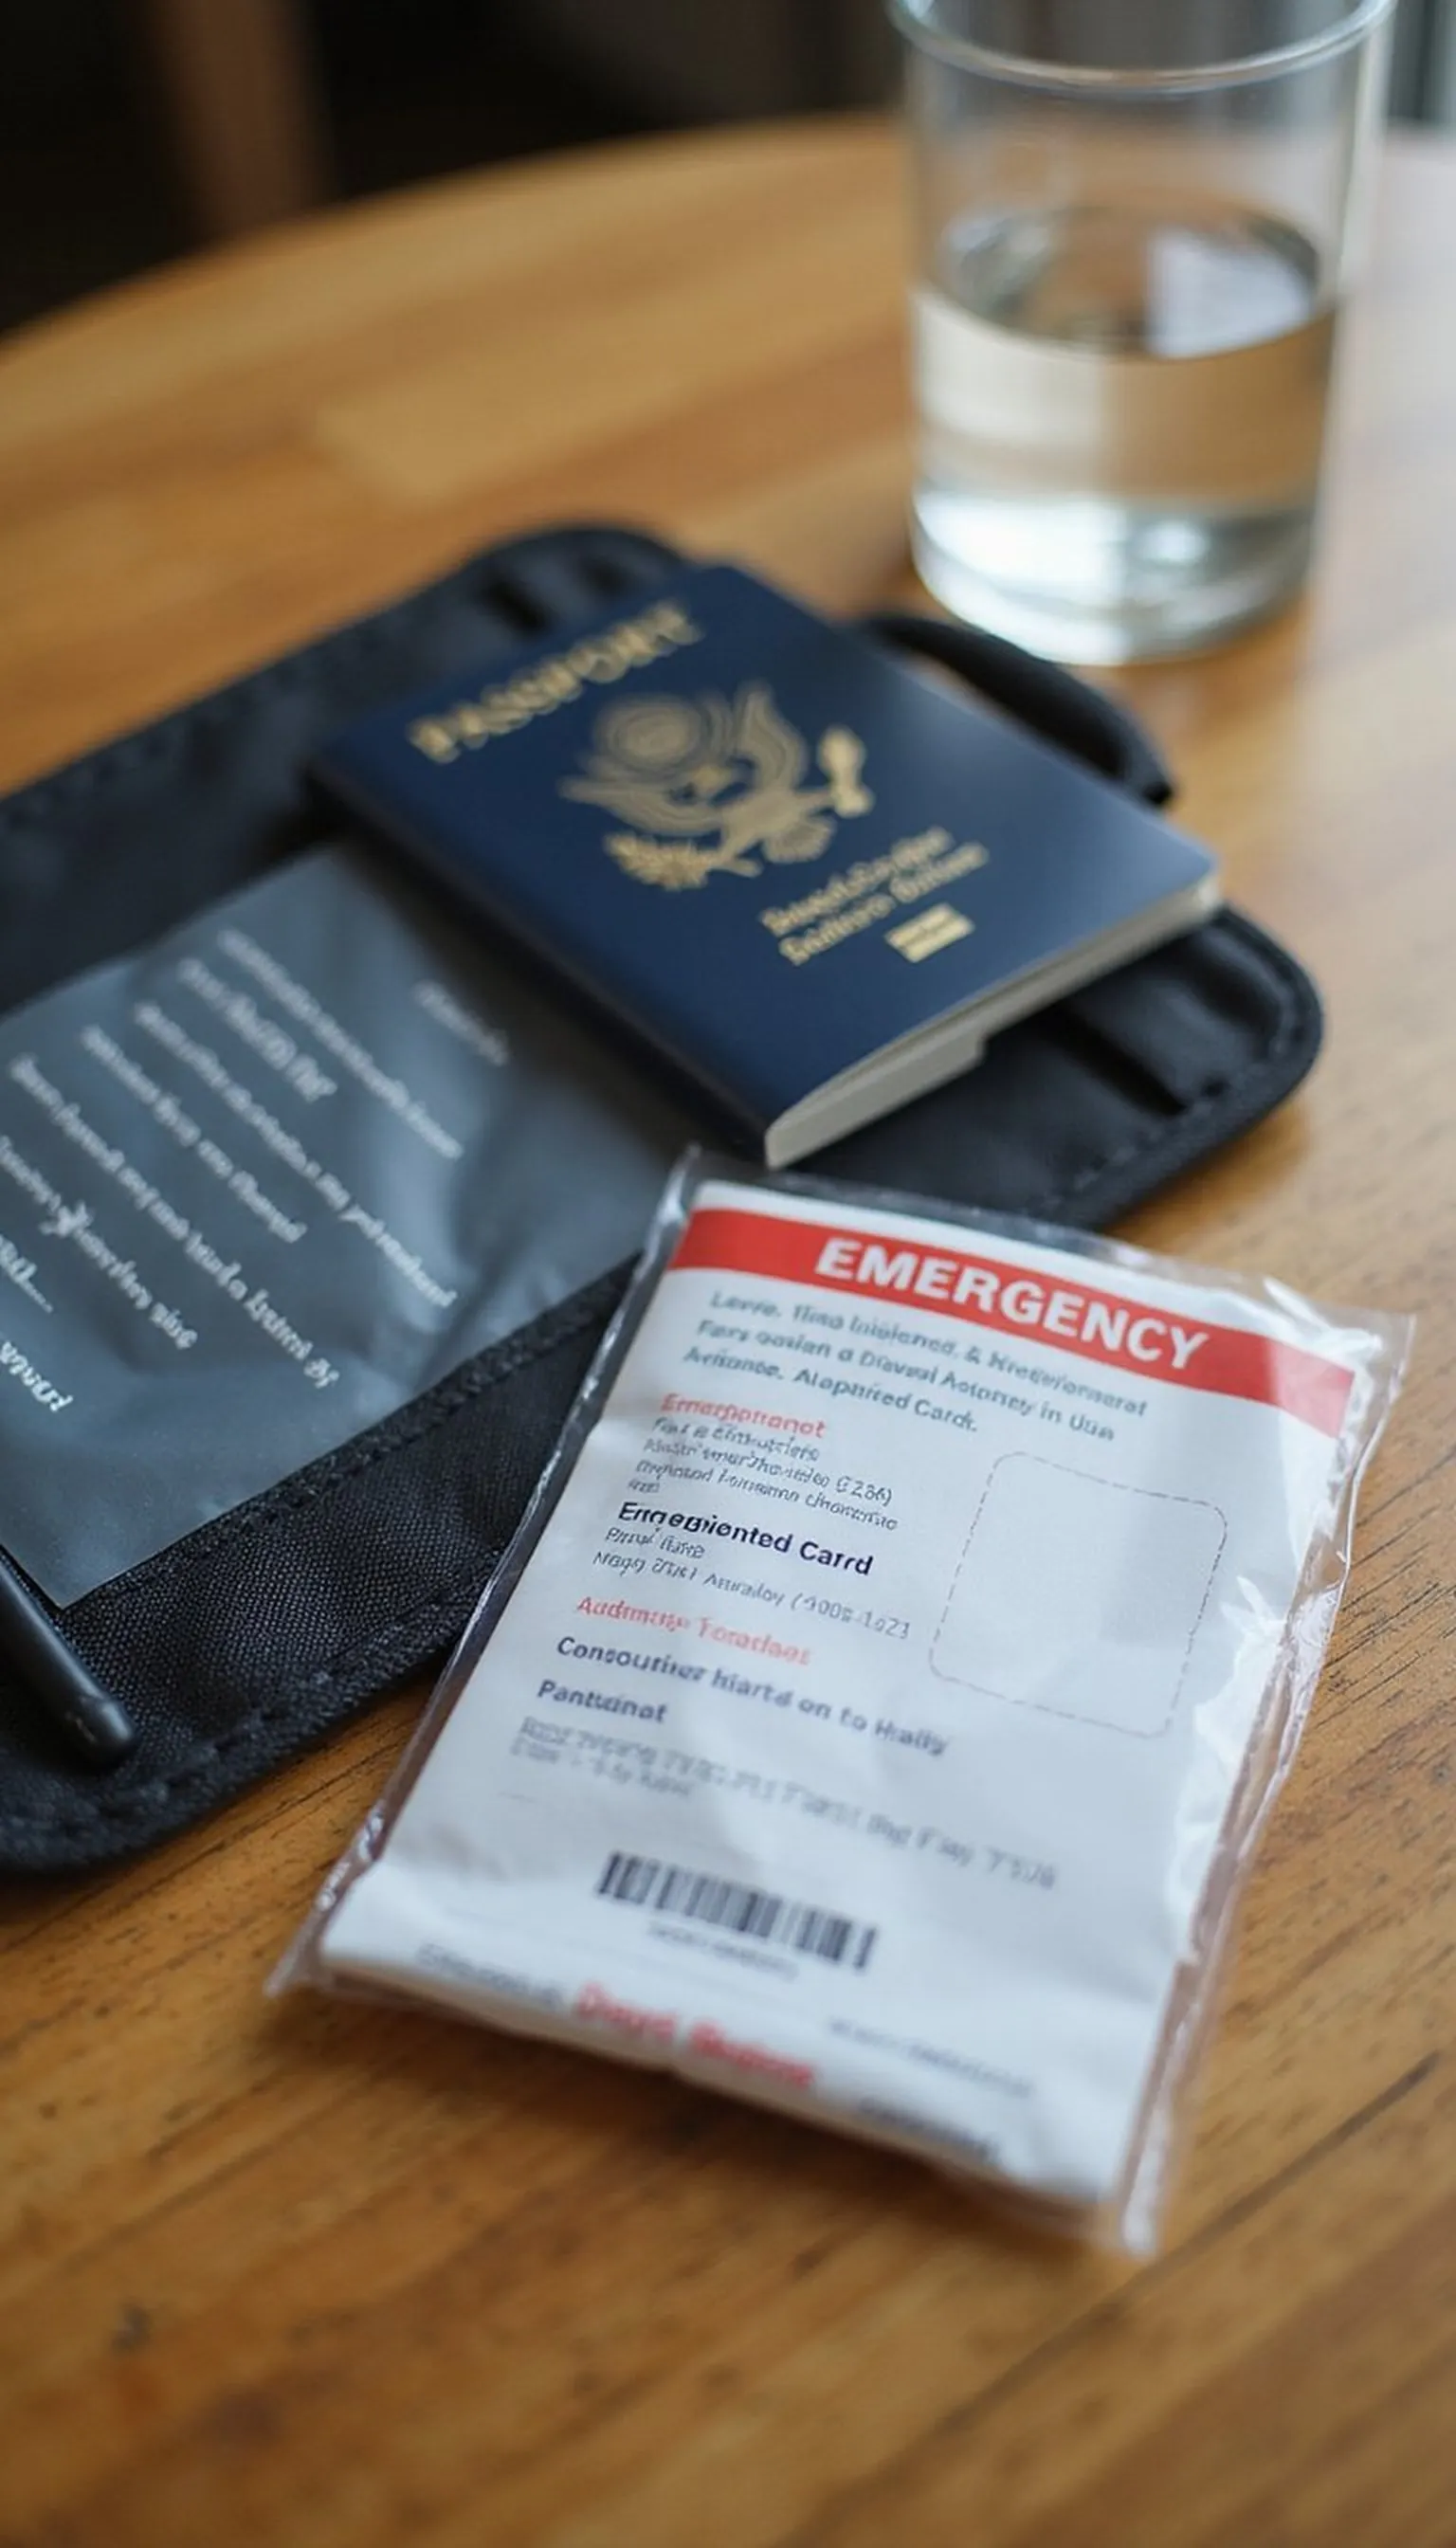
A waterproof passport holder protects travel documents from wet weather and hurried transfers between cars, boats, and terminals. Include printed confirmations, a laminated emergency contact card, and photocopies of passports tucked inside sealed sleeves.
Store the holder inside a waterproof pouch or dry bag for double protection during heavy rain or boat travel. Keep one copy of documents with a trusted travel companion and another in locked luggage as a backup.
Organize boarding passes and tickets in clear slots so checks are fast and stress-free at busy counters. Mark the holder with a bright tag to spot it quickly in a packed bag during evacuations.
Travel Tips
- Use a clear front passport holder for easy ID checks without removing documents.
- Store digital copies in cloud storage and offline on an encrypted device.
- Keep a separate photocopy in checked luggage in case carry items get wet.
Pro Tip: Slide passports and printed itineraries into a waterproof holder, then stash it in a dry bag for double protection when storms are forecasted.
Avoid: Leaving documents loose in pockets or backpacks risks water damage and loss. Avoid keeping only digital copies without printed backups in case of device failure.
Try Also: Use a travel wallet with RFID protection for cards, or instead carry documents in a zip-top clear pouch and a separate sealed plastic sleeve. For longer trips, add a small document organizer with multiple pockets.
Products & Materials
Items Used
- waterproof passport holder
- laminated emergency contact card
- resealable dry bag
“Waterproof passport holder keeps papers safe and ready during storms.”
Download printable itineraries, packing lists, and travel guides with high-resolution maps sent to your email immediately for your next trip.

One printable guide · $19.99 · yours forever
Packable rain jacket that tucks into a pocket
⏱️ 5 min · 🟢 Beginner
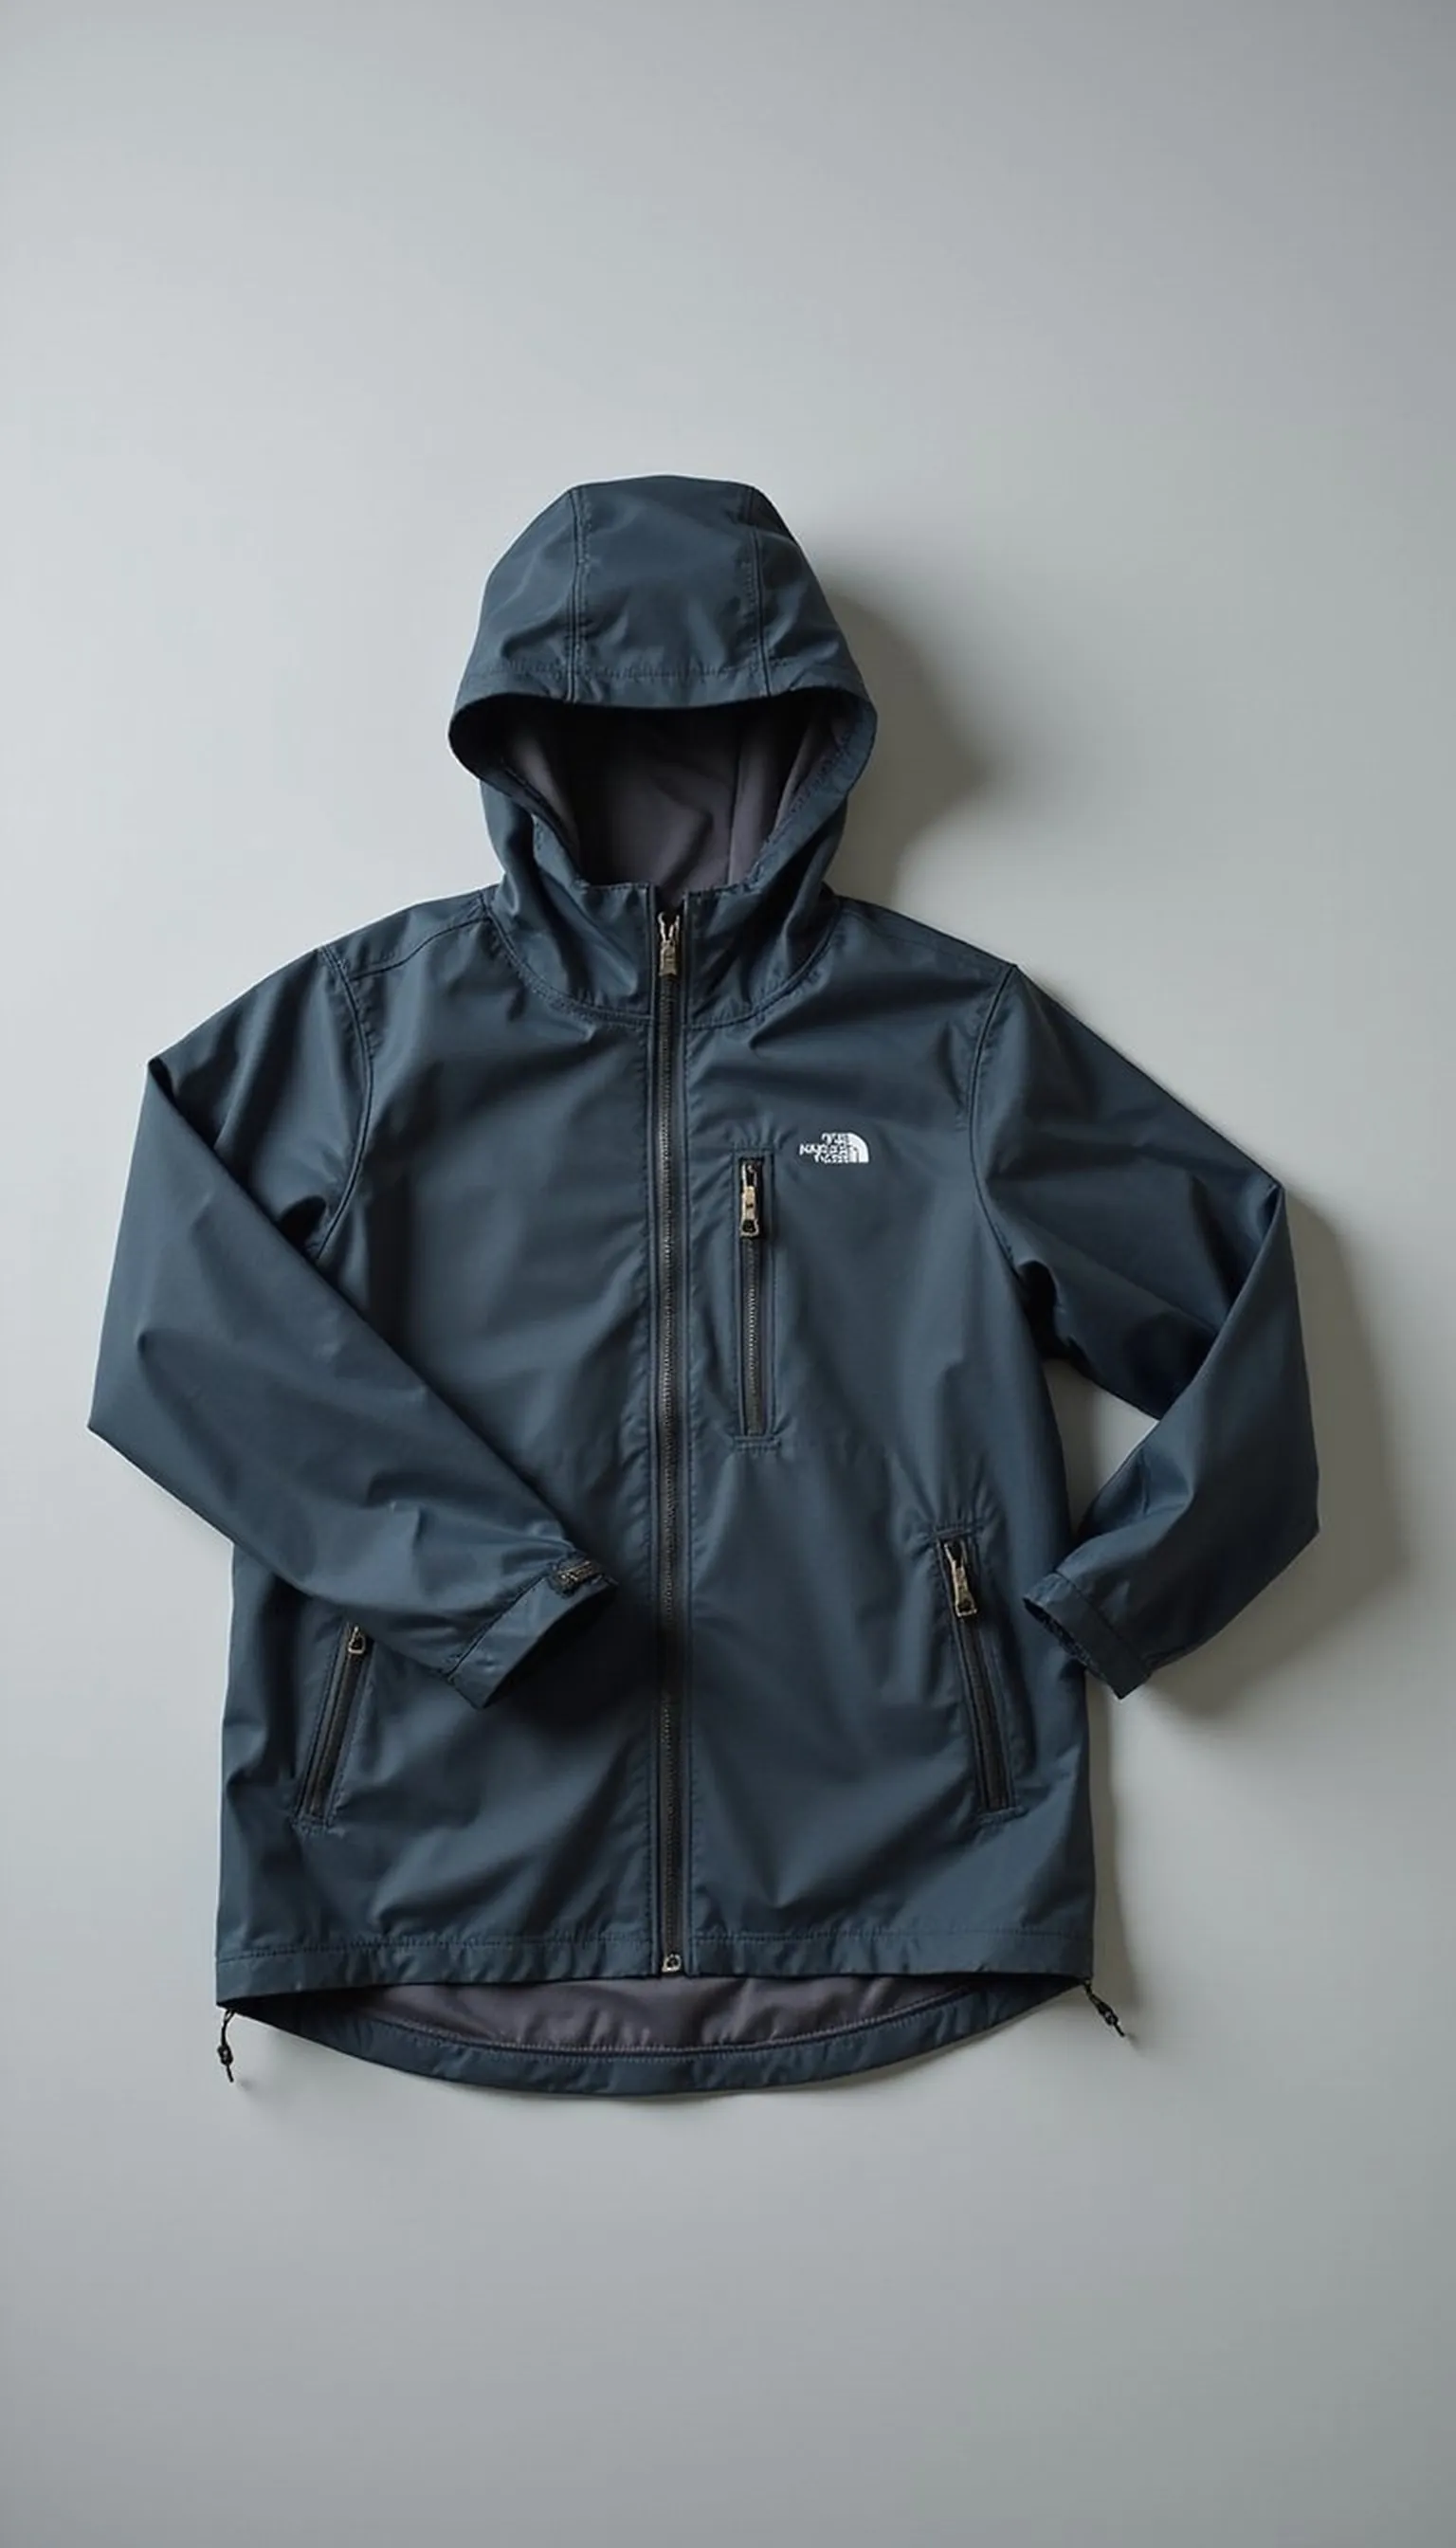
A lightweight packable rain jacket slips into its own pocket so it can be pulled out for sudden downpours without digging through luggage. Breathable fabrics and taped seams offer weather protection while staying compact in a daypack.
Choose a bright color for visibility around low-light conditions and busy evacuation points near storm-affected beaches. A hood with an adjustable draw helps keep rain away from face and electronics.
Fold the jacket into a small pouch or packing cube to save space and make it easy to remove during security checks. Keep it in a top compartment to toss on when heading to a car or ferry in rainy weather.
Travel Tips
- Test the jacket’s packability by folding it into its own pocket before travel.
- Pick one with a chest pocket or loop for hanging in damp rooms.
- Store near the top of a daypack for fast access when storms move in.
Pro Tip: Keep a packable rain jacket in the outer pocket of your daypack for instant shelter from sudden showers and spray.
Avoid: Relying on hotel umbrellas that may be unavailable during peak storms. Avoid bulky heavy coats that take up needed space in evacuation luggage.
Try Also: Choose a waterproof shell for longer wet seasons, or a lightweight poncho for ultra-compact packing; add a small travel umbrella if extra coverage is preferred. Consider breathable fabrics for humid climates.
Products & Materials
Items Used
“Packable rain jacket tucked away for sudden coastal downpours.”
Hydration and emergency snack kit for storms
⏱️ 10 min · 🟢 Beginner
Hydration matters during disruptions, so pack a refillable water bottle and a few ready-to-eat high-energy bars in a top compartment. Electrolyte tablets or sachets help replace salts if shelter stays are extended or heat is high after storms.
Seal snacks in clear zip bags to keep them dry and to show contents quickly at checkpoints. Choose nutrient-dense options that don’t require heating and have a long shelf life for multi-day delays.
Rotate supplies seasonally so nothing expires while sitting in a kit, and keep one spare bottle tucked away for families. Place snacks in easy-reach pockets so they’re available on long waits or when power is out at lodgings.
Travel Tips
- Stash a full water bottle in an insulated sleeve to slow warming.
- Pack compact, high-calorie bars rather than many small snacks.
- Keep electrolyte tablets in a sealed container to prevent moisture damage.
Pro Tip: Store a full reusable water bottle and three meal-replacement bars in an outer bag pocket for immediate access during evacuations.
Avoid: Packing perishable snacks that spoil quickly during power outages leads to waste. Avoid single-use plastics that add clutter when space and waste disposal are limited.
Try Also: Swap bars for ready-to-eat meal pouches or trail mix, and include instant coffee or drink mix packets for comfort. For kids, choose squeeze pouch foods and compact juice boxes.
Products & Materials
Items Used
- water bottle
- energy bars
- resealable zip bags
“Hydration and snack kit that keeps you fueled during storm travel delays.”
Portable solar charger and battery bank combo
⏱️ 25 min · 🟠 Intermediate
A portable solar charger with a paired battery bank offers extended power when outlets are out or unavailable during extended storm events. Solar panels recharge during sunlight while the power bank stores energy for night use or indoor shelter situations.
Select a compact panel rated for at least one phone recharge and a bank with multiple output ports to share power between devices. Keep a short, tangle-free cable and a small adapter kit to match different devices in a travel group.
Mount solar panels on a backpack or lay them in a sunny window when parked or sheltering to top off the bank. Label cables and keep them coiled with a Velcro strap to avoid losing adapters when moving quickly.
Travel Tips
- Test the solar charger and power bank together before leaving home.
- Store both items in an easy-access pocket for daylight recharging sessions.
- Bring a small adapter kit to fit multiple device ports if traveling with companions.
Pro Tip: Pair a compact solar panel with a high-capacity battery bank and carry short cables for fast, portable recharging during outages.
Avoid: Assuming solar chargers work well in cloudy conditions can lead to drained batteries. Avoid carrying only a single cable that may not fit every device in the travel group.
Try Also: Use a foldable solar panel for backpacking or a flat flexible panel for beach days; swap the bank for a higher-capacity unit if multiple devices need charging. Include a car charger adapter for road evacuations.
Products & Materials
Items Used
- portable power bank
- solar charger
- charging cable
“Solar charger and battery bank keep devices powered when outlets fail.”
Headlamp and compact lantern for blackout nights
⏱️ 5 min · 🟢 Beginner
A headlamp and small LED lantern provide both hands-free light and ambient room illumination during outages or shelter stays. Use a headlamp for tasks and a lantern for shared spaces or tent interiors to keep hands free for gear or children.
Choose LED models with adjustable brightness and long battery life, and bring spare batteries or a small power bank that can charge the lantern. A soft, collapsible lantern packs smaller and fits into tight spaces in a daypack or car kit.
Keep lights in an outer pocket for quick retrieval at night and practice switching modes before heading out. Mark them with bright tape or a colored loop to find them in low light without fumbling.
Travel Tips
- Pack both a headlamp and a collapsible lantern for task and area lighting.
- Test battery life before travel and bring one spare battery set.
- Store lights in a top pocket for instant access when power fails.
Pro Tip: Pack a hands-free headlamp and a collapsible lantern in an outer pocket for immediate light during nighttime evacuations.
Avoid: Relying on phone flashlights drains batteries needed for communication. Avoid packing high-wattage bulbs that require bulky spare batteries.
Try Also: Swap disposable batteries for rechargeable ones plus a small power bank, or choose a solar-charging lantern for extended outdoor stays. Consider lanterns with a USB port to double as a charger.
Products & Materials
Items Used
“Headlamp and collapsible lantern for hands-free blackout lighting.”
Medication organizer and medical info kit
⏱️ 15 min · 🟠 Intermediate
A clear medication organizer with labeled doses reduces confusion during stressful travel and ensures prescriptions are taken on schedule. Include printed medication lists, dosing schedules, and a photocopy of prescriptions inside a sealed pouch to show at pharmacies if replacements are needed.
Store medications in original containers when possible and put a small, locked pill case inside a waterproof sleeve for quick carry. Keep extra allergy medicines, pain relievers, and a small cold pack in the same kit for common issues while on the road.
Notify travel companions where the kit is kept and add a note to your main travel documents about critical medicines. Refill short-term prescriptions before travel and check airline regulations for controlled substances and documentation.
Travel Tips
- Label medication organizer compartments with days and times to avoid missed doses.
- Carry a printed medication list and prescription copies in a waterproof pouch.
- Keep a small cold pack and basic OTC meds in the same kit for quick relief.
Pro Tip: Keep prescriptions in original bottles plus a small labeled pill organizer and copies of prescriptions in a waterproof pouch for easy refill access.
Avoid: Mixing pills in unmarked containers leads to dosing mistakes under stress. Avoid leaving medications only in checked luggage when immediate access might be needed.
Try Also: Use blister-style organizers for daily dosing or a multi-day pill box for short trips; add a compact refrigeration pack for temperature-sensitive meds if required. Consider digital reminders for dosing.
Products & Materials
Items Used
- pill organizer
- prescription bottles
- resealable dry bag
“Medication organizer and printed prescriptions stored safely for travel storms.”
Cash backup: small bills and waterproof money pouch
⏱️ 10 min · 🟢 Beginner
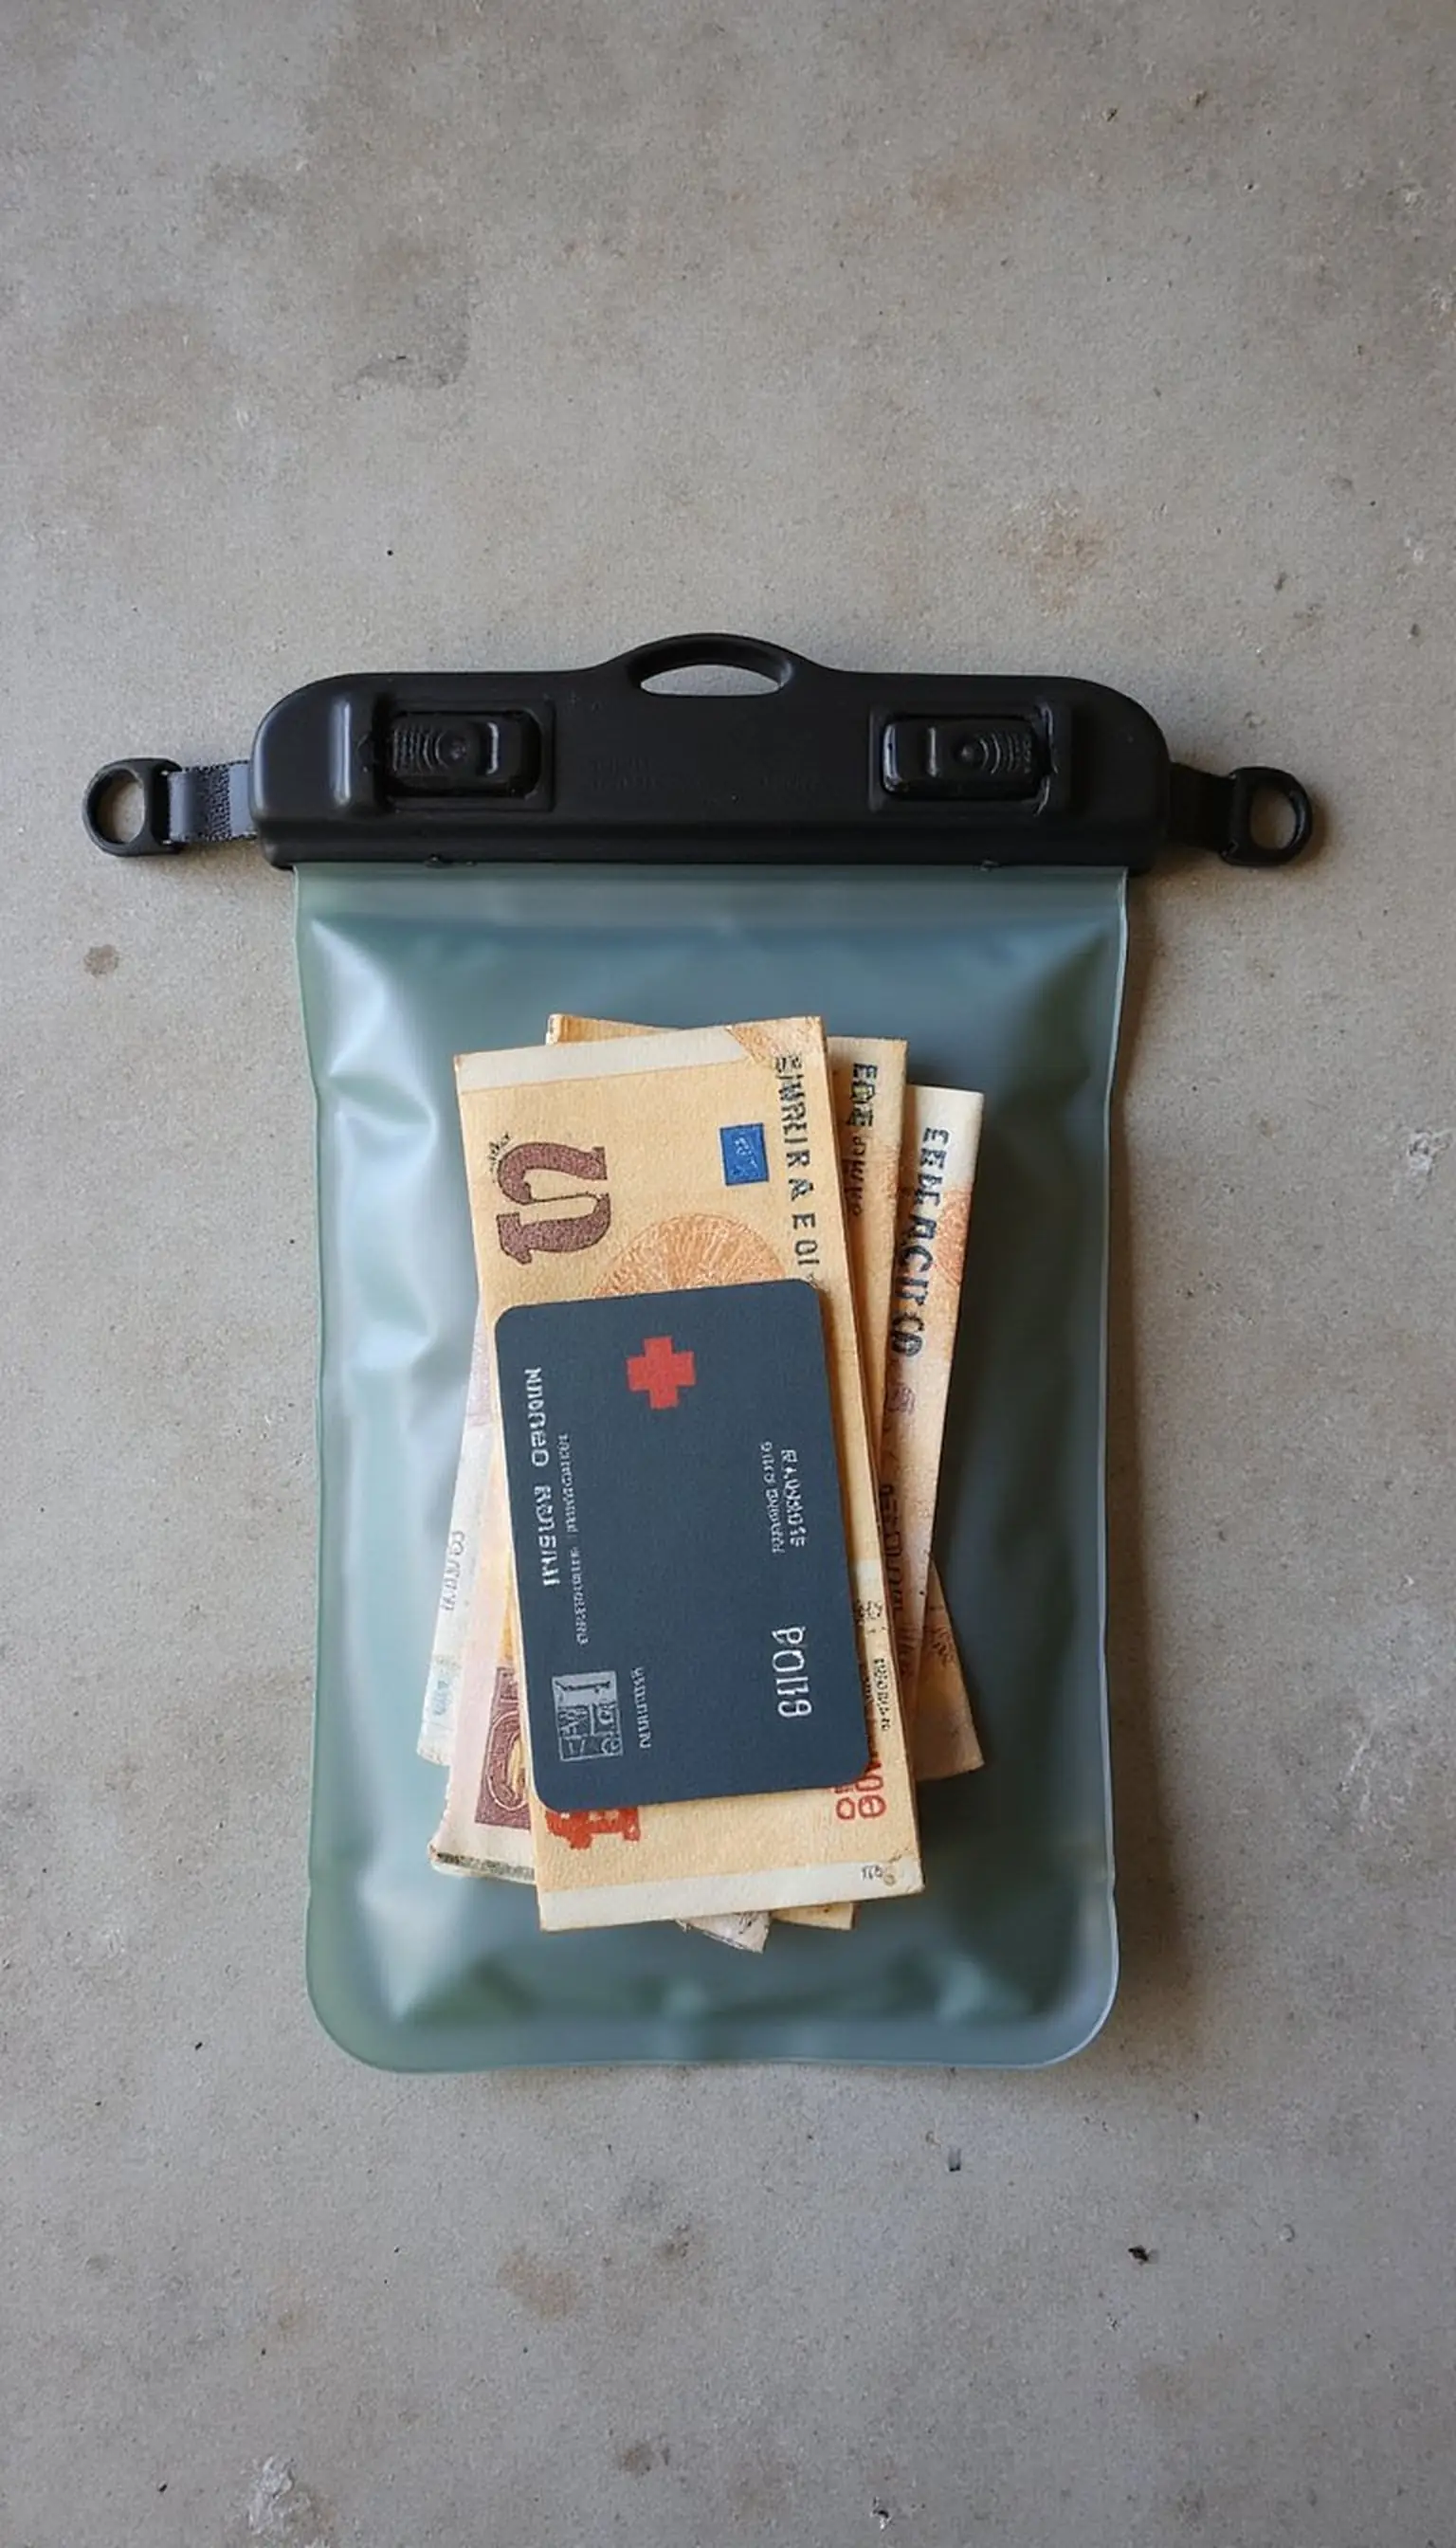
Keeping a small stash of cash in local currency is useful when ATMs are down or card systems fail during severe weather. Store notes and a few coins in a waterproof money pouch so funds remain dry in wet conditions.
Split cash between a hidden pocket and a companion’s bag to avoid losing everything at once. Include a compact emergency card with key phone numbers and addresses inside the pouch for quick access.
Limit the amount to what would cover a day or two of expenses to reduce loss risk while still being practical. Rotate small bills occasionally to make sure paper notes remain in good condition for use when needed.
Travel Tips
- Keep a small emergency fund in a waterproof pouch separate from your main wallet.
- Hide part of the cash in a secondary bag or with a travel companion.
- Carry commonly used small bills to avoid change issues at local vendors.
Pro Tip: Stash a small amount of local cash in a waterproof money pouch hidden separately from your main wallet for emergency use.
Avoid: Keeping all cash in one wallet risks losing funds if a bag is stolen or damaged. Avoid carrying large sums that tempt theft or add unnecessary loss.
Try Also: Use a money belt or neck pouch for concealed cash, or keep cards in a travel wallet plus a small cash reserve in a separate pouch. Consider prepaid travel cards as an additional backup.
Products & Materials
Items Used
- waterproof money pouch
- local currency bills
- emergency contact card
“Waterproof money pouch with small cash stash for storm travel safety.”
Waterproof luggage and dry bag for wet travel days
⏱️ 20 min · 🟠 Intermediate
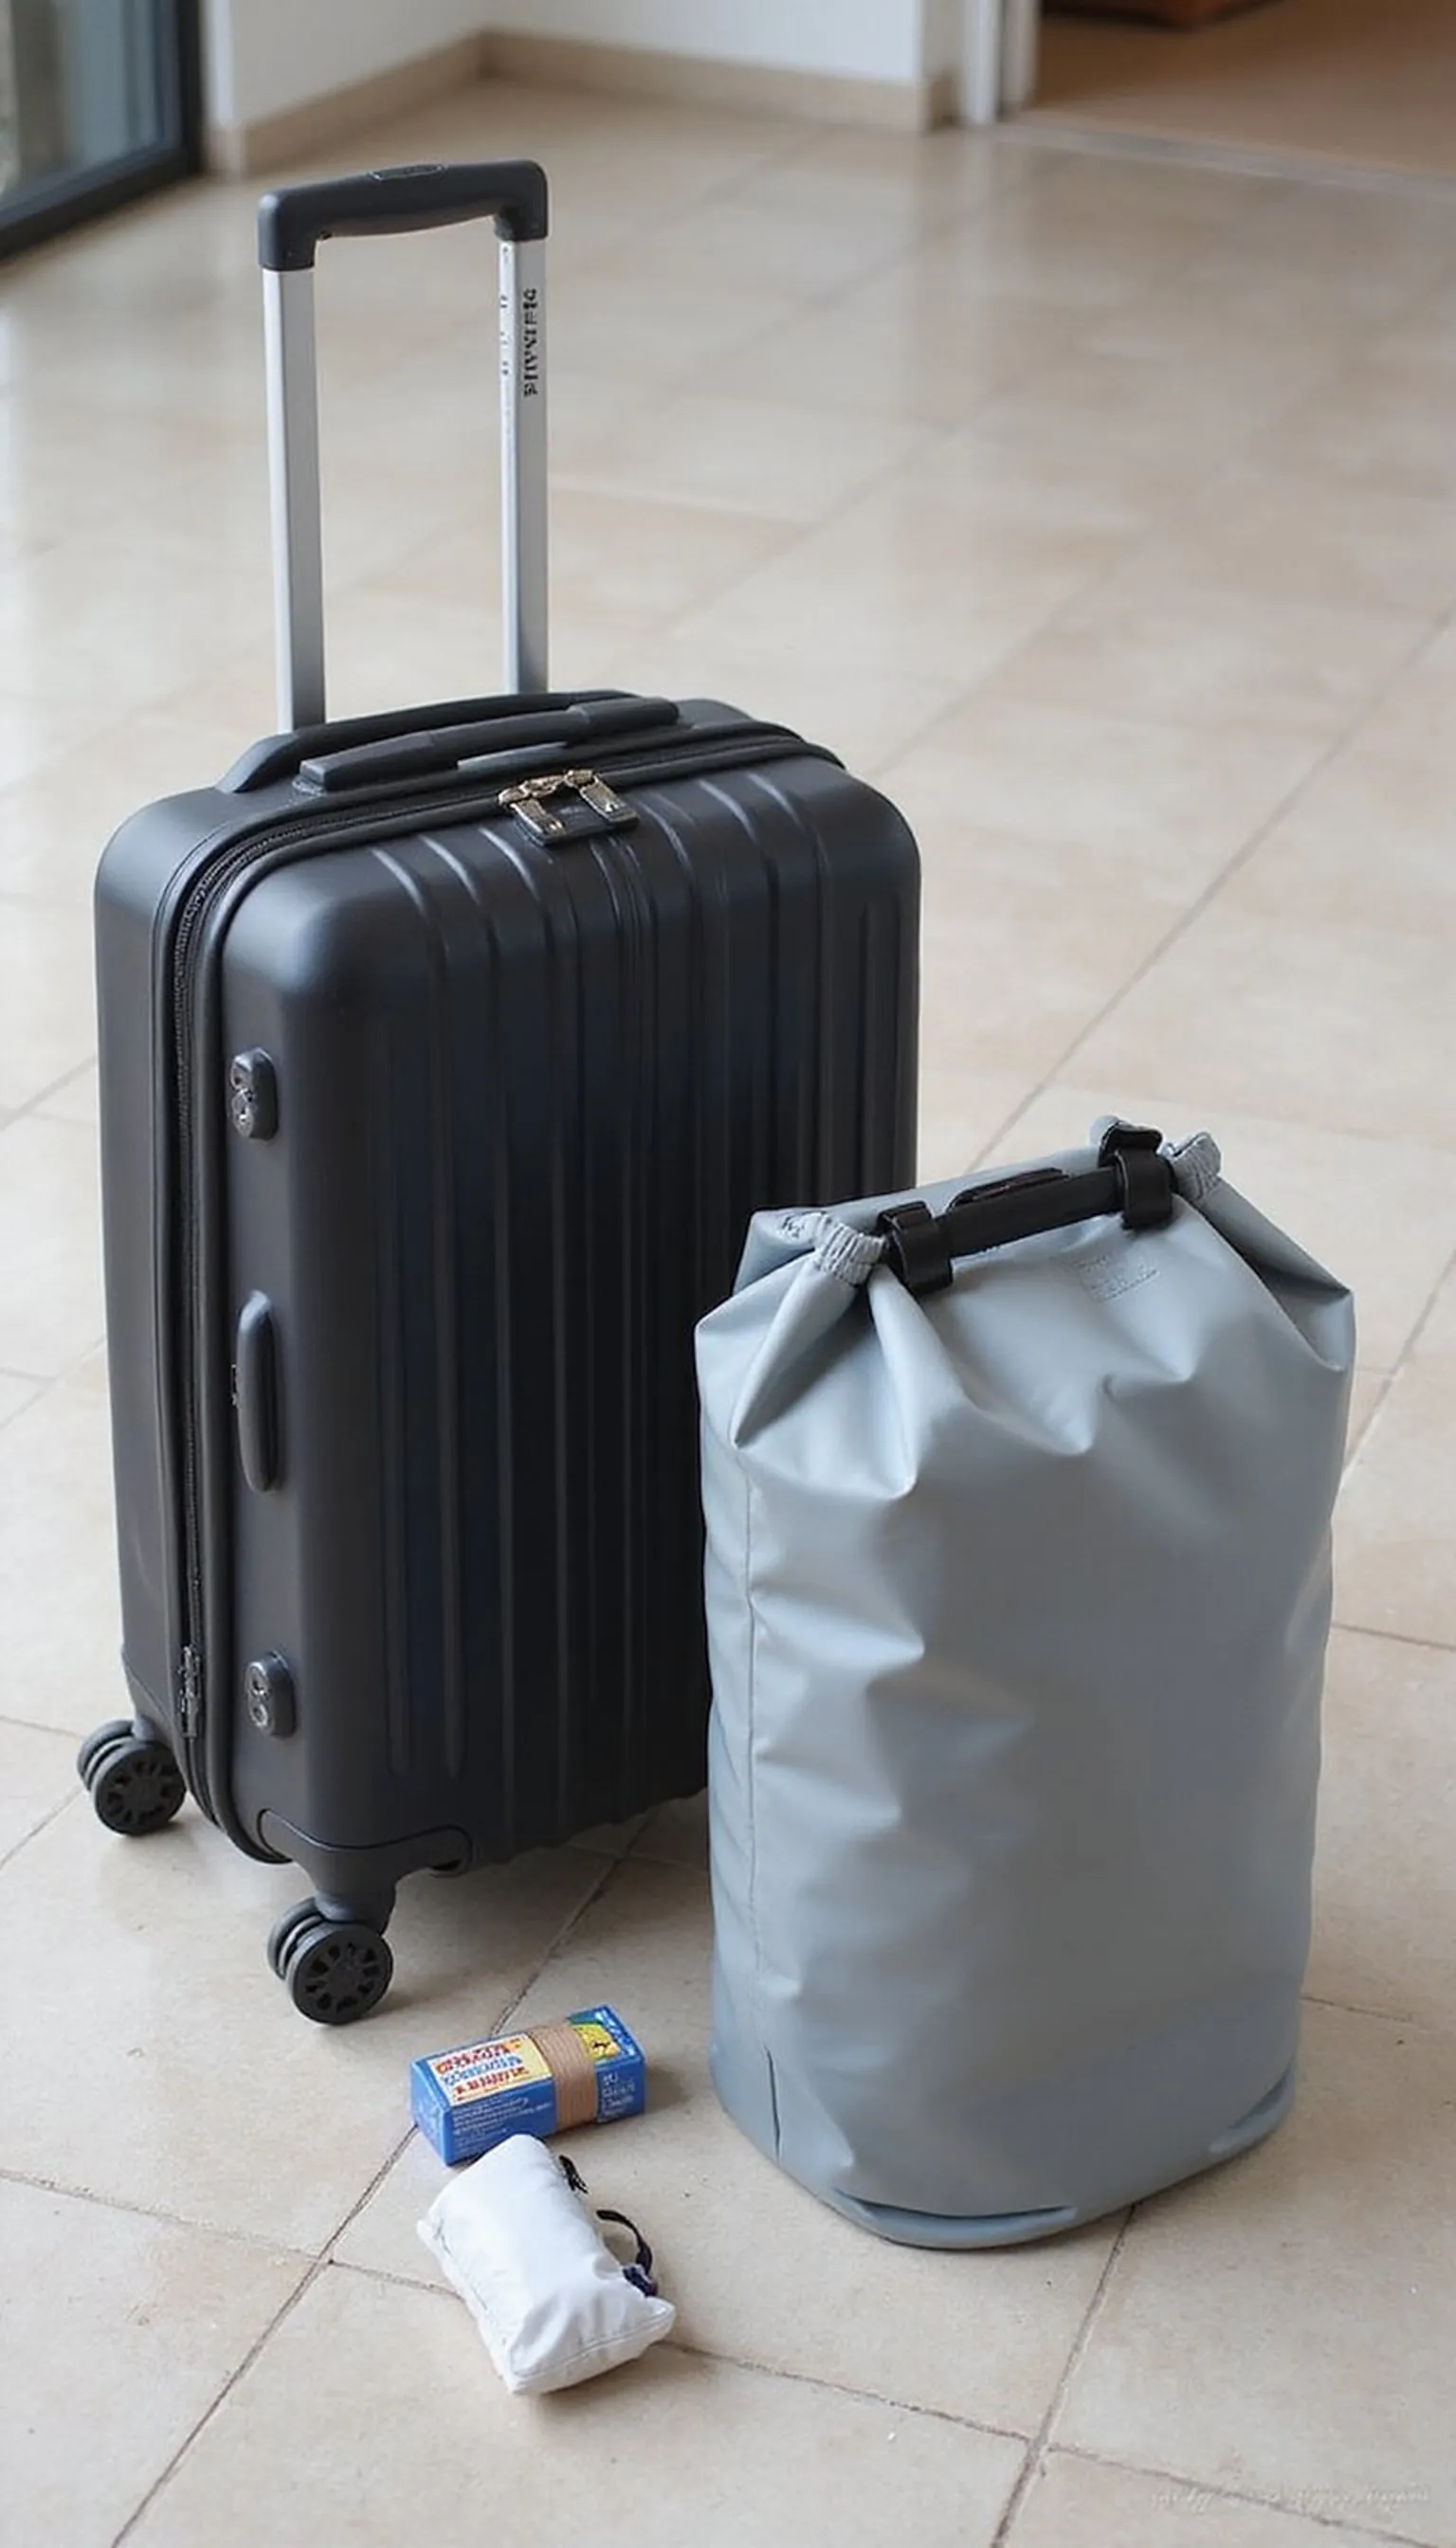
A waterproof duffel or a large dry bag protects clothing and gear during boat transfers, flooded streets, or heavy rain at transit stops. Choose strong seams and roll-top closures for the most reliable barrier against moisture and spray.
Use dry bags inside a hard-shell carry-on for layered protection, and pack lighter items in separate small dry pouches for organization. Bright colors make wet bags easier to spot in crowded storage areas or among other luggage.
Secure luggage tags with contact details in a waterproof sleeve to avoid lost-tag issues after exposure to water. Keep a small repair kit with nylon tape and cord in a separate pocket to fix minor tears on the move.
Travel Tips
- Layer dry bags inside larger luggage for double protection against leaks.
- Pick roll-top dry bags with sturdy buckles for long-term reliability.
- Add a repair tape kit to fix small rips quickly if needed.
Pro Tip: Use a roll-top dry bag inside a hard-shell suitcase to protect clothing and documents during wet transfers and rainy evacuations.
Avoid: Relying on a single thin plastic bag for wet weather protection often fails. Avoid overfilling dry bags which can strain seams and closures.
Try Also: Choose a waterproof duffel for car evacuations and a packable dry bag for day trips; use small dry pouches inside a larger bag for electronics and documents. Consider a waterproof cover for bulky suitcases.
Products & Materials
Items Used
- dry bag
- carry-on suitcase
- repair tape
“Dry bag and waterproof luggage protect gear during wet travel days.”
Foldable travel umbrella and quick-dry towel combo
⏱️ 5 min · 🟢 Beginner
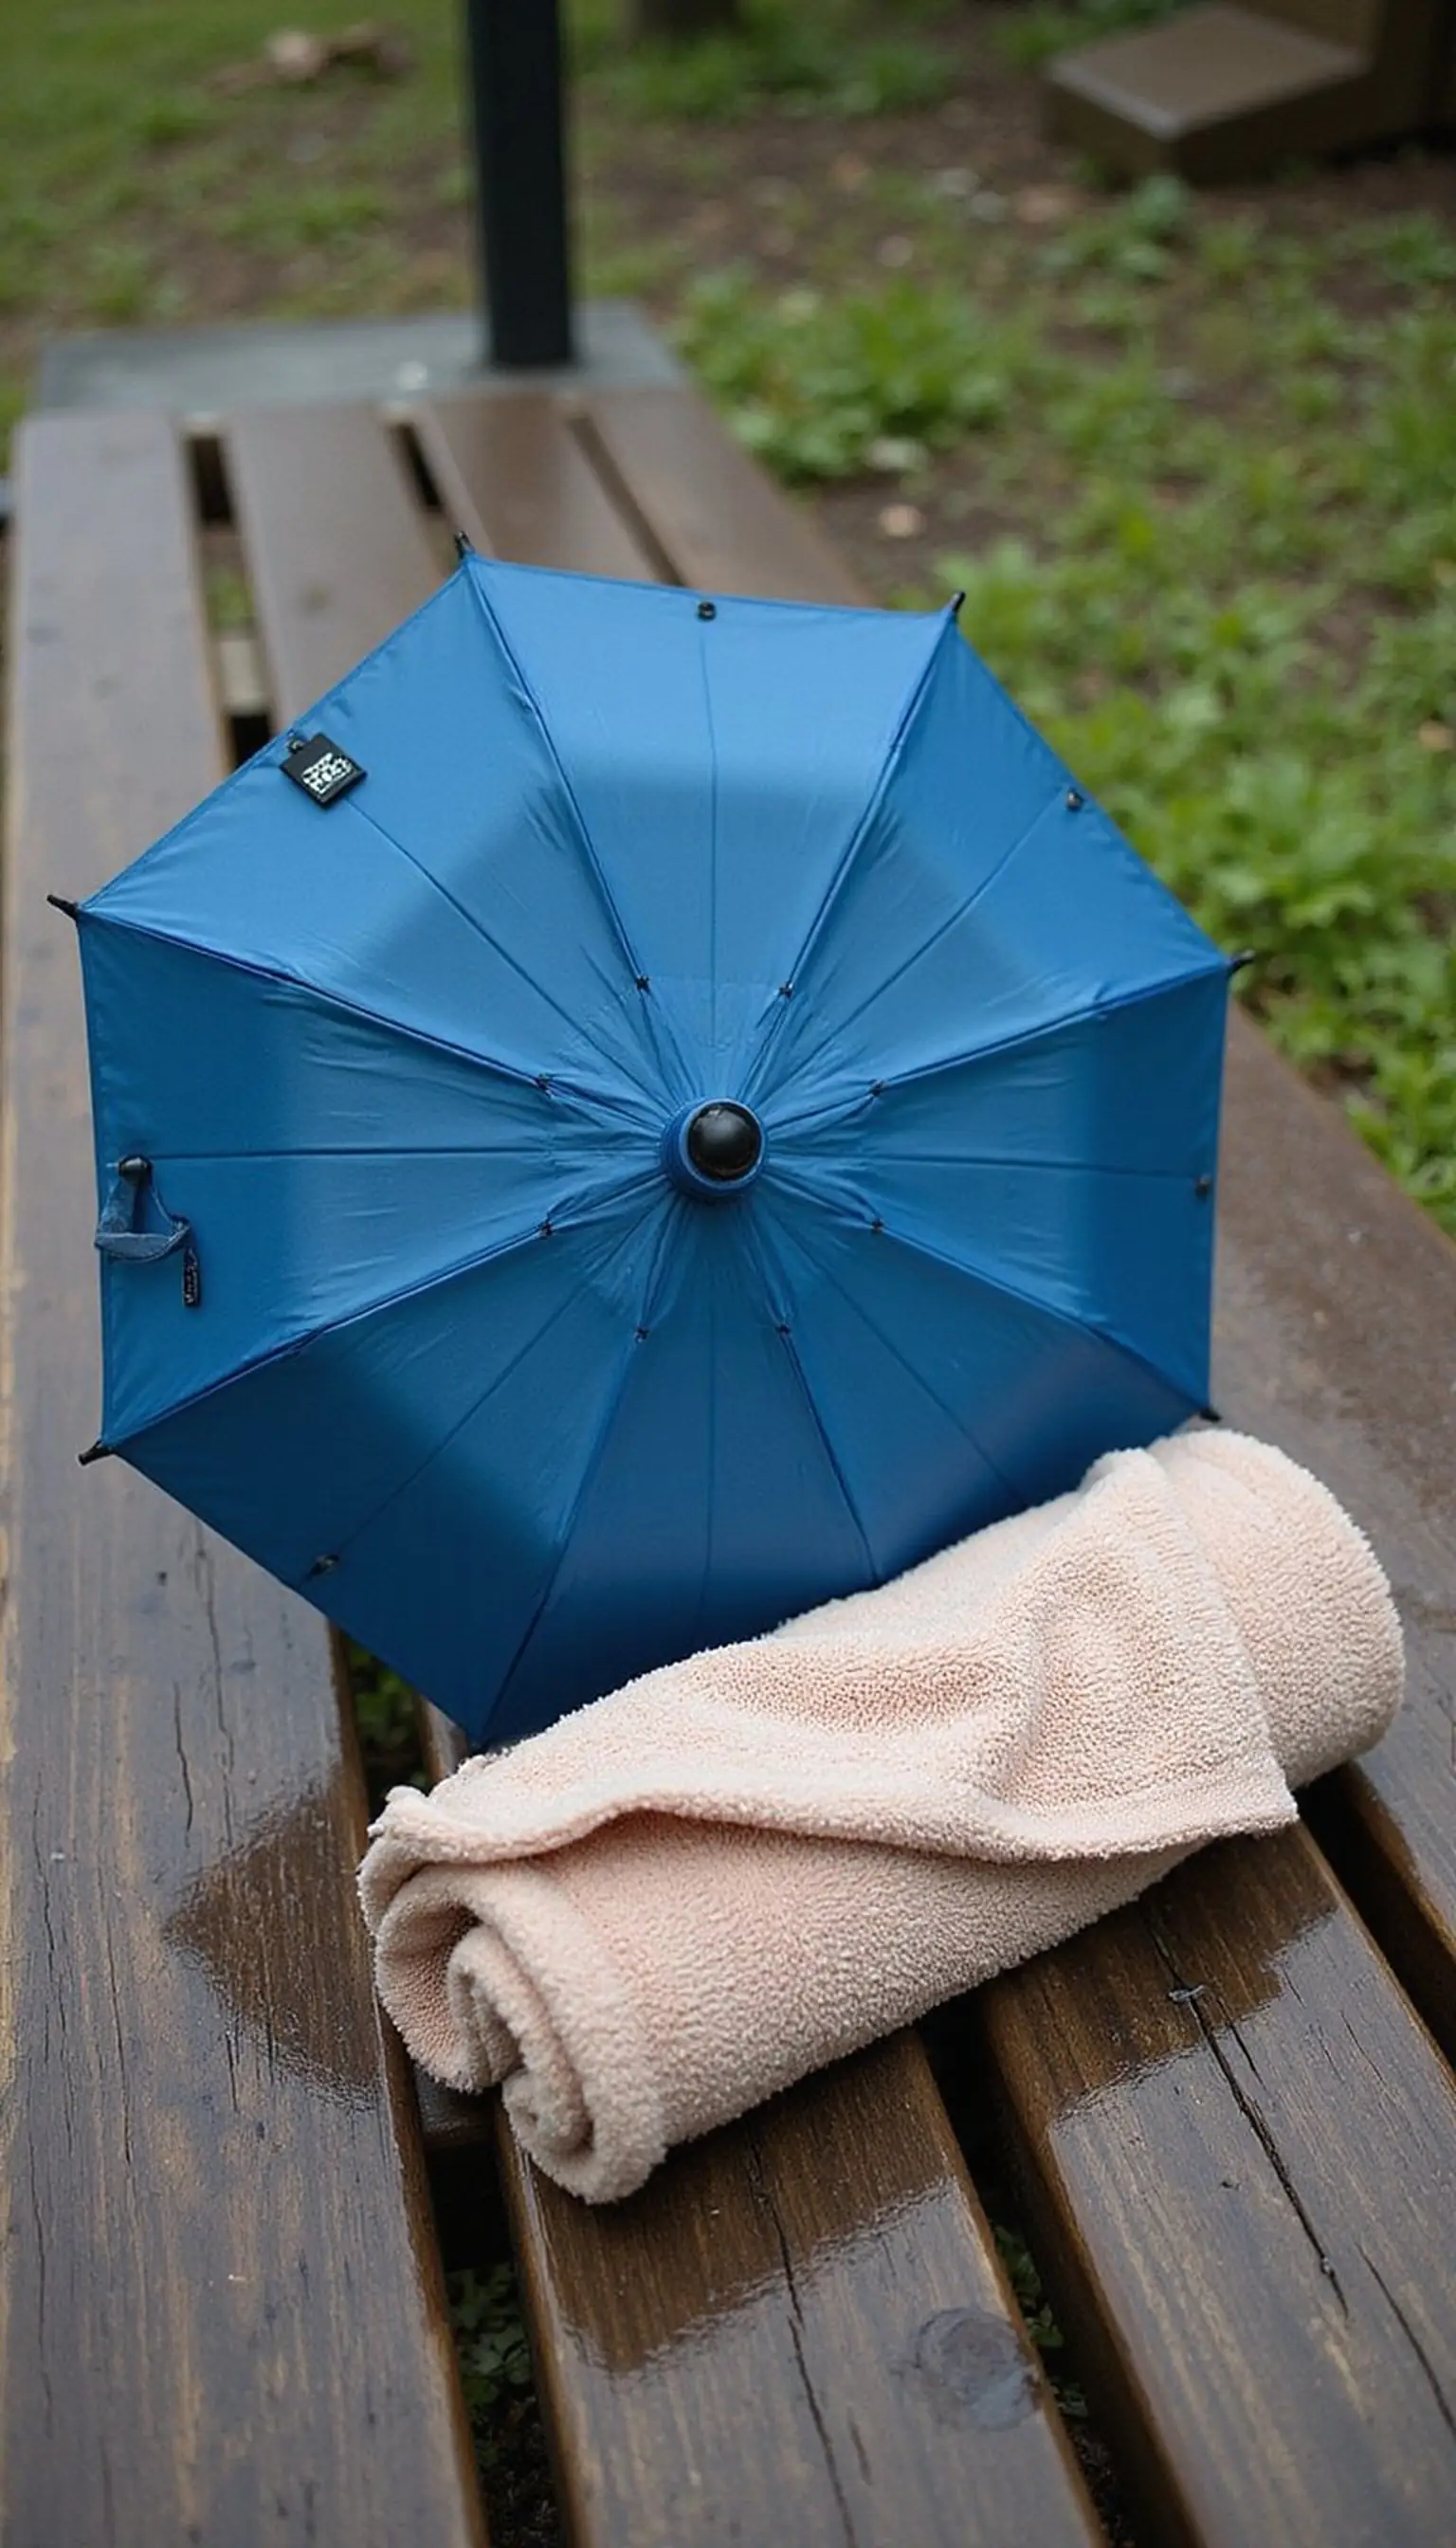
A compact foldable umbrella offers immediate shelter for short walks between transit points, while a quick-dry towel handles spray and moisture. Keep both items in easy-reach pockets for sudden showers or windy drizzle that comes with coastal storms.
Choose an umbrella with a sturdy frame to resist gusts, and a microfiber towel that packs small and dries fast without lingering dampness in luggage. Bright-colored towels double as visual markers in crowded shelters or parking lots.
Store these items near the top of a daypack so they are ready when leaving a car or lodging. Clean and dry both between uses to prevent mildew if space allows at the next stop.
Travel Tips
- Pick a compact umbrella with reinforced ribs for windy coastal conditions.
- Use a microfiber towel that folds small and dries quickly inside a mesh pocket.
- Store both in an outer pocket for immediate weather protection.
Pro Tip: Keep a reinforced foldable umbrella and a compact microfiber towel in an outer pocket for fast shelter and quick drying during storms.
Avoid: Relying on hotel umbrellas assumes availability and cleanliness. Avoid bulky heavy towels that take too long to dry in humid conditions.
Try Also: Swap the umbrella for a packable rain poncho for full-body coverage, or trade the towel for disposable absorbent sheets if washing opportunities are limited. For groups, bring extra towels for communal use.
Products & Materials
Items Used
“Foldable umbrella and micro towel ready for sudden coastal downpours.”
Car emergency kit for road evacuations and detours
⏱️ 30 min · 🔴 Advanced
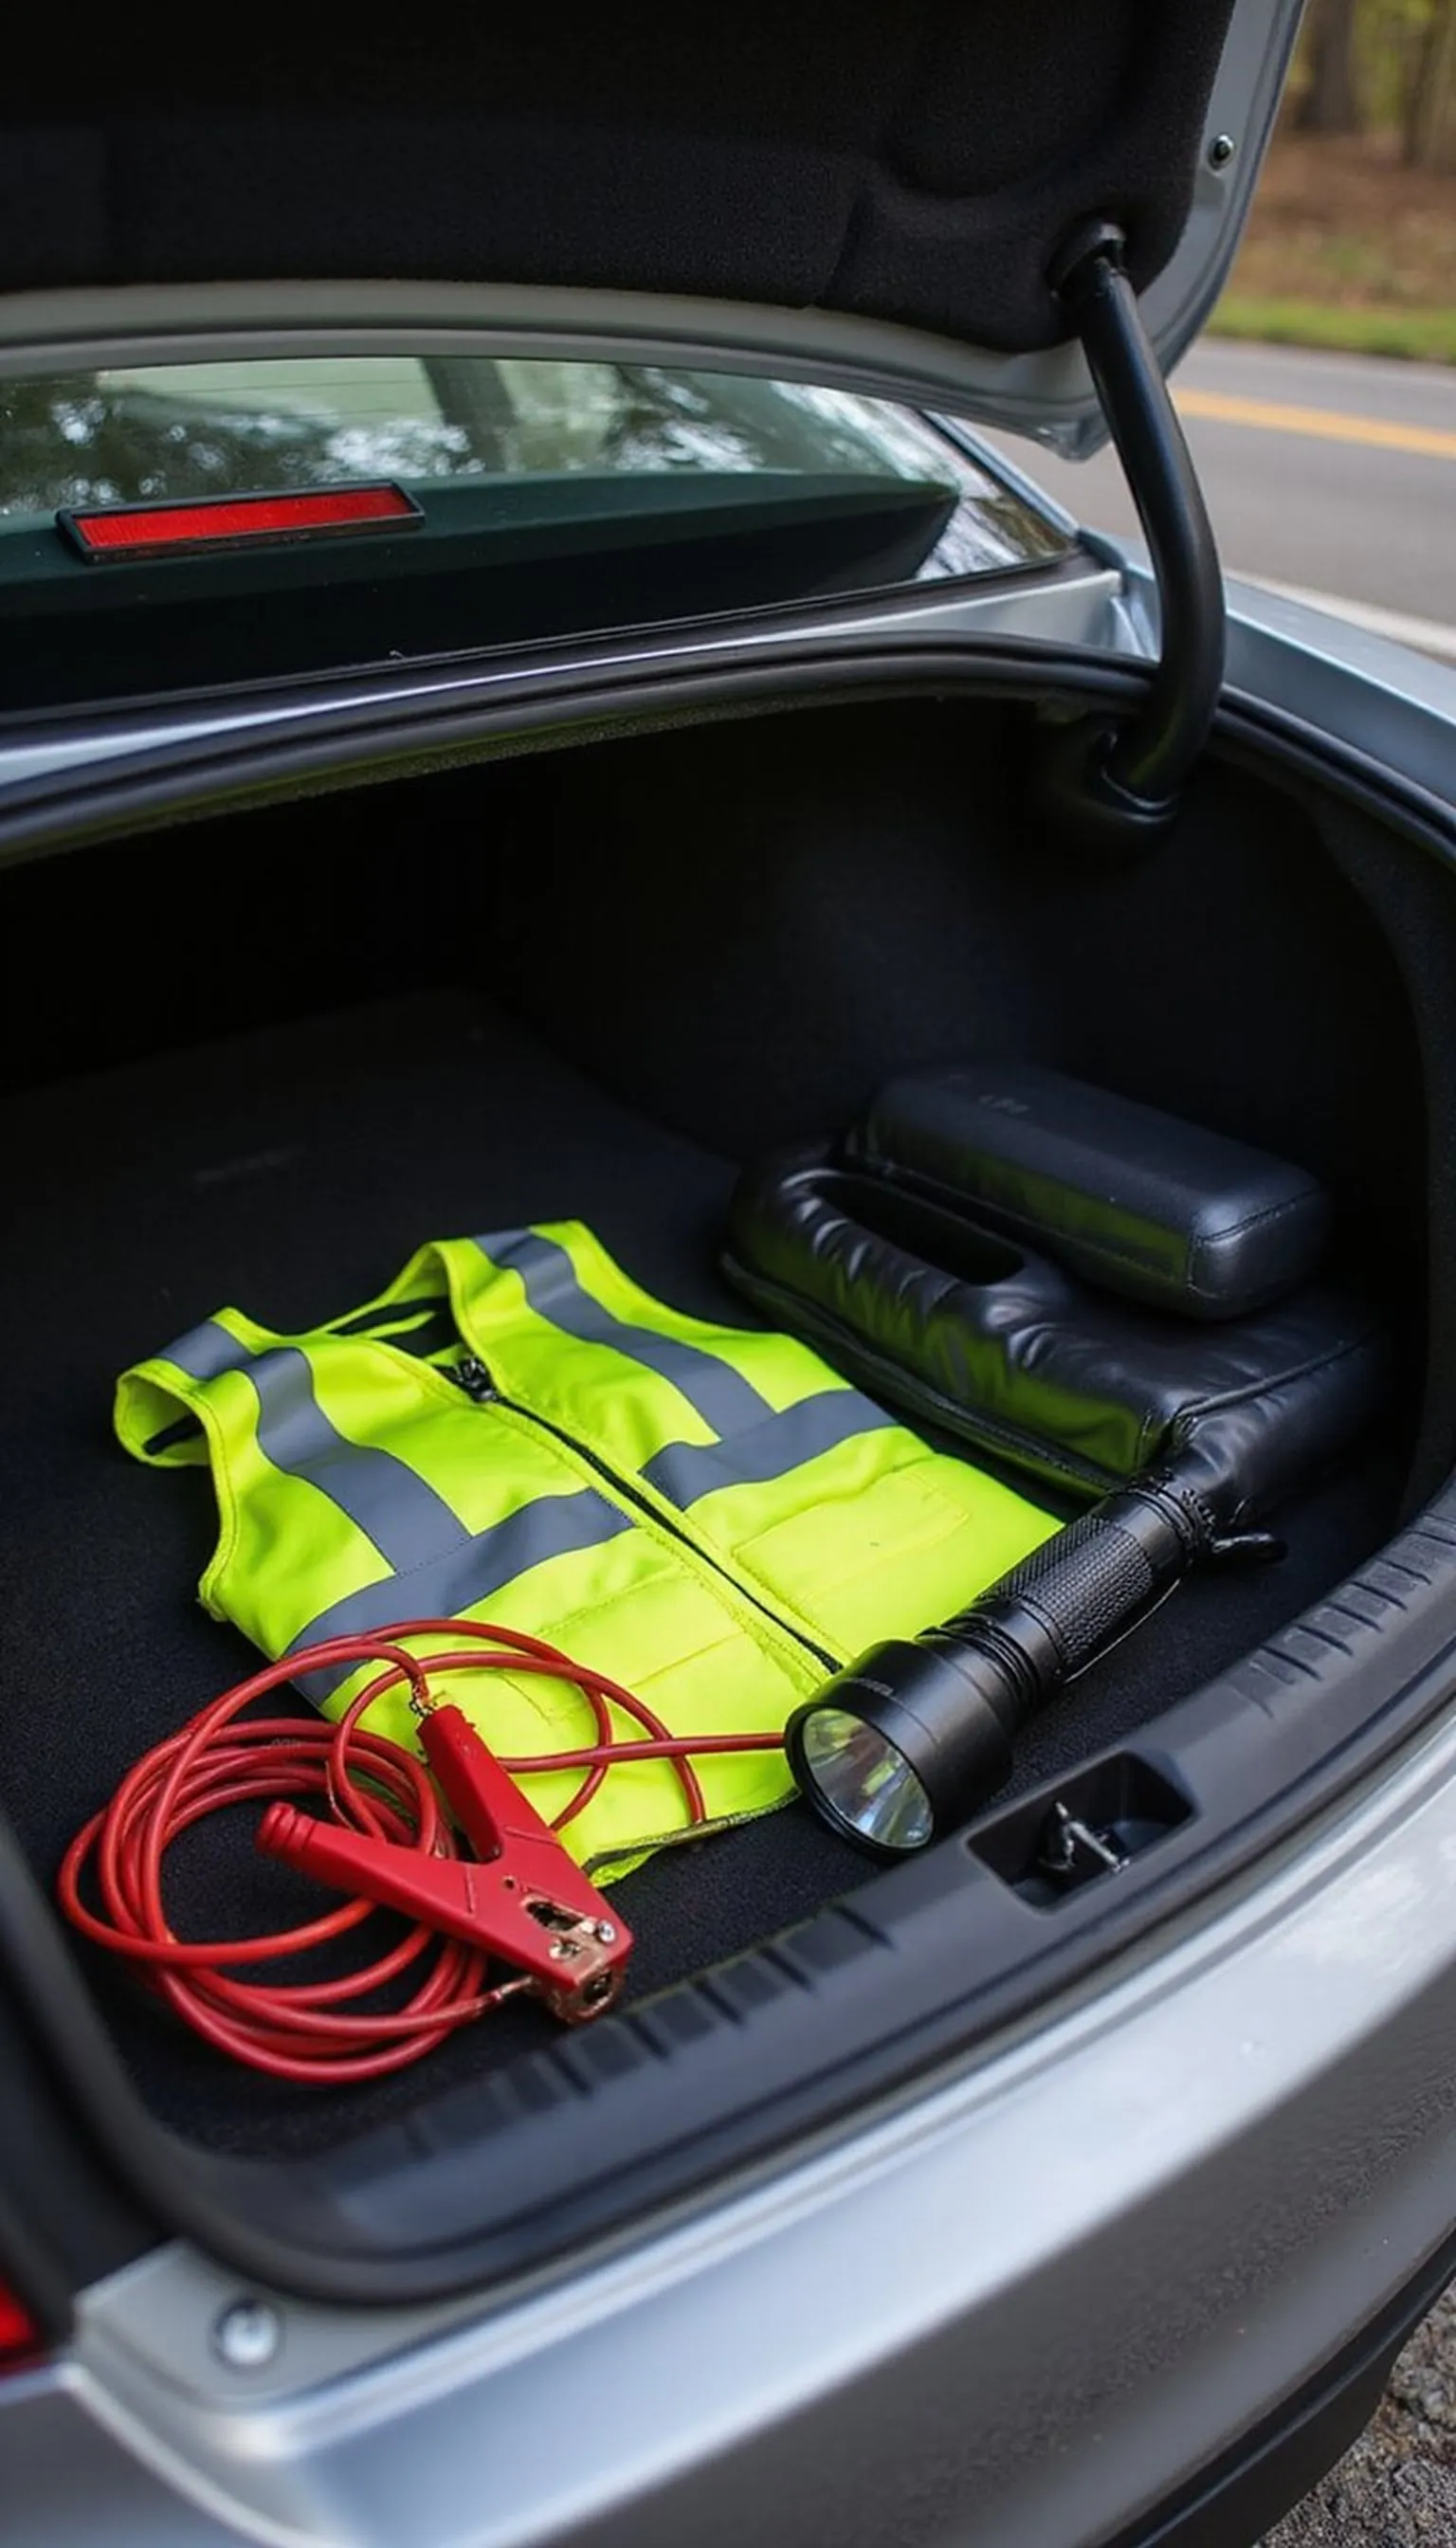
A car emergency kit should include jumper cables, a compact roadside triangle, a bright reflective vest, and a heavy-duty flashlight for safer nighttime stops. Add a small tool kit, tow strap, and a tire pressure gauge to handle common roadside issues during evacuation routes.
Store fresh water, a blanket, and emergency snacks in the trunk for long lines or unexpected stops. A paper map and a printed evacuation plan tucked into a waterproof sleeve help if GPS or mobile networks fail.
Check the kit monthly and rotate items like water and snacks to keep them fresh for travel season. Keep a separate fuel can and a small battery jump starter if long detours are expected away from service stations.
Travel Tips
- Regularly inspect jumper cables and tire repair tools before travel season.
- Store the reflective vest and flashlight within easy reach inside the vehicle.
- Include a paper map and printed routes in a waterproof sleeve for offline navigation.
Pro Tip: Keep a compact car kit with jumper cables, a reflective vest, a heavy flashlight, and basic tools in the trunk for quick roadside fixes during evacuations.
Avoid: Leaving the emergency kit uninspected for months leads to depleted batteries or expired supplies. Avoid storing the kit in hard-to-reach places when rapid access is needed.
Try Also: Add a portable jump starter and extra fuel container for long rural detours, or pare the kit down to essentials for short urban evacuations. Include a small air compressor if tire issues are common on your route.
Products & Materials
Items Used
- jumper cables
- reflective vest
- flashlight
“Car emergency kit packed for safe road evacuations and detours.”
Kids’ storm-ready activity pack for long waits
⏱️ 15 min · 🟢 Beginner
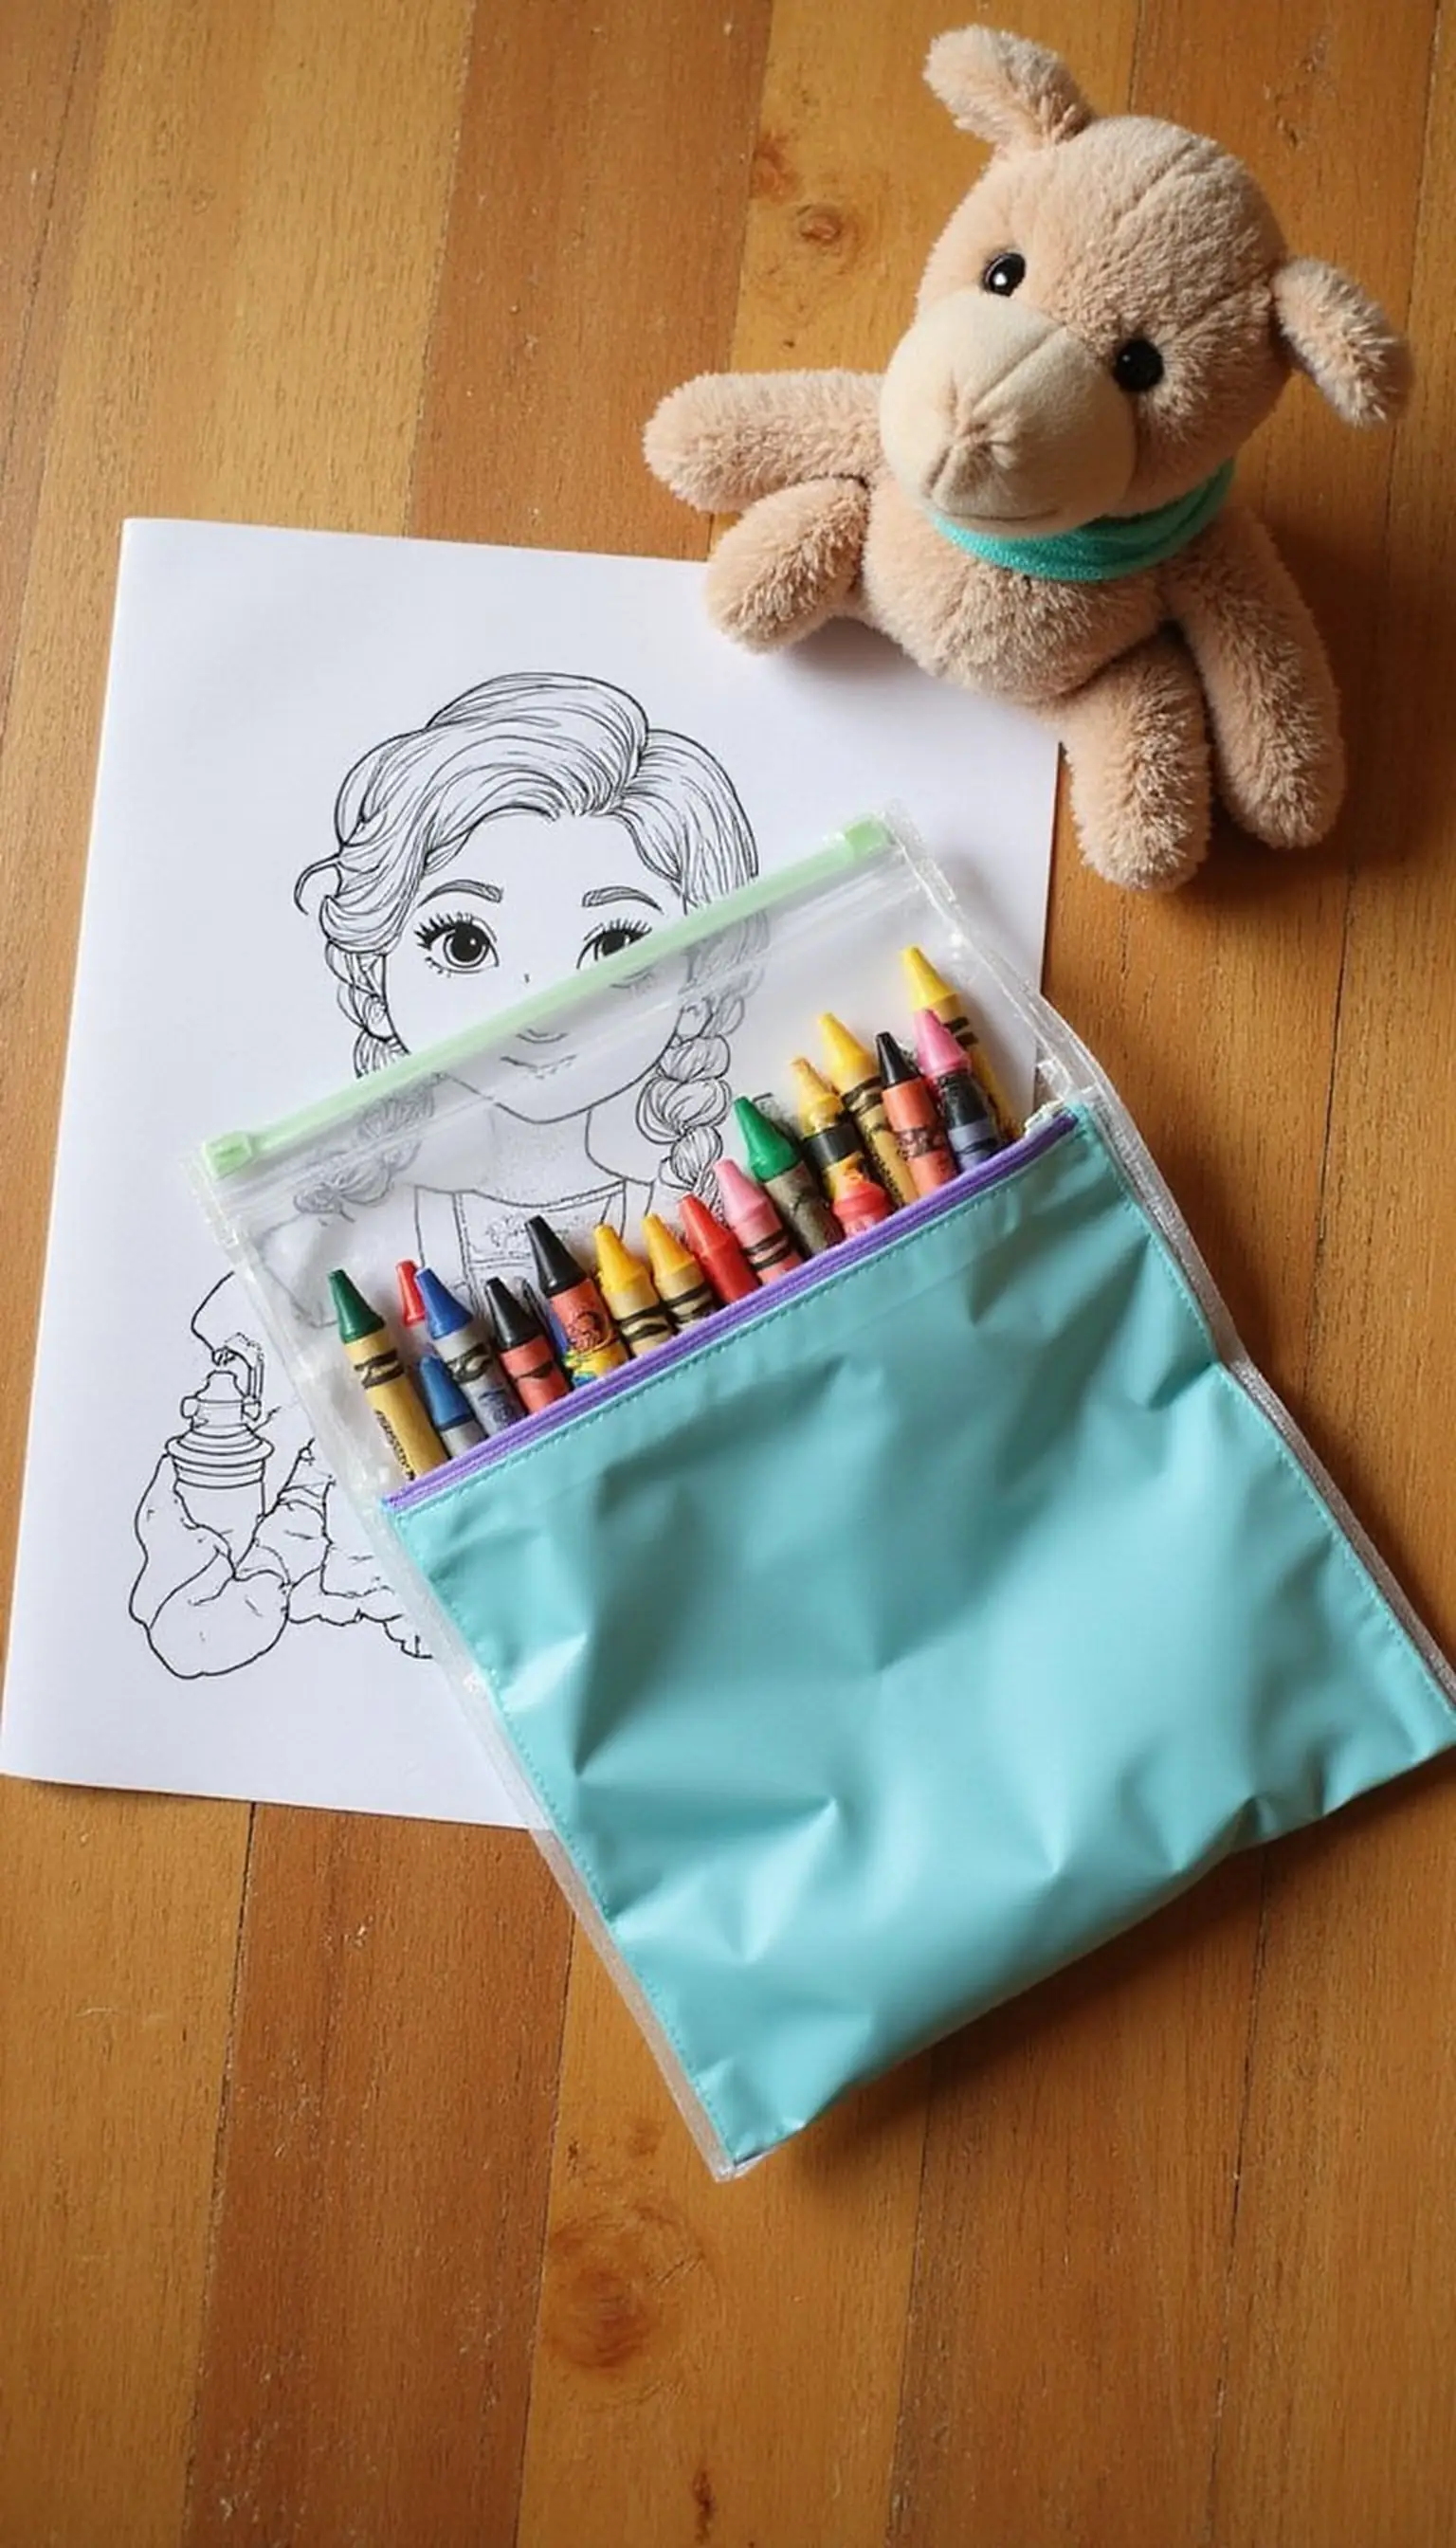
A compact activity pack for kids keeps them calm during long waits or shelter time and includes coloring pages, crayons, and a small toy. Pack items in a clear resealable bag so guardians can quickly find and share them in crowded spaces.
Include familiar comfort items like a small plush or a favorite snack to ease anxiety during unfamiliar shelter environments. Add a laminated contact card with guardian names and phone numbers tucked into the pack in case items are separated.
Rotate activities to prevent boredom and keep the pack lightweight so children can carry or stash it easily. Bring a small foldable mat or blanket to create a defined space in busy shared rooms for play and rest.
Travel Tips
- Use clear resealable bags to organize activities and snacks for kids.
- Include a laminated contact card with guardian details inside the pack.
- Swap out activities regularly to keep the pack engaging during long waits.
Pro Tip: Pack a clear resealable bag with simple activities, a small comfort toy, and a laminated contact card to keep kids calm during shelter waits.
Avoid: Filling the bag with bulky toys adds weight and becomes a burden. Avoid noisy electronic toys that drain batteries and upset other shelter residents.
Try Also: Include sticker books and workbooks for older kids, or activity dice and compact travel games for group play. Add hygiene wipes and a small hand sanitizer for quick cleanups.
Products & Materials
Items Used
- crayons
- coloring book
- resealable zip bags
“Kids’ activity pack with quiet toys and contact info for storm waits.”
Roof-top or balcony safety checklist for renters
⏱️ 20 min · 🟠 Intermediate
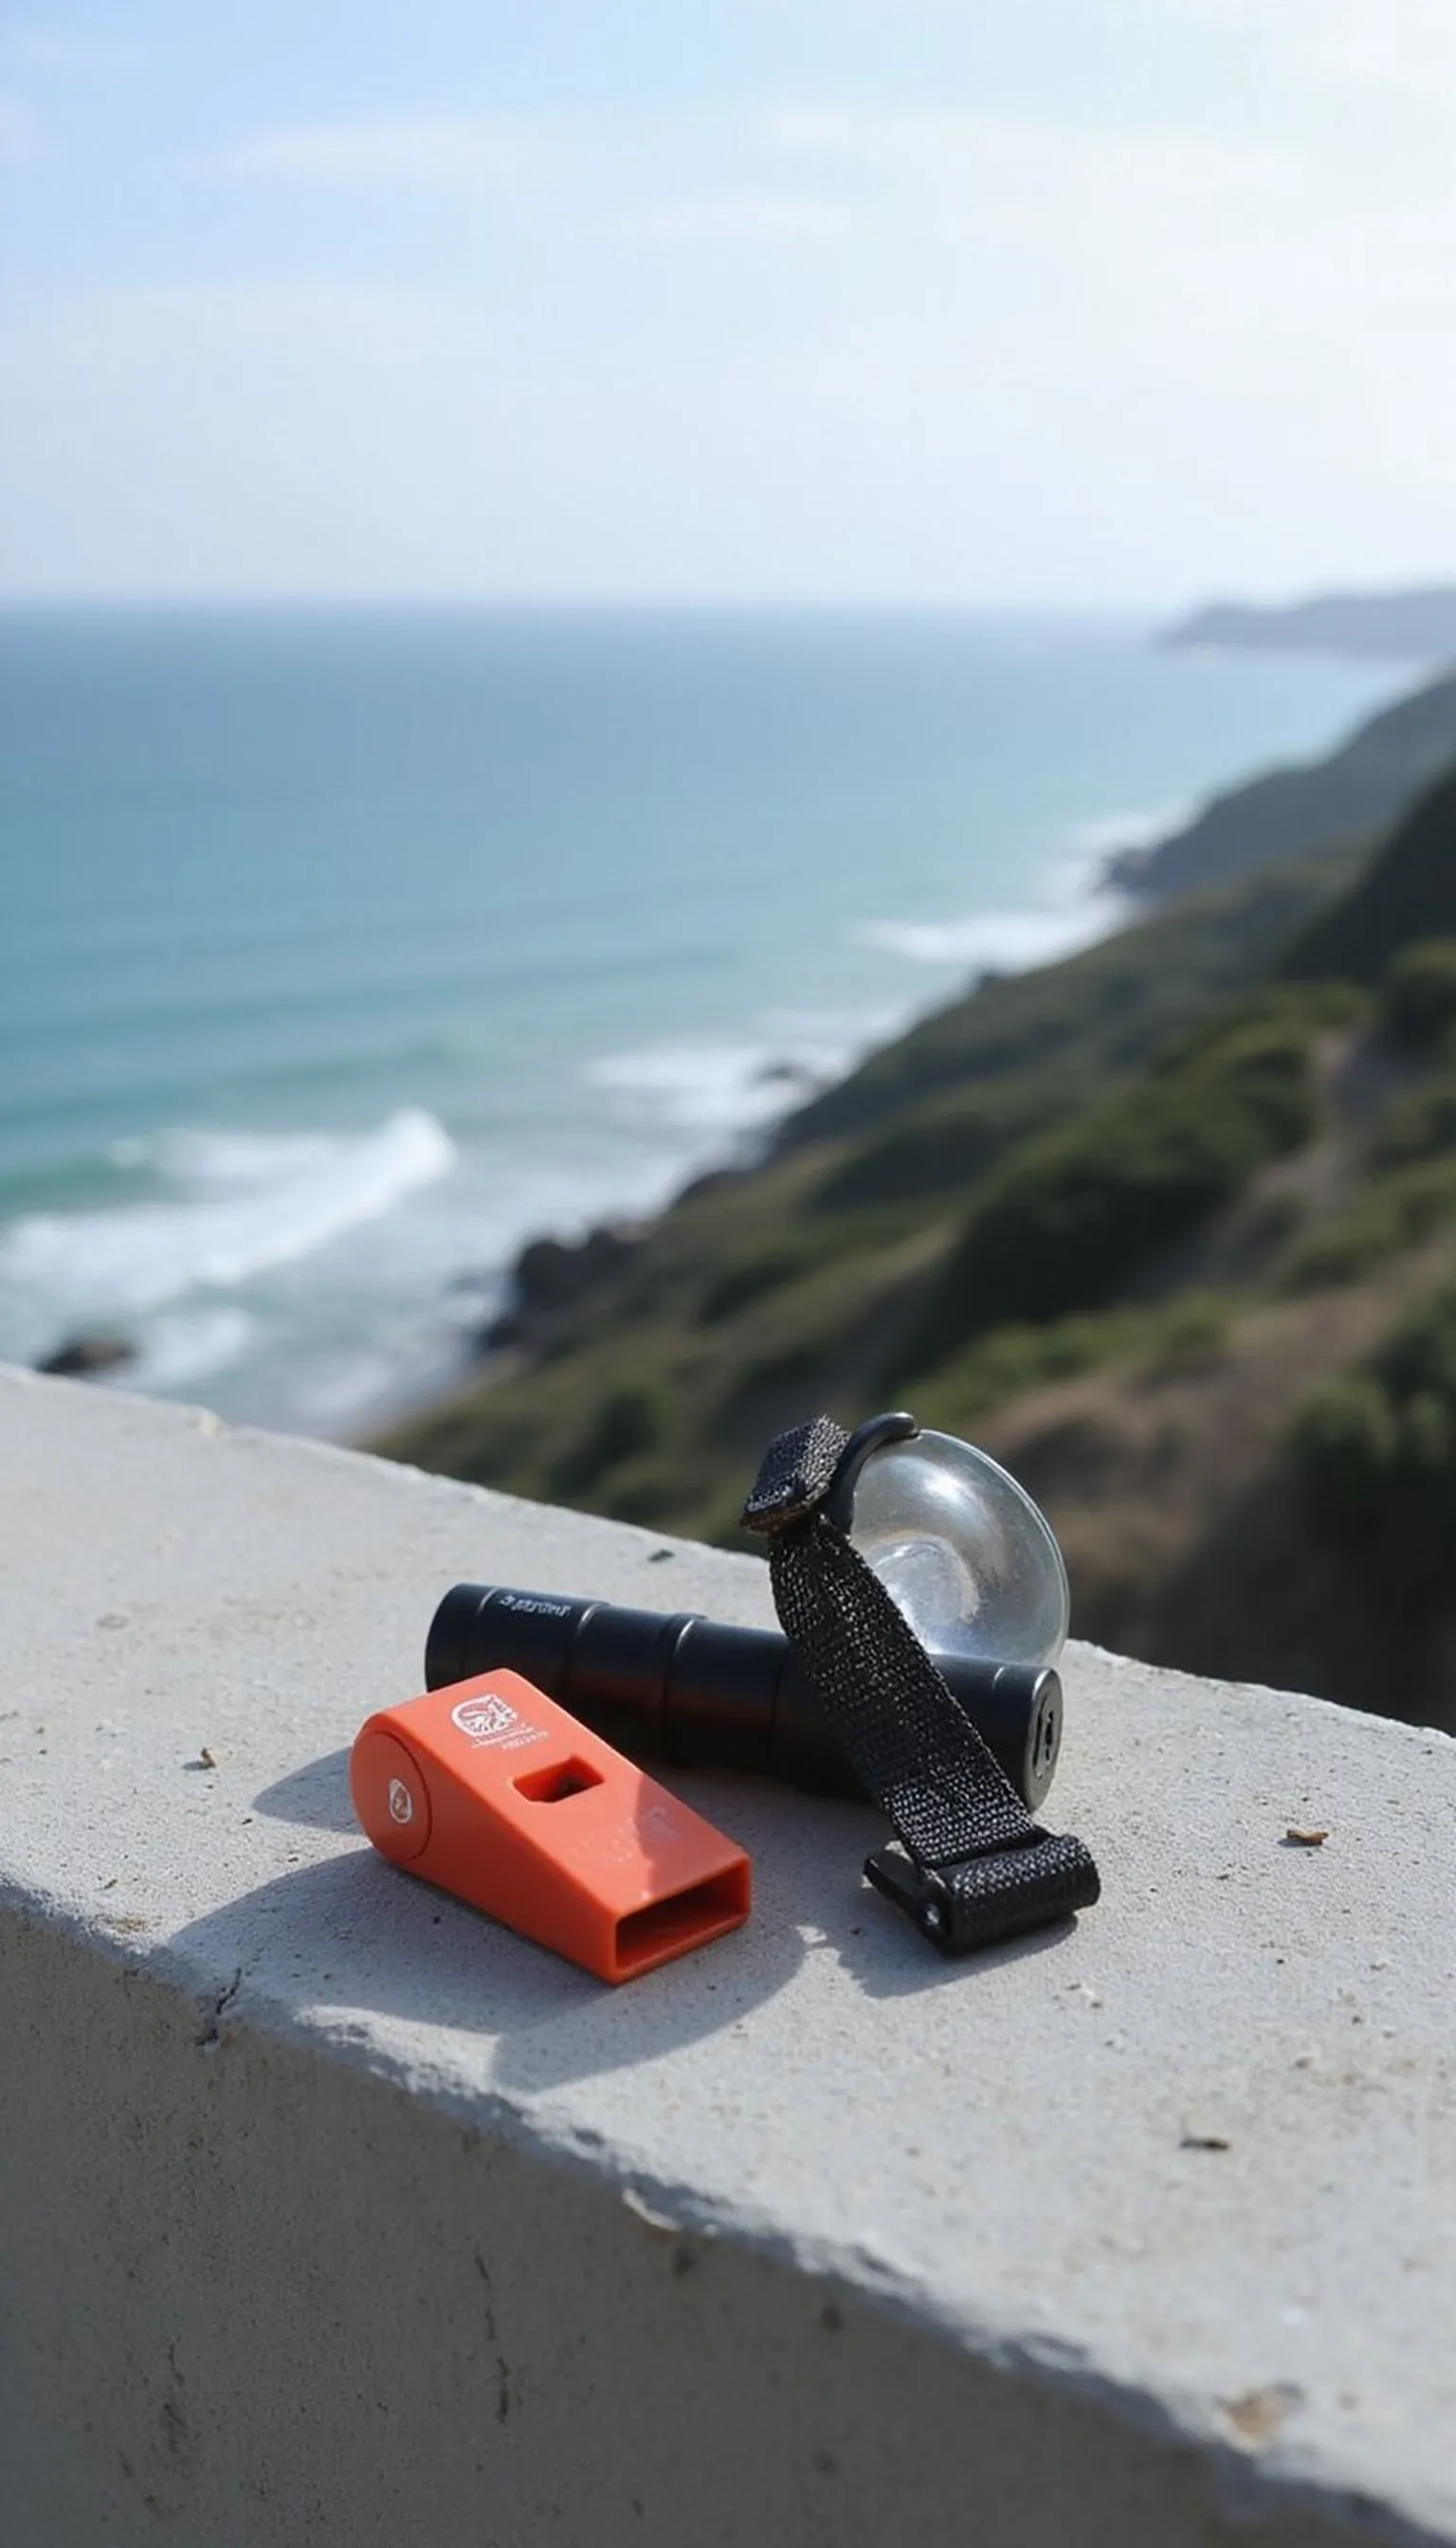
For short stays near coastlines, a quick roof-top or balcony safety checklist includes checking railings, clearing loose items, and identifying shelter access routes. Secure lightweight furniture and potted plants to prevent them from becoming projectiles in high winds.
Note the closest stairway and emergency exit and keep a flashlight and whistle nearby in a marked balcony box. A short rope or strap can help secure items or serve as a visible marker if assistance is needed during heavy weather.
Communicate the plan to travel companions so everyone knows the safest route inside the building and where to meet. Document any building-specific instructions from hosts and keep them easily accessible in a waterproof folder.
Travel Tips
- Secure or store away loose balcony items before storms approach.
- Keep a flashlight and whistle in a marked outdoor box for quick access.
- Confirm emergency exits and stair access when checking into a rental.
Pro Tip: Before storms, remove or secure lightweight balcony items, note nearest stair exits, and keep a flashlight plus whistle in a marked spot.
Avoid: Leaving loose furniture and planters on balconies risks damage and hazards during high winds. Avoid assuming rental hosts will secure outdoor items without checking.
Try Also: For longer rentals, add a small strap kit and a tarp for temporary covers, or arrange indoor storage with hosts for loose items. In urban areas, prioritize identifying indoor shelter spots.
Products & Materials
Items Used
- flashlight
- whistle
- rope strap
“Balcony safety checklist to secure rentals before storm arrivals.”
Compact multi-tool and small repair kit for gear fixes
⏱️ 10 min · 🔴 Advanced
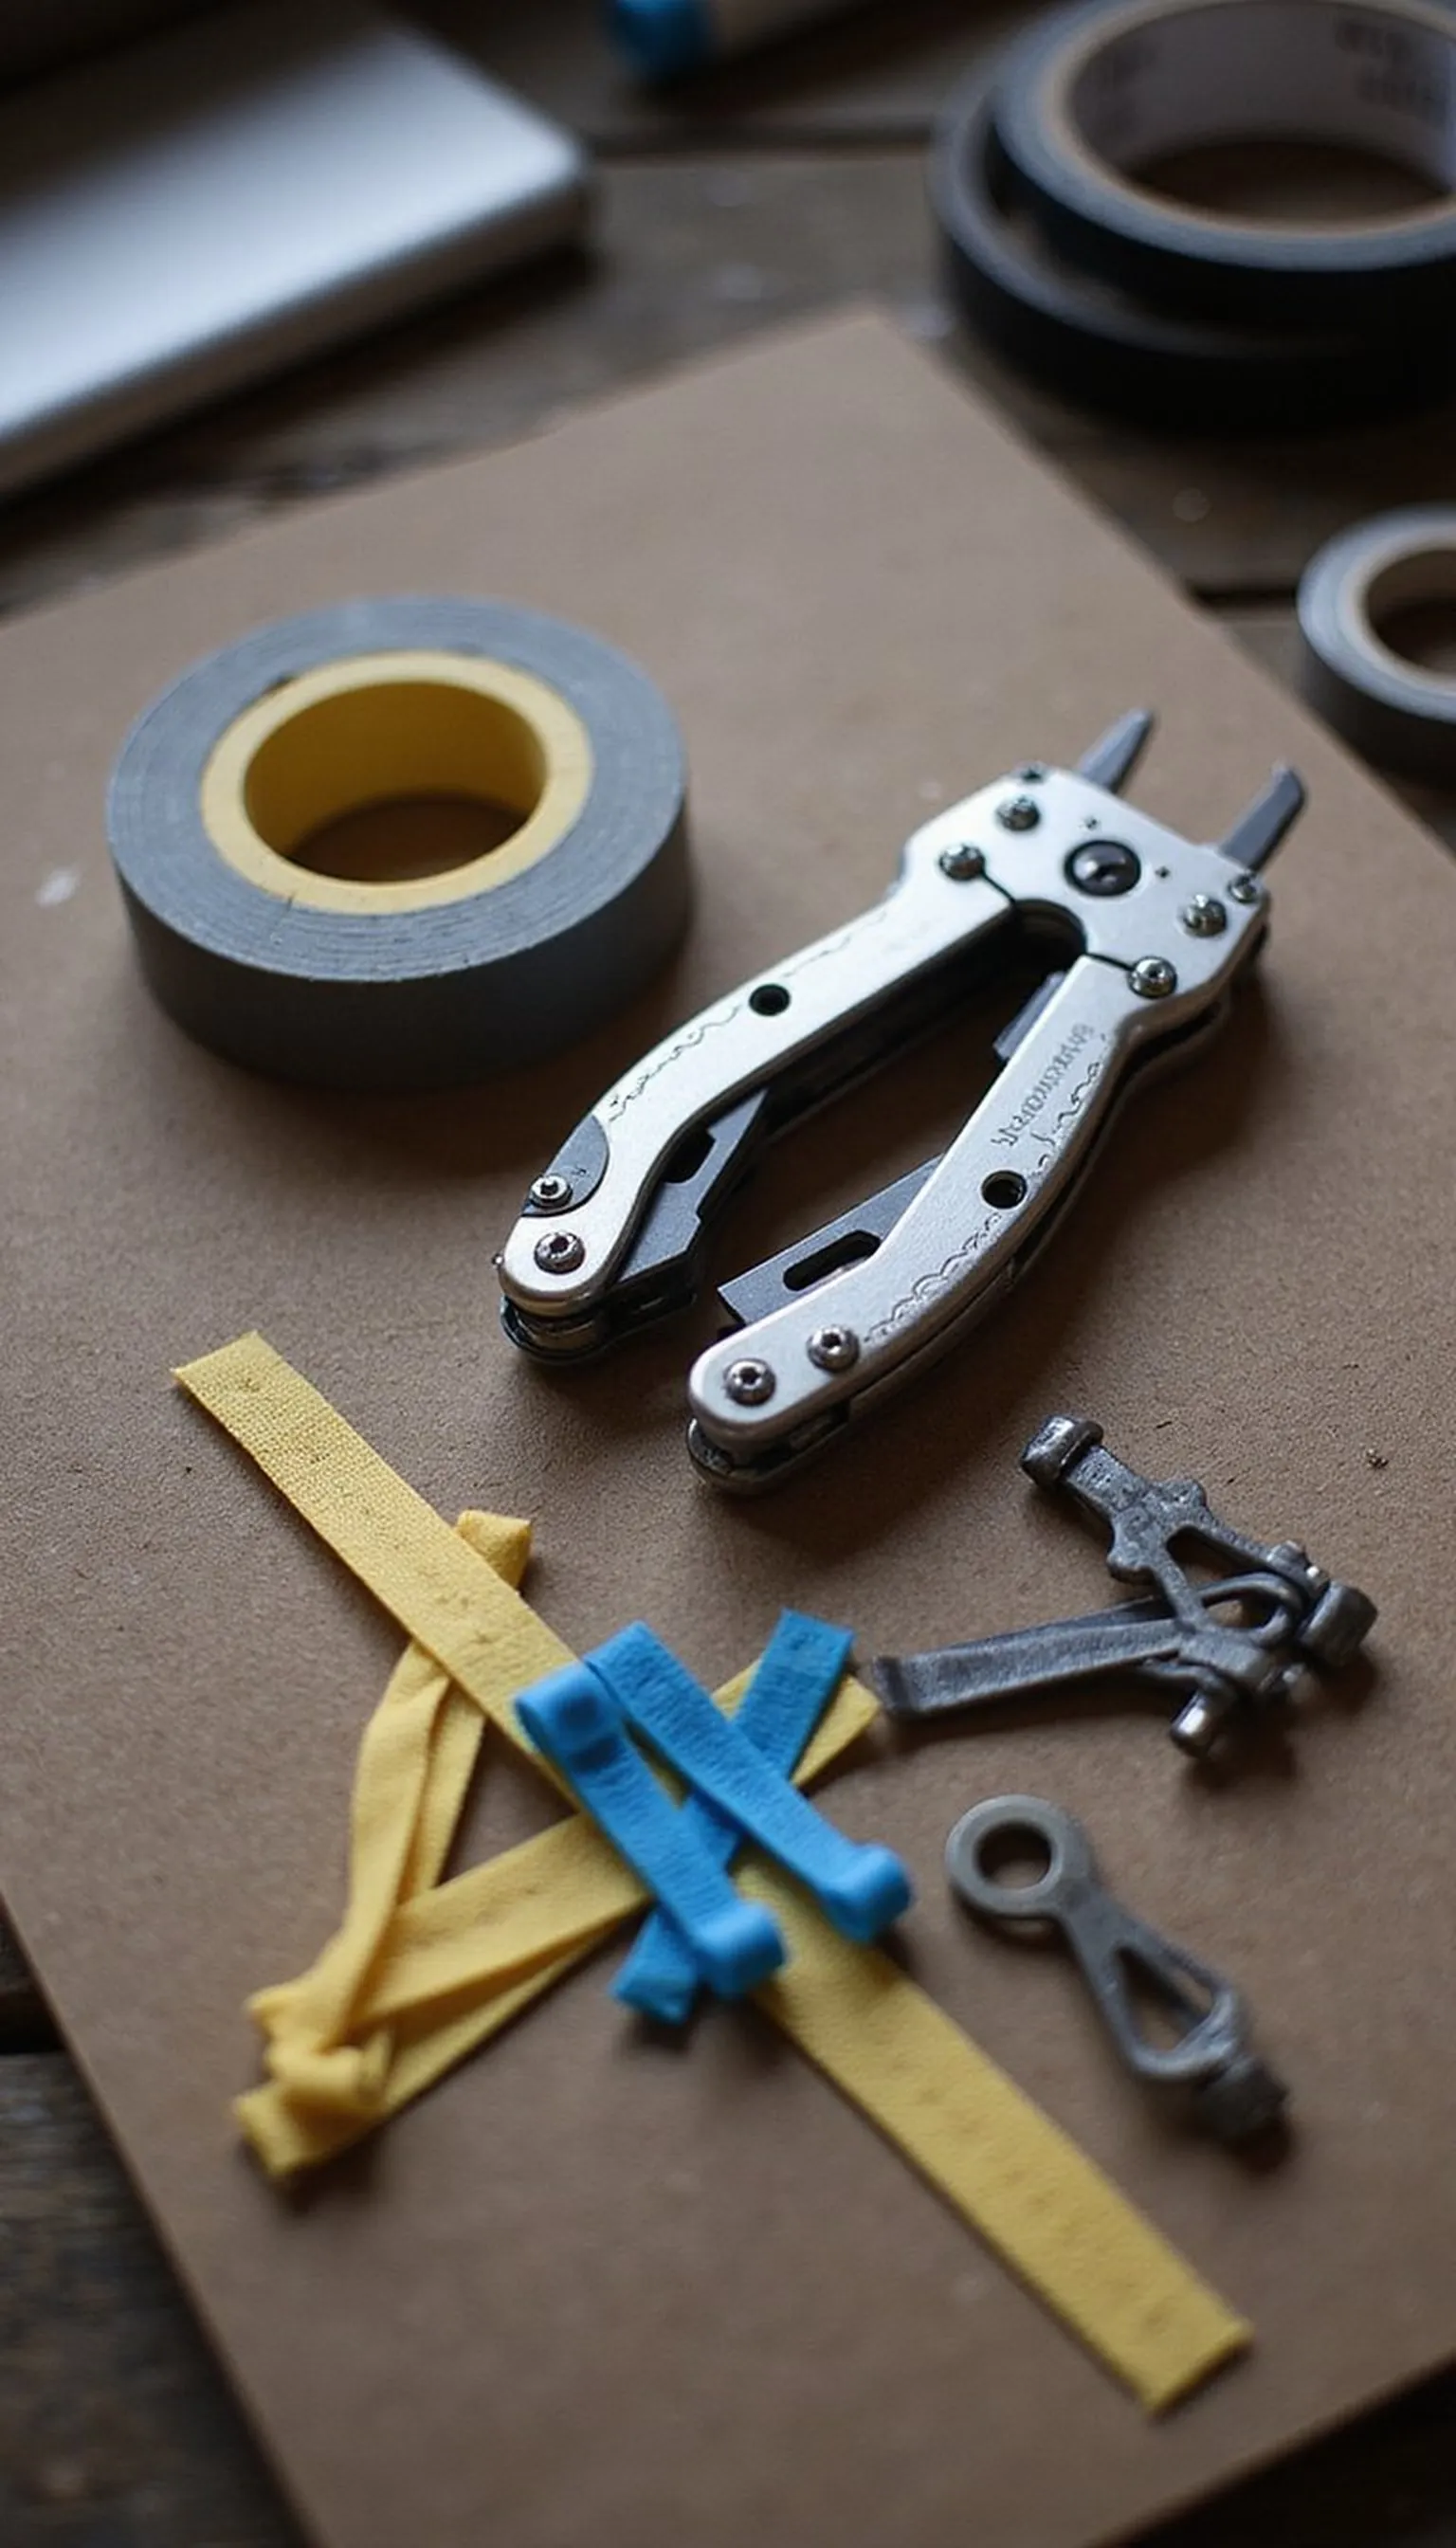
A compact multi-tool and a small repair kit solve many minor gear problems that arise during storm travel, from broken zippers to lost screws. Include duct tape, spare buckles, a multi-bit screwdriver, and a lightweight sewing kit to handle common luggage issues.
Keep supplies in a labeled pouch so they are easy to find in dim conditions or when under time pressure. A small roll of strong nylon cord and a few zip ties add quick fixes for straps, tarps, and temporary repairs on the road.
Practice basic repairs at home so the motions are familiar during stressful moments away from repair shops. Replace used items promptly after a trip so the kit remains ready for the next unexpected weather event.
Travel Tips
- Pack duct tape, spare buckles, and a compact multi-tool for quick repairs.
- Label the repair pouch and store it near the top of luggage for instant access.
- Practice basic fixes at home to build confidence in applying them when needed.
Pro Tip: Carry a labeled pouch with a compact multi-tool, duct tape, spare buckles, and a few zip ties for quick gear repairs on the road.
Avoid: Leaving repair tools at the bottom of checked luggage delays fixes in urgent situations. Avoid bulky tool choices that add unnecessary weight to carry-on kits.
Try Also: Use a tiny sewing kit and lighter tape for ultralight travel, or add a pocket-sized rivet kit for more durable fixes when longer trips are expected. Include extra straps for luggage replacements.
Products & Materials
Items Used
- multi-tool
- duct tape
- zip ties
“Compact repair kit with multi-tool for quick storm travel fixes.”
