
As an Amazon Associate I earn from qualifying purchases.
Easy Origami Animal Projects make paper crafting approachable and calming for all ages. These simple origami animals bring playful shapes to desks, gift tags, and cozy corners.
A handful of folding tricks transforms a square of paper into charming paper animals with minimal frustration. The projects range from quick beginner origami animals to slightly more detailed designs for patient crafters.
Each origami animal project focuses on clear visuals and sensory satisfaction rather than perfection. Small stacks of colored paper, soft creases, and finished silhouettes add personality to notebooks and miniature displays.
Fold a classic paper crane with gentle creases
⏱️ 20 min · 🟢 Beginner
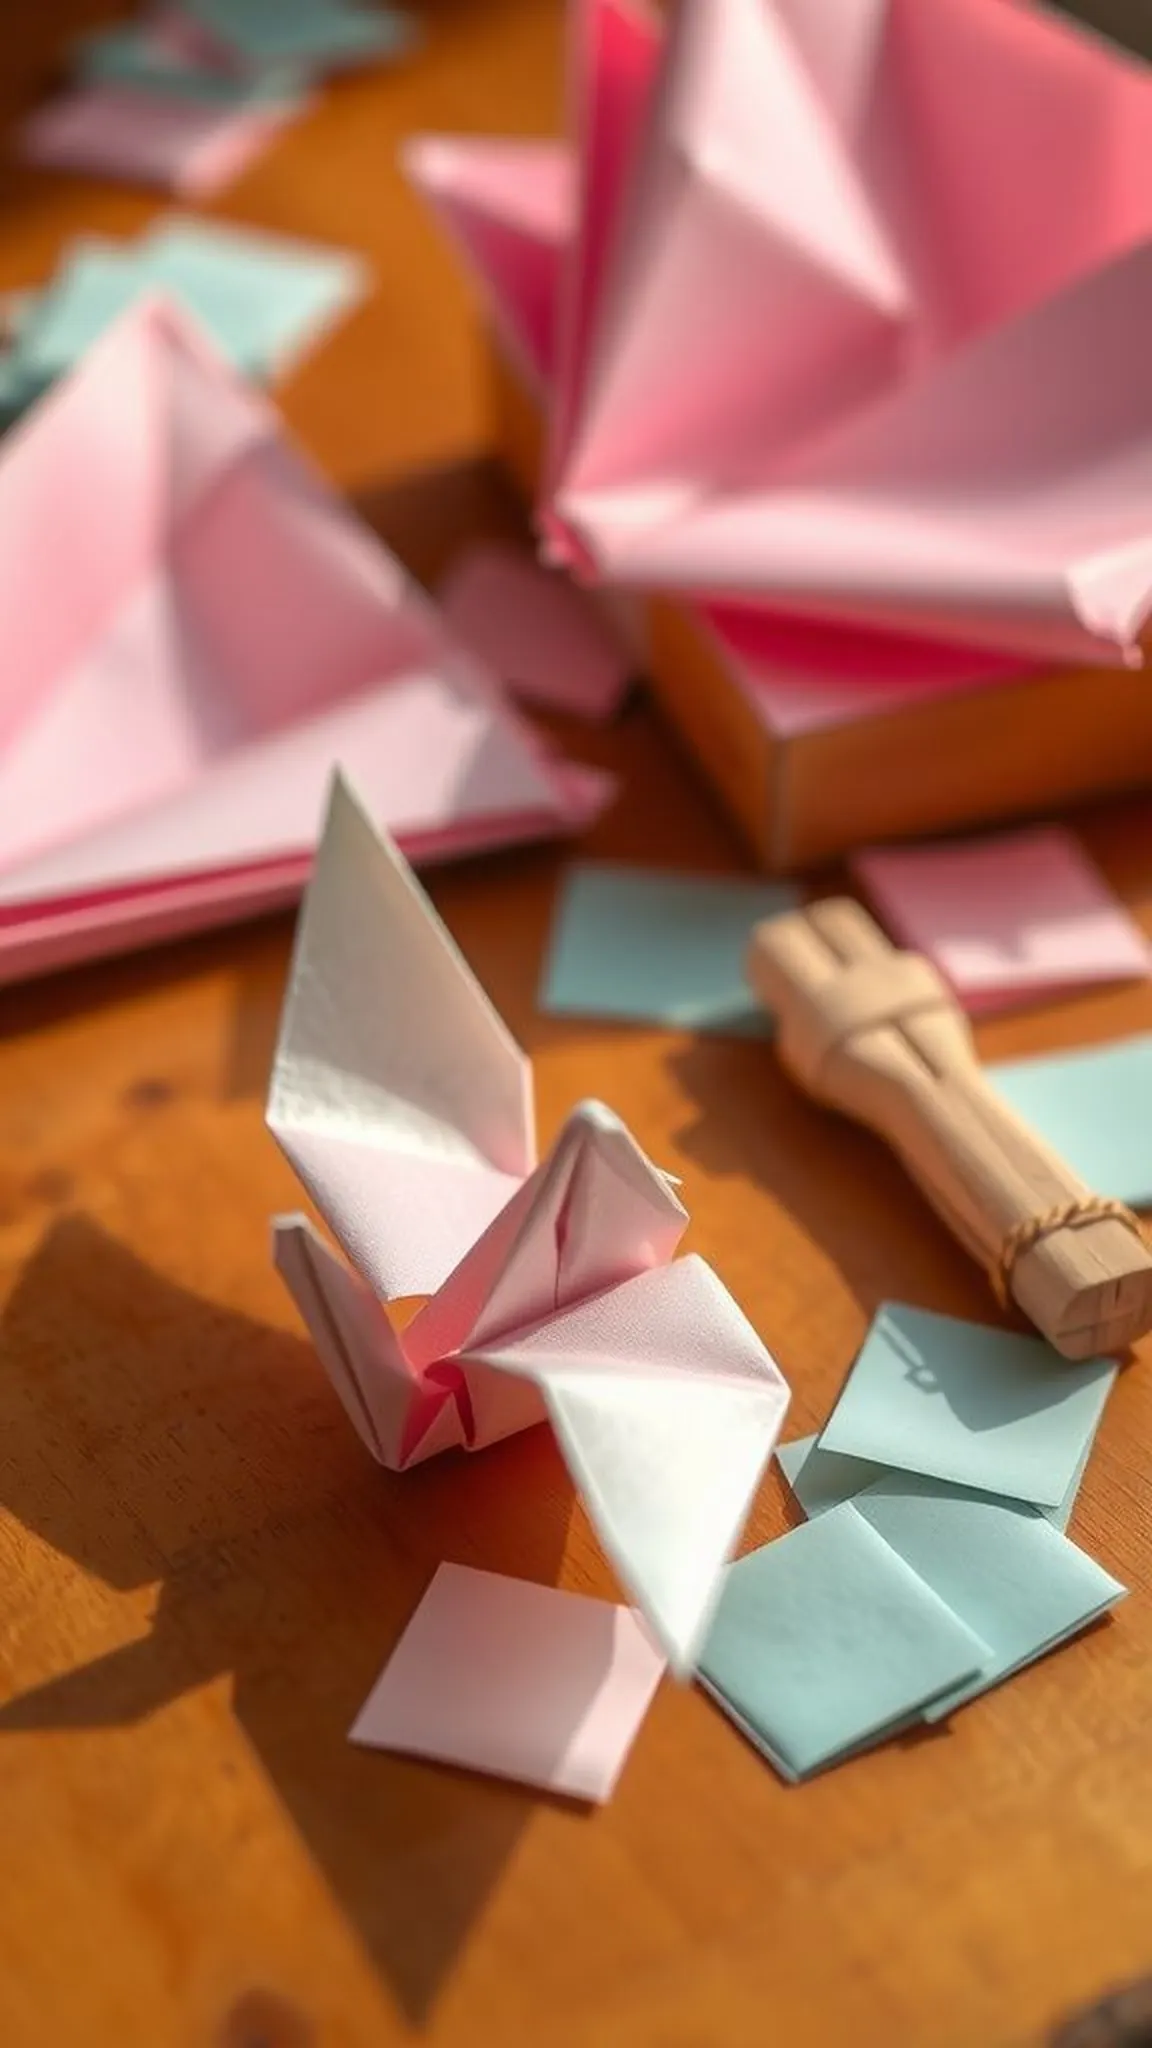
The classic paper crane perches like a tiny bird crafted from a single square of colored paper. Crisp angles and soft creases give the silhouette a quiet, paper-thin elegance.
Up close the paper edge catches light and casts delicate miniature shadows across each fold. The finished crane appears weightless against a warm wooden tabletop with scattered sheets nearby.
A slightly textured sheet invites a fingertip to follow the wing lines and feel each ridge. The small shape works well as a shelf accent or a gentle accent on a wrapped parcel.
Pro Tip: Choose slightly thicker 6 inch origami paper for crisper wings and cleaner creases that hold their shape longer.
How to Make This
- Fold the square paper into a preliminary base by aligning opposite corners and creasing firmly with a bone folder or fingertip.
- Collapse the preliminary base into a bird base and flatten the layers so the symmetry shows clearly.
- Narrow one end to form the neck and the opposite end to form a tail using narrow reverse folds.
- Pull the wings gently apart to form the body and refine the head by making a small inside reverse fold.
Avoid: Often beginners leave uneven creases which makes the model lopsided and harder to shape. Light, inconsistent pressure can blur the crisp silhouette and flatten details.
Try Also: Patterned paper gives a playful look while metallic paper adds a festive sheen, and larger sheets create dramatic tabletop sculptures.
Products & Materials
Items Used
“Delicate paper crane with crisp creases and graceful wings.”
Cute corner fox bookmark for playful pages
⏱️ 15 min · 🟢 Beginner
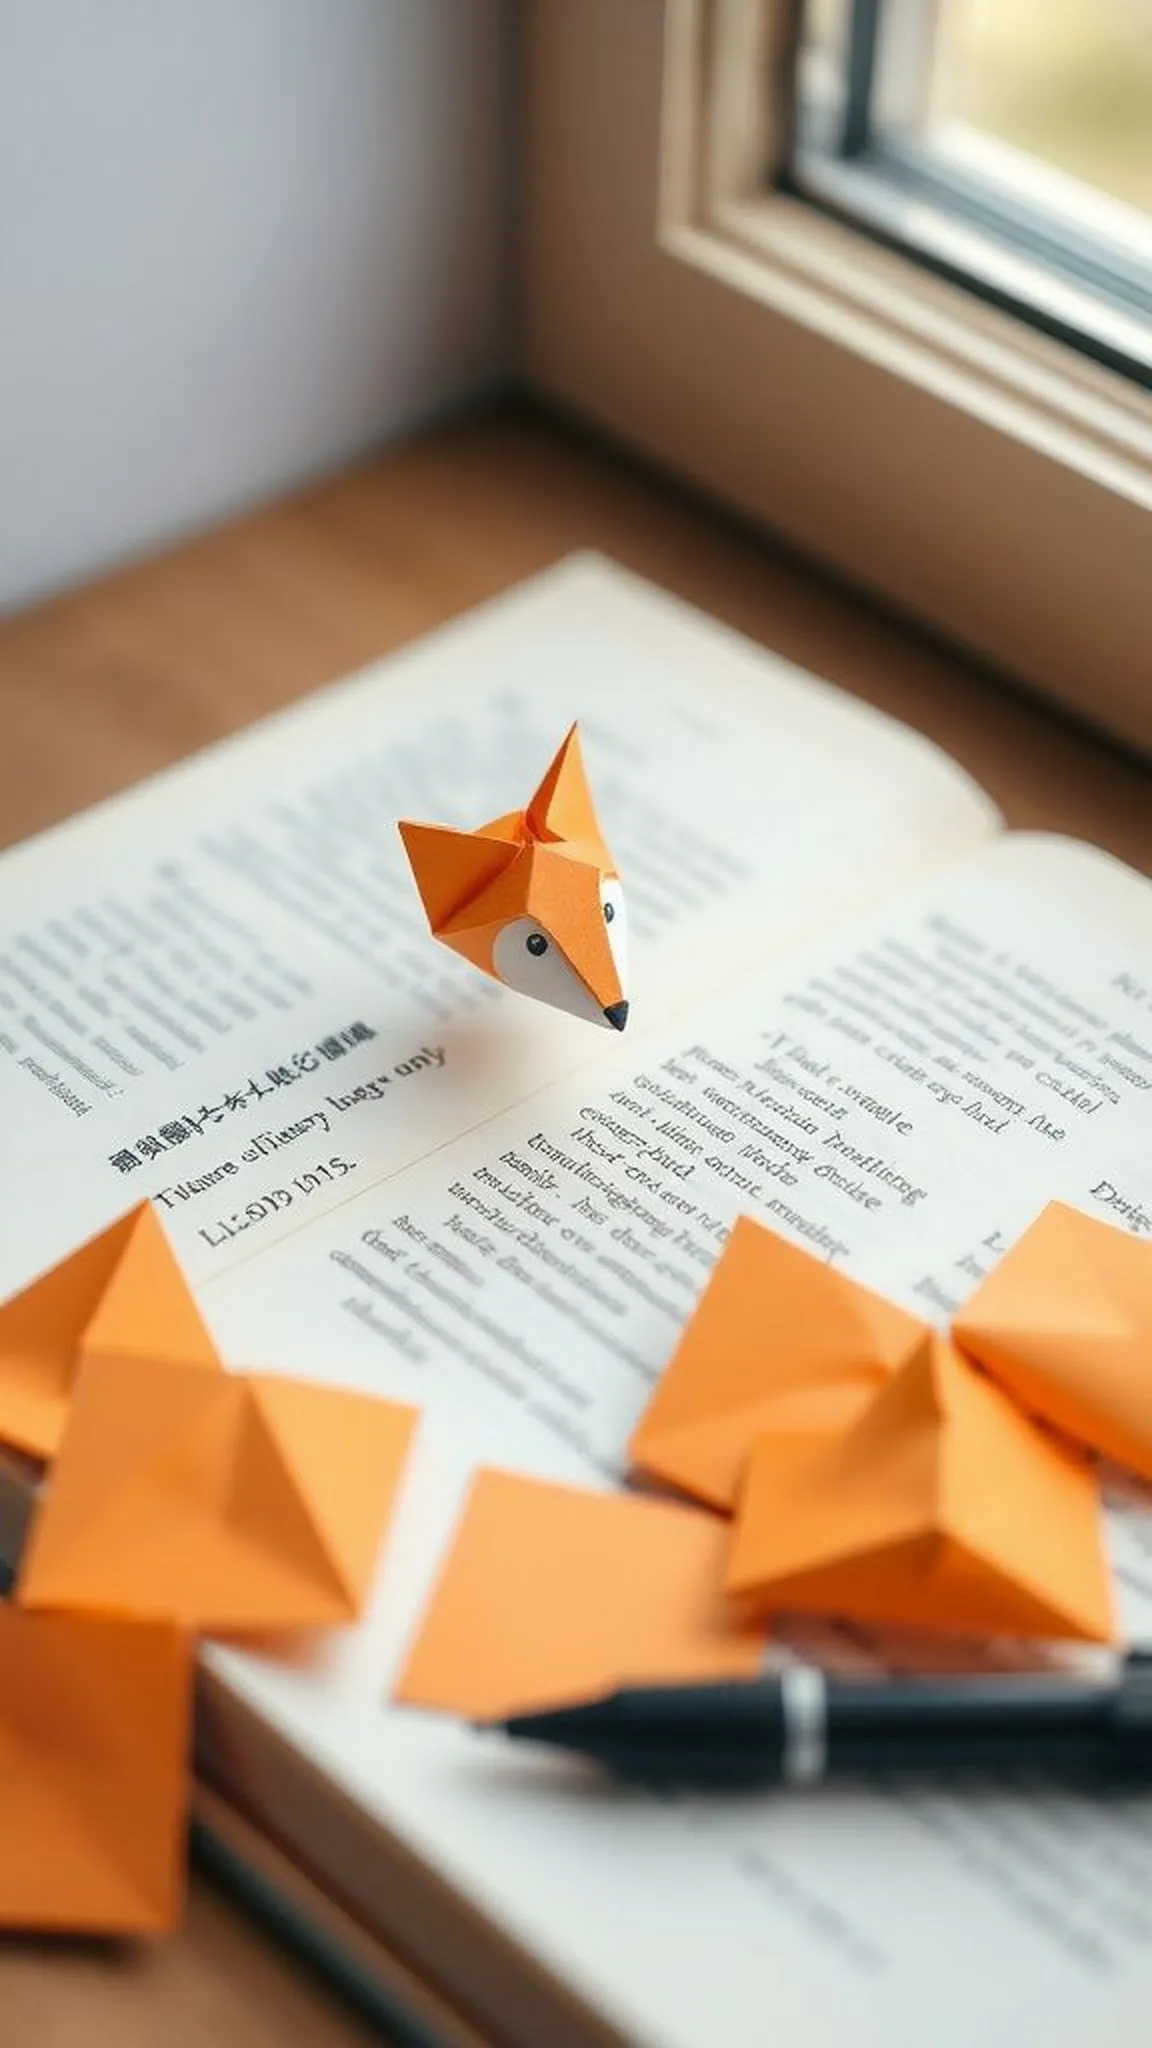
A bright triangular fox makes a lively corner bookmark from a single square of paper. Pointed ears and a cheeky face peek out between book pages like a tiny paper friend.
The vivid orange sheet brings a warm glow against aged paper or glossy covers. Tiny drawn whiskers and a dark nose give the paper animal a characterful expression.
A softly folded ear casts a crisp shadow that feels tactile under a fingertip. Stashing the fox on a bedside book adds a cheerful pause to reading rituals.
Pro Tip: Use double-sided paper for a contrasting face and interior that makes the fox bookmark pop on a page edge.
How to Make This
- Fold a square paper into a neat triangle base and form smaller triangular ears to shape the fox head.
- Tuck the lower corner into the pocket created by earlier folds so the bookmark slips onto a page securely.
- Add small facial details with a fine-tip marker to create eyes, a nose, and subtle whisker lines.
Avoid: Often the corner pocket is too loose which lets the bookmark slip off pages. Slightly deeper tucks create a snug hold without bulk.
Try Also: Try patterned paper for a whimsical fox, a muted brown for a woodland tone, or add a tiny felt tail for texture.
Products & Materials
Items Used
- square origami paper
- fine-tip black marker
“Tiny fox corner bookmark brings playful charm to any book.”
Make a little hopping frog that springs to life
⏱️ 20 min · 🟢 Beginner

The folding frog looks ready to leap from a pool of green paper with a single press. Rounded thighs and a wide mouth combine into a compact, springy silhouette that invites a playful tap.
Bright green paper and a glossy surface make the model feel lively under warm light. Tiny drawn eyes add a spark of personality that catches the eye across a desktop.
A gentle squeeze on the back releases a soft hop that brings a small moment of delight. The creases create small valleys and ridges that are pleasant to trace with a fingertip.
Pro Tip: Choose slightly thicker origami paper for the frog’s legs so the jump feels springy and the folds remain crisp longer.
How to Make This
- Create a rectangular base by folding and shaping the square into a central kite, then form the preliminary frog base.
- Fold the rear sections into broad legs and refine the body so it balances flat on a surface.
- Tuck and crease the hind leg sections to create stored energy, then press to test the frog’s little hop.
- Draw small pupils on the head to bring the frog’s face to life.
Avoid: Often creases are too soft which prevents a satisfying hop and causes the frog to collapse. Sharper, even creases help build the spring needed for movement.
Try Also: Try patterned green paper for a pond-like effect or metallic paper for a playful, reflective version; scale up for tabletop décor.
Products & Materials
Items Used
“Springy origami frog that actually hops with a soft press.”
Save time and printer ink with 50+ printable templates and step-by-step instructions in one ad-free guide.

Just $19.99 — lifetime access
Delicate paper butterfly with layered colorful wings
⏱️ 30 min · 🟠 Intermediate
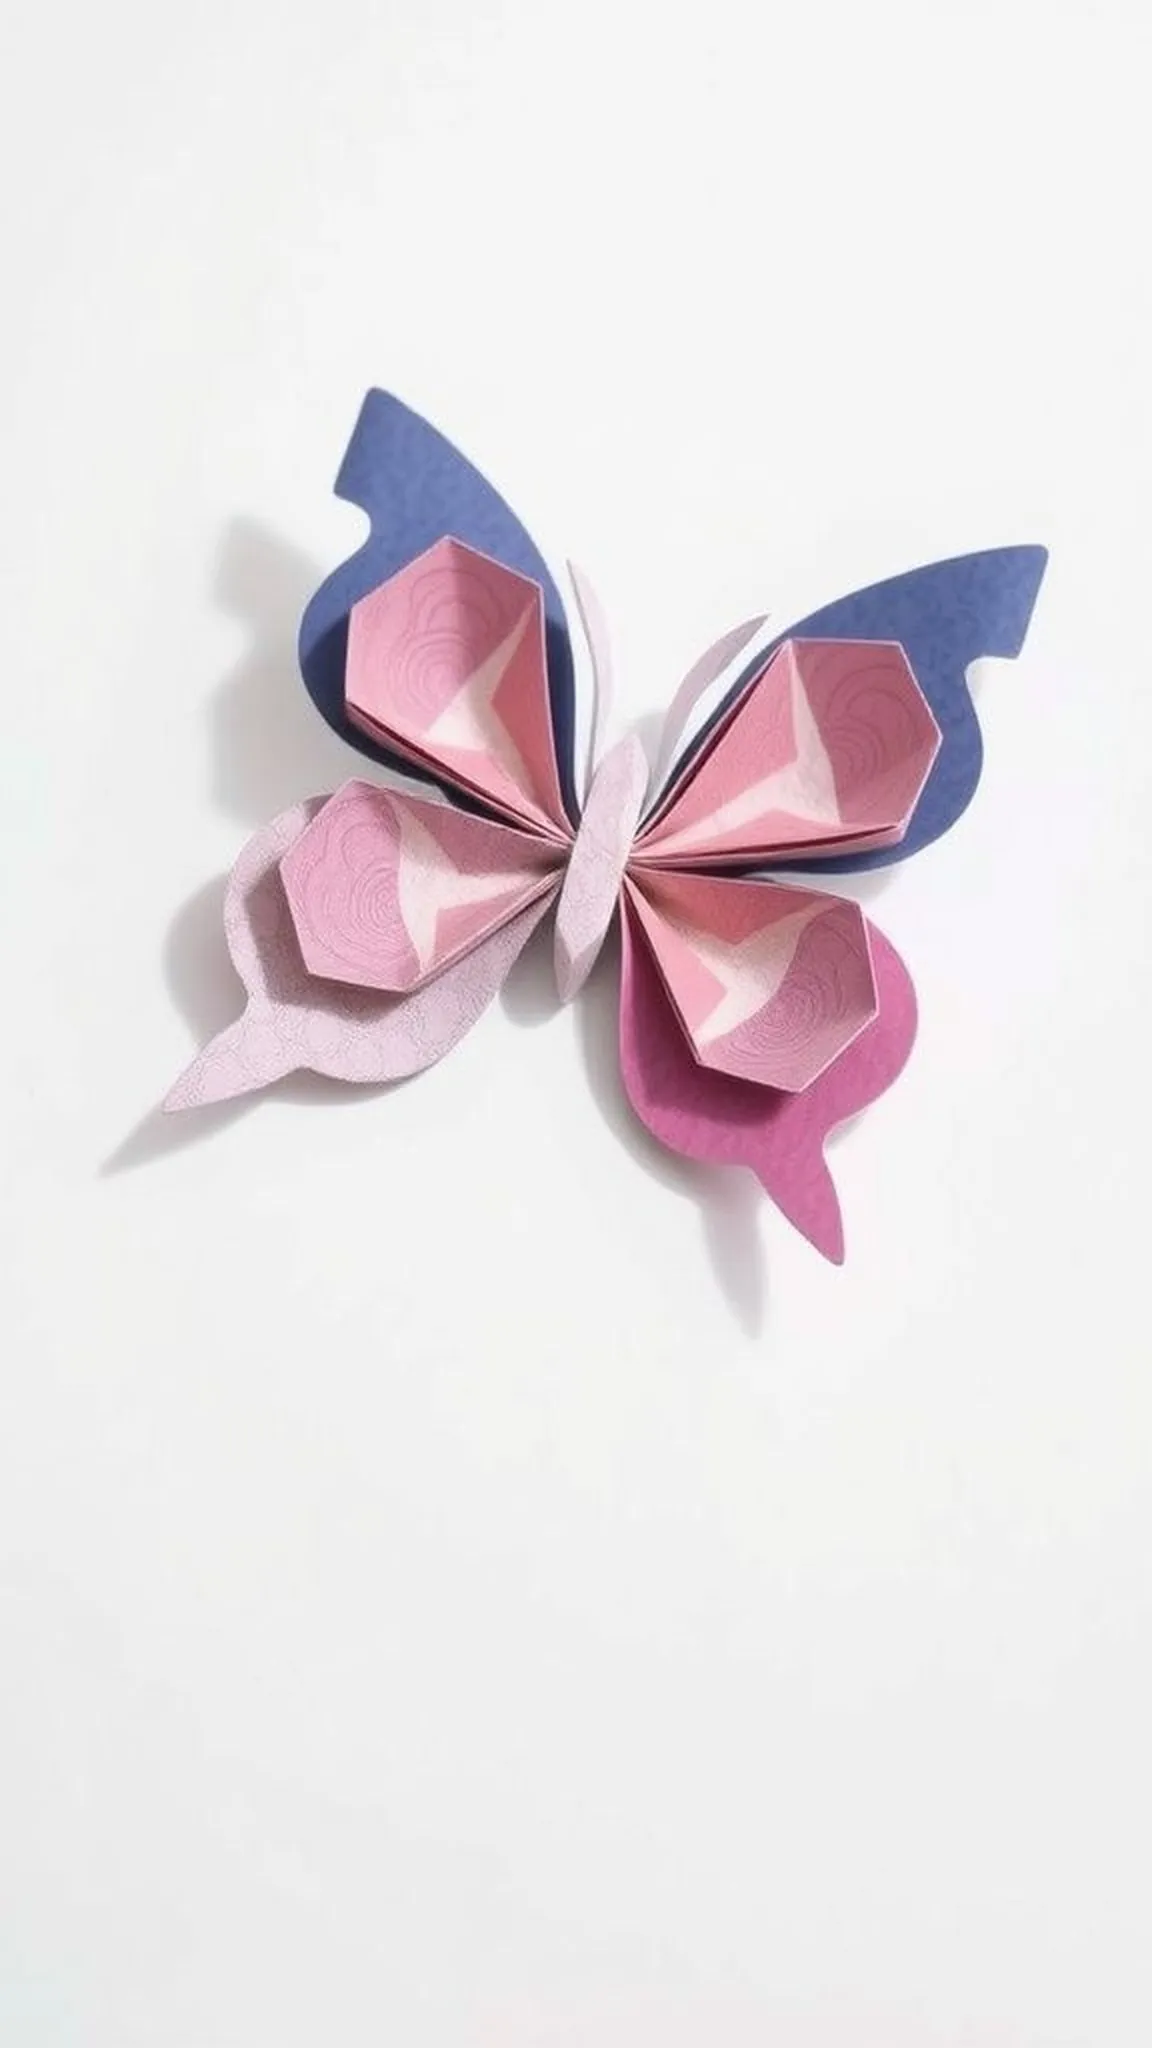
A layered origami butterfly spreads delicate wings that catch light like stained glass. Gentle ruffles and overlapping colors create a sense of fragile movement even when still.
Thin patterned papers with subtle fibers produce a soft sheen along each wing edge. When placed on a tabletop the wings cast layered shadows that shift with the light.
The finished butterfly feels almost like fabric, light and airy under a fingertip. Grouping several in different sizes produces a pleasing fluttering scene on a wall or gift top.
Pro Tip: Use a mix of patterned and solid-weight paper for layered wings that contrast in color and texture without over-thickening the model.
How to Make This
- Start with two square sheets and fold each into a fan-like wing section by creating accordion folds and compressing them gently.
- Attach the wing sections together at their centers with a small adhesive dot to form a balanced butterfly silhouette.
- Form a narrow body from a thin strip of paper and secure it between the wings to complete the shape.
Avoid: Often using too many thick layers makes the wings bulky and hard to shape. Choosing lighter patterned sheets keeps the layered effect light and elegant.
Try Also: Mix bright colors for a playful swarm, use translucent paper for a luminous look, or make tiny versions for card accents.
Products & Materials
Items Used
- square origami paper
- double sided tape dots
“Layered origami butterfly with colorful, fluttering textured wings.”
Sweet origami cat face with tiny whisker details
⏱️ 10 min · 🟢 Beginner
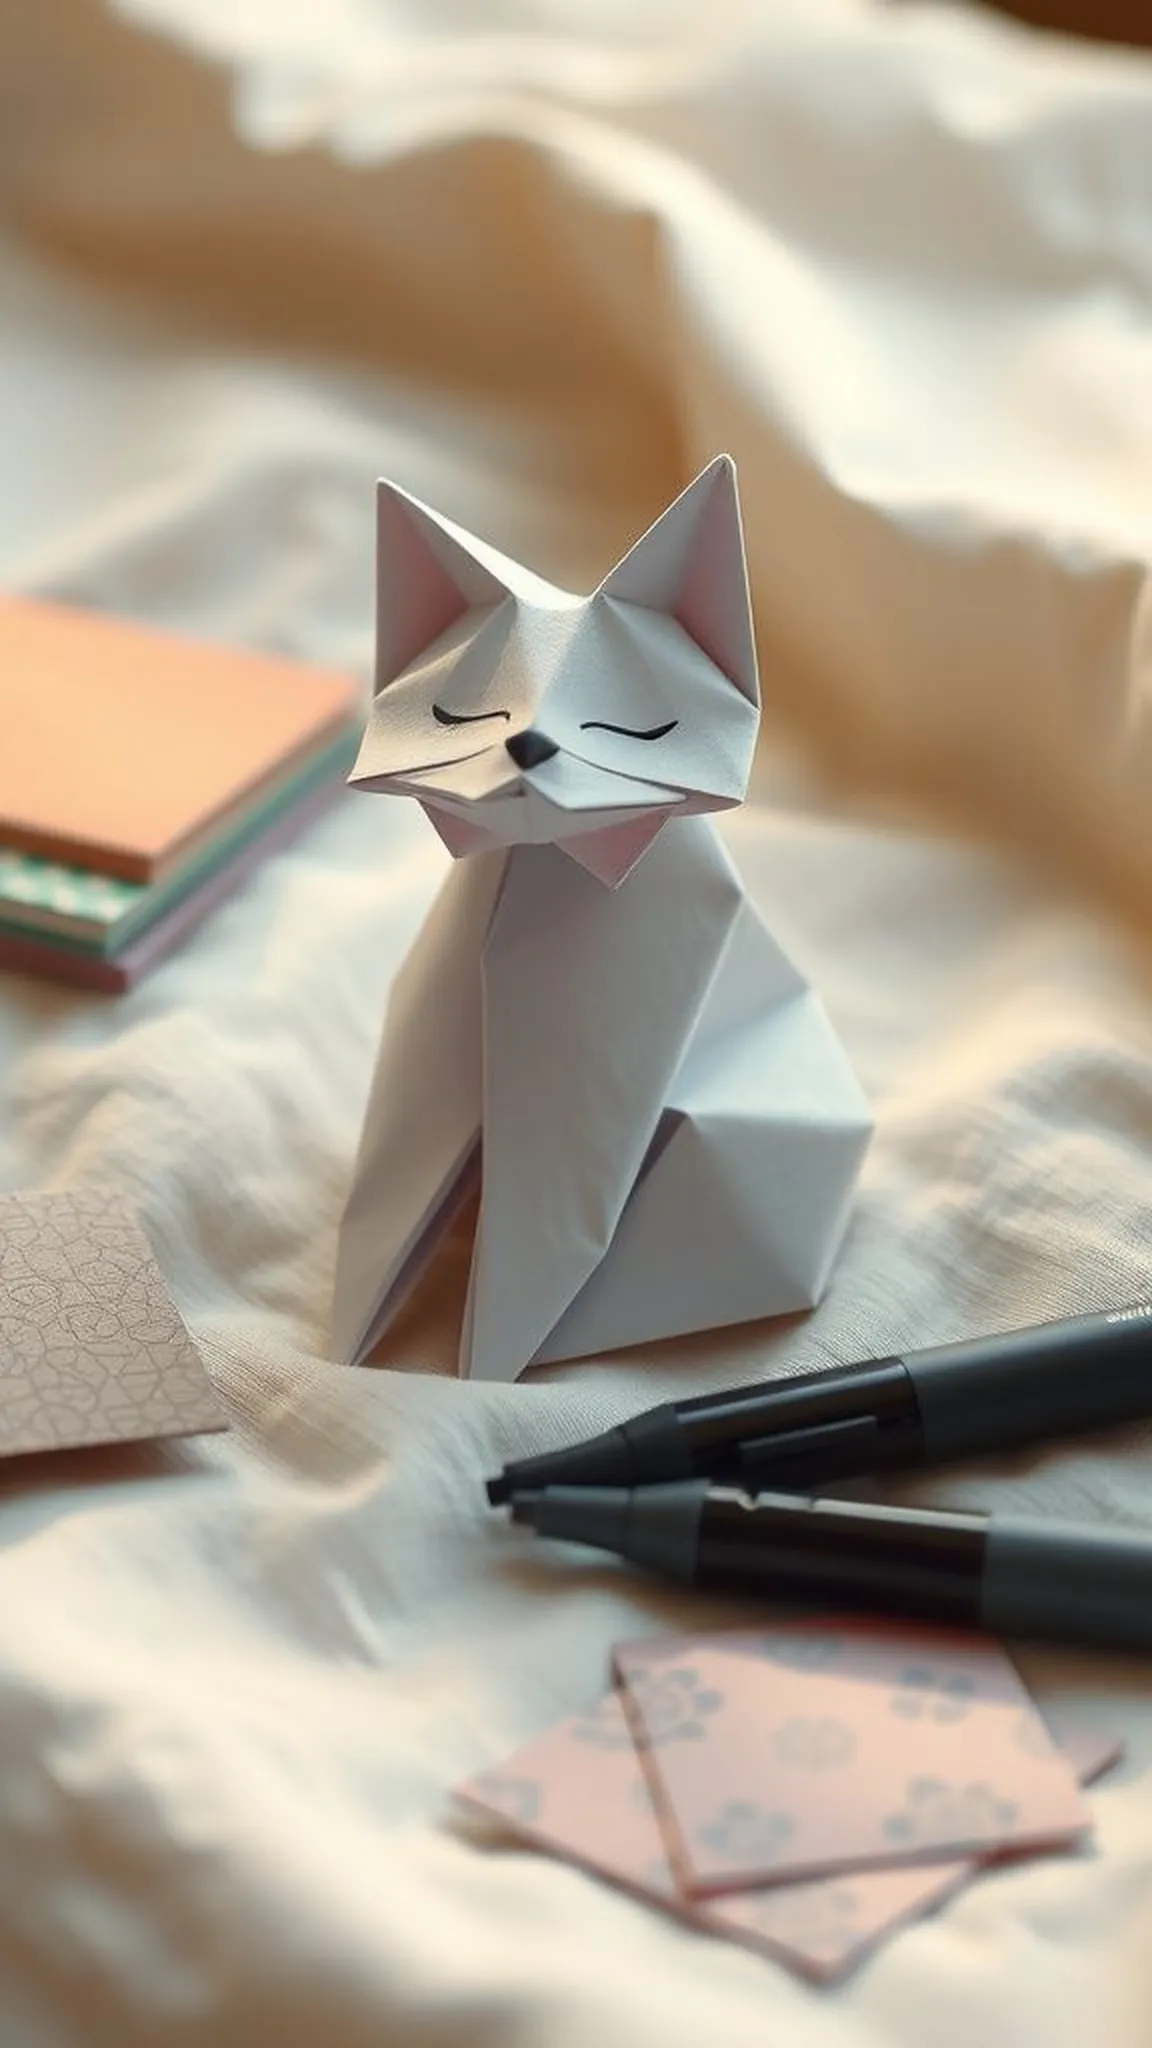
A folded cat face makes an endearing little ornament from a single square of paper. Perky ears and a gently rounded chin form a compact, approachable animal shape.
The texture of the paper becomes part of the expression, with light catching the cheek folds. A few inked strokes give the face warmth and personality that feels almost conversational.
Placed on a shelf the cat face reads like a small paper portrait. A soft shadow from the ears adds a three dimensional hint that invites a smile.
Pro Tip: Pick paper with a subtle texture for a cozy look and use a fine-tip marker for delicate whiskers and facial lines.
How to Make This
- Fold the square into a basic triangular head shape and shape the ear points by folding small triangles upward.
- Form the cheeks with shallow folds to create a rounded face and ensure symmetry across the center line.
- Draw tiny whiskers and a nose with a fine-tip marker to give the cat an expressive face.
Avoid: Often ears are uneven which makes the face look tilted and less polished. Small adjustments to symmetry restore balance and presence.
Try Also: Use patterned paper for a playful kitten, a mottled sheet for tabby markings, or add a tiny paper collar for charm.
Products & Materials
Items Used
“Charming origami cat face with delicate whisker accents.”
Friendly paper dog with floppy ear details
⏱️ 15 min · 🟢 Beginner
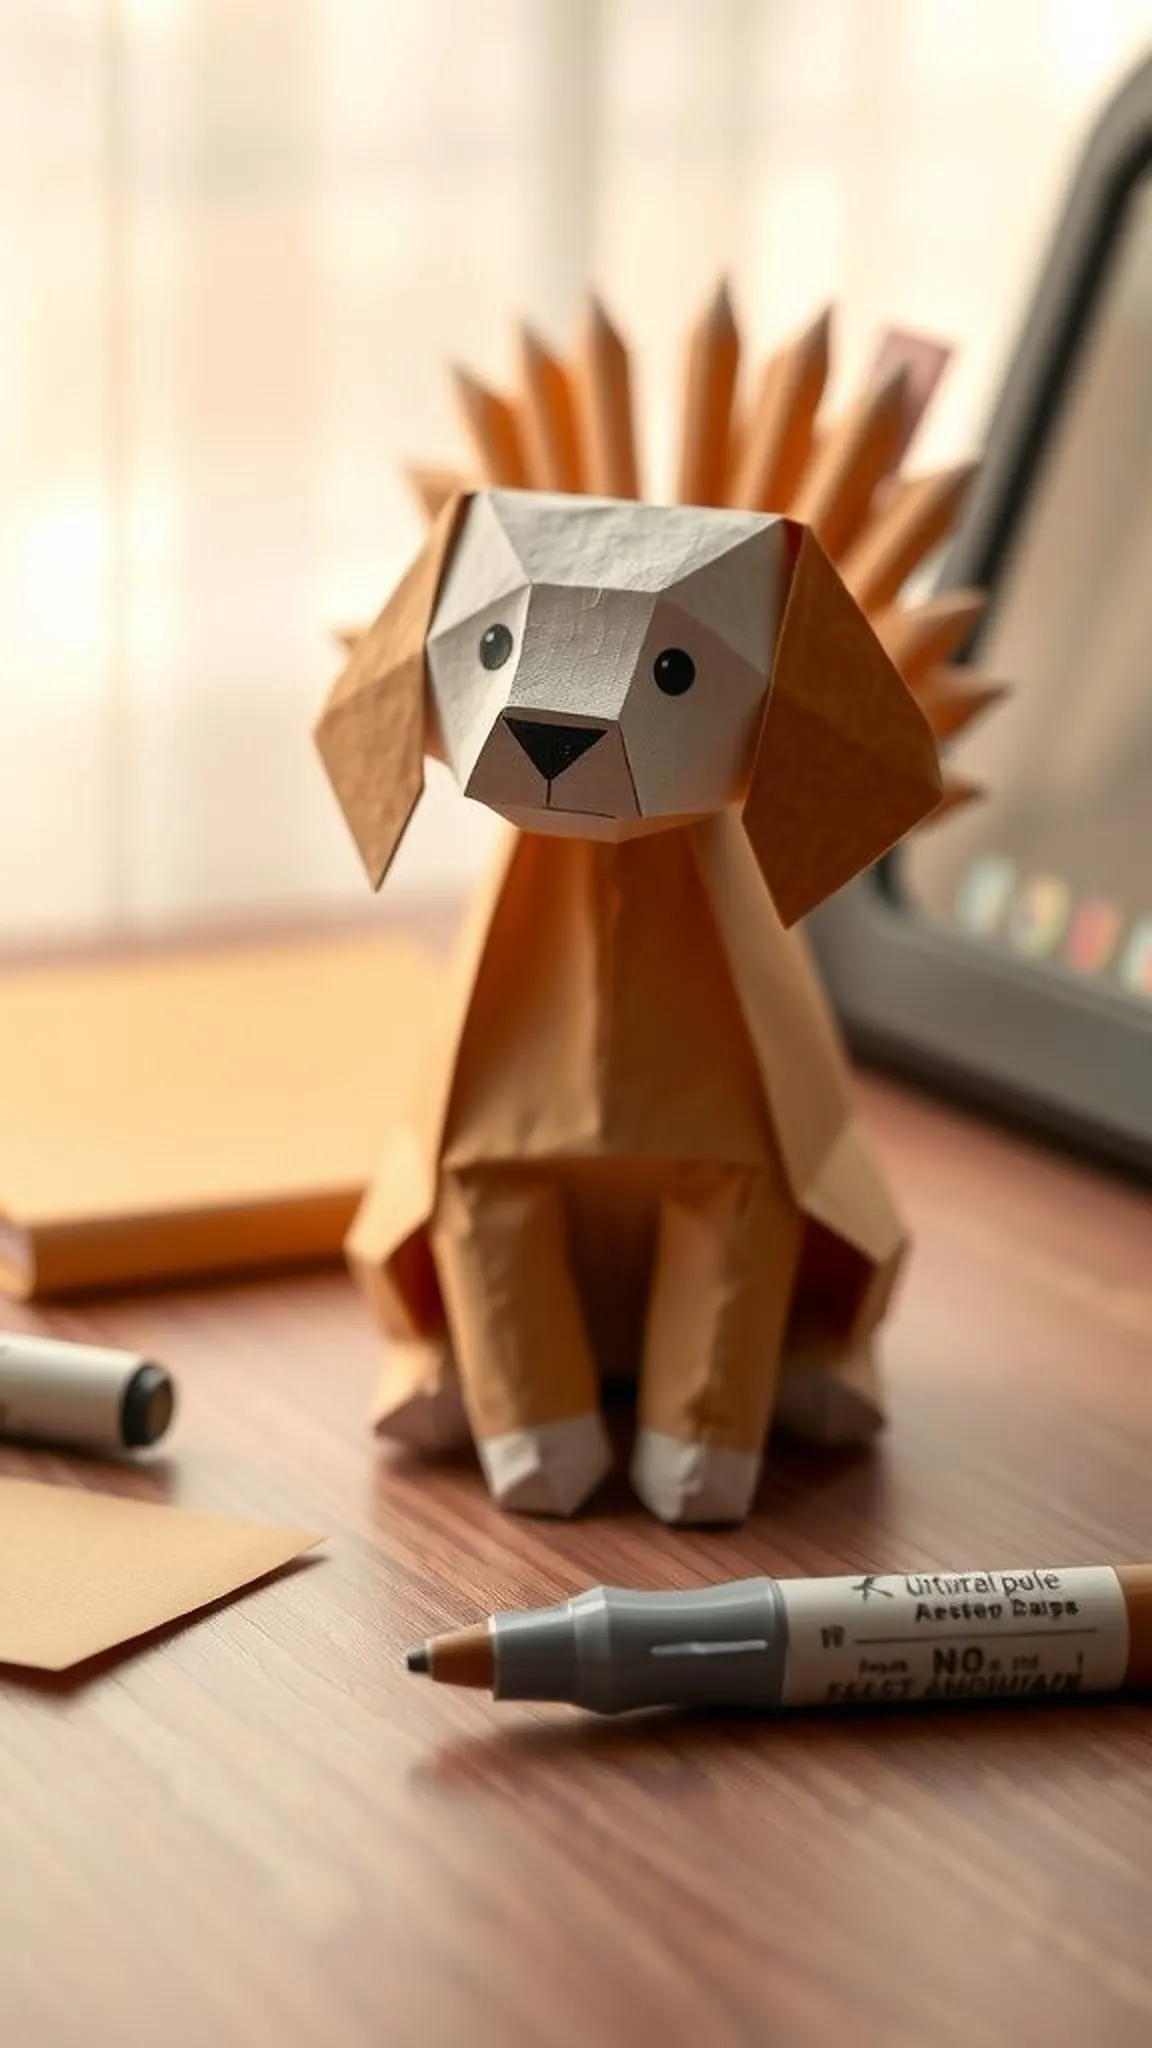
A little paper dog shows off floppy ears and a round snout in a small, cheerful pose. The silhouette reads as friendly and simple, perfect for tags or small tokens.
Warm brown or tan paper brings an instant canine familiarity and invites touch. Tiny drawn eyes and a shaded nose add expression and a soft focal point.
The folds create subtle planes across the face that play against ambient light. Nestling the dog among small objects on a desk gives the scene a cozy, companionable mood.
Pro Tip: Select paper with a gentle grain for natural-looking fur texture and use a micron pen for small facial details.
How to Make This
- Fold the square into a rounded head base and form soft ear shapes by folding outward edges.
- Shape the snout with a small forward fold and refine the cheek contours for a gentle profile.
- Add eyes and a nose with a fine-tipped pen to give the paper dog a warm expression.
Avoid: Often the ears are folded too tightly which hides their floppy character. Softer, shallower ear folds retain a relaxed, doglike look.
Try Also: Try a white sheet with a black nose for a terrier look, or use spotted paper for a playful pattern effect.
Products & Materials
Items Used
“Small folded dog with floppy ears and a friendly face.”
Big-eared paper elephant with a sculpted trunk
⏱️ 30 min · 🟠 Intermediate
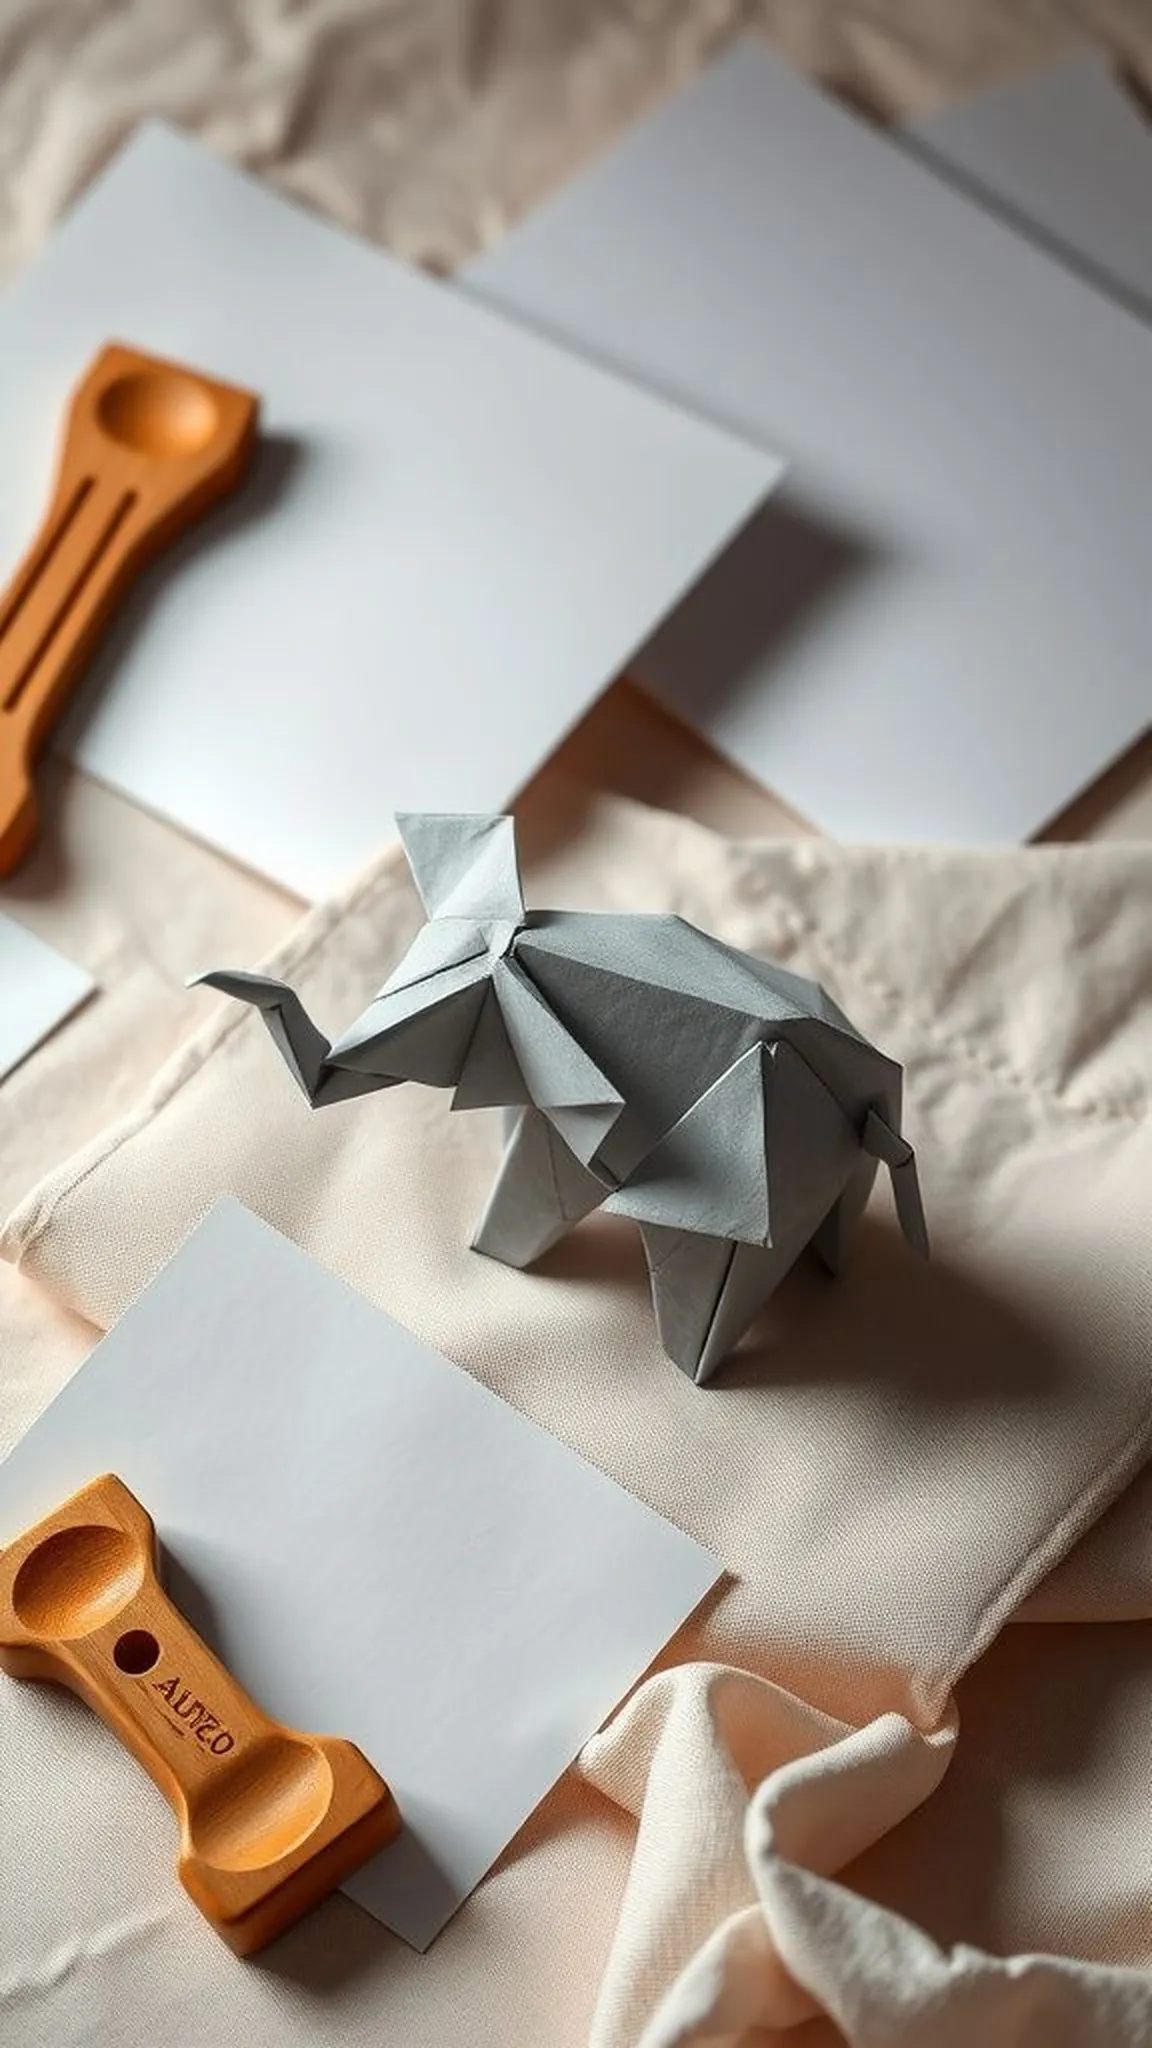
An origami elephant with oversized ears and a gently curved trunk feels surprisingly sculptural. The broad ear planes catch light in a way that highlights the paper grain and form.
Soft grey or patterned sheets provide a subtle, tactile surface that enhances the animal’s weighty presence. The trunk’s gentle curl creates a graceful line that balances the round body.
The finished piece sits with a stout, amiable stance and a tiny shadow under its belly. A fingertip traveling along the trunk enjoys the mild ridge of repeated creases.
Pro Tip: Work with slightly larger sheets for the elephant so ear shaping and trunk curling feel more natural and manageable.
How to Make This
- Begin by forming a broad base and shaping wide ear flaps through outward folds to create the elephant’s signature silhouette.
- Narrow a center section into a trunk and use gentle reverse folds to introduce the curved trunk shape.
- Refine the body proportions with small adjustments to the legs and flatten the base so the elephant stands securely.
Avoid: Often the trunk becomes too stiff when creases are overly compressed, losing its gentle curve. Softer shaping maintains a natural arc and pleasing profile.
Try Also: Use speckled paper for an aged look, make a tiny baby elephant from smaller squares, or add a painted eye for character.
Products & Materials
Items Used
“Sturdy origami elephant with wide ears and a curved trunk.”
Bright origami fish with flowing tail and scales
⏱️ 20 min · 🟢 Beginner

A cheerful paper fish arches its body with a flowing tail that suggests gentle movement. Shiny or patterned paper turns the scales into a shimmering mosaic under light.
Thin papers allow delicate tail frills that seem to ripple with the slightest breeze. The round eye and curved mouth bring a hint of mischief to the tiny face.
Placed against a blue background the fish reads as if suspended in water, soft shadows lending depth. A fingertip across the tail ridge feels the layered folds and light texture.
Pro Tip: Pick a patterned or metallic paper for lively scale effects and keep folds gentle to preserve tail frills.
How to Make This
- Fold the square into a base that narrows toward the tail and form a slightly rounded body shape.
- Create a flowing tail by forming angled folds and slightly curling the tail tips for movement.
- Add a tiny circular eye with a marker and refine the mouth area with a small outward fold.
Avoid: Often the tail folds are creased too sharply which reduces the flowing effect and makes the tail feel rigid. Softer curvature preserves a sense of motion.
Try Also: Use iridescent paper for a shimmering school, try pastel sheets for a calm palette, or make a tiny trio for a display.
Products & Materials
Items Used
“Vibrant origami fish with a flowing, ribbon-like tail.”
Graceful swan silhouette for cards and table accents
⏱️ 25 min · 🟠 Intermediate
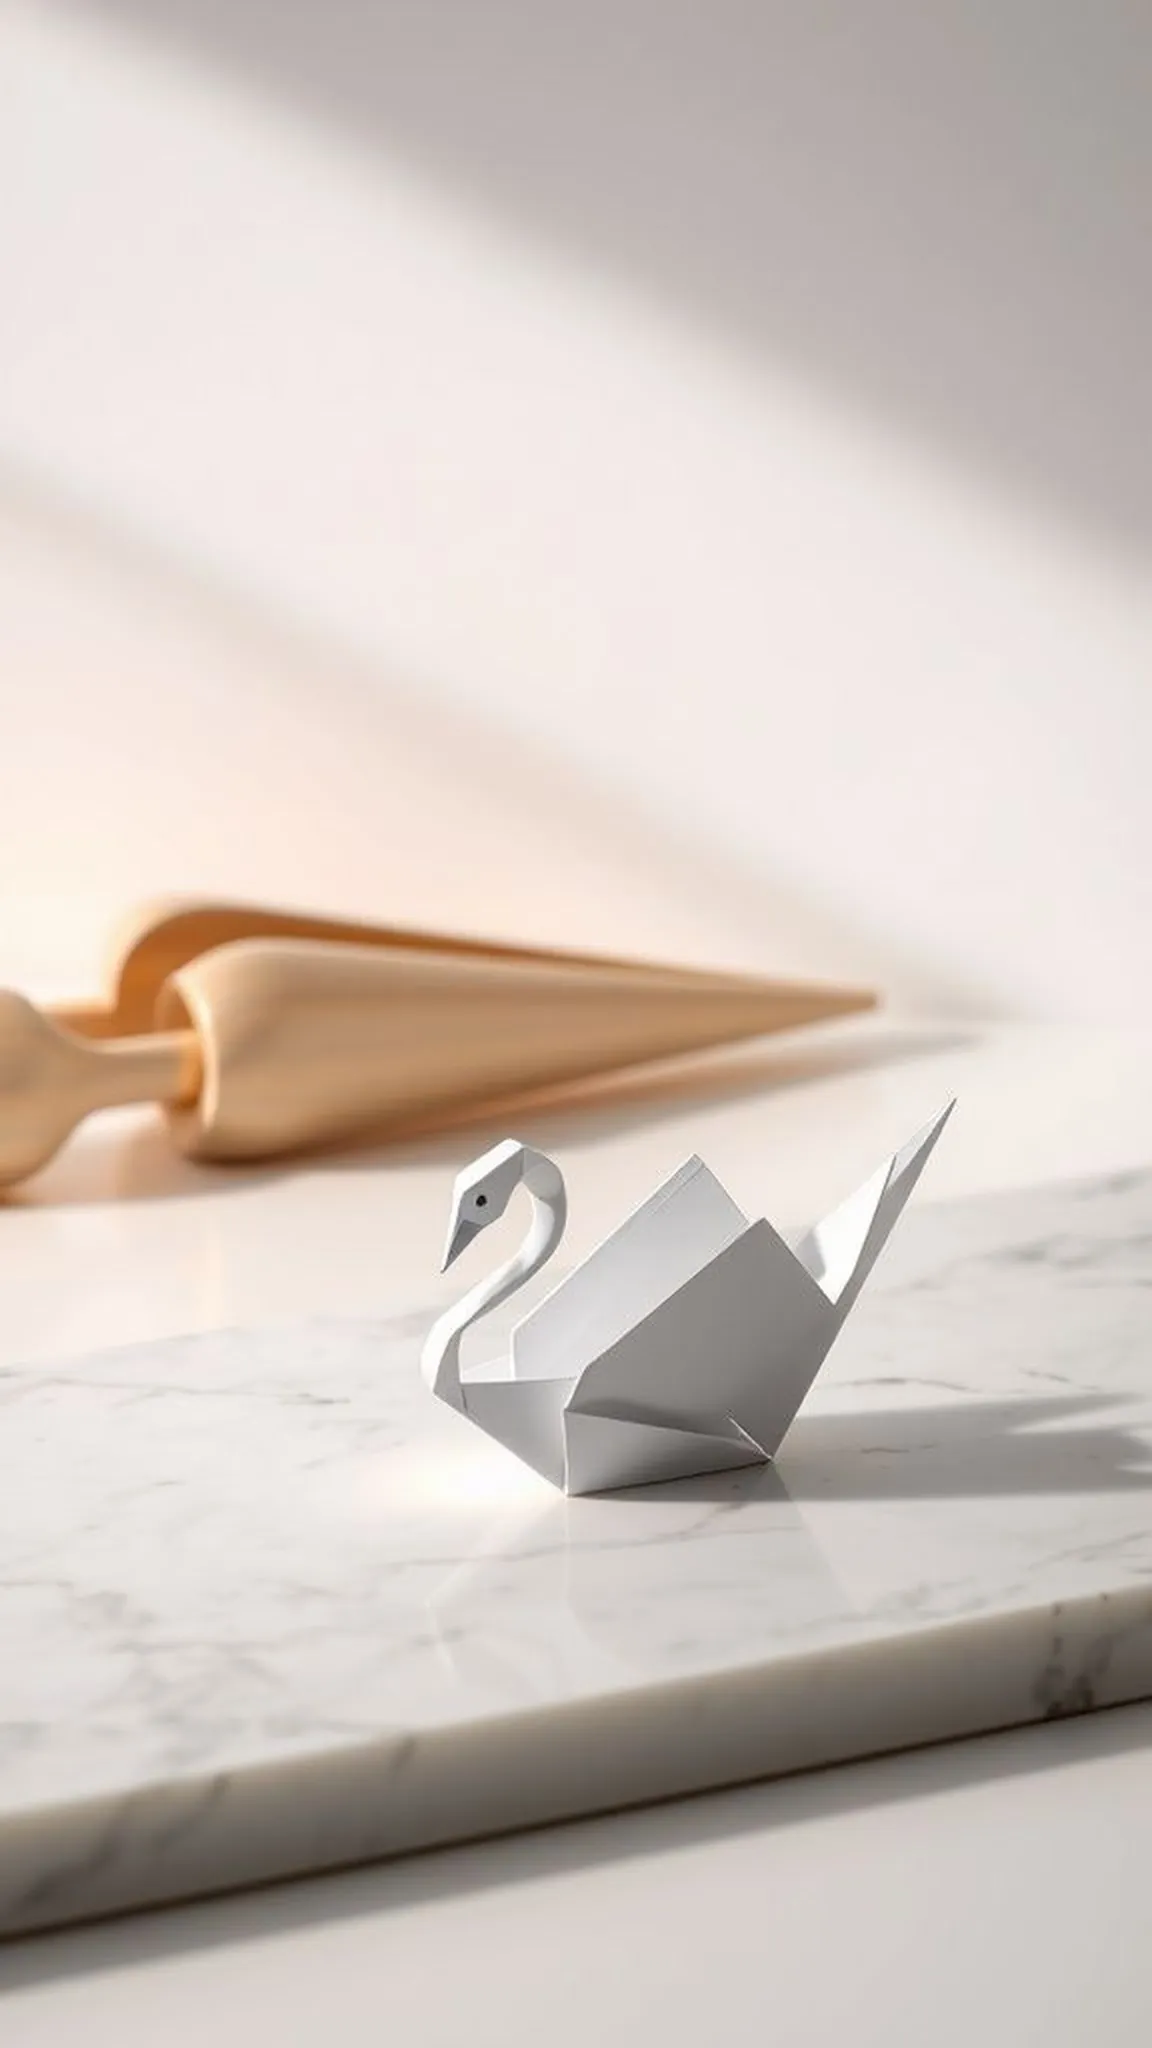
A folded swan offers a long graceful neck and an elegant arched back that reads very refined in white or pearled paper. The slender silhouette casts an elongated shadow that accentuates its classic posture.
The paper’s subtle sheen highlights the neck curve while the body holds a quiet, sculptural weight. When clustered together the swans form a serene paper flotilla with soft reflections.
Tracing the neck with a fingertip reveals faint ridge lines from delicate folds that hint at careful shaping. The finished piece complements stationery, place settings, or a minimalist shelf vignette.
Pro Tip: Work from a slightly larger square for the swan so the neck can be shaped smoothly without crowding the body folds.
How to Make This
- Shape the square into a narrow base and form a slender neck through controlled reverse folds for the elegant curve.
- Refine the body by flattening and shaping the back to create a smooth, balanced silhouette.
- Make a small head tuck and adjust the neck angle to achieve the graceful posture typical of a swan.
Avoid: Often the neck appears too thick when folds are rushed, reducing the elegant profile. Gentle, patient shaping keeps the neck slim and flowing.
Try Also: Use pearlescent paper for a wedding look, make tiny versions for place cards, or color the beak for contrast.
Products & Materials
Items Used
- large square origami paper
- bone folder
“Elegant paper swan with a long neck and refined silhouette.”
Soft-eared paper rabbit that feels like spring
⏱️ 20 min · 🟢 Beginner
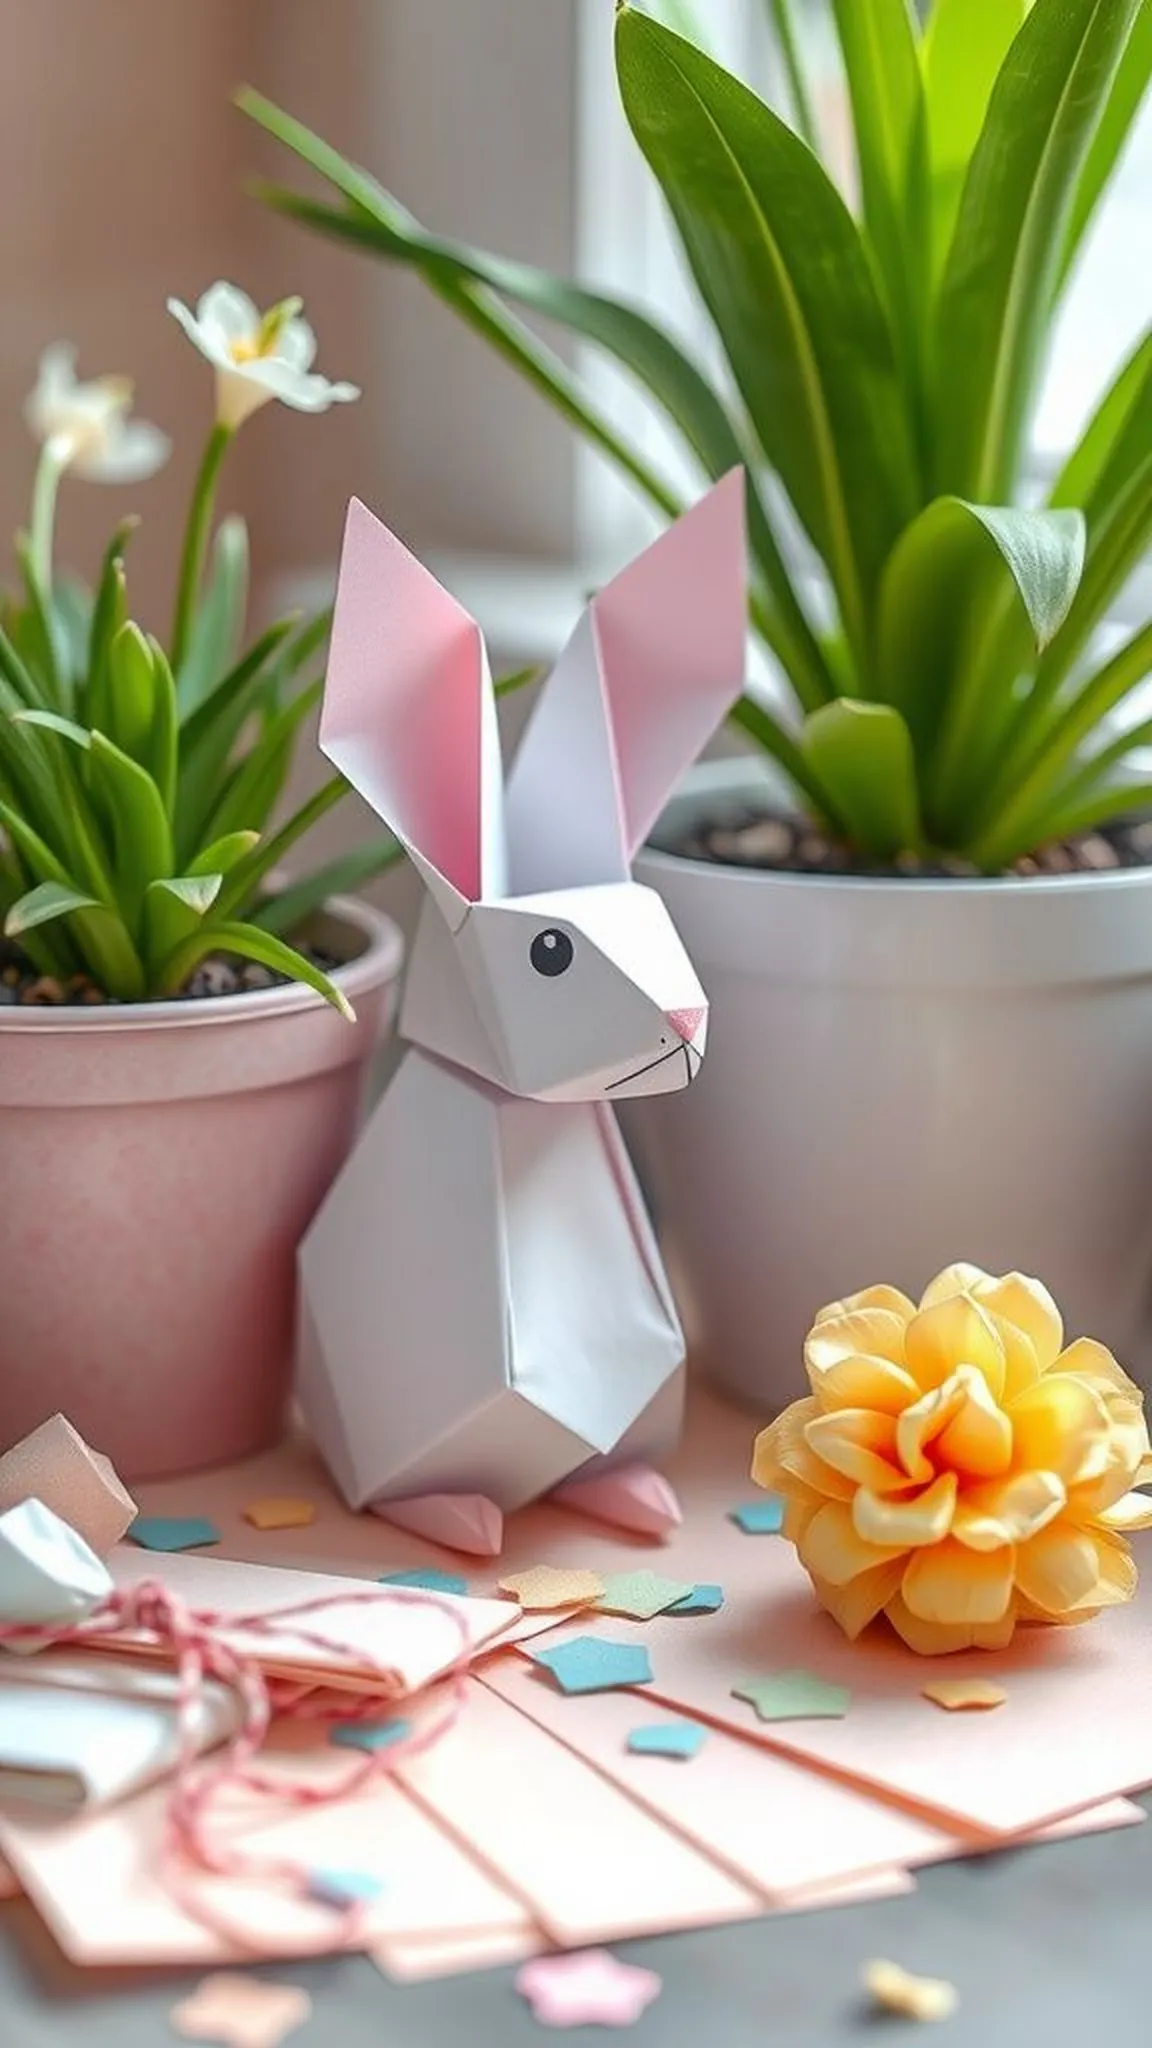
A folded rabbit with long ears and a rounded body evokes a gentle springtime mood. Floppy ear tips and a small face create a quiet, approachable expression.
Pastel or speckled papers add a cozy, tactile look that invites touch. Light falling on the curved back highlights a tender series of soft folds.
The rabbit sits like a tiny companion among potted plants or a stack of books. Its silhouette feels heartwarming and quietly playful in a small vignette.
Pro Tip: Pick a soft pastel sheet and keep ear folds loose so the rabbit’s ears remain floppy and full of character.
How to Make This
- Fold the square into a rounded base and form long ear shapes by folding narrow vertical flaps.
- Shape the face with shallow folds to suggest cheeks and a small muzzle for a gentle expression.
- Tuck a small tail fold at the back and adjust ear angles to enhance the rabbit’s posture.
Avoid: Often the ears are folded too tightly which makes them stiff instead of soft and floppy. Gentle, shallow folds preserve a relaxed look.
Try Also: Make tiny bunny pairs for a spring display, use mottled paper for a natural fur effect, or add a tiny pompom tail.
Products & Materials
Items Used
- square origami paper
- small pompom
“Adorable origami rabbit with long floppy ears and soft curves.”
Interactive flapping bird that moves with a pull
⏱️ 30 min · 🟠 Intermediate
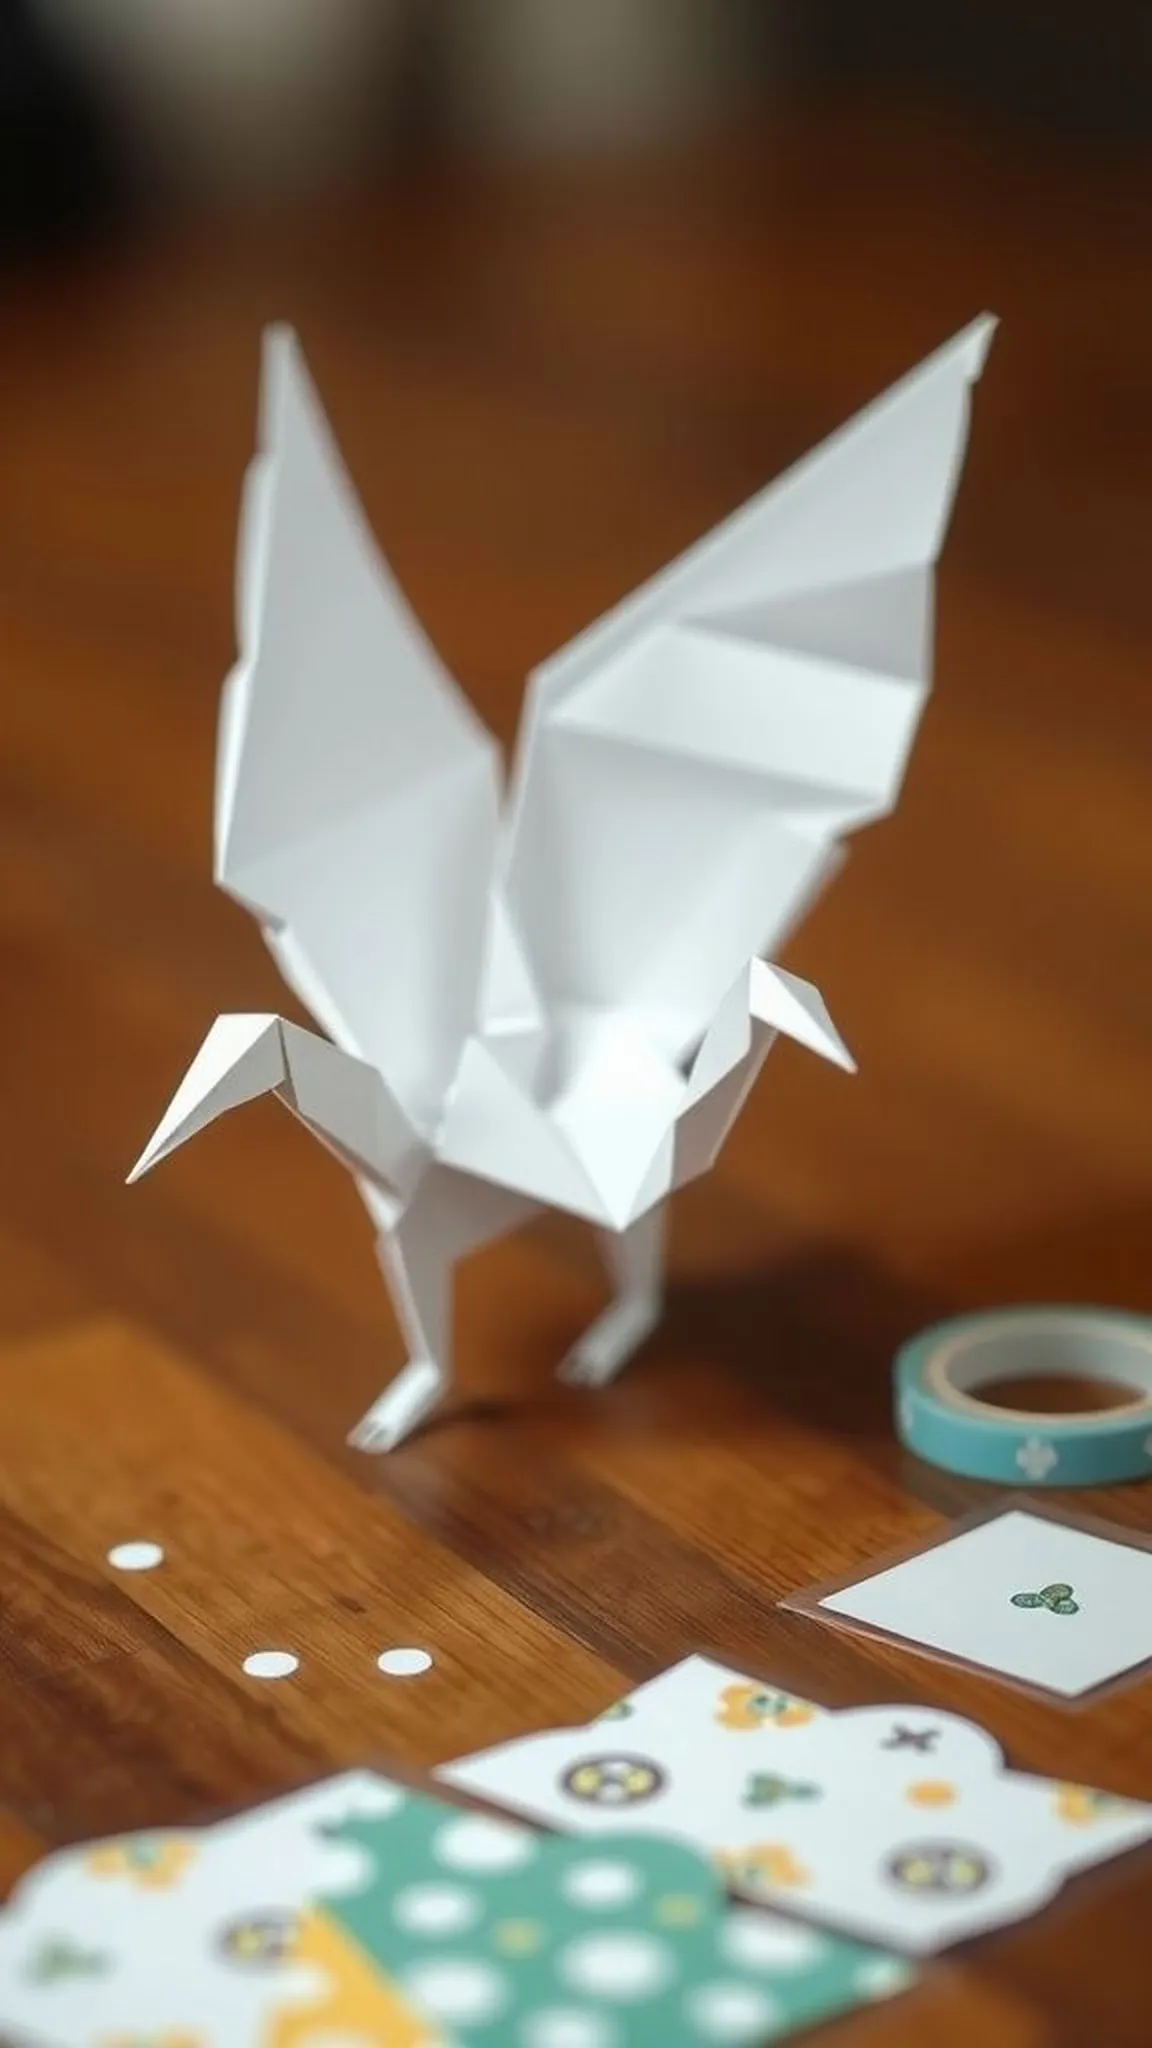
The flapping bird gives a delightful sense of motion when the tail is tugged and the wings respond. Balanced layers and a clever central hinge make the action feel lively and kinetic.
Shiny or patterned wings create a visual flutter as they catch the light during movement. The body stays compact while the wings open and close in a satisfying rhythm.
Testing the mechanism on a flat surface highlights how small adjustments change the motion and timing. The finished bird makes an engaging desk companion or a playful gift tag.
Pro Tip: Ensure creases at the central hinge are crisp but not overly tight so the wings can move freely with gentle pulls.
How to Make This
- Construct a bird base with an internal hinge by folding symmetrical wing sections and creating a central movable flap.
- Refine the wing shapes and ensure the hinge creases allow the wings to open and close smoothly.
- Test the mechanism by pulling the tail flap and make small crease adjustments to balance the motion.
Avoid: Often hinge creases are too stiff which prevents smooth wing movement and causes jerky action. Softer, even creases improve the flapping motion.
Try Also: Create a flock in varying sizes for a kinetic display, use transparent paper for ethereal wings, or add painted tips for contrast.
Products & Materials
Items Used
- square origami paper
- double sided tape dots
“Playful flapping paper bird that moves when pulled gently.”
Tiny origami turtle with layered shell texture
⏱️ 25 min · 🟠 Intermediate
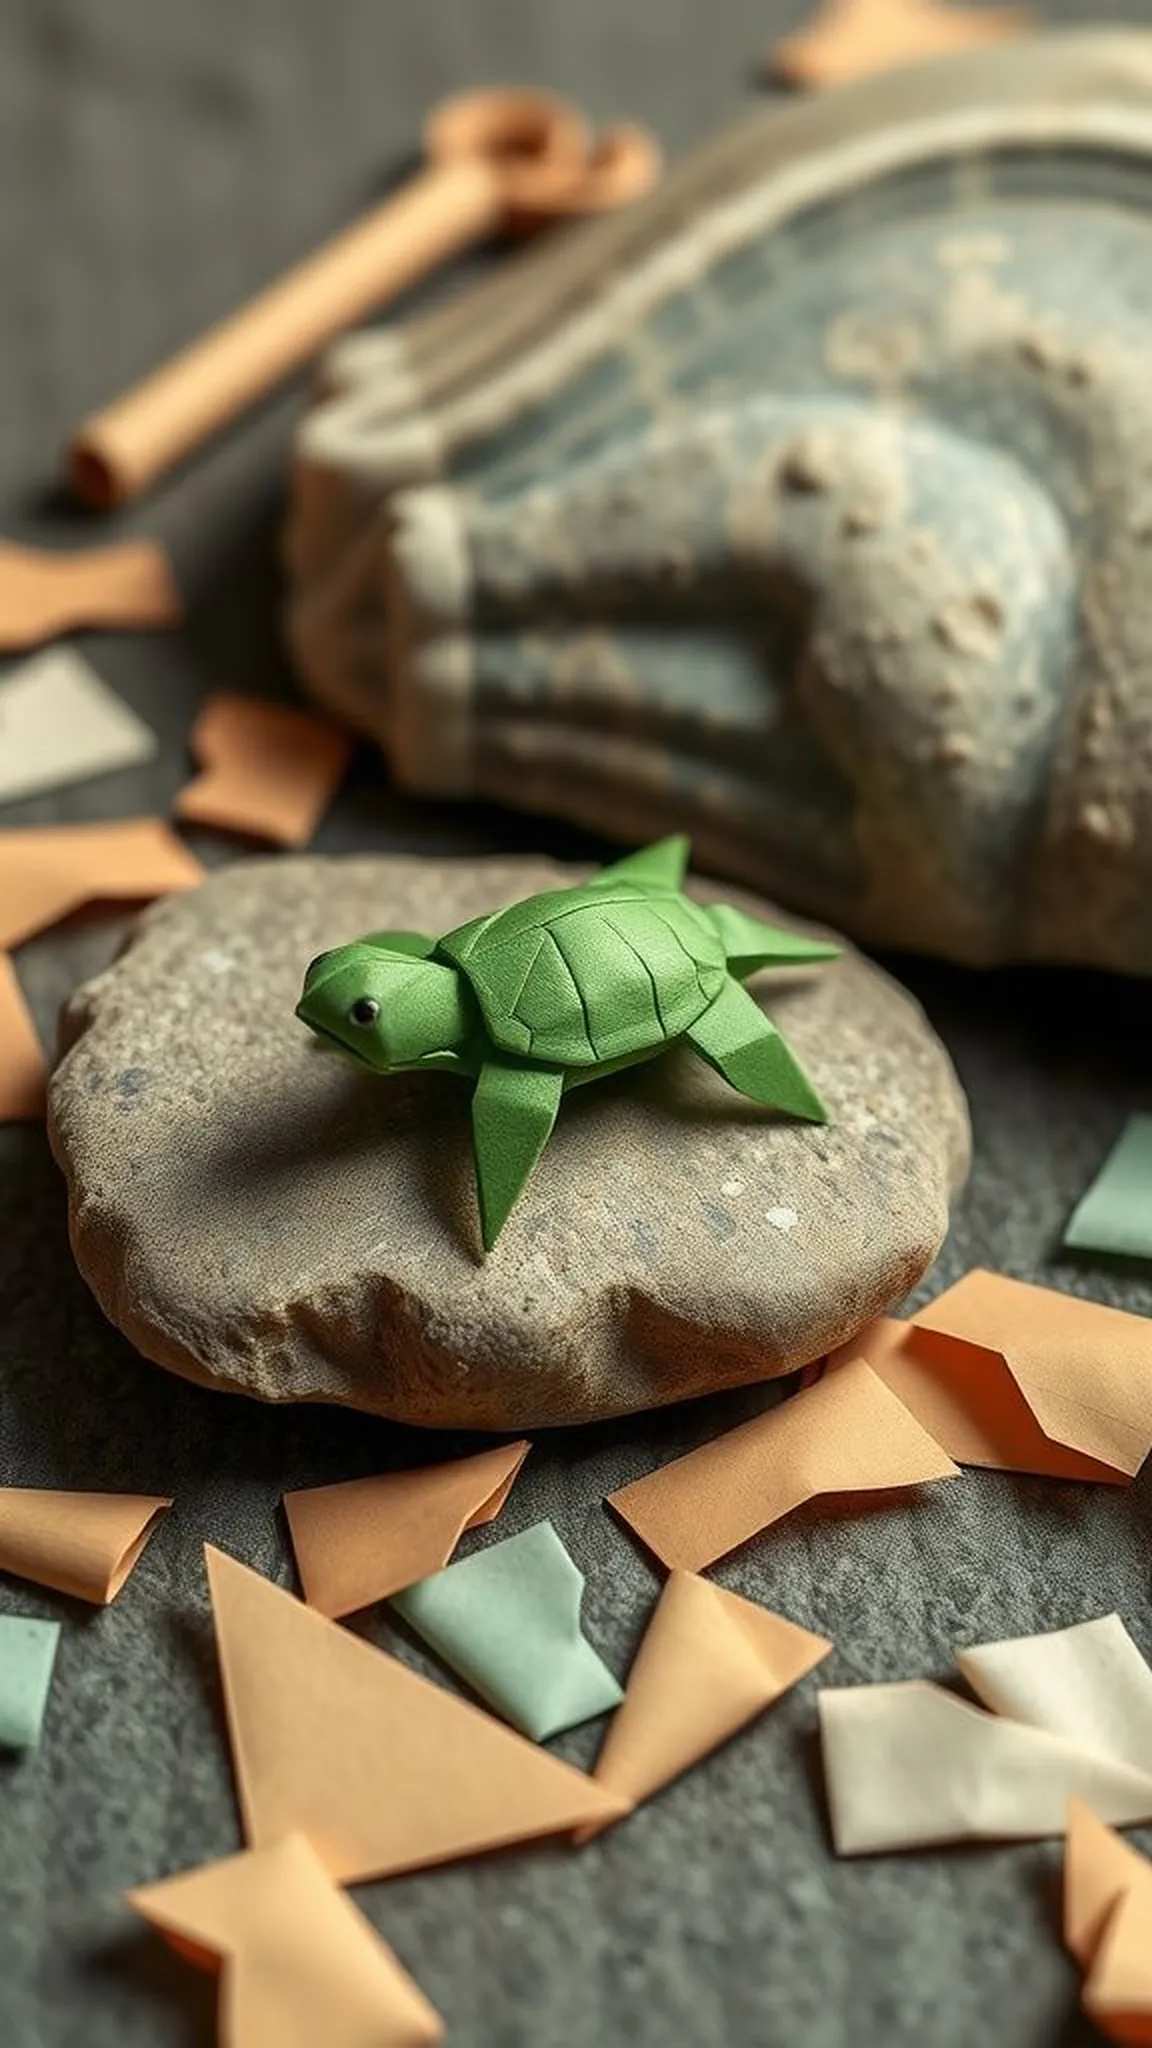
A folded turtle presents a compact shell with layered folds that feel tactile under the fingertips. The dome of the shell catches shadows and reveals the careful pleating inside.
Matte green or mottled paper gives a sturdy, earthy quality to the tiny creature. The short legs and stubby head peek out charmingly from beneath the curved shell.
The turtle sits with a calm, grounded presence that pairs well with pebble displays. Each small fold invites a gentle tracing motion that is oddly soothing.
Pro Tip: Work with slightly thicker paper for the shell layers so the pleats hold their rounded shape without collapsing.
How to Make This
- Form a compact base and pleat the top area into layered shell folds to build a rounded dome.
- Shape the head and limbs by forming small outward folds that peek out beneath the shell.
- Refine the shell curvature by carefully softening some pleats and reinforcing others for a balanced dome.
Avoid: Often pleats are pressed too flat which reduces the shell’s rounded look and makes the model lose dimension. Gentle shaping keeps the dome intact.
Try Also: Use speckled paper for a rock-like shell, make tiny hatchlings from smaller squares, or paint subtle patterns for interest.
Products & Materials
Items Used
“Charming origami turtle with a textured layered shell.”
Whale with a curved tail and friendly smile
⏱️ 20 min · 🟢 Beginner

A folded whale offers a broad belly and a gently curved tail that feels tranquil and substantial. The silhouette reads playful when made from deep blue or ocean-toned paper.
Light plays along the body curve, emphasizing the paper’s grain and the subtle ridge where tail meets body. A small inked eye and a lifted tail tip add a cheerful, maritime personality.
Grouped with paper waves the whale feels part of a tiny seascape that recommends a calm, breezy display. The folds produce gentle ridges that are pleasant to follow with a fingertip.
Pro Tip: Choose slightly larger paper to allow smooth tail shaping and an elegant belly curve without compressing layers.
How to Make This
- Fold the square into a broad, rounded base to form the whale’s belly and mark the tail section with a shallow crease.
- Shape the tail with a gentle outward fold and refine the body curves so the whale sits steadily.
- Add a tiny eye with a fine marker and adjust the tail angle for a friendly posture.
Avoid: Often the tail is folded too flat which makes the whale appear lifeless instead of gently curved. Slightly lifting the tail creates a lively profile.
Try Also: Use textured paper for a deep-sea feel, add a tiny spray of paper water, or make a pod of whales in graduated sizes.
Products & Materials
Items Used
“Sweet origami whale with curved tail and gentle expression.”
Minimal penguin with contrasting belly and tiny beak
⏱️ 15 min · 🟢 Beginner
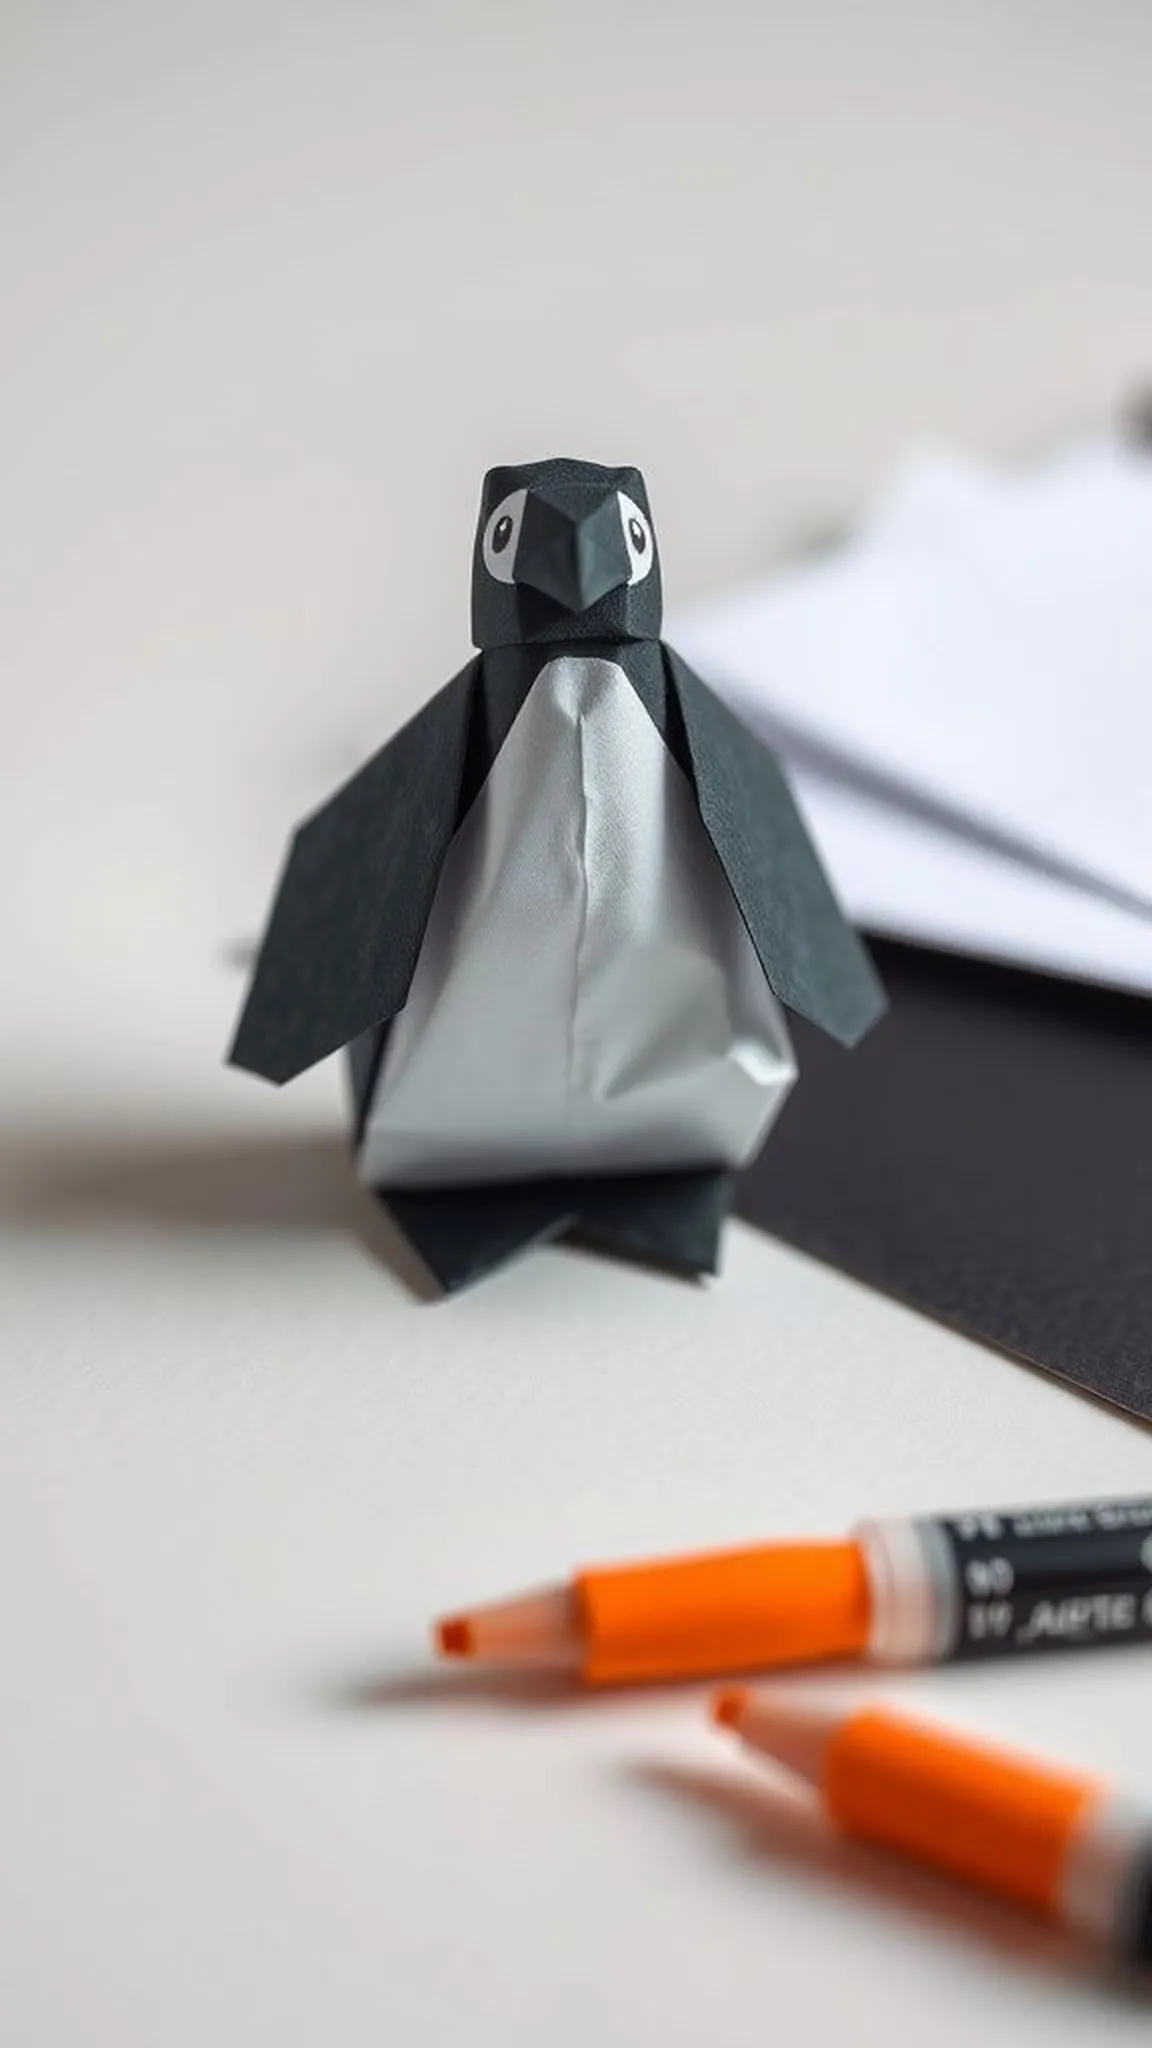
A simple penguin uses contrasting paper to create a bold two-tone look that reads immediately as seabird. The rounded belly and short flippers form a compact, approachable figure.
Black and white papers produce crisp edges where the belly meets the back, and a tiny orange beak offers a bright focal point. The small shape sits sturdily and feels pleasantly squat in hand.
Placing a row of little penguins on a shelf creates a playful, graphic scene. The paper planes and soft shadows make the group feel animated even at rest.
Pro Tip: Use a single sheet with a white underside or combine two sheets for the cleanest contrasting belly and back.
How to Make This
- Fold a black square to expose a white interior section for the belly and shape the body into a rounded, compact form.
- Form short wing flaps and a tiny beak by folding a small colored triangle at the head area.
- Tidy edges and flatten the base so the penguin stands upright on a surface.
Avoid: Often the belly contrast is off-center which makes the penguin look asymmetrical. Aligning the centerline while folding keeps the color boundary even.
Try Also: Make a tuxedo trio with varied beak colors, or use sparkly black paper for a festive twist.
Products & Materials
Items Used
“Charming two-tone penguin with a tiny beak and bold silhouette.”
Playful folded dragon head with spiky ridge accents
⏱️ 45 min · 🔴 Advanced
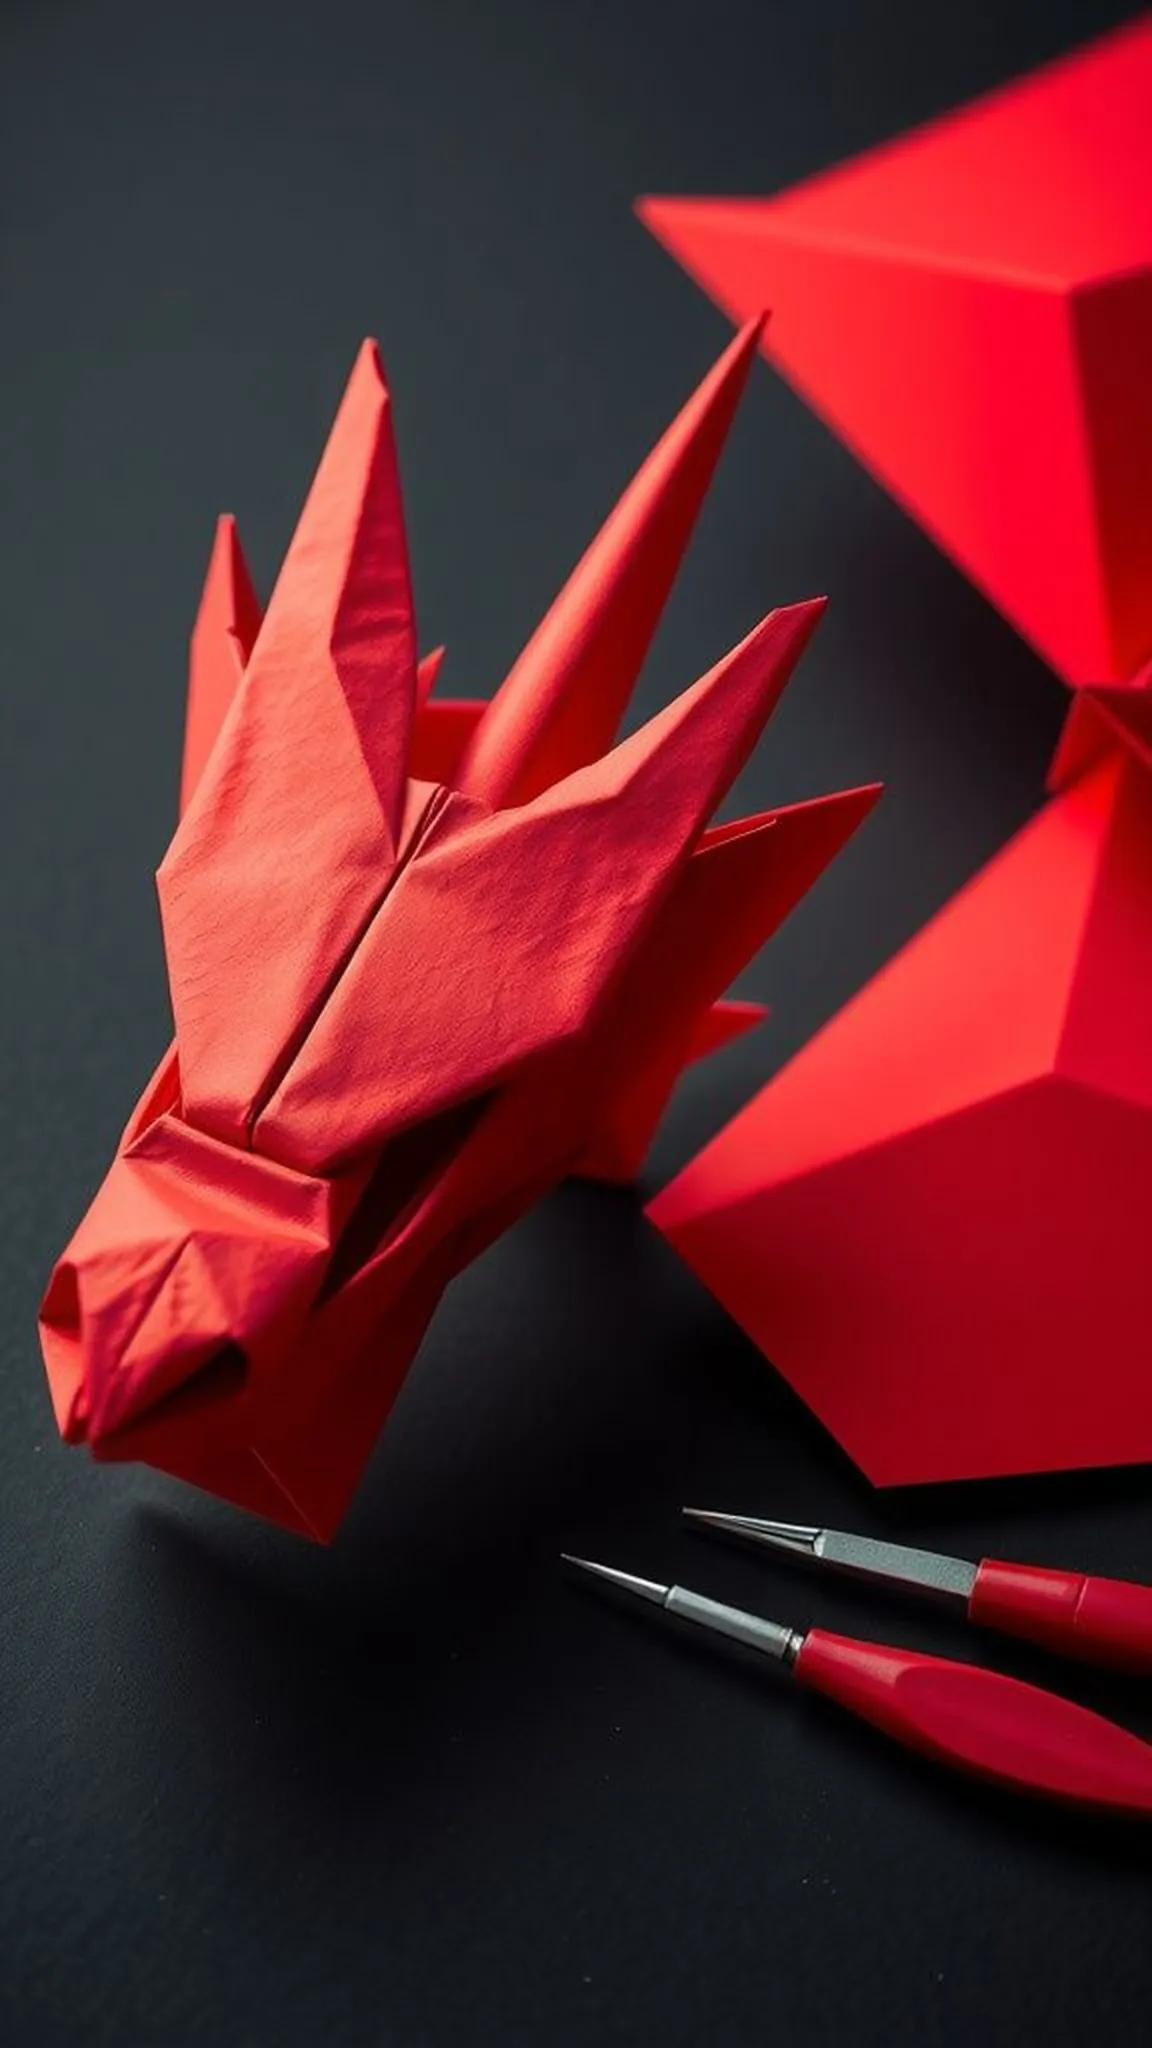
A folded dragon head shows dramatic angles, a tapered snout, and a row of spiky ridges along the crown. The paper’s edges become teeth and scales that create a tactile, striking profile.
Deep red or metallic paper lends an intense, theatrical presence and highlights each sharp plane. The jaw line and eye ridge catch hard light differently, producing dramatic contrast and character.
When displayed alone the head reads like a small sculptural mask with fierce personality. The ridged spine invites a careful touch and rewards attention with a rich textural feel.
Pro Tip: Work slowly with a slightly larger, strong paper to manage complex ridges and narrow snout folds without tearing.
How to Make This
- Begin with a larger square and form a long pointed snout using multiple narrowing folds to create the tapered head.
- Build the ridge along the crown with a sequence of small pleats that form the dragon’s spiky crest.
- Shape jaw and eye areas with precise reverse folds and reinforce prominent edges for a defined, sculptural look.
- Refine tiny details and sharpen ridges by carefully re-creasing troublesome areas for crispness.
Avoid: Often folds become crowded and paper weakens at tight ridges, causing small tears. Using larger, stronger paper and gentle pressure reduces tearing risk.
Try Also: Try metallic paper for a fierce sheen, go monochrome for a graphic look, or scale up for a dramatic wall display.
Products & Materials
Items Used
“Dramatic origami dragon head with spiky sculptural ridges.”
