
As an Amazon Associate I earn from qualifying purchases.
Classic Home Craft Projects gather simple, timeless ideas that bring warmth and personality to everyday rooms. These classic home craft projects and traditional home crafts invite tactile pleasures and familiar materials for cozy results.
Each project highlights approachable techniques and enduring styles that fit many interiors and lifestyles. A mix of classic home craft projects and timeless DIY home projects makes it easy to refresh corners with texture, color, and small handmade accents.
Attention to texture, scent, and soft light often defines the charm of these projects and their quiet appeal. Exploring classic home craft projects reveals approachable ways to add handcrafted details that feel homey and lived-in.
Mason jar candle holders with rustic charm
⏱️ 30 min · 🟢 Beginner
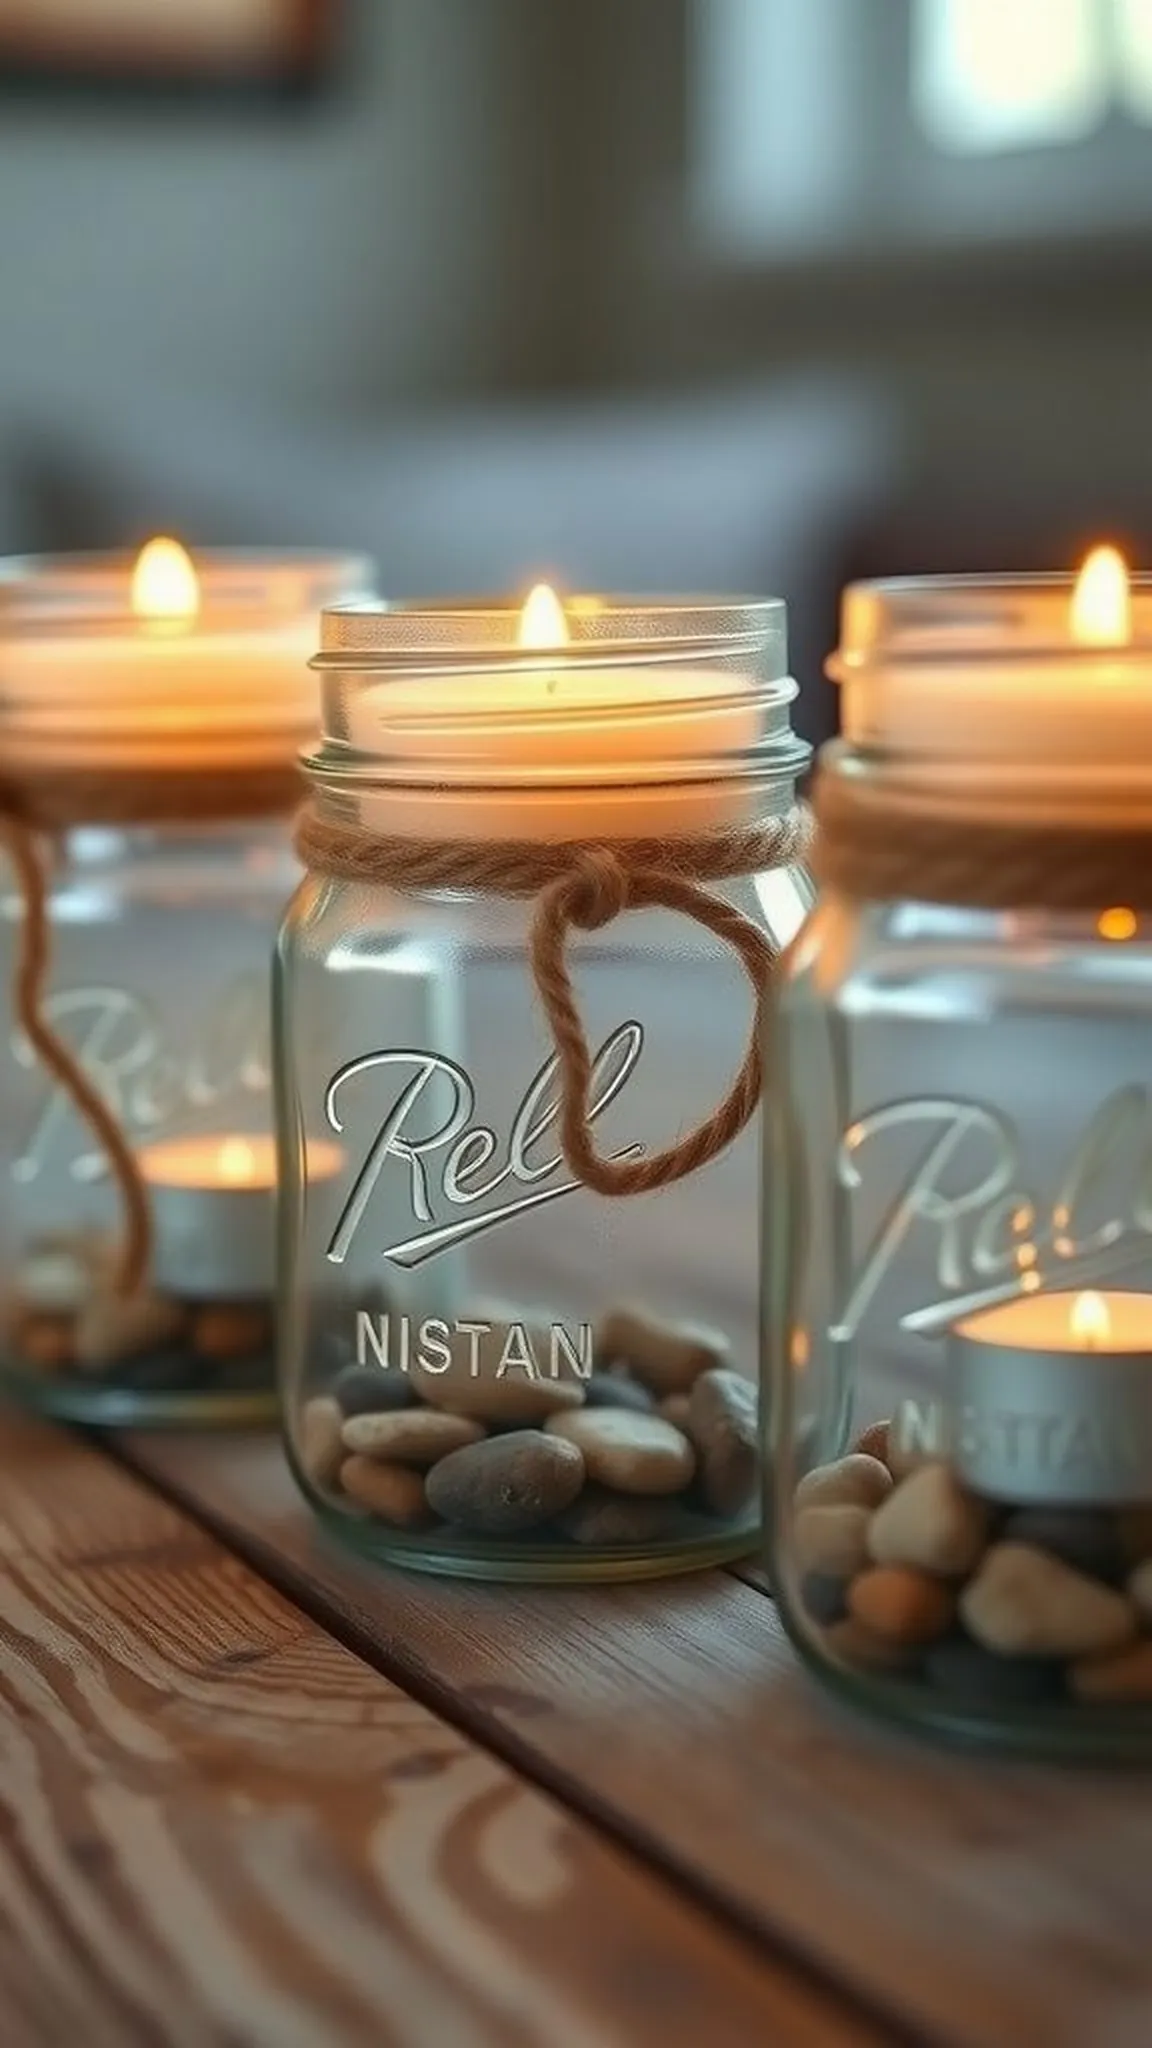
Glass jars catch warm light and create a gentle, flickering atmosphere that softens a tabletop. The cool smoothness of glass contrasts with rough twine and tiny pebbles, producing a pleasing tactile mix.
A faint scent can rise from a small flame while shadows dance against nearby surfaces for a relaxed, evening mood. The overall effect is inviting and quietly handcrafted without feeling fussy.
Natural materials like jute or hemp introduce an earthy note while clear jars reflect candlelight with a subtle shimmer. A grouping of jars in varied heights feels collected and casual on a wooden surface.
Pro Tip: Select wide-mouth jars and unscented candles to keep flame size balanced and to preserve a clean glass finish during use.
How to Make This
- Gather a few clean mason jars, unscented tealight candles, natural jute twine, and a small bag of river pebbles.
- Pour a shallow layer of pebbles into each jar to create weight and a textured base for the candle.
- Center a tealight candle on the pebbles and wrap twine around the jar neck several times, tying a small knot or bow.
- Arrange jars in a cluster on a wooden tray or table, varying heights for a relaxed, collected look.
Avoid: A frequent beginner mistake is using long-burning scented candles that leave residue on the glass and discolor the jar. Choosing unscented, low-profile candles helps preserve clarity and prevents excess soot buildup.
Try Also: Glass jars with frosted finishes offer a softer, diffused glow while thin ribbon or lace lends a delicate, vintage vibe. Small sprigs of dried lavender inside add subtle scent and a natural accent to the glass grouping.
Products & Materials
Items Used
- mason jars
- unscented tealight candles
- natural jute twine
- river pebbles
“Rustic mason jar candle holders for cozy, collected tabletops.”
Knotted macrame plant hanger for hanging greens
⏱️ 2 hours · 🟠 Intermediate
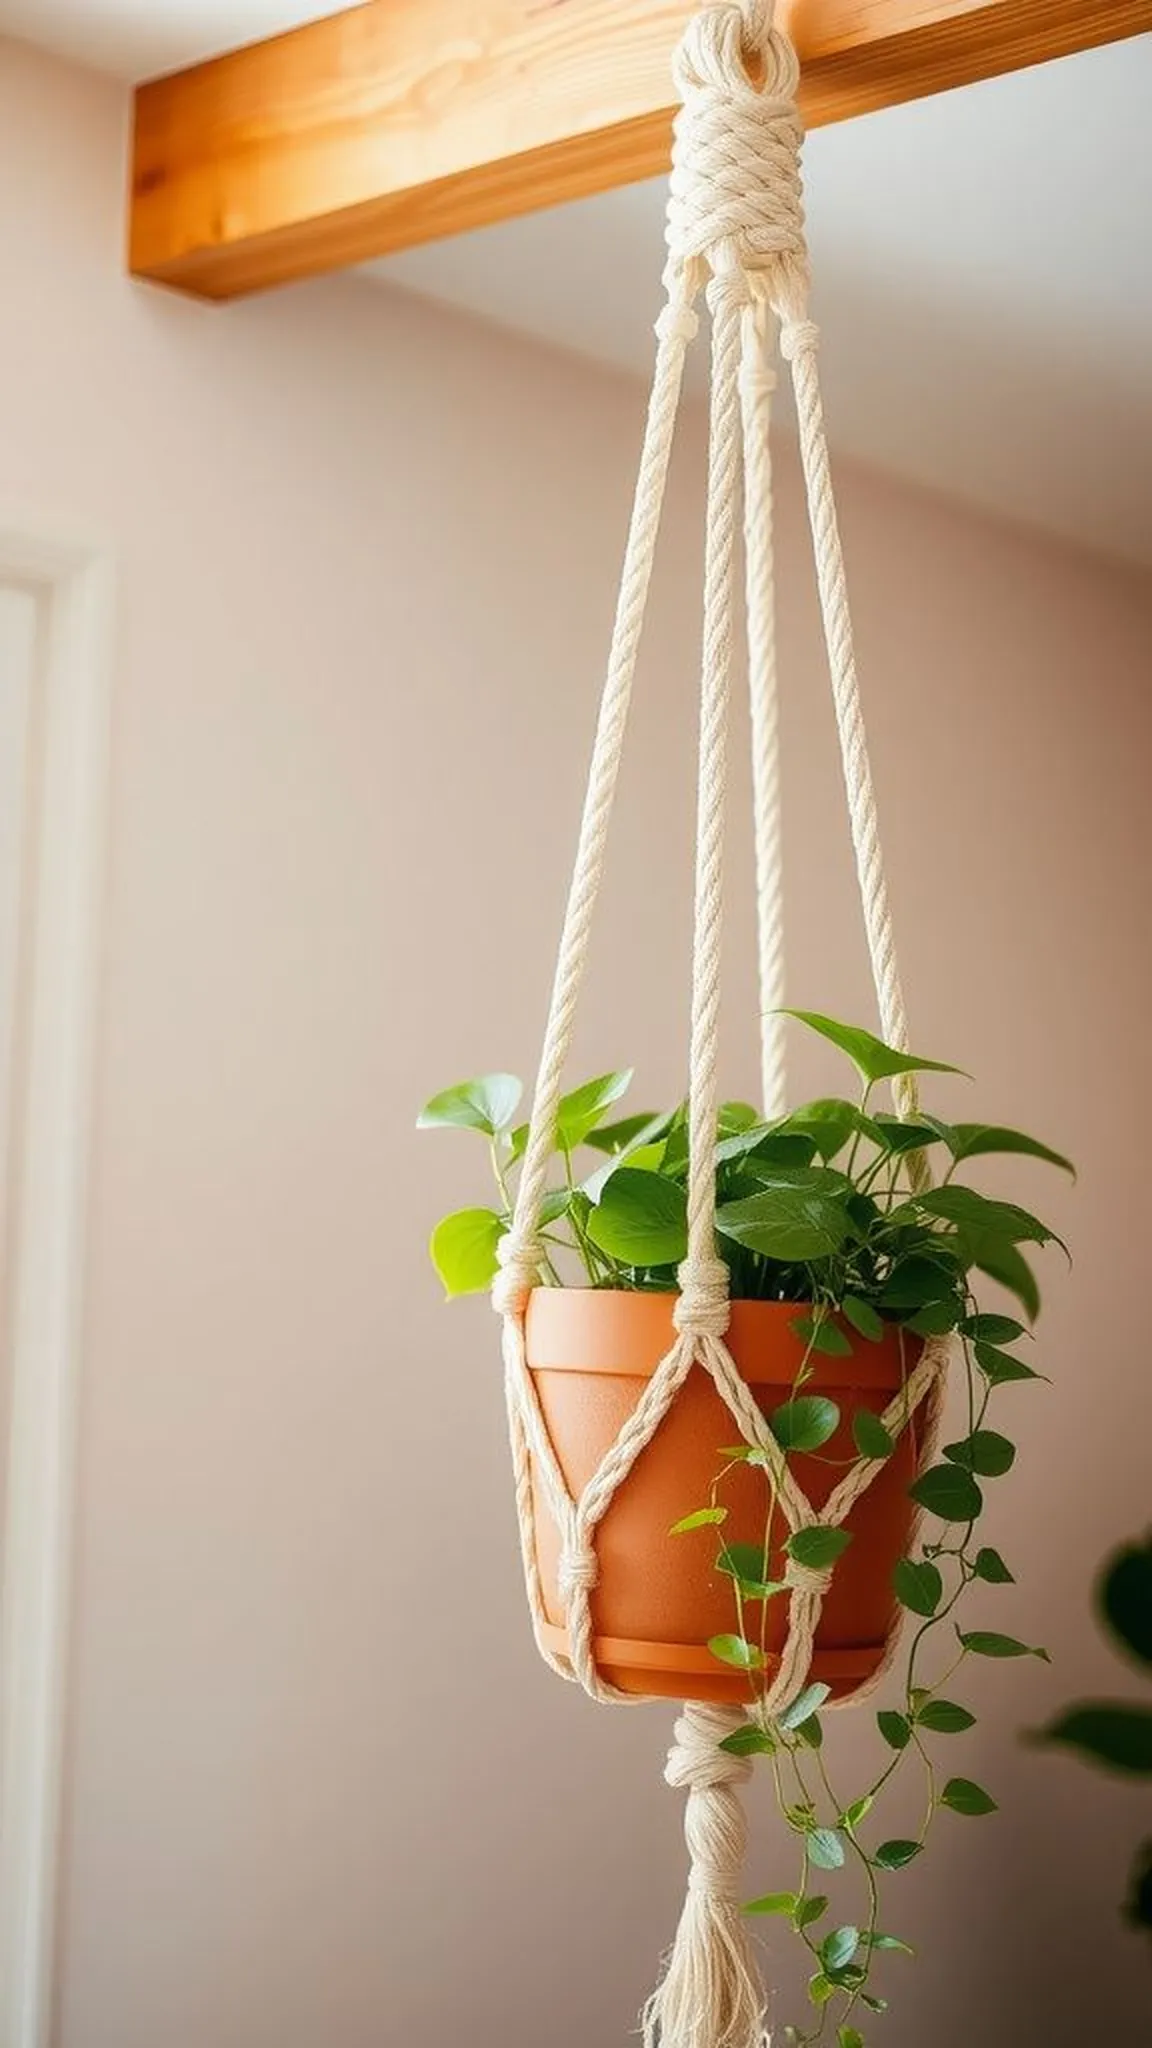
A suspended plant hanger introduces a vertical accent that brightens a sunny corner and shows off trailing leaves. The braided cords and knotted patterns create a repeating rhythm that is pleasing to the eye.
The natural fiber cord feels slightly rough under fingertips, and the planter sways gently with room breezes for a living, breathing display. Light filtering through foliage makes soft moving shadows on nearby walls for a peaceful effect.
Neutral tones and simple knotting allow the plant itself to remain the visual star while the hanger complements rather than competes. A sturdy metal ring at the top anchors the composition and adds a little cool sheen against the fibers.
Pro Tip: Measure ceiling height before starting and choose cord length that leaves room for plant growth and graceful hanging proportions.
How to Make This
- Cut several lengths of cotton macrame cord to the planned hanging length plus extra for knotting.
- Fold cords in half and loop them through a metal or wooden ring to form the base for knotting.
- Create series of square knots and alternating patterns to form a cradle that will hold a small pot securely.
- Gather and tie the cord ends together below the cradle to finish the hanger and trim ends to an even length.
Avoid: A frequent beginner mistake is choosing cords that are too slick or thin, causing knots to loosen over time. Heavier, twisted cotton cord holds knots better and provides a sturdier cradle for plant pots.
Try Also: Natural cotton works for a classic look while colored cords or beads create a playful, bohemian impression. A short hanger suits a shelf edge while a long version adds drama from a ceiling hook.
Products & Materials
Items Used
- cotton macrame cord
- metal hanging ring
- small terracotta pot
“Create a knotted macrame hanger to showcase trailing houseplants.”
Soft felt coasters with stitched edges
⏱️ 45 min · 🟢 Beginner
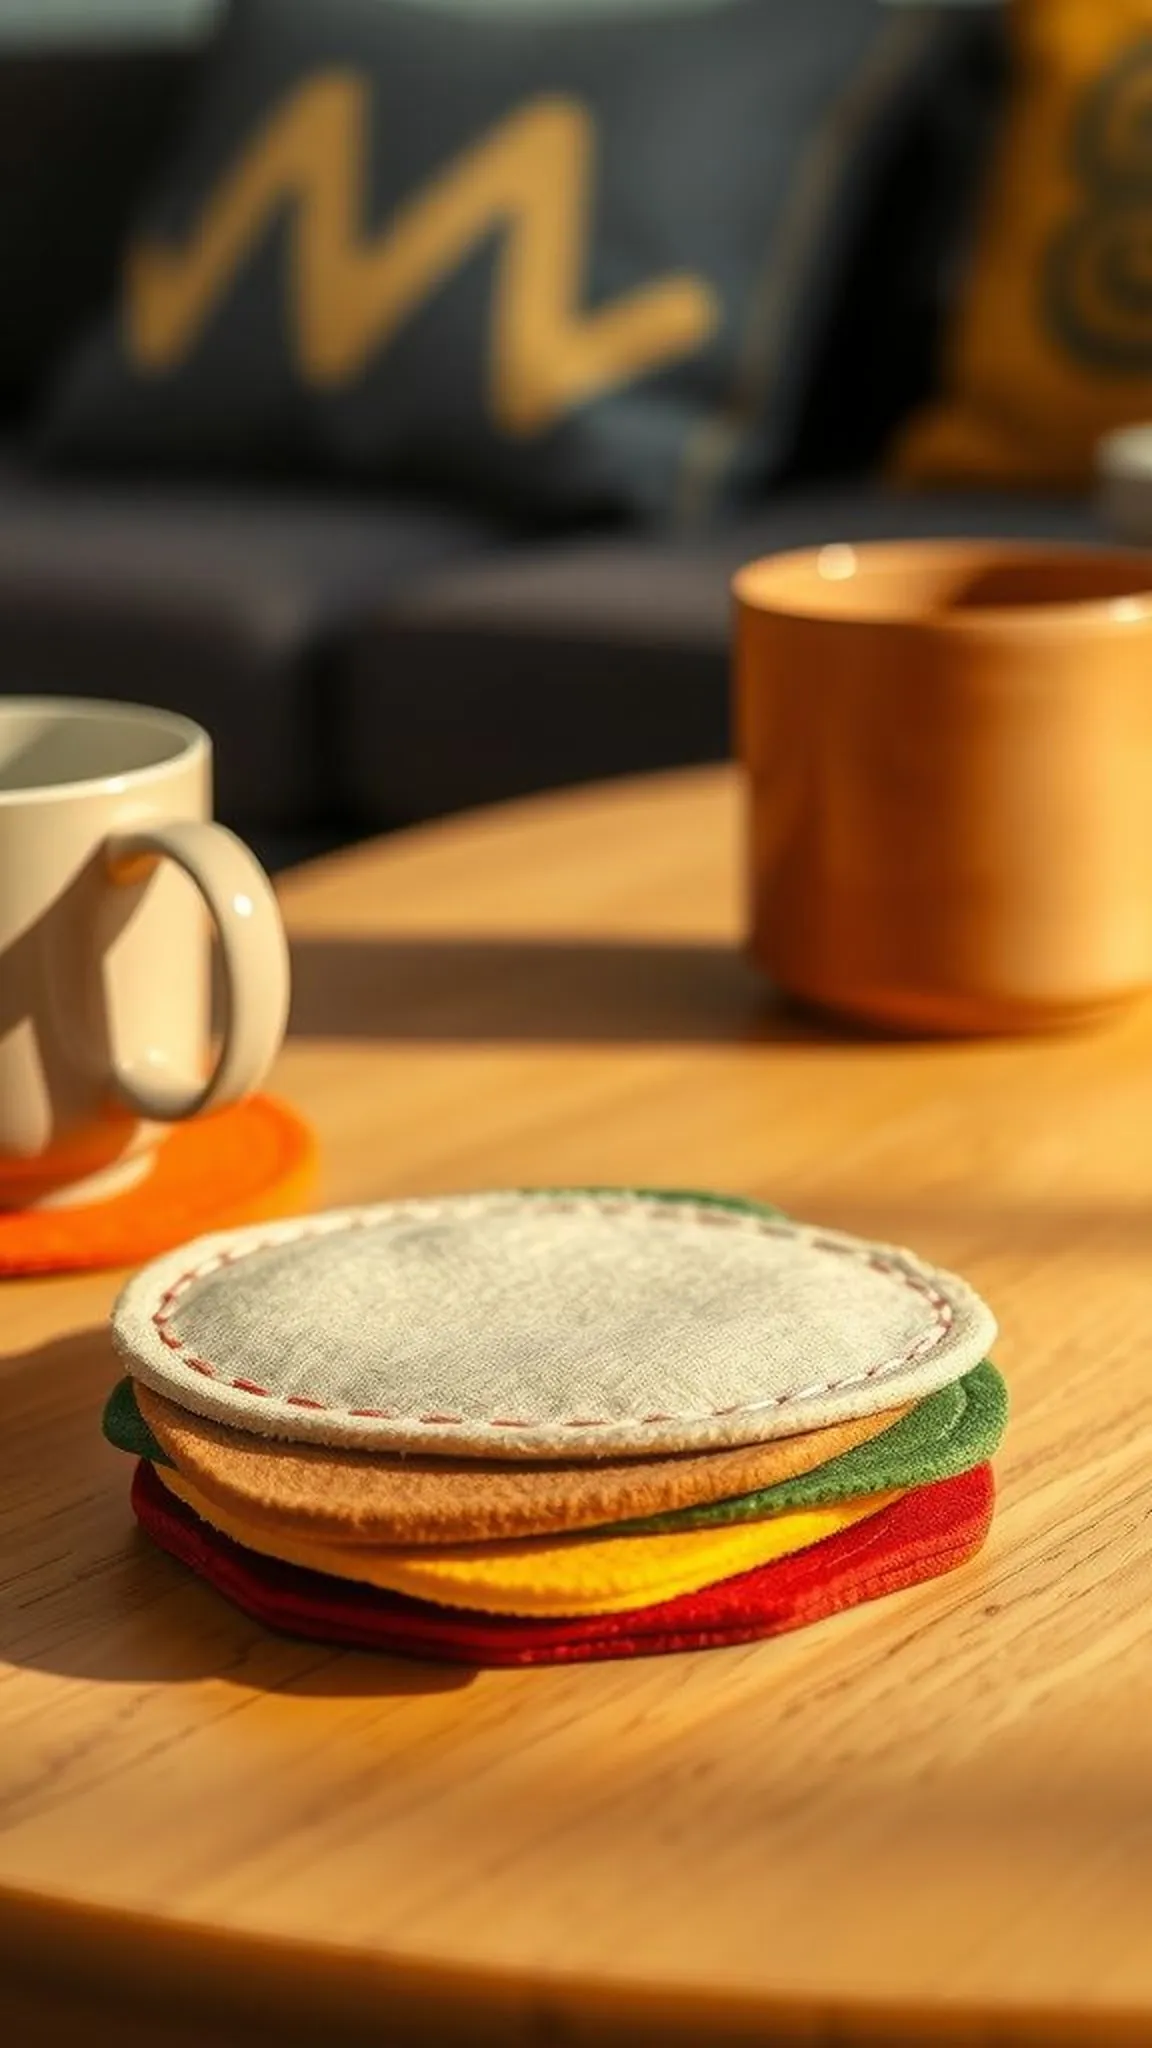
Thick felt squares absorb tiny spills and mute clinking cups with a soft, velvety hush that feels pleasant under fingers. Stitched edges lend a handmade aura and create a crisp outline that frames every mug attractively.
A palette of warm woolen hues or bright contrasting tones sets the mood for tabletop arrangements and seasonal accents. The slightly fuzzy surface captures light softly and resists scratches from ceramic bases.
Simple geometric shapes and running stitches offer a calm, tidy aesthetic that complements both modern and cottage interiors. A small stack of coasters tied together looks inviting on a coffee table and suggests casual hospitality.
Pro Tip: Choose felt at medium thickness for a balance of absorbency and durability while using contrasting thread for visible, neat stitches.
How to Make This
- Cut felt into uniform square or circular shapes using a template for consistent sizing.
- Thread a blunt embroidery needle and use a running or blanket stitch around each edge to secure layers.
- Optionally glue two layers together for extra thickness before stitching and press gently to flatten seams.
Avoid: A frequent beginner mistake is picking very thin craft felt that shows wear quickly and slips under cups. Thicker wool-blend felt provides better protection and a more substantial, lasting coaster.
Try Also: Use two-tone layers for a framed effect or try circular shapes and scalloped edges for a softer, vintage feel. Small appliqué shapes like leaves or simple hearts add seasonal personality.
Products & Materials
Items Used
- wool felt sheets
- embroidery thread
- blunt embroidery needles
- fabric glue
“Cozy felt coasters with neat stitched edges for everyday tables.”
Save time and printer ink with 50+ printable templates and step-by-step instructions in one ad-free guide.

Just $19.99 — lifetime access
Patchwork throw pillow for a lived-in sofa
⏱️ 2-3 hours · 🟠 Intermediate
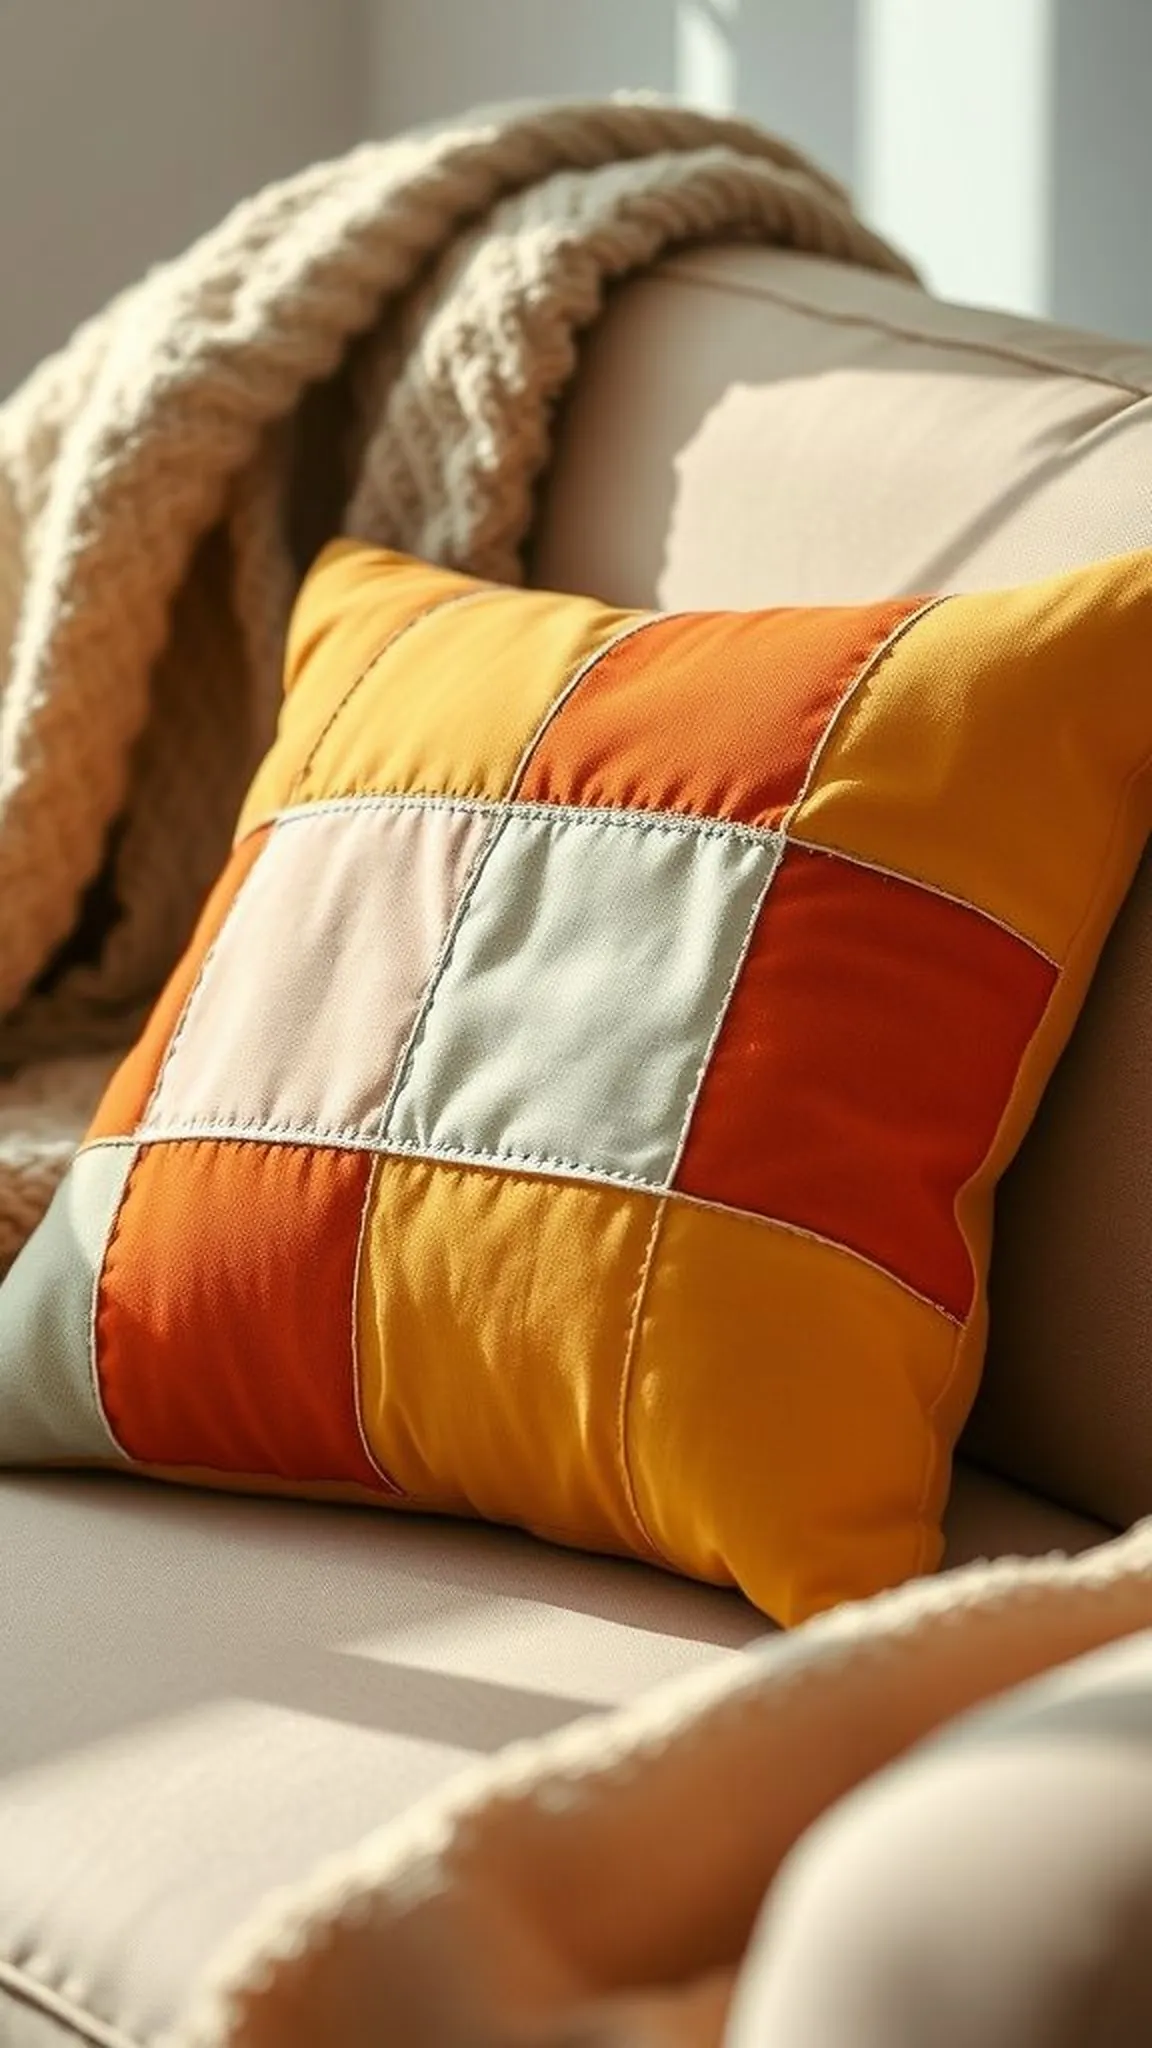
A patchwork pillow brings scraps of cloth together into a single, comforting accessory that suggests a warm, curated space. Textures vary from soft cotton to brushed linen, creating subtle contrasts under the hand.
Stitch lines and seams form a quiet geometry that reads as craft-forward decoration while the pillow itself invites sinking into it during an afternoon read. The mix of colors and patterns can anchor a seating area and make the sofa feel more personal.
A slightly rumpled finish and soft stuffing contribute to a relaxed, welcoming silhouette that lives well with daily use. Edges may show gentle wear over time, adding to the relaxed, homey appeal of the piece.
Pro Tip: Cut patch pieces slightly larger than needed to allow for tidy seam allowances and precise matching during assembly and pressing.
How to Make This
- Select coordinating fabric scraps and cut squares or rectangles to a unified size, accounting for seam allowances.
- Lay pieces in the desired layout, then sew rows together with a quarter-inch seam allowance and press seams flat.
- Join rows into a front panel, add batting or interfacing if desired, then sew front and back panels together, leaving a small opening to insert pillow stuffing or an insert.
- Finish by hand-stitching the opening closed and fluffing to even out filling for a plump look.
Avoid: A frequent beginner mistake is neglecting consistent seam allowances, which leads to a warped patchwork layout and uneven corners. Marking and maintaining a steady seam width helps the patchwork sit squarely when assembled.
Try Also: Try a monochrome palette with varied textures for a subtle, modern result or bold prints for a cottage-inspired accent. Add a flange or piping along the edge for a polished, tailored feel.
Products & Materials
Items Used
- assorted quilting cotton
- polyester pillow insert
- all-purpose thread
- sewing pins
“Patchwork throw pillow that adds texture and color to any sofa.”
Festive fabric bunting to brighten a mantel
⏱️ 1 hour · 🟢 Beginner
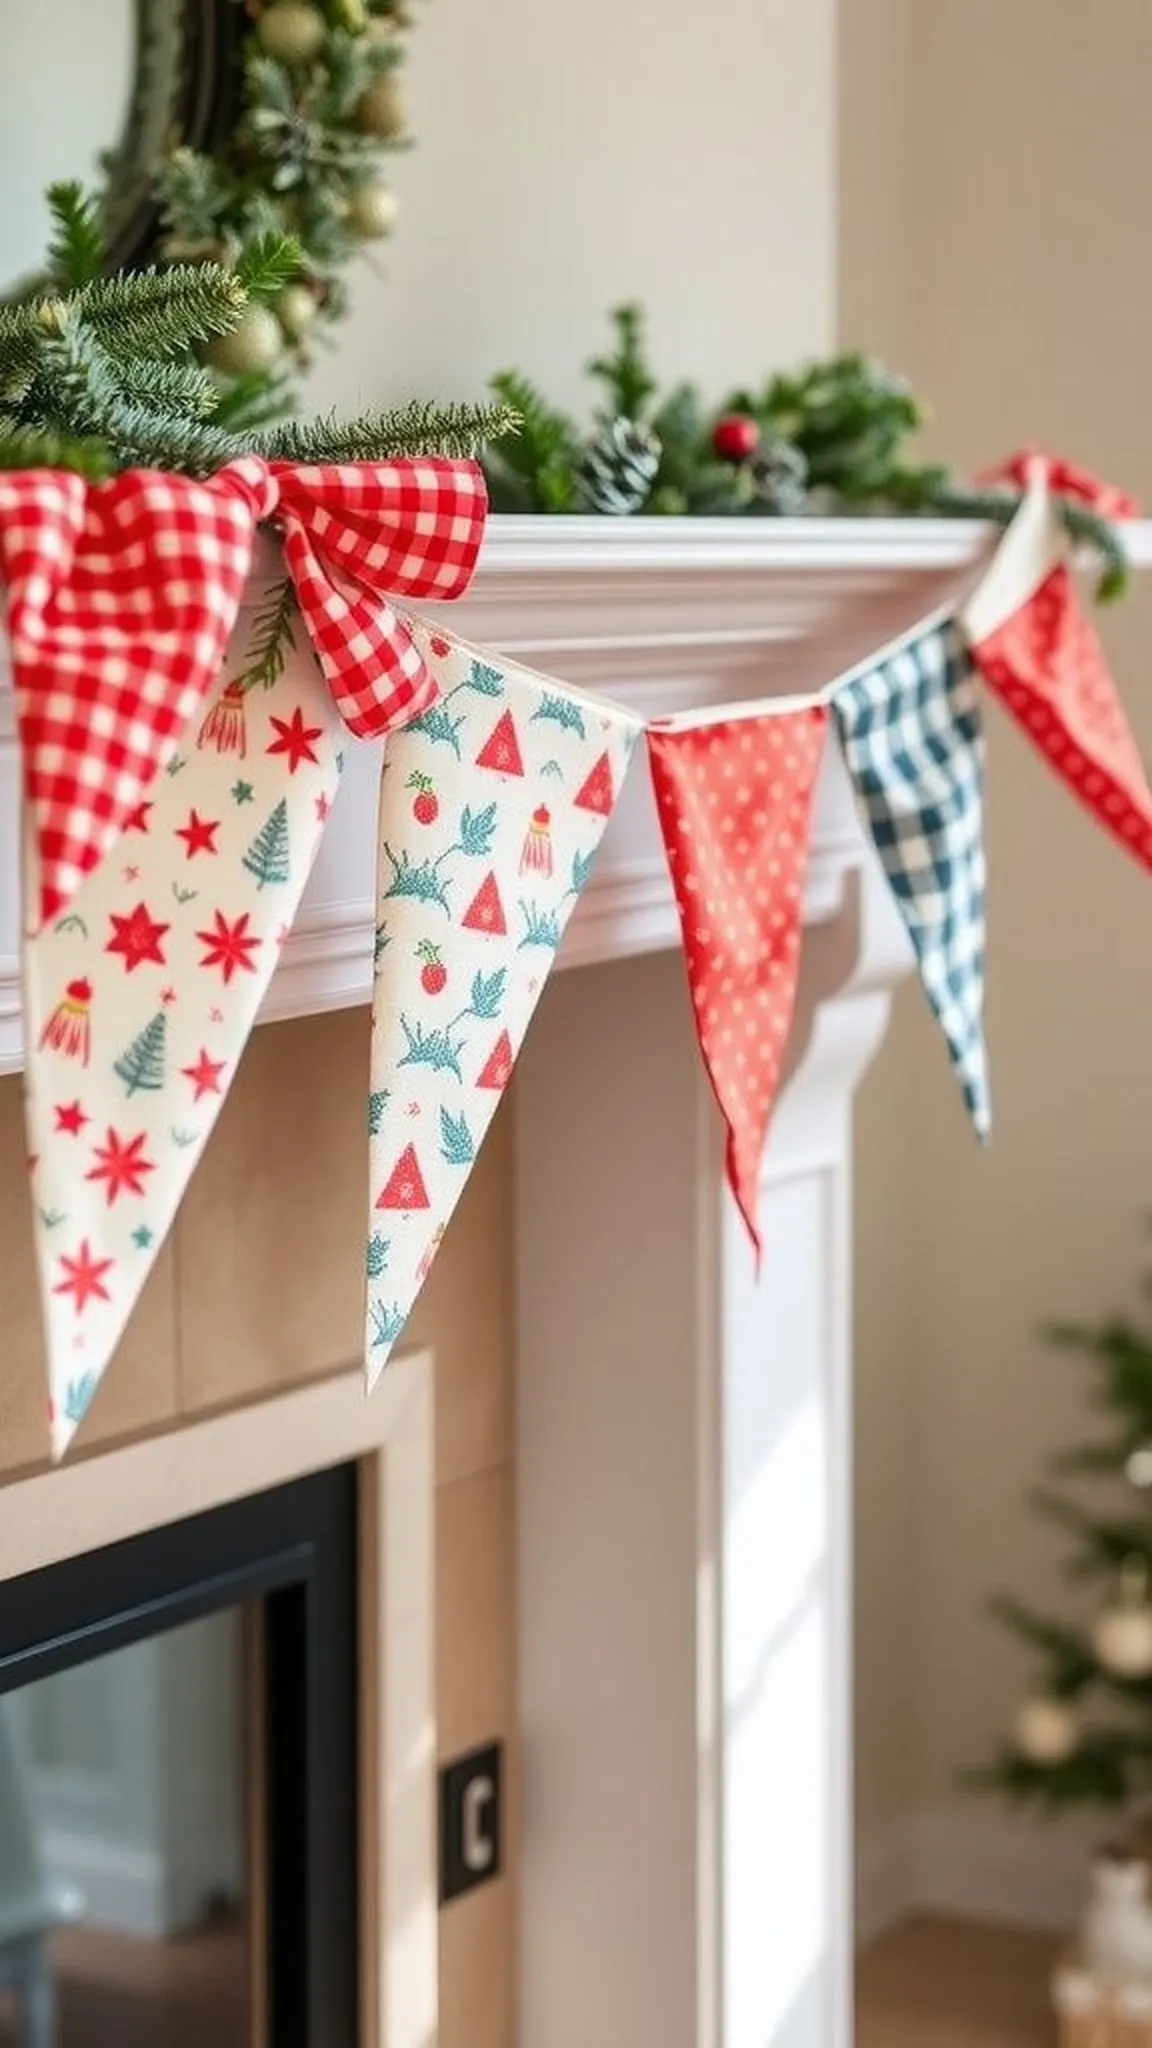
A string of fabric flags brings cheerful movement and color to a mantel or doorway with minimal fuss. Soft cotton triangles flutter slightly and catch light, adding a handcrafted accent to seasonal displays.
The edges of each flag present a crisp line while the fabric pattern peeks through when viewed up close, creating small visual discoveries. When draped casually, the bunting reads as friendly and celebratory without overwhelming a space.
Neutral tones paired with a single accent color produce an understated rhythm while bolder prints create a festive focal point. The fabric texture stays visible and invites touch, enhancing the cozy atmosphere of a room.
Pro Tip: Cut flag shapes with a consistent template and press each on the fold for crisp edges and even, tidy points along the string.
How to Make This
- Choose lightweight cotton fabrics and create a paper template for the flag shape to ensure uniform sizes.
- Fold rectangles over a length of bias tape or ribbon, positioning the tops evenly and stitching along the folded edge to secure each flag.
- Space flags along the tape to achieve the desired drape and hang the bunting across a mantel or doorway for display.
Avoid: A frequent beginner mistake is using heavy fabric that weighs down the string and makes the bunting sag. Lightweight cotton or linen keeps flags lively and allows a gentle drape.
Try Also: Mix small floral prints with solid panels for a cottage look or choose graphic geometrics for a modern twist. Swap fabric for felt for a sturdier, year-round version.
Products & Materials
Items Used
- cotton fabric scraps
- bias tape or ribbon
- all-purpose thread
“Cheerful fabric bunting that adds instant festivity and color indoors.”
Decoupaged wooden tray with vintage papers
⏱️ 2 hours · 🟠 Intermediate

A wooden tray layered with patterned paper and a glossy seal evokes patchwork charm and a collected feeling. The paper edges peek beneath the sheen, creating depth and a quiet narrative in the surface.
The wood grain under the paper adds warmth while the sealed finish catches light in small highlights that animate the tray. Handled gently, the tray brings a touch of crafted attention to serving and display moments.
Weathered tones and floral prints suggest an old-world sensibility while geometric papers feel more modern, allowing the tray to bridge styles easily. Subtle surface textures reward a closer look and invite placing small objects on top for a styled vignette.
Pro Tip: Smooth paper onto the tray surface slowly and press outward to minimize air pockets for a cleaner sealed finish.
How to Make This
- Measure the tray interior and trim decorative paper to fit, allowing a slight margin for edges.
- Brush on a thin layer of decoupage medium to the wood surface, lay the paper carefully, and smooth from center outward.
- After drying, apply two thin coats of decoupage medium over the top for sealing, sanding lightly between coats if desired for smoothness.
Avoid: A frequent beginner mistake is applying heavy coats of medium that pool and dry unevenly, obscuring the paper. Thin, even layers prevent bubbling and create a more transparent, durable finish.
Try Also: Use old book pages and map fragments for a nostalgic effect or bold patterned paper for a contemporary accent. Add small metal handles for a functional, decorative upgrade.
Products & Materials
Items Used
- wood serving tray
- decoupage medium
- decorative paper sheets
- foam brush
“Decoupaged wooden tray blending vintage paper and glossy finish.”
Embroidered hoop art with botanical motifs
⏱️ 1-2 hours · 🟠 Intermediate
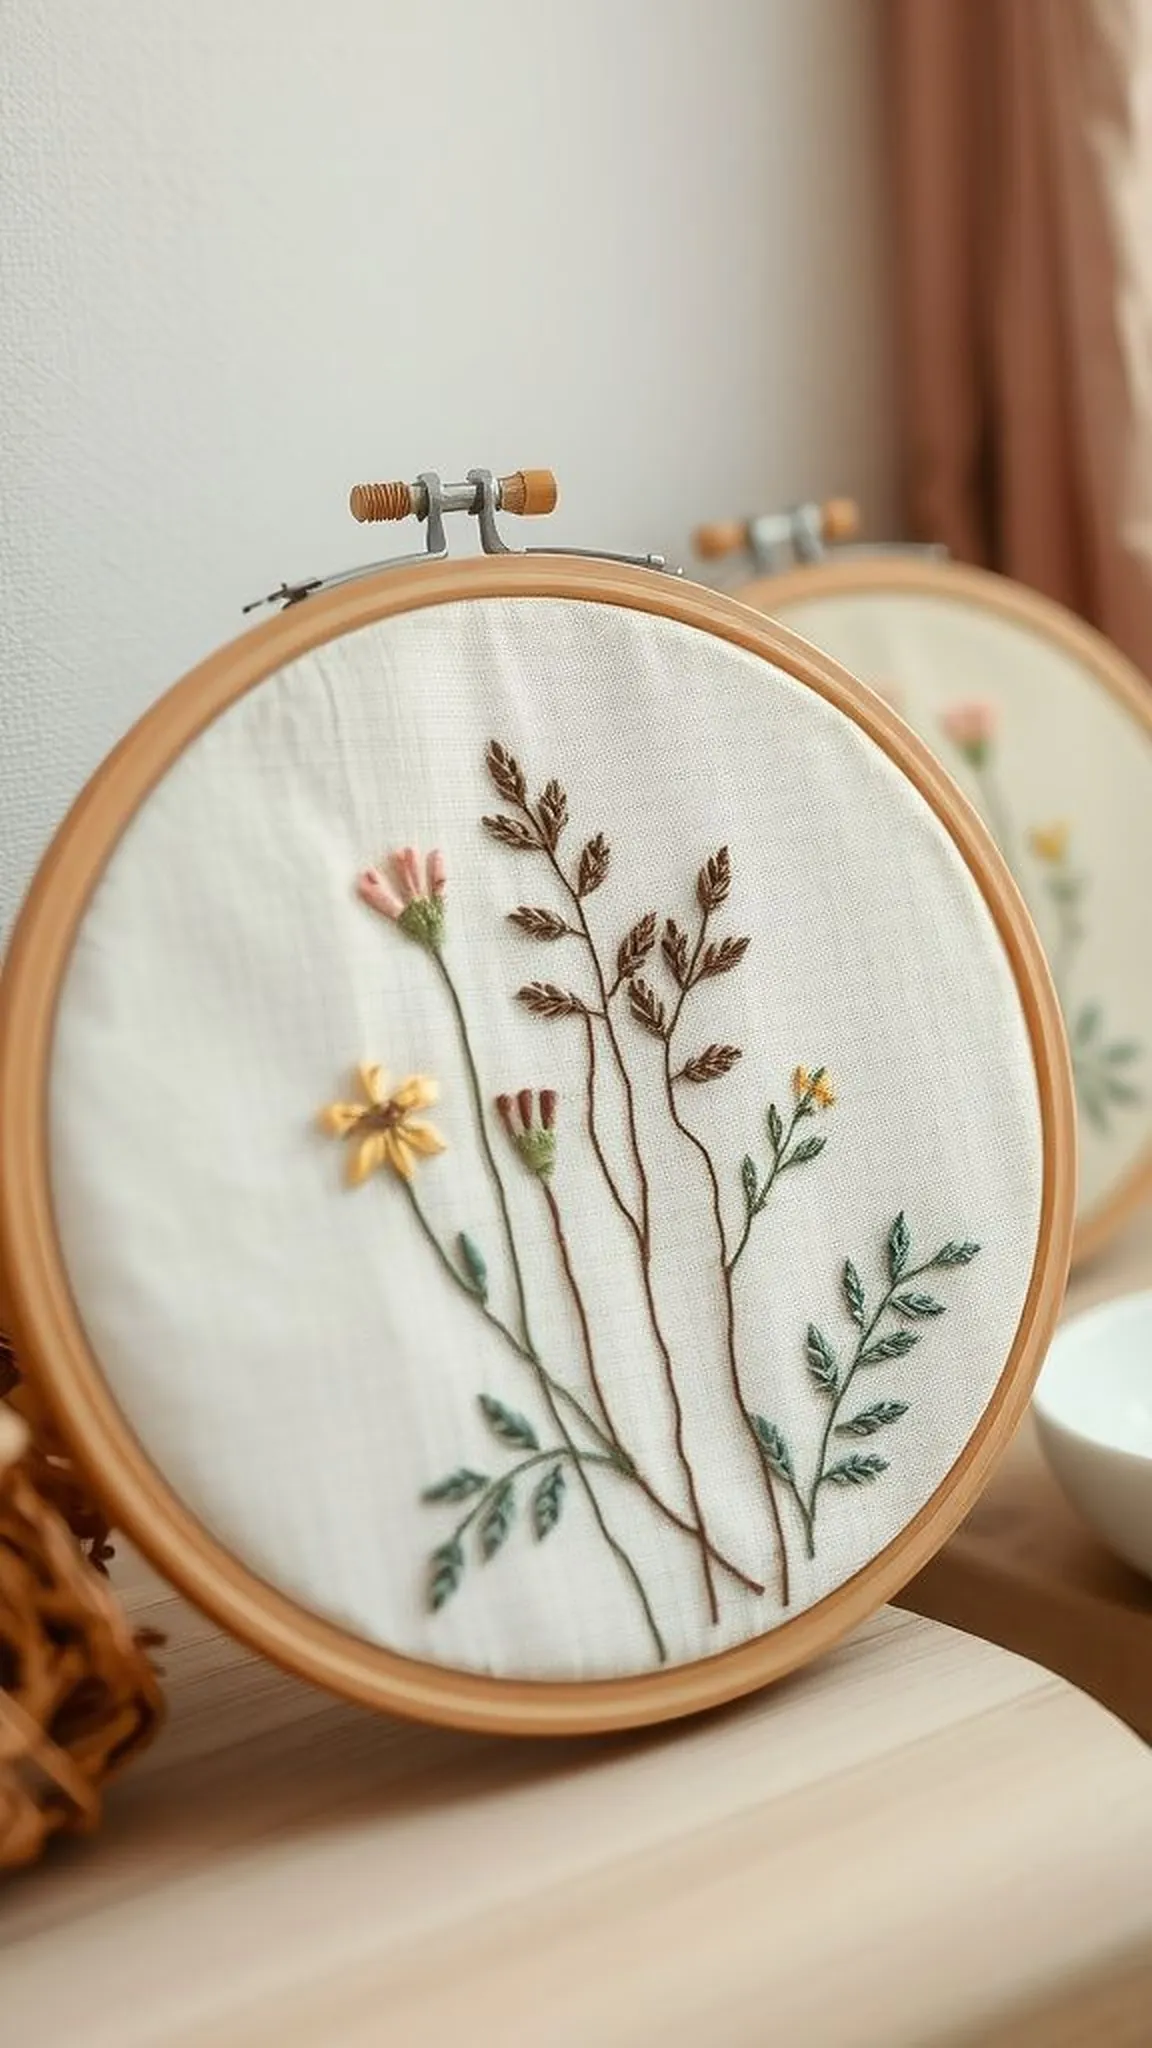
An embroidered hoop offers a small, intimate canvas for delicate stitching and botanical shapes that feel serene and handcrafted. The fabric surface shows tiny raised stitches that catch light and create a gentle relief under fingertips.
Green leaf stems and muted petal tones present a measured calm that suits bedroom or hallway walls without overwhelming the eye. The wooden hoop rim frames the composition with a soft, circular boundary that keeps the scene feeling finished.
Threads in matte and slightly lustrous finishes provide subtle contrasts while tiny knots add texture and character. A grouping of hoops in staggered sizes forms a quietly curated display of small stitched scenes.
Pro Tip: Transfer a light pencil outline onto fabric for accurate stitch placement and keep small embroidery scissors nearby for tidy thread trimming.
How to Make This
- Stretch a piece of linen or cotton fabric in an embroidery hoop and tighten until taut.
- Trace a simple botanical outline onto the fabric and choose thread colors that offer soft contrast.
- Use basic stitches such as backstitch for stems and satin or French knots for petals and centers to build the motif.
- Trim excess fabric and secure the hoop back with a dab of glue or a running stitch along the edge if desired.
Avoid: A frequent beginner mistake is leaving fabric slack in the hoop, which causes uneven stitches and puckering. Keeping the fabric taut ensures clean lines and even stitch tension.
Try Also: Try monochrome thread for a minimalist look or metallic accents for a hint of shine. Combine two small hoops to create a paired botanical set.
Products & Materials
Items Used
- embroidery hoop
- embroidery floss
- linen fabric
- embroidery needle
“Delicate embroidered hoop art featuring calming botanical stitches.”
Reclaimed wood picture frame with weathered finish
⏱️ 3 hours · 🔴 Advanced
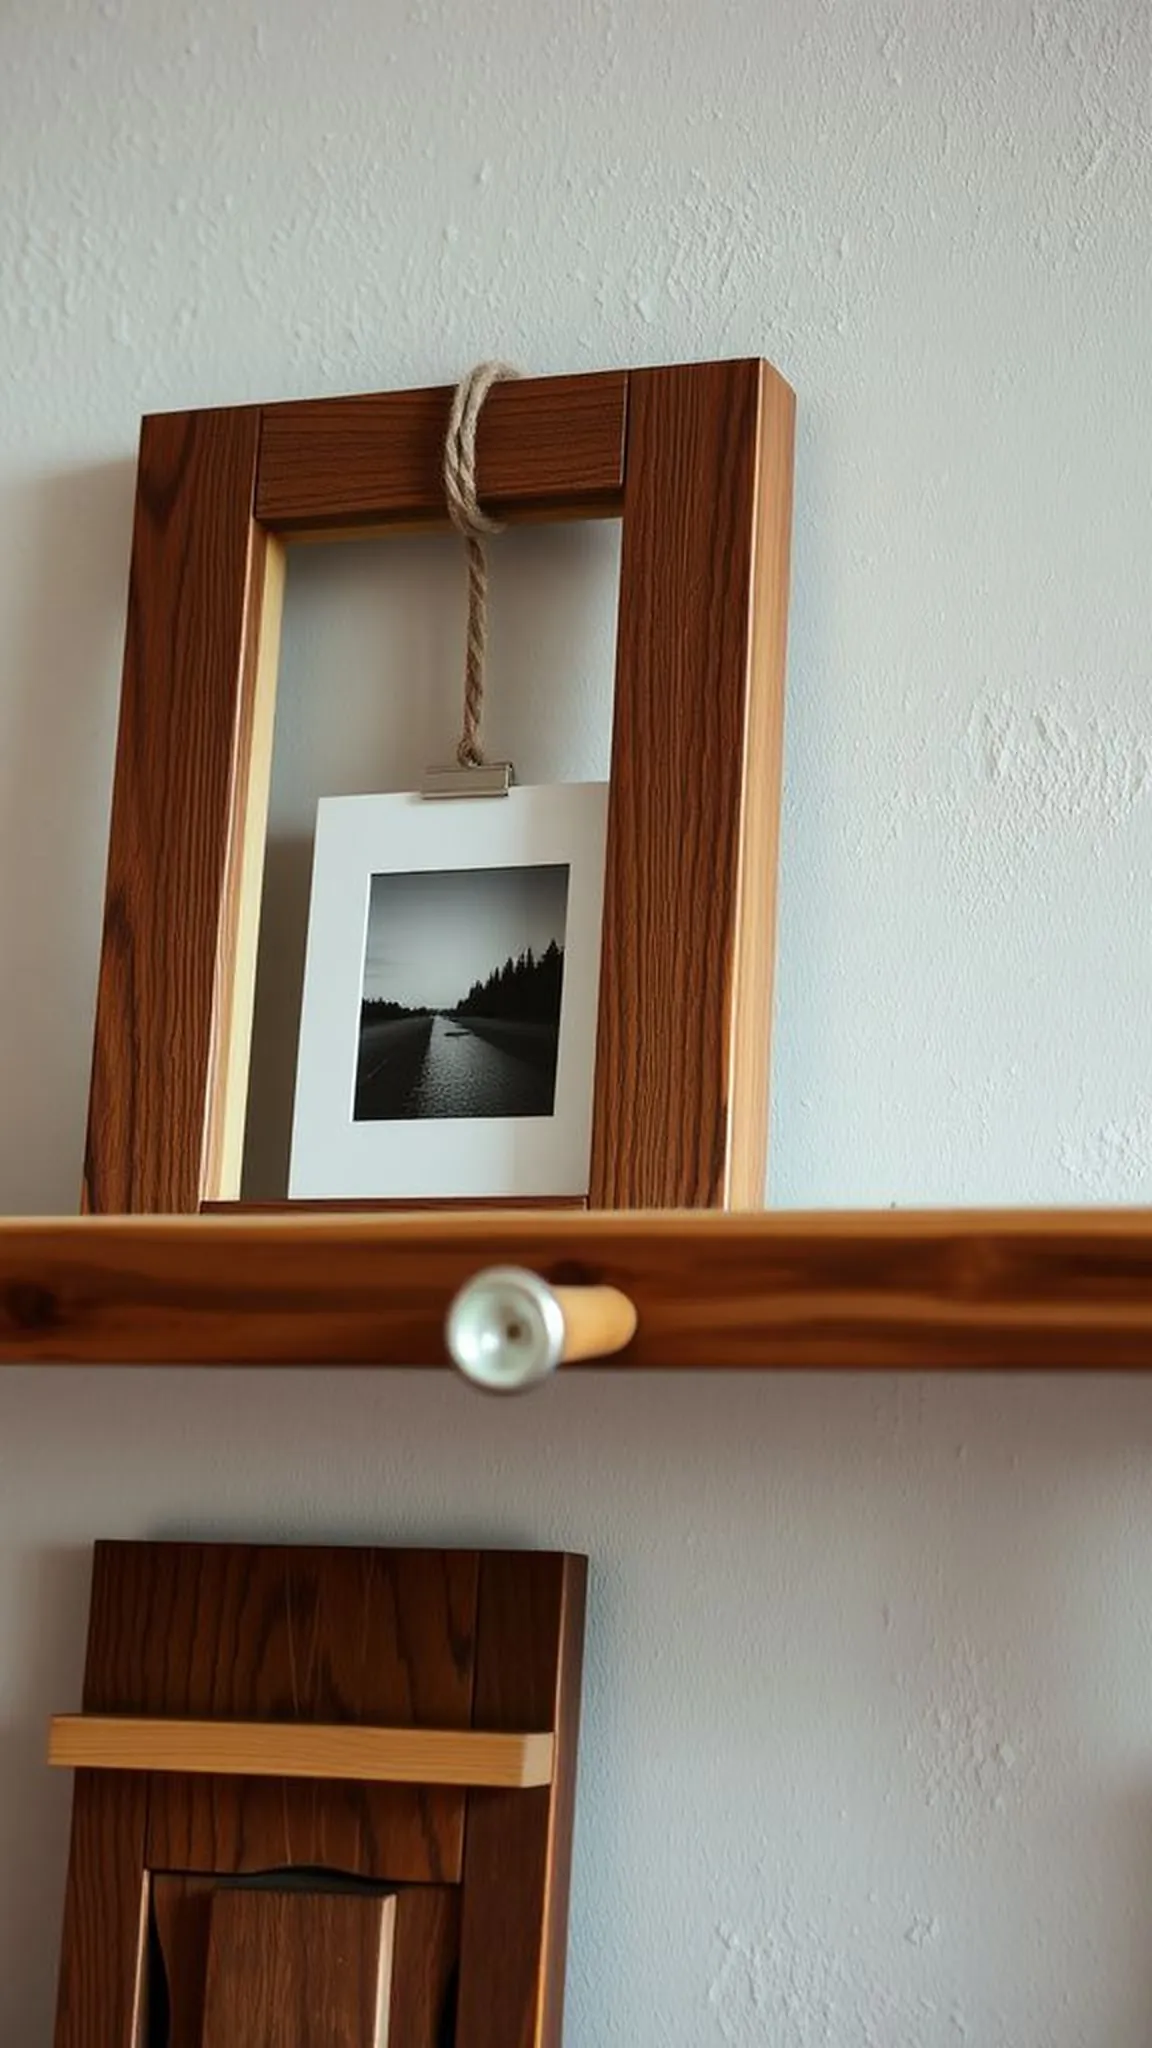
A frame made from reclaimed planks carries traces of past life in grain marks and color variations that feel storied and tactile. The rough-hewn edges and soft splinters give the object a distinct, timeworn personality.
Photographs or prints paired with the frame gain an immediate sense of history because the wood suggests hands-on craft and long use. The frame surface absorbs light and casts modest shadows that emphasize its layered surface.
Cool nail heads and subtle tool marks create little focal points that reward a close look, and the natural patina warms with age. A slightly uneven joinery is part of the charm, reinforcing the reclaimed, informal aesthetic.
Pro Tip: Dry-fit pieces and sand only the contact edges for snug joints while preserving the outer weathered surface for character retention.
How to Make This
- Select reclaimed wood planks and cut four pieces to match the intended frame dimensions, accounting for mitered corners.
- Dry-fit the pieces and adjust lengths before assembling the corners with wood glue and small finishing nails or brads for reinforcement.
- Sand lightly at joints for a smooth mating surface while leaving outer faces intentionally weathered, then apply a clear wax or oil to protect the wood.
Avoid: A frequent beginner mistake is over-sanding the faces, which removes the desirable patina and aged character. Focus sanding on contact edges and maintain the visible weathered texture.
Try Also: Combine narrow and wide boards for a layered, collage-like border or inset a thin metal channel for a touch of industrial contrast. Stain only the inner rabbet for a two-tone effect.
Products & Materials
Items Used
- reclaimed wood planks
- finishing nails
- wood glue
- clear finishing oil
“Reclaimed wood frame that adds rustic character to any photo.”
Hand-painted terra cotta pots with simple motifs
⏱️ 1 hour · 🟢 Beginner
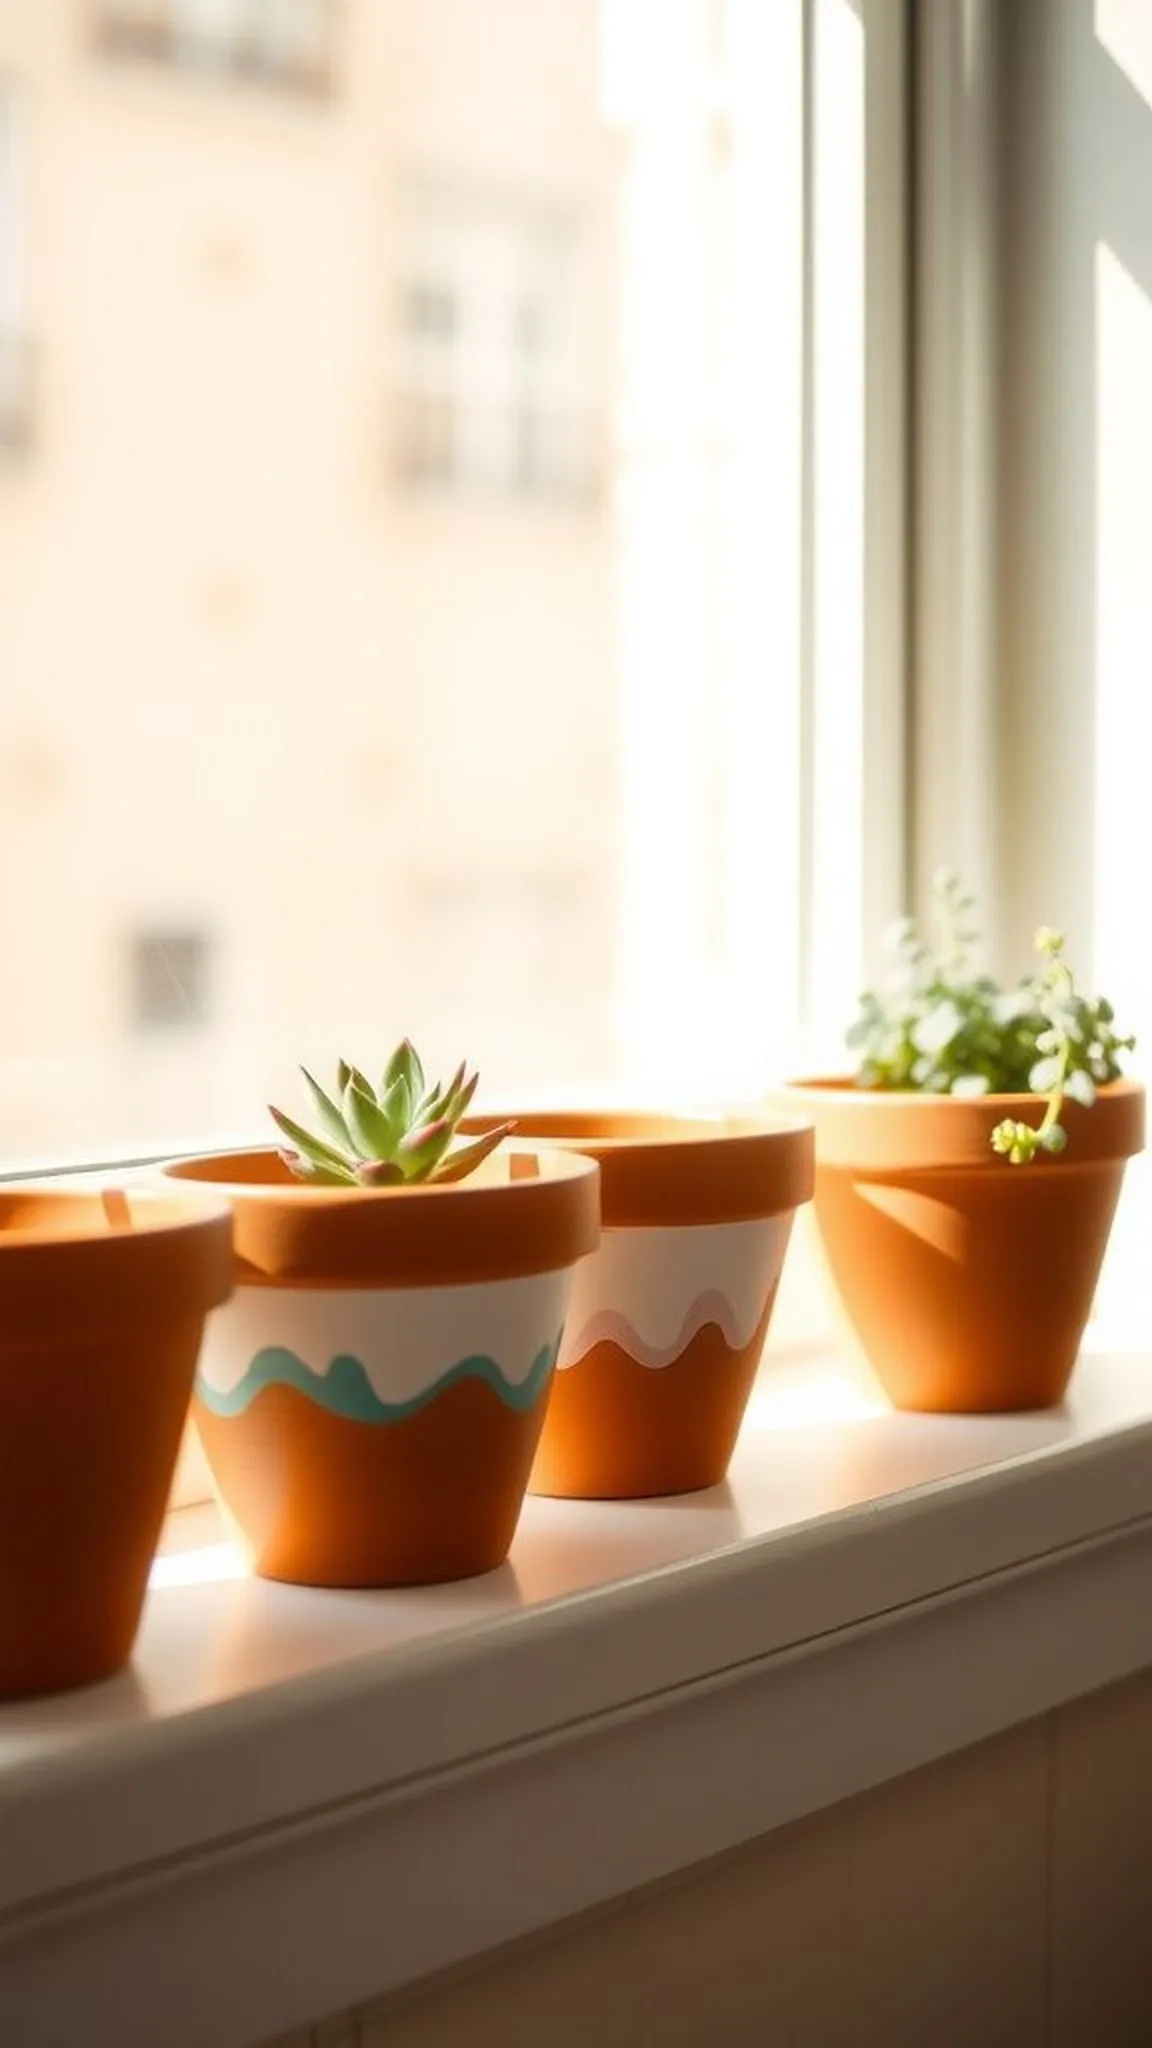
Warm, porous terra cotta takes paint with a matte, tactile finish that feels earthy under fingertips. Small graphic motifs like dots, stripes, or tiny leaves can change a planter from plain to personality-packed.
The clay surface soaks up pigments slightly, producing soft edges and a hand-applied look that reads as approachable and friendly. A grouping of pots with coordinated marks creates a rhythm and a sense of homegrown charm on a windowsill.
Neutral base tones with a single contrasting accent color keep the effect calm and cohesive while bolder palettes feel lively and youthful. Slight brush textures remain visible, adding an intimate, human touch to each vessel.
Pro Tip: Use acrylic craft paint thinned slightly for smoother coverage on porous clay, and allow adequate drying time between color layers for crisp motifs.
How to Make This
- Clean terra cotta pots of dust and set them on a protected surface for painting.
- Apply a base coat of acrylic paint if desired and allow it to dry fully before adding motifs.
- Use a small round brush to paint dots, stripes, or simple leaf shapes in a contrasting color and let dry completely.
Avoid: A frequent beginner mistake is painting onto dusty pots, which causes uneven adhesion and flaking. Cleaning surfaces thoroughly supports smoother paint application and longer-lasting results.
Try Also: Try a chalky finish for a vintage feel or terra cotta left raw with painted rims for a two-tone look. Metallic accents on rim edges add a subtle hint of shine.
Products & Materials
Items Used
- terra cotta pots
- acrylic craft paint
- small round paintbrush
“Painted terra cotta pots with charming, simple hand-drawn motifs.”
Sturdy woven basket from paper rope
⏱️ 3 hours · 🔴 Advanced
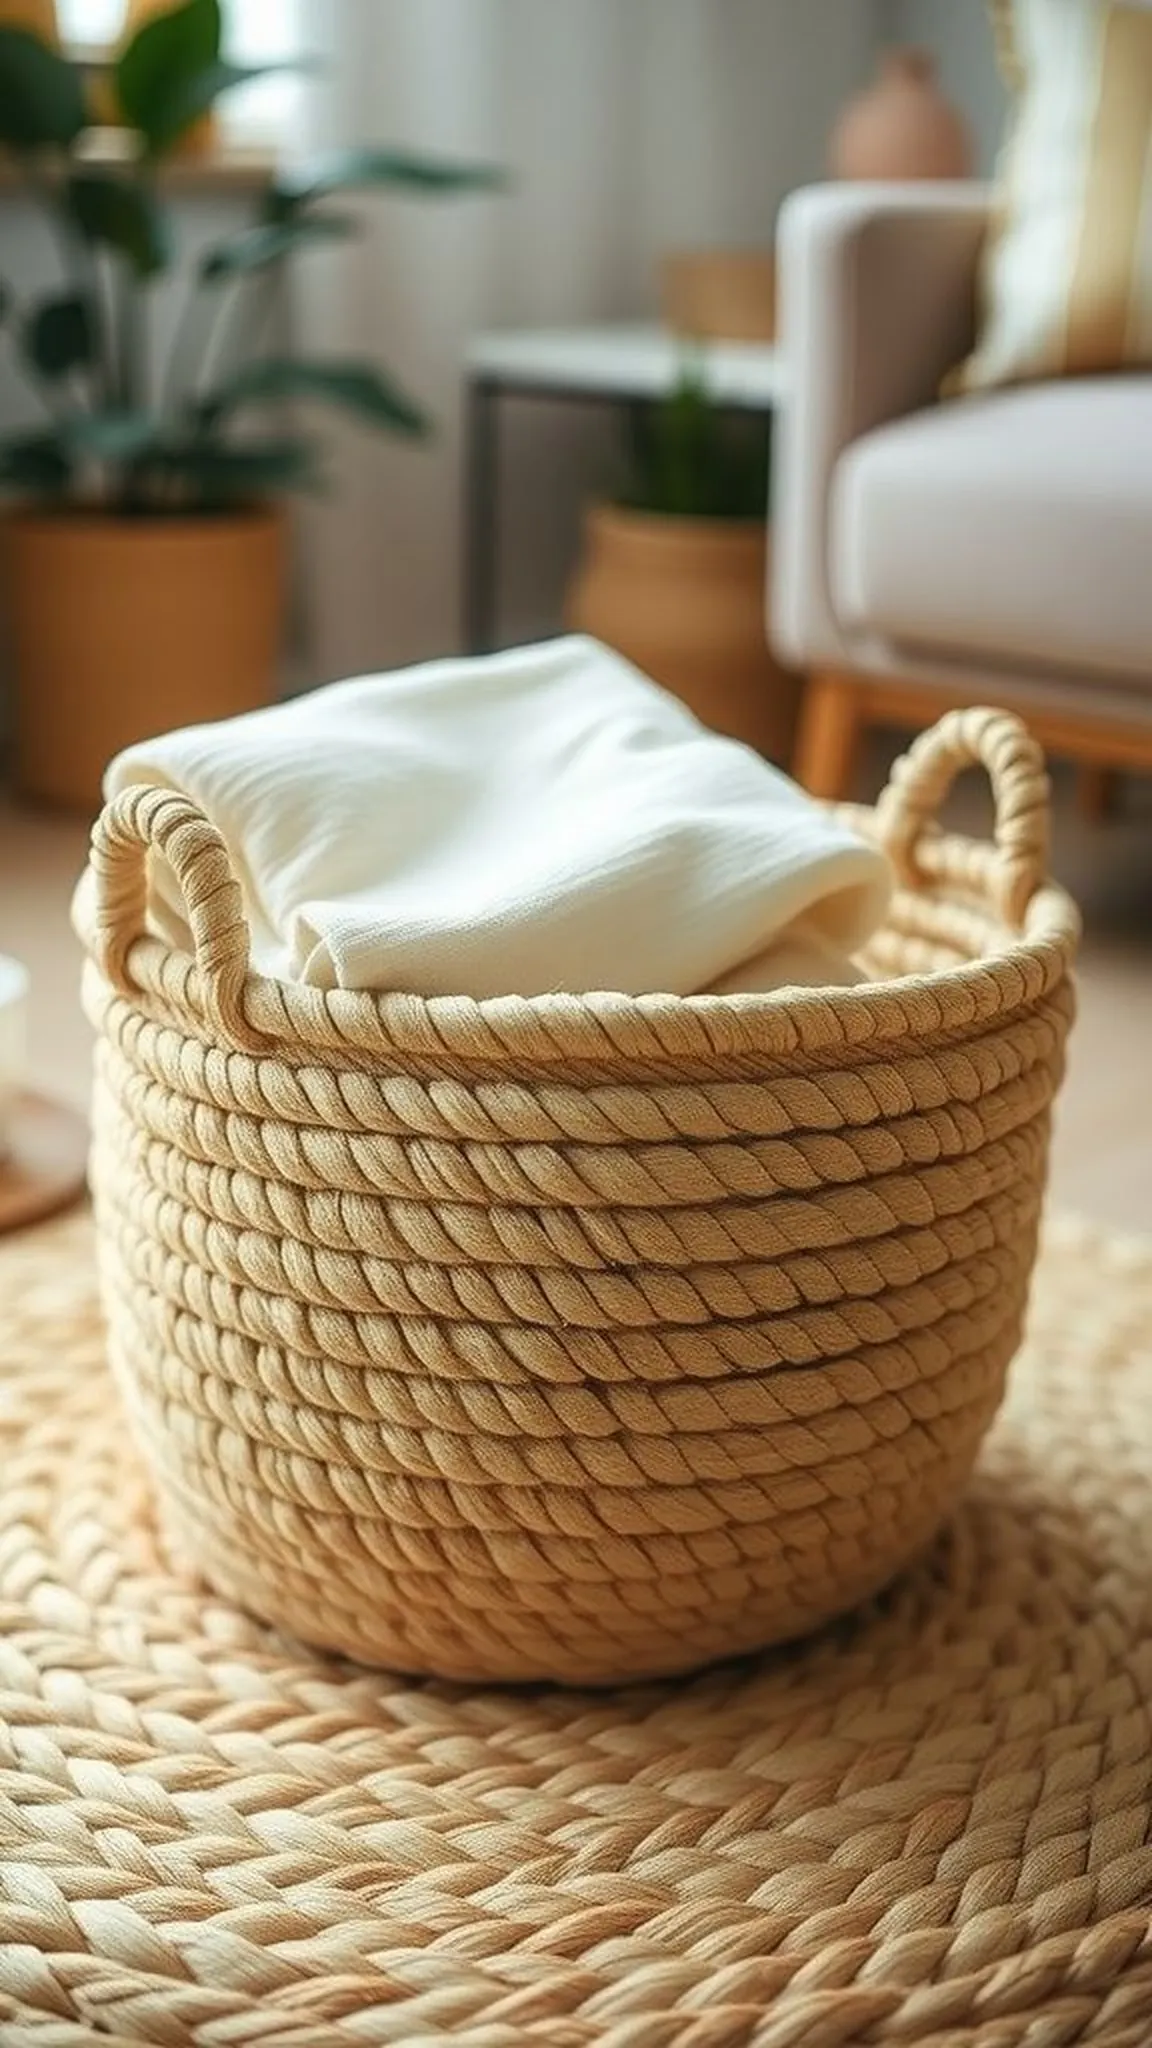
A paper rope basket has a tactile coil structure that feels pleasantly firm and slightly textured to the hand. The woven surface creates a dance of shadow and highlight that emphasizes the round shape.
Natural kraft tones offer an organic look that pairs well with cushions and linen, while painted rope brings a playful splash of color. The basket’s weight and small irregularities convey handiwork and practical charm.
Edges show small ridges from the coiling process that invite close inspection and appreciation for the making. A basket like this functions as neat storage while contributing a quiet, crafted personality to a shelf.
Pro Tip: Keep tension consistent while coiling and secure joins with strong craft adhesive and hidden stitches for a durable, neat finish.
How to Make This
- Twist kraft paper into long, tight ropes and coil the rope into a flat circle to form the base.
- Stitch or glue the coil as it builds upward, maintaining even tension to shape the sides of the basket.
- Continue coiling and securing until the desired height is reached, then finish the rim with a tidy wrap or stitched binding.
Avoid: A frequent beginner mistake is varying coil tension, which leads to uneven walls and a lopsided shape. Maintaining steady pressure while coiling keeps the basket symmetrical and stable.
Try Also: Paint the rope before coiling for striped interiors or mix natural and dyed ropes for a banded effect. Add a fabric liner for a softer inner surface and easier cleaning.
Products & Materials
Items Used
- kraft paper rope
- clear craft adhesive
- stitching needle
“Handwoven paper rope basket for stylish, practical storage.”
Hand-knit dishcloth in tactile cotton yarn
⏱️ 1-2 hours · 🟢 Beginner

A hand-knit dishcloth offers a pleasing nubby texture that invites damp hands and water, making kitchen chores feel a little more tactile. Cotton yarn feels cool and absorbent, and small stitch patterns create gentle surface ridges.
Bright or neutral yarn colors can brighten a sink area and add a handcrafted accent to everyday routines. The compact square shape folds easily and sits neatly by a soap dish or basin.
Stitch tension and yarn thickness influence scrubbing performance and drying speed, so materials shape the cloth’s character. A finished cloth looks approachable and useful, made to be handled rather than preserved on a shelf.
Pro Tip: Choose tightly spun cotton yarn and a simple knit-purl pattern for a textured cloth that dries quickly and withstands frequent washing.
How to Make This
- Cast on an appropriate number of stitches for the desired dishcloth width using medium weight cotton yarn and needles.
- Work a textured stitch pattern such as seed stitch or garter stitch until the piece reaches the targeted square size.
- Bind off loosely, weave in ends, and wash the cloth to encourage gentle softening and slight natural felting for absorbency.
Avoid: A frequent beginner mistake is using yarn that is too fuzzy or synthetic, which reduces absorbency and can pill quickly. Natural cotton yarn maintains scrubbing power and holds up well to repeated laundering.
Try Also: Try a two-color stripe or a subtle border in a contrasting hue for visual interest. Knit a larger size for use as a small towel or placemat.
Products & Materials
Items Used
- cotton yarn
- knitting needles
- yarn needle
“Absorbent hand-knit cotton dishcloth with tactile texture.”
Upcycled wine bottle vase with twine wrap
⏱️ 45 min · 🟢 Beginner
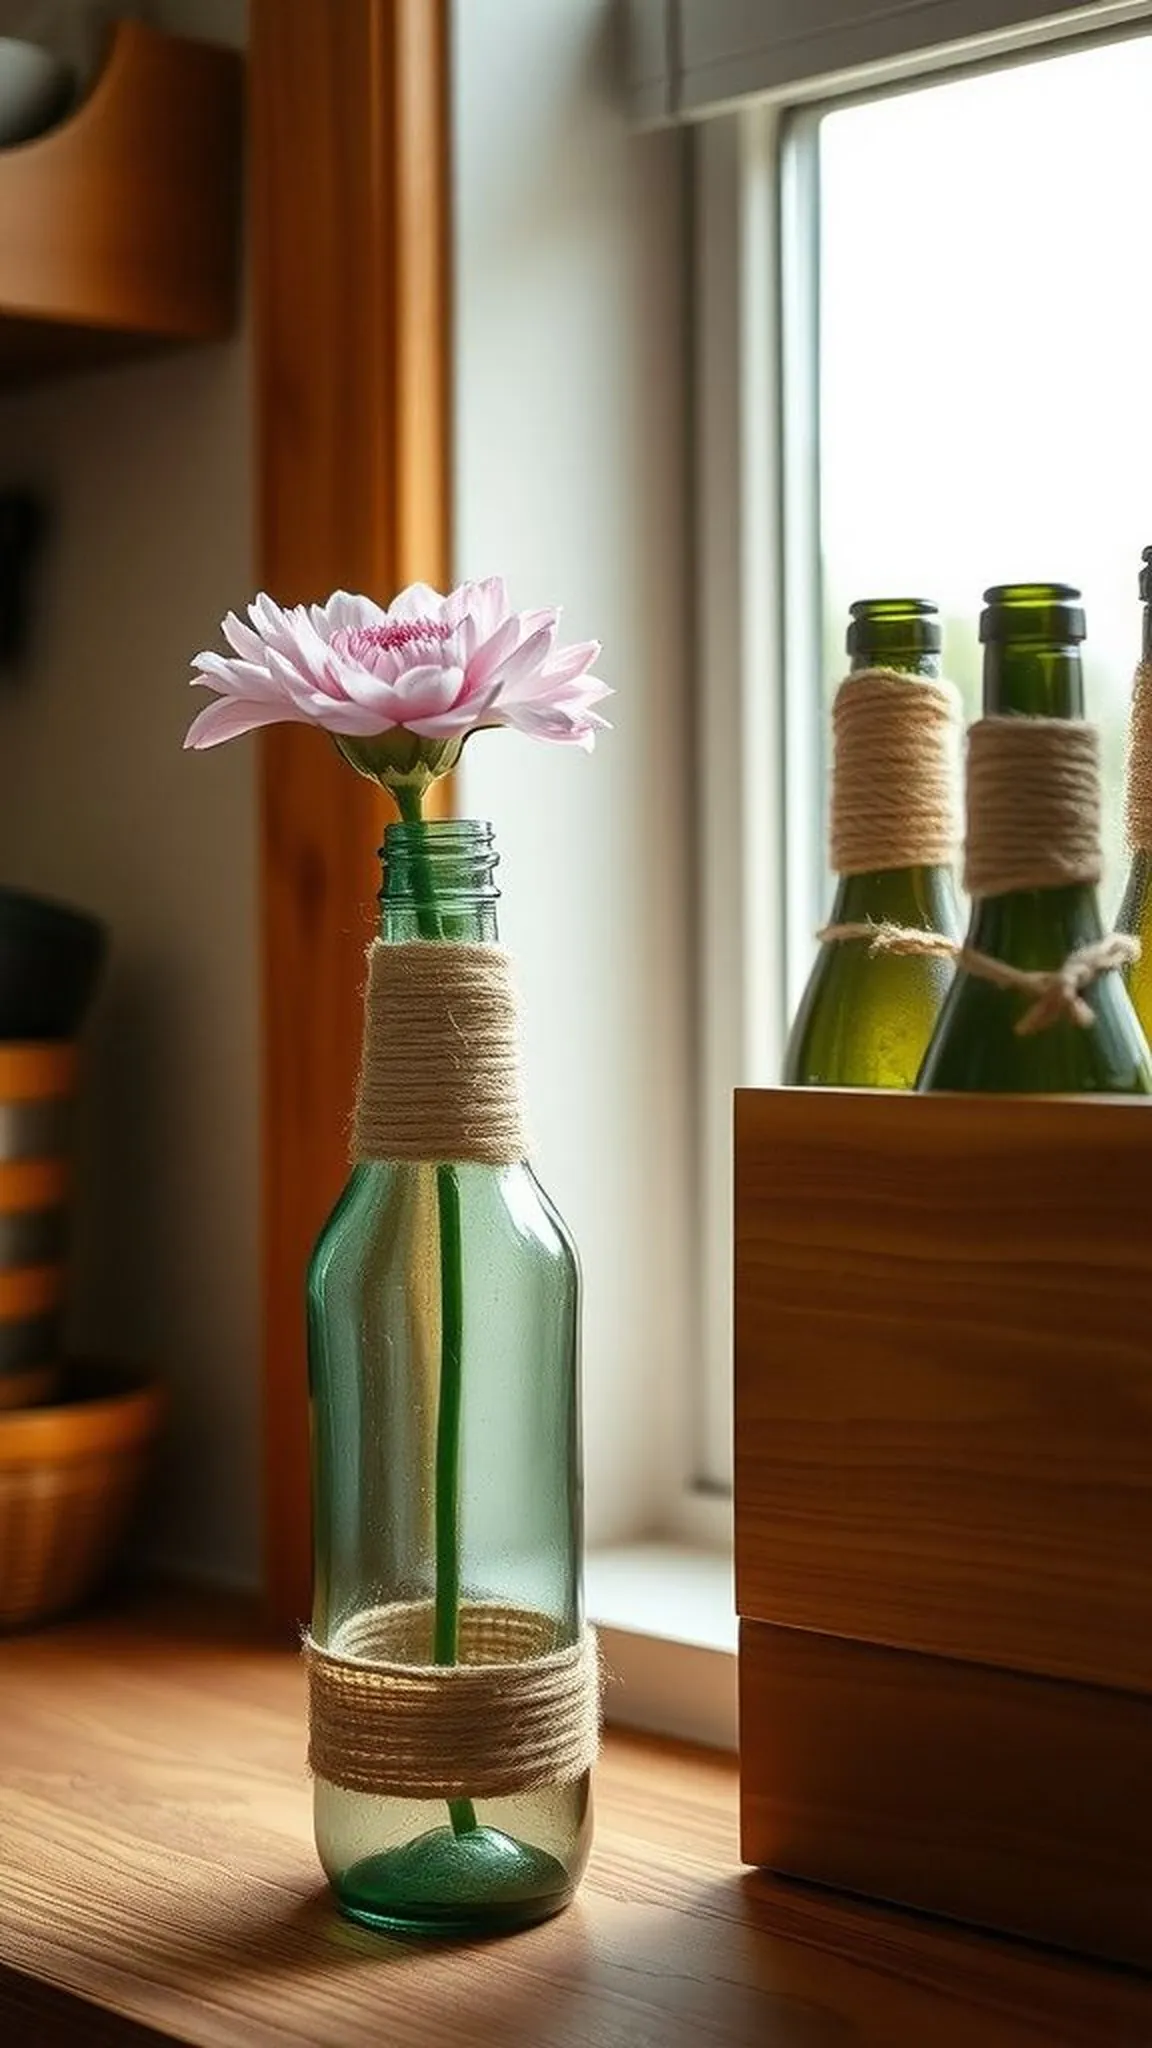
An upcycled glass bottle gains new life as a slender vase when wrapped in natural twine, creating a pleasing contrast between smooth glass and fibrous texture. The twine surface feels coarse and tactile while the glass peeks through in small amounts for visual interest.
Single stems or narrow bunches of flowers look elegant and slightly sculptural in a tall, slim bottle profile. Soft reflections on the glass and matte twine bring balance that reads both casual and refined.
Neutral wrapping tones pair well with pale flowers while dyed twine can add a pop of color along a windowsill. A trio of wrapped bottles at different heights feels artfully collected without fuss.
Pro Tip: Begin wrapping at the bottle base and maintain steady tension to keep twine wraps snug and evenly spaced for a tidy, professional look.
How to Make This
- Clean and dry an empty wine bottle thoroughly, removing any labels and adhesive residue.
- Secure the end of natural jute twine near the bottle base and wrap tightly upward, keeping wraps snug and even.
- Fasten the twine end with a small dab of craft glue and tuck the remainder neatly under adjacent wraps for a seamless finish.
Avoid: A frequent beginner mistake is wrapping too loosely, which causes gaps and an uneven appearance on the bottle. Firm, consistent pressure produces a neater, more durable twine covering.
Try Also: Wrap only the lower third for a dipped effect or combine twine with thin ribbon for a layered texture. Paint the bottle a muted tone before wrapping for a mixed-material look.
Products & Materials
Items Used
- empty wine bottle
- natural jute twine
- clear craft glue
“Upcycled wine bottle vase wrapped in twine for rustic charm.”
Lavender sachets for drawers and linens
⏱️ 30 min · 🟢 Beginner
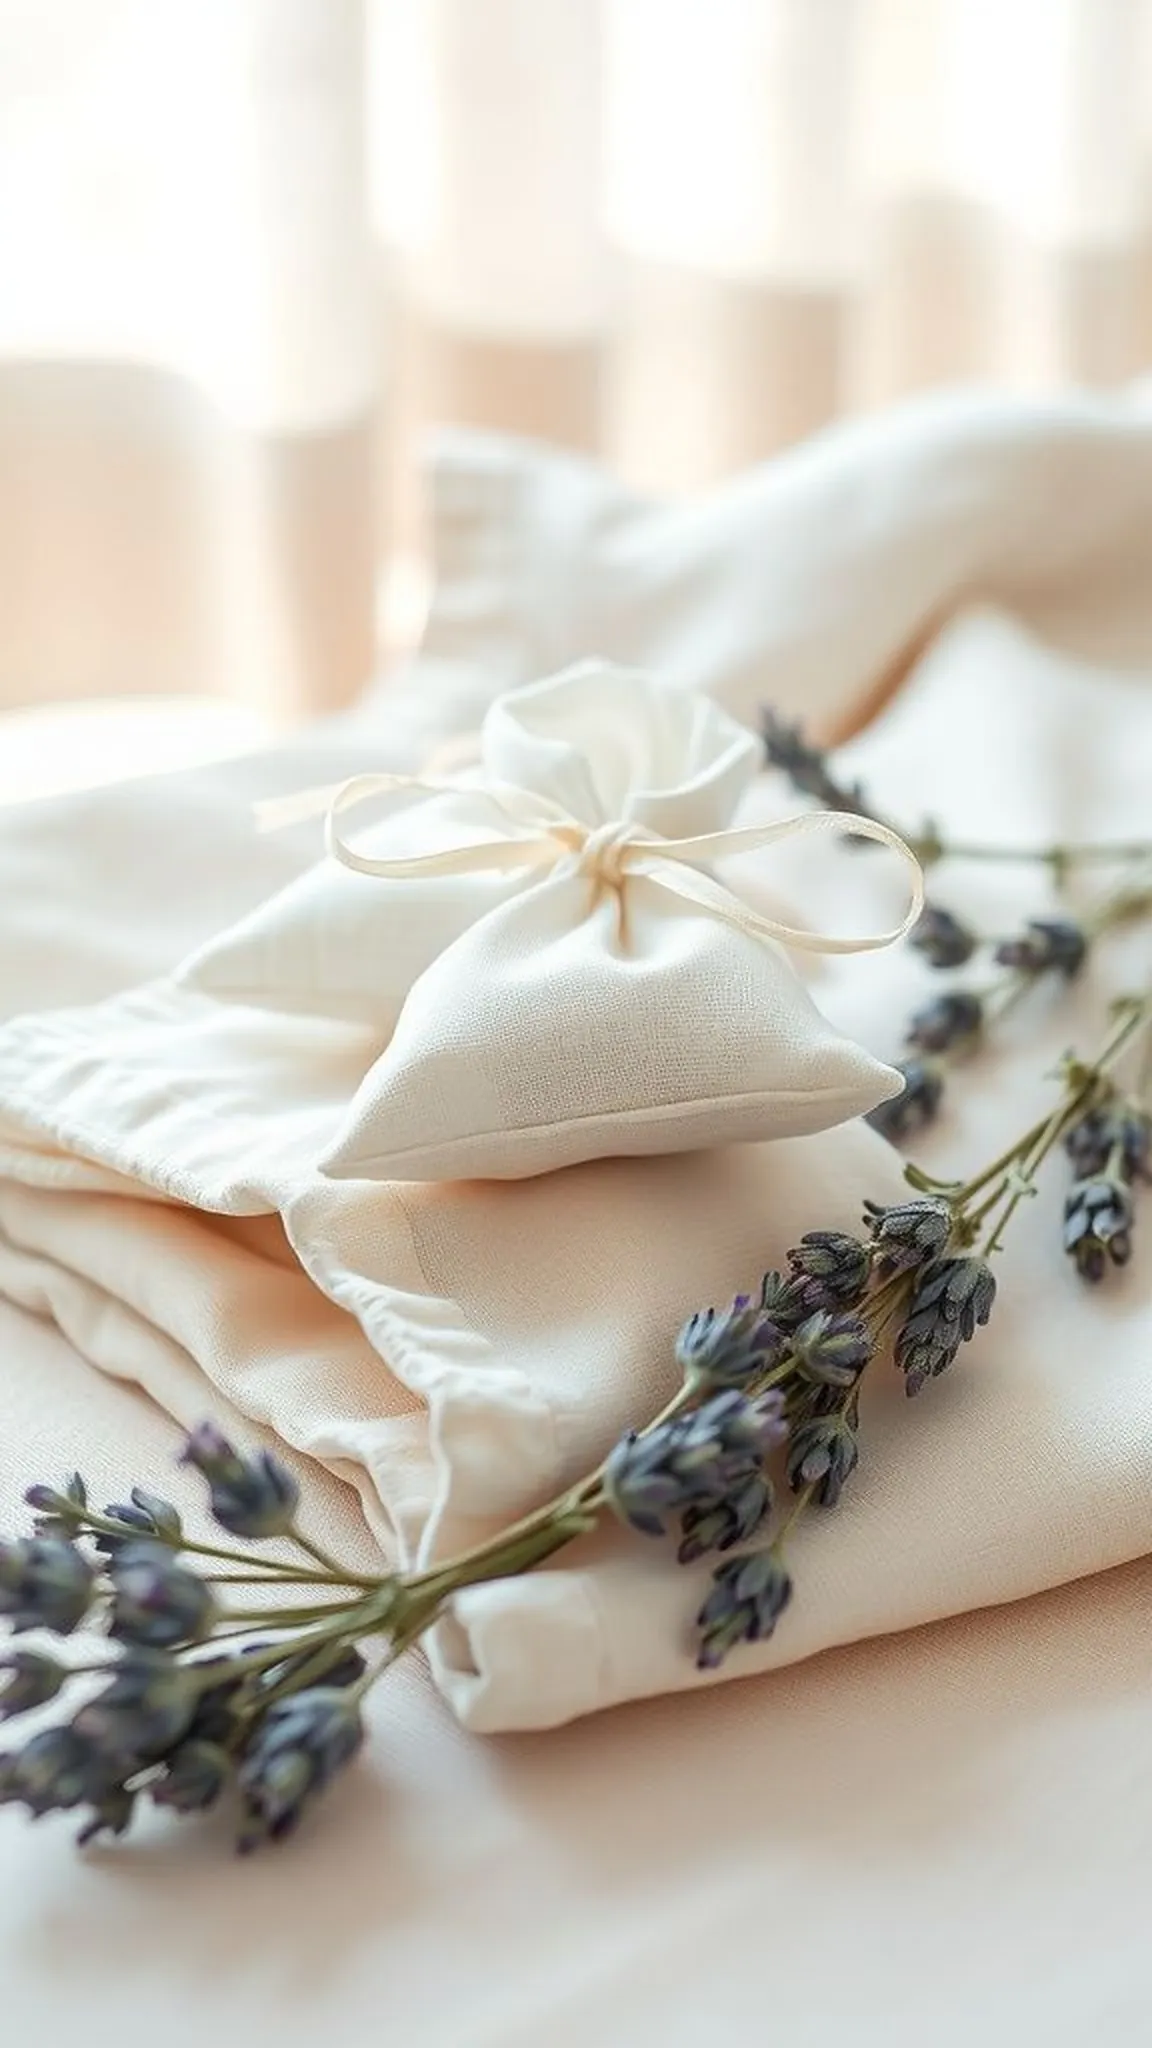
Small fabric sachets filled with dried lavender deliver a soft floral scent that feels calming when drawers are opened or linens are refreshed. The delicate fragrance pairs with fabric textures for a quietly fragrant storage solution.
Natural muslin or linen carries the scent through its weave while remaining breathable, and tiny stitches keep contents snugly enclosed. The sachet weight is light and the tactile impression is soft, lending a peaceful detail among folded textiles.
Muted fabric tones allow the pale purple buds to remain the olfactory star while printed cloth adds personality to each sachet. A neatly tied ribbon or stitched closure gives a subtle finishing touch and keeps the bundle secure.
Pro Tip: Mix dried lavender with a small amount of rice to help the sachet retain its shape and extend the gentle scent over time.
How to Make This
- Cut two identical small squares of muslin or linen and place them right sides together.
- Sew around the edges leaving a small opening, then turn the sachet right side out through the gap.
- Fill with dried lavender blossoms mixed with a pinch of rice, stitch the opening closed, and garnish with a ribbon if desired.
Avoid: A frequent beginner mistake is overfilling sachets, causing seams to stretch and pop in storage. A modest filling keeps the sachet soft and secure inside drawers.
Try Also: Combine lavender with dried rose petals or lemon verbena for a layered scent profile. Sew tiny heart or square shapes for different drawer presentations.
Products & Materials
Items Used
- dried lavender buds
- muslin fabric
- all-purpose thread
- uncooked rice
“Fragrant lavender sachets to freshen drawers and linens naturally.”
Chalkboard-painted door sign with handwritten charm
⏱️ 45 min · 🟢 Beginner
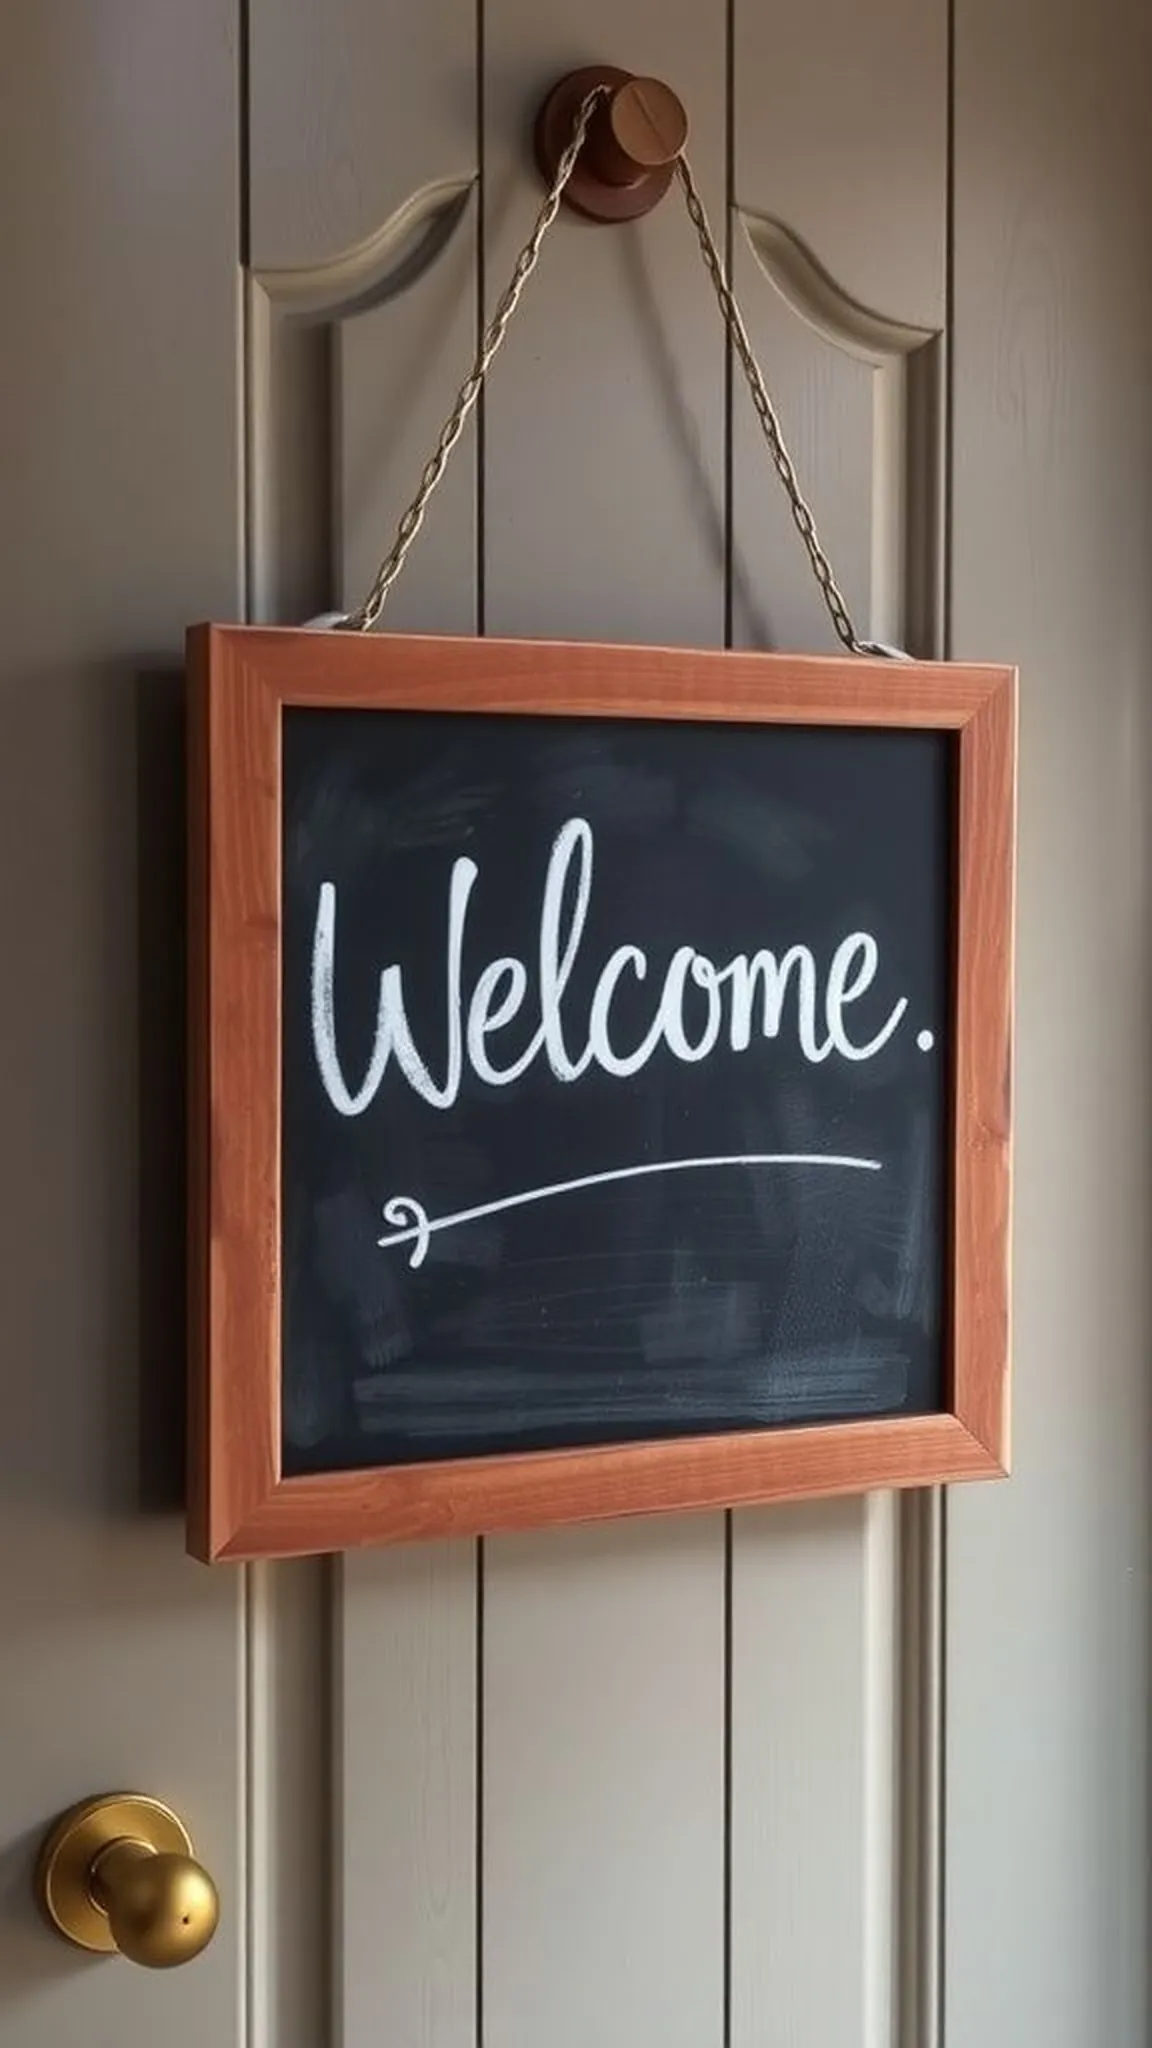
A small chalkboard sign on a door brings a handwritten note and a lived-in personality to a hallway or entry. The matte surface absorbs light and invites soft, erasable messages that change with mood.
Chalk dust leaves a faint powdery scent and a tactile residue on fingers while written letters have a pleasing, irregular quality. Unframed or in a simple wooden frame, the sign reads as approachable and informal.
Neutral frames and crisp white chalk offer a timeless contrast that fits many decor styles, from cottage to modern farmhouse. The temporary nature of chalk encourages playful, short-lived phrases and casual updates.
Pro Tip: Prime the chalkboard surface by rubbing a piece of chalk flat across it and wiping clean to avoid permanent ghosting from single-word use.
How to Make This
- Paint a small wooden plaque with chalkboard paint following the manufacturer’s drying recommendations between coats.
- Once fully dry, frame the plaque or attach hanging hardware to the back for door display.
- Season the surface by rubbing chalk over it and wiping clean, then write messages with white chalk or chalk markers.
Avoid: A frequent beginner mistake is writing on an unseasoned board, which causes markings to remain faint and ghosted. Proper priming ensures clean erasable writing and better contrast.
Try Also: Use colored chalk for playful notes or add a small painted border for a framed look. Create a calendar grid for weekly reminders or a welcome sign with changing greetings.
Products & Materials
Items Used
- wood plaque
- chalkboard paint
- white chalk sticks
- picture hanging hardware
“Handwritten chalkboard door sign for quick, changeable messages.”
Hand-stamped tea towels with graphic motifs
⏱️ 1 hour · 🟢 Beginner
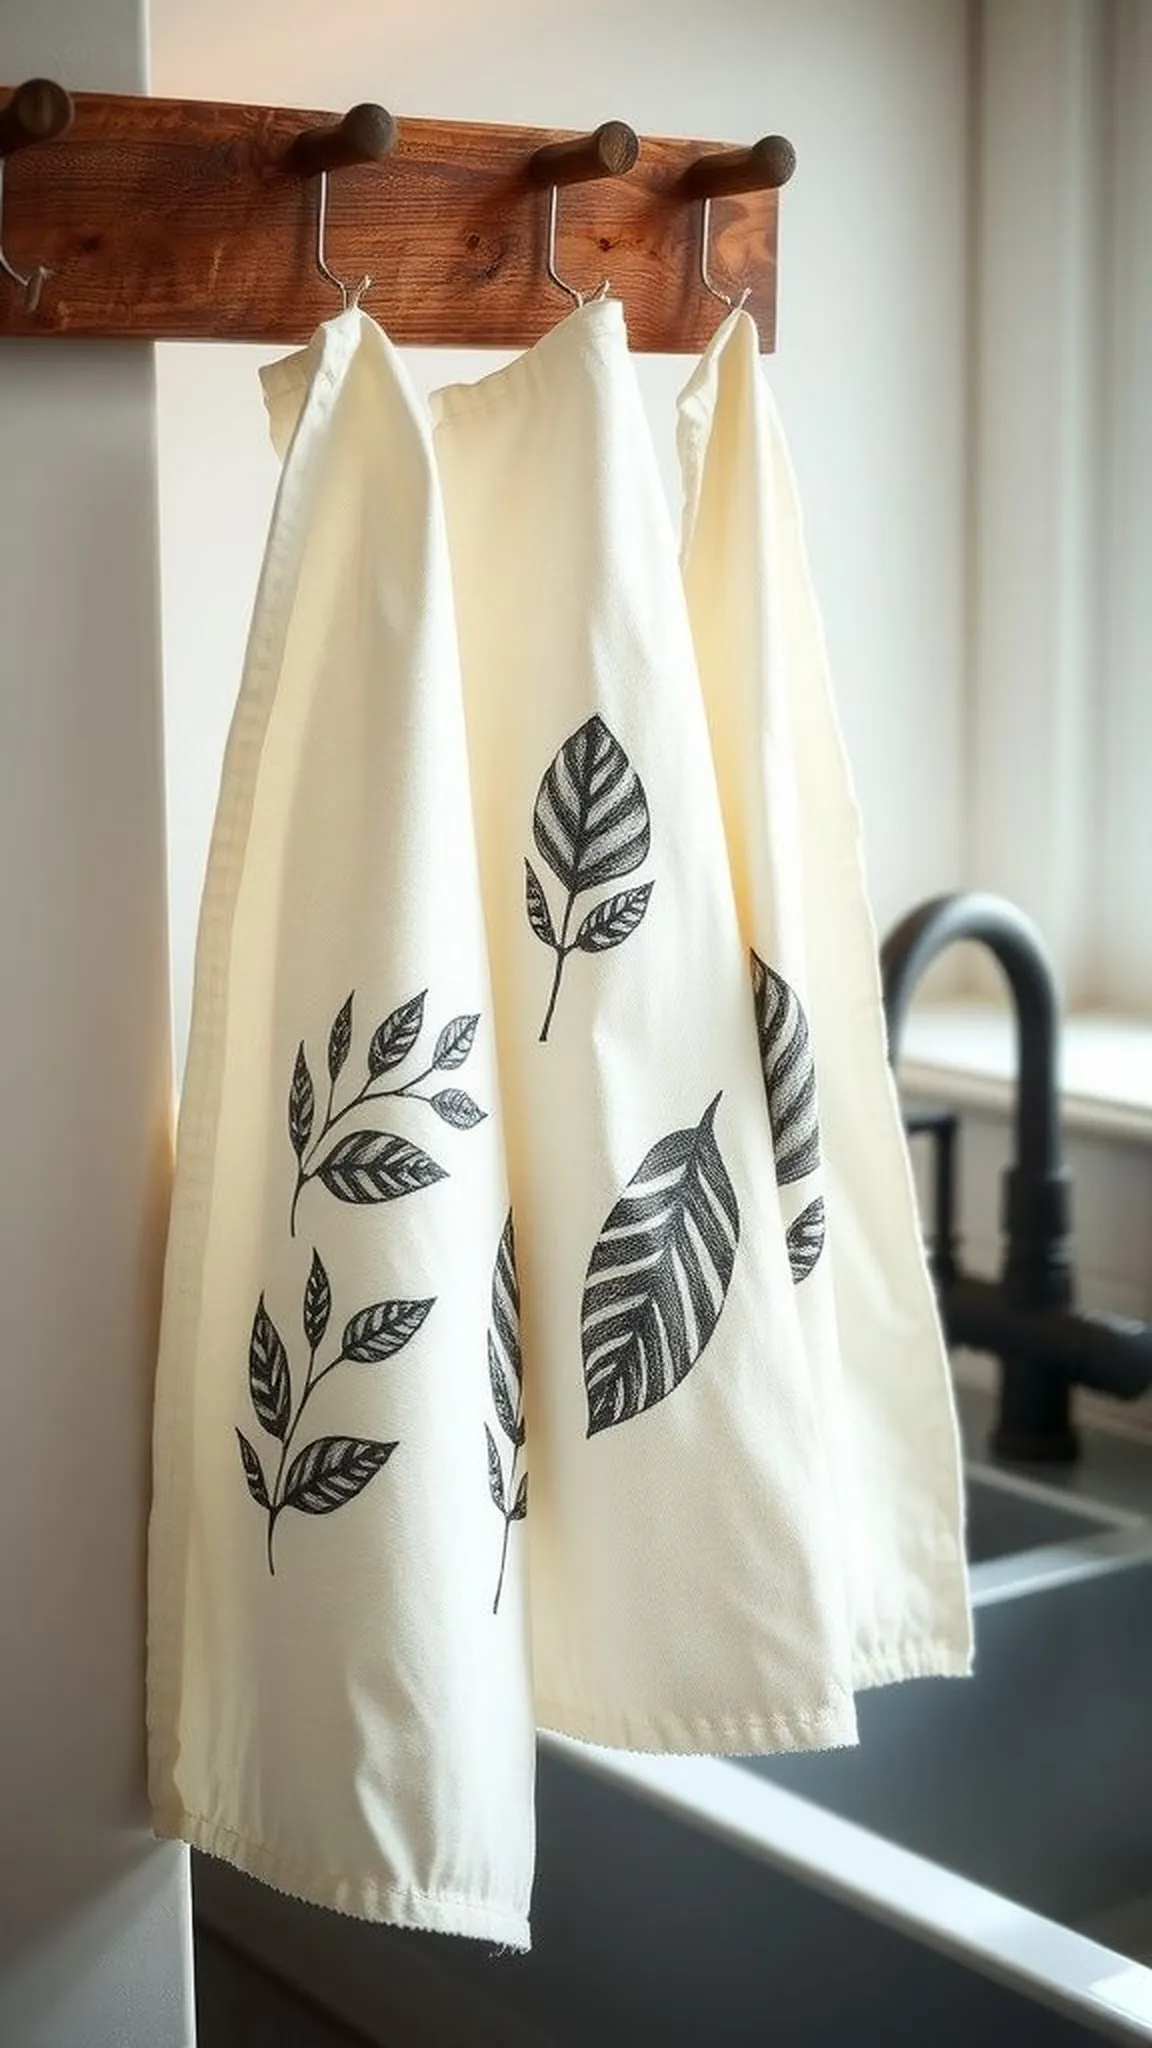
Plain cotton towels receive crisp, hand-printed shapes that read as casual and curated when hung near the sink. The stamped ink creates slight texture and edge variation, giving each motif a handcrafted personality.
Natural fiber towels feel soft and absorbent, and the printed surface stands up to repeated display and gentle use. The contrast of ink against neutral cloth provides a simple visual rhythm that suits many kitchen styles.
Motifs such as small leaves, dots, or kitchen icons keep the effect tidy while oversized patterns feel bold and graphic. A finished towel looks ready for daily use and simple enough to refresh over time.
Pro Tip: Test stamp placement on scrap fabric first to check ink saturation and spacing before committing to the final tea towel.
How to Make This
- Choose a plain cotton tea towel and set up a protected work surface, using a foam pad beneath the fabric.
- Apply fabric ink to a rubber stamp evenly, then press the stamp onto the towel with steady pressure for a clear impression.
- Allow ink to dry fully and heat-set according to the ink manufacturer’s instructions to ensure washfastness.
Avoid: A frequent beginner mistake is over-inking the stamp, which causes blurred edges and loss of crisp detail. Light, even coverage produces clearer impressions and a more refined result.
Try Also: Stamp a repeating border pattern for a traditional look or create a clustered vignette in one corner for a modern statement. Use colored inks for a lively, seasonal update.
Products & Materials
Items Used
“Graphic hand-stamped tea towels that brighten kitchen routines.”
