
As an Amazon Associate I earn from qualifying purchases.
Bright Summer Wreath DIY Crafts bring a burst of sunshine to any entryway through bold color and natural texture.
These Bright Summer Wreath DIY Crafts ideas blend playful florals with citrusy accents and woven bases for an instant cheery welcome.
Each project suits a range of skill levels from quick looped stems to mixed material designs meant for relaxed afternoons.
Citrus and bloom wreath on a grapevine base
⏱️ 1 hour · 🟢 Beginner
A grapevine base dressed with glossy faux citrus slices and soft silk blooms radiates sunny energy and textured contrast. The bright orange peels catch morning light while leaves offer a cool, matte counterpoint.
The arrangement reads like a small summer market stall with visual rhythm and a hint of sweetness. Touches of green add a fresh finish that feels inviting and lively.
This wreath carries friendly curb appeal that pairs especially well with light colored doors and woven doormats. It evokes relaxed porch chats and warm afternoon breezes.
Pro Tip: Tuck slices and petals into open vine loops for a layered look that settles naturally without extra bulk.
How to Make This
- Lay out a grapevine wreath base and arrange faux citrus slices and silk flowers around it to find a pleasing composition.
- Secure pieces with thin floral wire wrapped snugly behind the stems to hold shapes against the vine.
- Add small leaf sprigs into gaps and anchor them with hot glue for extra hold in windy spots.
Avoid: Overcrowding the vine can flatten blooms and hide the natural twist of the base, making the wreath feel heavy instead of airy.
Try Also: Swap silk peonies for chamomile clusters for a softer palette, or replace citrus with dried orange slices for an earthy mood.
Products & Materials
Items Used
- grapevine wreath base
- faux citrus slices
- silk floral stems
- floral wire
- hot glue gun
“Sunny citrus and blooms for a bright summer front door.”
Sunflower paper wreath for a cheerful porch
⏱️ 2 hours · 🟢 Beginner
Layered paper sunflowers assembled around a lightweight hoop create a bold sunny silhouette that reads clearly from the curb. Crisp yellow petals fan out in repetitive rhythm while rich brown centers add grounding contrast.
The paper texture offers gentle rustle when a breeze passes and a pleasant paper edge that catches highlights. The overall look is graphic and playful with a handcrafted charm that feels joyful.
This wreath pairs well with a painted door or a woven wreath hanger for a pop of seasonal color. It brings a garden feel without live flowers.
Pro Tip: Score petal folds lightly for subtle dimension so paper catches highlights and keeps a petal-like curve.
How to Make This
- Cut layered petal shapes from yellow cardstock and glue them around a foam or wire hoop to build bloom clusters.
- Create textured centers from brown crepe or corrugated paper and attach them to petal clusters with glue.
- Space clusters evenly and finish with a ribbon loop for hanging.
Avoid: Using thin paper without reinforcement can lead to floppy petals that lose shape in humidity or sun exposure.
Try Also: Try warm orange tones for a sunset variation or small white daisies interspersed for a cottage garden feel.
Products & Materials
Items Used
- yellow cardstock
- wire hoop
- brown crepe paper
- craft glue
“Bright layered paper sunflowers for an eye catching summer wreath.”
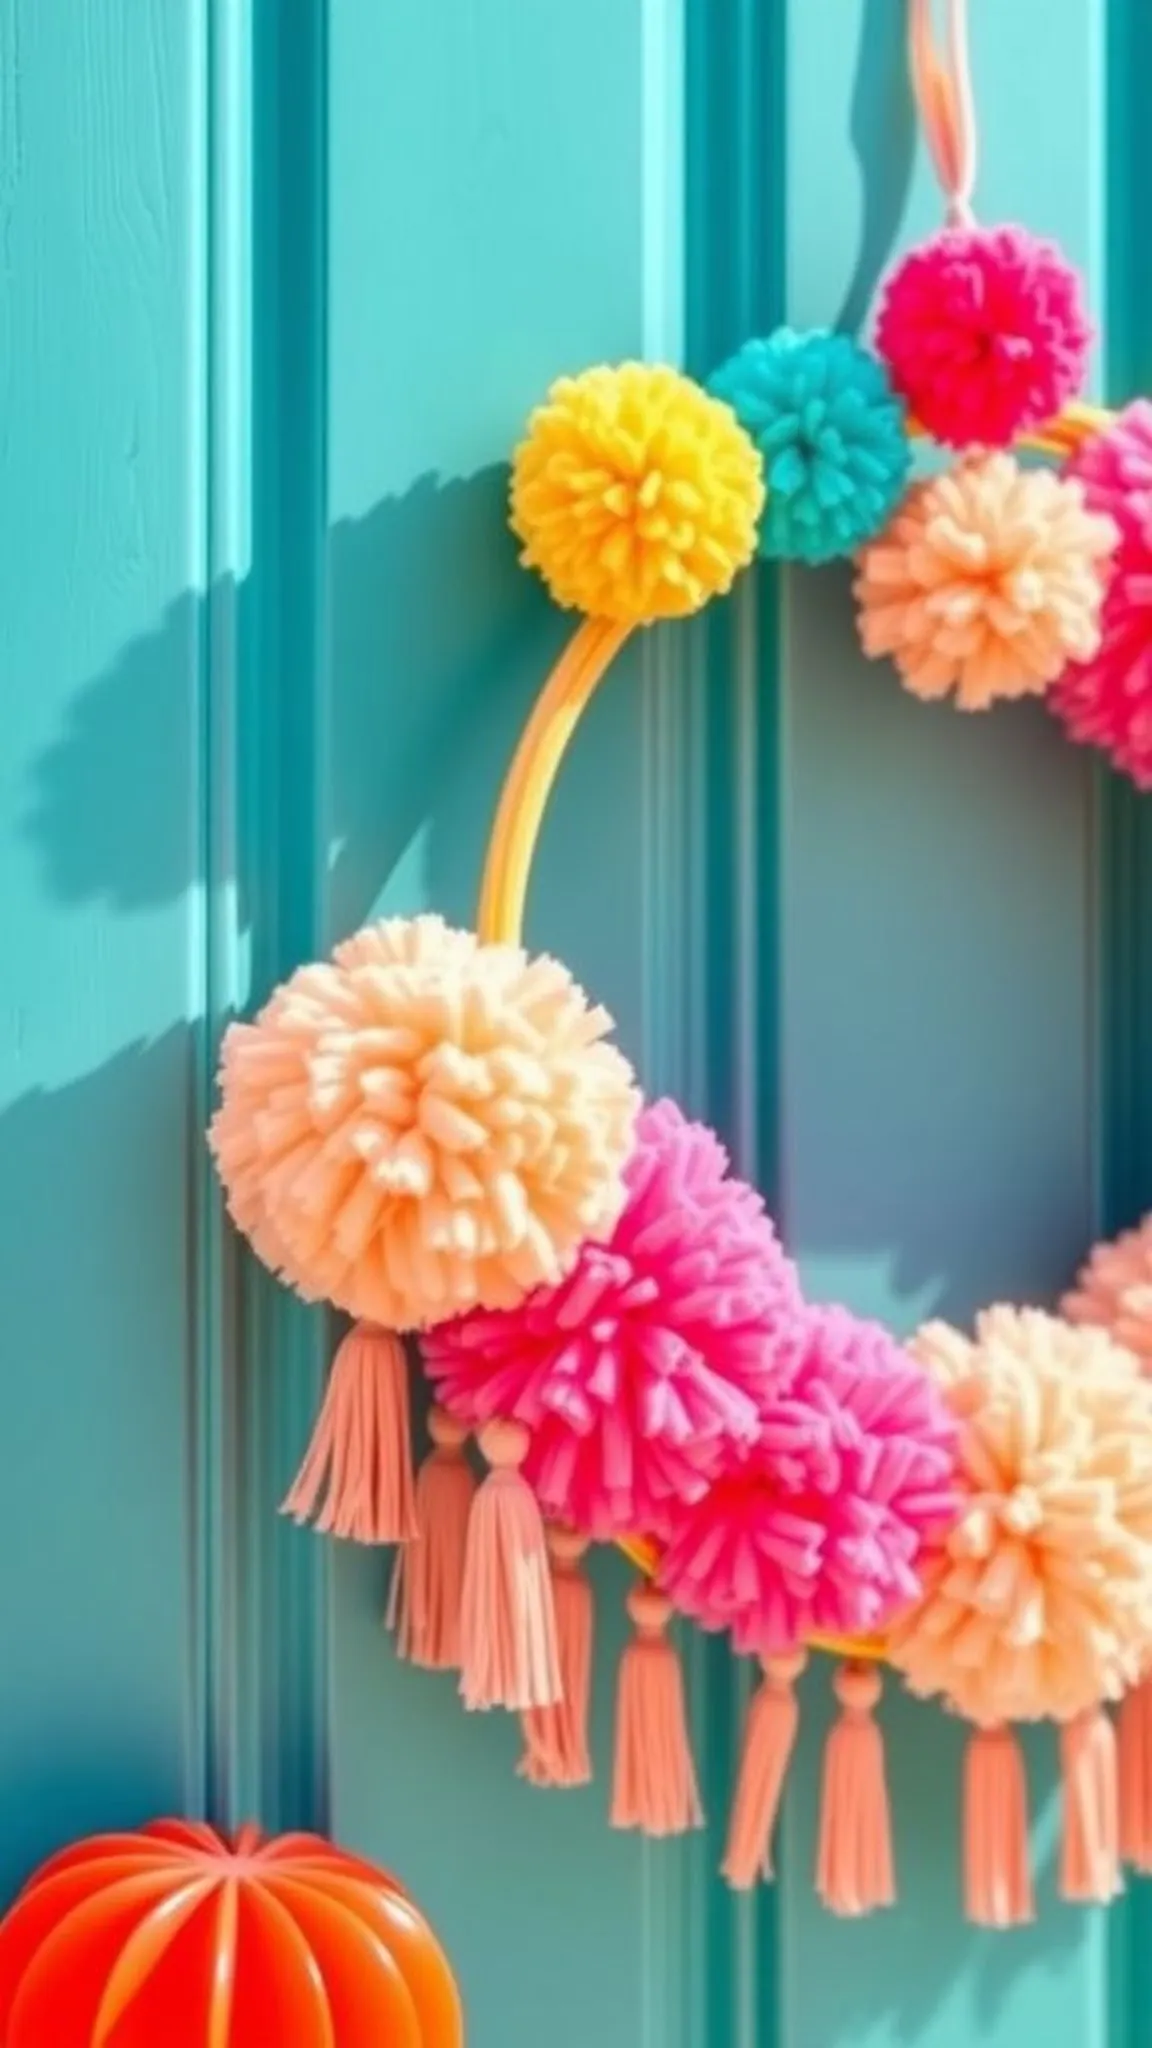
Pom pom party wreath in rainbow colors
⏱️ 1.5 hours · 🟢 Beginner
Fluffy yarn pom poms gathered densely around a foam ring form a squishy, colorful wreath with playful bounce. The soft fibers invite a touch and give the piece a cozy, tactile presence on a door or wall.
Color transitions create a happy rhythm that reads like confetti frozen in place, and fringe edges catch light for subtle highlights. This project feels celebratory while staying relaxed and casual in tone.
The finished wreath works well for porches, patios, or bright indoor nooks where texture matters more than fuss. It makes a strong color statement without fuss.
Pro Tip: Make slightly larger pom poms than expected so the foam base disappears and the wreath reads full and plush.
How to Make This
- Wrap yarn around a pom pom maker or cardboard forms and trim to create fluffy poms in chosen colors.
- Attach pom poms in tight clusters around a foam wreath with hot glue for a cohesive plush look.
- Rotate color groups to form gradients or blocks for a lively visual flow.
Avoid: Too small or sparse pom poms let the base show through and weaken the overall plush silhouette.
Try Also: Create a pastel version with soft cotton yarn or a coastal look using blues and sand tones with accent shells.
Products & Materials
Items Used
- yarn skeins
- foam wreath form
- pom pom maker
- hot glue sticks
“Plush rainbow pom pom wreath for playful summer vibes.”
Save time and printer ink with 50+ printable templates and step-by-step instructions in one ad-free guide.

Just $19.99 — lifetime access
Tropical leaves and ribbon palm wreath idea
⏱️ 2-3 hours · 🟠 Intermediate
Lush faux palm fronds layered with wide satin ribbons evoke a tropical breeze and a holiday beach mood. The glossy leaf surfaces reflect light while ribbon tails add flowing motion that shifts with wind.
A palette of lime green and turquoise reads bright without being loud, and the combination of slick leaves with soft ribbon creates a pleasant tactile contrast. The piece feels both spirited and slightly elegant for outdoor summer gatherings.
Placement on a shaded porch adds depth as leaf shadows dance across the door surface. The wreath suggests a relaxed island mood in an urban setting.
Pro Tip: Angle leaves in alternating directions so light reflects differently across the wreath for a multi dimensional look.
How to Make This
- Arrange faux palm leaves around a wire wreath frame, layering edges for a full tropical silhouette.
- Secure ribbon loops and tails among the fronds with floral wire tucked behind the leaves.
- Add smaller fern sprigs and hot glue where needed to fill gaps and steady loose pieces.
Avoid: Placing all leaves in the same direction can create a flat appearance instead of a lively layered effect.
Try Also: Mix in bright hibiscus blooms for a floral twist or use raffia ribbon for a relaxed beachy texture.
Products & Materials
Items Used
- faux palm leaves
- wire wreath frame
- satin ribbon
- floral tape
- hot glue gun
“Lush palm leaves and flowing ribbon for a tropical summer entrance.”
Seashell and netting beach wreath for coastal doors
⏱️ 2 hours · 🟠 Intermediate
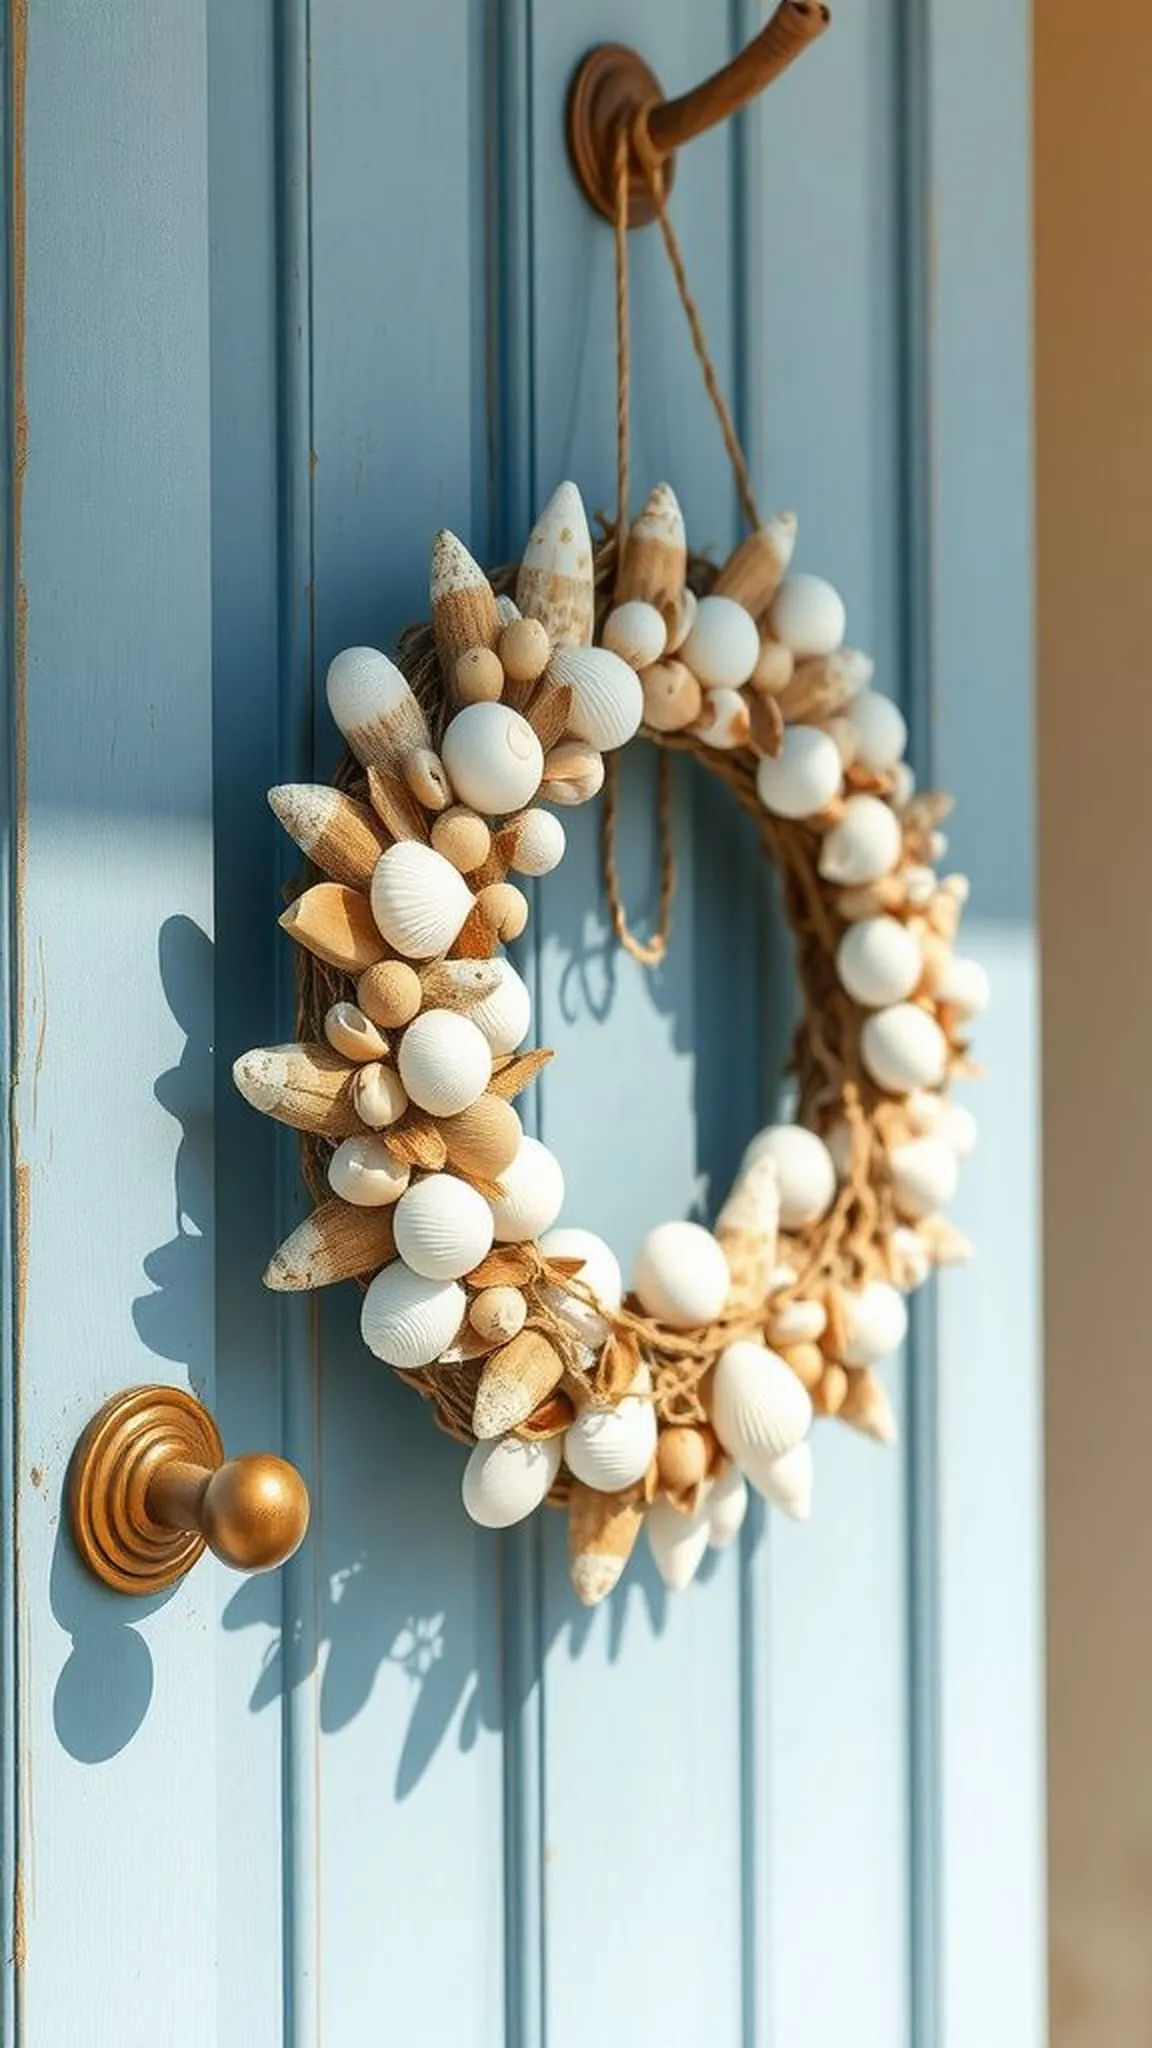
A base wrapped in open netting and scattered with real shells and driftwood pieces conjures salt air and sandy toes. The shells’ pearly interiors catch light while rough driftwood adds tactile contrast.
The neutral palette with hints of pale blue reads calm and breezy, perfect for beachfront cottages or nautical-themed porches. The texture mix invites a leisurely glance and a small smile from passersby.
The completed wreath feels casually collected as if it were gathered on a relaxed morning walk along the shore. It brings a seaside mood to everyday entrances.
Pro Tip: Group shells in small clusters to create focal points so each shell’s texture and color can be appreciated.
How to Make This
- Drape fishing netting over a foam or straw wreath base and fix it into place with discreet glue or wire.
- Arrange shells and small driftwood pieces in clusters and attach with a hot glue gun for secure hold.
- Add a loop of jute twine for hanging and trim stray net fibers for a tidy edge.
Avoid: Spreading shells too thinly reduces visual interest, whereas clustered groupings feel intentional and coastal curated.
Try Also: Include sea glass for color pops or add knotted rope accents for a stronger nautical mood.
Products & Materials
Items Used
“Coastal charm with shells, netting, and driftwood accents.”
Colorful paper fan fiesta wreath for summer parties
⏱️ 2 hours · 🟢 Beginner
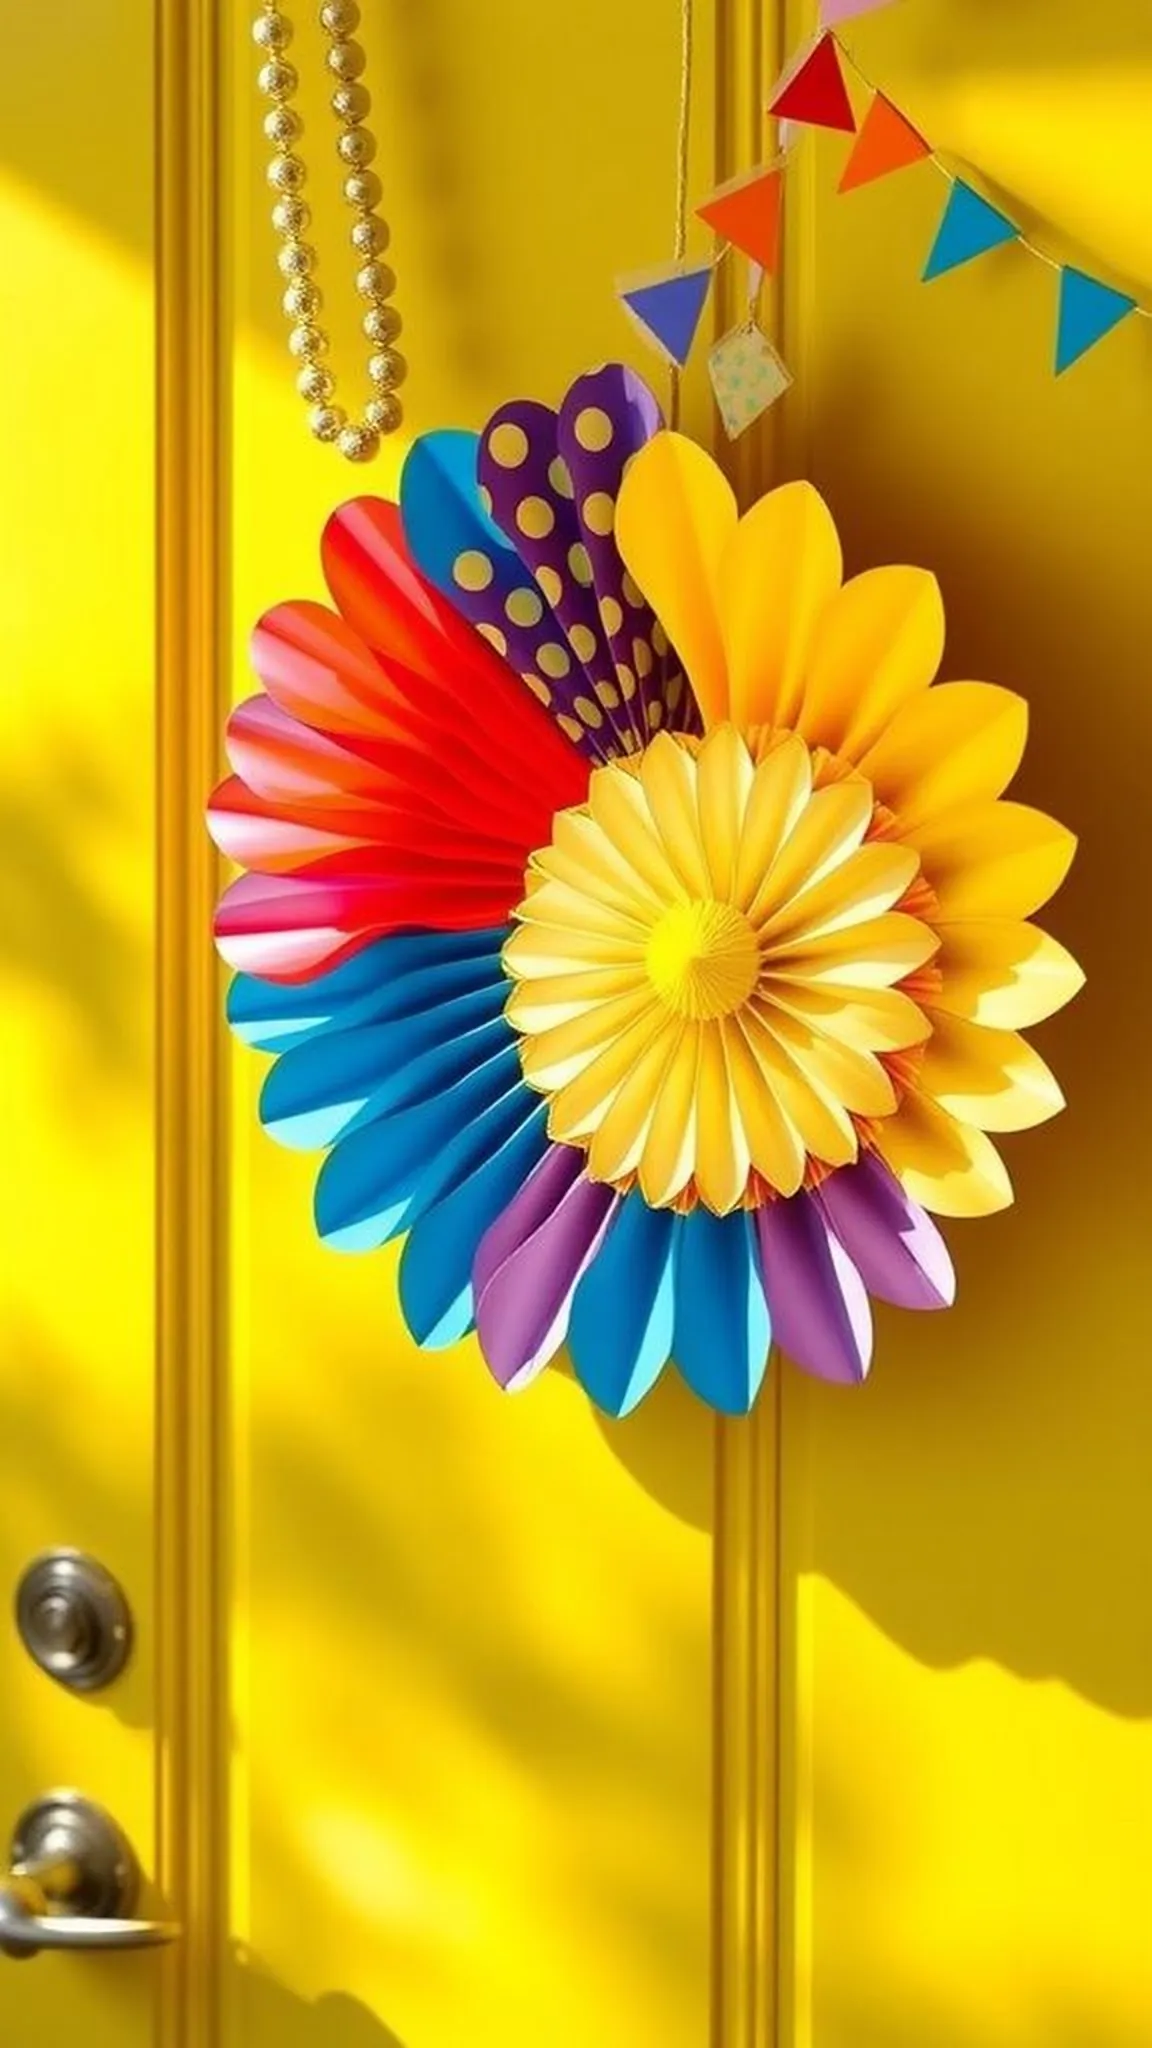
Bright folded paper fans mounted in a circular pattern create a festive, graphic wreath that reads like a summer celebration. Each fan edge adds a scalloped rhythm that is lively and cheerful from a distance.
The paper surfaces catch highlights and cast soft shadows, offering a pleasant play of light. Layers overlap to form depth and a tactile scallop that feels energetic and playful.
This wreath makes a strong, colorful statement on porch doors or interior party areas. It lifts the mood without feeling fussy or overly ornate.
Pro Tip: Alternate fan sizes and orientations so the wreath retains a dynamic silhouette and prevents symmetry from feeling static.
How to Make This
- Fold and secure paper fans from brightly colored cardstock, varying diameters for interest.
- Attach fans around a lightweight foam or cardboard ring, overlapping edges for a full look.
- Add a ribbon hanger and small tassel accents for extra playfulness.
Avoid: Using all identical fan sizes can make the wreath look flat instead of lively and dimensional.
Try Also: Use tissue paper for a softer texture or metallic cardstock for a glam summertime bash effect.
Products & Materials
Items Used
“Festive paper fans arranged into a bright summer wreath.”
Boho fabric scrap tied wreath with relaxed texture
⏱️ 45 min · 🟢 Beginner
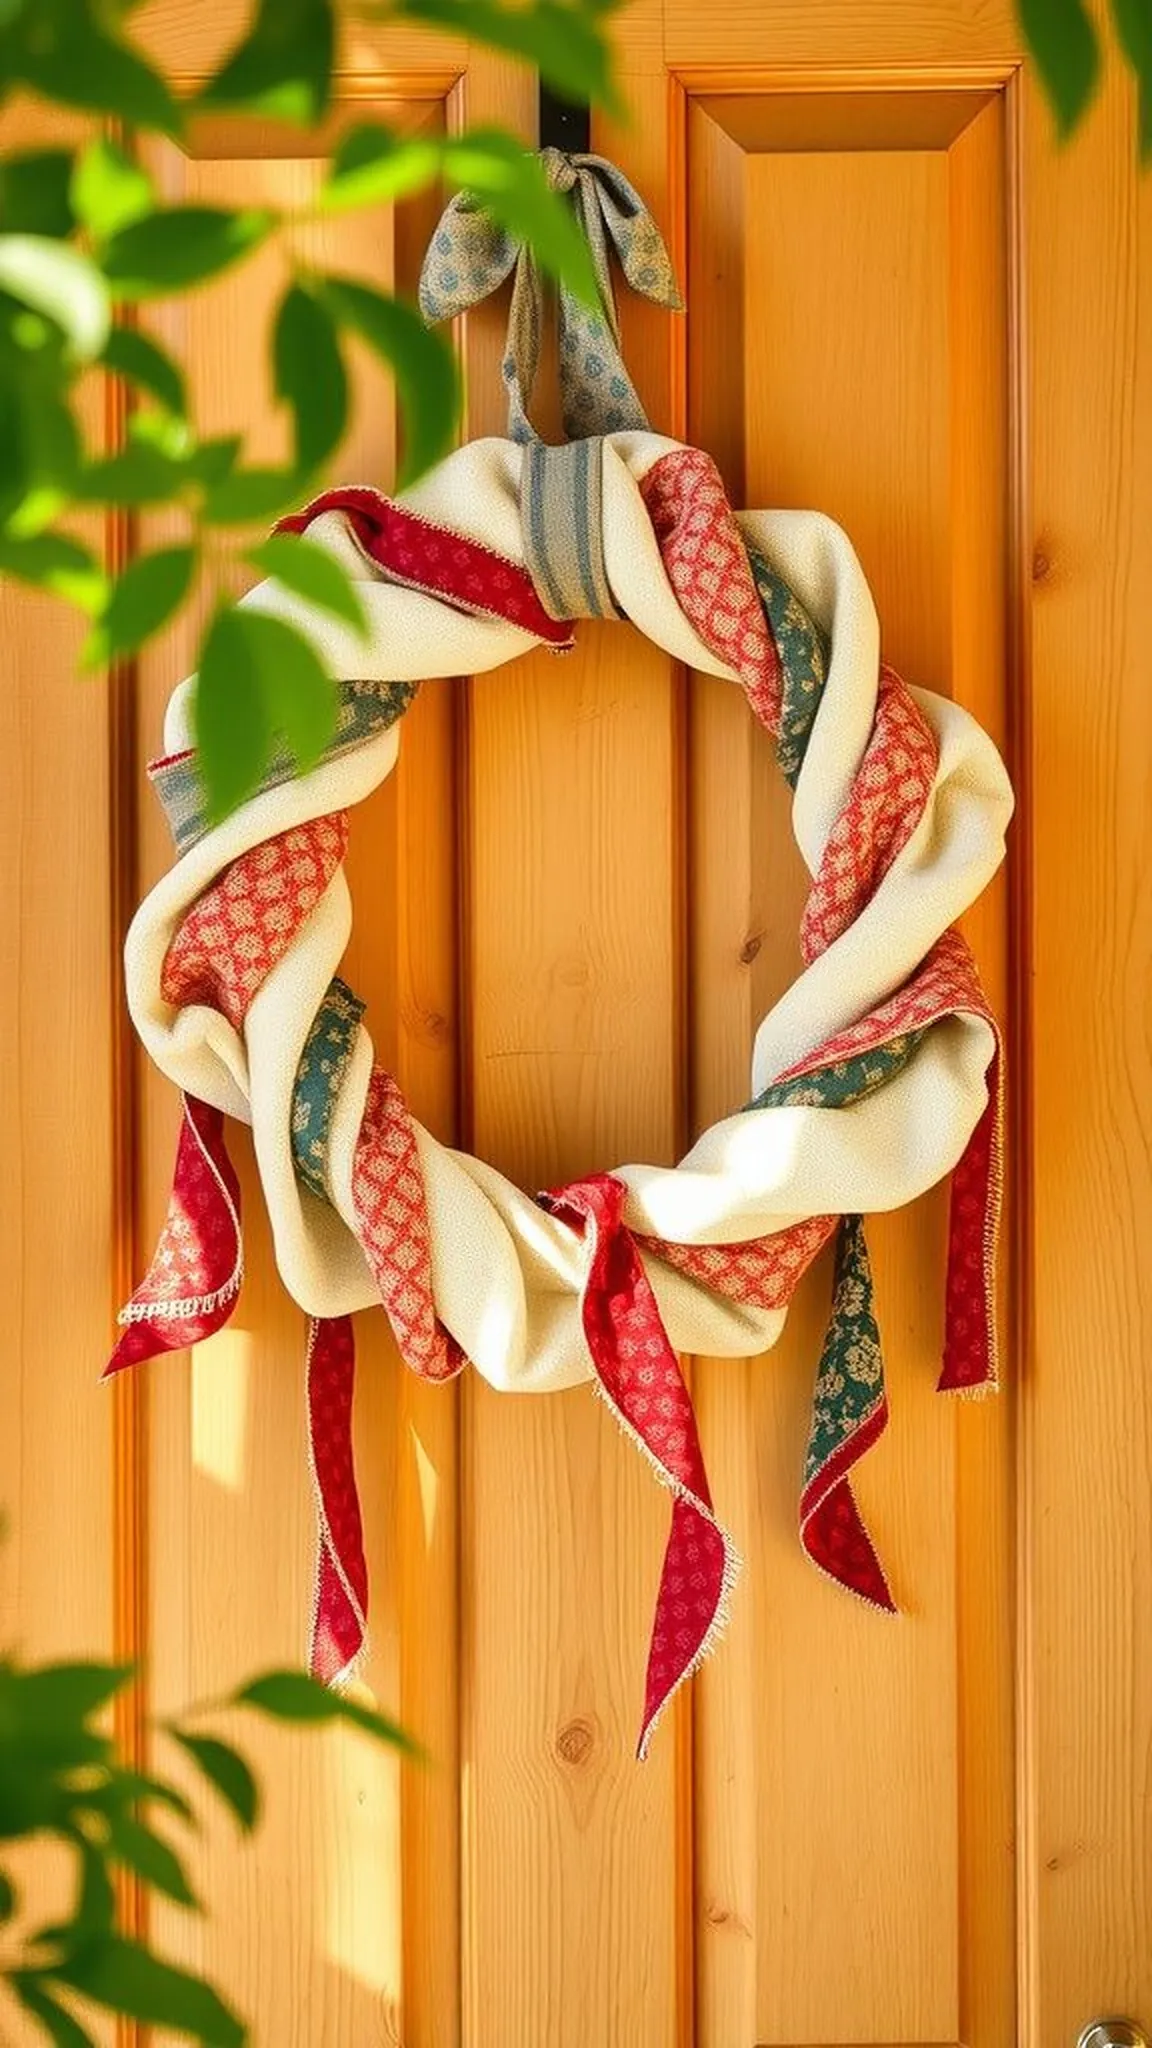
Strips of colorful fabric tied around a wire hoop produce a bohemian, textural wreath that moves gently in the breeze. Frayed edges and mixed prints create a layered, handmade charm that feels cozy and unpretentious.
The mix of cotton, linen, and lightweight prints offers a pleasing combination of matte and soft sheen so the wreath reads rich in texture. The overall effect suggests thrifted finds assembled with an easygoing spirit.
This style works beautifully on screen doors or in casual indoor spaces where softness and pattern bring warmth. It is approachable for quick seasonal refreshes.
Pro Tip: Use uneven strip lengths and a mix of solids with small prints so the overall look stays relaxed and visually interesting.
How to Make This
- Cut fabric scraps into uniform width strips and tie them around a metal hoop with snug knots.
- Continue tying strips densely until the hoop is fully covered and adjust for balanced fullness.
- Trim any overly long tails and fluff fabric to create an inviting silhouette.
Avoid: Tying strips too sparsely reveals the frame and reduces the cozy, collected look that defines this style.
Try Also: Try a monochrome palette for a calmer vibe or add a single large tassel cluster for a focal accent.
Products & Materials
Items Used
- fabric scraps
- metal hoop
- pinking shears
“Easy boho fabric wreath with relaxed texture and color.”
Lemon and eucalyptus mixed wreath with fresh vibes
⏱️ 1.5 hours · 🟠 Intermediate
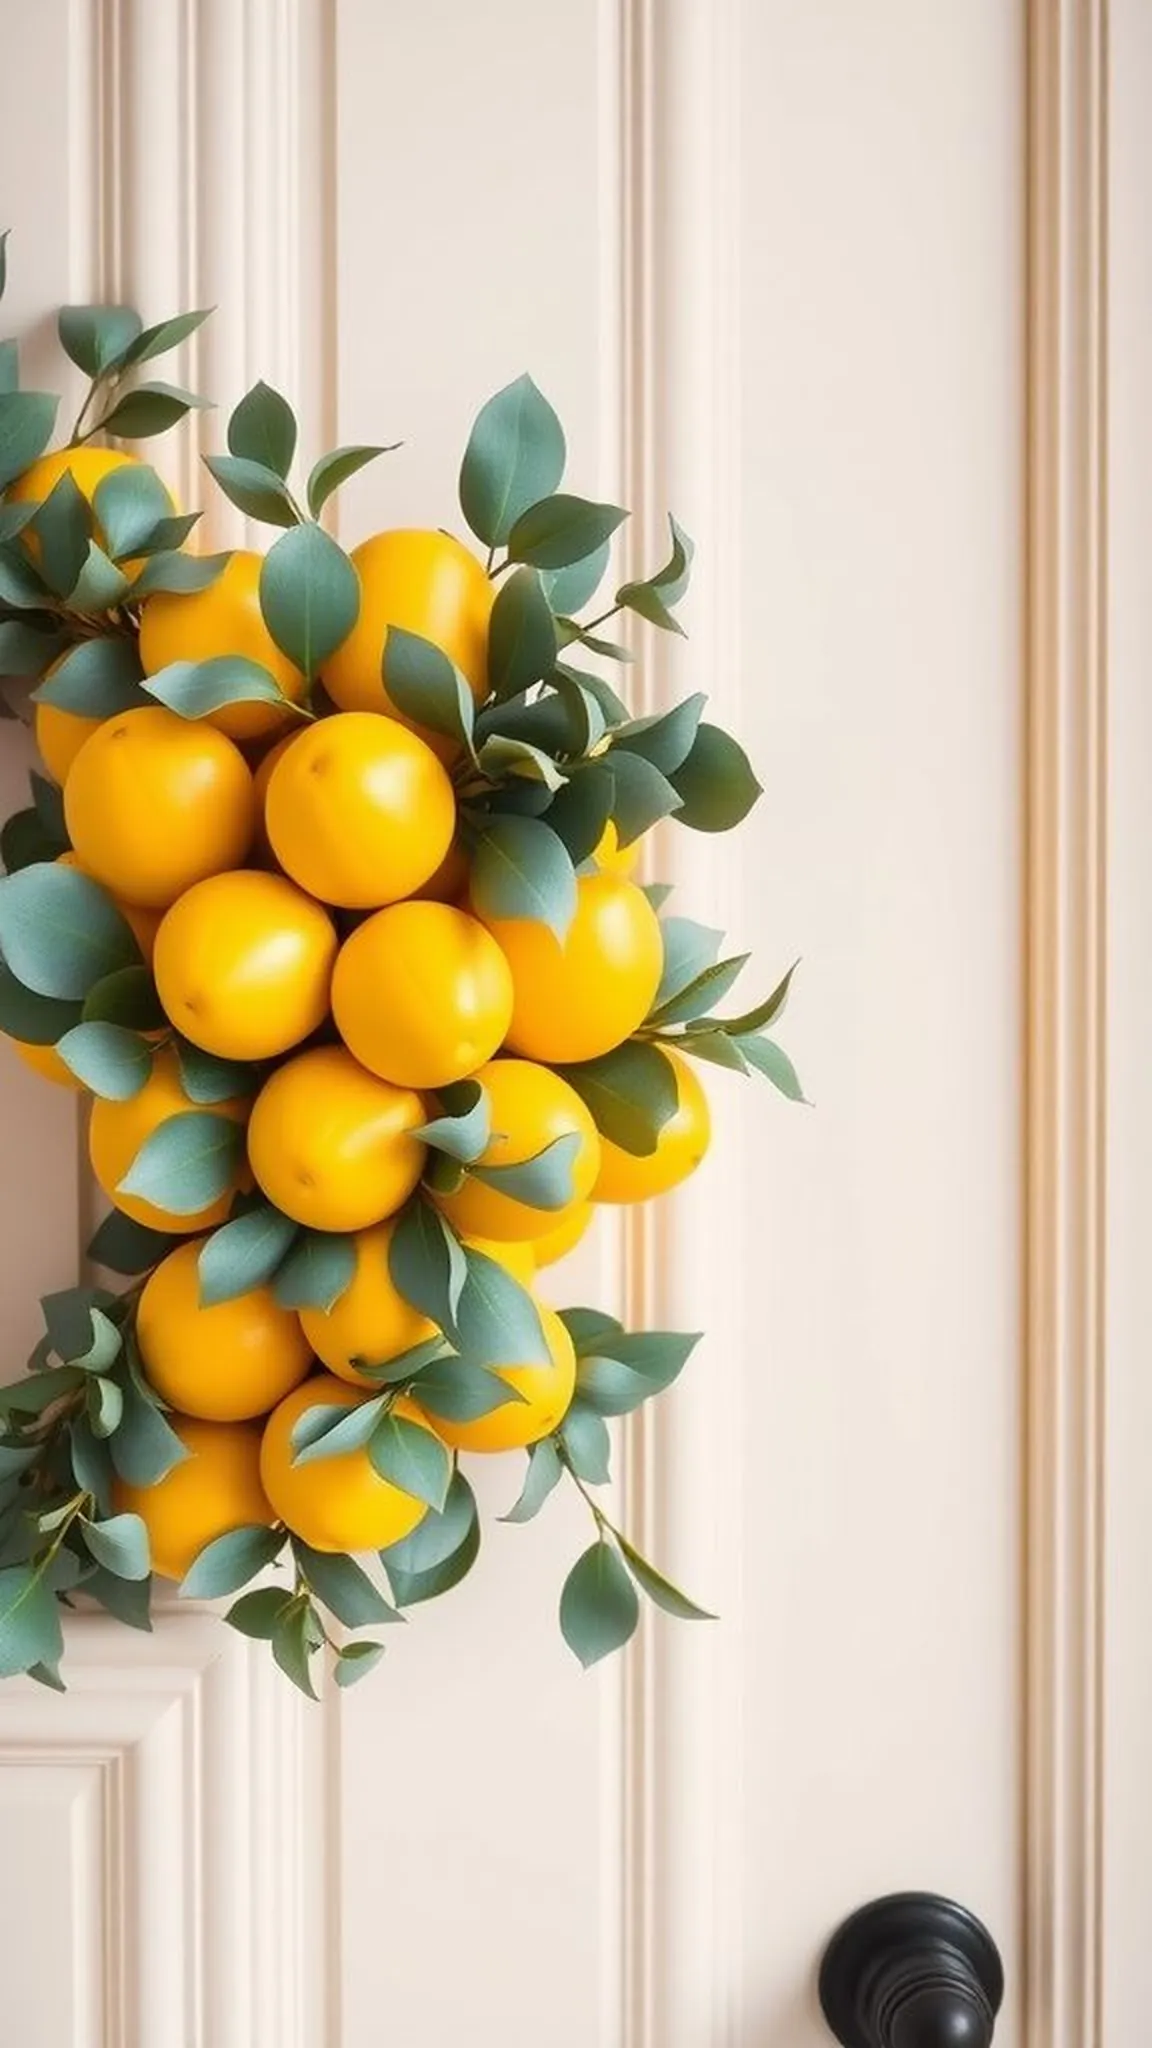
Glossy faux lemons paired with tapered eucalyptus sprigs create a bright and fragrant-feeling wreath that reads fresh and modern. The slick lemon surfaces catch highlights while soft matte silver-green leaves add botanical calm.
The contrast between citrus sheen and eucalyptus texture gives the piece a clean, composed look that still feels lively. Layering stems provides shadow play and a sense of depth that is pleasing to the eye.
This wreath suits a contemporary entry or a sunlit kitchen wall where its citrus tone complements light finishes. It brings a crisp summer energy indoors or out.
Pro Tip: Cluster a few lemons close together for impact while letting eucalyptus stems fan outward to soften the silhouette.
How to Make This
- Position faux lemons in small groups on a grapevine or wire frame and secure with floral wire.
- Tuck eucalyptus stems around and between lemon clusters to create airy green pockets.
- Reinforce connections with hot glue on exposed stems for stability in breezy locations.
Avoid: Scattering lemons too thinly weakens the theme; small clusters create stronger focal interest and balance.
Try Also: Substitute limes for a different hue or add a thin jute bow for rustic contrast.
Products & Materials
Items Used
- faux lemons
- faux eucalyptus stems
- grapevine wreath base
- floral wire
- hot glue gun
“Fresh lemon and eucalyptus wreath for crisp summer style.”
Tissue paper peony cluster wreath with soft petals
⏱️ 2-3 hours · 🟠 Intermediate
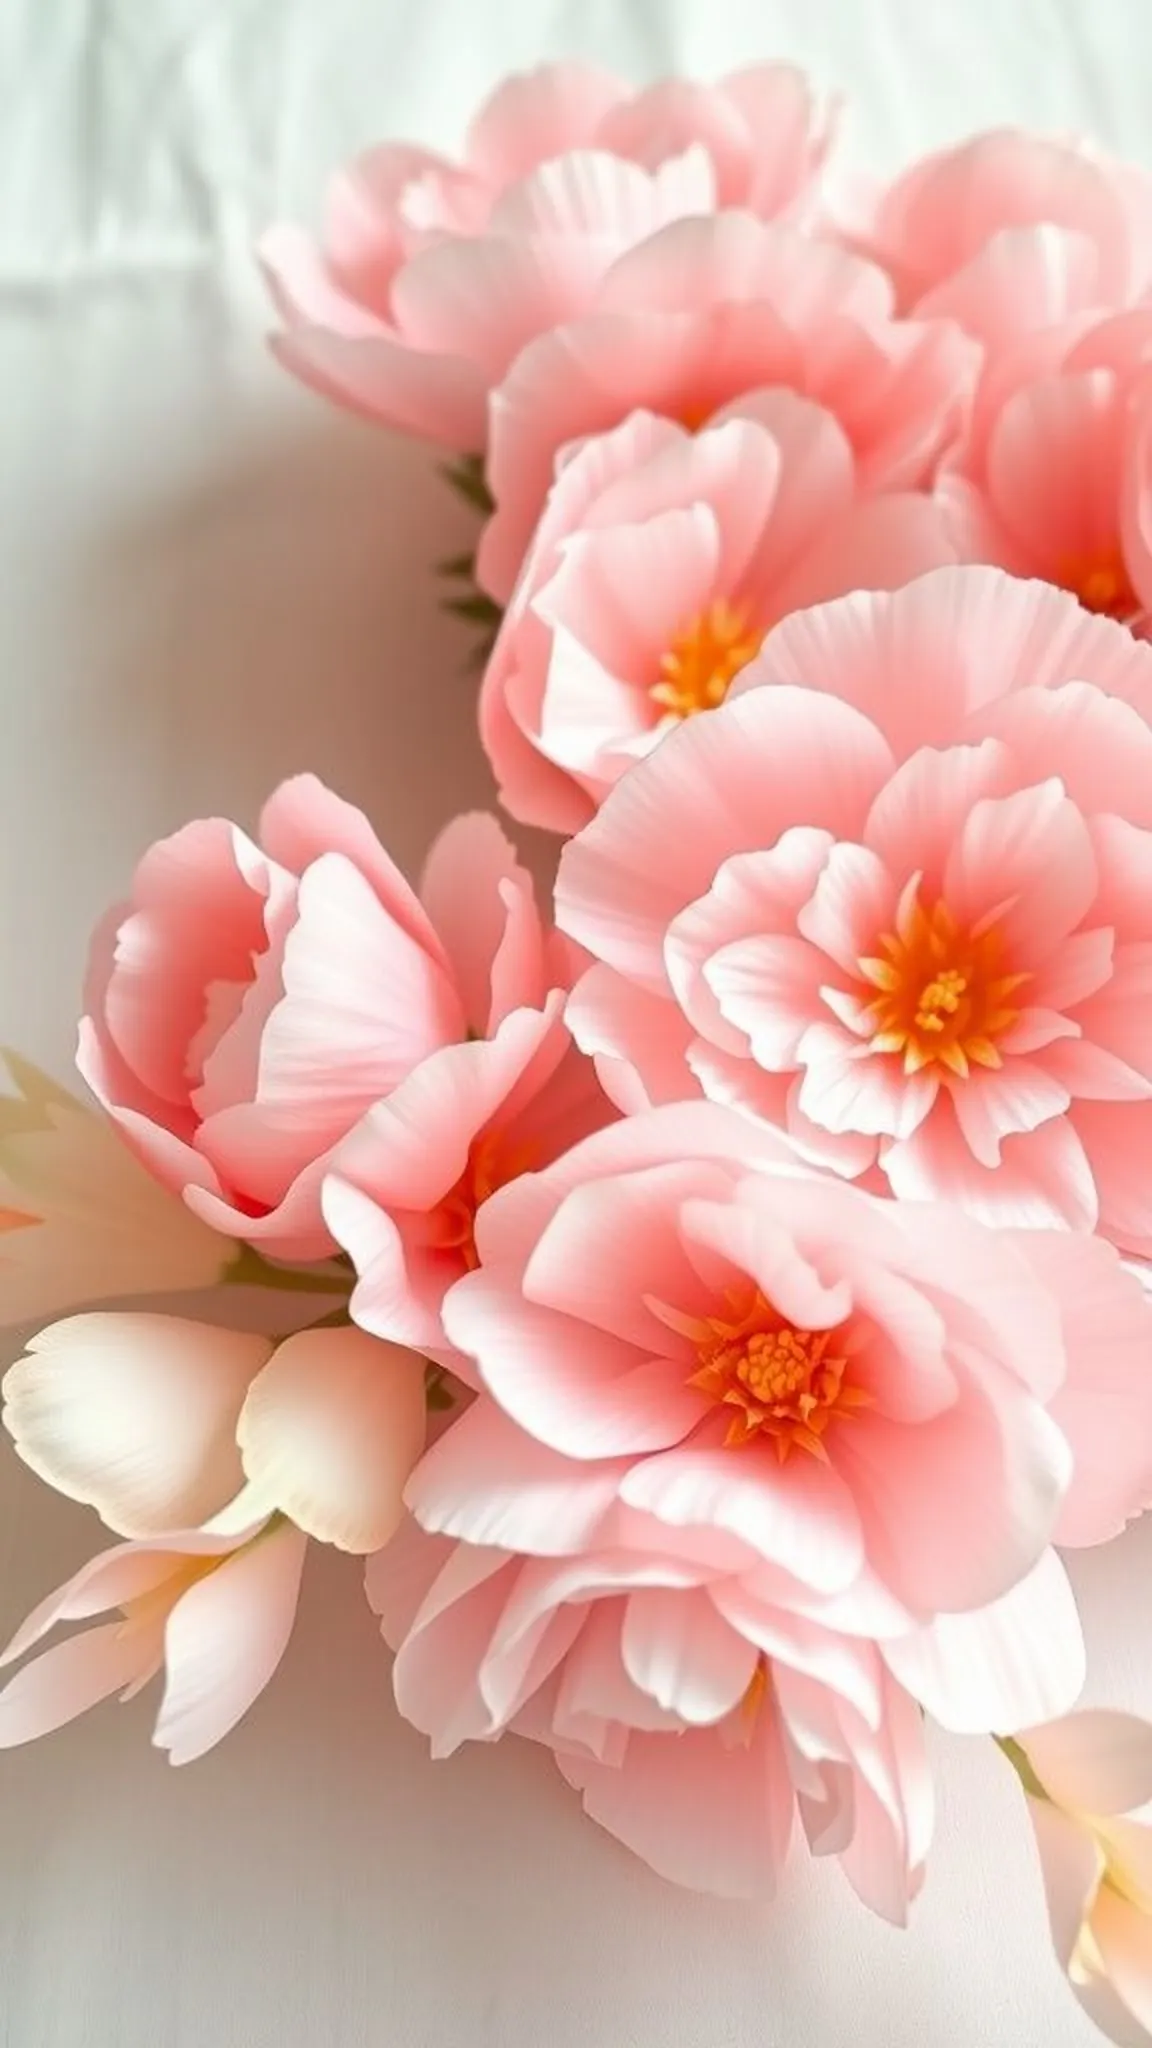
Fluffy tissue paper peonies gathered densely produce a romantic, cloudlike wreath with delicate edge details. Each petal layer catches soft light so the arrangement reads as airy yet substantial.
The translucent tissue introduces subtle color shifts and a gentle flutter as air moves by, adding life to the piece. The mix of blush tones and cream creates a warm, inviting presence on entryways or indoor walls.
This wreath feels like a summer afternoon softened with gentle blooms and warm light. It brings an intimate, floral touch to casual gatherings.
Pro Tip: Do small multiple centers rather than one large bloom so the cluster looks abundant and balanced from every angle.
How to Make This
- Shape tissue paper into layered peony blooms by stacking sheets and securing centers with floral wire.
- Attach peony clusters tightly around a foam ring, filling gaps to achieve plush coverage.
- Fluff individual petals gently to create depth and soft movement.
Avoid: Leaving centers compressed can make blooms appear flat; gentle fluffing is key to a lively result.
Try Also: Use bolder coral hues for a vibrant statement or pale blue tissue for a dreamy coastal look.
Products & Materials
Items Used
“Cloudlike tissue peonies for an elegant summer wreath.”
Colorful button mosaic wreath with vintage charm
⏱️ 2-3 hours · 🟠 Intermediate
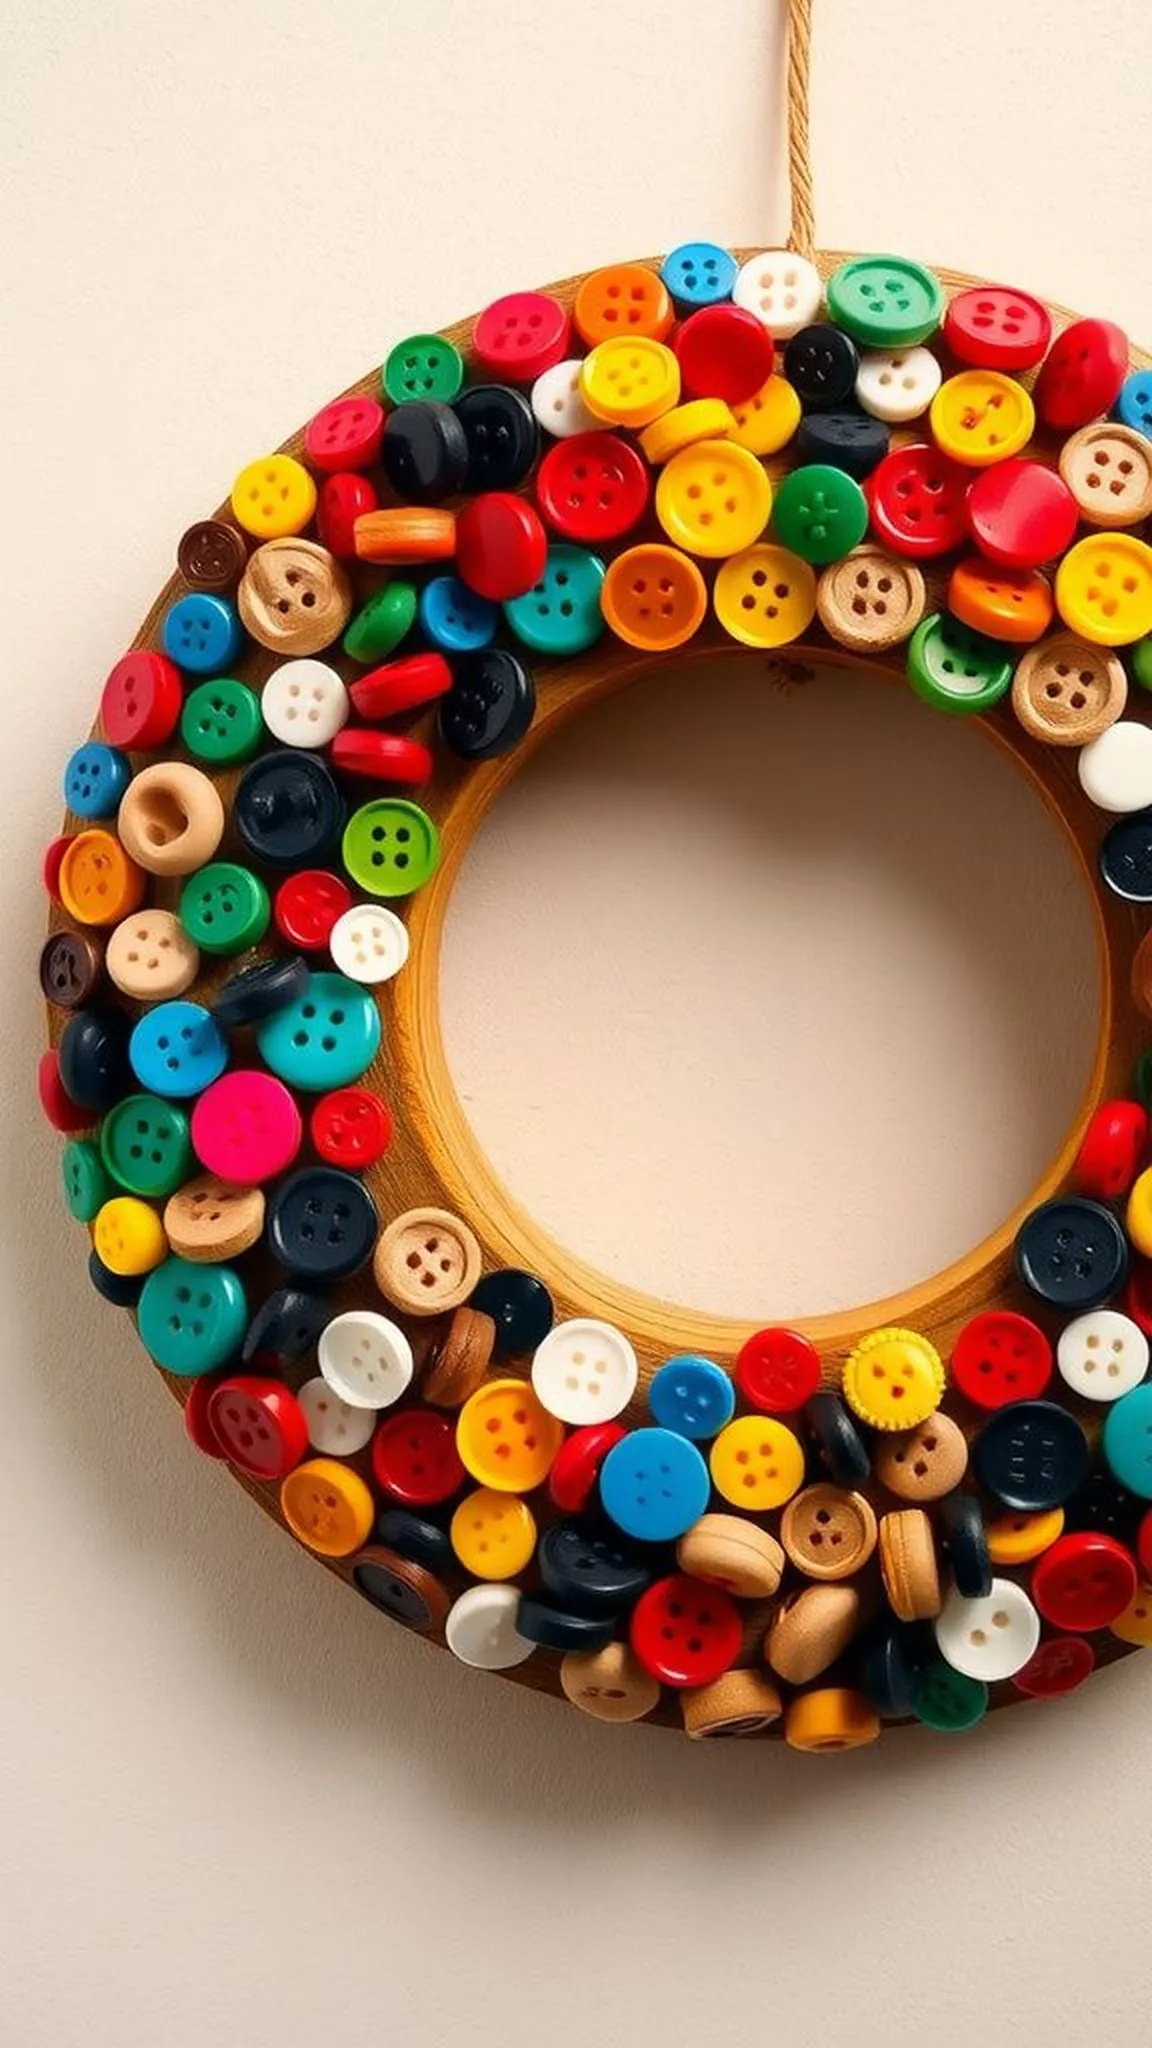
A mosaic of assorted colorful buttons affixed to a disc base forms a tactile, nostalgic wreath with pops of gloss and matte finishes. The buttons’ tiny shapes create a lively surface that invites close inspection.
The varied sizes and hues build a playful rhythm and small highlights where plastic meets light. The contrast between smooth buttons and a textured base gives the piece a collected feel that evokes thrifted finds.
This wreath works well indoors on a gallery wall or as a quirky front door accent for a playful household. It brings handcrafted personality to a small entry space.
Pro Tip: Group buttons by shade and size to create subtle bands of color that read well from a distance and still reward a close look.
How to Make This
- Glue buttons densely onto a sturdy cardboard or wood round, working from the outer edge inward to avoid gaps.
- Layer smaller buttons into gaps between larger ones for a seamless mosaic texture.
- Seal the surface with a clear matte sealer to protect colors and hold small pieces in place.
Avoid: Scattered single color buttons can look accidental; intentional grouping gives the mosaic visual structure.
Try Also: Use shell buttons for a coastal touch or wooden buttons for a rustic farmhouse vibe.
Products & Materials
Items Used
- assorted buttons
- wooden round base
- craft glue
- clear matte sealer
“Vintage button mosaic wreath with playful color and texture.”
Bright tassel and ribbon hoop for modern boho look
⏱️ 45 min · 🟢 Beginner
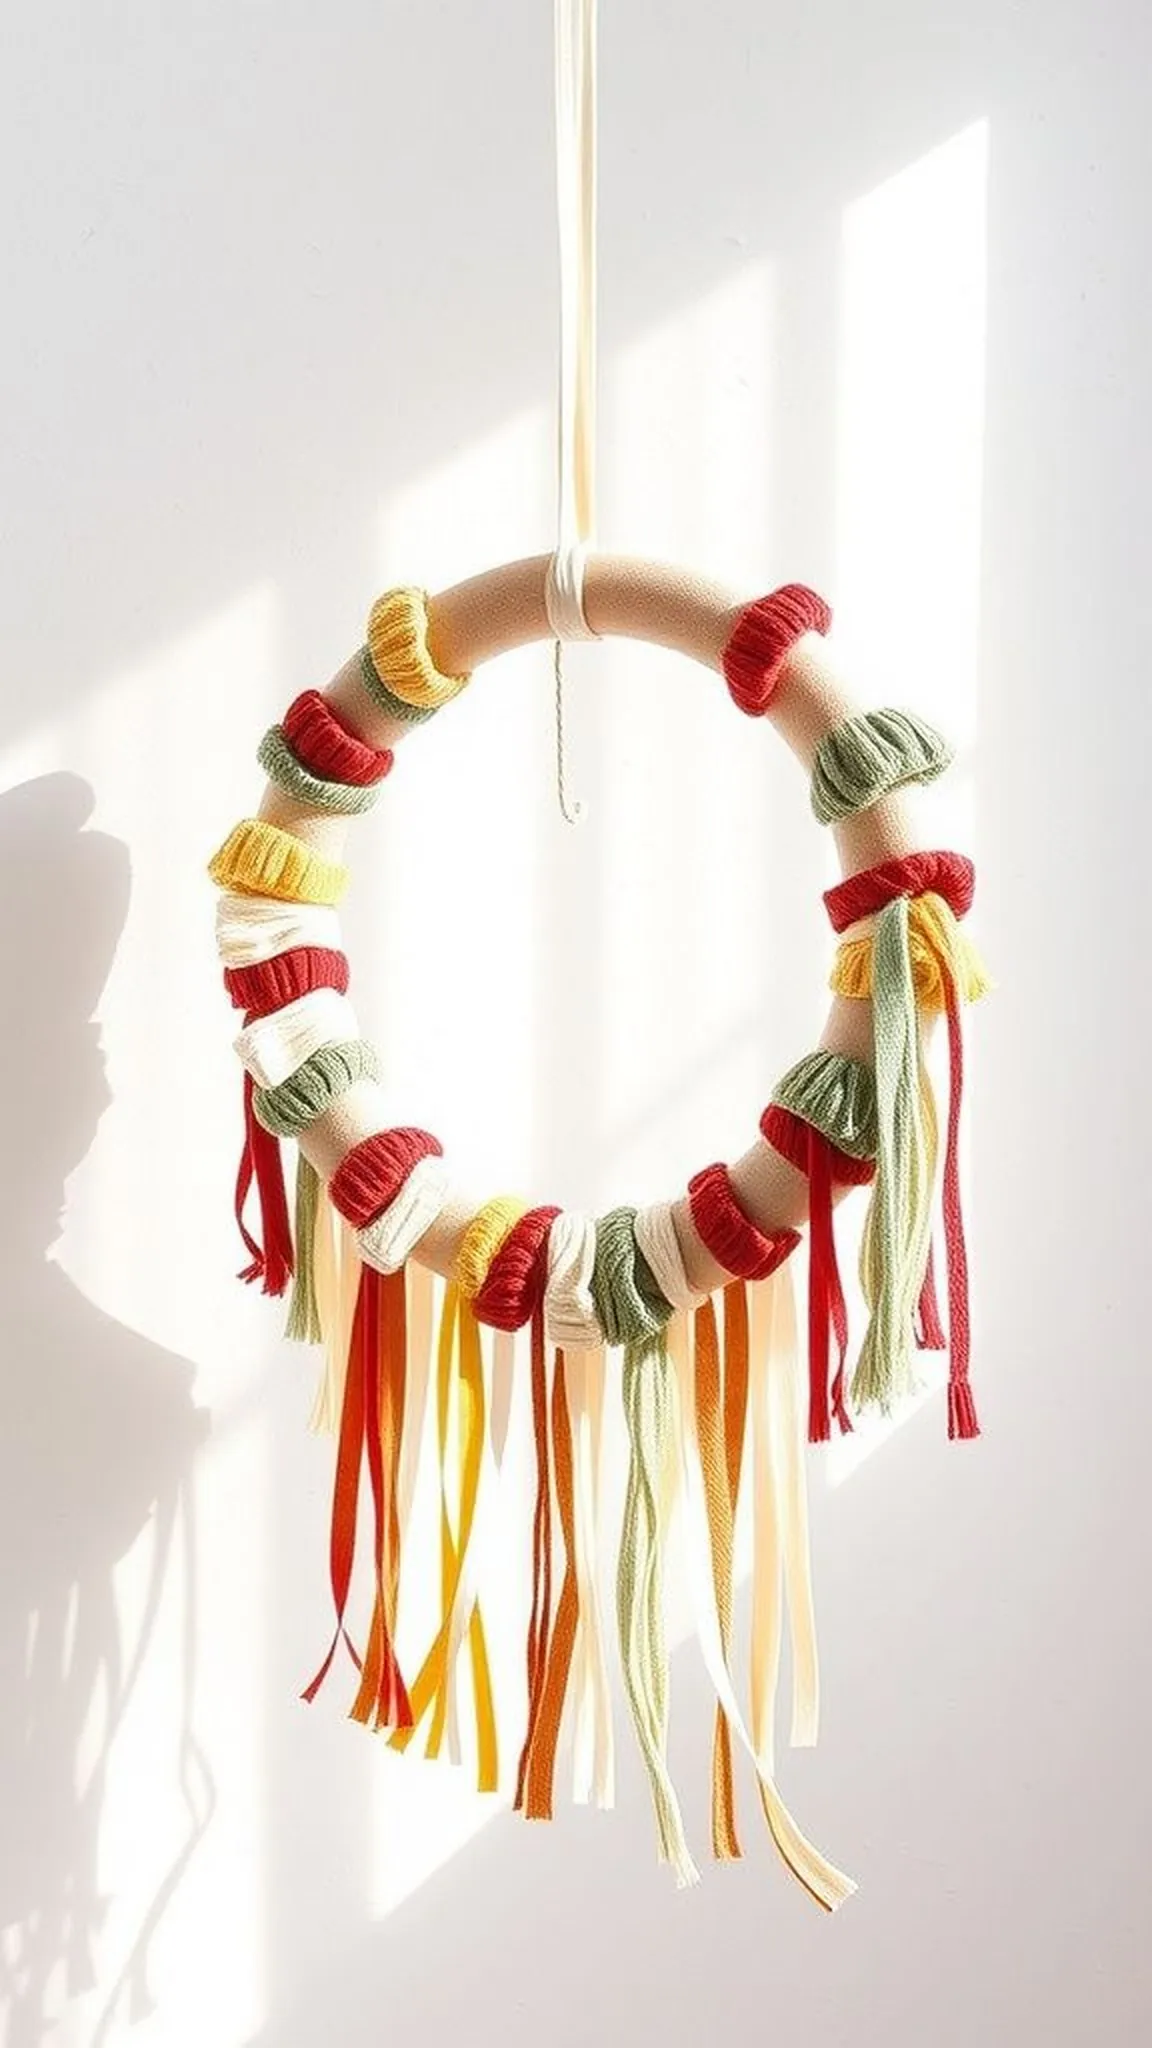
Tassels and ribbons arranged along a thin metal hoop create a modern boho statement that is light and breezy. Soft yarn tassels swing gently while ribbon adds color panels that catch the eye.
The contrast between metal sheen and soft fibers brings a tactile balance that feels contemporary yet handmade. Movement and layered color give the piece a lively silhouette on a porch or interior wall.
This wreath is playful and low fuss, perfect for quick seasonal updates. It reads fresh and expressive without the weight of heavier decorations.
Pro Tip: Vary tassel lengths and ribbon widths so the hoop maintains a layered, airy feel rather than a flat fringe.
How to Make This
- Tie or loop tassels and ribbon pieces at intervals around a metal hoop to build texture and color.
- Cluster some tassels close together to create focal areas and leave other sections more open for balance.
- Adjust lengths and comb tassel fibers for a neat, finished look.
Avoid: Using uniform lengths can make the piece feel rigid; variation adds visual interest and soft motion.
Try Also: Use metallic threads for evening shimmer or natural cotton for a laid back, neutral palette.
Products & Materials
Items Used
- metal hoop
- yarn for tassels
- fabric ribbon
- scissors
“Light tassel and ribbon hoop for modern summer boho style.”
Bright pom pom tassel hoop with playful movement
⏱️ 1 hour · 🟢 Beginner
A neat circle of small pom poms interspersed with short tassels creates a compact, joyful wreath that reads like a party accessory for the door. The mix of round poms and trailing tassels provides both structure and flutter.
Close inspection reveals soft yarn fibers and tiny knots that give the piece a handmade charm. Color choices determine whether the wreath feels energetic or softly sweet.
This cheerful hoop suits a kid friendly porch or a colorful entry where personality rules. It is light enough to swap seasonally without fuss.
Pro Tip: Alternate pom and tassel placement to keep the silhouette balanced and avoid crowded clusters.
How to Make This
- Make small pom poms and short tassels from coordinating yarn colors.
- Attach them around a craft hoop in an alternating pattern, securing with glue or wire.
- Trim stray fibers and fluff poms for consistent roundness.
Avoid: Grouping too many poms in one area creates lopsided weight and a less polished silhouette.
Try Also: Use two tones for a gradient effect or metallic thread poms for evening sparkle.
Products & Materials
Items Used
- yarn skeins
- craft hoop
- hot glue gun
“Playful pom pom and tassel hoop for a colorful summer entrance.”
Bright felt rose wreath with soft classic flair
⏱️ 2 hours · 🟠 Intermediate
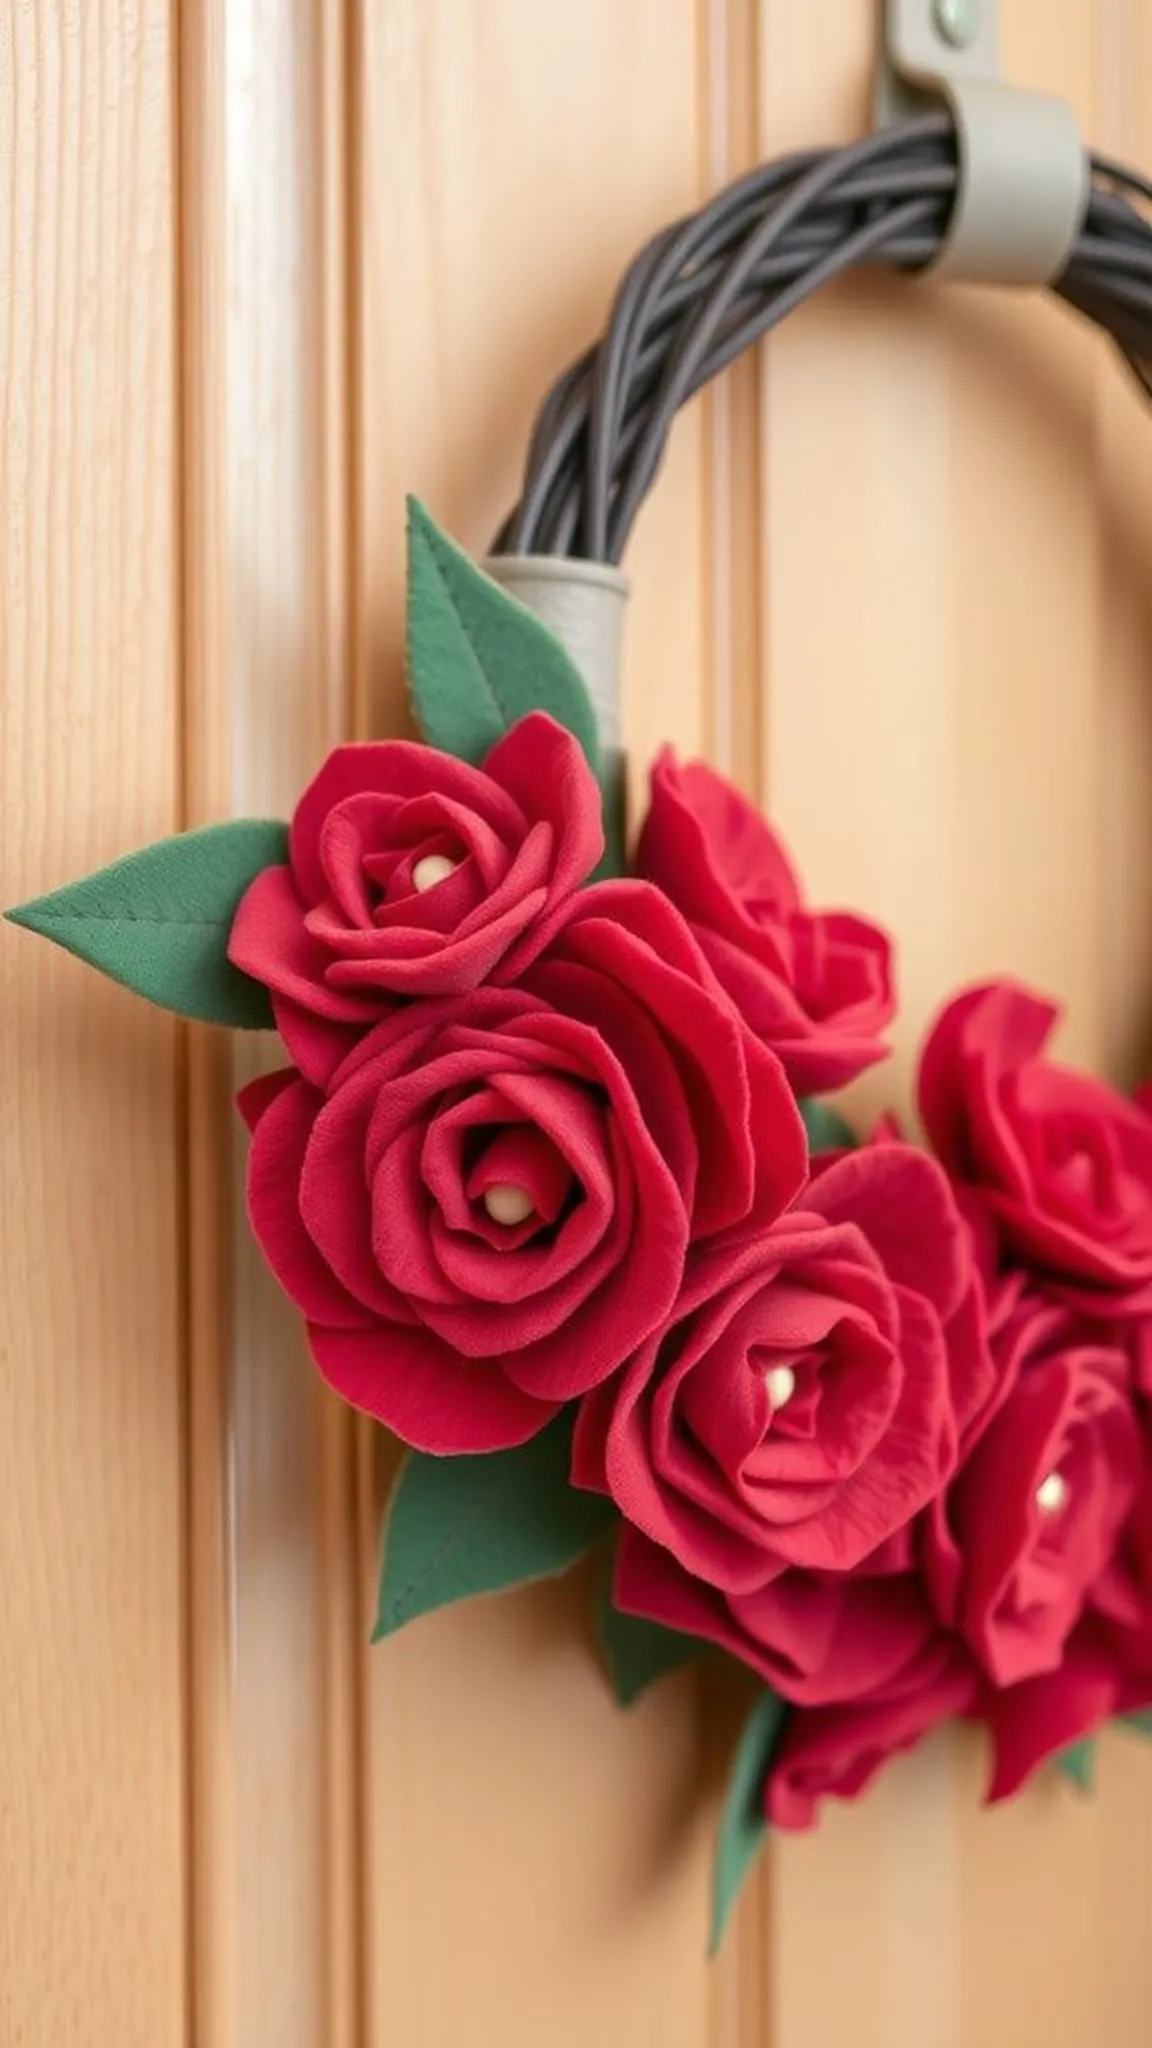
Rolled and layered felt roses clustered tightly give this wreath a soft, classic look that feels tactile and warm. The felt surface yields gentle, muted highlights that lend the piece a cozy handmade quality.
A palette of coral, magenta, and apricot creates summer warmth while leafy felt sprigs soften the edges. The arrangement reads like a small bouquet frozen into a circular form that invites a closer glance.
This wreath brings a refined handmade vibe to front doors or interior nooks, pairing well with wicker and natural wood finishes. It feels both crafted and personal.
Pro Tip: Keep petals tapered and slightly angled so each rose opens naturally and avoids a flat rolled look.
How to Make This
- Cut felt strips into spirals and roll them into rose shapes, securing the base with glue.
- Cluster roses on a foam or grapevine base, filling gaps with small felt leaves.
- Press clusters gently to create a compact, cohesive wreath face.
Avoid: Rolling strips too tightly makes roses look small and dense instead of lush and open.
Try Also: Combine felt roses with small silk buds for mixed texture or choose pastel tones for a vintage mood.
Products & Materials
Items Used
- craft felt sheets
- foam wreath base
- craft glue
- scissors
“Soft felt roses clustered into a warm summer wreath.”
Bright coastal rope wreath with nautical accents
⏱️ 1 hour · 🟢 Beginner
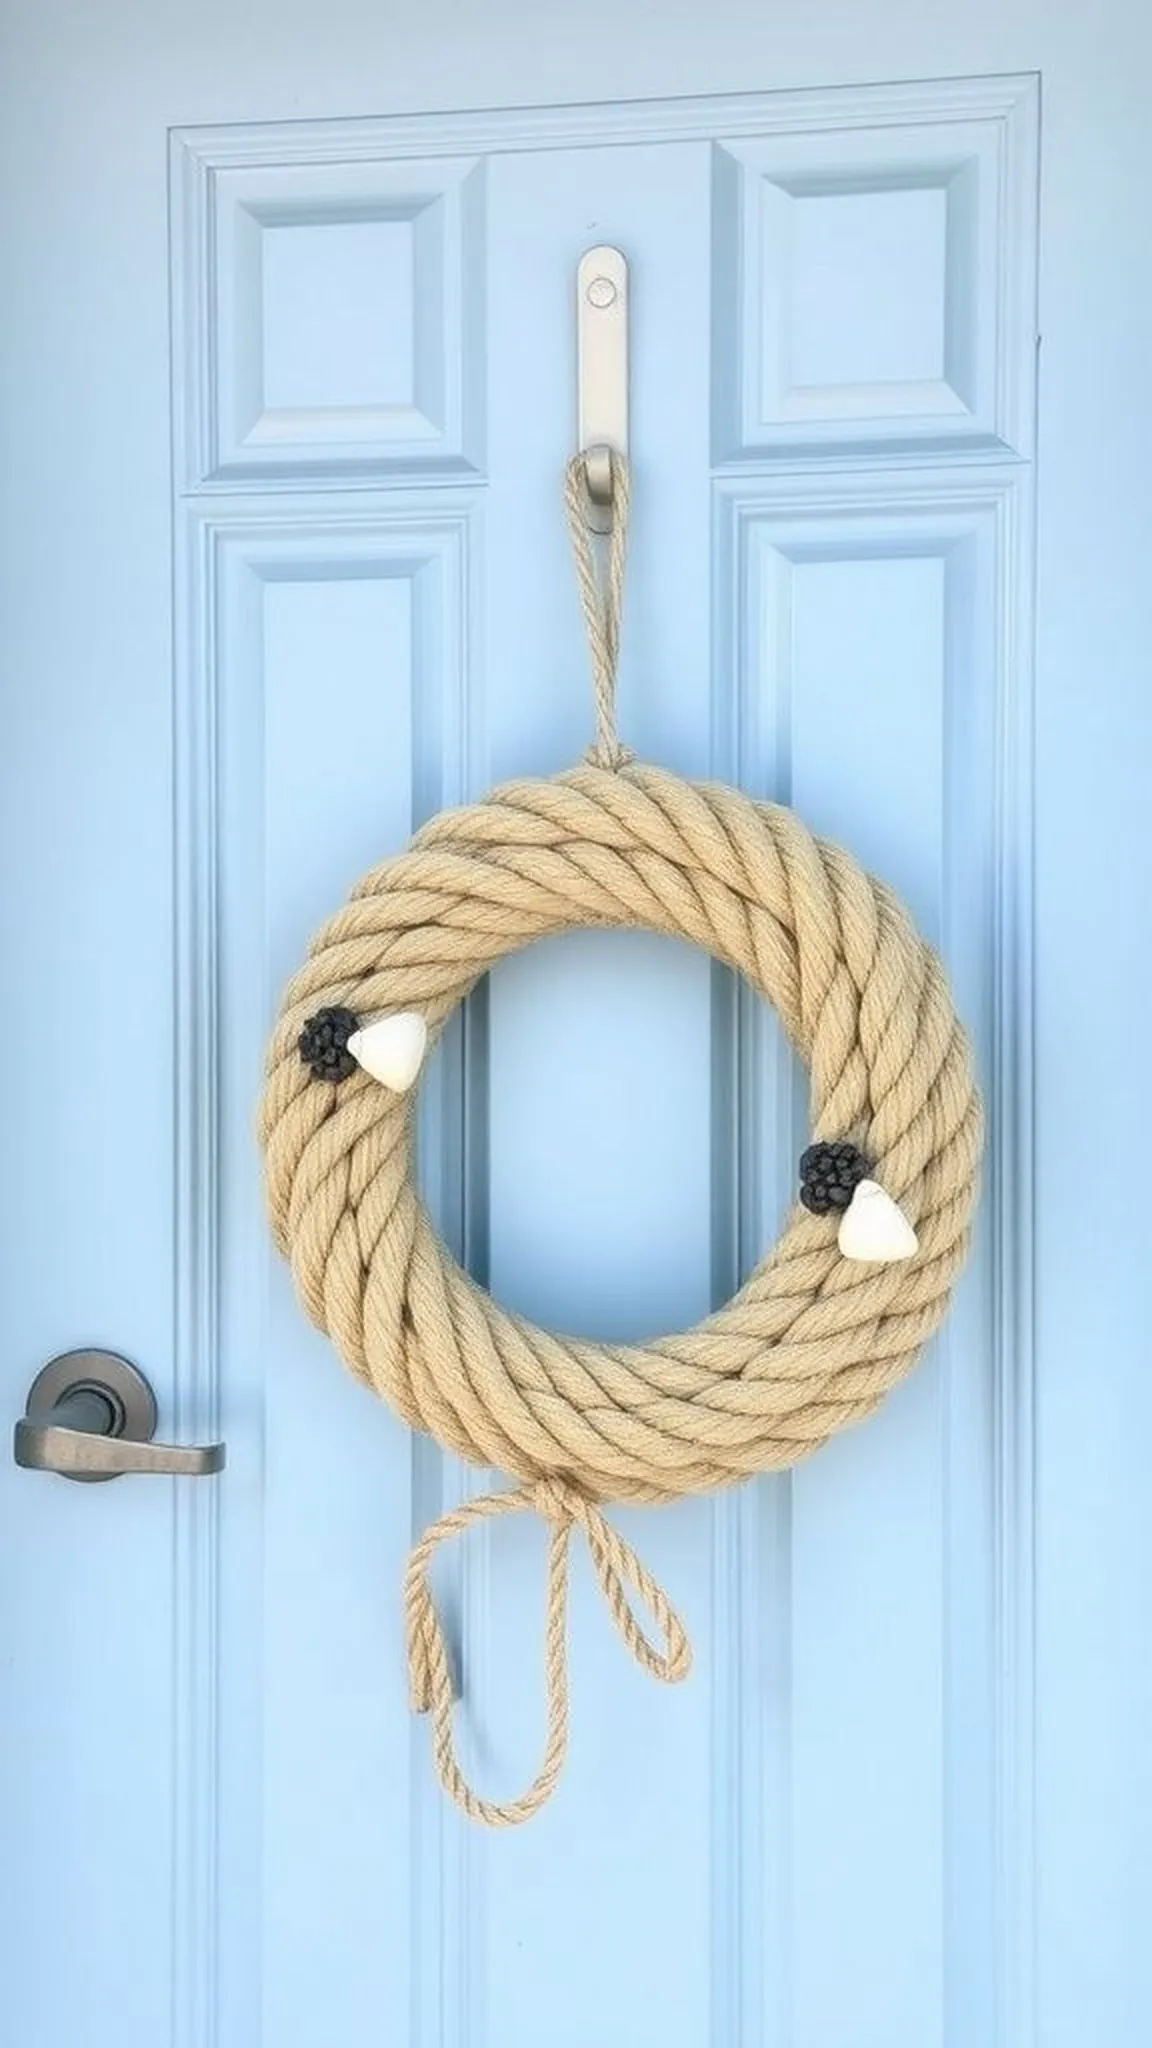
A thick coiled rope base decorated with small nautical charms conjures sun warmed docks and relaxed boat days. The rope’s natural fibers show subtle shadowing and a warm sand tone that pairs well with pale blues.
Small clusters of shells and a knotted accent give the wreath a tidy maritime silhouette that feels at once casual and styled. The texture is tactile and durable for covered outdoor spaces.
This piece reads best on light colored doors where rope and accent shadows add sculptural interest. It brings a gentle seaside note to summer entrances.
Pro Tip: Wrap the rope coil tightly so the surface looks continuous and the wreath holds its shape without bulging gaps.
How to Make This
- Coil natural rope around itself to form a circular base and secure the ends with glue or stitching.
- Attach small shell clusters and knotted rope accents with glue for a nautical touch.
- Add a short loop of rope for hanging and trim any loose fibers.
Avoid: Loose rope coils can sag and appear unfinished; a snug wrap is key for a neat silhouette.
Try Also: Paint a thin stripe of turquoise for a modern twist or add a small anchor charm for a bolder nautical cue.
Products & Materials
Items Used
- natural jute rope
- assorted seashells
- craft glue
“Coastal rope wreath with shells and knotted accents for summer.”
Bright gingham ribbon wreath with country charm
⏱️ 45 min · 🟢 Beginner
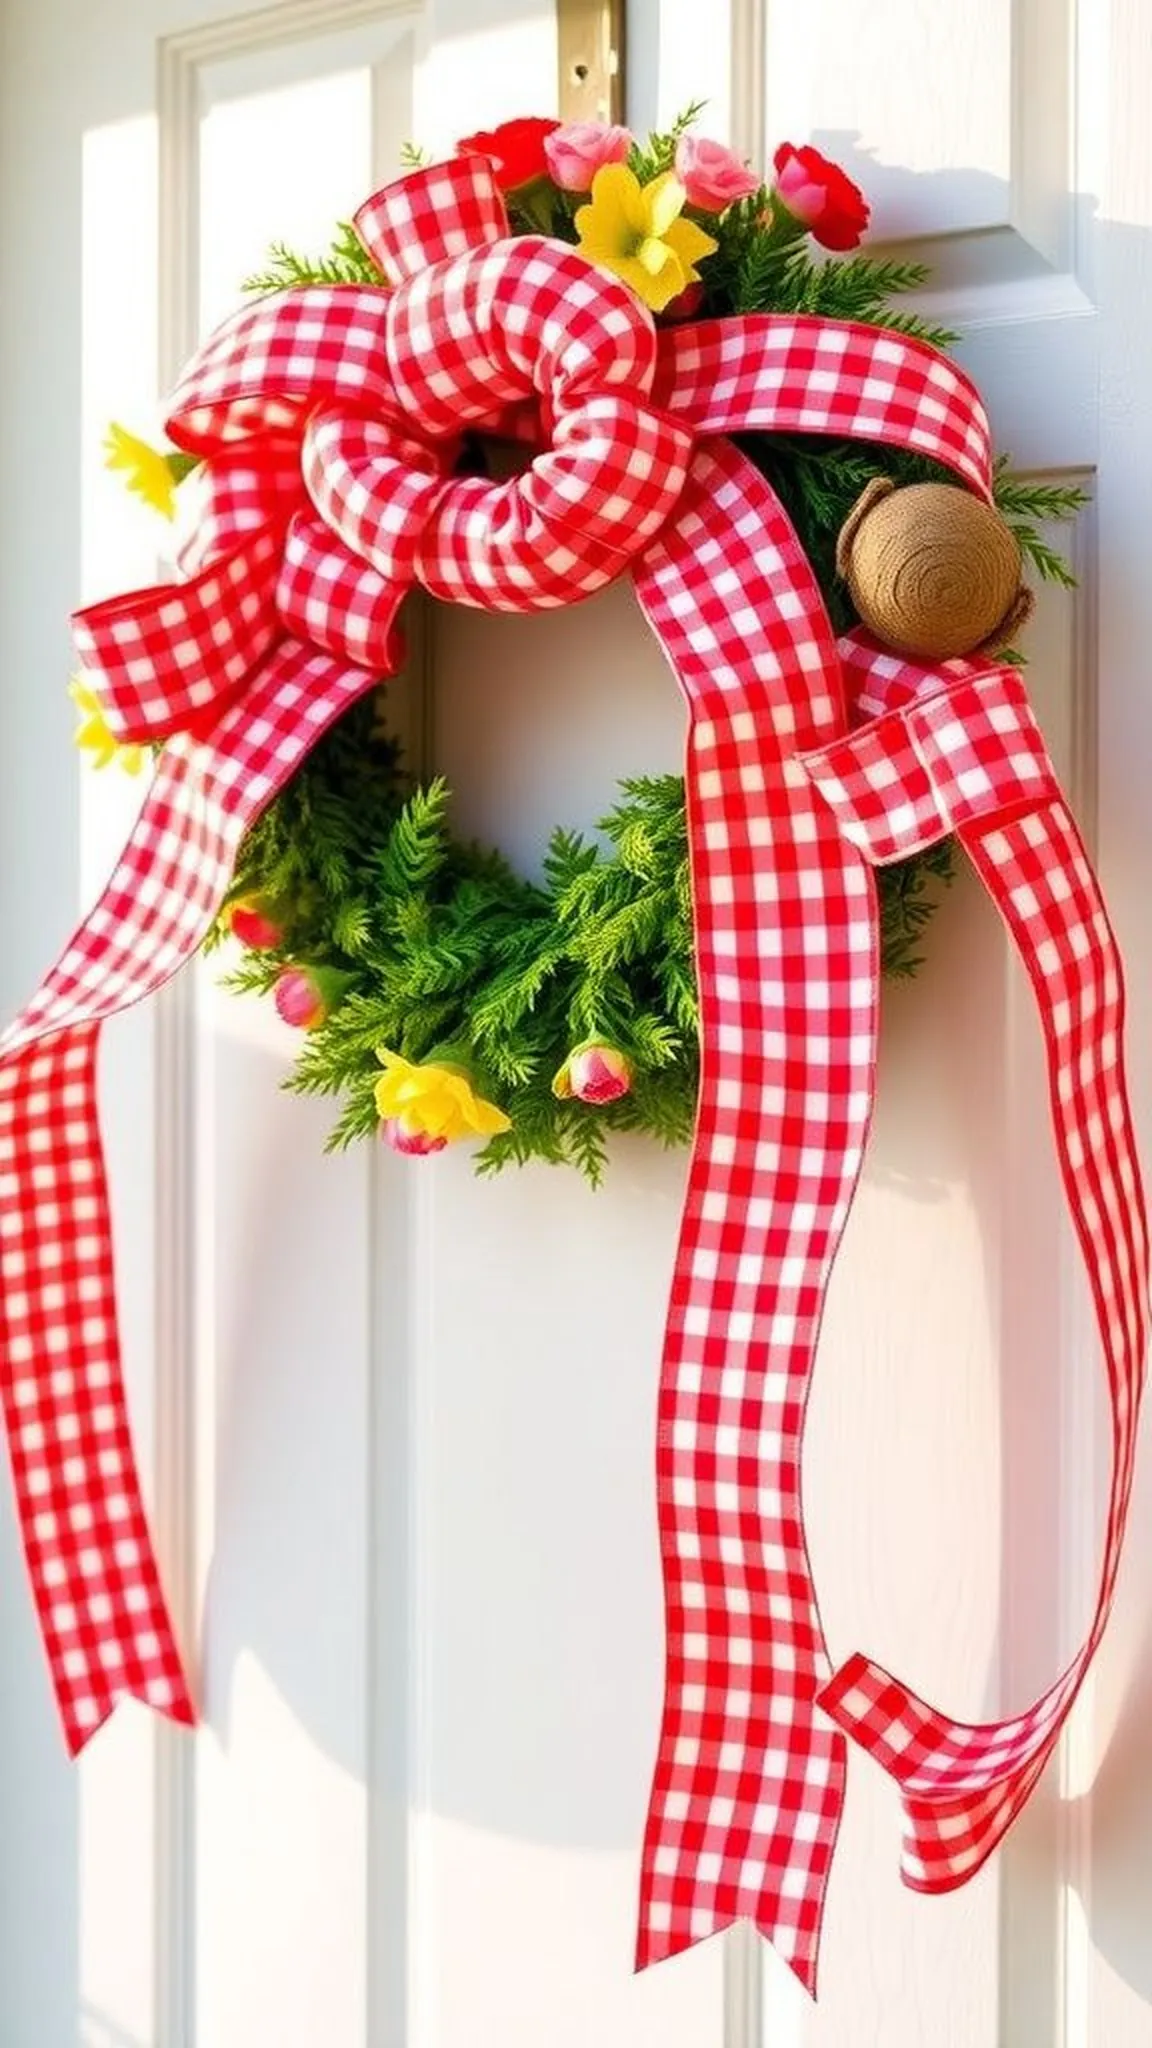
Wide gingham ribbons looped around a round base give a lively country vibe with clear graphic checks and soft folds. The fabric catches both sun and shade, creating pleasant contrasts across the loops.
The gingham pattern lends a picnic day feel that pairs nicely with rustic porch furniture and potted herbs. The overall presence is cheerful and uncomplicated, adding seasonal warmth.
This wreath feels right at home on cottage doors or kitchen walls where a homespun accent reads welcoming. It brings a simple, sunny aesthetic to summer decor.
Pro Tip: Rotate ribbon loops so checks face different directions for a textured, lively surface instead of a flat repeated pattern.
How to Make This
- Wrap wide gingham ribbon around a foam or wire ring, forming loops and securing them in place.
- Layer additional ribbon passes to cover the base fully and create a voluminous look.
- Finish with a tied ribbon bow or small herb sprig tucked into a loop for charm.
Avoid: Covering the base too sparsely allows the frame to show and reduces the full, cozy feel of the ribbon wreath.
Try Also: Swap gingham for floral ditsy prints for a cottage mood or use bold checks for a farmhouse statement.
Products & Materials
Items Used
- gingham ribbon
- foam wreath base
- scissors
“Gingham ribbon loops for a sweet country summer wreath.”
