
As an Amazon Associate I earn from qualifying purchases.
Macrame Wall Hanging Pattern Ideas transform blank walls into tactile, cozy displays that balance texture and light. These macrame wall hangings range from airy lace panels to weighty fringe pieces that bring soft rhythm to a room.
Fresh pattern ideas include geometric knots, botanical motifs, and layered tapestries that pair well with natural wood and woven accents. Each suggestion highlights knot choices, cord weight, and hanger styles that influence overall scale and movement.
Beginner friendly motifs sit alongside more intricate knotwork for dedicated afternoons of quiet crafting. These macrame wall hanging pattern ideas offer approachable starting points and creative variations to adapt for any space.
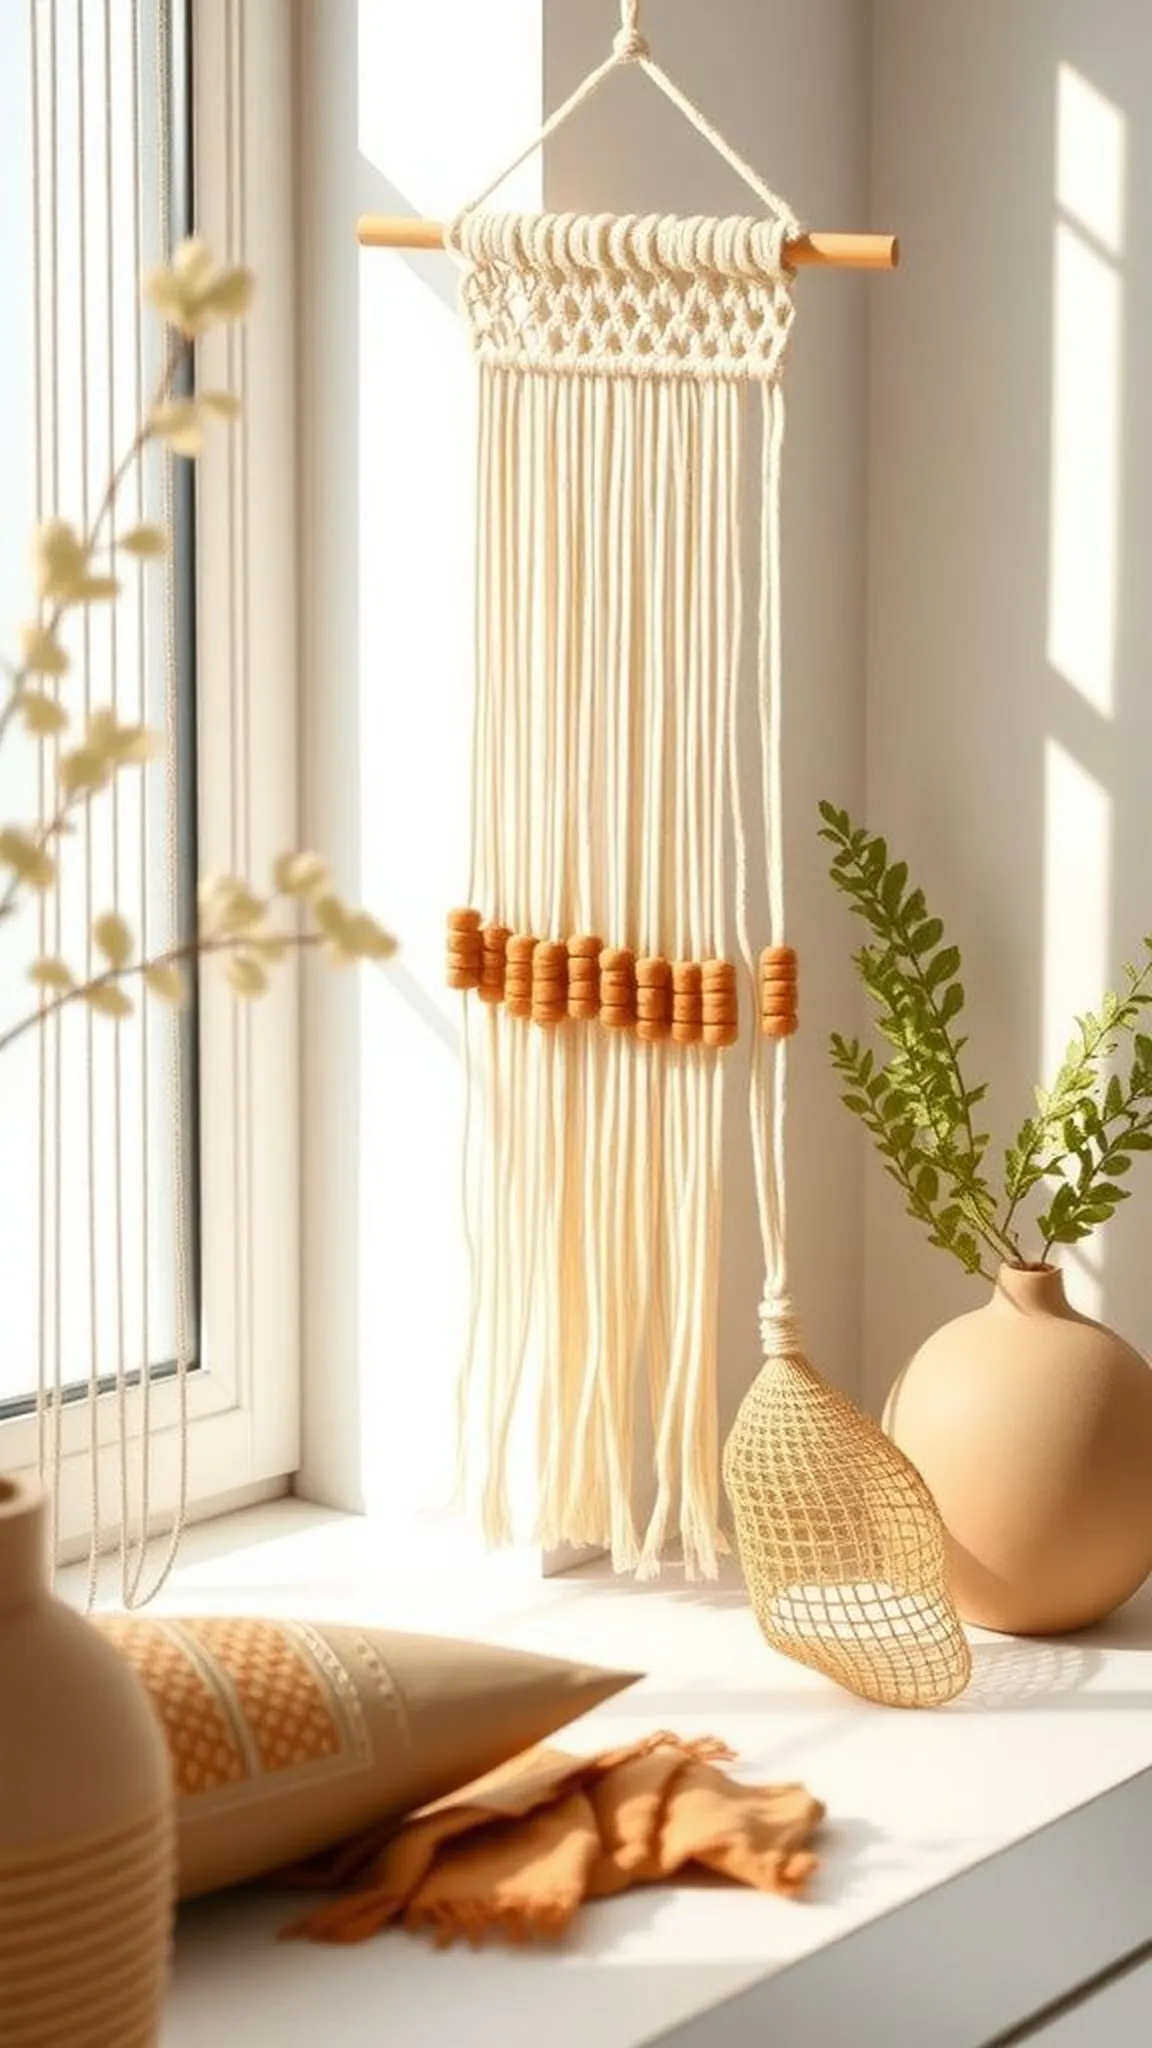
Simple tassel macrame for a cozy wall
⏱️ 30 min · 🟢 Beginner
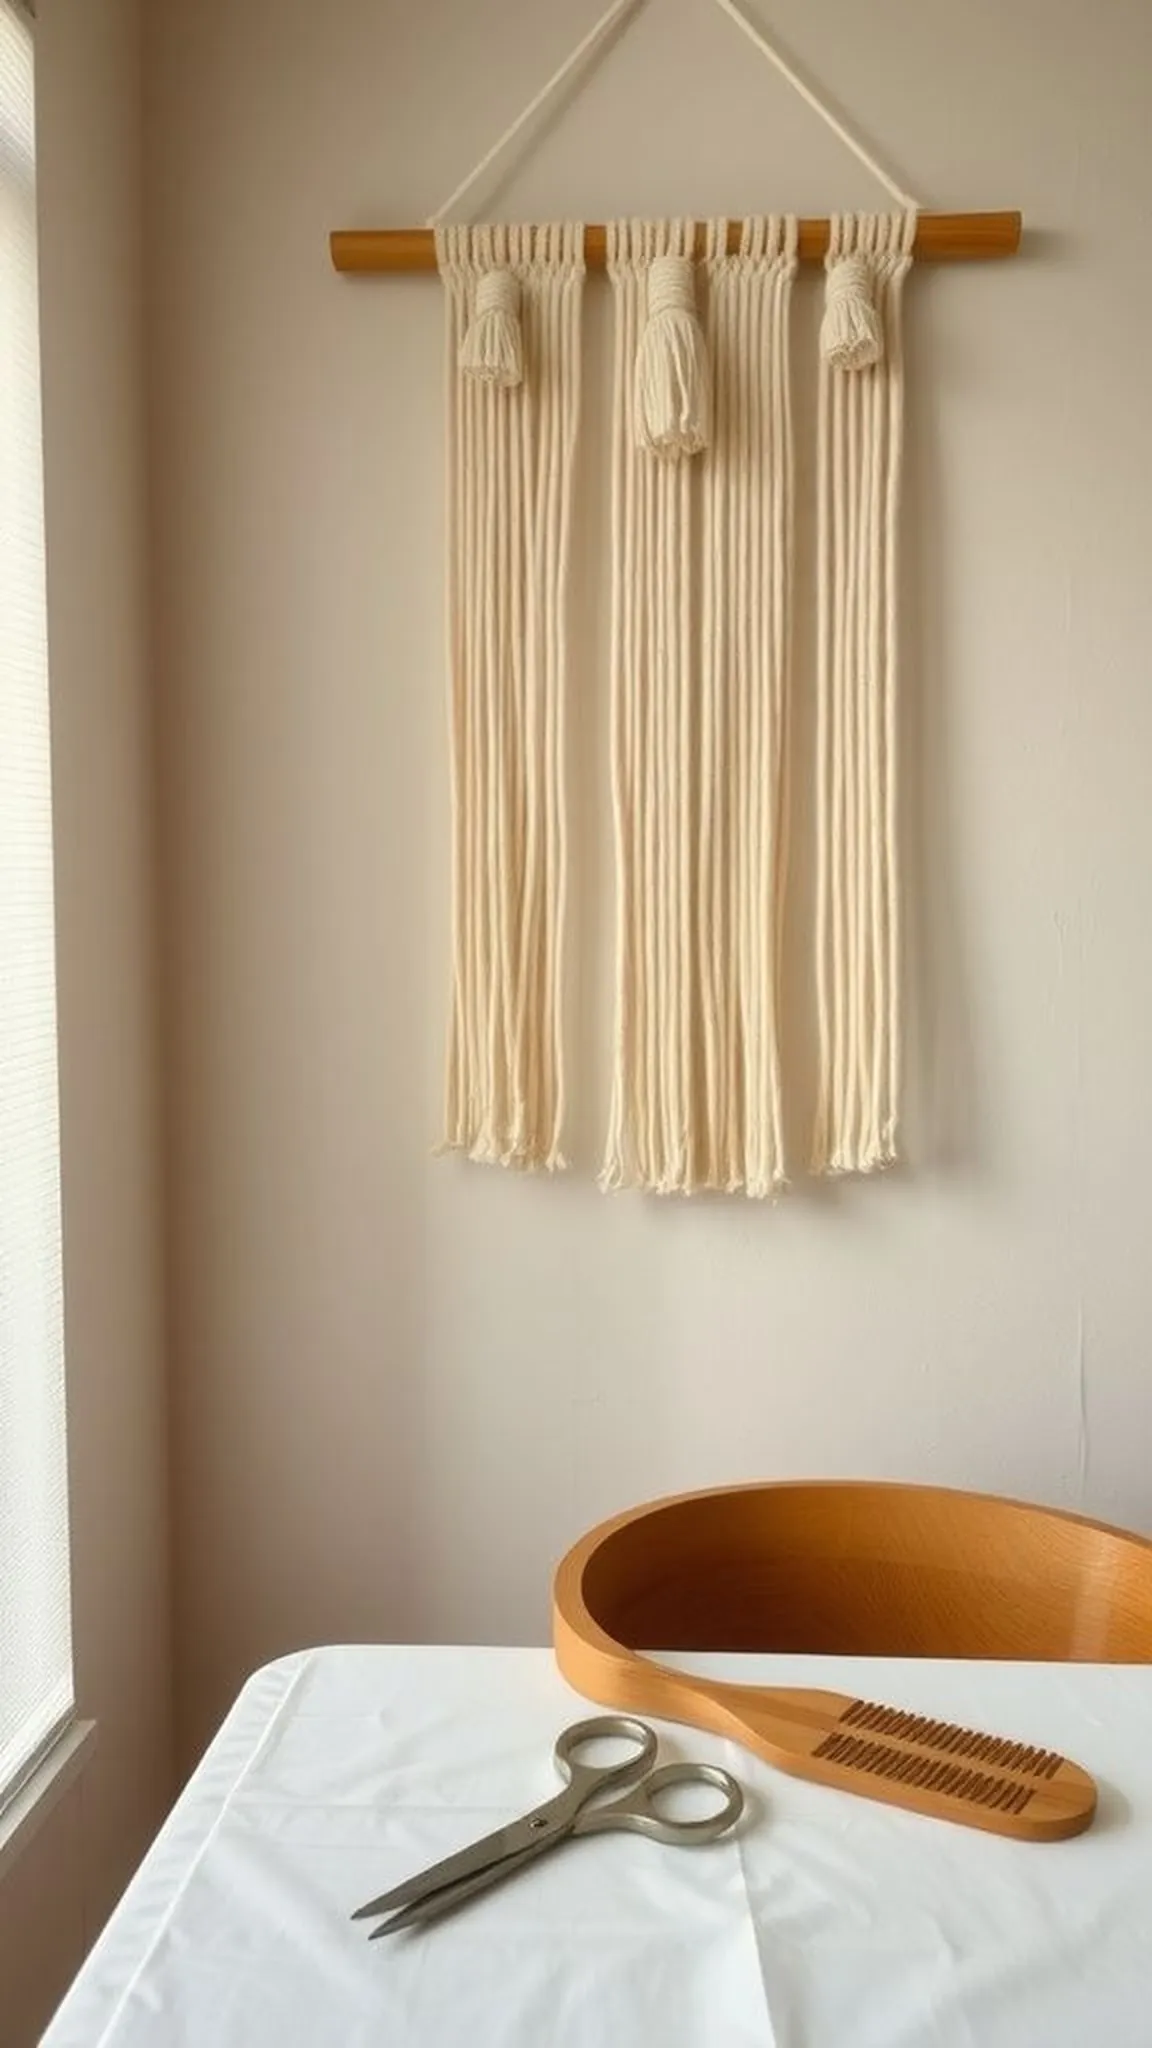
A soft tassel macrame piece brings gentle movement and a warm textile presence to a wall. Cream cotton cords tumble like a soft waterfall, catching sunlight and shadow with subtle shifts.
The tactile fringe invites touch, edged with slight fuzz that feels cozy beneath fingertips. A slender wooden branch anchors the composition with quiet grain and earthy aroma.
The overall palette leans neutral, offering quiet texture without bold color interruption. Viewed up close, knot details form a slow rhythm that soothes rather than shouts.
Pro Tip: Work with slightly damp cords to reduce fuzz and help knots lie flatter for cleaner texture.
How to Make This
- Choose soft cotton cord and a straight wooden dowel and cut lengths slightly longer than desired fringe.
- Fold cord pieces and loop them over the dowel using simple hitch knots across the span.
- Trim the bottom fringe into a gentle curve and comb through fibers for a soft, even look.
- Add a hanging loop and lightly steam or spritz to relax fibers before final display.
Avoid: Pulling knots unevenly often causes the fringe to hang lopsided and feel unbalanced. Allowing cords to tangle during layout can create uneven texture.
Try Also: A subtle ombre dye on the lower fringe shifts the mood toward warm tones, while a cluster of wooden beads adds rustic detail. A shorter version creates a scaled gallery of multiple mini hangings.
Products & Materials
Items Used
- cotton macrame cord 3mm
- wooden dowel 12 inch
- craft scissors
- wide tooth comb
“Soft tassel macrame that whispers texture and warmth.”
Geometric diamond macrame with crisp lines
⏱️ 2-3 hours · 🟠 Intermediate
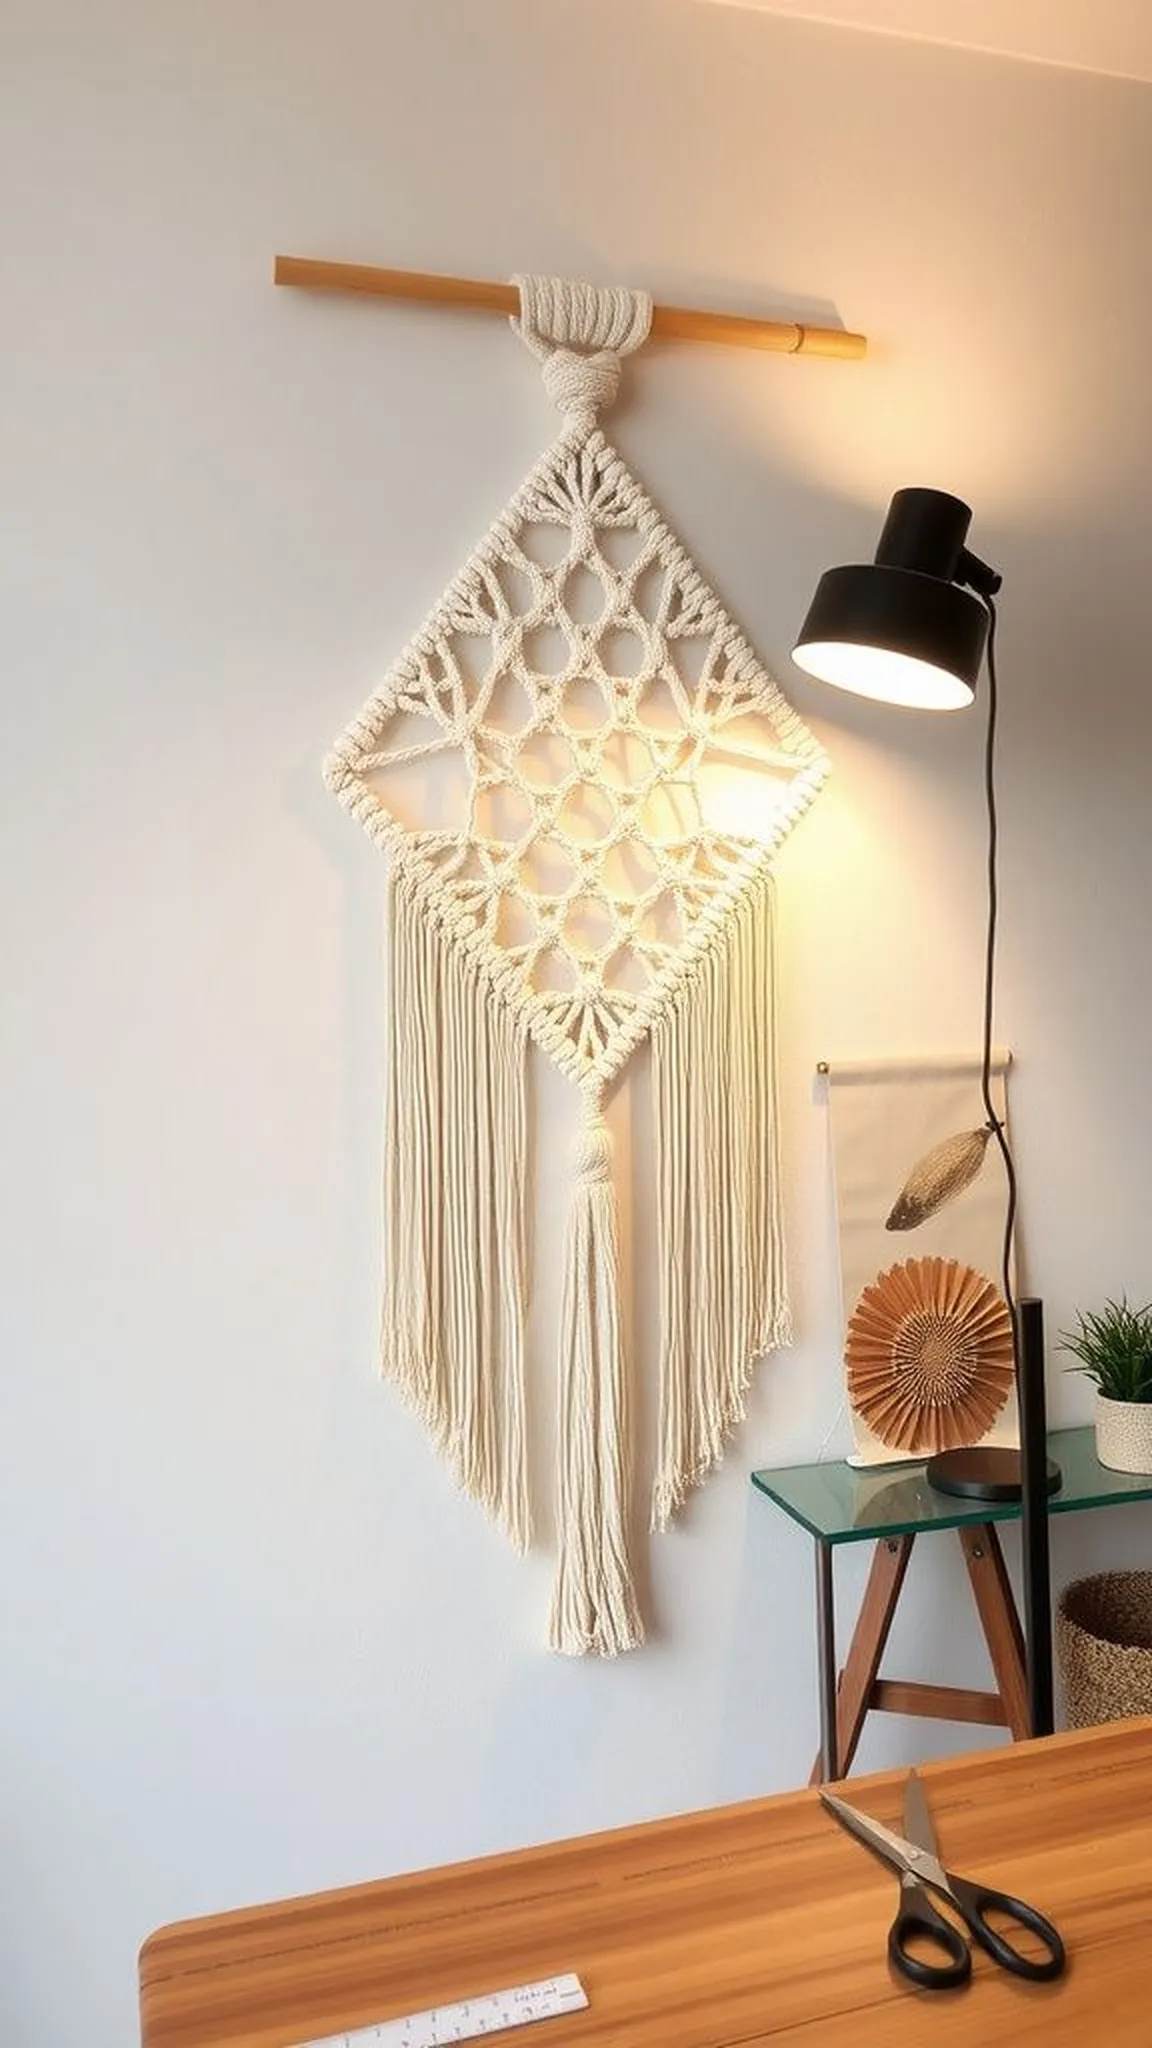
Crisp diamond geometry in macrame gives a room a calm, architectural focal point that still reads handmade. Tight, even knots form angular motifs that catch light along raised ridges.
The rhythm of repeated diamond shapes creates a pleasing cadence that draws the eye upward. Natural cotton cord paired with a smooth wooden dowel produces a clean, modern contrast with subtle warmth.
From across a room, the piece reads like woven lace with structure and presence. Close inspection reveals tiny shadow valleys and soft cord texture that reward quiet looking.
Pro Tip: Marking knot points lightly on the dowel helps maintain even spacing and keeps diamond shapes consistent across the width.
How to Make This
- Measure and cut matching cord lengths and secure them to a straight dowel using lark’s head knots.
- Create vertical rows of square knots to define the diamond edges and work inward with alternating knots.
- Tighten each knot evenly and use a small ruler to check consistent spacing across the panel.
- Finish lower edges into a crisp V shape and trim fringe with sharp scissors for clean lines.
Avoid: Uneven tension in knots can warp diamond shapes so the panel looks skewed. Skipping regular spacing checks leads to inconsistent pattern repetition.
Try Also: Swap a dark cord for a high-contrast look or add slim wooden beads along the diamond centers for mid-century flair. Narrower diamonds produce a taller, more delicate tapestry.
Products & Materials
Items Used
“Crisp diamond macrame that feels structured yet cozy.”
Botanical leaf macrame motif with soft curves
⏱️ 1-2 hours · 🟠 Intermediate
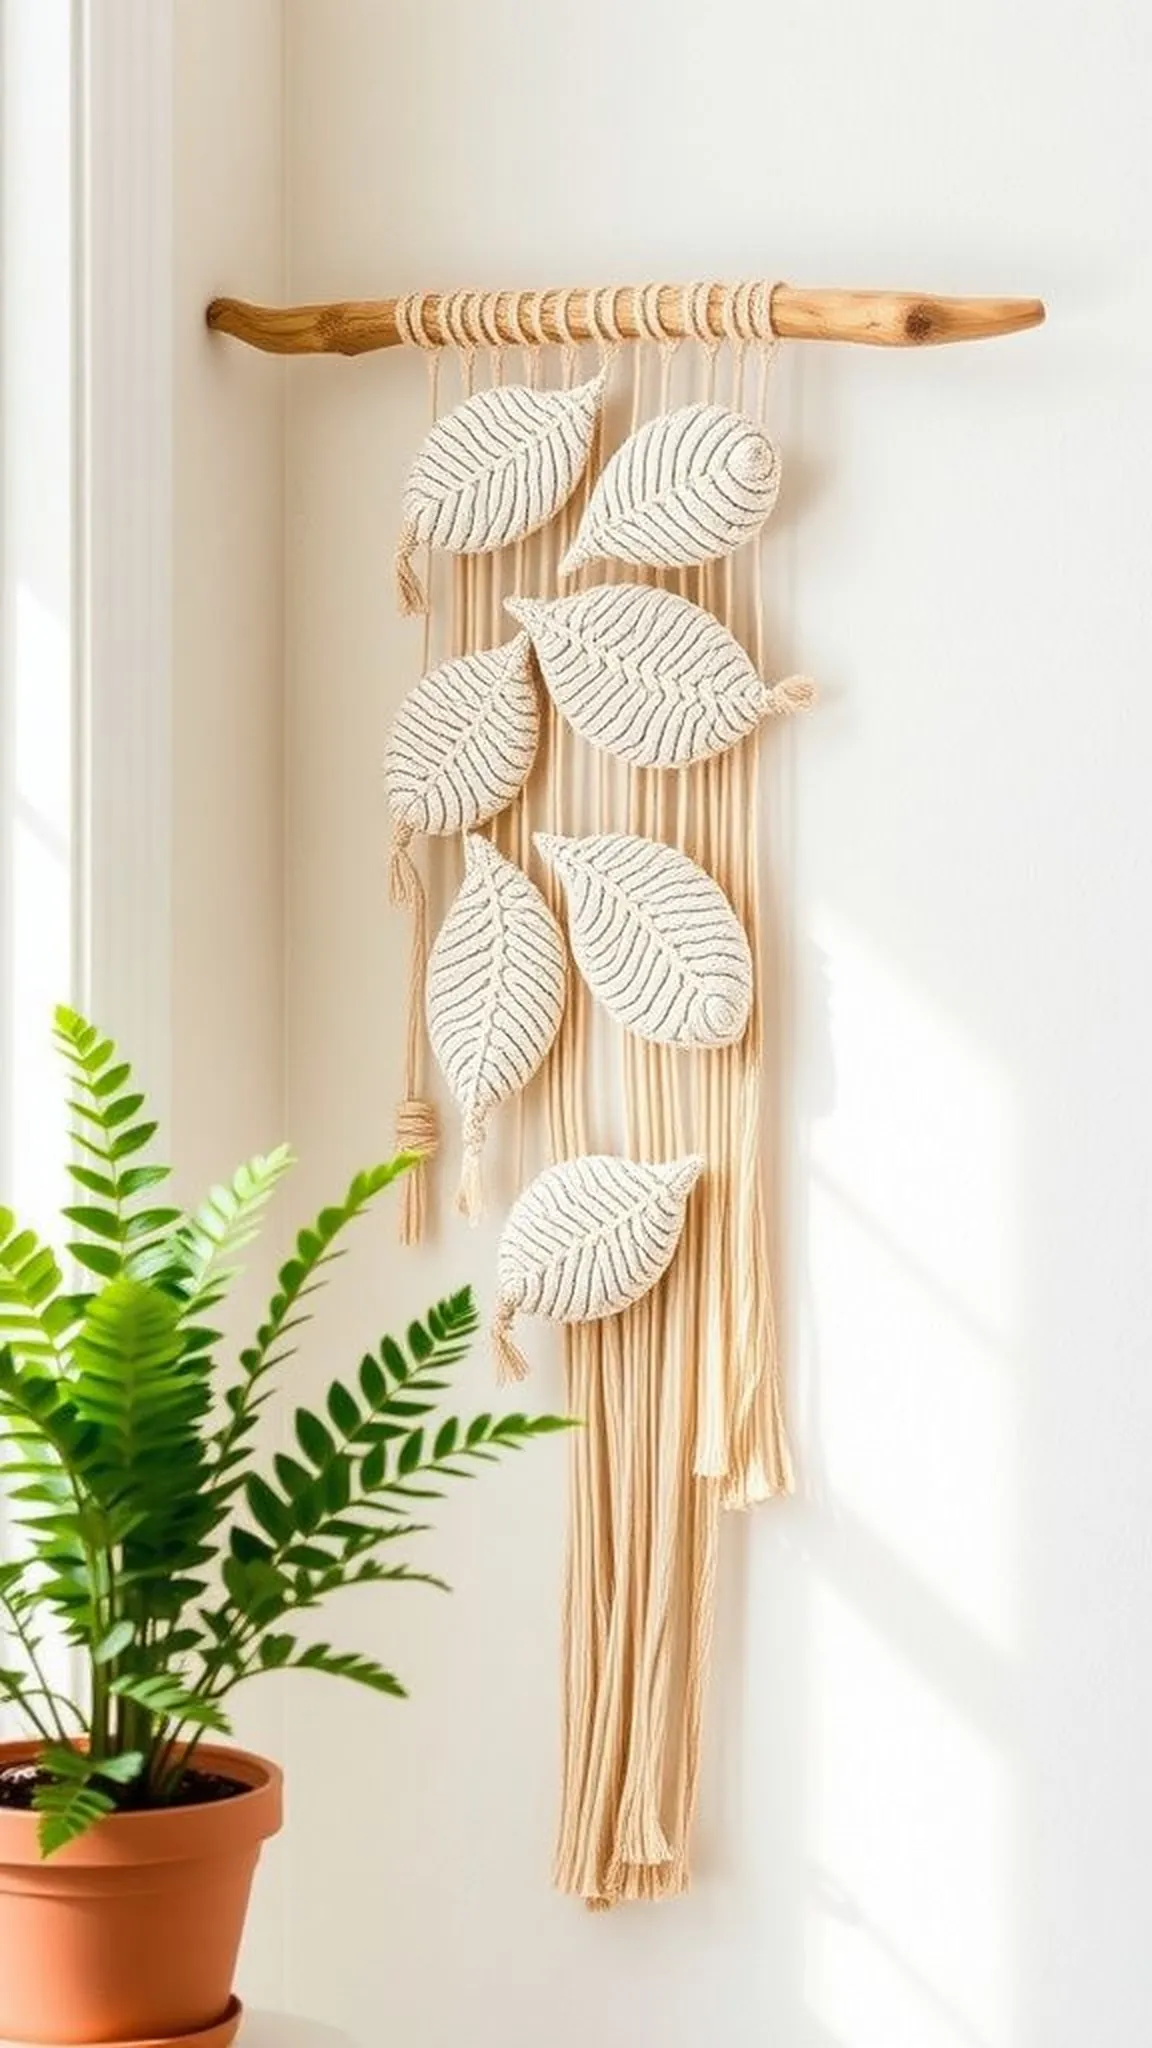
A botanical leaf pattern in macrame reads like woven foliage, softening corners with organic curves. Rows of tapered knotwork suggest veins and give the piece gentle dimensionality.
The cord fans into delicate leaf tips that sway when air moves, producing a quiet kinetic flourish. Subtle shadows fill the spaces between veins, adding depth against a pale background.
Earthy tones accentuate the plantlike quality and make the hanging pair well with real greenery. The overall impression is natural and quietly sculptural, like a textile study of a single leaf.
Pro Tip: Working with a slightly thinner cord for the leaf motifs helps create graceful tapering and delicate knot definition.
How to Make This
- Attach cords to a short branch or dowel and divide into leaf groupings with equal spacing.
- Form tapered leaf shapes by alternating half hitch and diagonal knots, tightening toward the tip.
- Soften the edges by teasing fibers gently and adjust leaf symmetry visually before finishing.
- Trim stray fibers and hang the piece where light enhances the vein-like shadows.
Avoid: Using overly thick cord for the leaf sections can make tips look bulky rather than tapered. Neglecting to balance each side creates a lop-sided botanical silhouette.
Try Also: Try a trio of stacked leaves for a layered screen effect or introduce a pop of dyed cord at leaf tips for subtle color contrast. Small wooden beads at the base add a seedlike accent.
Products & Materials
Items Used
- macrame cord 2.5mm
- driftwood branch 14 inch
- tapestry needle
“Botanical leaf macrame with soft, flowing curves.”
Save time and printer ink with 50+ printable templates and step-by-step instructions in one ad-free guide.

Just $19.99 — lifetime access
Boho layered fringe with cascading tiers
⏱️ 2 hours · 🟠 Intermediate

Cascading tiers of fringe create a layered boho tapestry with plenty of surface movement. Each layer overlaps the next, producing shadow lines and a plush, inviting silhouette.
Different cord weights are visible in the pile, where heavy rope meets airy strands for tactile contrast. The feel is both earthy and indulgent, with a soft hush when fingers brush across the fringes.
Colors can remain neutral to emphasize texture or shift into warm hues for extra personality. The layered arrangement reads like textile jewelry for a wall, full of little surprises on close inspection.
Pro Tip: Mix two complementary cord thicknesses to amplify textural contrast while keeping a consistent knot motif across tiers.
How to Make This
- Secure multiple rows of cords to a long dowel with even spacing for each tier.
- Create horizontal bands using square knots and leave sections of loose fringe between them.
- Repeat banding to build cascading tiers, staggering lengths for depth.
- Neaten fringe edges and fluff fibers to enhance the layered look before display.
Avoid: Using identical cord thickness for every tier can flatten the layered effect and make the piece feel monotonous. Overcrowding tiers too tightly reduces the appealing shadow play.
Try Also: Short, dense tiers read modern and sculptural, while long, wispy tiers feel more bohemian and relaxed. Add a slim fringe of contrasting color between two tiers for a stripe-like highlight.
Products & Materials
Items Used
- macrame cord 5mm
- wooden dowel 30 inch
- fabric scissors
“Layered fringe macrame that adds plush, boho texture to walls.”
Ombre dyed macrame panel with sunset tones
⏱️ 2-3 hours · 🟠 Intermediate

An ombre-dyed macrame panel introduces watercolor-like color transitions across knotwork and fringe. Warm sunset shades move from deep pigment to soft creamy tips, lending the wall a gentle glow.
The dyeing brings a mellow unevenness that feels handcrafted and personal rather than flat and uniform. Knots catch color slightly differently, so small tonal shifts appear across textured ridges.
When suspended near warm light, the piece seems to shift brightness and deepen hues. The combination of soft knotwork and gradient color creates a relaxed, sunset-inspired focal point.
Pro Tip: Test a small cord sample for dye absorption before treating the entire panel to ensure desired gradient and tone.
How to Make This
- Complete the macrame panel using chosen knots and secure it to a protective surface for dyeing.
- Mix fabric dye baths in graduated concentrations for gradient effect and submerge cord sections to desired depth.
- Rinse gently, dry fully, and lightly steam to set color before trimming fringe.
- Reattach to a dowel or branch and smooth fibers for final presentation.
Avoid: Dyeing without testing can produce overly saturated or muddy hues that mask knot detail. Rushing the rinse stage may leave uneven color patches along the cords.
Try Also: Try cool ocean blues for a coastal vibe or muted greens for a botanical look. A dip-dye at the fringe only keeps the top neutral and subtle.
Products & Materials
Items Used
- cotton macrame cord 3mm
- fiber reactive dye set
- large mixing tubs
- wooden dowel 24 inch
“Sunset ombre macrame for soft, gradient wall color.”
Minimalist semicircle fan in modern neutral shades
⏱️ 1 hour · 🟢 Beginner
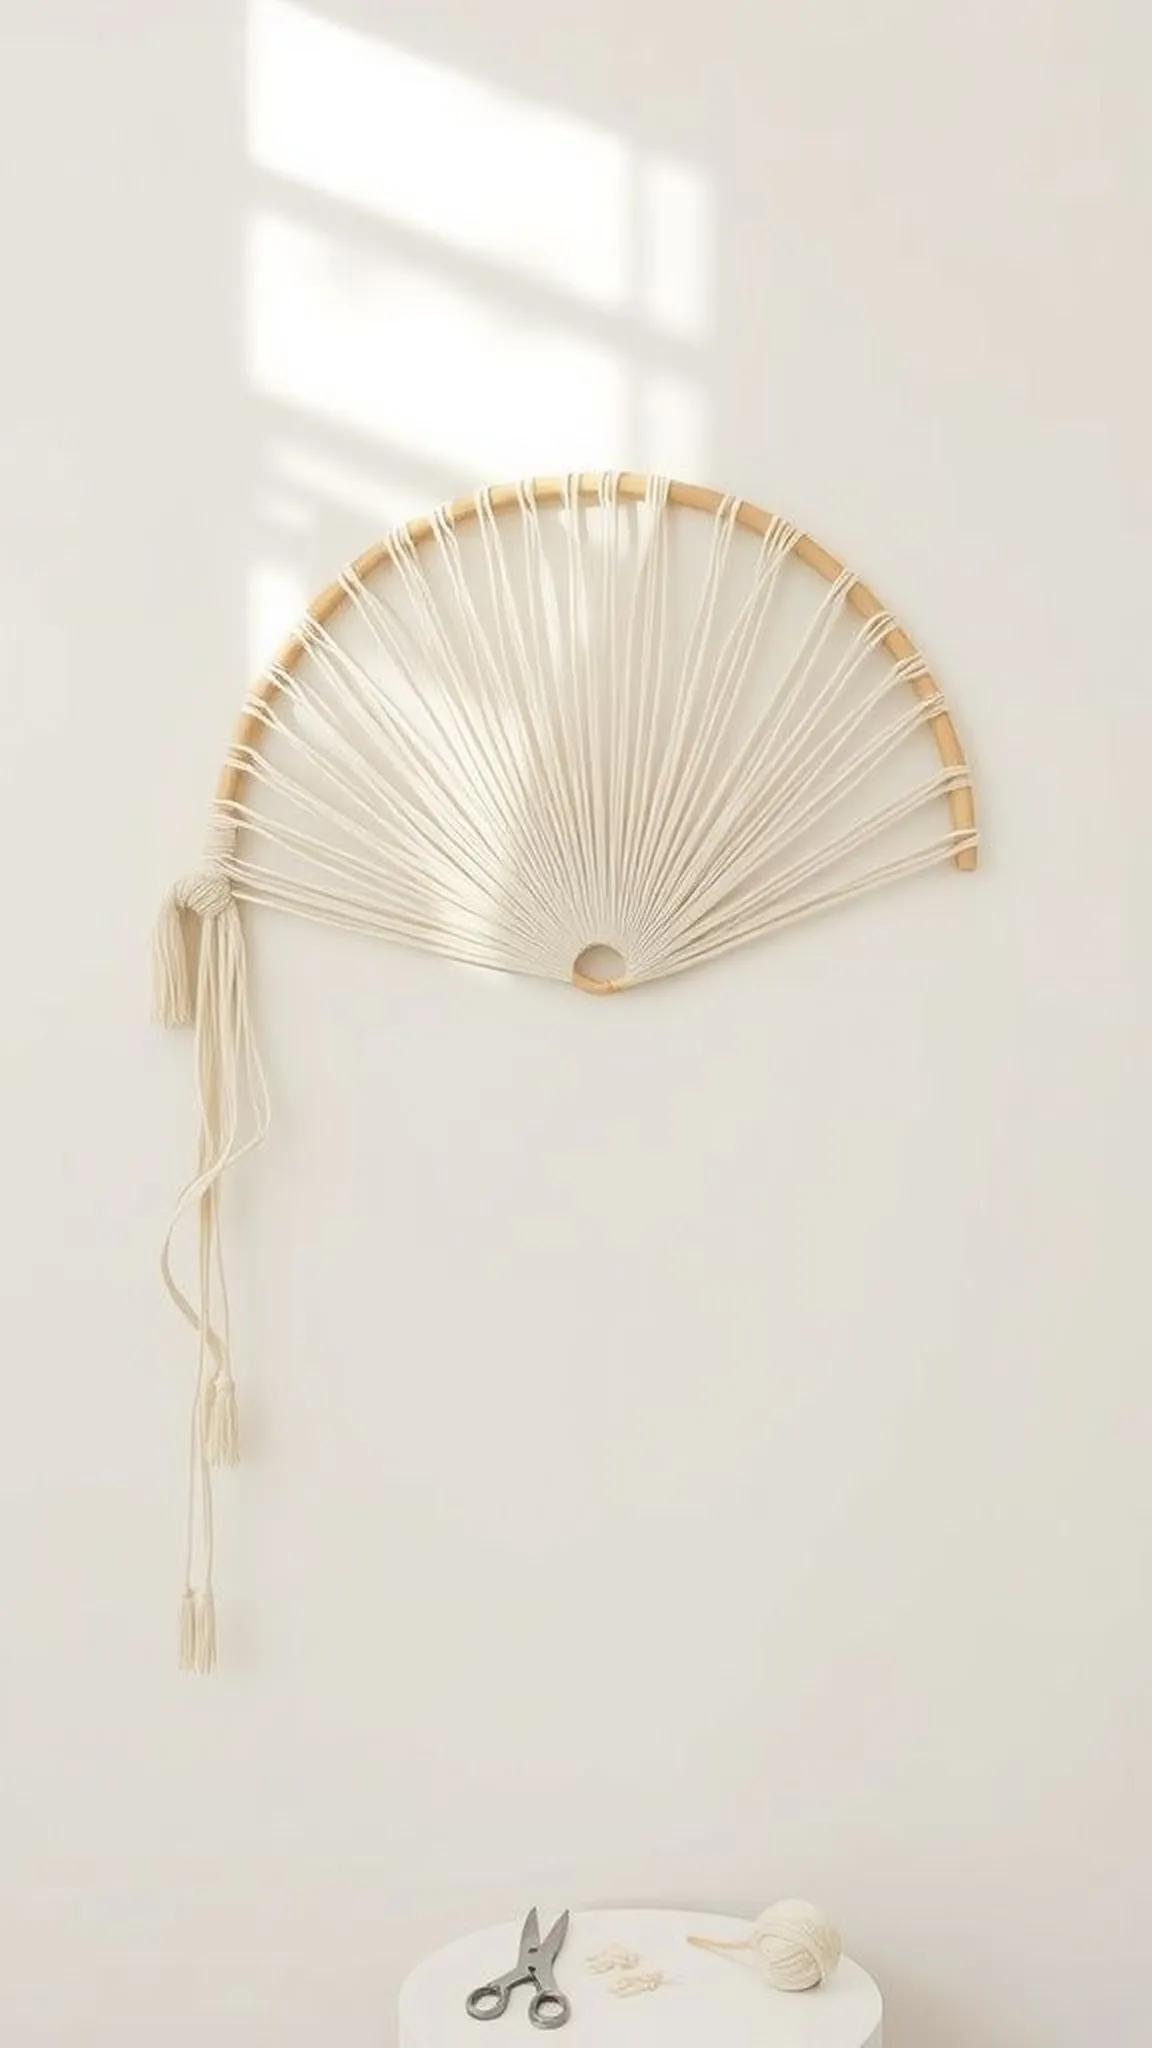
A semicircle fan macrame has clean, sculptural curves that suit minimalist spaces beautifully. The fan spreads like a soft halo, with tidy rows of short fringe forming a smooth arc.
Small, even knots maintain a calm, low-contrast surface while allowing the silhouette to read clearly from a distance. The shallow depth and restrained palette keep the piece understated and tactile.
Its gentle curve reflects light softly and casts a delicate shadow line on the wall behind. Paired with light wood tones, the fan feels airy and quietly architectural.
Pro Tip: Trim fringe gradually into the semicircle shape to preserve a smooth, symmetrical arc without overcutting.
How to Make This
- Attach pairs of cords along a curved dowel or hoop for even distribution.
- Create even rows of half hitch knots radiating from the center to form the fan pattern.
- Shape the lower edge into a soft semicircle by trimming and checking symmetry frequently.
- Lightly comb the fringe to achieve a uniform, soft appearance.
Avoid: Trimming aggressively can ruin the smooth arc and require reworking large sections. Unequal cord lengths at attachment make the fan look off-center.
Try Also: A metal hoop gives a modern, minimal edge while a short wooden dowel reads softer and more organic. Add a thin dyed border for subtle definition.
Products & Materials
Items Used
- cotton cord 3mm
- wooden hoop 14 inch
- scissors
“Minimal semicircle macrame with a soft, architectural curve.”
Macrame mirror frame with woven detailing
⏱️ 3-4 hours · 🔴 Advanced
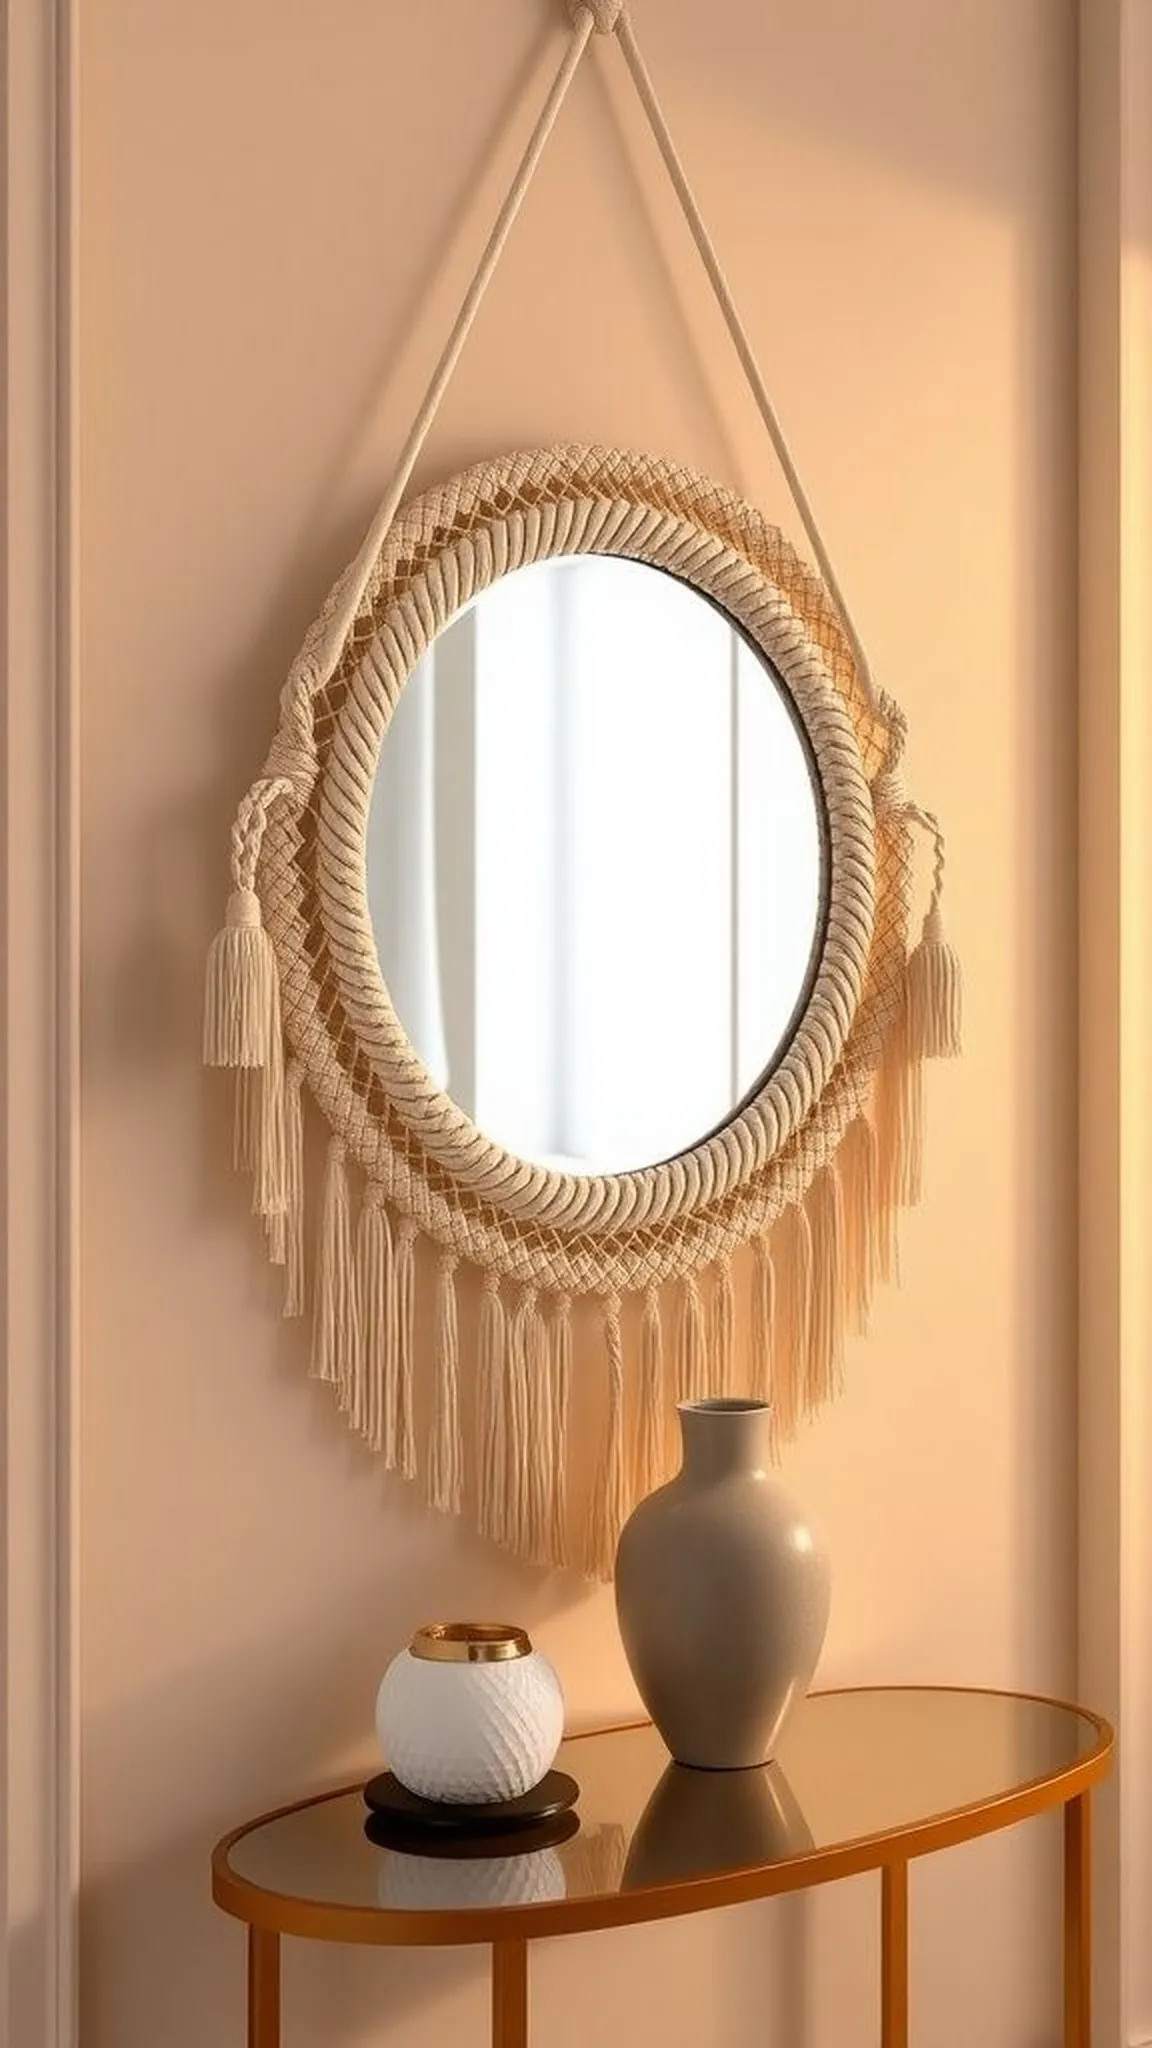
A macrame frame around a round mirror creates a tactile halo that softens reflective surfaces. Intricate knot patterns cradle the mirror, turning a functional object into a crafted focal point.
The mirror picks up tiny highlights from raised knots while the cord’s texture mutes glare into warm tones. Curved knotwork and bundled fringe add dimensionality that changes with the viewer’s angle.
Placed over a console, the framed mirror invites close inspection and gentle interaction as light shifts. The overall feel is handcrafted refinement that balances structure and softness.
Pro Tip: Secure the mirror temporarily while knotting to keep tension consistent and avoid accidental slippage during assembly.
How to Make This
- Measure the mirror circumference and cut cords to wrap and attach evenly around its edge.
- Create a sturdy base of knots behind the mirror to support decorative frontwork without slipping.
- Knot ornamental patterns outward from the mirror edge, integrating fringe and looped accents.
- Finish with a hidden hanging loop and check that the mirror sits flush and balanced in the frame.
Avoid: Neglecting a secure backing can let the mirror shift and distort the pattern. Using inconsistent tension causes the frame to twist away from the mirror’s surface.
Try Also: Add small beads between knot rows for a subtle sparkle or choose thicker cord for a bolder sculptural frame. Try an oval mirror for a more classical feel.
Products & Materials
Items Used
- cotton cord 4mm
- round mirror 12 inch
- strong mounting tape
- fabric scissors
“Handcrafted macrame mirror frame that softens reflective surfaces.”
Round mandala macrame for a boho focal point
⏱️ 4 hours · 🔴 Advanced
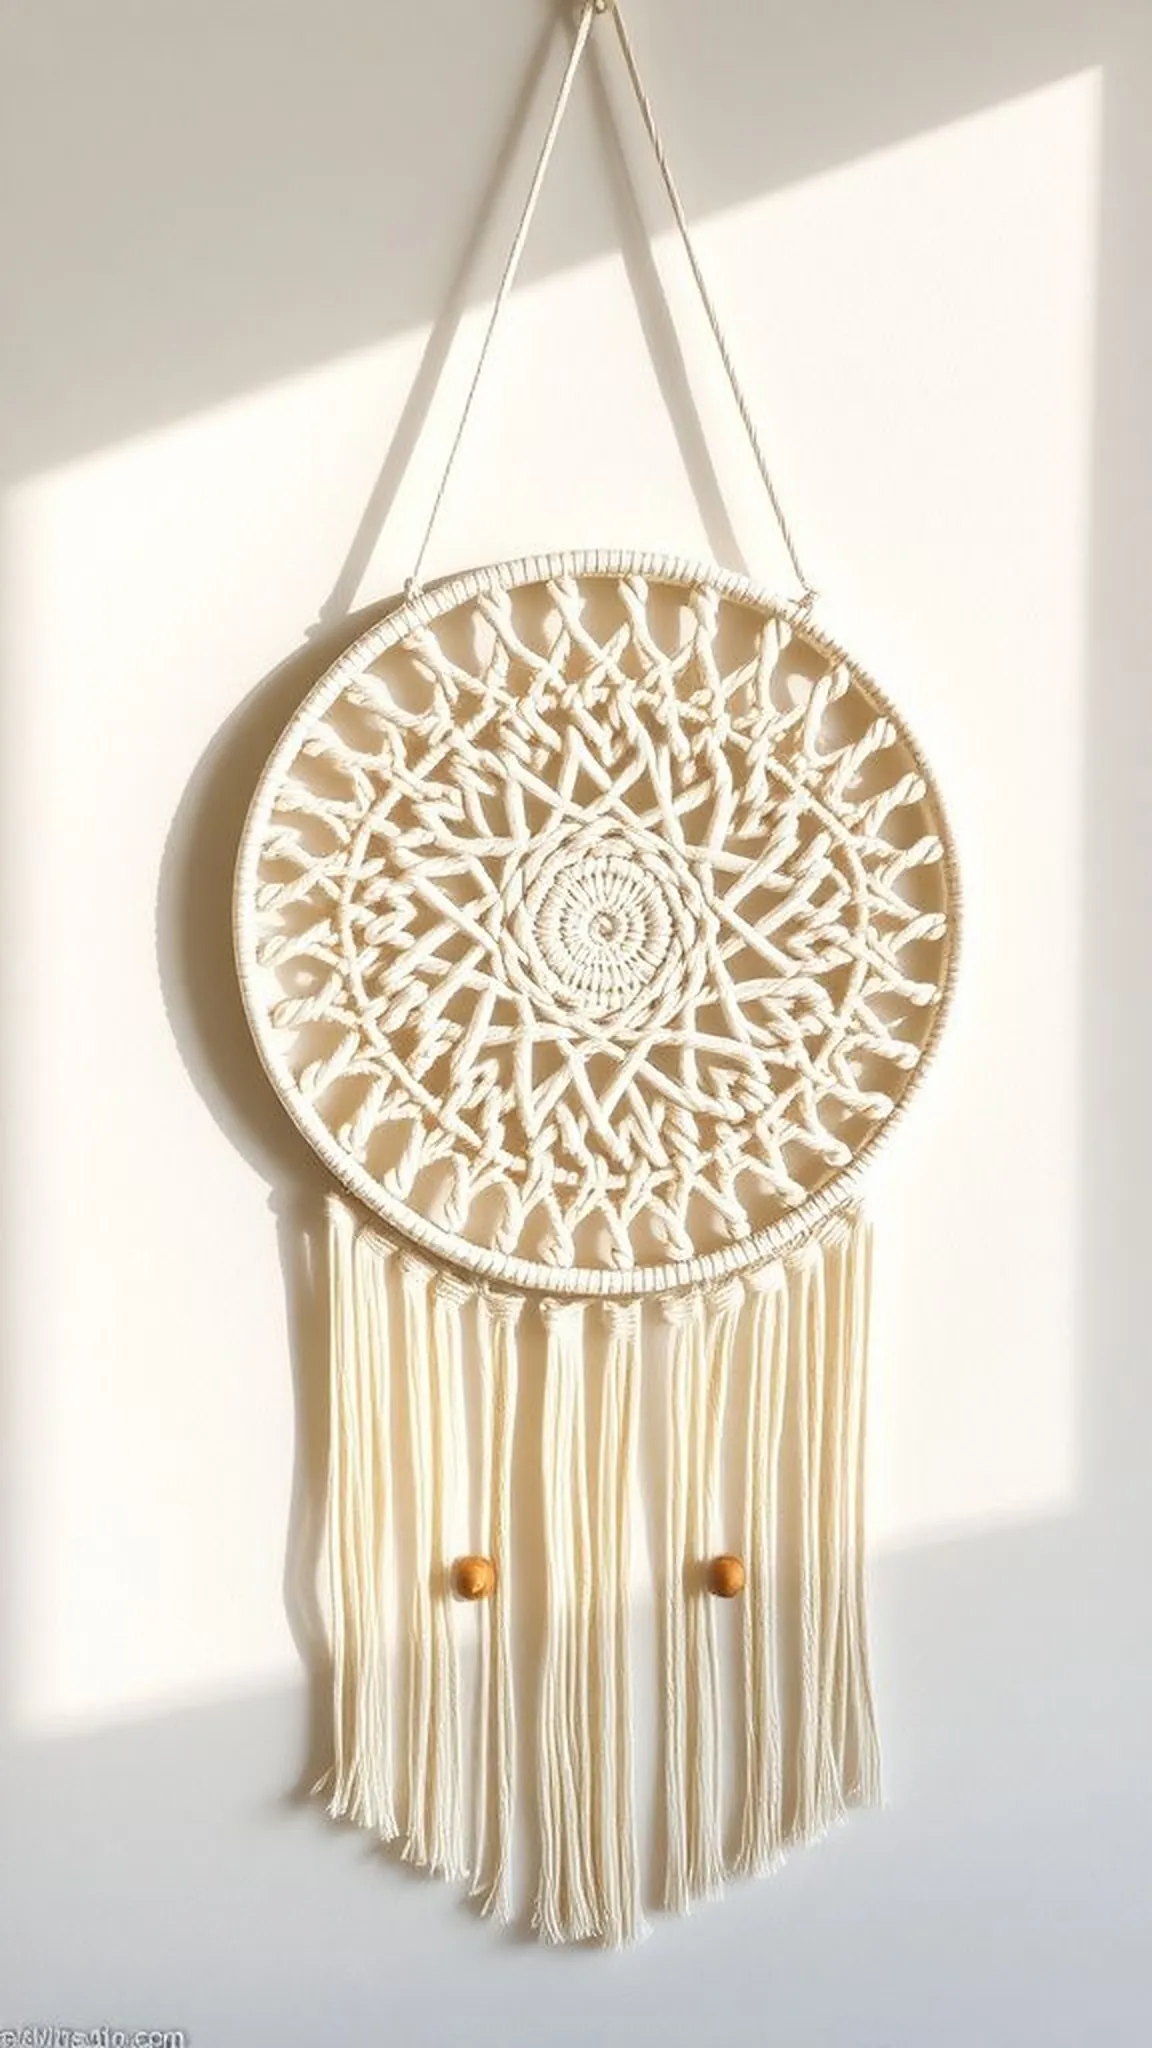
A circular mandala-style macrame works like a sunburst stitched from cord, offering radial symmetry and layered texture. Concentric rings of knotwork create a meditative pattern that invites slow looking.
Varying knot types build depth while fringe radiates outward to soften edges and catch movement. The circle’s shape feels complete and calming, like a textile wreath with endless tiny details.
Natural fibers add warmth, while occasional bead accents introduce little bright points among matte cords. Hung against a plain wall, the mandala becomes a rhythmic centerpiece with handcrafted presence.
Pro Tip: Begin the mandala from the center and work outward, keeping radial sections consistent to preserve symmetry and balance.
How to Make This
- Secure a metal ring or hoop and attach cords evenly around its circumference.
- Build concentric knot rings using alternating knot styles to create layered texture.
- Add fringe or looped elements on the outermost ring to soften the border.
- Embellish select radial spokes with wooden beads for subtle highlight points.
Avoid: Uneven cord distribution around the hoop can throw the whole mandala off-center. Inconsistent knotting tension breaks the radial symmetry and becomes obvious at a distance.
Try Also: A small mandala trio makes a textured cluster while a very large single piece reads like woven art. Metallic threads woven into inner rings add delicate shimmer.
Products & Materials
Items Used
- macrame cord 3mm
- metal hoop 16 inch
- wooden beads 8mm
“Circular macrame mandala that radiates textured, boho charm.”
Macrame plant pocket integrated into wall art
⏱️ 1-2 hours · 🟠 Intermediate
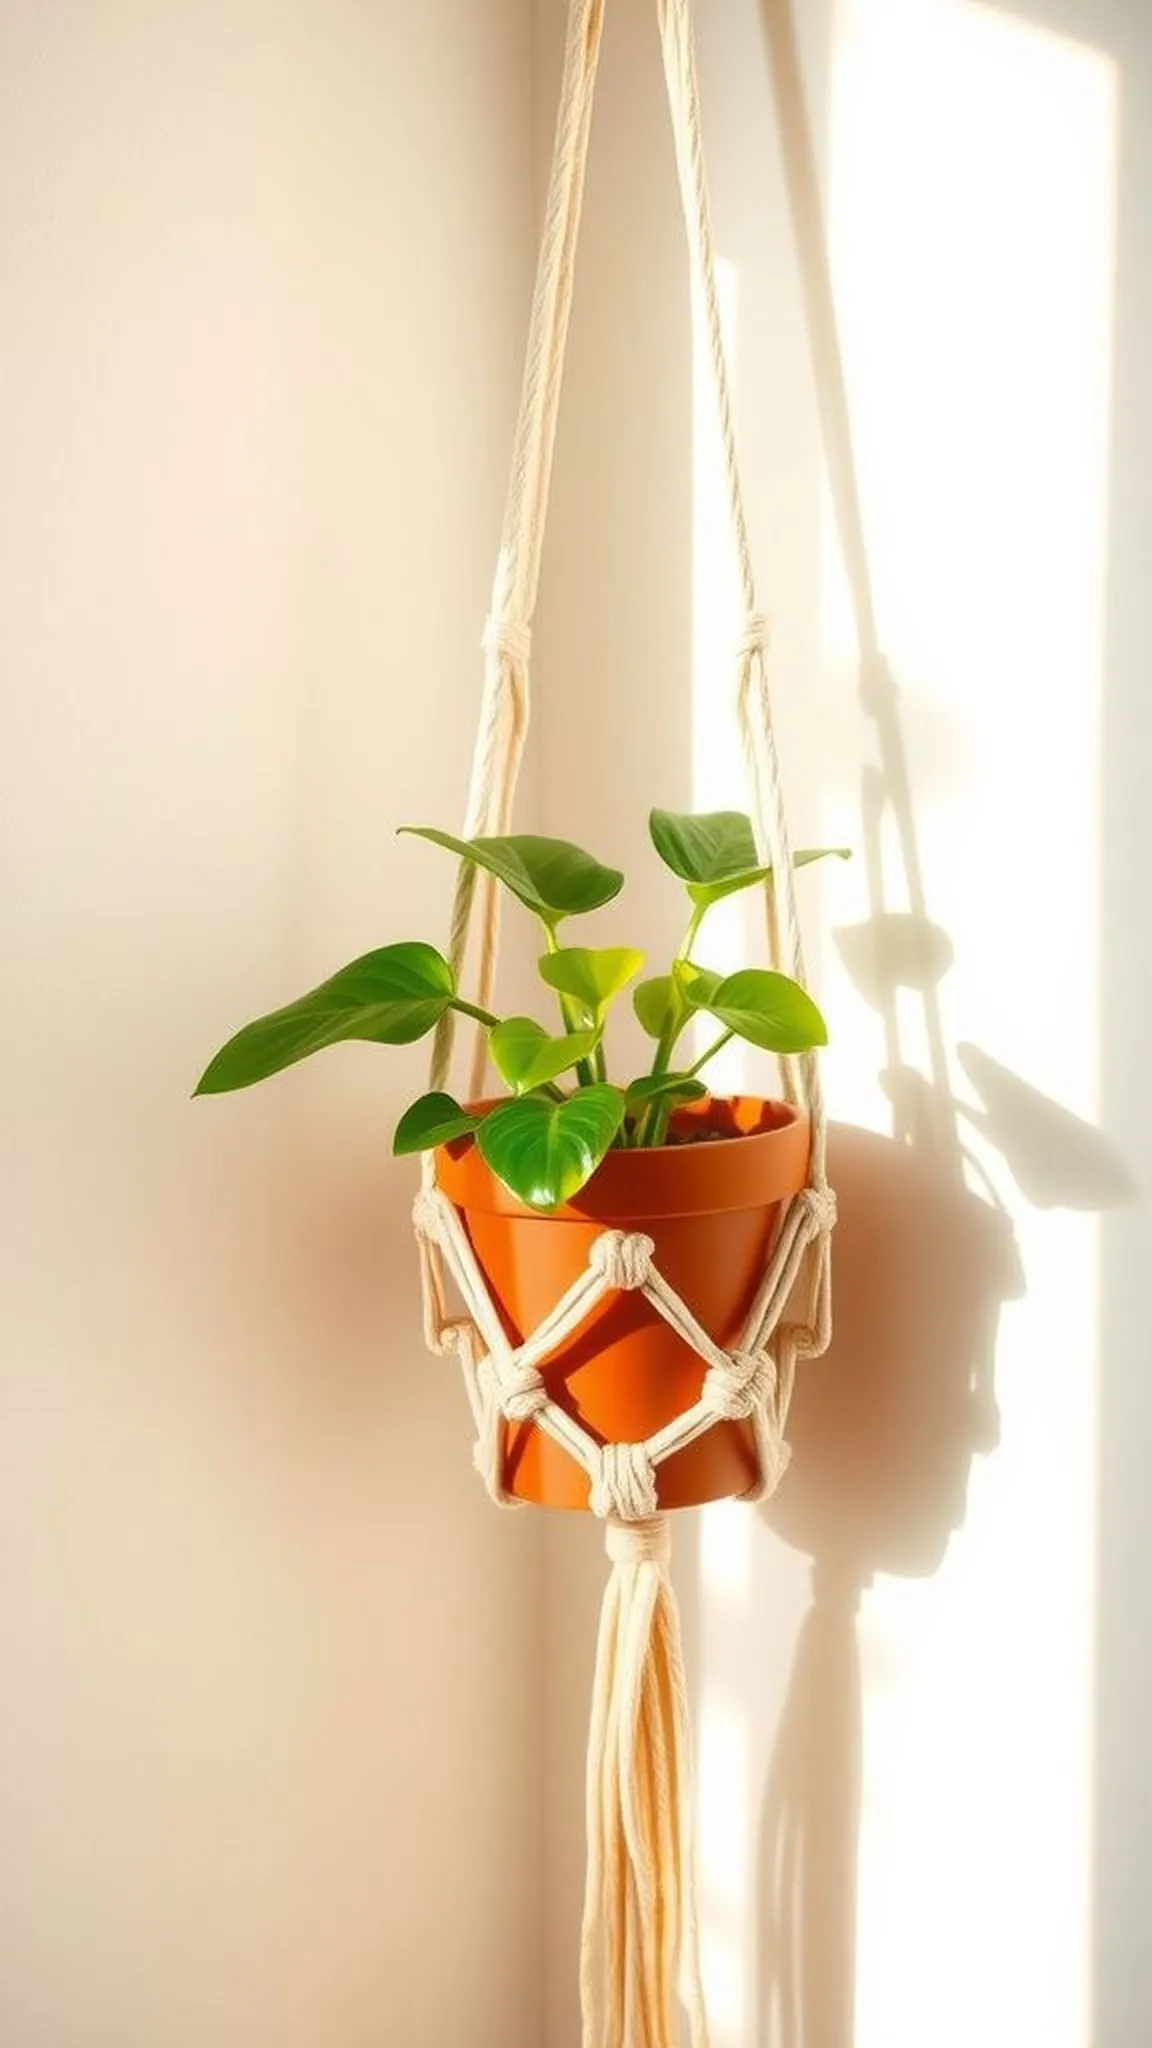
A macrame wall hanging with an integrated plant pocket introduces living texture and practical green display. The pocket cradles a small pot, while surrounding knots frame the plant like a living portrait.
Natural cord tones and the plant’s glossy leaves create a pleasing contrast of matte and sheen. The texture of knots and trailing roots combine to give the installation a subtle, organic vibrancy.
Placed near a sunny window, the arrangement feels lively and collected in a casual, homey way. The living element adds seasonal change as leaves grow and cast new shadows across the cordwork.
Pro Tip: Choose a shallow, lightweight pot and line the pocket with plastic to protect cords from moisture and soil damage.
How to Make This
- Construct the macrame panel and form a secure pocket section with reinforced knots at the base.
- Insert a small pot wrapped in protective liner and balance it within the pocket.
- Adjust cords around the pot for even support and tidy outer knotwork for a neat frame.
- Hang where the plant receives gentle light and monitor moisture to protect fibers.
Avoid: Using a heavy or deep pot strains the pocket and can cause sagging or tearing. Skipping a protective liner lets soil moisture contact cords and weakens fibers over time.
Try Also: Multiple small pockets create a vertical green wall, while a single deeper pocket suits a trailing plant for dramatic drape. Swap cord color to complement the plant’s foliage.
Products & Materials
Items Used
“Macrame wall pocket that displays a plant like living art.”
Leather accented macrame with mixed materials
⏱️ 1-2 hours · 🟠 Intermediate
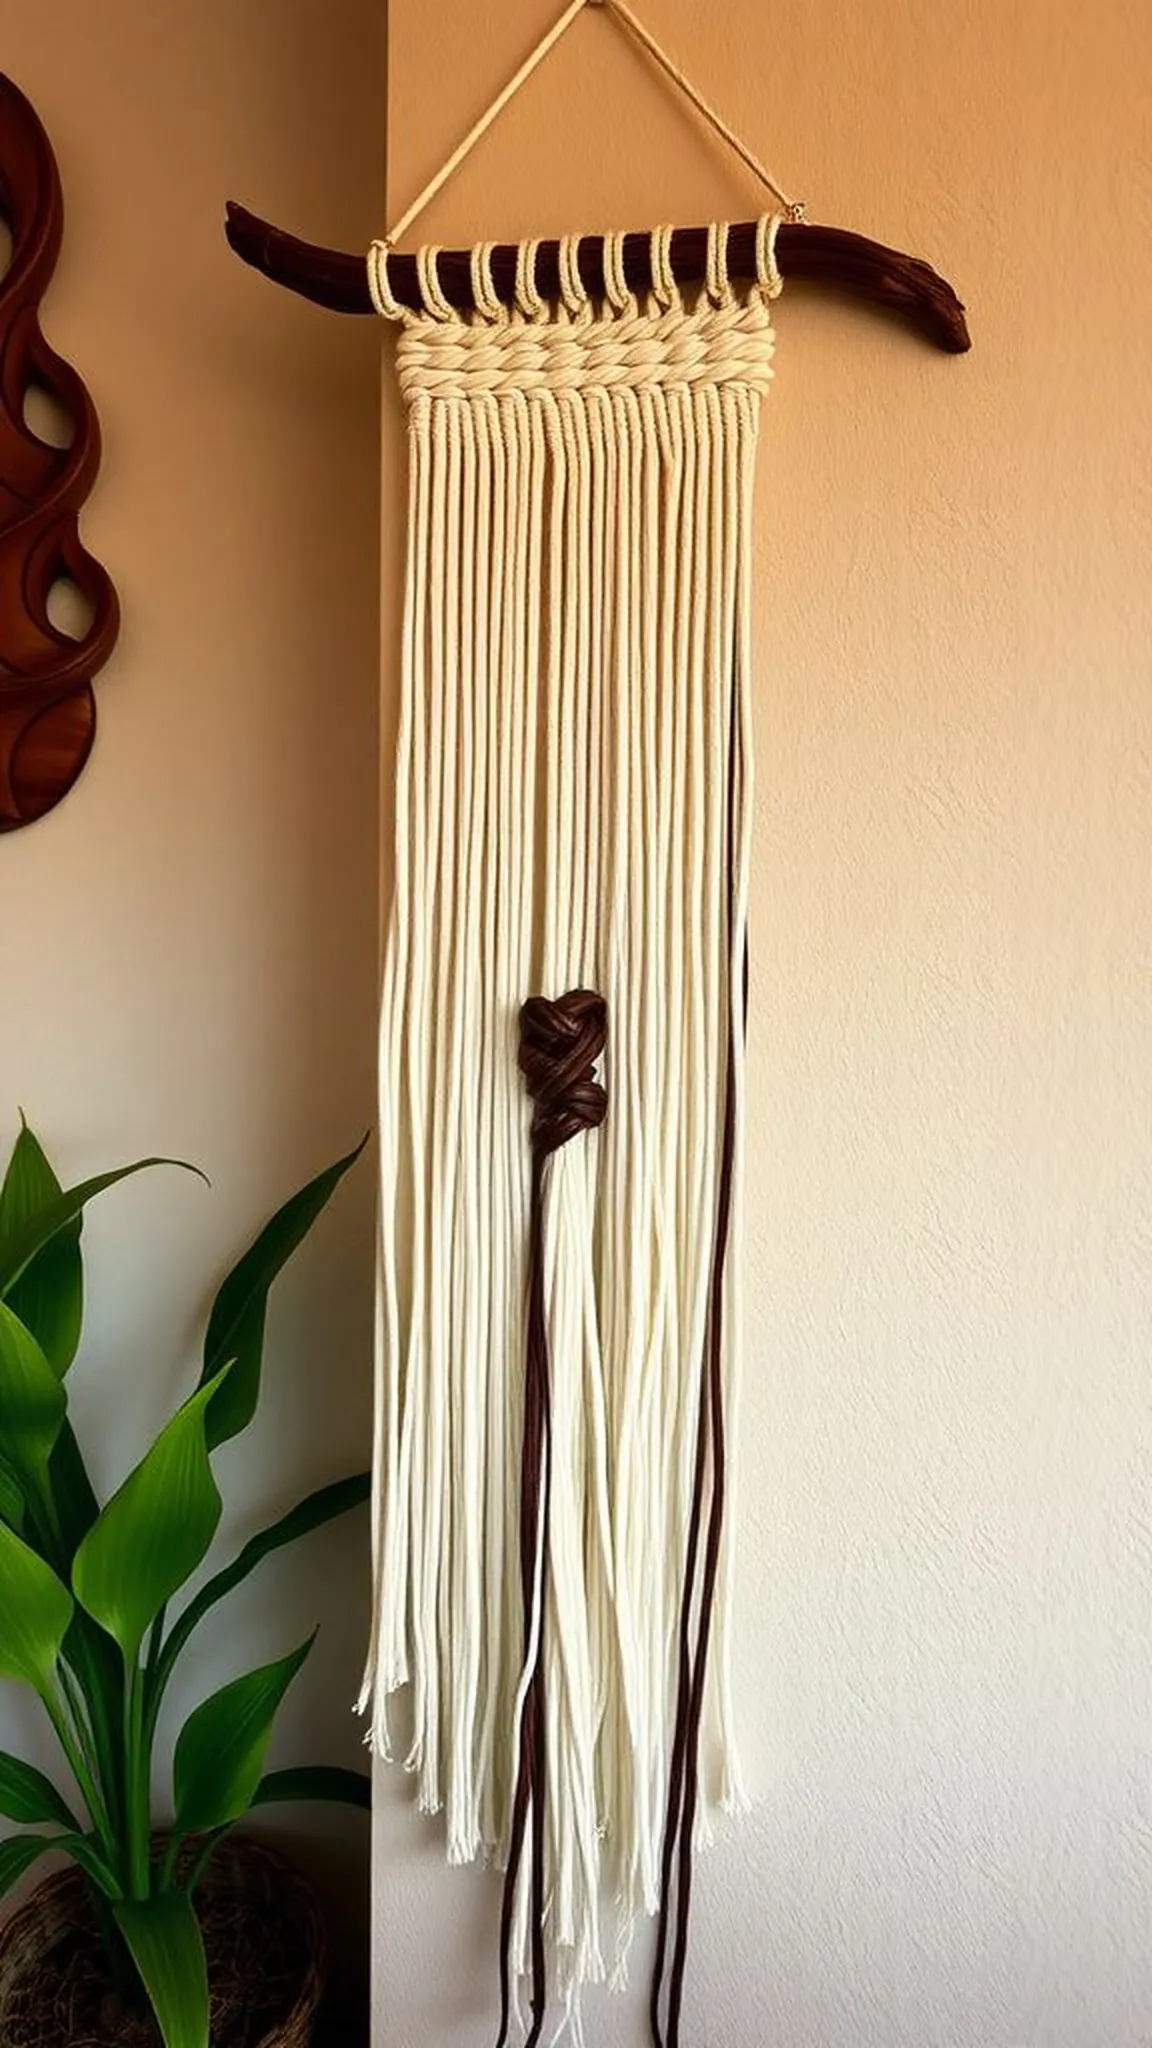
A mixed-material macrame piece blends soft cord with warm leather accents for contrast and modernity. Narrow leather strips weave through knots, offering a smooth, dark counterpoint to matte fibers.
The tactile exchange between fibrous cotton and cool leather creates an interesting handfeel and visual punch. Light catches the leather differently, adding small reflective notes along the pattern.
Mounted on a raw wooden branch, the hybrid look reads both rustic and refined, pairing well with leather-trimmed decor. The piece feels intentional and thoughtfully textured in any room.
Pro Tip: Pre-treat leather edges with a small amount of leather conditioner to soften them and prevent cracking during weaving.
How to Make This
- Cut leather strips and cord to working lengths and attach both to the chosen dowel or branch.
- Incorporate leather into alternating knot rows, threading strips through loops to secure them visually.
- Keep leather strips taut and trim ends cleanly to maintain a neat, integrated look.
- Finish with a protective leather edge or knot to prevent slippage and hang securely.
Avoid: Leather that is too stiff can tear or not seat well within knots, causing gaps. Failing to secure leather ends carefully can let them slip over time.
Try Also: Swap leather for suede for a softer handle or introduce slim metal rings for an industrial touch. Contrast color leather dramatically changes the piece’s mood.
Products & Materials
Items Used
- cotton cord 3mm
- leather strips 1/4 inch
- driftwood branch 16 inch
- craft knife
“Mixed-material macrame with leather accents for modern texture.”
Bead embellished macrame with playful highlights
⏱️ 45 min · 🟢 Beginner
Wooden beads threaded into macrame add punctuated dots of warmth and tactility across a neutral panel. The beads sit nestled between knot rows, catching light and creating tiny points of interest.
Bead grain and smooth cord interplay to create subtle rhythm that feels handcrafted and friendly. The sound of beads shifting is barely audible but adds a gentle, lived-in quality when the hanging moves.
This approach provides personality without overwhelming the knotwork, and beads can echo nearby decor colors. The overall effect is cheerful and handcrafted with low fuss.
Pro Tip: Pre-test bead hole sizes with a spare cord piece to ensure a smooth threading fit without forcing fibers through tight openings.
How to Make This
- Slide beads onto selected cord lengths before knotting to position them easily along the pattern.
- Secure beads in place using knots on either side to prevent sliding during use.
- Continue knotwork around beaded sections and tension evenly to keep beads centered.
- Trim excess cord and arrange beads for balanced visual distribution across the panel.
Avoid: Forcing beads with too-small holes damages cord fibers and can fray ends. Placing all beads in a single area makes the design feel lopsided rather than balanced.
Try Also: Glass beads introduce small reflective pops while ceramic beads add earthy weight. Cluster beads in vertical lines or scatter them sparingly for a playful look.
Products & Materials
Items Used
- cotton cord 3mm
- wooden beads 10mm
- craft scissors
“Bead-studded macrame that adds charming, tactile accents.”
Woven macrame shelf to display small treasures
⏱️ 3 hours · 🔴 Advanced
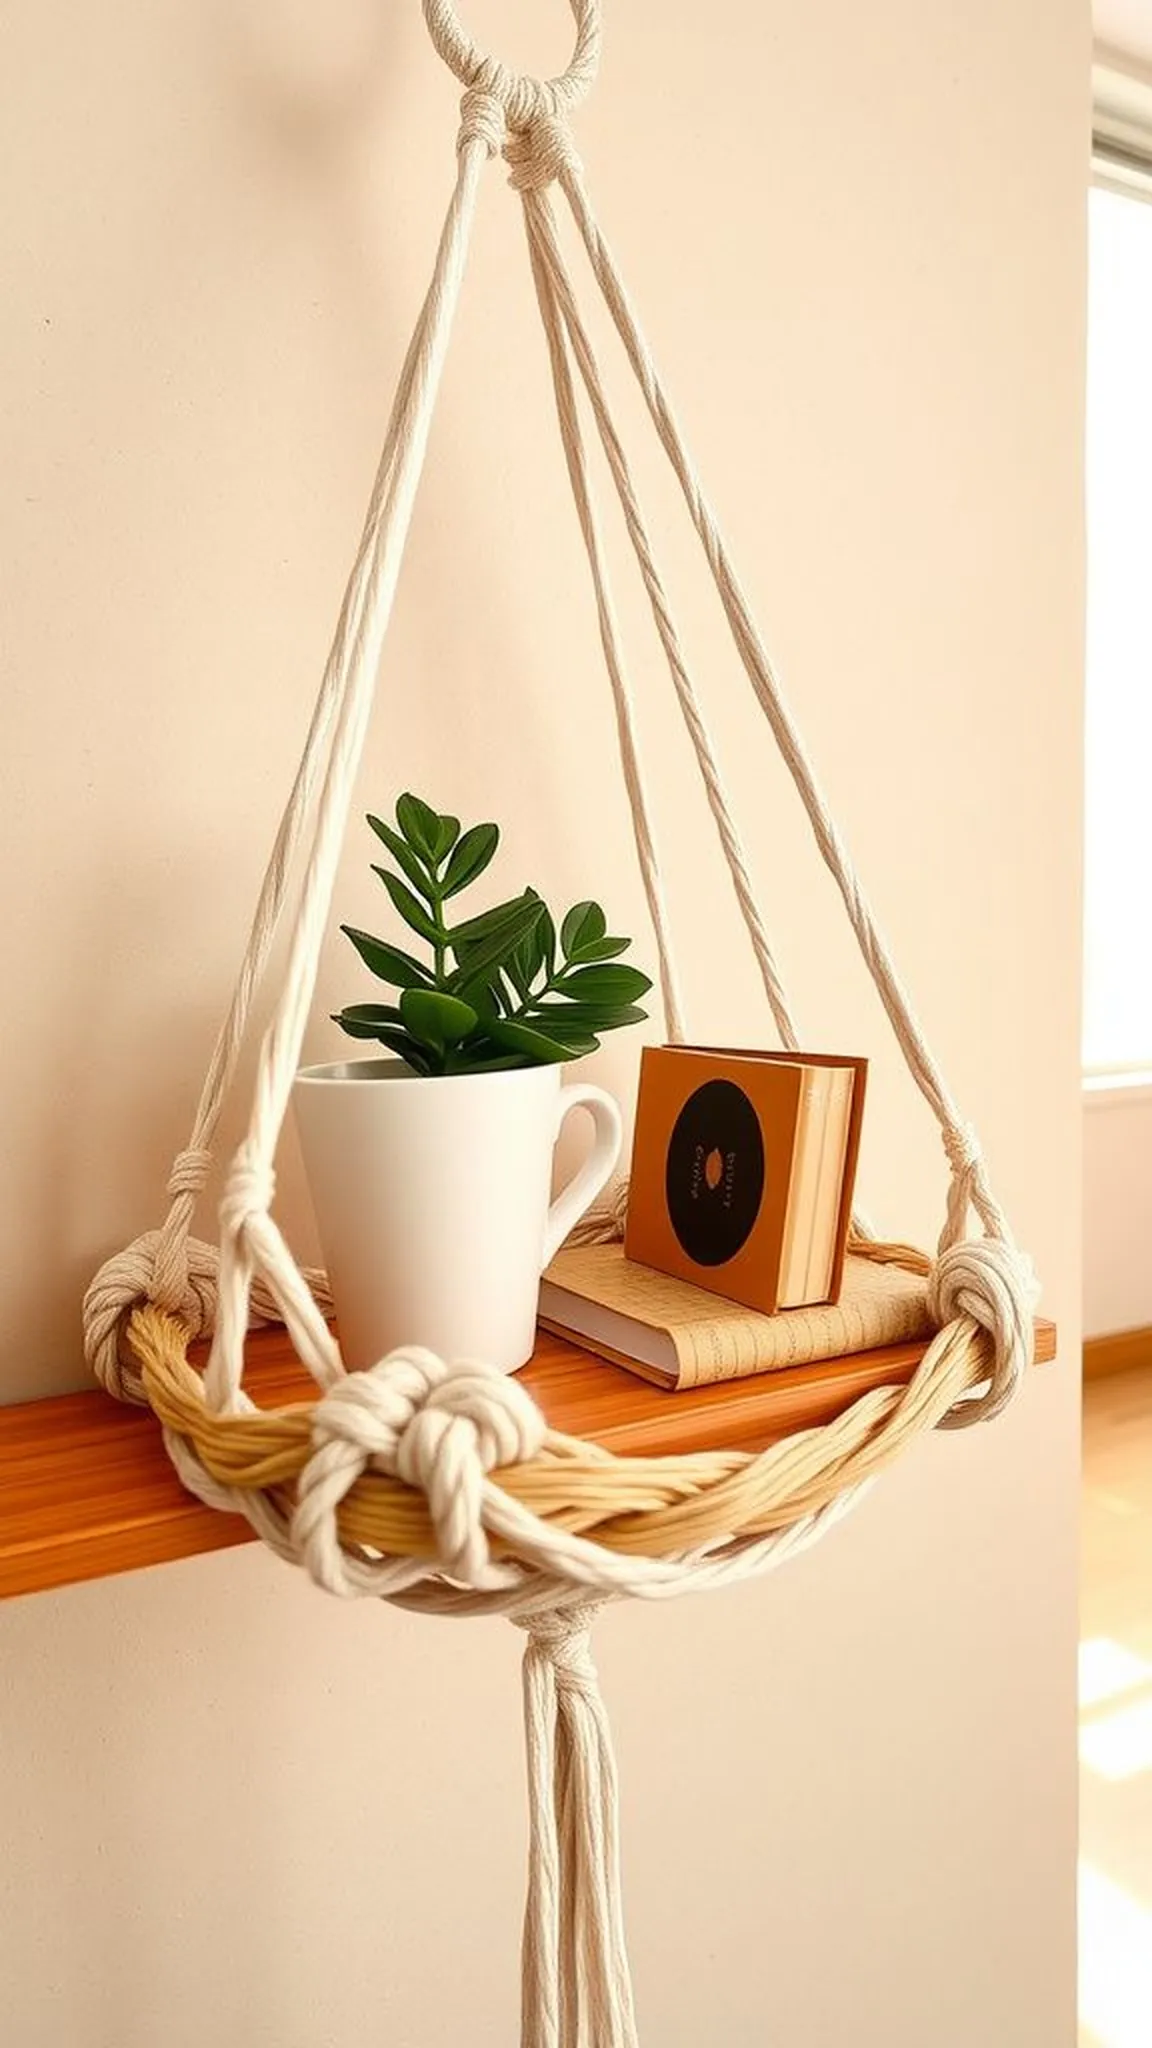
A macrame shelf blends functional storage with decorative knotting to hold lightweight objects. The woven base and secure cord supports form a small platform that reads like a sculptural ledge.
Textured knots cradle ceramics or small planters while suspended cords create a rhythmic curtain underneath. Viewed from different angles, the shelf reveals structural details and shadowed negative space.
Natural fibers keep the look warm and approachable, balancing structure with softness. The shelf becomes a tiny staged vignette that changes with the items it holds.
Pro Tip: Use a strong, thicker cord for load-bearing supports and test the shelf with weight increments before mounting permanently.
How to Make This
- Construct the base using tightly knotted rows to form a flat woven platform sized for the intended objects.
- Create reinforced suspender cords at each corner and secure them to a sturdy hanging rod or hook.
- Attach decorative knotting around the platform edges to hide joins and add visual interest.
- Test the platform with light objects first and adjust tension to ensure stability.
Avoid: Using thin cord for load-bearing parts leads to sagging and unsafe shelving. Skipping a weight test risks damage to both the shelf and the displayed items.
Try Also: A shallow shelf suits small ceramics while a wider version offers room for a couple of books and a plant. Add a woven fabric insert for a cleaner base surface.
Products & Materials
Items Used
“Functional macrame shelf that stores and displays tiny treasures.”
Curtain style macrame with long vertical panels
⏱️ 4-6 hours · 🔴 Advanced
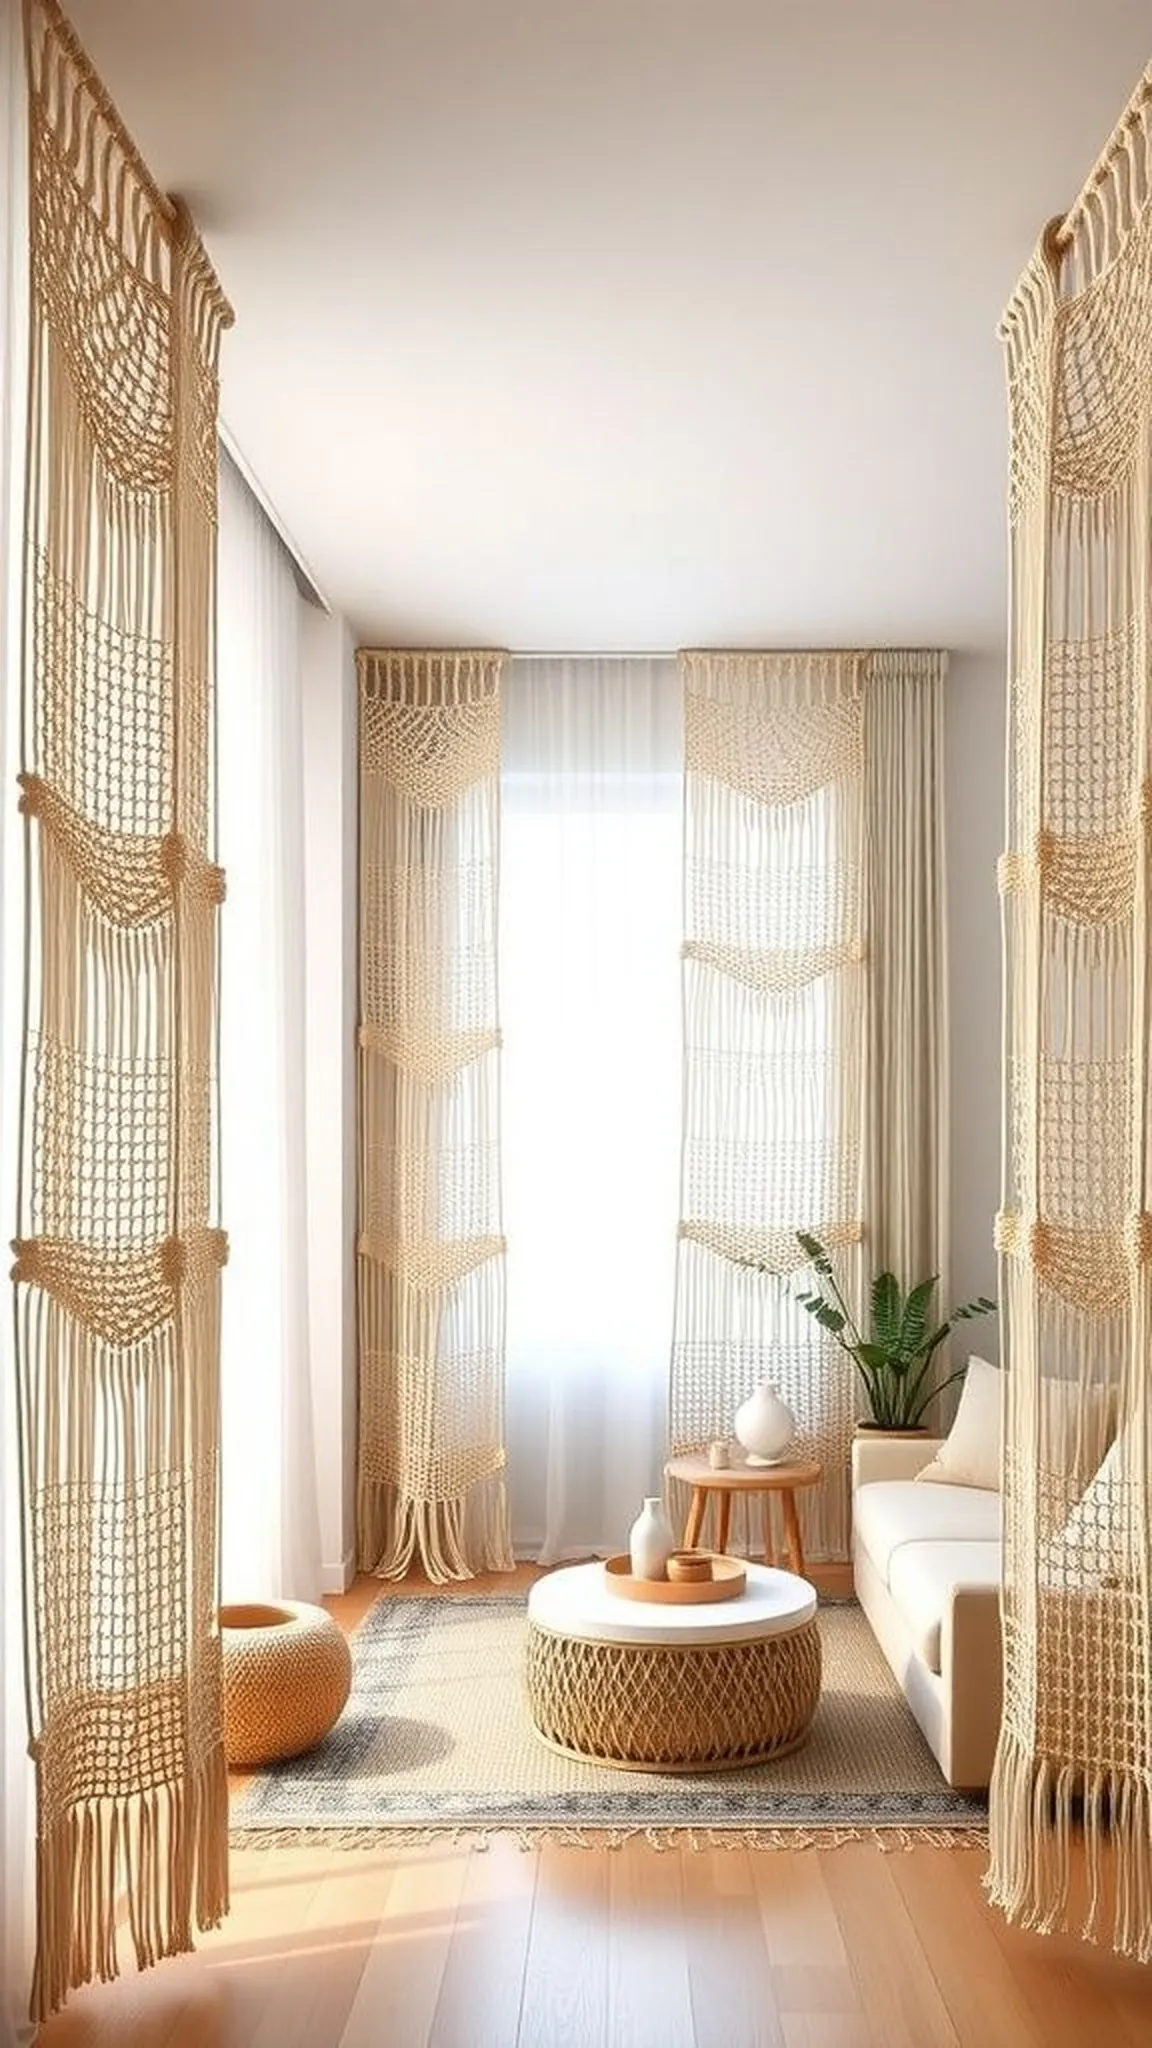
Floor to ceiling macrame panels read like a textile curtain that filters light and defines space. Long vertical knotwork creates subtle privacy while allowing soft daylight to pass through knotted lace.
The layered panels sway slightly with air movement, producing a graceful, rhythmic motion across the room. Close up, the complexity of interlaced knots contributes rich texture and shadow play.
Neutral tones and openwork keep the effect airy rather than heavy, making it suitable for dividing rooms gently. The curtain becomes both architectural and domestic, shaping space without closing it off completely.
Pro Tip: Plan panel spacing and measure ceiling height carefully to ensure even coverage and comfortable hem length before starting large panels.
How to Make This
- Measure the installation height and cut multiple long cord bundles for each panel with extra length for finishing.
- Attach cords to a sturdy overhead rod and create repeated lace-like motifs down each panel for openwork.
- Join adjacent panels with matching knots or leave small gaps depending on desired coverage.
- Secure top mounting hardware to a stud or reinforced anchor and trim lower edges to uniform length.
Avoid: Underestimating cord length can leave panels too short or require reworking. Failing to anchor the top to secure supports causes the whole installation to sag over time.
Try Also: Use alternating knot patterns between panels for a striped texture or dye alternate panels for a soft banded effect. A double-layer with slight offset adds privacy and depth.
Products & Materials
Items Used
- heavy macrame cord 6mm
- ceiling rod 48 inch
- stud finder
“Room-defining macrame curtain that filters light with woven elegance.”
Mini macrame trio for a playful gallery
⏱️ 45 min · 🟢 Beginner
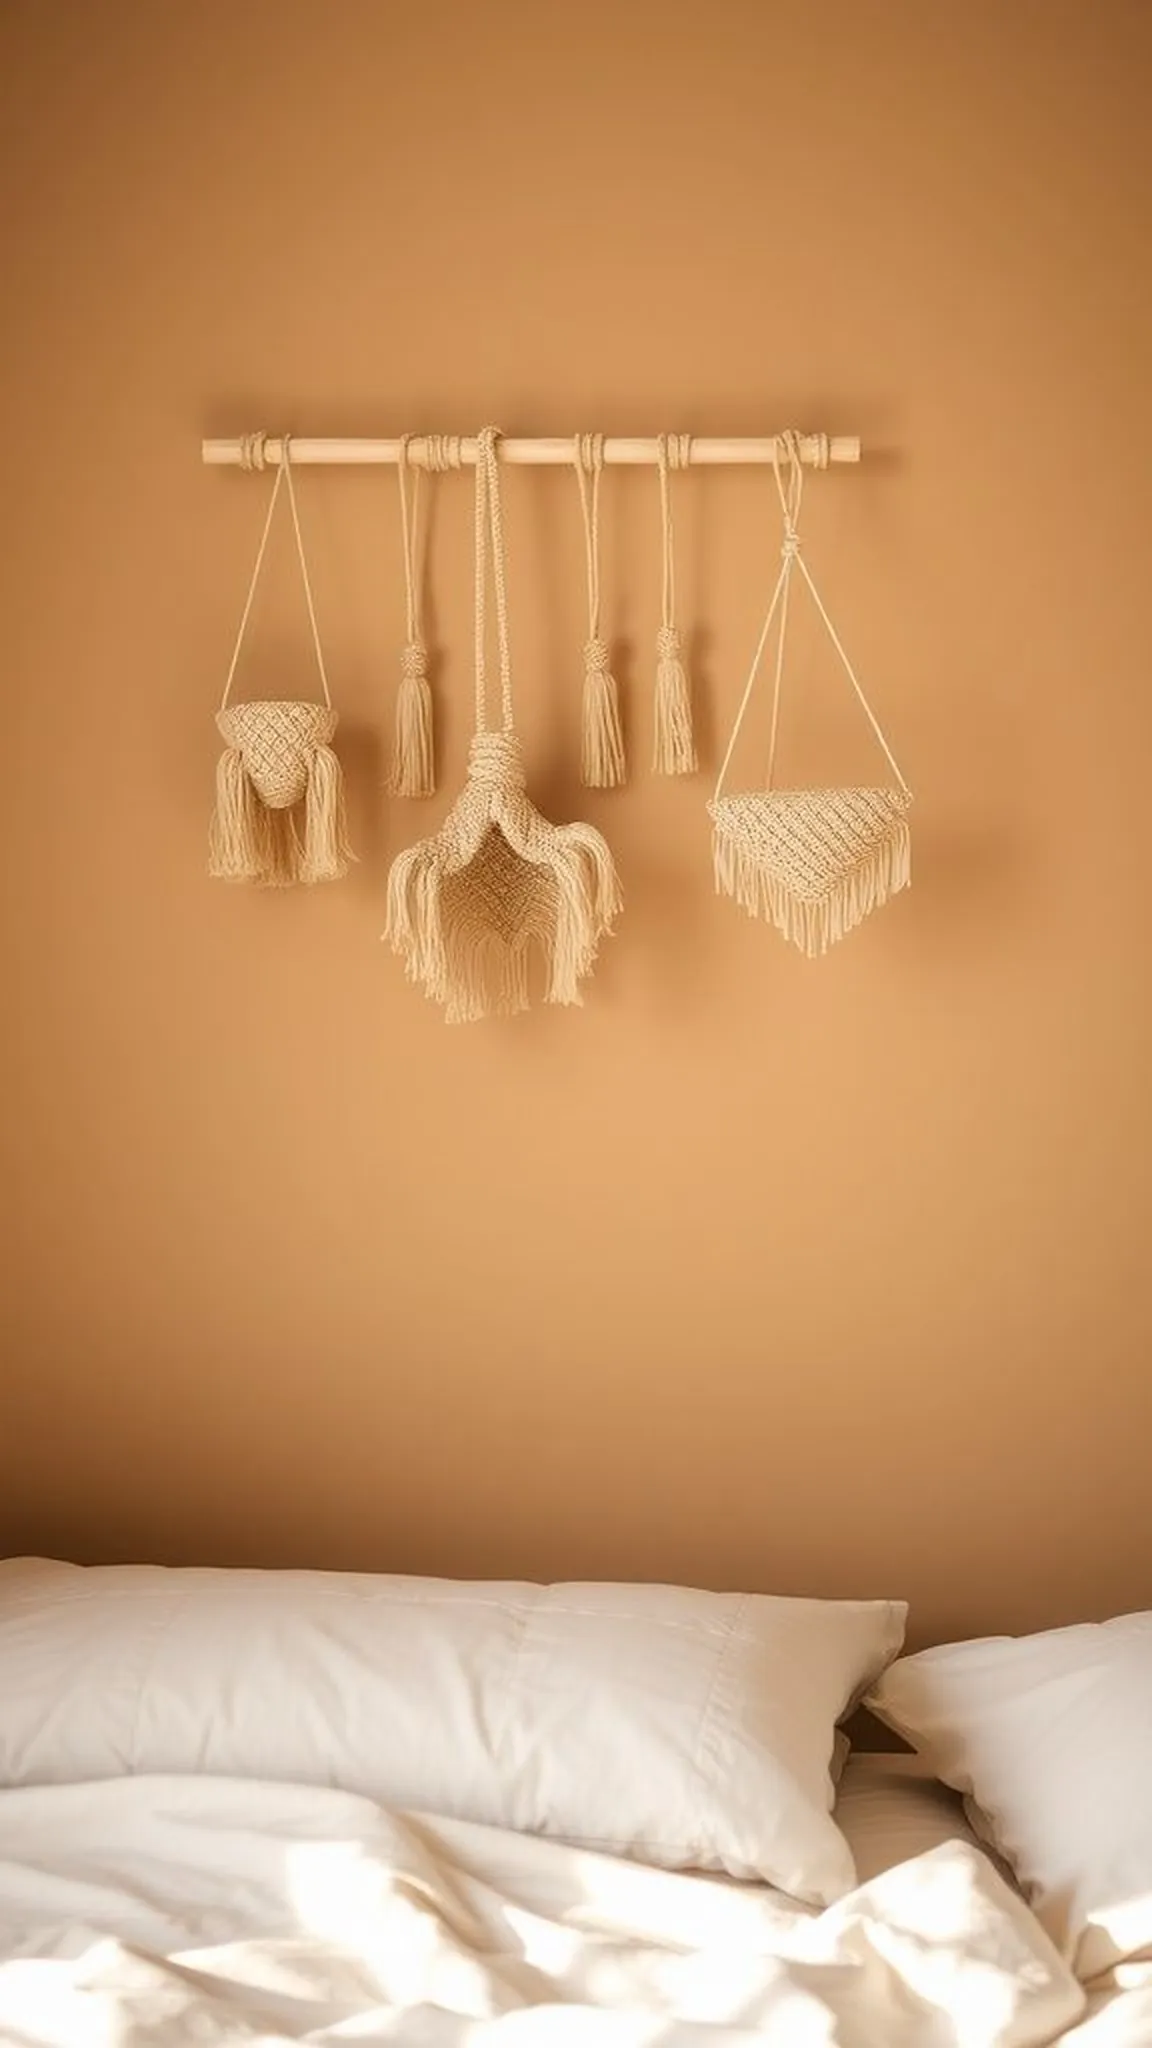
A set of three mini macrame hangings makes a playful grouped display that feels casual and collected. Small-scale knotwork reads charmingly in a staggered arrangement above a desk or bed.
Each mini piece can vary slightly in fringe length and texture, creating lively contrast across the trio. Close-up details feel intimate and approachable, inviting a second look at knot edges and tiny variations.
The small size keeps each piece quick to complete while the group composition offers visual richness. Together they make an accessible way to try different patterns without a large commitment.
Pro Tip: Keep mini hangings proportionate by using the same dowel width and consistent cord thickness across the trio for cohesive display.
How to Make This
- Choose three short dowels and cut matching cord groups for each small panel.
- Create simple knot patterns like square knots and alternating larks to vary texture across pieces.
- Trim each fringe to different lengths for visual interest and arrange on the wall in a balanced cluster.
- Adjust spacing until the group reads harmonious and aligned with surrounding decor.
Avoid: Using different cord weights across minis can make the trio feel mismatched rather than cohesive. Haphazard hanging without spacing checks leads to an unbalanced grouping.
Try Also: Make a monochrome set for minimalism or dye each mini a different hue for playful color. Swap a metal ring for one mini to add shape contrast.
Products & Materials
Items Used
- cotton cord 3mm
- small wooden dowels 6 inch
- scissors
“Three cute mini macrame hangings for a playful wall cluster.”
Knotted wave pattern with gentle undulating lines
⏱️ 2 hours · 🟠 Intermediate
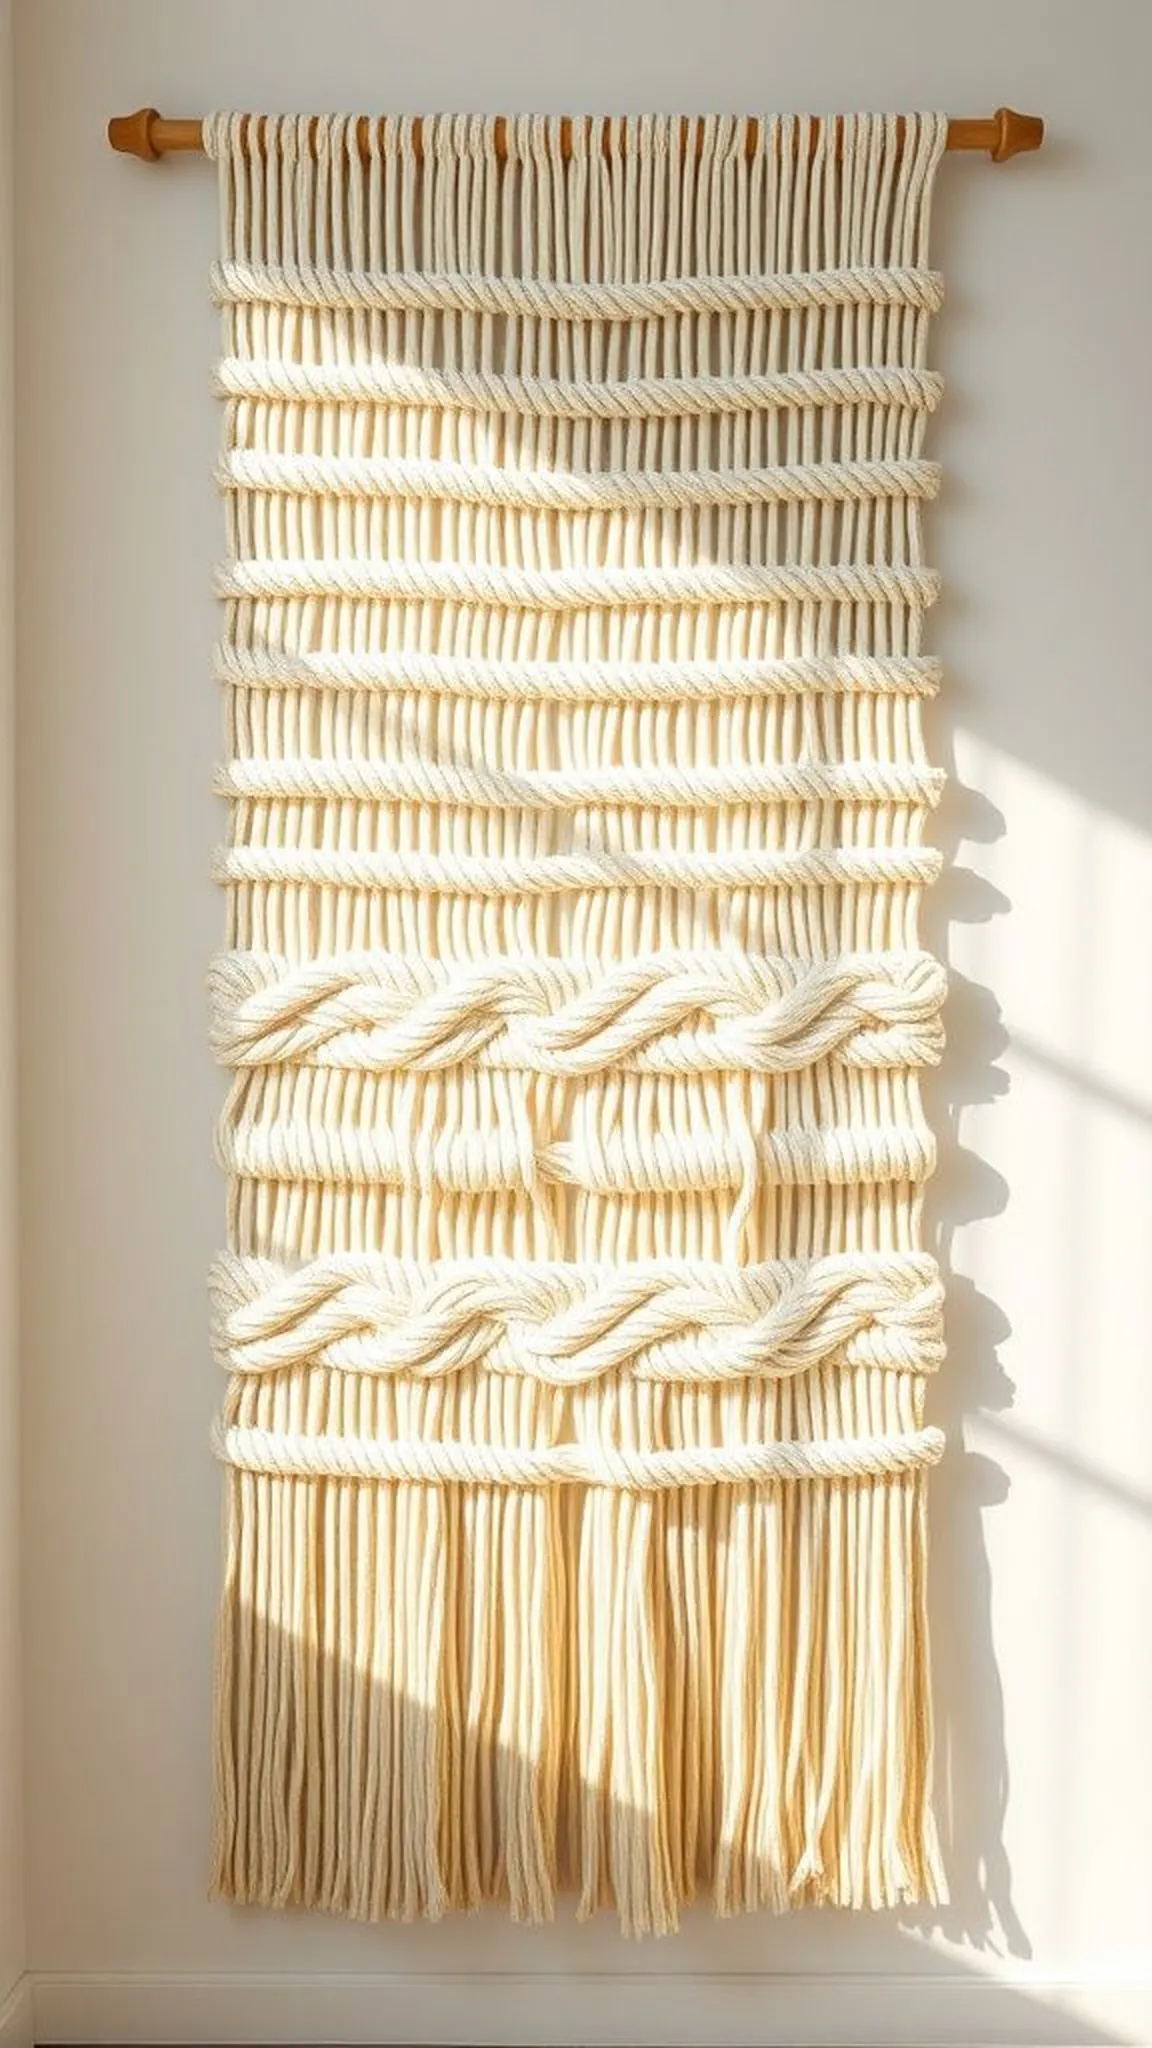
An undulating wave pattern in macrame offers a soft, rhythmic flow across a panel that feels soothing. Curved knot lines move horizontally, producing a motion that feels calm and organic.
The interplay of raised knots and recessed gaps creates subtle shadowing that reads like rolling fabric. Smooth, even tension keeps the waves consistent and peaceful to the eye.
Natural muted hues emphasize form and movement rather than color contrast, giving a serene coastal or Scandinavian vibe. The finished piece brings a sense of quiet motion to a still wall.
Pro Tip: Lay the panel flat and smooth each wave row as knots are tightened to maintain consistent curvature and avoid waviness errors.
How to Make This
- Attach cords to a dowel and map out horizontal guide lines where each wave crest will sit.
- Form curved rows by varying knot direction and tension to shape flowing undulations.
- Adjust each row visually and tighten knots evenly to preserve smooth wave shapes.
- Trim and tidy fringe edges to complement the soft horizontal flow.
Avoid: Inconsistent knot tension leads to irregular wave shapes that appear jagged. Skipping frequent visual checks causes unintended distortion of the intended curve.
Try Also: Add a thin painted stripe on the dowel for a faint horizon reference or alternate cord colors between waves for a subtle banded effect. A tapered bottom edge enhances the flowing silhouette.
Products & Materials
Items Used
- macrame cord 3mm
- wooden dowel 24 inch
- measuring tape
“Gentle macrame waves for a calm, flowing wall display.”
