
As an Amazon Associate I earn from qualifying purchases.
Quick Office Hairstyles make busy mornings look polished without extra fuss. These quick office hairstyles deliver neat, wearable looks that suit meetings, commutes, and last-minute client calls.
Each selection focuses on fast steps and small accessories so workday hair stays tidy and professional. Easy-to-follow moves like twists, low buns, and clipped-up styles keep hair out of the face while looking crisp.
Photos highlight texture and placement so recreation is straightforward for short, medium, and long lengths. Swap a clip or add a scarf to turn a simple look into a refined office-ready statement.
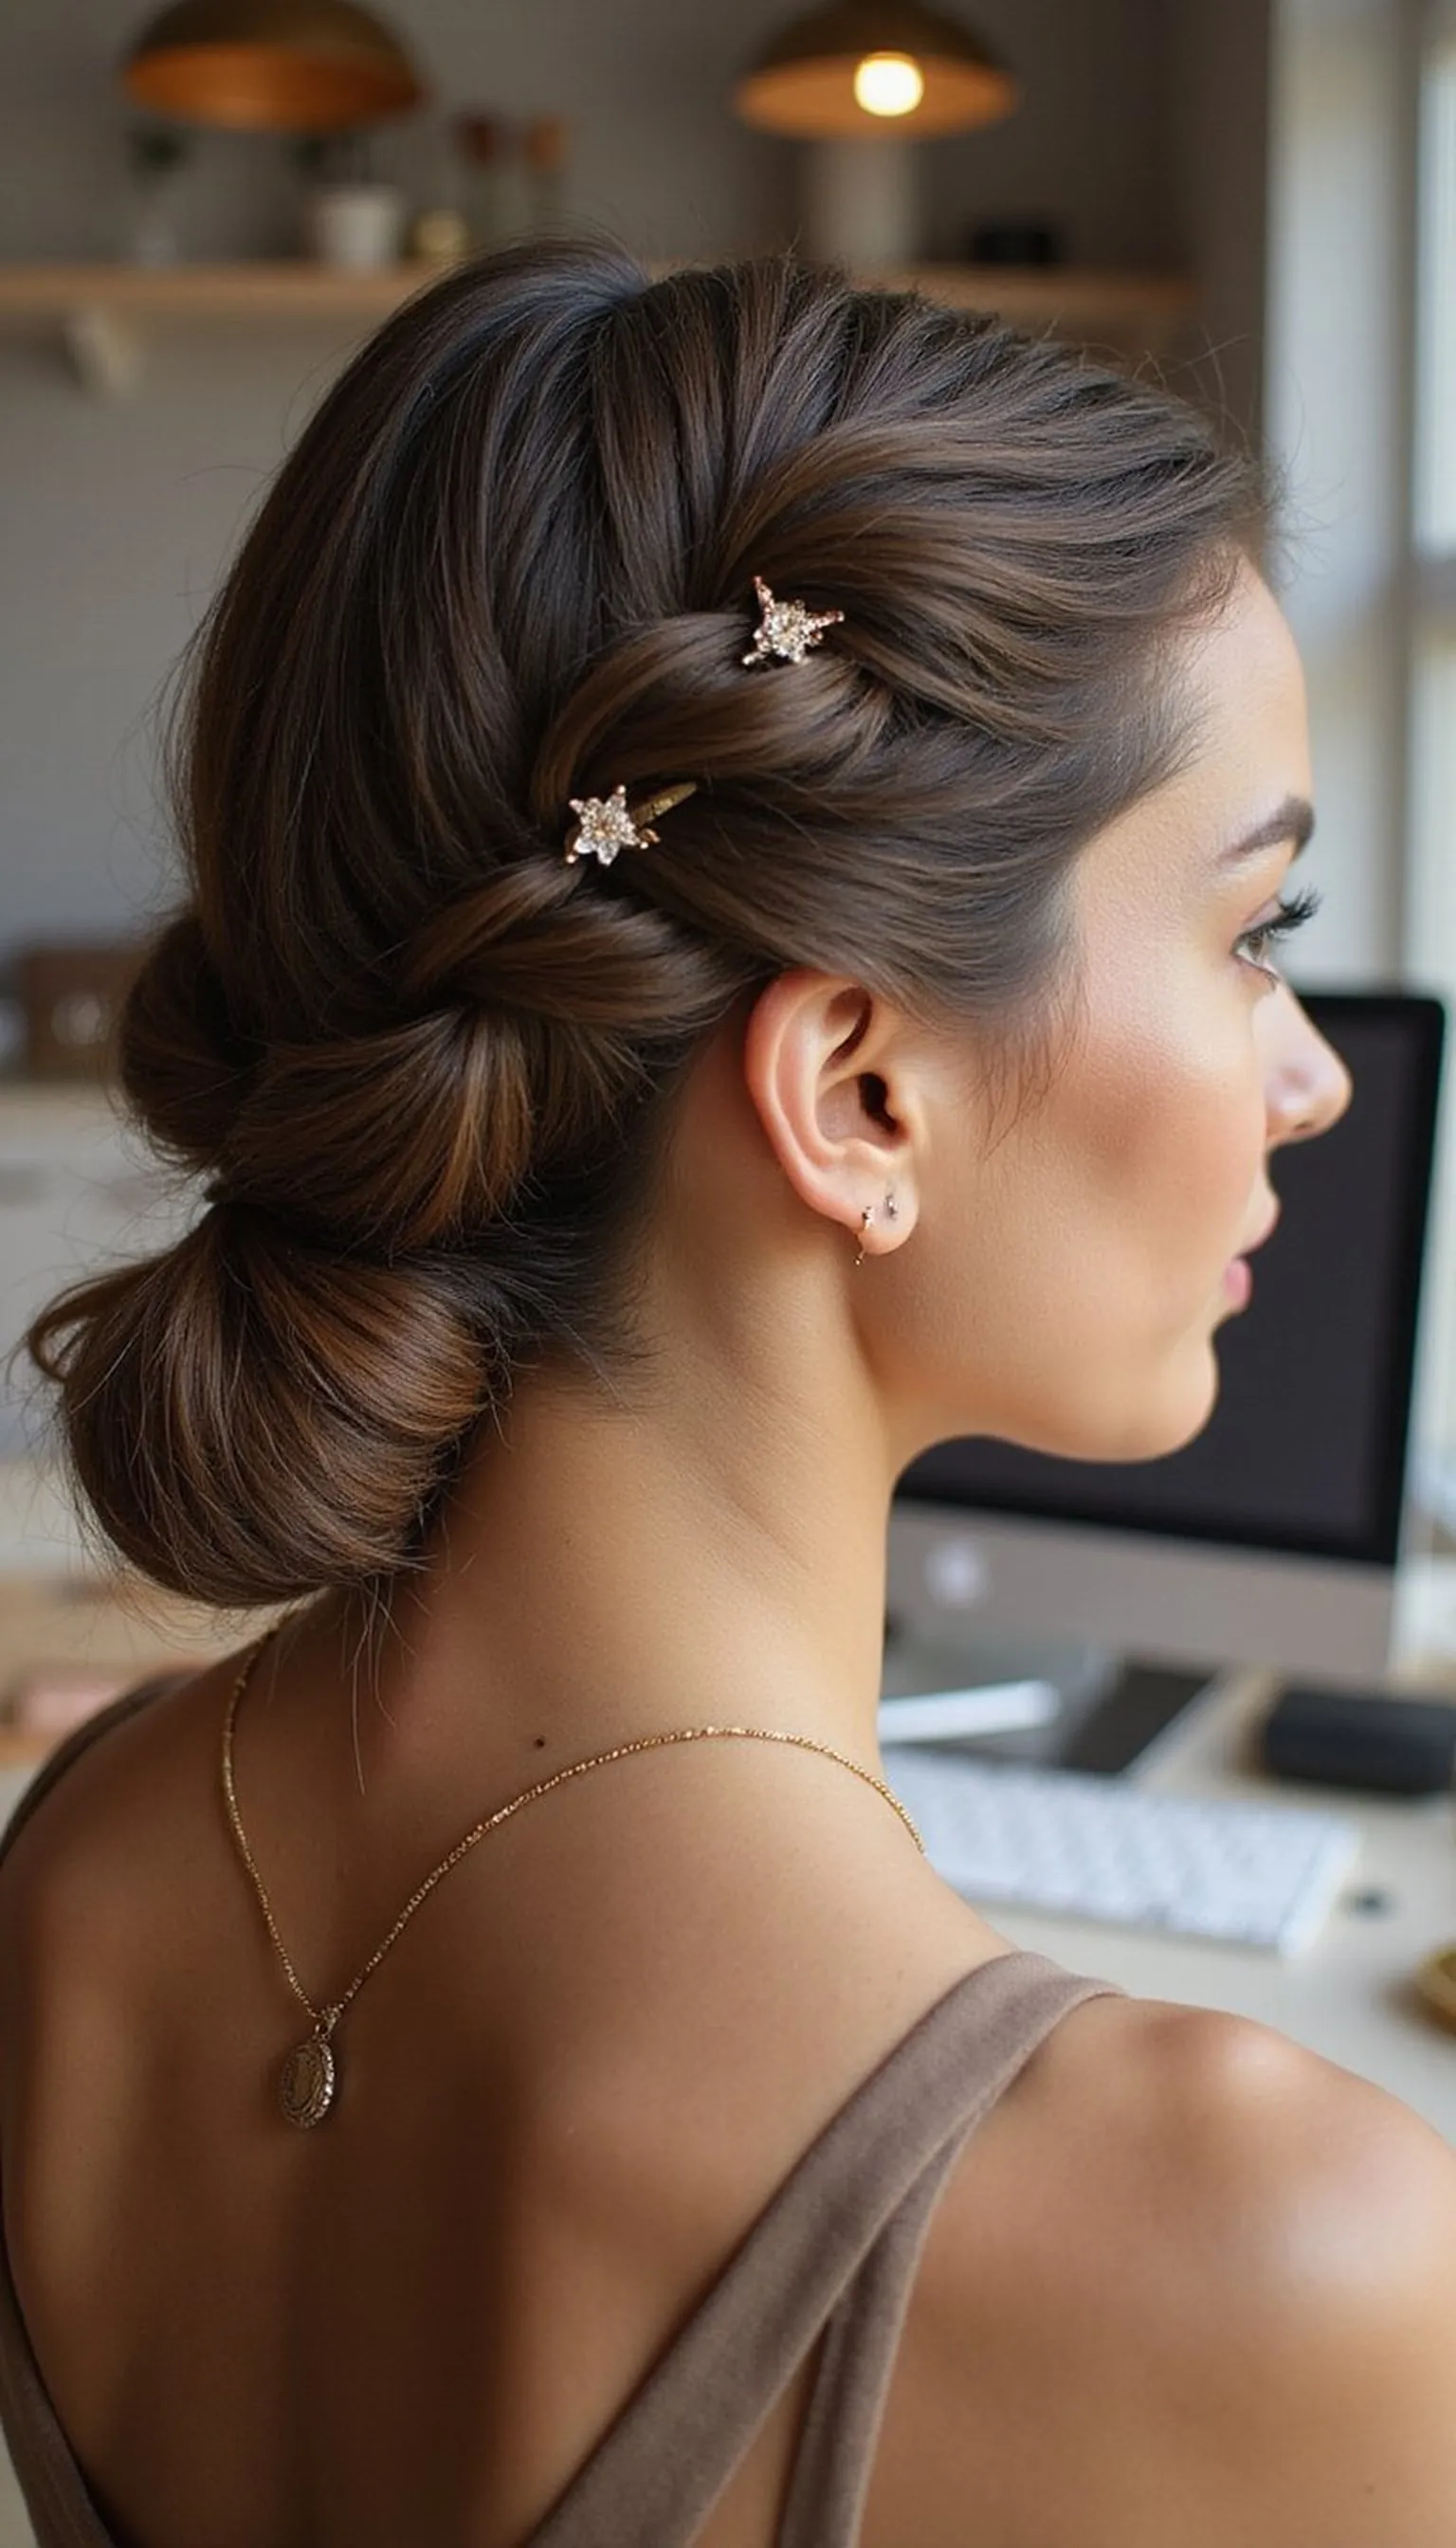
Sleek Low Bun For Office Hours
⏱️ 5 min · 🟢 Beginner
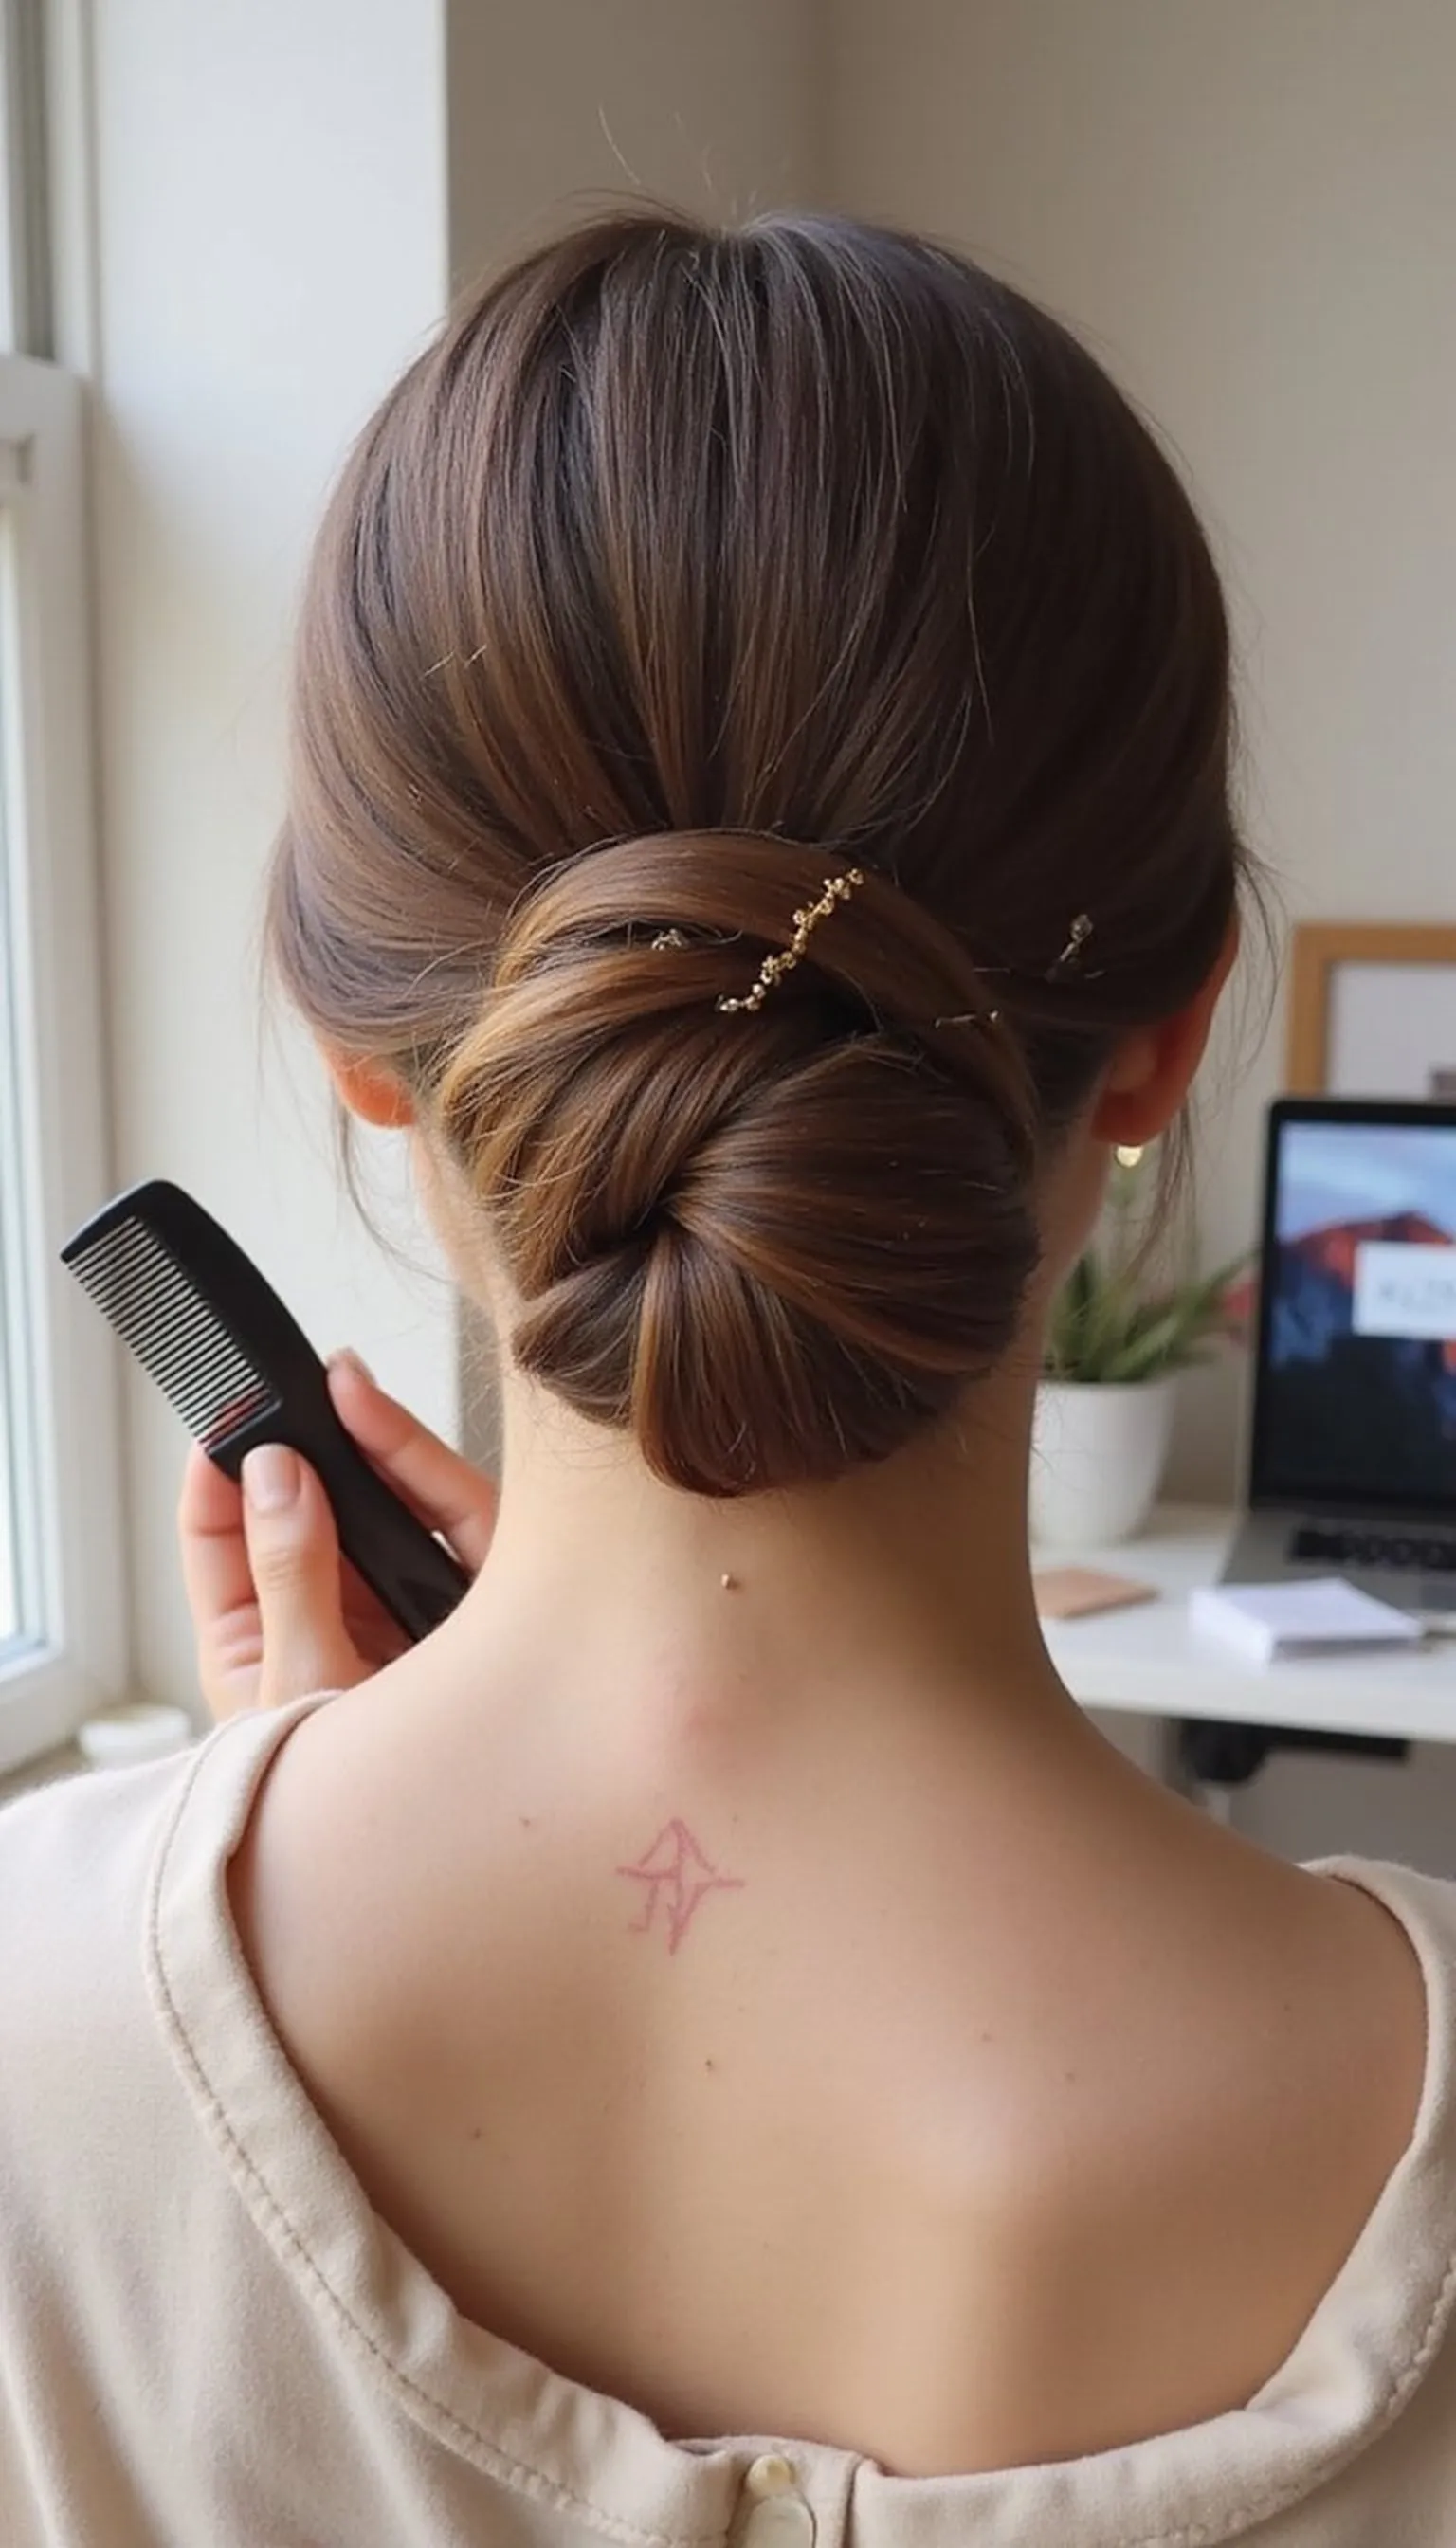
A sleek low bun creates an instantly polished look that pairs well with blazers and smart blouses. Smooth hair back with a fine-tooth comb, secure at the nape, and wrap into a snug coil for a neat finish.
This style keeps strands off the face and stays neat through meetings or long workdays without fuss. Tame flyaways with a light-hold hairspray and a soft bristle brush for mirror-ready shine.
It flatters straight to slightly wavy hair and makes fine hair appear fuller when twisted tightly against the head. Slip in a couple of discreet bobby pins to lock the bun and preserve a clean silhouette.
Styling Tips
- Use a small elastic that matches hair color to keep the base invisible.
- Smooth with a fine-tooth comb for a glossy finish before pinning.
- Anchor the bun with two bobby pins in an X shape for extra hold.
Pro Tip: Wrap hair tightly around the elastic, then hide the tail under the bun for a smooth, professional finish.
Avoid: A common mistake is wrapping too loosely, which creates a messy shape. Avoid uneven tension by smoothing and securing each section tightly.
Try Also: Try a braided low bun for added texture, or a twisted chignon for softer edges. Add a slim silk scarf tied under the bun for a refined accent.
Products & Materials
Items Used
- hair tie
- bobby pins
- fine-tooth comb
“Polished low bun for crisp, office-ready hair in minutes.”
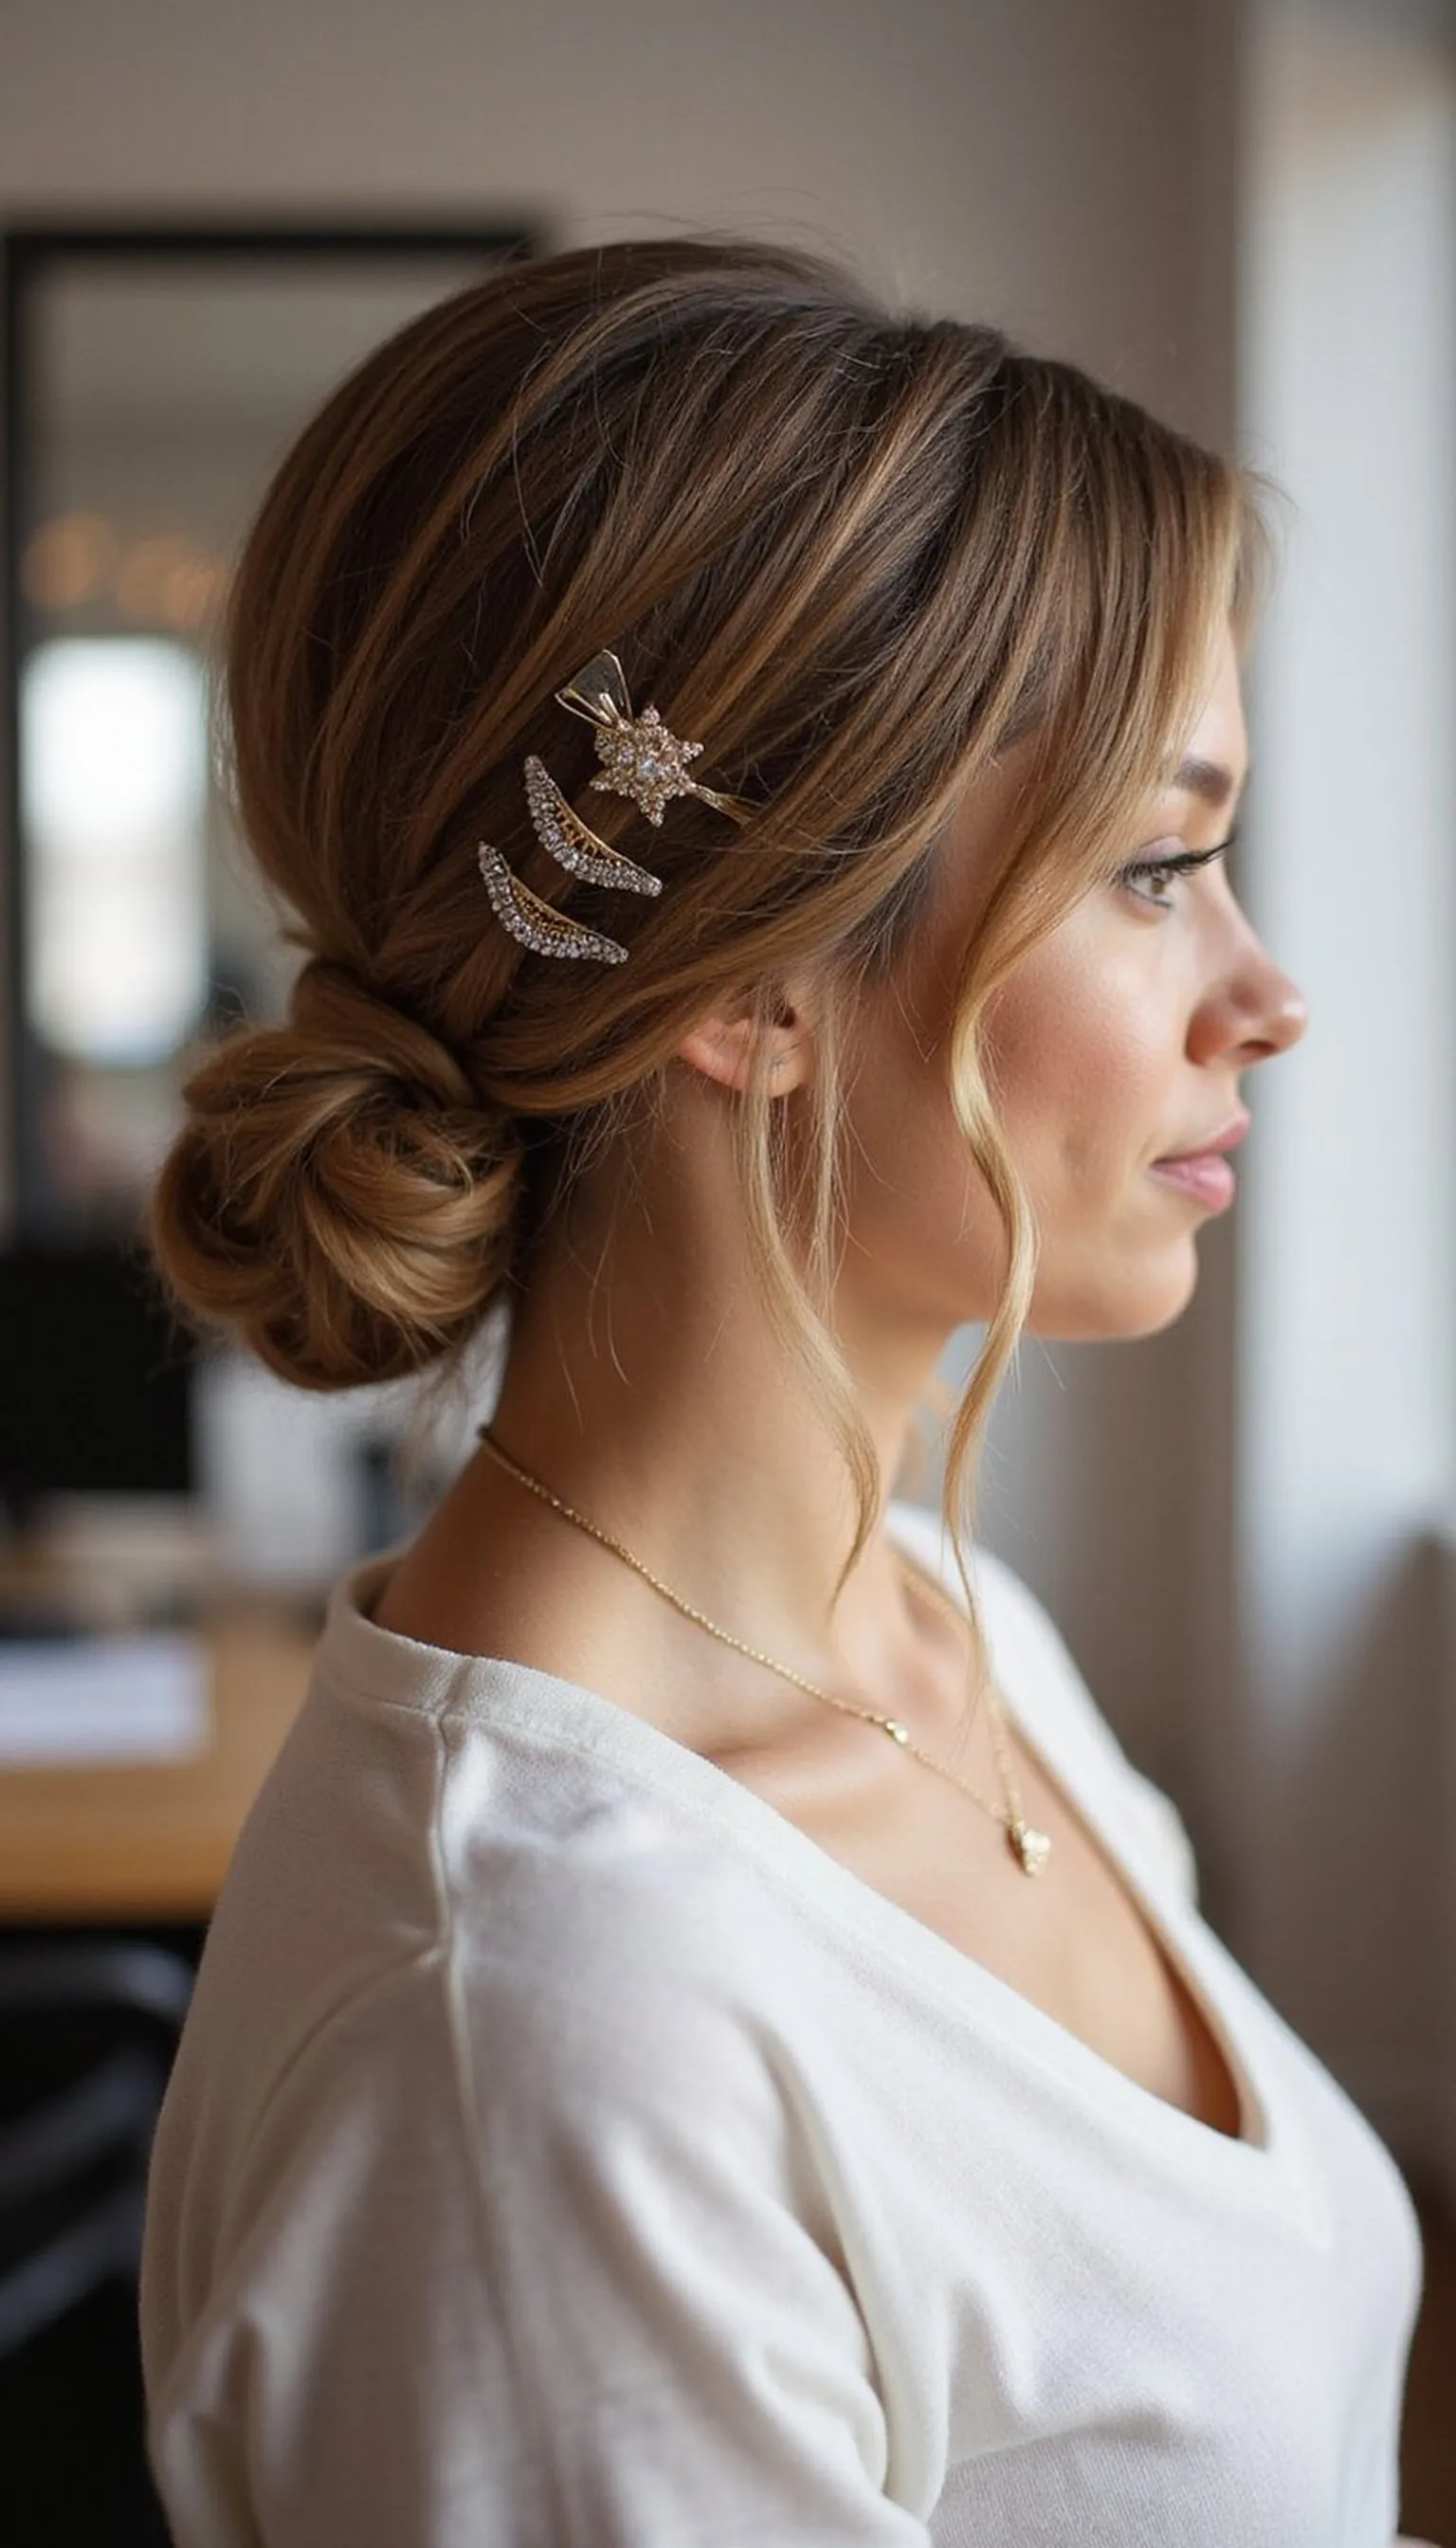
Messy Low Bun With Face-Framing Strands
⏱️ 7 min · 🟢 Beginner
The messy low bun keeps a relaxed, modern vibe while staying office-appropriate with a few face-framing strands. Pull hair into a low pony, leave out soft pieces at the front, then wrap into a loose bun and secure gently.
Texture spray adds separation and prevents the bun from looking flat at the crown. Lightly tug on the bun and the pieces to create soft movement that reads intentional, not undone.
This style works well for medium to long hair and hides minor regrowth or layers. Slide in some bobby pins where needed to keep the shape through a busy day.
Styling Tips
- Spritz texturizing spray before styling to add grip and body.
- Leave two soft strands at the temples for a flattering frame.
- Pin the bun loosely so it can be adjusted throughout the day.
Pro Tip: Pull a few face-framing strands out after pinning, then mist with light-hold spray to keep the casual shape intact.
Avoid: A common mistake is over-smoothing, which removes the relaxed texture. Embrace light frizz and soft pieces for that effortless office look.
Try Also: Turn it into a low braided bun or twist the sides before pinning for more structure. Add a decorative barrette at the side for extra polish.
Products & Materials
Items Used
- hair tie
- bobby pins
- texturizing spray
“Effortless low bun with soft face-framing strands for polished ease.”
High Ponytail With A Volume Boost
⏱️ 10 min · 🟠 Intermediate
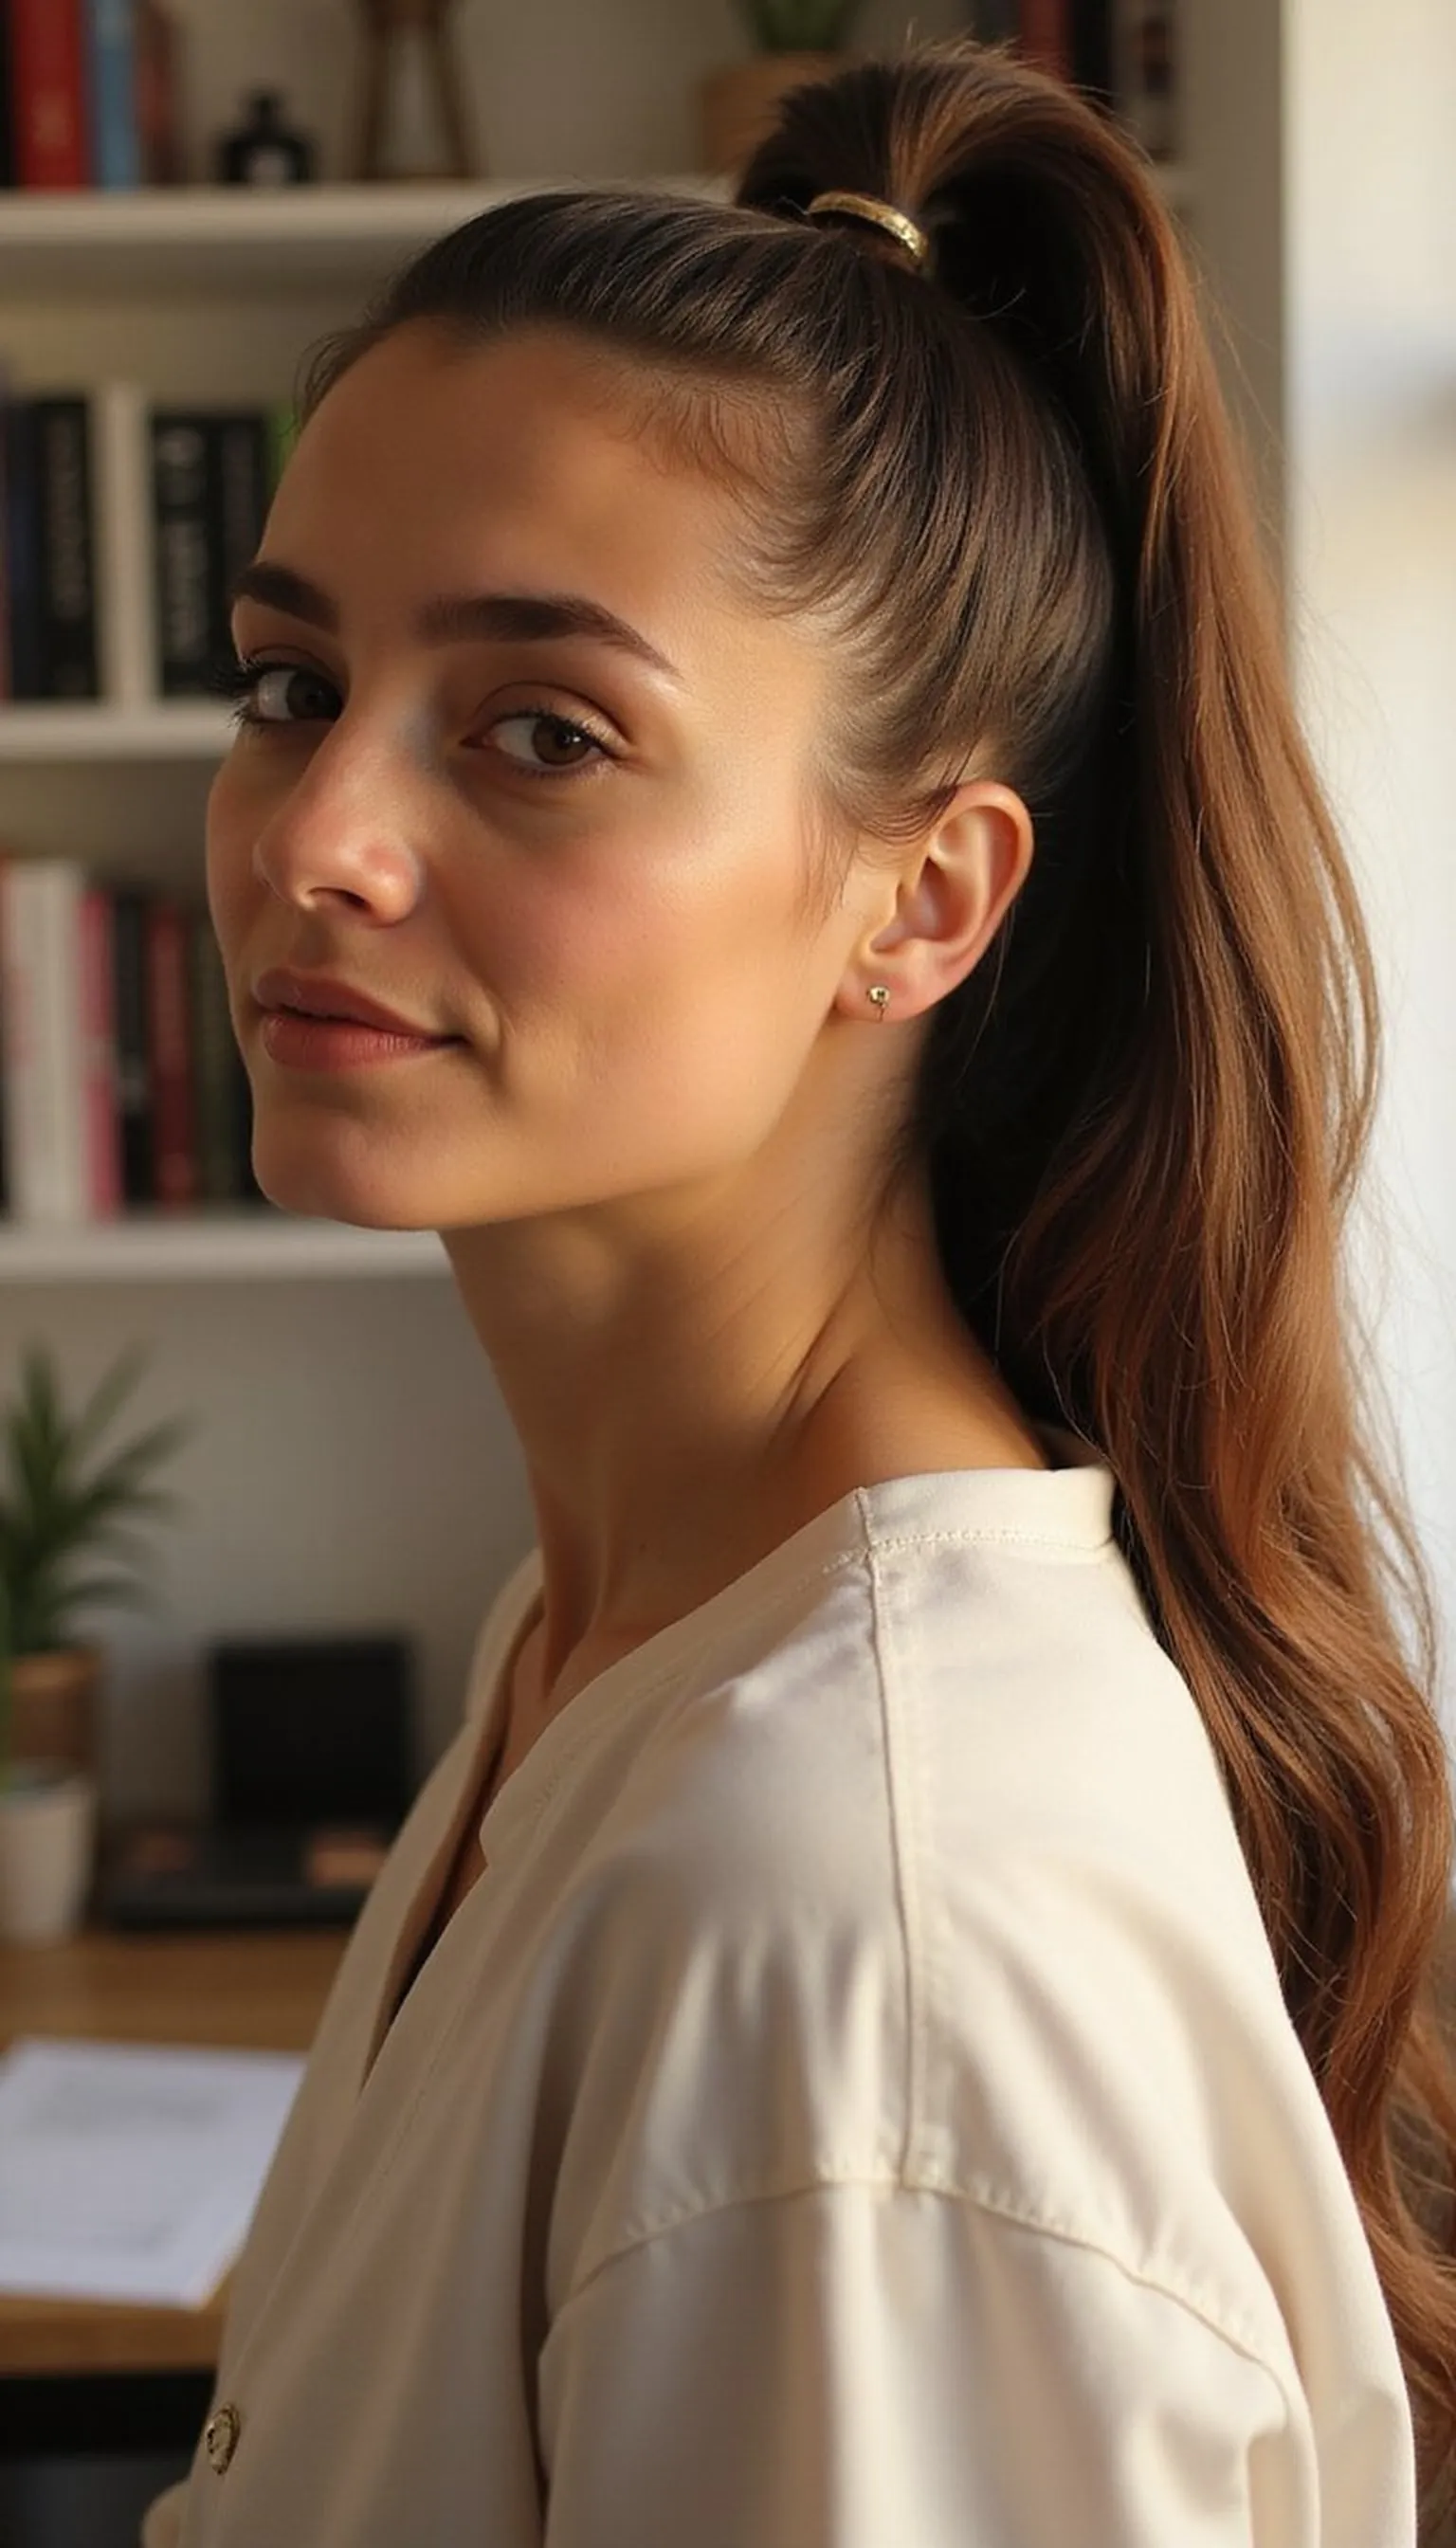
A high ponytail with added volume keeps hair polished while feeling energetic and professional. Tease the crown gently, smooth the top, and gather hair high on the head before securing with a strong elastic for lift.
Wrap a small piece of hair around the elastic to hide it and pin underneath for a cleaner look. Use a bit of light-hold spray to tame flyaways without flattening the volume at the roots.
This style suits medium to long hair and looks crisp with straight or waved textures. For extra longevity, add a second elastic lower down and slide hair up to boost hold.
Styling Tips
- Backcomb the crown lightly for instant lift and natural volume.
- Use a strong, snag-free elastic to prevent slip during the day.
- Wrap a small hair section around the elastic and pin it underneath for a seamless finish.
Pro Tip: Place the first elastic close to the crown, then add a second elastic and slide the hair up slightly to lock extra volume.
Avoid: A common mistake is smoothing too much and losing height at the crown. Keep some texture when backcombing to preserve the lift.
Try Also: Try a low-volume pony for a softer profile, or curl the ends of a high pony for movement. Add a wide ribbon for a feminine touch.
Products & Materials
Items Used
- hair tie
- teasing comb
“High ponytail with lifted crown for chic, energetic office style.”
Get 75+ ad-free, high-resolution printable tutorials for salon-quality results every single morning.
One printable guide · $19.99 · yours forever
Braided Crown For Professional Polish
⏱️ 12 min · 🟠 Intermediate
A braided crown wraps hair away from the face with an elegant, controlled finish ideal for presentations. Create two small Dutch braids from the temples and pin them across the crown, tucking ends under for a seamless halo effect.
This look reads refined and stays put through long meetings, keeping focus on the face. Add a touch of shine serum before braiding to reduce frizz and make the plaits look neat and uniform.
It flatters medium to long lengths and works particularly well with layered hair when pieces are woven tightly. Swap the braids for a single crown braid if time is tight for a similar polished outcome.
Styling Tips
- Start with slight texture so braids grip and hold better throughout the day.
- Pin braids flat against the head to avoid a bulky crown silhouette.
- Finish with a light mist of shine spray to polish the braids.
Pro Tip: Apply a small amount of styling cream to the hair before braiding to smooth flyaways and make plaits appear crisp.
Avoid: A common mistake is braiding too loosely, which causes the crown to sag. Keep even tension for a neat, long-lasting finish.
Try Also: Try a single wide crown braid for a softer edge or two smaller cornrow braids for a sleeker look. Incorporate a thin ribbon woven through the braids for subtle detail.
Products & Materials
Items Used
“Braided crown for an elegant, presentation-ready office hairstyle.”
Twisted Half-Up Office Chic
⏱️ 6 min · 🟢 Beginner
The twisted half-up tucks hair away from the face while keeping length for a soft, professional shape. Pull two front sections back, twist them toward each other, and secure with a discreet barrette or elastic at the crown.
This style adds interest without heavy commitment and suits most hair textures and lengths. A light smoothing cream on the front sections keeps the twist sleek and prevents flyaways during the day.
It works well with both straight and wavy hair and layers blend nicely into the twist. Swap the barrette for a decorative clip when a more refined finish is desired.
Styling Tips
- Twist tightly near the roots for a secure hold that won’t slip.
- Use a small barrette that matches hair color for a low-key look.
- Finish the front with a smoothing cream or serum for a polished front view.
Pro Tip: Anchor the twist with a tiny elastic beneath the clip before adding the barrette to keep it secure all day.
Avoid: A common mistake is twisting too loosely, which causes the style to fall apart. Keep the twist close to the scalp for better hold.
Try Also: Try two small twists on either side meeting at the back, or braid each section before joining for more texture. Swap the barrette for a minimal claw clip for faster styling.
Products & Materials
Items Used
“Twisted half-up for easy, classy office hair in minutes.”
Sleek Lob Tucked Behind The Ears
⏱️ 5 min · 🟢 Beginner

A sleek lob tucked neatly behind the ears feels effortlessly polished for client calls and office days. Part hair slightly off-center, smooth with a paddle brush, and tuck both sides behind the ears for a tidy, face-framing effect.
This minimalist look highlights statement earrings or a collar and reads very refined in meetings. A serum or light polish spray gives the hair a smooth surface without weight or stickiness.
It suits straight or subtly waved lobs and is quick to refresh between meetings. Tuck one side behind the ear and use a small barrette to keep layers in place if needed.
Styling Tips
- Use a light smoothing serum sparingly to avoid flattening natural volume.
- Tuck the ends behind the ear and secure with a discreet barrette if layers slip out.
- Comb through with a paddle brush for a clean, glossy finish.
Pro Tip: Apply a pea-sized amount of smoothing serum to the ends and comb through before tucking for a sleek, professional look.
Avoid: A common mistake is over-applying product, which makes hair look greasy. Use a small amount concentrated on the ends and smooth lightly.
Try Also: Wear one side tucked and the other pinned back for asymmetry, or add soft waves for a more relaxed feel. Clip in a thin decorative barrette for extra polish.
Products & Materials
Items Used
“Sleek lob tucked behind ears for crisp, minimal office style.”
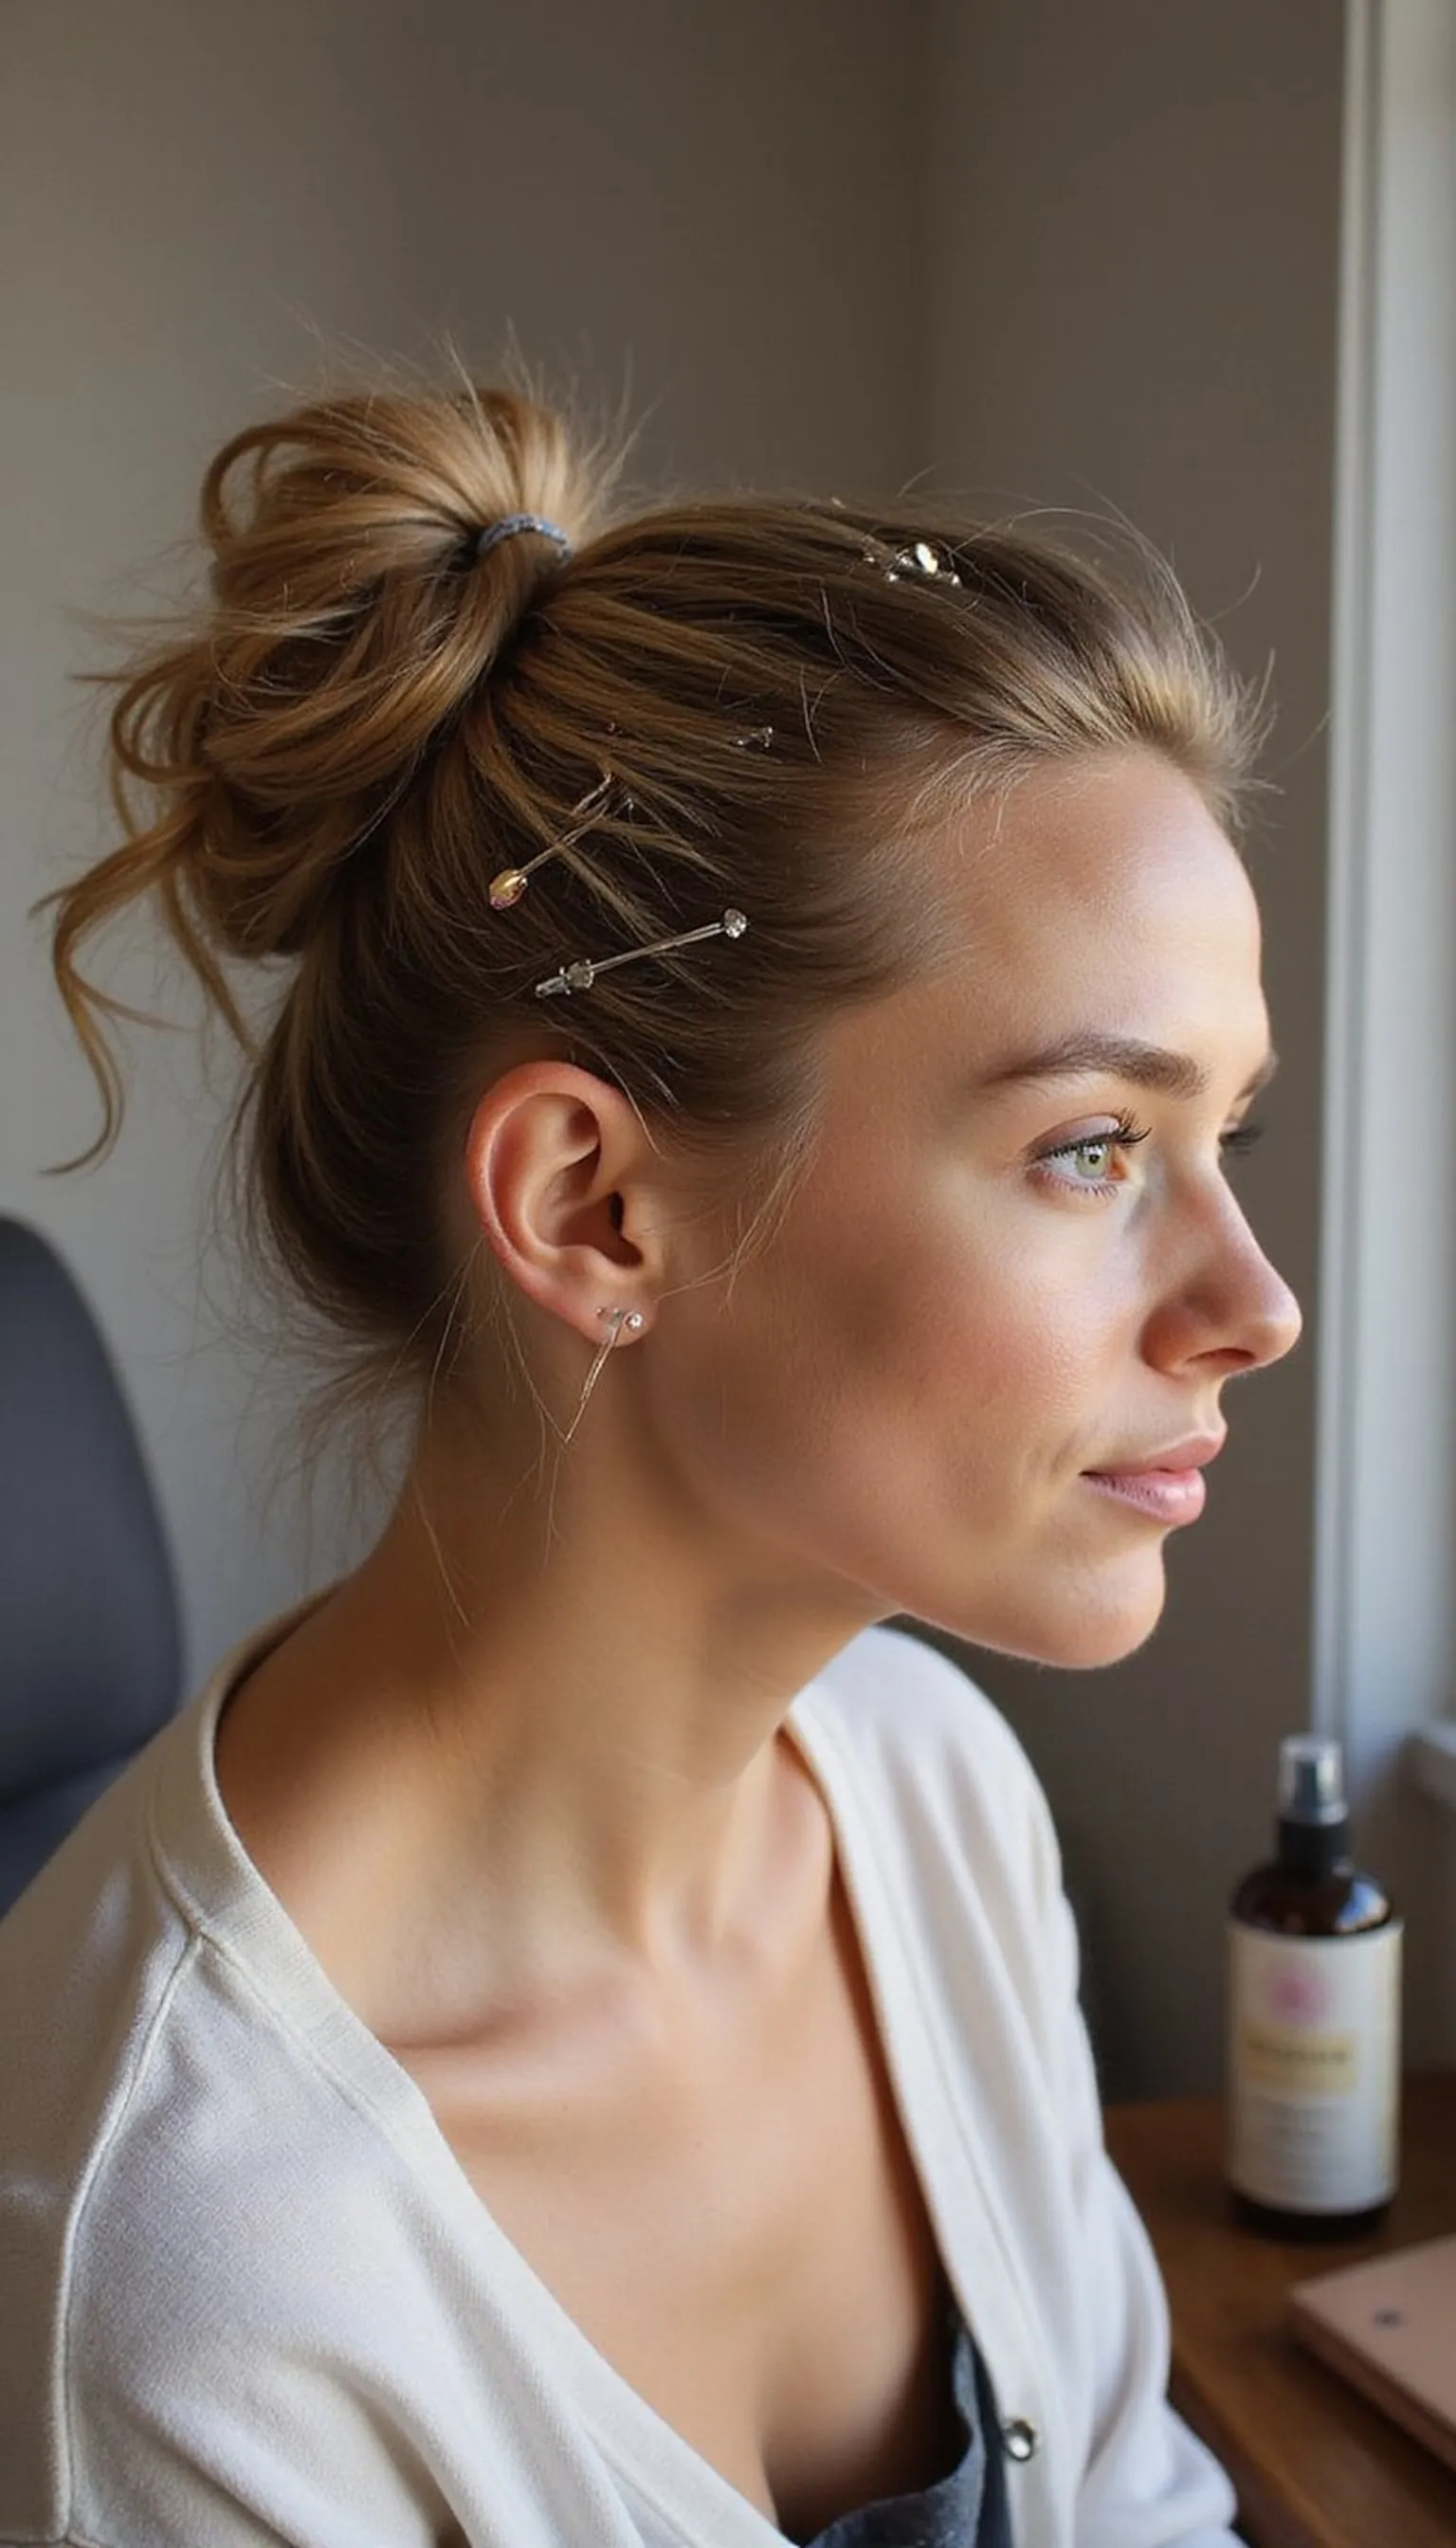
Textured Top Knot With Soft Pieces
⏱️ 8 min · 🟠 Intermediate
The textured top knot is a smart option when hair needs to be up but not severe. Pull hair into a high pony, tease lightly at the mid-lengths, then twist into a knot leaving soft pieces out for a casual, office-friendly silhouette.
Texturizing spray helps the knot hold shape and adds depth to the finish. Tug gently on the knot to create height and a lived-in look that still reads tidy from the front.
This style wears well for long days and works with layered hair since the shorter pieces add softness. Secure with bobby pins and a strong elastic to keep the knot in place through back-to-back meetings.
Styling Tips
- Start with a light texturizing spray to add grip and body.
- Leave a few face-framing pieces out for a softer, modern feel.
- Use bobby pins to secure any loose ends and shape the knot.
Pro Tip: Backcomb mid-lengths slightly before twisting and pinning to give the knot a full, textured appearance without extra product.
Avoid: A common mistake is over-smoothing which removes texture and causes the knot to appear flat. Keep some movement for a professional yet relaxed finish.
Try Also: Make it sleeker by smoothing the sides before knotting or add thin braids into the pony for detail. Try a low textured knot for a subtler profile.
Products & Materials
Items Used
“Textured top knot with soft pieces for relaxed, office-appropriate flair.”
Side-Swept Waves Tamed For Office
⏱️ 15 min · 🟠 Intermediate
Side-swept waves read polished and feminine while keeping hair controlled and off one side of the face. Create soft waves with a large barrel, sweep hair to one side, and secure lightly behind the ear with a decorative clip or barrette.
This look balances movement with formality, great for client meetings or presentations. Smooth the part and add a touch of shine spray to keep waves defined without frizz throughout the day.
It flatters longer lobs and mid-length hair that holds a loose curl. Swap the barrette for a minimal hair clip for quicker styling on rushed mornings.
Styling Tips
- Create loose waves away from the face for a soft, professional finish.
- Use a medium-hold spray to keep shape without stiffness.
- Secure behind the ear with a decorative clip for lasting control.
Pro Tip: Sweep waves to one side and pin just behind the ear with a decorative clip to keep hair tidy and camera-ready.
Avoid: A common mistake is over-curling, which makes waves look dated. Aim for loose, modern bends rather than tight ringlets.
Try Also: Wear both sides pinned back for a symmetrical look or pin a small braid behind one ear for subtle detail. Use a slim barrette for a sleeker finish.
Products & Materials
Items Used
“Side-swept waves pinned for a soft, professional office hairstyle.”
Classic French Twist Made Easy
⏱️ 20 min · 🔴 Advanced
The classic French twist elevates any office look and holds exceptionally well for long days and formal meetings. Smooth hair back, gather and roll upward, then tuck the ends into the seam and secure with multiple bobby pins for a sculpted finish.
This timeless style appears intricate but is doable with a bit of practice and the right pins. Finish with a medium-hold spray to eliminate flyaways and maintain the twist from morning to evening.
It suits medium to long hair and creates a streamlined silhouette that pairs well with collared shirts. For a modern take, leave a thin tendril at the nape or add a slim decorative pin along the seam.
Styling Tips
- Smooth the hair well before twisting to avoid bumps and uneven folds.
- Insert bobby pins vertically along the twist for stronger hold.
- Finish with medium-hold spray to lock the shape without stiffness.
Pro Tip: Use multiple bobby pins placed vertically along the twist seam and mist lightly to secure the shape all day.
Avoid: A common mistake is using too few pins, which causes slippage. Use several pins and test the hold before leaving the mirror.
Try Also: Make it softer by loosening the twist slightly or add a decorative hair stick for a contemporary accent. Leave a delicate tendril at the nape for femininity.
Products & Materials
Items Used
- bobby pins
- hair stick
“Timeless French twist for polished, formal office elegance.”
Low Chignon Secured With Decorative Barrette
⏱️ 10 min · 🟠 Intermediate
The low chignon with a decorative barrette reads refined and feminine while staying comfortable for long wear. Gather hair into a low pony, twist into a chignon, and secure the outer edge with a statement barrette for quick polish.
This method keeps the look tidy with minimal pins and instantly elevates a simple bun. Use a smoothing brush to tame flyaways and a light-hold spray to preserve the chignon’s shape and shine.
It works well for medium and long lengths and makes upstyles feel accessible on busy mornings. Swap the barrette for a cluster of pins for a slightly edgier take.
Styling Tips
- Create a low pony as the base to keep the chignon secure and centered.
- Use a statement barrette to cover the seam and add elegance.
- Smooth the final shape with a soft brush before spraying lightly.
Pro Tip: Place the barrette across the chignon seam and secure extra ends with small bobby pins to keep everything neat and stable.
Avoid: A common mistake is placing the barrette too low, which exposes the seam. Position it to cover the pinched area for a seamless look.
Try Also: Make a braided chignon by braiding the pony before coiling or try multiple slim barrettes for a modern stacked look. Add a small silk scarf tucked under the barrette for texture.
Products & Materials
Items Used
- barrette
- bobby pins
“Low chignon with a decorative barrette for instant office polish.”
Minimalist Claw Clip Updo For Meetings
⏱️ 3 min · 🟢 Beginner
The minimalist claw clip updo is the fastest way to look pulled together between calls. Gather hair at the back, twist once or twice, and clamp a medium-sized claw clip over the twist for an instant, chic updo.
This look is forgiving on second-day hair and keeps volume at the crown when positioned slightly forward. Choose a matte or neutral-colored clip to keep the style office-appropriate and modern.
It works with most lengths from lob to long hair and is great for busy mornings. For added security, anchor loose pieces with a few bobby pins hidden under the clip.
Styling Tips
- Twist hair tightly around itself before clipping for a secure hold that lasts all day.
- Select a medium claw clip that fits the hair’s thickness to avoid slippage.
- Use a couple of bobby pins under the clip if the hair is very layered.
Pro Tip: Twist hair tightly and place the claw clip slightly forward at the crown to add lifted shape and better hold.
Avoid: A common mistake is using a clip too small for the hair volume, causing it to slip. Pick the right clip size for your density.
Try Also: Try a half-twist with the clip for a softer look, or do two small claws for a modern take. Add a slim hair scarf woven through the twist for femininity.
Products & Materials
Items Used
“Quick claw clip updo for polished, instant meeting-ready hair.”
Ribbon-Tied Ponytail For A Soft Professional Finish
⏱️ 6 min · 🟢 Beginner
A ribbon-tied ponytail turns a simple style into a soft, feminine office look in a few steps. Pull hair back into a mid or low pony, secure with an elastic, then tie a narrow ribbon around the base and let the tails fall neatly.
This small detail elevates a basic ponytail without being fussy or distracting in a meeting. Keep the ribbon neat and avoid overly long tails for a refined, professional vibe.
It works beautifully on straight and wavy hair and is especially charming on shoulder-length to long styles. Swap the ribbon for a slim scarf for richer texture on dressier days.
Styling Tips
- Choose a ribbon color that complements workplace attire for a cohesive look.
- Tie the ribbon in a simple knot or bow and trim tails to a sensible length.
- Secure the pony with a strong elastic to keep the ribbon in place all day.
Pro Tip: Loop the ribbon under the elastic and tie a neat bow, then tuck one tail under for a cleaner, professional finish.
Avoid: A common mistake is choosing a ribbon that is too wide or long, which looks casual. Pick a slim ribbon and keep the tails tidy.
Try Also: Try a low pony with a ribbon twist at the base or a half-up tied ribbon for a subtler accent. Use a silk scarf for a luxe upgrade.
Products & Materials
Items Used
- hair tie
- ribbon
“Ribbon-tied ponytail for a soft, feminine professional touch.”
Slicked Back Low Ponytail With Shine
⏱️ 5 min · 🟢 Beginner
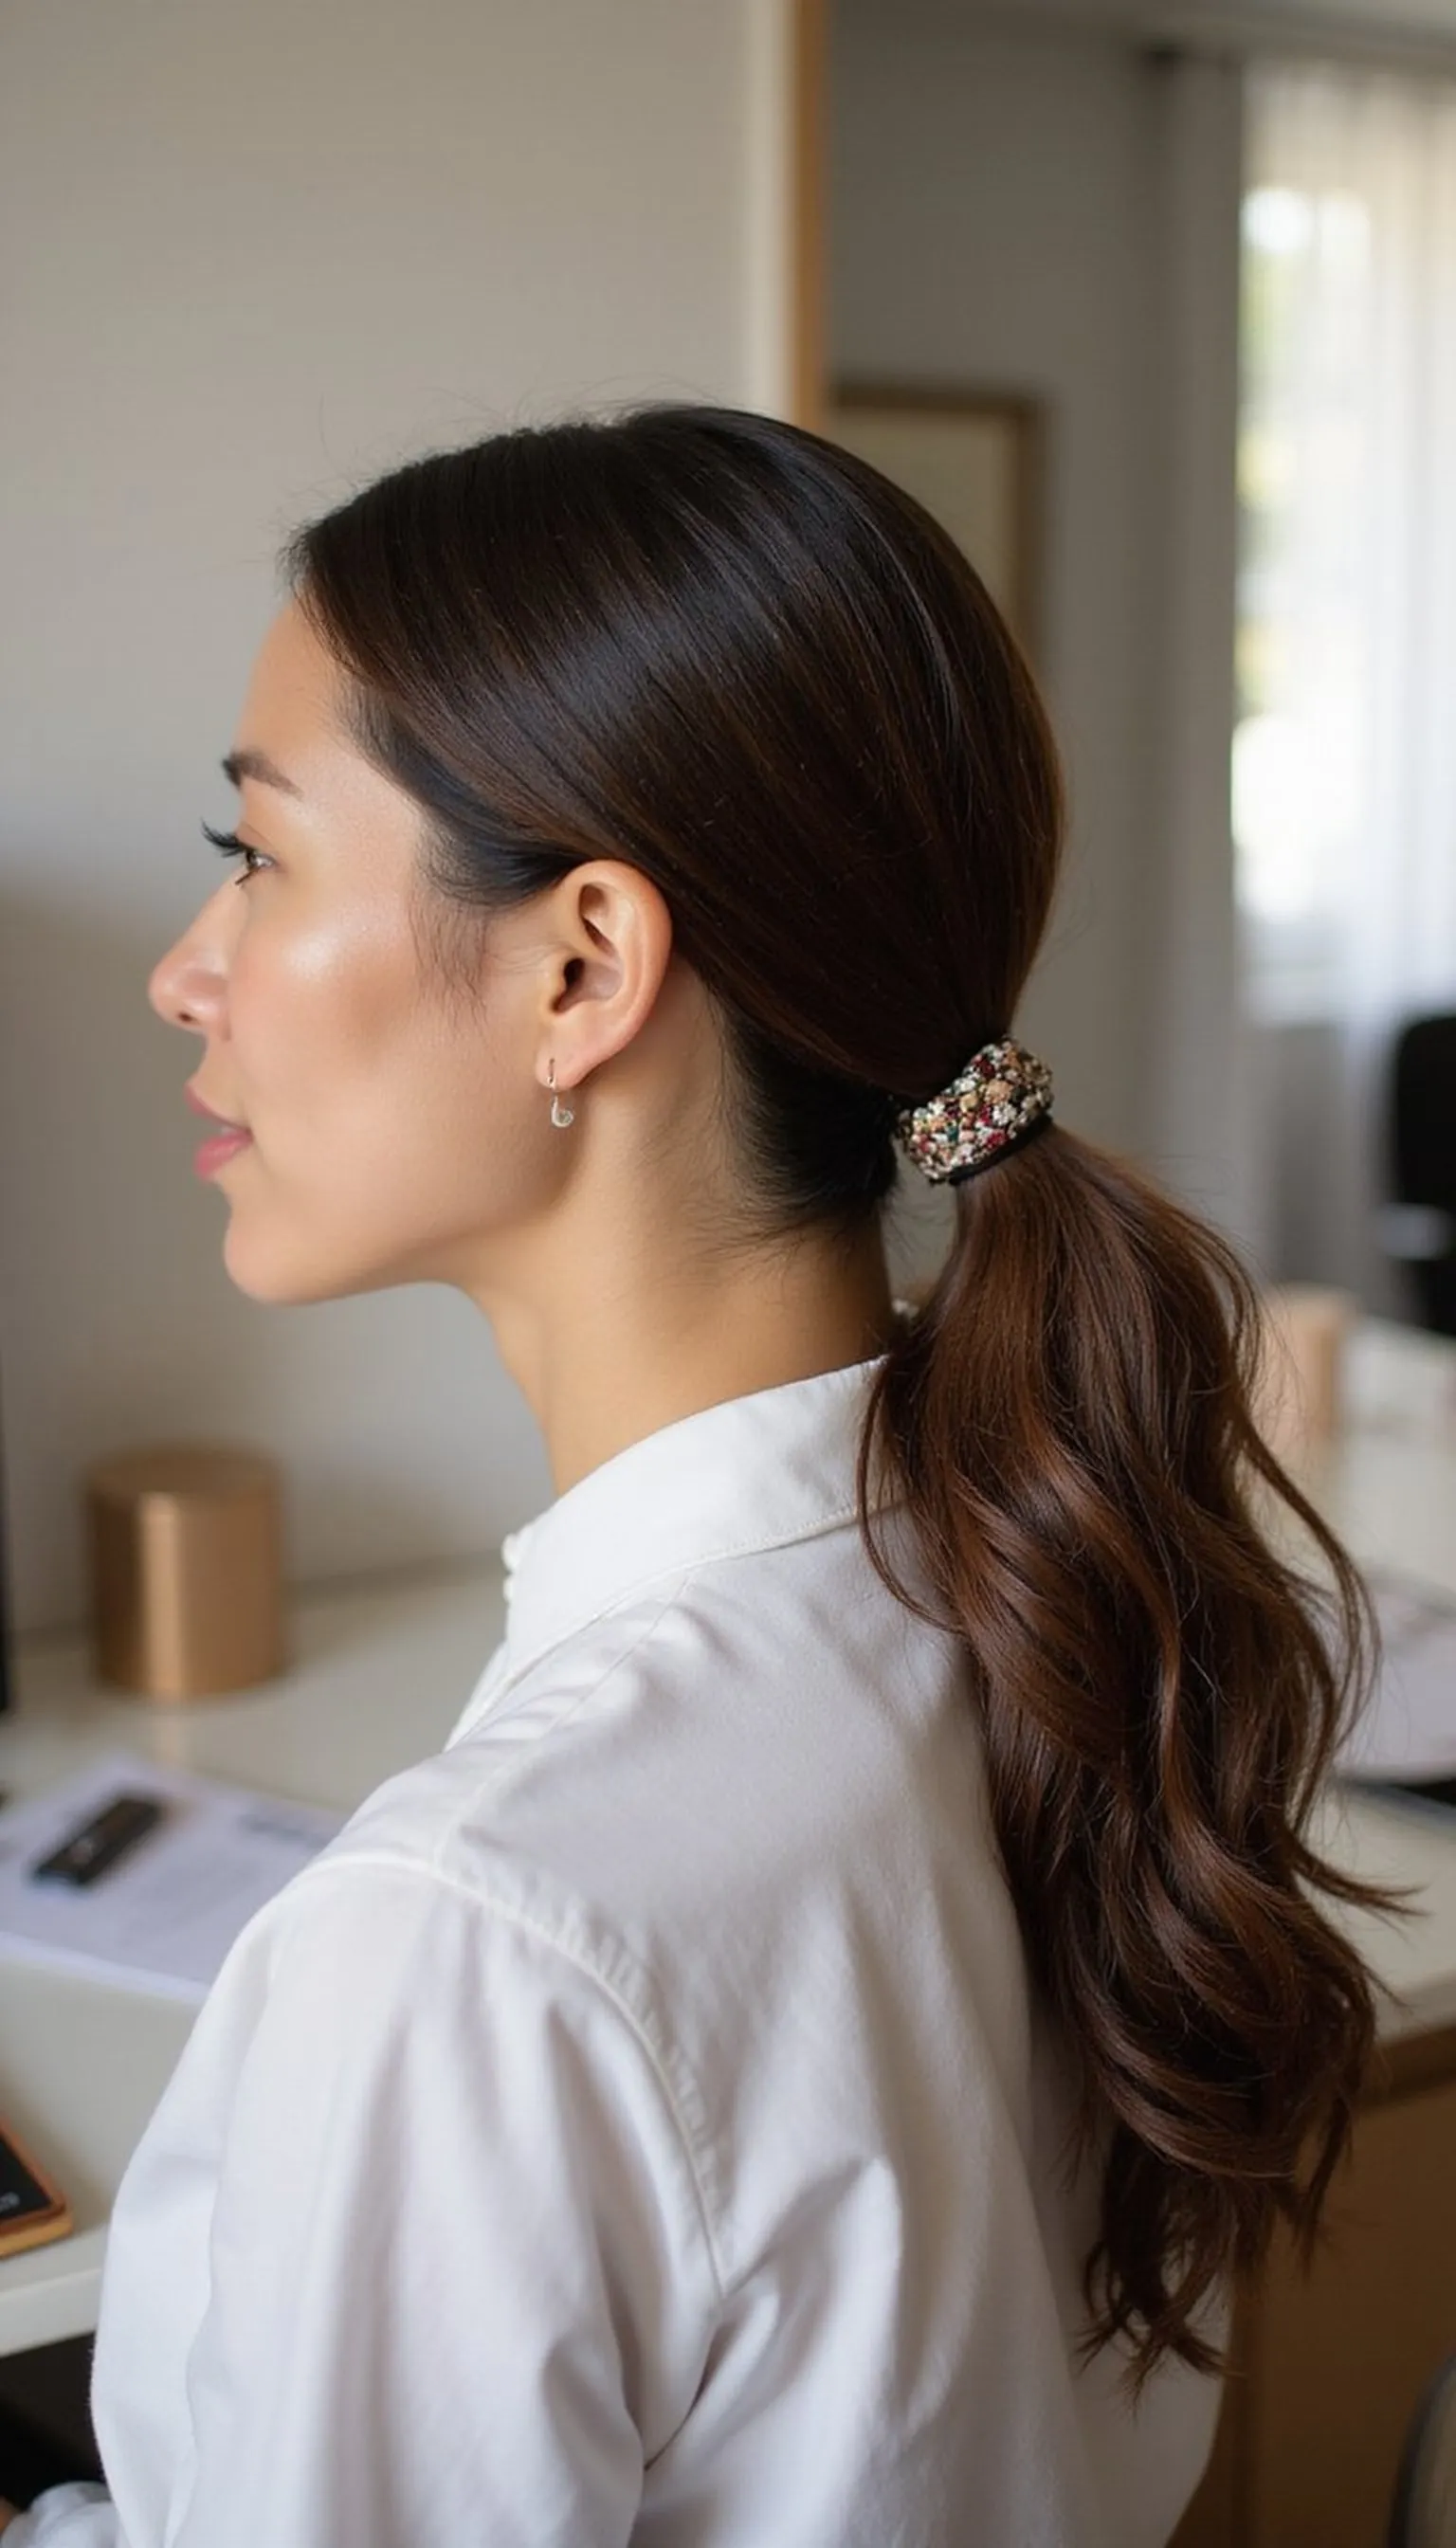
The slicked-back low ponytail reads modern and professional with a polished, glossy finish. Smooth hair back with a fine-tooth comb, apply a small amount of smoothing product, and secure at the nape with an elastic for a clean silhouette.
This style keeps attention forward and works well for polished presentations or video calls. A tiny dose of shine serum applied to the topside keeps flyaways under control without greasiness.
It suits straight hair best but can be adapted to slightly wavy textures with smoothing. Wrap a small hair section around the elastic for a seamless, elevated look.
Styling Tips
- Use a fine-tooth comb and smoothing product to achieve a sleek, controlled surface.
- Secure the base with a snug elastic and hide it by wrapping a hair section around it.
- Apply a small amount of shine serum sparingly to avoid an oily look.
Pro Tip: Apply a dab of smoothing product to the hairline and comb through for a sleek look, then wrap a hair piece around the elastic.
Avoid: A common mistake is over-applying serum which can look greasy under office lighting. Use a tiny amount and focus on flyaways.
Try Also: Wear it with a middle part tucked behind the ears for a slightly different profile or add a low knot instead of an elastic for a softer finish. Use a slim metal barrette at the base for detail.
Products & Materials
Items Used
“Slick low pony with glossy finish for a sleek office look.”
Mini Dutch Braids Pulled Into A Bun
⏱️ 12 min · 🟠 Intermediate
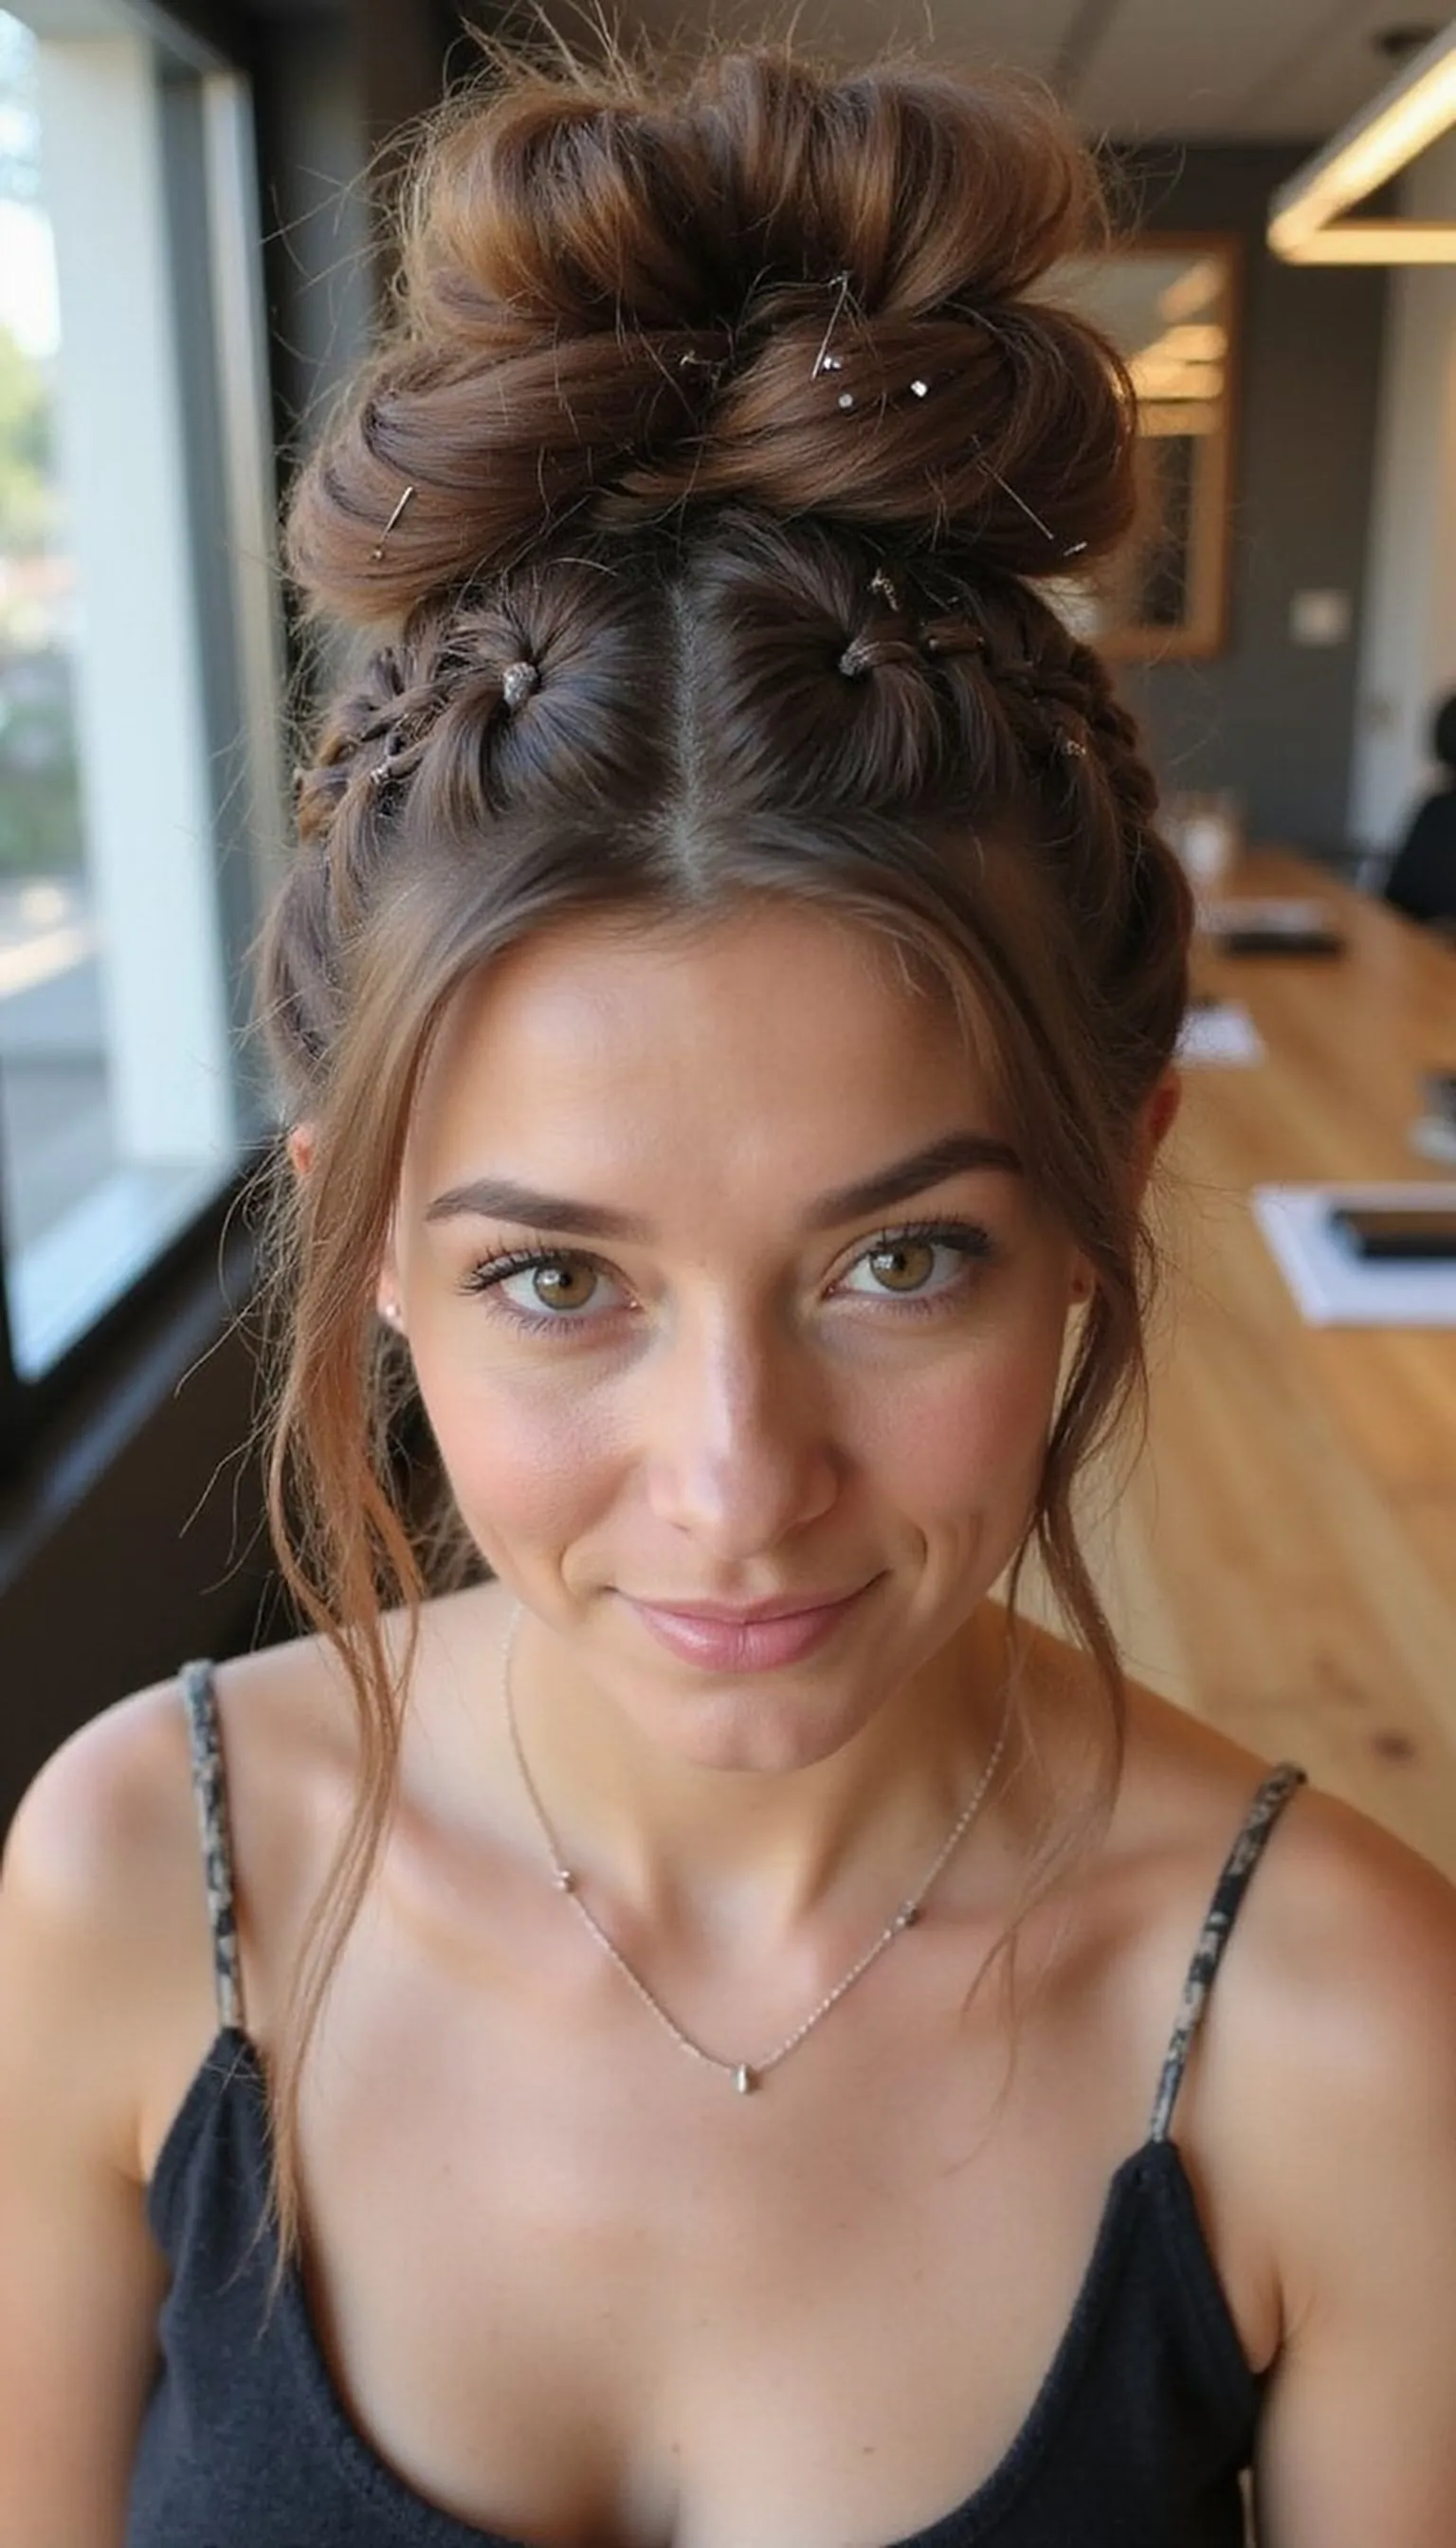
Mini Dutch braids pulled into a bun add texture and interest while keeping hair controlled and tidy. Create two tight Dutch braids starting at the hairline, secure the ends with small elastics, then wrap both braids into a low bun and pin.
This method keeps layered pieces secured and gives a finished look that stays put through meetings. Use lightweight styling cream to smooth the hairline and keep the braids neat without stiffness.
It is especially flattering on medium to long hair and makes a bun feel structured rather than casual. Swap the braids for twisted ropes if braiding feels too time-consuming.
Styling Tips
- Braid tightly close to the scalp so the braids hold and don’t loosen during the day.
- Secure braid ends with small elastics to make wrapping into a bun easier.
- Use bobby pins in an X pattern to anchor the wrapped braids firmly.
Pro Tip: Start braiding close to the roots and keep even tension to create long-lasting mini Dutch braids that secure neatly into a bun.
Avoid: A common mistake is uneven braiding tension, causing one braid to loosen faster. Keep the tension consistent on both sides.
Try Also: Try single side braids wrapped into a low knot for an asymmetrical look or small twist ropes instead of Dutch braids for faster styling. Add a decorative pin where the braids meet for interest.
Products & Materials
Items Used
“Mini Dutch braids wrapped into a bun for textured, office-ready hair.”
Soft Knot With A Silk Scarf Accent
⏱️ 6 min · 🟢 Beginner
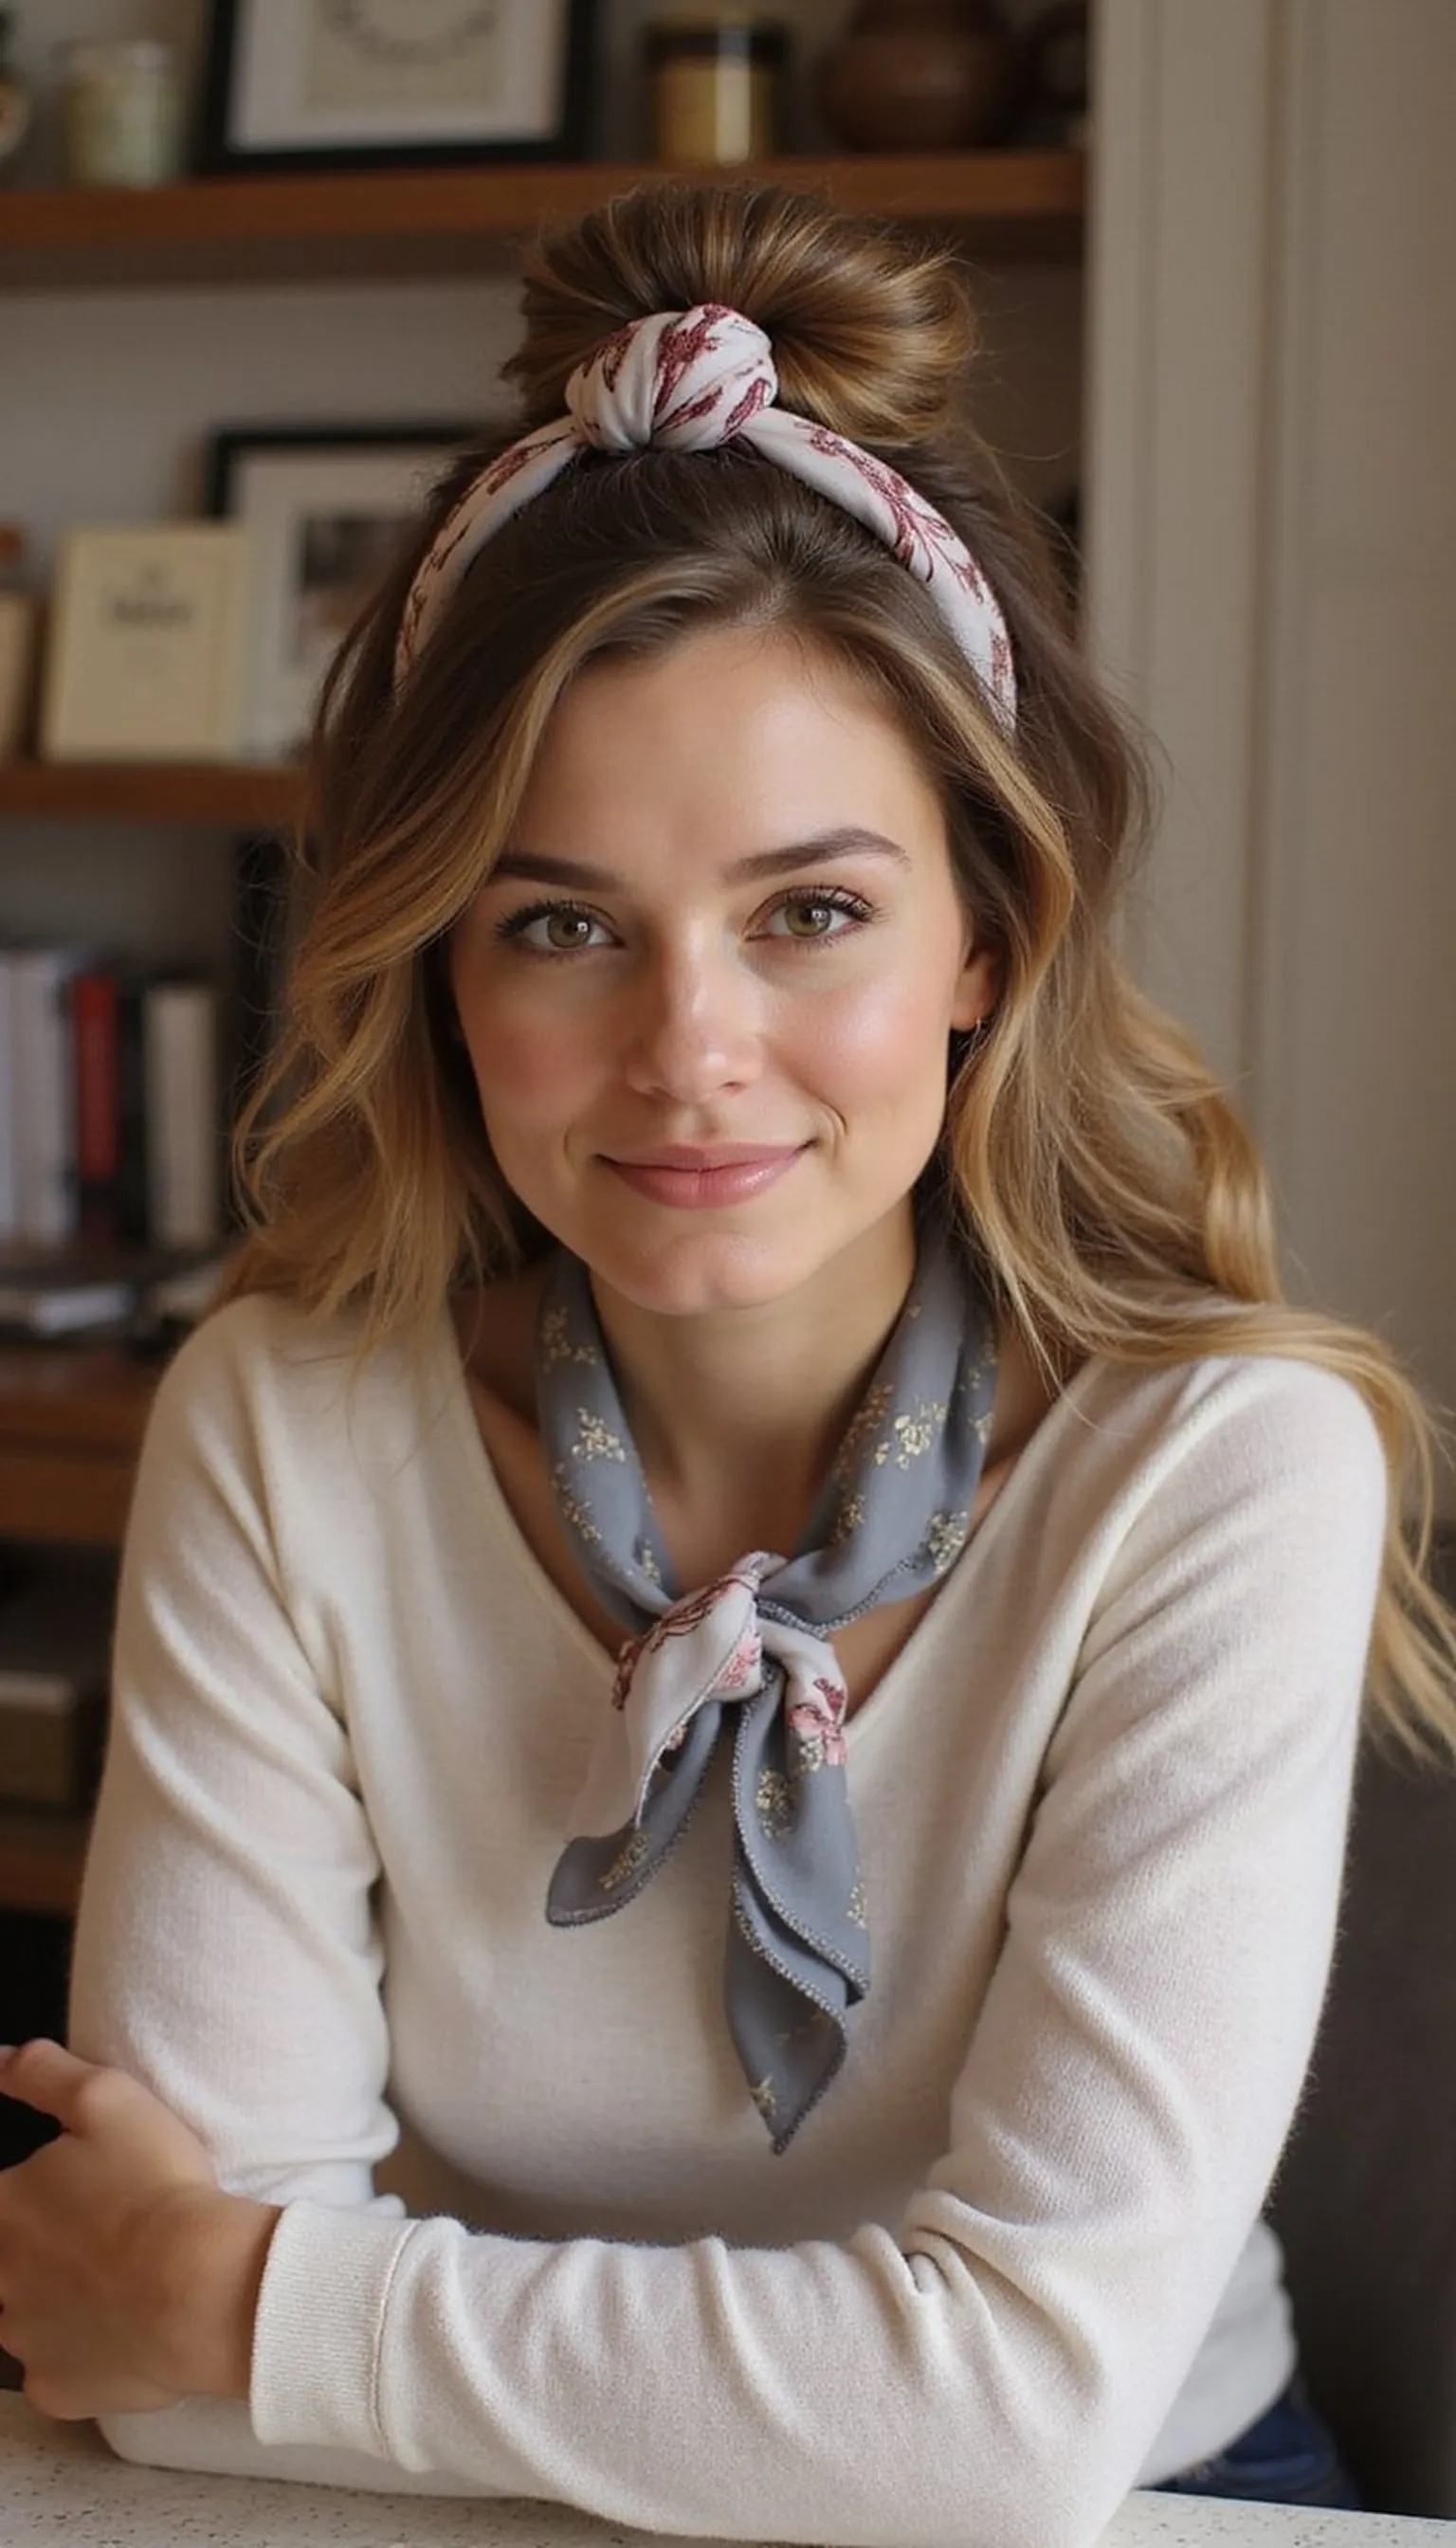
The soft knot with a silk scarf feels polished and feminine while remaining comfortable for a long day. Gather hair at the nape, tie into a loose knot, then wrap a slim silk scarf around the base and tie a small knot to secure it.
The scarf adds instant personality and disguises any messy ends for a tidy appearance. Choose muted colors or subtle patterns to keep the look office-friendly and refined.
This approach works well on medium and long lengths and brightens simple outfits without being distracting. For extra hold, anchor the knot with a couple of hidden bobby pins under the scarf.
Styling Tips
- Select a narrow silk scarf so it sits comfortably without overwhelming the style.
- Tuck ends neatly and anchor with bobby pins before tying the visible knot.
- Keep the knot low at the nape for a conservative, professional feel.
Pro Tip: Secure the knot with hidden bobby pins and tie the silk scarf in a small bow for a tidy, sophisticated accents that stays put.
Avoid: A common mistake is choosing a scarf that’s too wide, which looks bulky. Opt for a slim scarf to maintain a refined silhouette.
Try Also: Wear the scarf as a headband and tuck hair into a low knot, or braid the ends and wrap them around the knot for texture. Swap silk for a matte scarf for a more casual feel.
Products & Materials
Items Used
“Soft knotted hair with a silk scarf for chic, feminine office style.”
