
As an Amazon Associate I earn from qualifying purchases.
Easy Origami Star Tutorials bring playful folding practice with clear examples of Easy Origami Star Tutorials that show tiny puff stars, flat five-point designs, and modular builds. These Easy Origami Star Tutorials present approachable patterns so anyone can enjoy easy origami stars at home, making small decorations and thoughtful gifts. With crisp paper and neat creases, Easy Origami Star Tutorials turn simple sheets into charming three-dimensional charms in compact Easy Origami Star Tutorials sessions.
Tiny puff lucky stars from paper strips
⏱️ 15 min · 🟢 Beginner
The small, almost toy-like presence of puffy origami stars makes a craft table feel cozy. The paper feels satiny or matte under fingertips while tiny stars hold light like miniature lanterns. Watching a long narrow strip curl and become a plump pentagon brings quiet satisfaction, and jars of finished stars make a shelf look whimsical.
The texture of creases and the slight bounce of the tiny puff are oddly calming and invite keeping a few in a pocket.
📋 How to Make This ▶
- Tie a loose knot near one end of a paper strip and flatten the knot into a short pentagon shape using fingertips.
- Tuck the remaining tail around the pentagon edges until only a short tail remains, then slip the tail into the pocket of the pentagon.
- Pinch the five corners of the pentagon gently and press toward the center to create slight creases, then blow air into the central opening to puff the star.
⚠️ Avoid: New folders sometimes pull the knot too tight and the strip tears or becomes impossible to tuck. Leaving a little slack in the initial knot keeps the paper flexible.
🔄 Try Also: Try patterned craft paper for a festive jar, metallic strips for shimmer, or oversized strips for larger decorative stars.
🛒 Products & Materials ▶
Items Used
- narrow craft paper strips
- blunt pencil
- glass jar for display
📌 “Make tiny puffy stars from strips for whimsical jar décor.”
• • •
Flat five-point Kawasaki star folded from a square
⏱️ 30 min · 🟠 Intermediate
The flat five-point star has an almost architectural elegance when laid on a table. The crisp points catch light along their sharp edges, and contrast between front and back colors creates a layered look. Paper used here responds to pressure with audible, satisfying creases, and the finished star feels like a delicate medallion.
Observing how a single square transforms into radiating points is quietly thrilling, and the flat shape works beautifully as a gift topper or wall accent.
📋 How to Make This ▶
- Begin with a colored square and fold precise diagonal and midline creases to form a guideline grid for the star points.
- Collapse the creased square into a base that forms triangular flaps radiating from the center, aligning edges carefully for symmetry.
- Shape each triangular flap into a pointed arm by folding edges toward the center and locking flaps where needed to secure the flat five-point star.
⚠️ Avoid: Misaligned preliminary creases lead to uneven points that make the star look lopsided. Precise initial creasing keeps symmetry intact.
🔄 Try Also: Use double-sided patterned paper for a reverse-color effect or make a mini version for confetti-style accents.
🛒 Products & Materials ▶
Items Used
- square origami paper
- bone folder
- cutting mat (surface)
📌 “Create a sculpted flat five-point star from one square sheet.”
• • •
Modular five-module kusudama star assembly
⏱️ 2-3 hours · 🔴 Advanced
This modular star feels like building with tiny architectural modules. Each folded unit has a crisp corner and a satisfying weight when joined into a three-dimensional blossom. The assembly hums with patience; aligning petals produces a rhythmic pace and the final object holds angles with quiet confidence.
The finished kusudama becomes a tactile sculpture that seems more complex than the sum of its parts, and its layered shadows create a compelling silhouette on a shelf.
📋 How to Make This ▶
- Fold five identical modules from square sheets, shaping each into a petal with locking flaps at the base.
- Arrange four modules in a circle and interlock their side flaps so each module supports its neighbor around the central gap.
- Add the final module by aligning its flaps into the remaining slots and press joints gently so the kusudama holds its three-dimensional form.
⚠️ Avoid: Rushing the modules can create uneven flaps that refuse to interlock neatly; pre-folding each part carefully makes assembly smoother.
🔄 Try Also: Alternate contrasting paper for a starburst look, use metallic paper for a festive ornament, or scale up modules for a larger centerpiece.
🛒 Products & Materials ▶
Items Used
- square origami paper (multicolor)
- small craft clips
- clear-drying craft glue
📌 “Assemble a sculptural five-module kusudama star for sculptural decor.”
• • •
Save time and printer ink with 50+ printable templates and step-by-step instructions in one ad-free guide.

Just $19.99 — lifetime access
Two-piece ninja star (origami shuriken) quick fold
⏱️ 20 min · 🟢 Beginner
The origami shuriken feels playful and a touch nostalgic, bringing back childhood experiments. The bold, sharp points and the flattened center give a satisfying contrast in shape. Paper used for this model responds crisply when creased, and the interlocking halves create a sense of mechanical cleverness.
A finished ninja star looks like folded metal but remains delightfully light, making it fun to slide across a desk as a small decorative accent.
📋 How to Make This ▶
- Fold two identical rectangles into mirrored halves, creating diagonal creases and folding edges toward the center to form pointed arms.
- Slide the two mirrored halves together so points interleave and locking tabs engage at the central opening.
- Adjust aligned points and press central joins so the origami shuriken holds a flat, star-like profile.
⚠️ Avoid: Trying to force thin paper into sharp points can leave them floppy; a heavier paper weight gives the star more structure.
🔄 Try Also: Make them from patterned paper for playful gift toppers or scale them down for confetti-style stars.
🛒 Products & Materials ▶
Items Used
- rectangular origami paper
- stiffer cardstock sheets
📌 “Fold a two-piece origami ninja star with crisp interlocking points.”
• • •
Lucky star garland for cozy displays
⏱️ 45 min · 🟢 Beginner
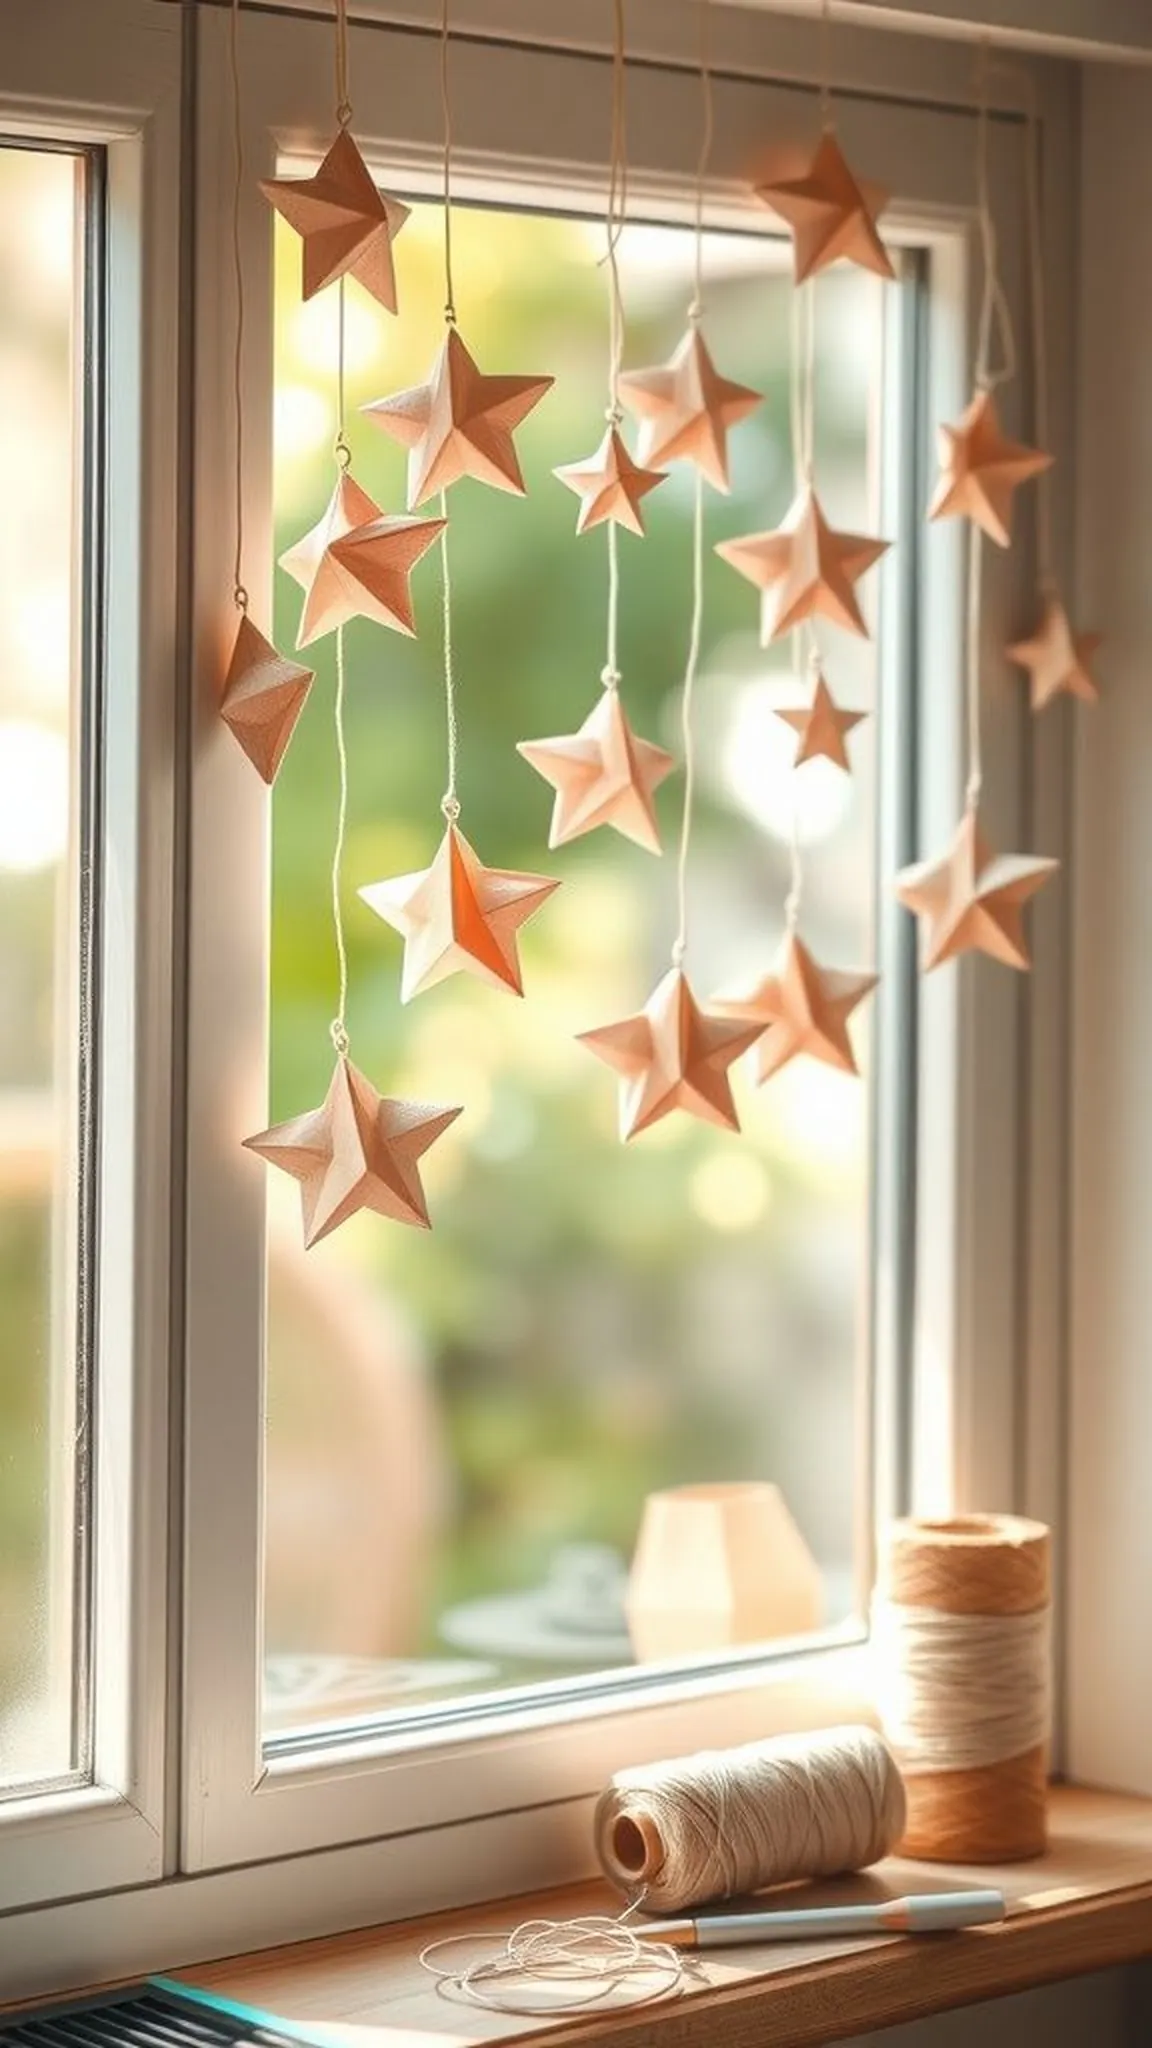
A string of little lucky stars makes a room feel acquainted and warm. The stars sway slightly when the air moves, creating a soft rustle and catching glints from lamps. Colors repeat along the cord and the tactile softness of the puffed paper provides a pleasant contrast with twine or ribbon.
Seeing a line of tiny folded shapes suspended in a window brings a handcrafted, domestic quiet that feels welcoming and lightly celebratory.
📋 How to Make This ▶
- Create a collection of puffy stars from narrow strips until enough are available for the desired garland length.
- Thread a blunt needle with cotton twine and pierce a small hole through a star center, sliding the star onto the twine and leaving a short gap between stars.
- Continue adding stars until the garland reaches the intended length, then knot or secure ends for hanging.
⚠️ Avoid: Piercing too close to an edge can split a tiny star; aiming through the center keeps each star intact on the cord.
🔄 Try Also: Alternate color blocks for stripes, add beads between stars for sparkle, or cluster stars densely for a boutique look.
🛒 Products & Materials ▶
Items Used
- paper craft stars (made)
- cotton twine
- large-eye darning needle
📌 “String tiny lucky stars into a sweet, swaying garland for windows.”
• • •
Compact star corner bookmark that peeks out
⏱️ 10 min · 🟢 Beginner

A corner bookmark shaped like a star offers a tiny, playful surprise when a book reopens. The paper sits flat against a page and the star tip peeks out with a bright color accent. The texture of the fold holds snugly on a page without slipping, and the thin profile keeps the book closing neatly.
Seeing a small geometric shape jutting from a hardcover adds personality to reading material without bulky additions.
📋 How to Make This ▶
- Fold a square sheet into a simple triangular pocket by creasing diagonally and bringing corners to form a corner base.
- Shape the outer layer into a star-like point with a few angled folds, tucking edges into the pocket to secure the shape.
- Slide the finished corner bookmark onto a book page to test fit and adjust creases for a snug hold.
⚠️ Avoid: Too-shallow creases can cause the bookmark to slip off; firm, even creases help the pocket grip pages reliably.
🔄 Try Also: Cut the outer point into a heart shape for a different motif or use patterned paper for a whimsical peek.
🛒 Products & Materials ▶
📌 “Slip a star-shaped corner bookmark onto pages for a playful reveal.”
• • •
Nautical eight-point origami star for gift tags
⏱️ 40 min · 🟠 Intermediate
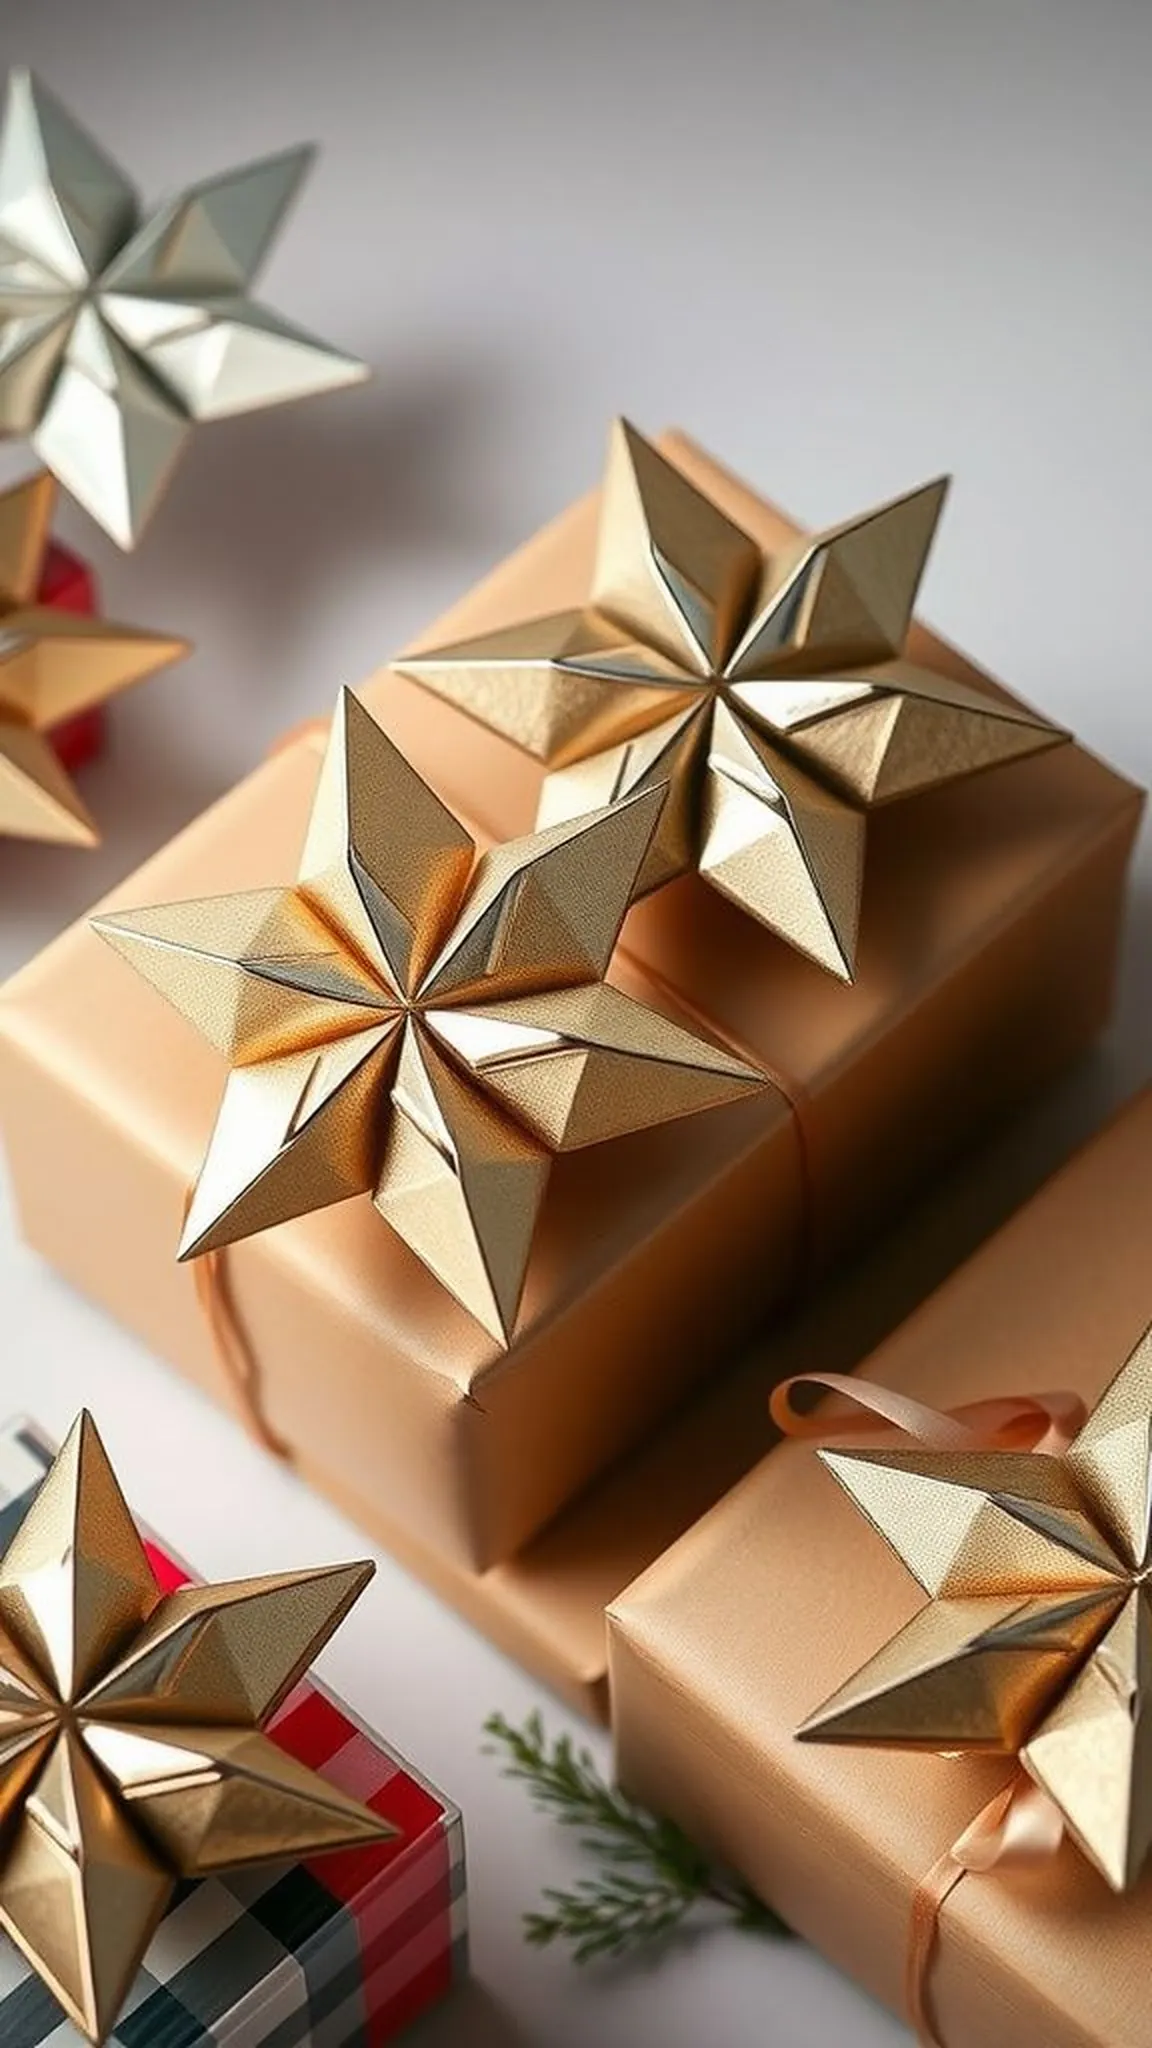
The nautical eight-point star has a crisp, compass-like presence that pairs nicely with wrapped gifts. Its alternating long and short points create a pleasing rhythm, and the layered centers add depth. The star responds to firm creasing with sharp silhouettes, and the overall effect is tidy and intentional.
When clustered on a table, the stars read like miniature compasses, lending a structured, slightly maritime charm to package presentation.
📋 How to Make This ▶
- Fold a square into a base with diagonal and orthogonal creases to map out alternating long and short point positions.
- Form the long points by shaping elongated triangular flaps and secure the short points by folding smaller flaps between them.
- Refine the central layers and flatten the star carefully to keep the eight points sharp and evenly spaced.
⚠️ Avoid: Ignoring initial guide creases often results in uneven points that disrupt the star’s radial symmetry.
🔄 Try Also: Make miniature tags by scaling down the square or use metallic paper for a refined holiday accent.
🛒 Products & Materials ▶
Items Used
- square origami paper metallic
- scoring stylus
📌 “Fold a compass-like eight-point star for elegant gift tags.”
• • •
Starburst accordion-fold star with layered textures
⏱️ 1 hour · 🟠 Intermediate
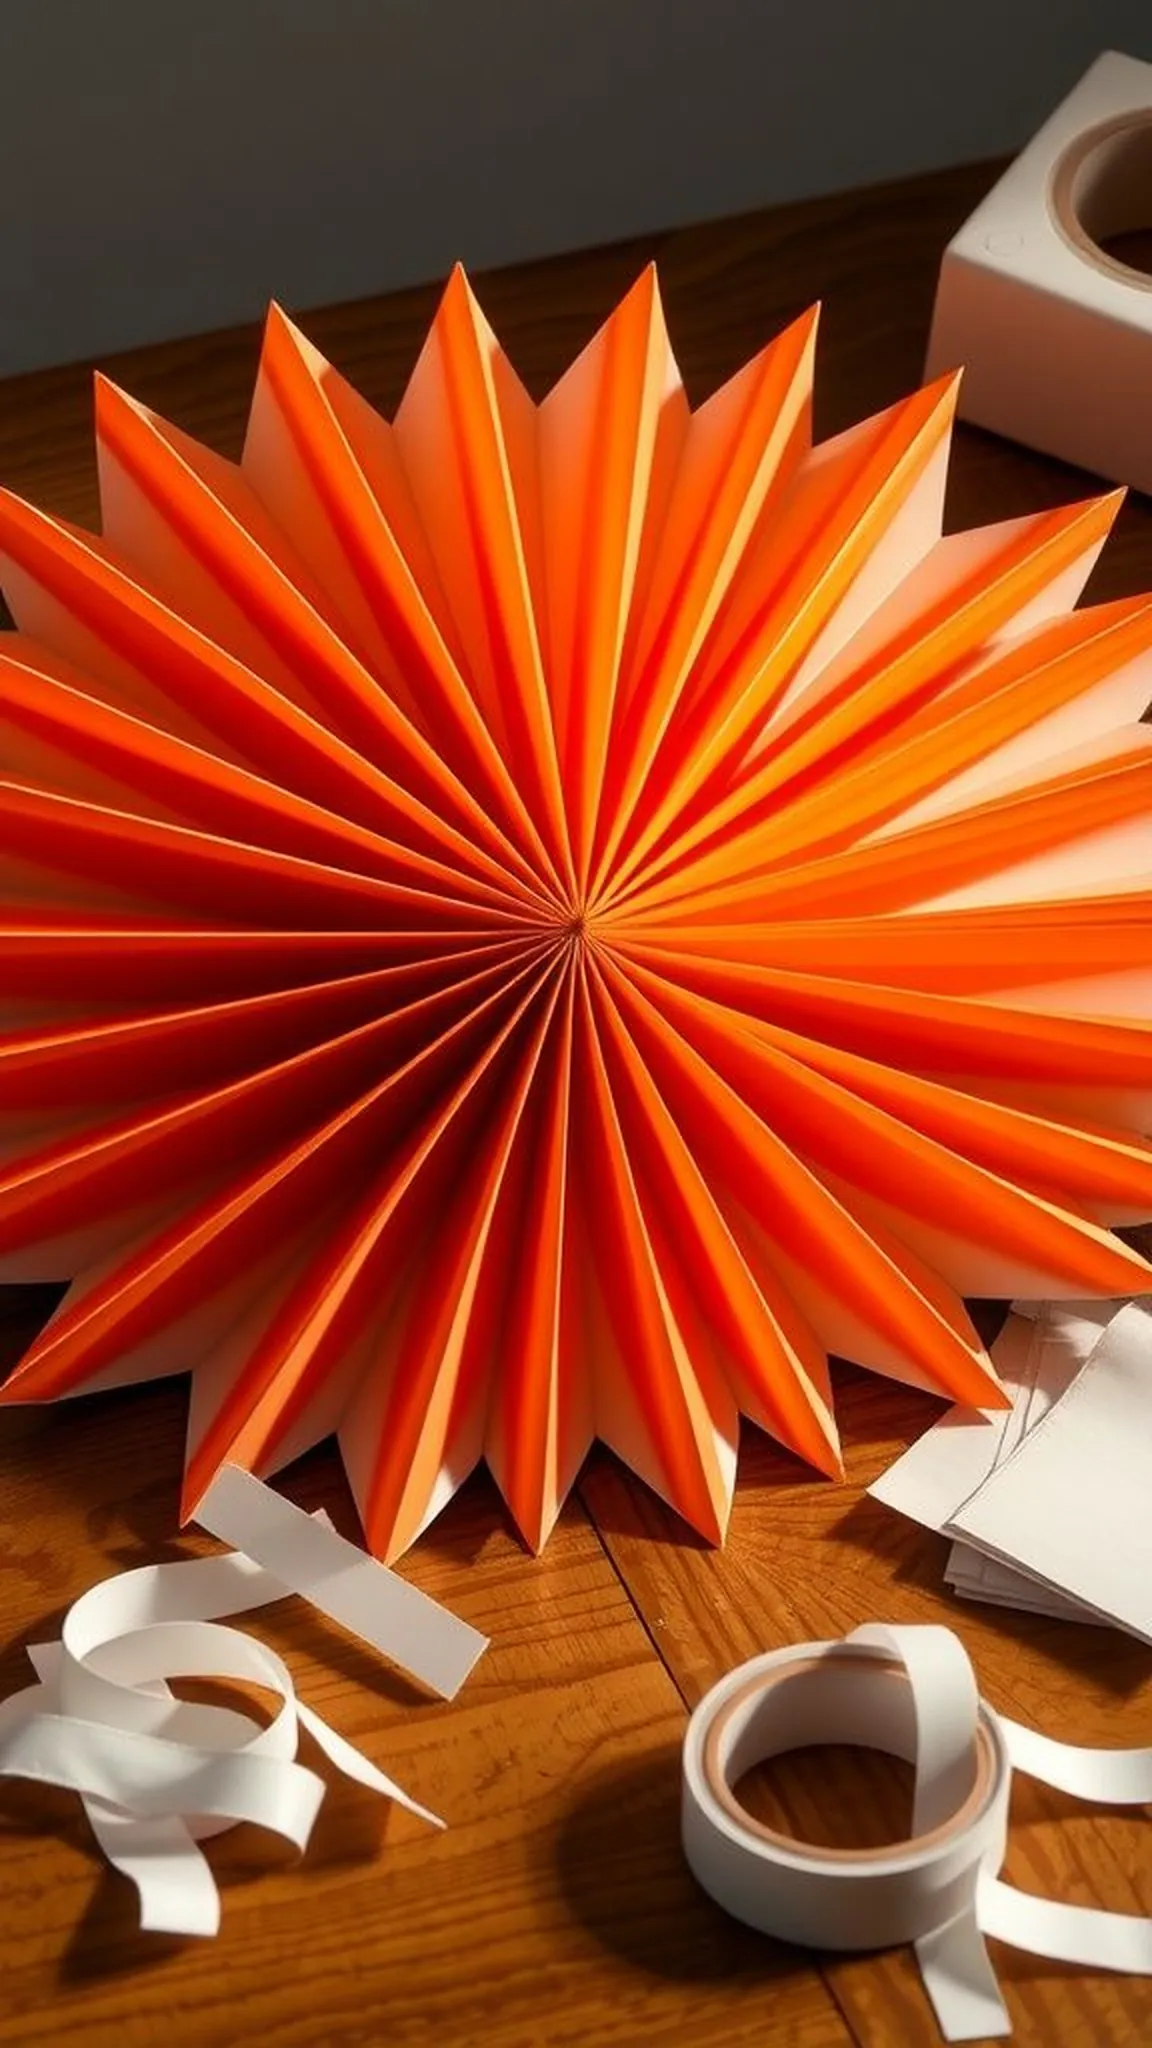
The accordion-fold star spreads energy across a tabletop with rhythmic pleats that catch light on each ridge. The layered paper edges create a tactile fringe and a bold silhouette when viewed from the side. The folding process results in a gratifying rhythm as pleats build up, and the finished star has an architectural air reminiscent of paper fans.
Placed under a low lamp, the ridges cast intricate shadows that deepen the star’s visual interest.
📋 How to Make This ▶
- Prepare several long strips of paper and fold each into even accordion pleats of matching width.
- Join the ends of each pleated strip into rings and layer the rings concentrically, offsetting pleats to create the starburst effect.
- Attach layered rings at the center so the pleated edges splay outward evenly to complete the accordion-fold star.
⚠️ Avoid: Unequal pleat widths create a lopsided star; measuring or folding with a consistent guide prevents imbalance.
🔄 Try Also: Mix thin patterned strips with solid-color pleats for contrast or make a set of graduated sizes for a wall cluster.
🛒 Products & Materials ▶
Items Used
- long craft paper strips
- double-sided tape
📌 “Make a pleated starburst from accordion folds for textured decor.”
• • •
Mini modular star ornaments with glossy paper
⏱️ 1.5 hours · 🔴 Advanced

Mini modular stars have an almost jewel-like presence when grouped together. The glossy paper reflects light subtly, and each module fits like a tiny sculpted tile. As modules accumulate, the star begins to feel like crafted jewelry rather than paper.
The small scale invites patience, and the final ornament shows careful geometry with crisp seams. When a cluster of these stars sits on a mantel, they read like handcrafted gems catching the room’s light.
📋 How to Make This ▶
- Fold multiple identical modules into compact units with tabs designed to interlock without adhesive.
- Assemble the modules pairwise, sliding tabs into pockets so edges align to form the star’s facets.
- Complete the ornament by joining remaining modules, checking that all seams sit flush for a tidy finish.
⚠️ Avoid: Forcing tabs into tight pockets can cause creases to tear; easing connections and aligning gently protects delicate glossy paper.
🔄 Try Also: Use a monochrome palette for a refined look, alternate colors for a mosaic effect, or add a thin ribbon loop for hanging.
🛒 Products & Materials ▶
Items Used
- glossy origami paper
- micro tweezers
📌 “Craft jewel-like modular star ornaments from glossy paper units.”
• • •
Paper star lantern with cutout glow
⏱️ 1 hour · 🟠 Intermediate
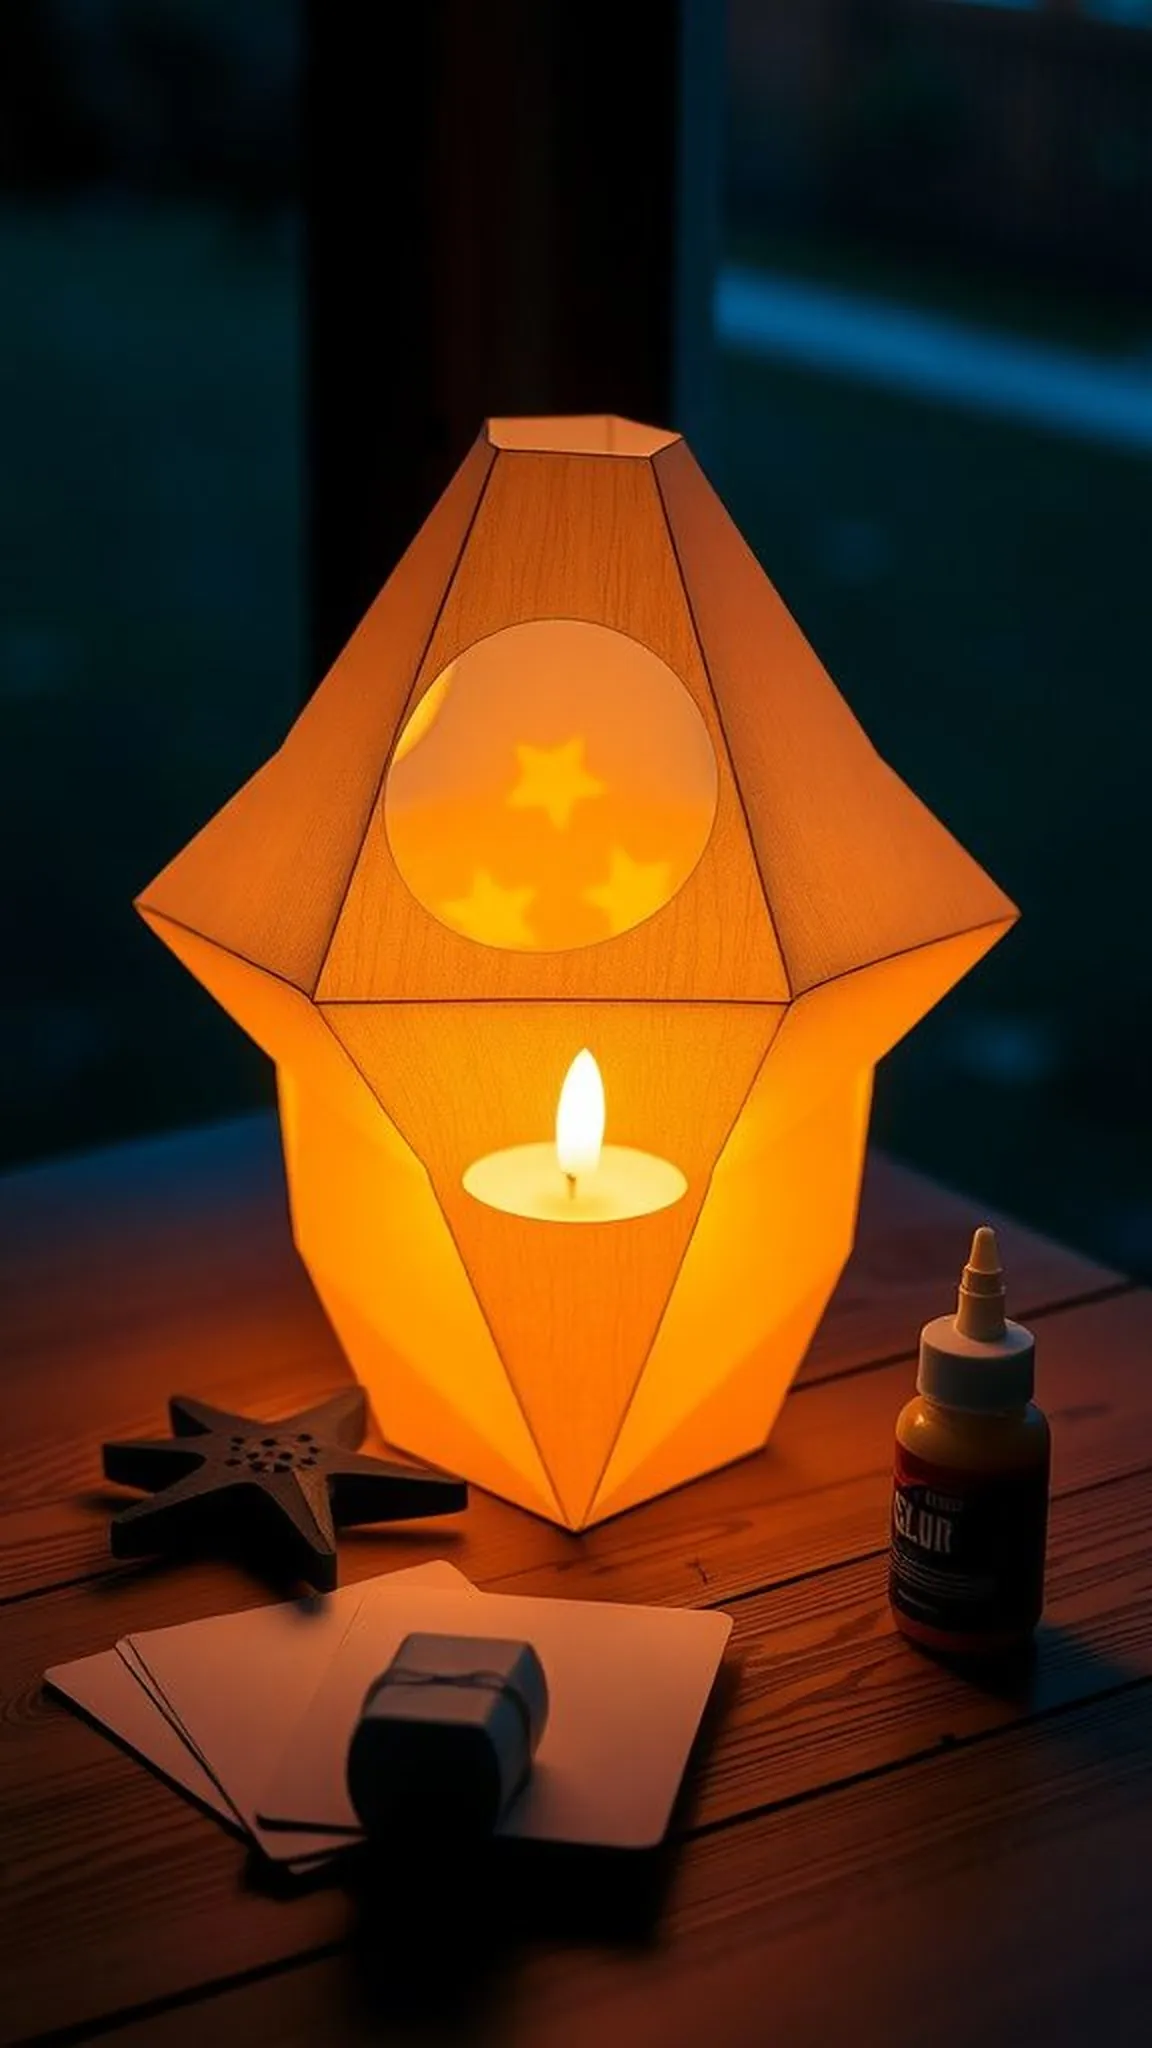
A paper star lantern glows with a soft, paper-filtered light that feels intimate. Cutout edges create lace-like patterns when a candle substitute sits within, and creases form gentle ribs that catch light. The lantern’s body has a handcrafted warmth, and the glow through paper feels softer than hard materials.
Hanging one creates a quiet vignette, and its silhouette at dusk becomes a focal point with a comforting, homemade ambiance.
📋 How to Make This ▶
- Fold and assemble star points from thicker paper panels, incorporating small decorative cutouts in each panel before assembly.
- Join the panels around a central frame by aligning tabs and slots so the star forms a hollow lantern shape.
- Place an LED tealight inside the hollow center and check that the lantern hangs or sits level to showcase the glow.
⚠️ Avoid: Using a real candle inside a thin paper lantern risks scorching; an LED light gives safe illumination and consistent glow.
🔄 Try Also: Use vellum panels for a diffuse glow, metallic paper for shimmer, or paint interiors with warm tones for richer light.
🛒 Products & Materials ▶
📌 “Fold a glowing paper star lantern with decorative cutouts.”
• • •
Layered star medallion for wall clusters
⏱️ 50 min · 🟠 Intermediate
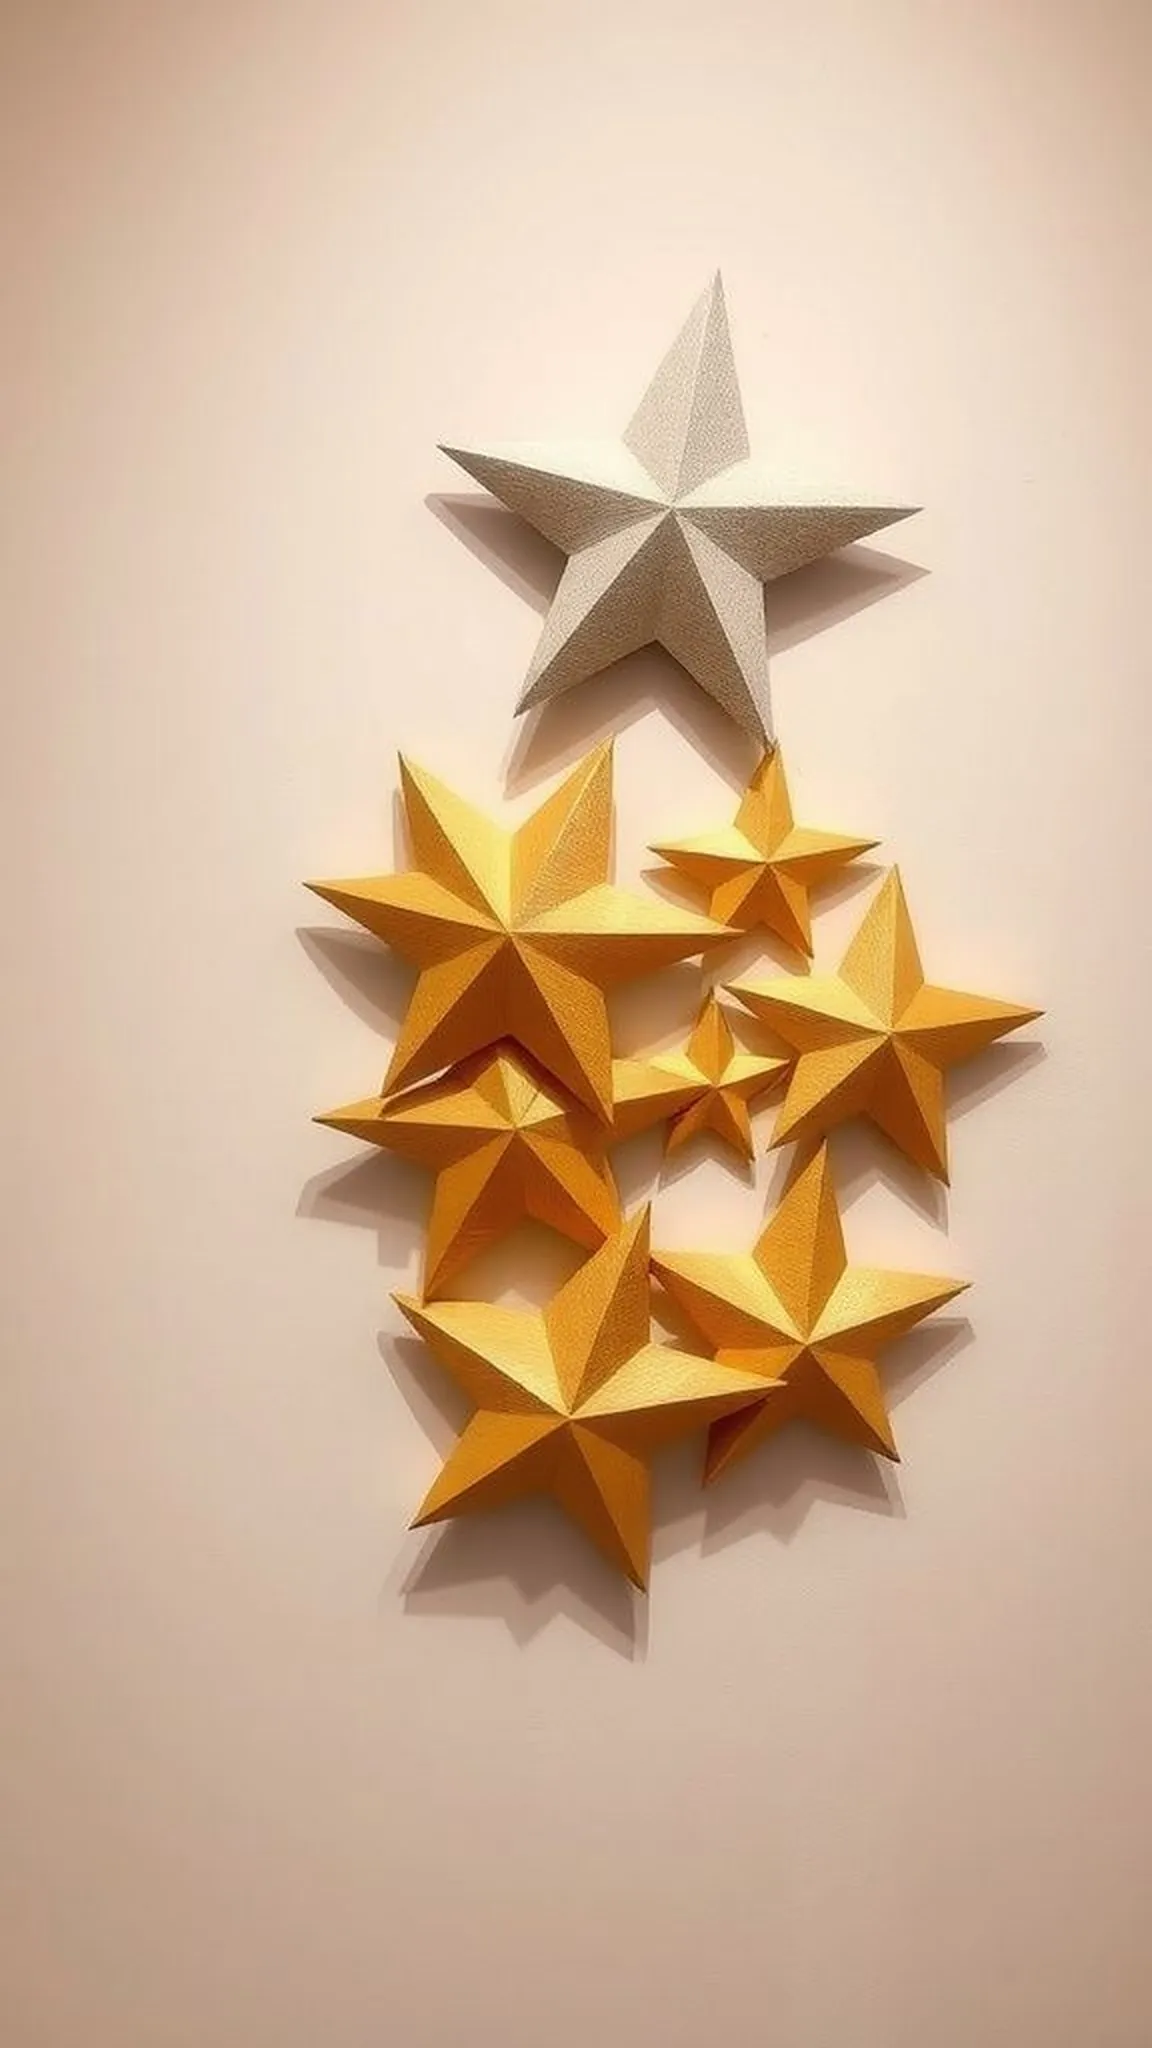
A layered star medallion reads like handcrafted heraldry when mounted in groups. Different paper weights create subtle relief between layers and edges throw tiny shadows that emphasize depth. The medallion feels sturdy yet paper-light, and combining textures like matte and metallic adds visual interest.
Mounted on a wall, a cluster of medallions reads as an artful installation, with rhythms created by varied sizes and alternating finishes that keep the eye moving across the display.
📋 How to Make This ▶
- Cut concentric star shapes from papers of differing colors or textures, each slightly smaller than the next.
- Center the layers and adhere them with small foam adhesive squares to create a raised, dimensional medallion.
- Affix a mounting tab to the back and arrange multiple medallions to form an eye-catching wall cluster.
⚠️ Avoid: Aligning layers off-center makes the medallion look uneven; centering each layer carefully avoids a lopsided final piece.
🔄 Try Also: Mix metallic and matte papers for contrast, use patterned centers for focal points, or make a monochrome set for subtle texture.
🛒 Products & Materials ▶
📌 “Create layered star medallions for artful wall clusters.”
• • •
Folded star favor boxes with secret pockets
⏱️ 1.5 hours · 🔴 Advanced
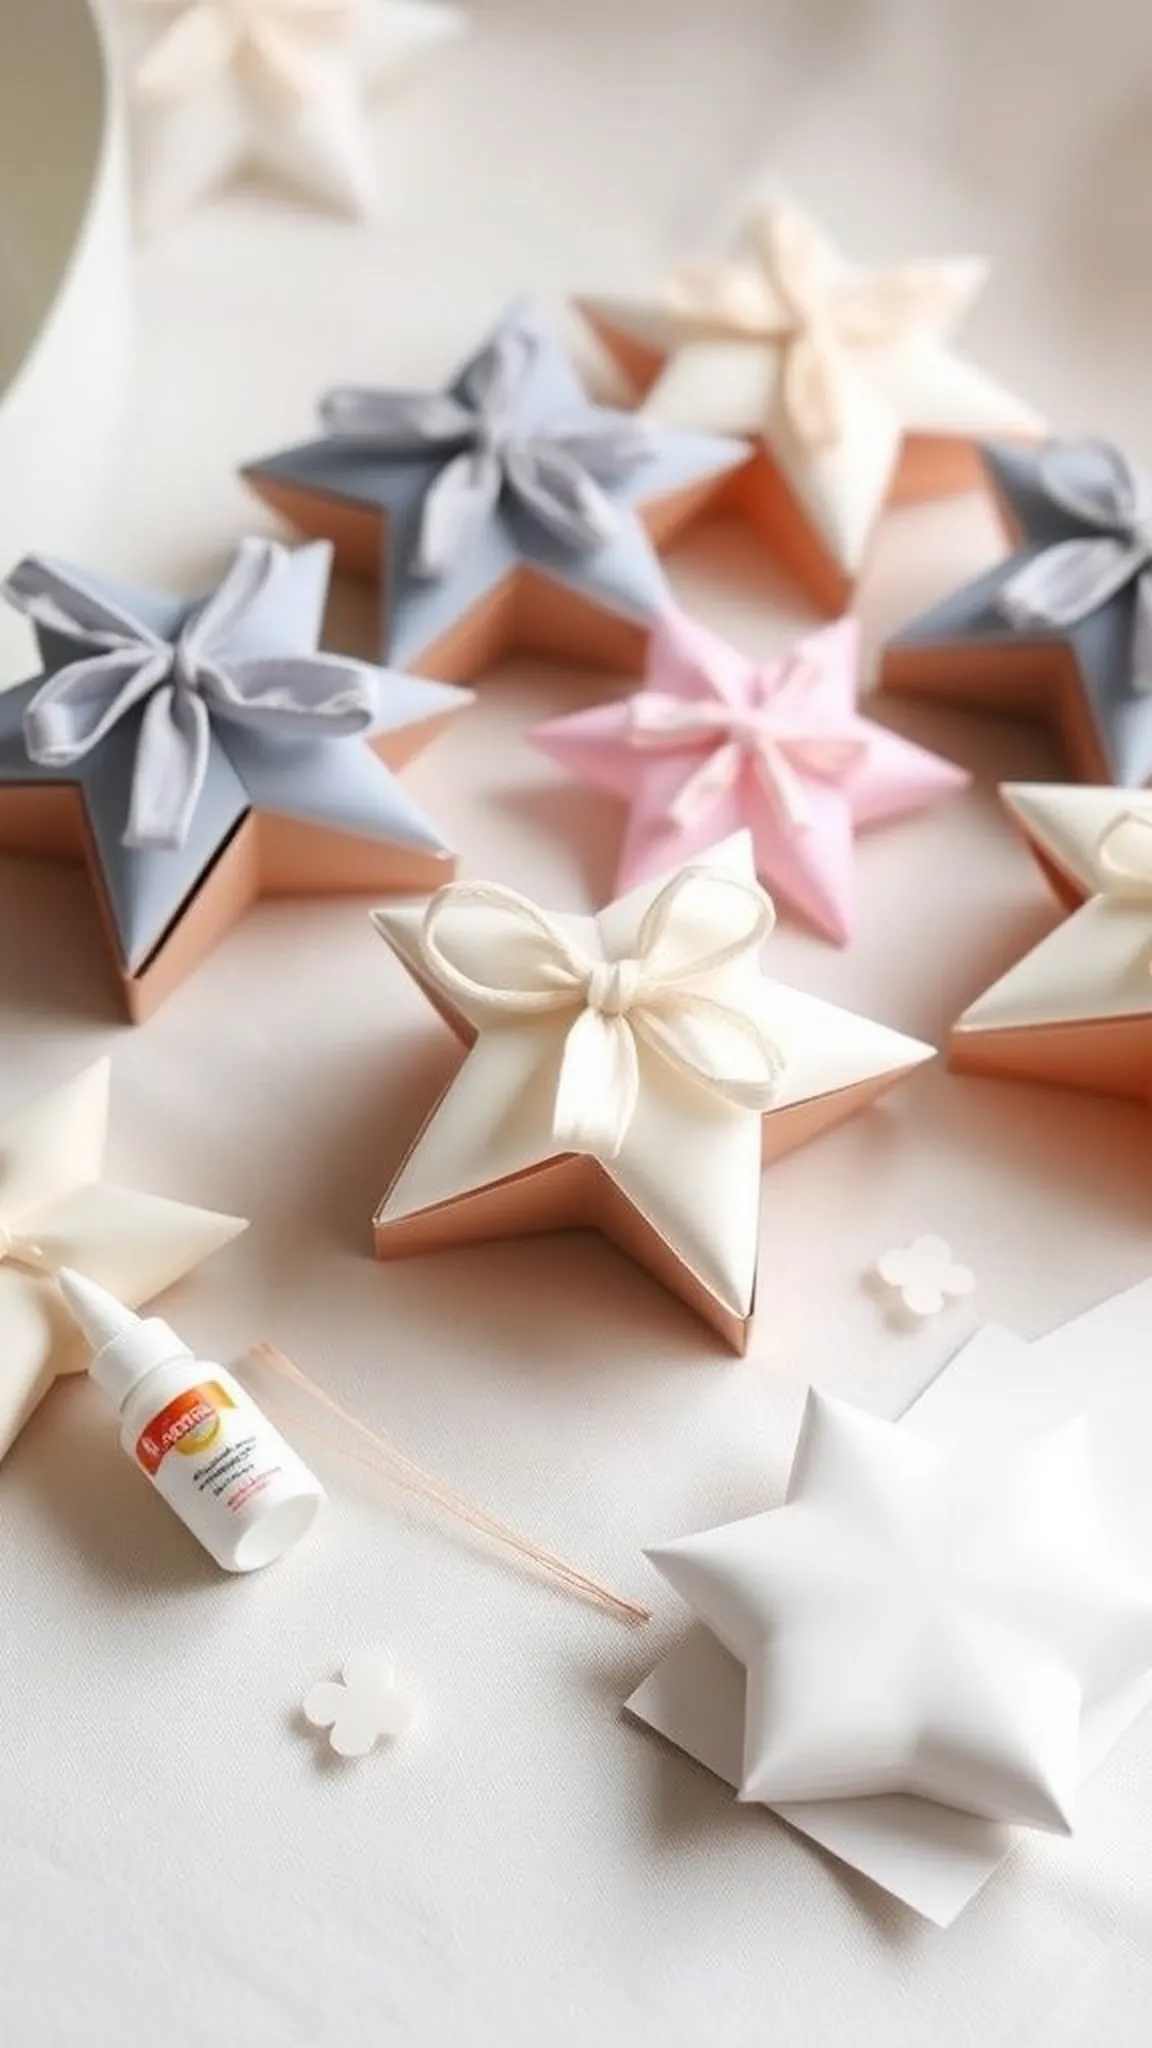
Folded star favor boxes combine practicality with playful geometry, holding tiny treats within a sculpted shape. The tactile interaction of opening a small star-shaped lid feels satisfying, and the box’s facets reflect light differently as it rotates. Crisp edges and snug corners create a neat parcel that feels thoughtful to give away.
Placed on a table, a cluster of these little boxes reads like miniature sculptures with the added delight of hidden treats inside.
📋 How to Make This ▶
- Prepare a larger square sheet and fold a base with reinforced corners to form the lower compartment of the box.
- Create a matching lid by folding a slightly larger square into a shallow star-shaped cover that nests over the base.
- Decorate the exterior if desired and nest the lid onto the base, checking fit so the pocket remains secure for small favors.
⚠️ Avoid: Making the lid and base the same size causes a tight fit that resists closing; sizing the lid slightly larger yields a smooth nesting fit.
🔄 Try Also: Use patterned interiors for a surprise contrast, add a ribbon loop for pull tabs, or scale up for a larger gift box.
🛒 Products & Materials ▶
Items Used
- heavyweight origami paper
- clear craft glue
📌 “Create star-shaped favor boxes with neat nesting lids for small gifts.”
• • •
Pocket-sized star charms on ribbon loops
⏱️ 25 min · 🟢 Beginner
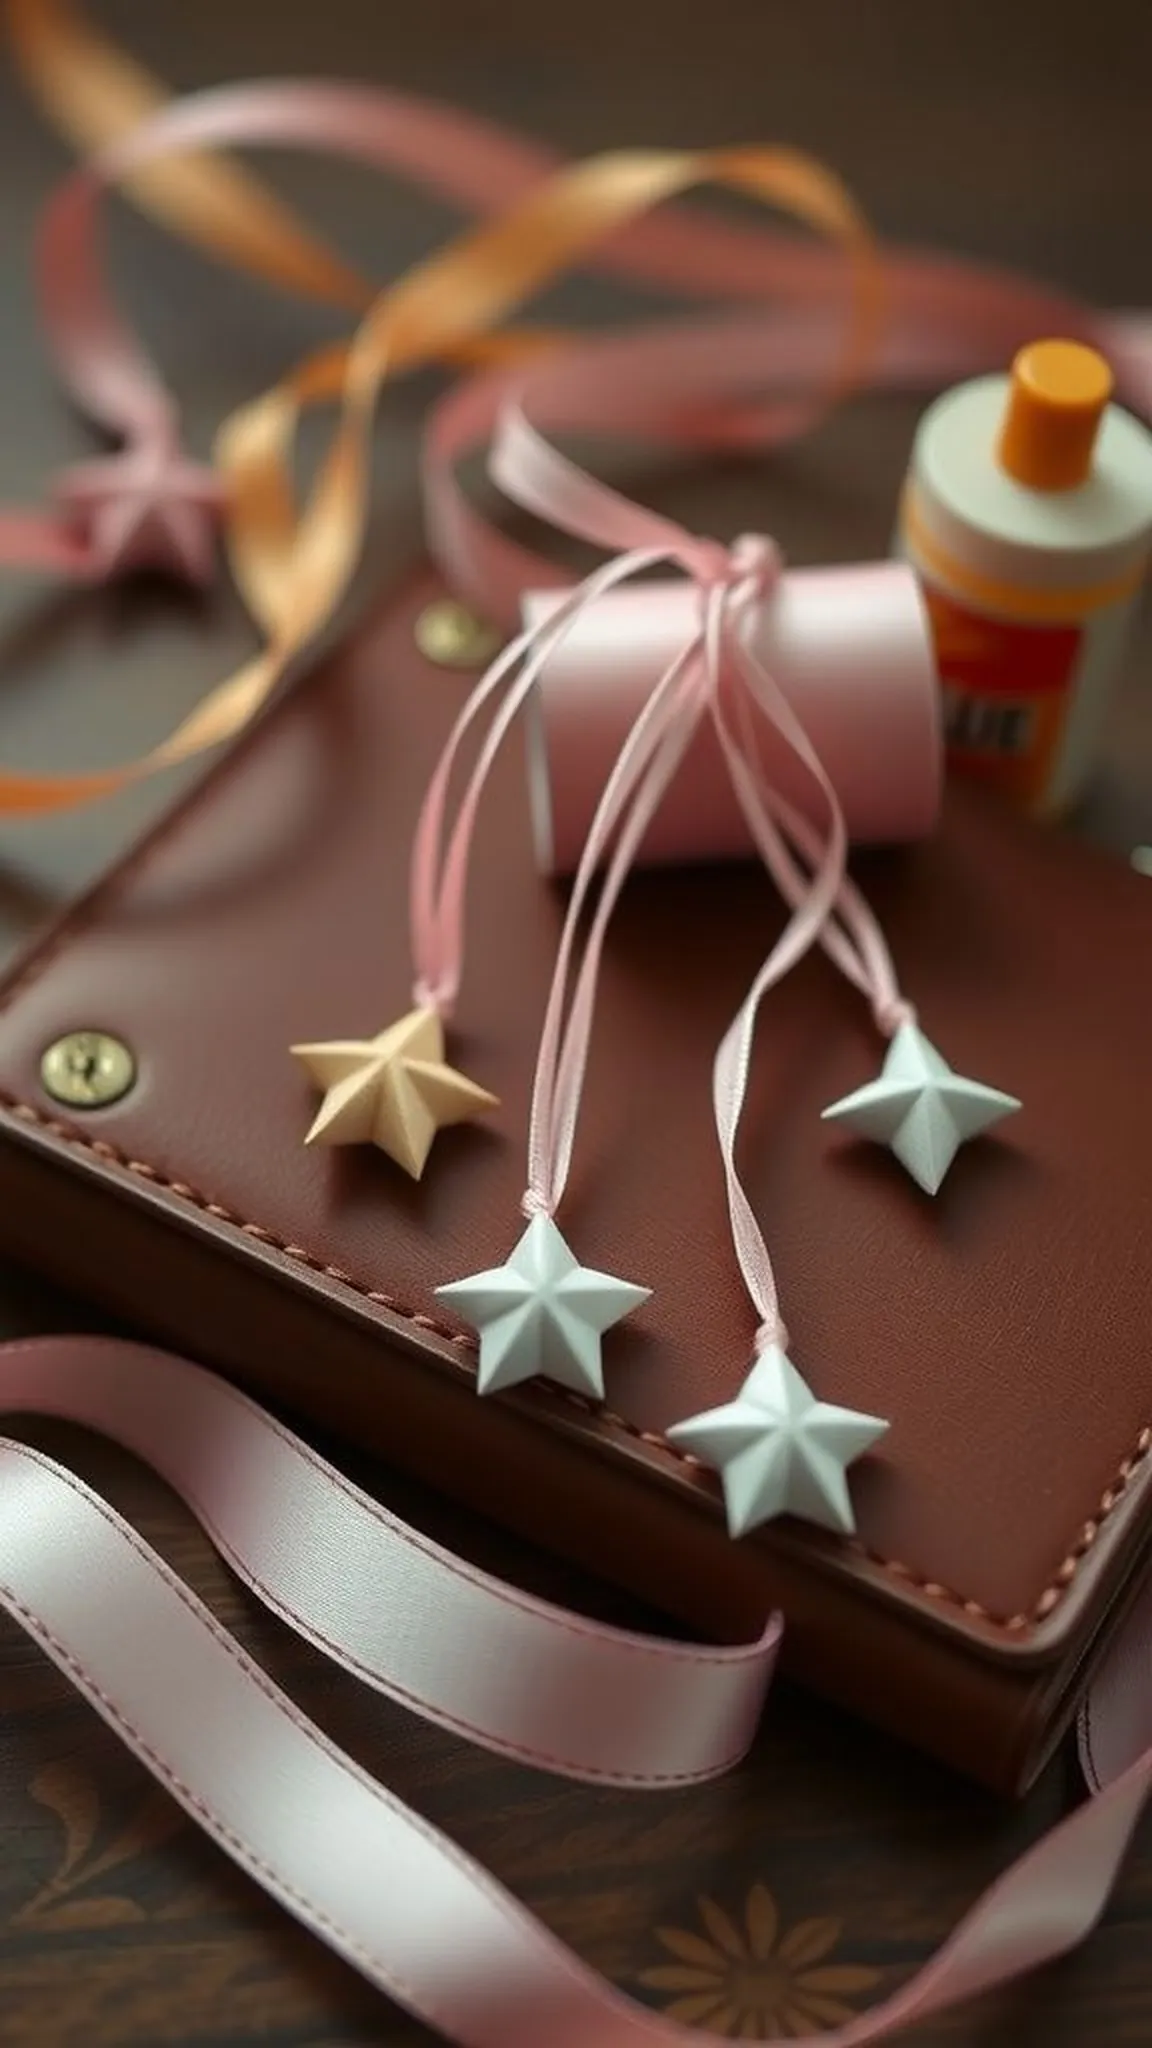
Tiny star charms on ribbon add a small handcrafted flair to bags or keys. The loop gives movement and a tactile pull that feels satisfying when carried. Paper chosen for charms often has a soft sheen that catches highlights and the miniature size makes each charm feel intimate.
Placing a star on a ribbon creates a keepsake-ready accent that is light enough to tuck into a pocket yet stable enough to dangle proudly from daily carry items.
📋 How to Make This ▶
- Fold small lucky or flat stars to the desired charm size from sturdy paper.
- Make a tiny hole near a stable center point with a needle and thread a short ribbon loop through, securing with a small knot.
- Add a tiny dab of clear glue to reinforce the entry point so the charm stays attached during daily use.
⚠️ Avoid: Putting the ribbon through a thin edge can cause tearing; reinforcing the hole with a small glue dot prevents wear.
🔄 Try Also: Use satin ribbon for elegant charms, braided twine for rustic flair, or mix sizes for a layered keychain effect.
🛒 Products & Materials ▶
Items Used
- mini origami stars (folded)
- satin ribbon narrow
- clear craft glue
📌 “Turn tiny origami stars into ribbon loop charms for pockets and bags.”
• • •
Folded star wreath made from repeated units
⏱️ 2 hours · 🔴 Advanced
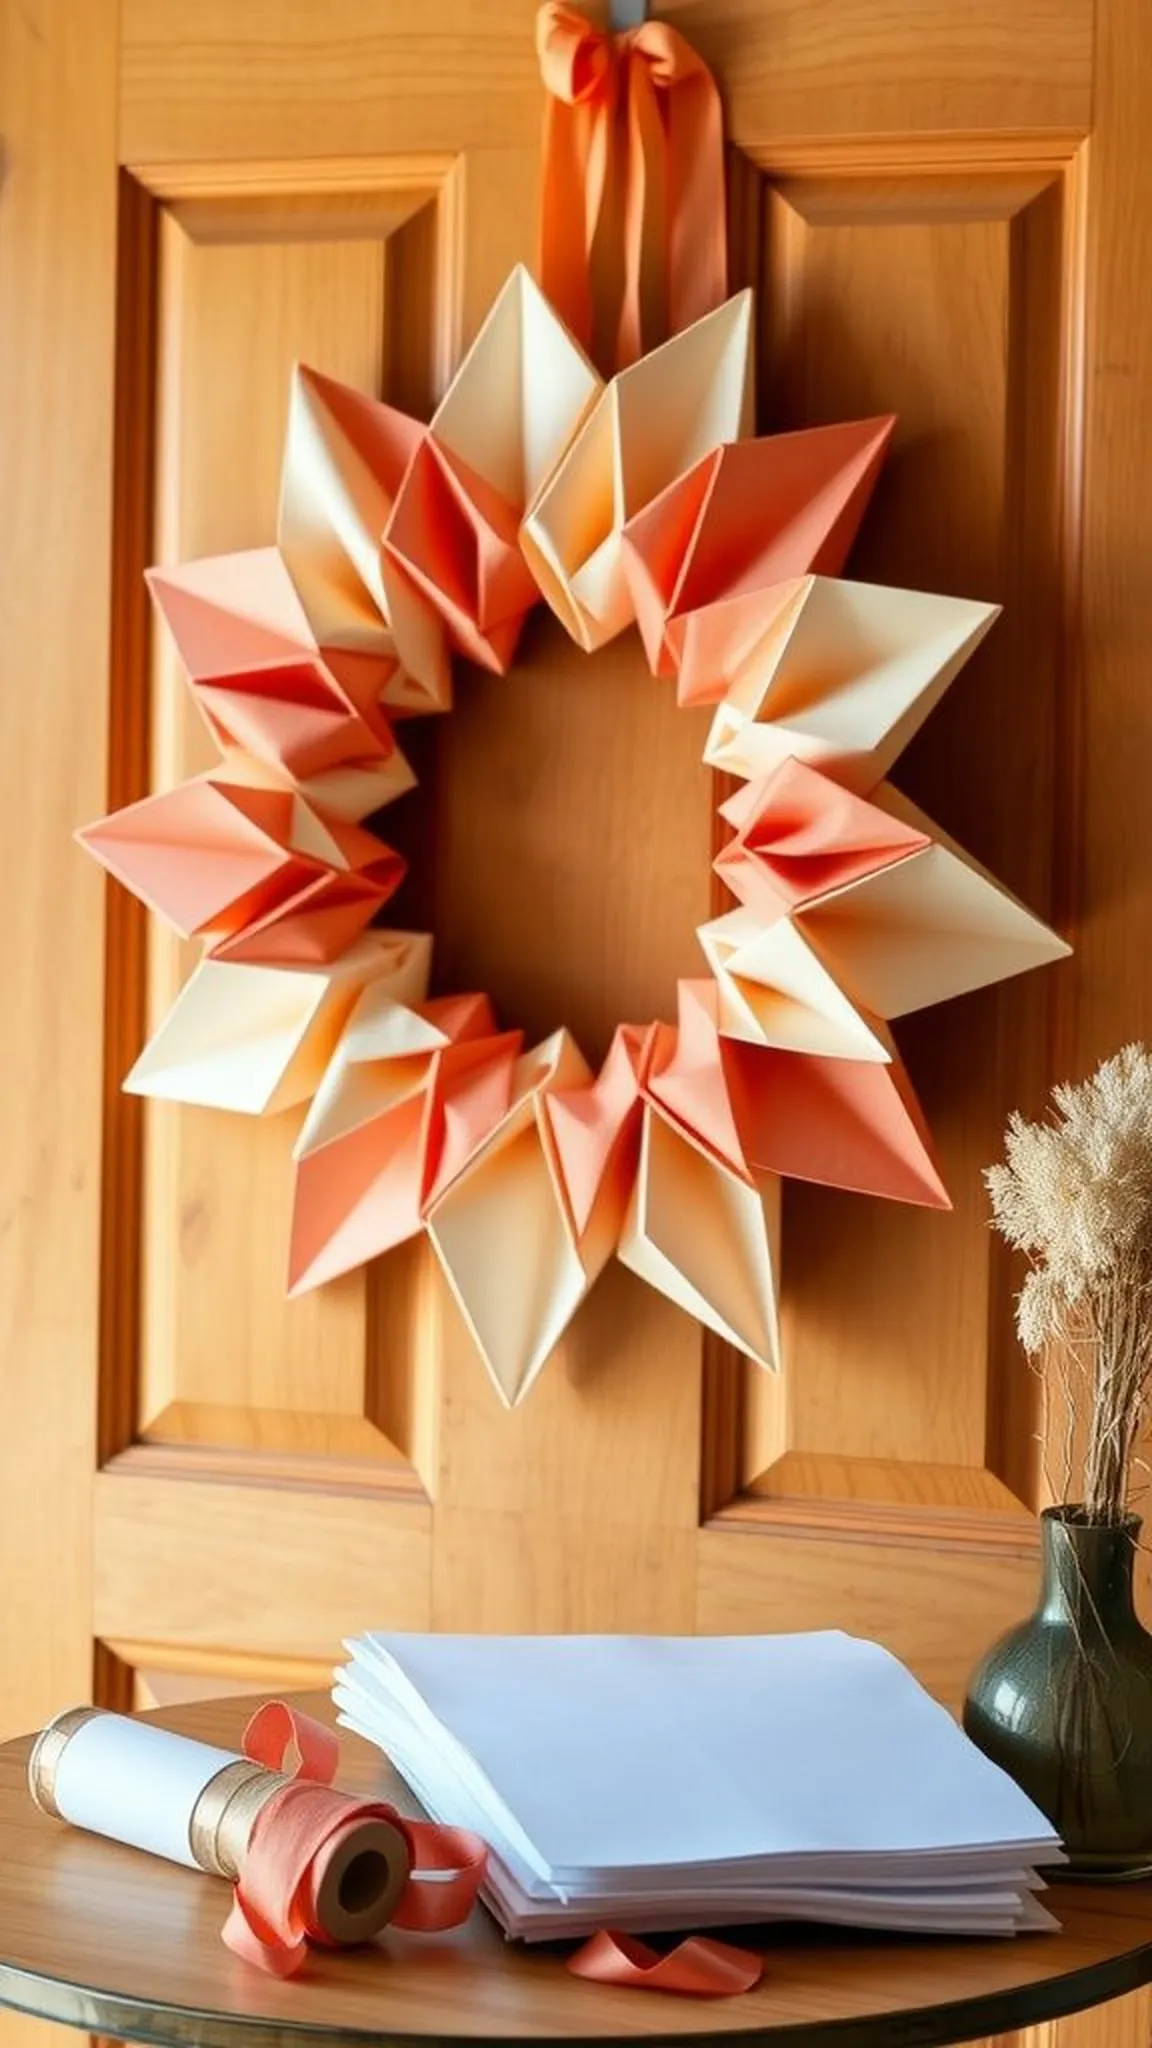
A folded star wreath has an inviting circular rhythm that feels ceremonial and handmade. Repeating identical units produces a satisfying pattern and the joined points form a spiky ring that reads as decorative craftwork. The wreath has a pleasant tactile quality where seams meet, and the alternating colors can create a rhythmic pulse around the circle.
Hung on a door, the wreath announces a careful, paper-based welcome with a handcrafted presence.
📋 How to Make This ▶
- Fold multiple identical star units, keeping each unit’s creases consistent for predictable joins.
- Arrange units in a circle and connect adjacent units by tucking tabs into pockets so the ring forms without visible gaps.
- Secure the final connection and add a hanging loop to the back so the wreath sits flat when displayed.
⚠️ Avoid: Assembling without a prearranged color plan can lead to awkward color clusters; planning layout first keeps the wreath balanced.
🔄 Try Also: Make a compact tabletop ring or scale up for a larger door wreath, and alternate metallic and matte units for depth.
🛒 Products & Materials ▶
Items Used
- origami paper squares pack
- thin ribbon for hanging
📌 “Create a spiky folded-star wreath by linking repeated paper units.”
• • •
Geometric star mobile with mixed paper sizes
⏱️ 2-3 hours · 🔴 Advanced
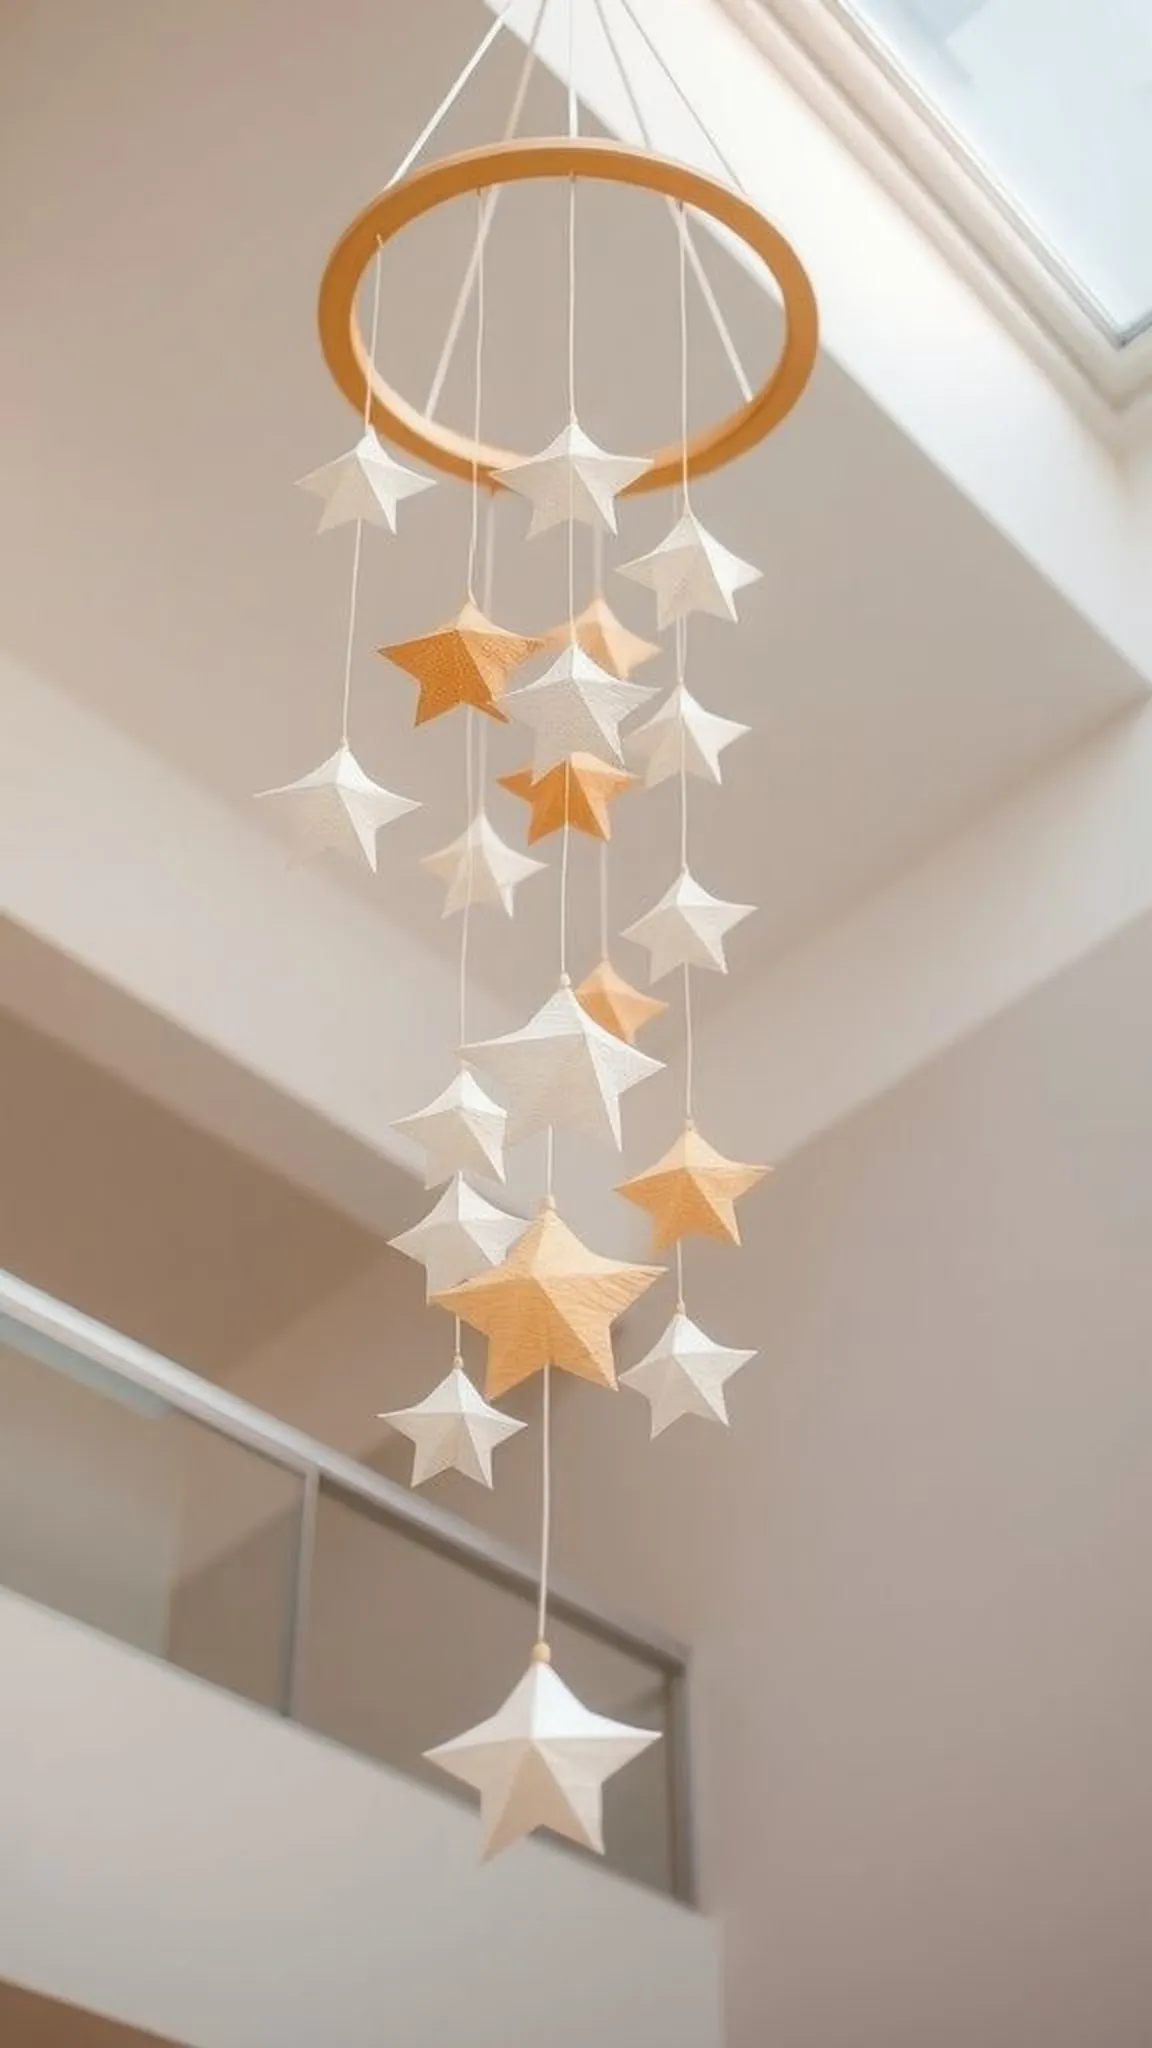
A geometric star mobile has a calming kinetic quality as pieces rotate in breeze. Mixed sizes create a layered depth and the suspended silhouettes shift light and shadow across a room. The interplay of small and large stars brings a balanced composition, and the mobile’s gentle movement feels meditative.
Each hanging link reads like a small study in proportion, and the overall installation brings a handcrafted, airy presence to a ceiling corner or nursery.
📋 How to Make This ▶
- Fold a variety of star sizes using both puffy and flat techniques, choosing slightly different paper weights for visual contrast.
- Attach each star to thin clear fishing line or thread, adjusting lengths so stars hang at staggered heights.
- Balance the stars on a circular hoop or frame, tying lines carefully and trimming excess to keep the mobile centered.
⚠️ Avoid: Uneven weight distribution causes lopsided rotation; testing balance on a temporary hook before final tying prevents tilt.
🔄 Try Also: Use a single color family for a minimalist mobile, or introduce metallic accents for shimmer in motion.
🛒 Products & Materials ▶
📌 “Suspend mixed-size paper stars into a calming geometric mobile.”
