As an Amazon Associate I earn from qualifying purchases.
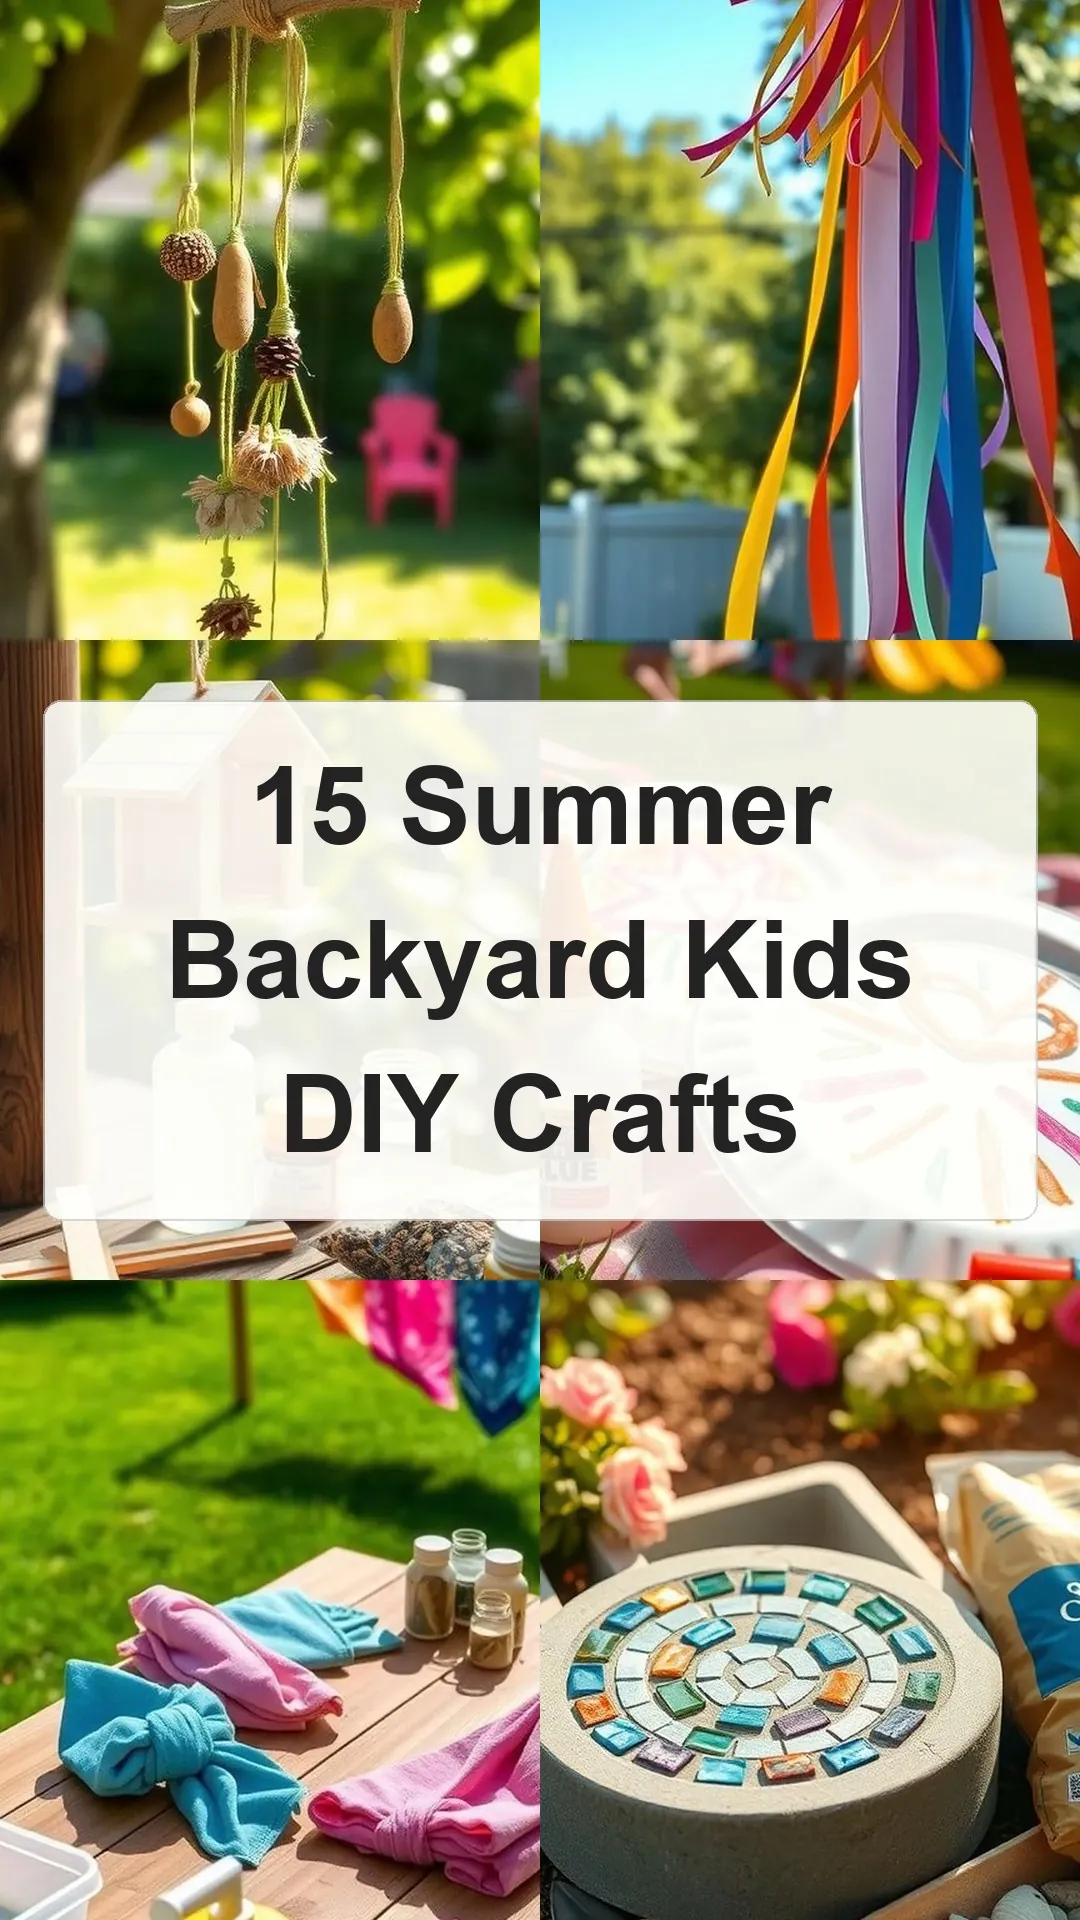
Summer Backyard Kids DIY Crafts bring sun-soaked play and hands-on creativity into the yard. Summer Backyard Kids DIY Crafts turn ordinary afternoons into colorful experiments as Summer backyard kids DIY crafts invite painted rocks, bubble wands, sunprint paper, tie-dye bandanas and popsicle feeders for small hands. Backyard kids DIY crafts spark sticky-finger laughter beside sprinklers and summer kids DIY crafts keep imaginations busy with bright drips, windy streamers and sun-warmed treasures.
Colorful painted rock garden markers for kids

I remember a sunny afternoon when smooth river stones lay like little islands on the picnic table, glossy paint jars humming with color. Tiny hands hovered, choosing bold oranges and lemon yellows that seemed to glow under warm light. The stones felt cool in palm against sun-heated skin, while little brushes whispered across rounded surfaces and fine-tipped pens left small neat letters.
There was mud-smudged laughter nearby as the markers joined a herb bed, each rock holding a tiny painted story that made the garden feel friendlier.
Items Used
- smooth river rocks (1-3 inches)
- washable acrylic paint set (assorted colors)
- small round paintbrush set
- clear acrylic sealer spray
Steps
- Gather smooth river rocks, washable acrylic paints, a set of small brushes and a fine-tip permanent marker.
- Place rocks on a protected surface and let children decorate each rock with symbols, colors and names.
- Allow painted surfaces to dry thoroughly before outlining labels with the marker for clarity.
- Spray a clear acrylic sealer outdoors to protect surfaces if desired and let it dry completely.
- Arrange finished rocks along plant rows to mark herbs or flowers.
Simple bubble wands that make giant bubbles
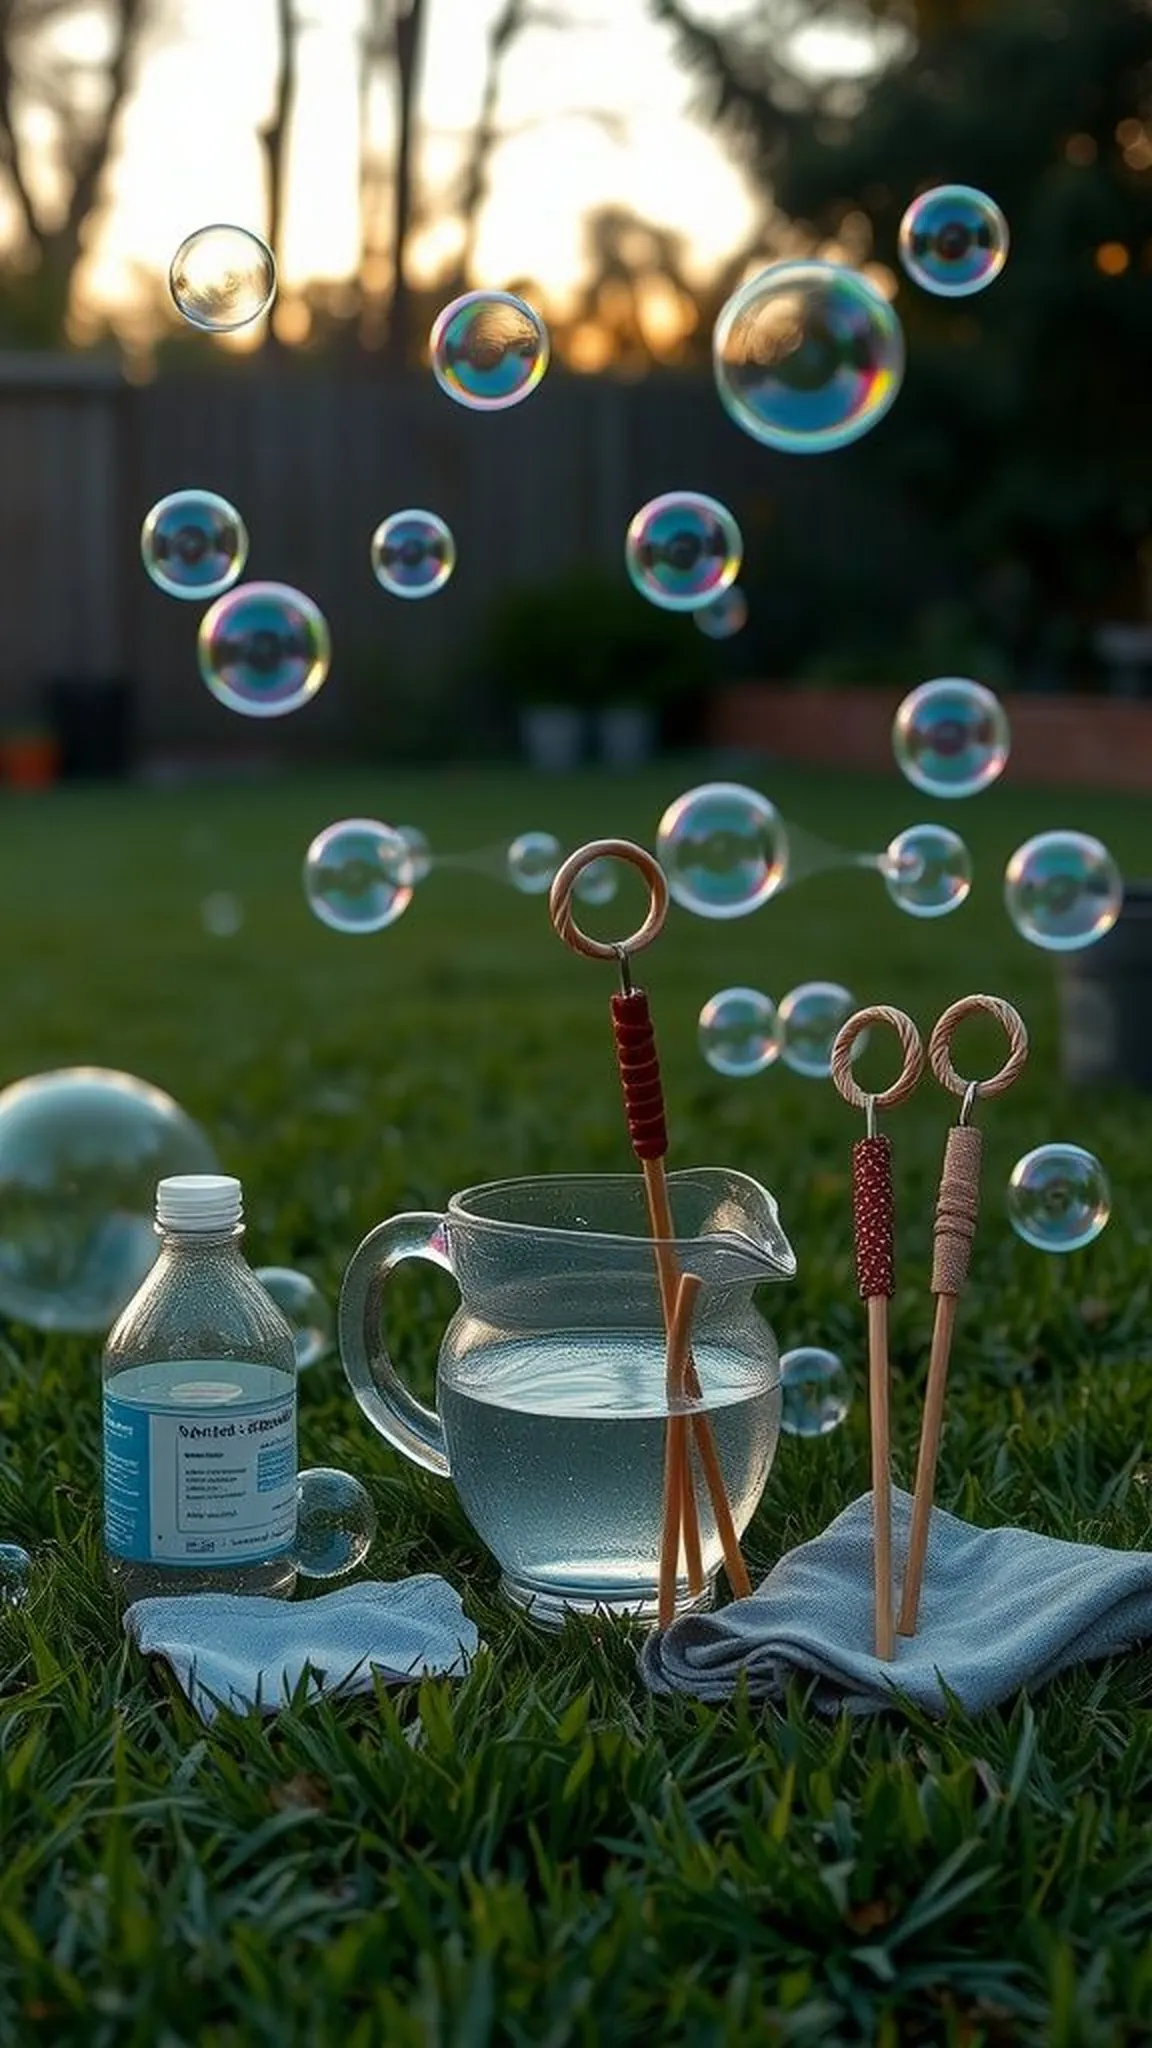
A warm evening produced a sticky-sweet scent of bubble solution while homemade wands lay gleaming in the grass, their wire loops catching sun. Children ran barefoot and laughed as iridescent spheres rolled off the loops and drifted like tiny planets. The metal felt cool at first, then warmed in hands, while soapy necklaces formed on braided twine and shimmering skins reflected backyard trees.
Each wand had its own rhythm; some blew out slow pearls, others launched long trains that ribboned across the lawn and popped with a soft kiss.
Items Used
- coated garden wire (18 gauge)
- glycerin bottle
- liquid dish soap (mild)
- floral tape (green)
Steps
- Bend coated garden wire into loops of different sizes and wrap the handle ends with floral tape for grip.
- Mix a gentle bubble solution of dish soap and water with a small amount of glycerin for longevity.
- Dip wand loops into the solution and lift slowly to create bubbles, adjusting loop size for variety.
- Dry handles after use and store wands in a shaded container to prevent rusting.
Sunprint leaf plates — sun and shadow art
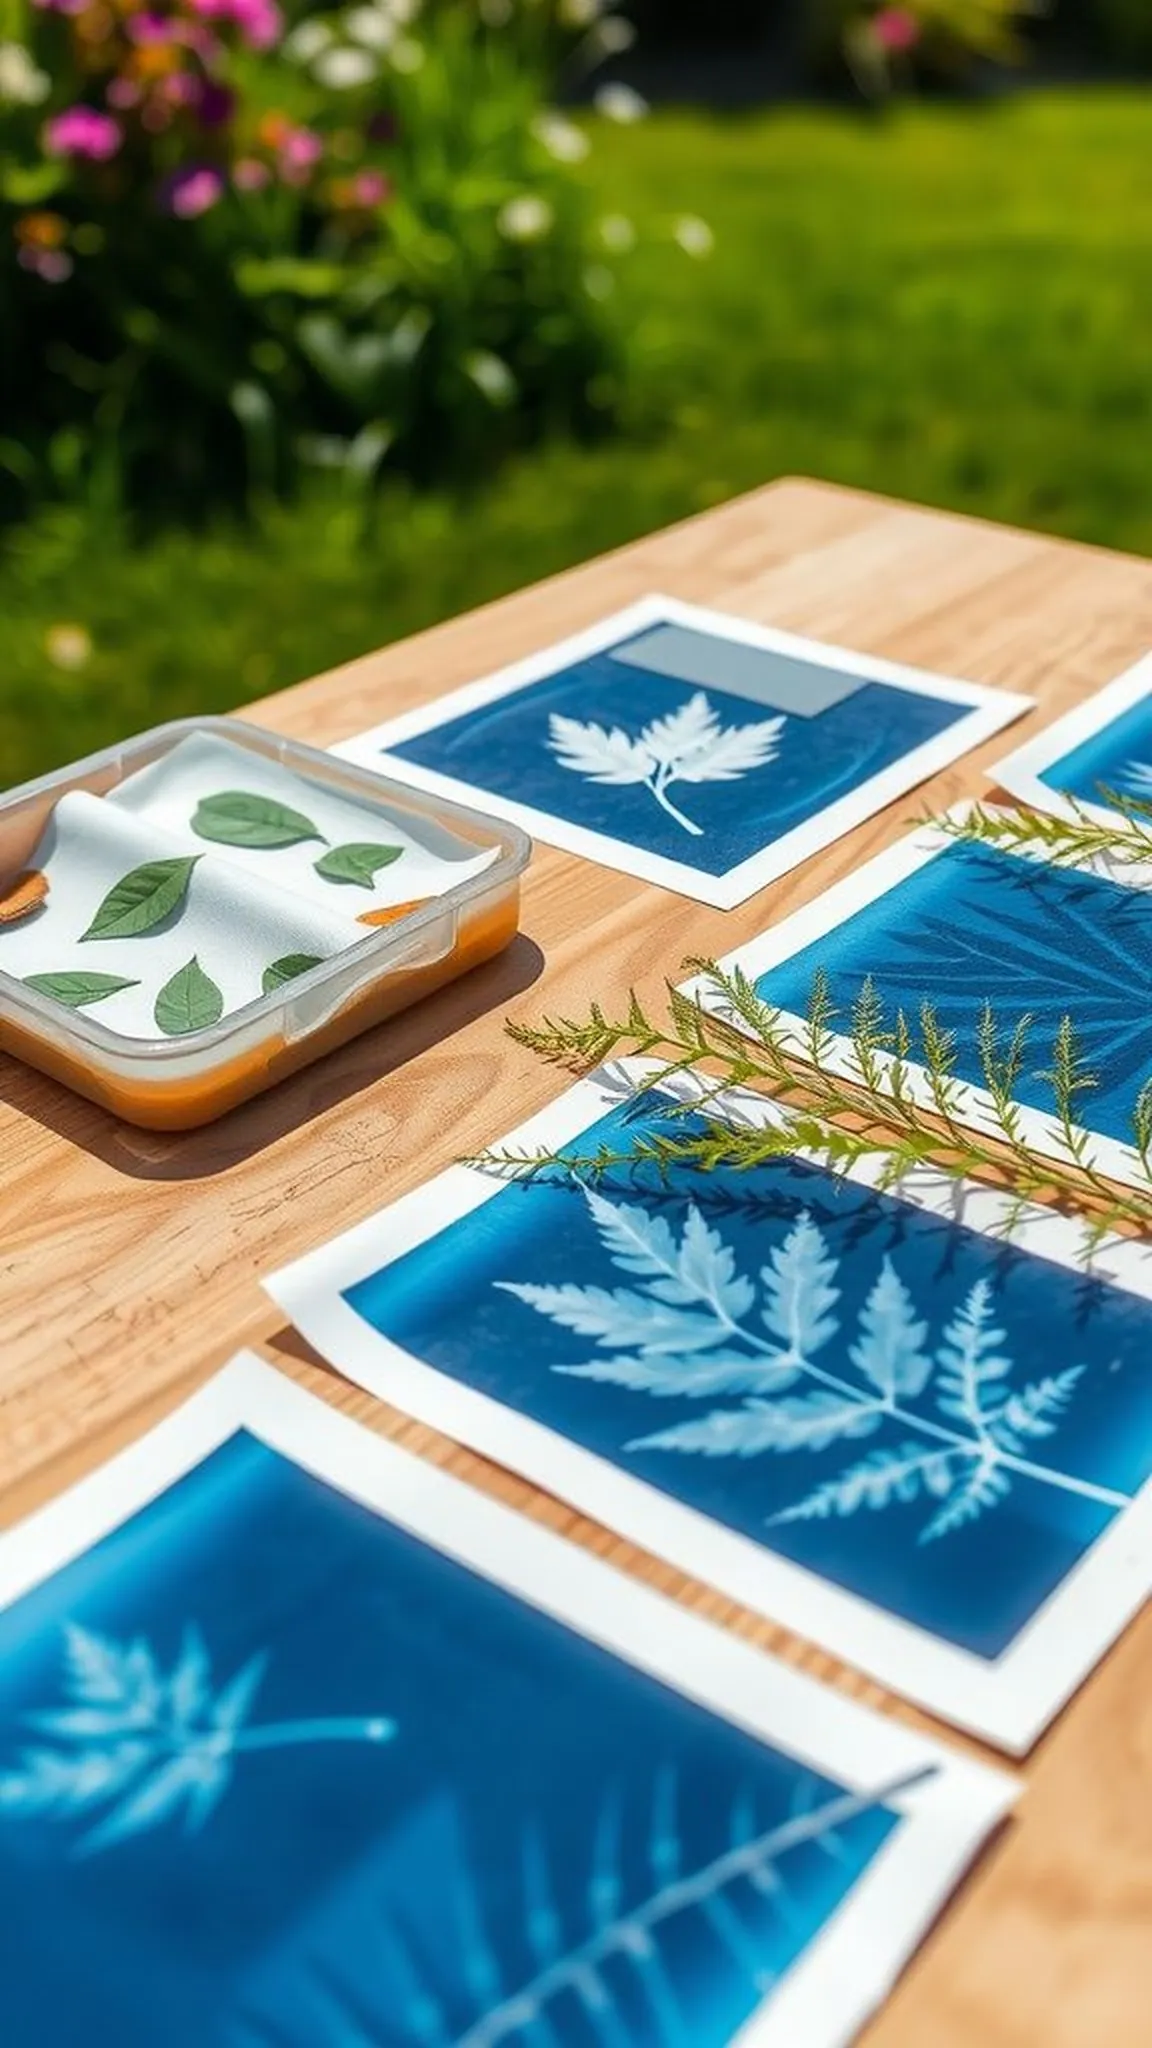
Thin sheets of sun-reactive paper lay flat on a picnic table, leaves pressed gently onto them as sunlight heated the backyard. The paper went from pale to deep blue where sun warmed it, leaving pale silhouettes beneath each leaf edge. There was a quiet focus as fingers arranged fern fronds and clover, savoring the crisp contrast that appeared like ghostly snapshots of the garden.
After water touched the sheets the images snapped into permanence and the yard filled with a soft paper scent and a feeling of small, clear triumph.
Items Used
- sunprint photographic paper (blue)
- assorted flat leaves and ferns
- shallow rinse tray
Steps
- Arrange fresh leaves or flat natural objects on sheets of sun-print paper outdoors under direct sunlight.
- Expose the arranged paper to sunlight for the time recommended on the paper instructions until tone shifts.
- Rinse papers in water to reveal high-contrast leaf silhouettes, then lay flat to dry.
- Press finished prints under a heavy book after drying for a smooth finish and display in the yard.
Save time and printer ink with 50+ printable templates and step-by-step instructions in one ad-free guide.

Just $19.99 — lifetime access
Tie-dye bandanas with bright summer swirls
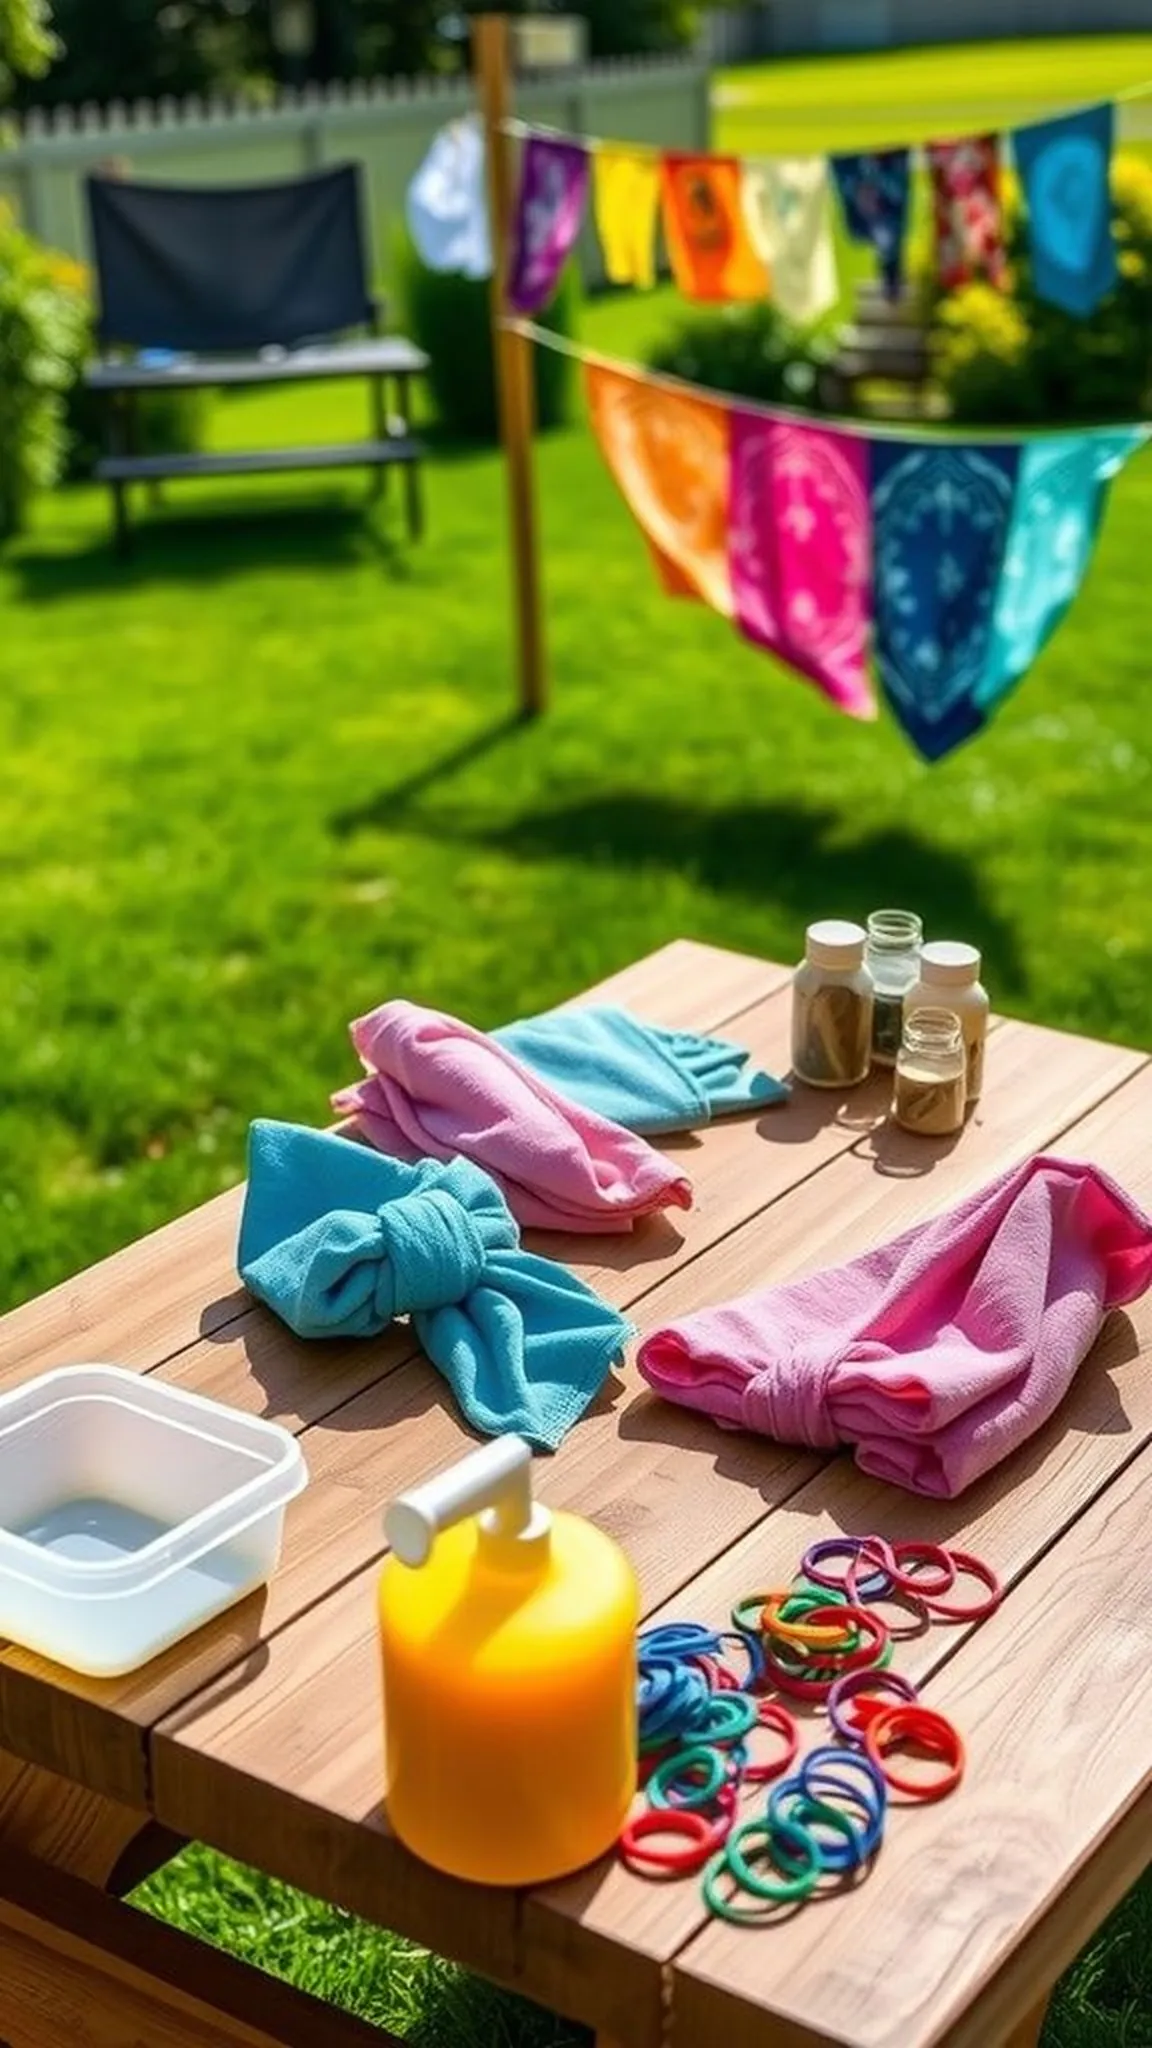
Bandanas pooled color like tiny sunsets on the picnic bench while the air smelled faintly of damp fabric and citrus from a spray bottle. Hands squeezed tight knots and watched dyes spread in vibrant blooms, the cotton softening as colors bled into each other. Each cloth took on a different personality; spirals, stripes and burst patterns appeared unpredictable and charming.
When fabrics were unbound, wet colors ran like river maps and the backyard buzzed with a satisfied hush as bandanas dried and brightened in the breeze.
Items Used
- 100% cotton bandanas (assorted colors, white)
- fiber-reactive dye powder set
- rubber bands for fabric
- plastic squeeze bottles
Steps
- Fold bandanas into desired patterns and secure sections with rubber bands.
- Mix fiber-reactive dye according to package directions and apply dyes to fabric sections.
- Allow dye to set for the recommended time in a covered container to keep fabric moist.
- Rinse fabrics until water runs clear, wash separately, and hang to dry in the sun.
Popsicle stick bird feeder — a backyard favorite
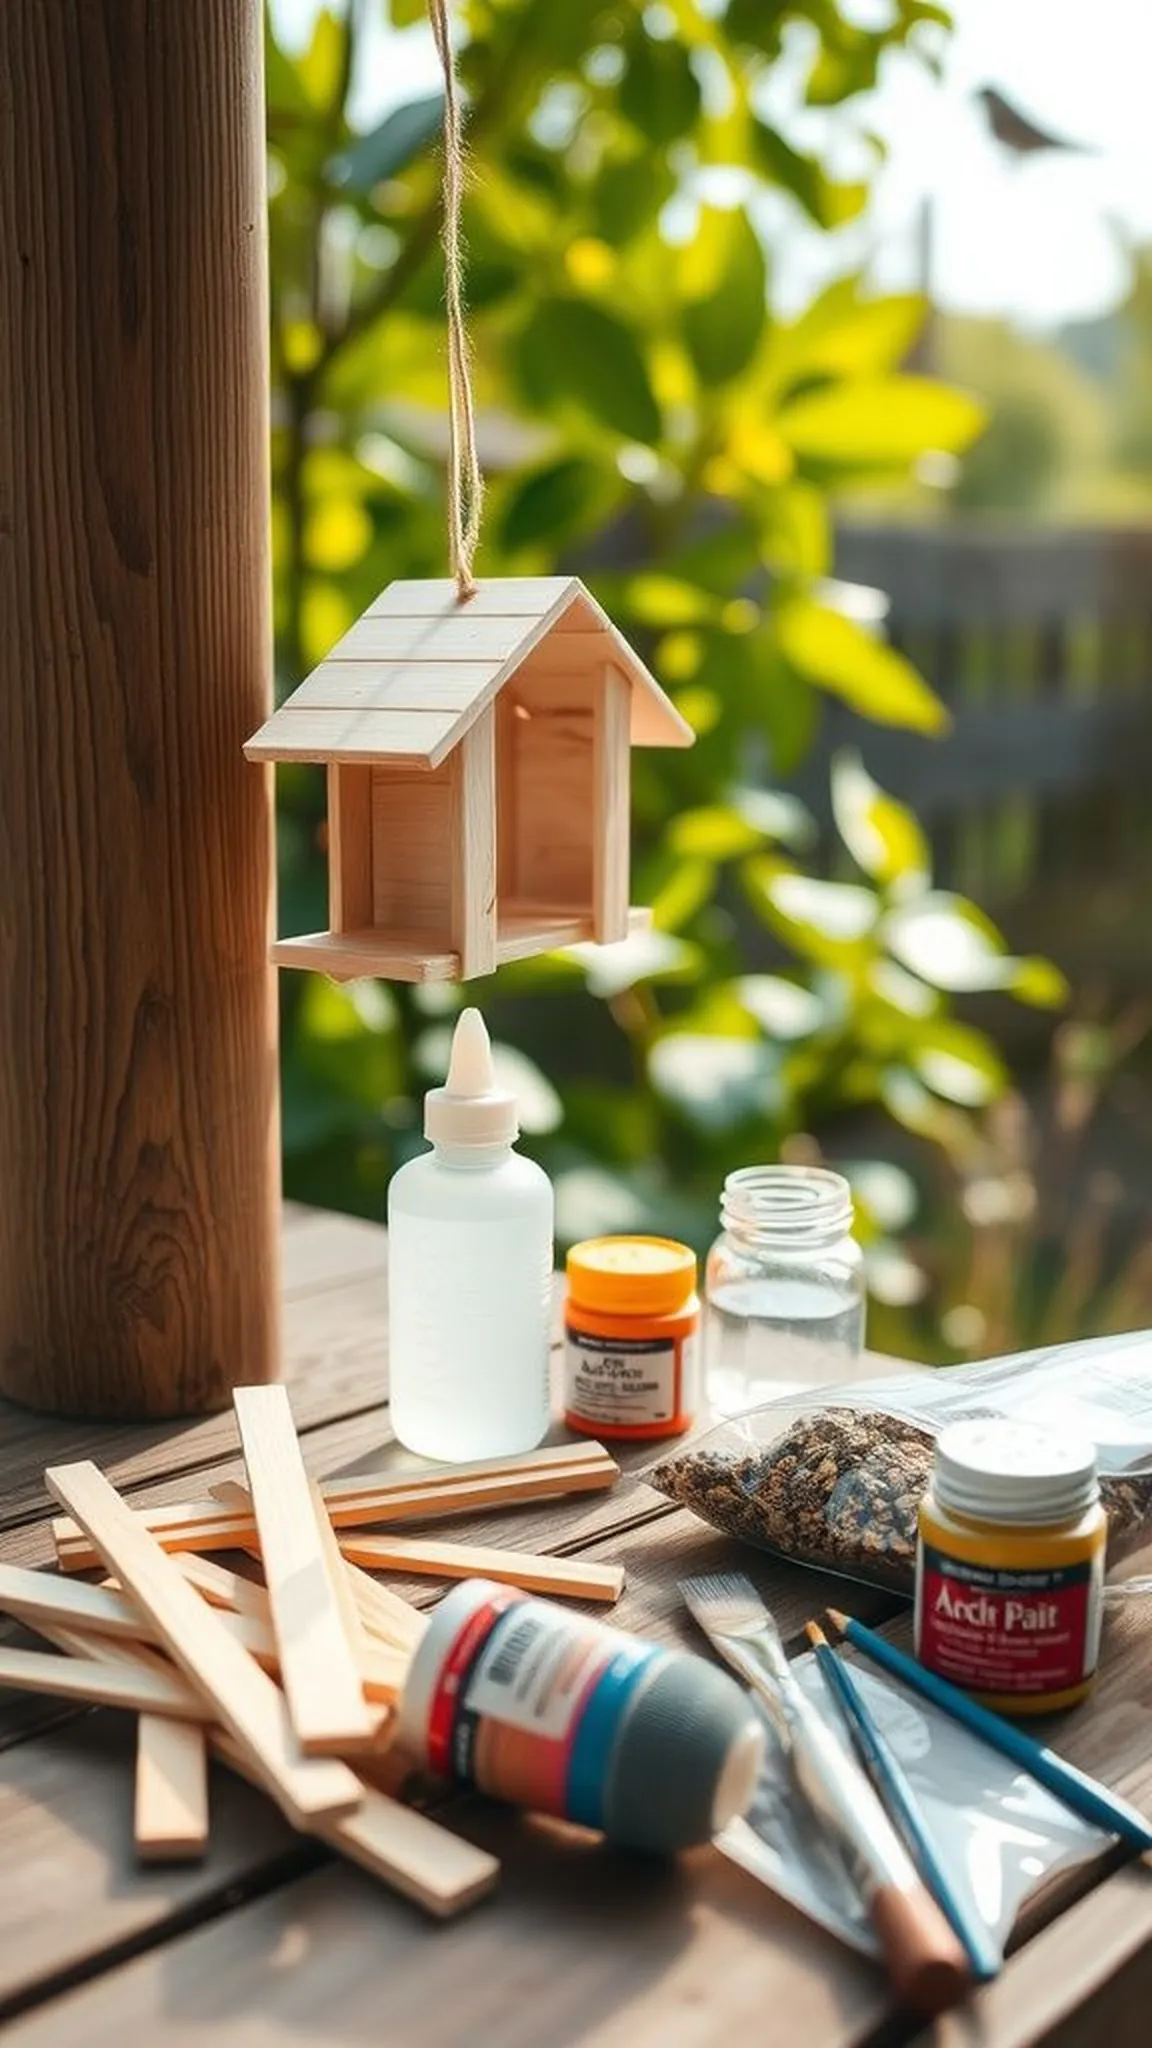
A miniature log cabin sat on the fence, built from popsicle sticks and dotted with sunflower seeds, inviting sparrows and curious finches. The stick textures gave the feeder a cozy, handmade look while a faint woody smell lingered as birds pecked at the tray. Little fingers pressed decorative beads and painted small patterns that glinted in morning light.
Watching the quick flutters and soft wingbeats up close felt like tuning into a tiny neighborhood radio, and the feeder became a quiet ritual between snack time and sun naps.
Items Used
Steps
- Arrange popsicle sticks to form a square tray and glue joints together to hold seed mix.
- Build side walls and a simple roof structure from additional sticks, securing with quick-drying craft glue.
- Decorate the outer surfaces with weather-resistant paint or markers and allow to dry fully.
- Fill the feeder with mixed birdseed and hang it from a sturdy branch or hook.
Nature collage mobile with twigs and seeds
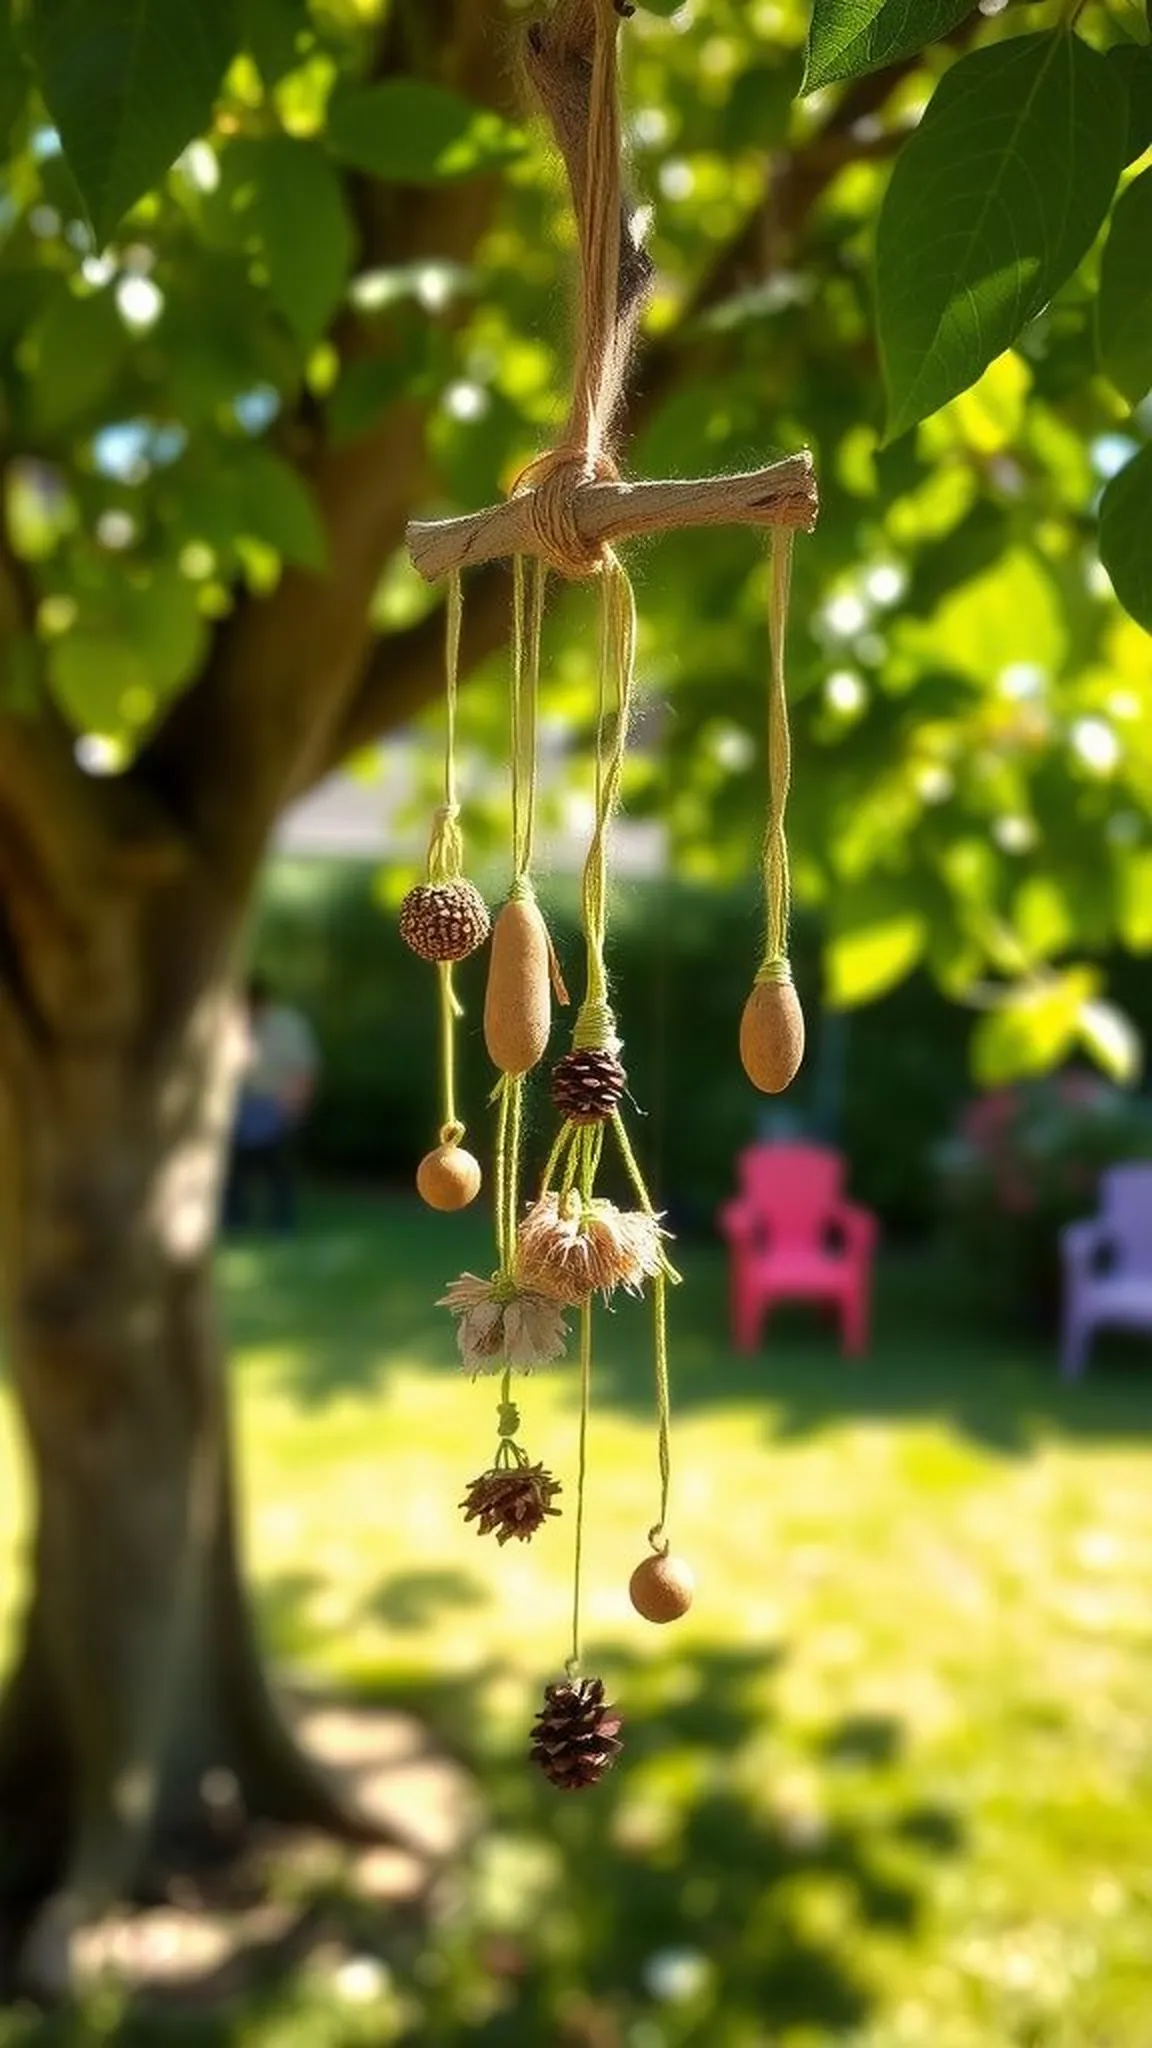
A gentle breeze made the mobile murmur while little hands threaded seed pods and dried petals onto strands that hung from a weathered twig. The twig smelled faintly of sap and earth, and the collage caught light differently throughout the day, casting playful shadows on the lawn. There was a quiet rhythm when beads clinked and shells brushed against each other, a backyard lullaby.
The mobile seemed to hold a small version of the yard itself, with textures that begged to be stroked and tiny shapes that invited lingering attention.
Items Used
- natural twine (100 ft)
- sturdy driftwood twig or branch
- assorted natural beads and shells
Steps
- Collect a sturdy twig and gather natural elements like seed pods, dried flowers, small pinecones and smooth stones.
- Tie lengths of natural twine to the twig and thread collected elements onto each strand, securing with knots.
- Balance the twig by adjusting strand lengths and hang the mobile from a shaded tree branch.
- Check strands periodically for wear and replace natural elements as they weather.
Homemade sidewalk chalk in playful shapes

Chunks of chalk sat like short candy sticks on the newspaper, pastel dust clinging to fingers as shapes were admired. The colors were saturated yet soft, leaving thick ribbons on warm concrete where children traced hopscotch grids and swirled suns. The chalk smelled faintly of plaster, and the sandpaper-like edges gave a satisfying scrape when pressed.
Little smudges on knees and smiling faces told the story of hours spent outdoors; a box of homemade chalk felt like a portable patch of color for every corner of the driveway.
Items Used
- plaster of Paris powder (2 lb)
- powdered tempera pigment set
- silicone candy molds (cylinders or shapes)
Steps
- Mix powdered plaster of Paris with water to a smooth consistency, stirring in powdered tempera pigment until evenly colored.
- Pour mixture into silicone molds and tap gently to remove air bubbles.
- Allow molds to cure thoroughly before demolding and dry chalk pieces overnight.
- Store chalk in a dry container and bring outside for sidewalk art sessions.
Water balloon piñata — backyard giggles and splashes
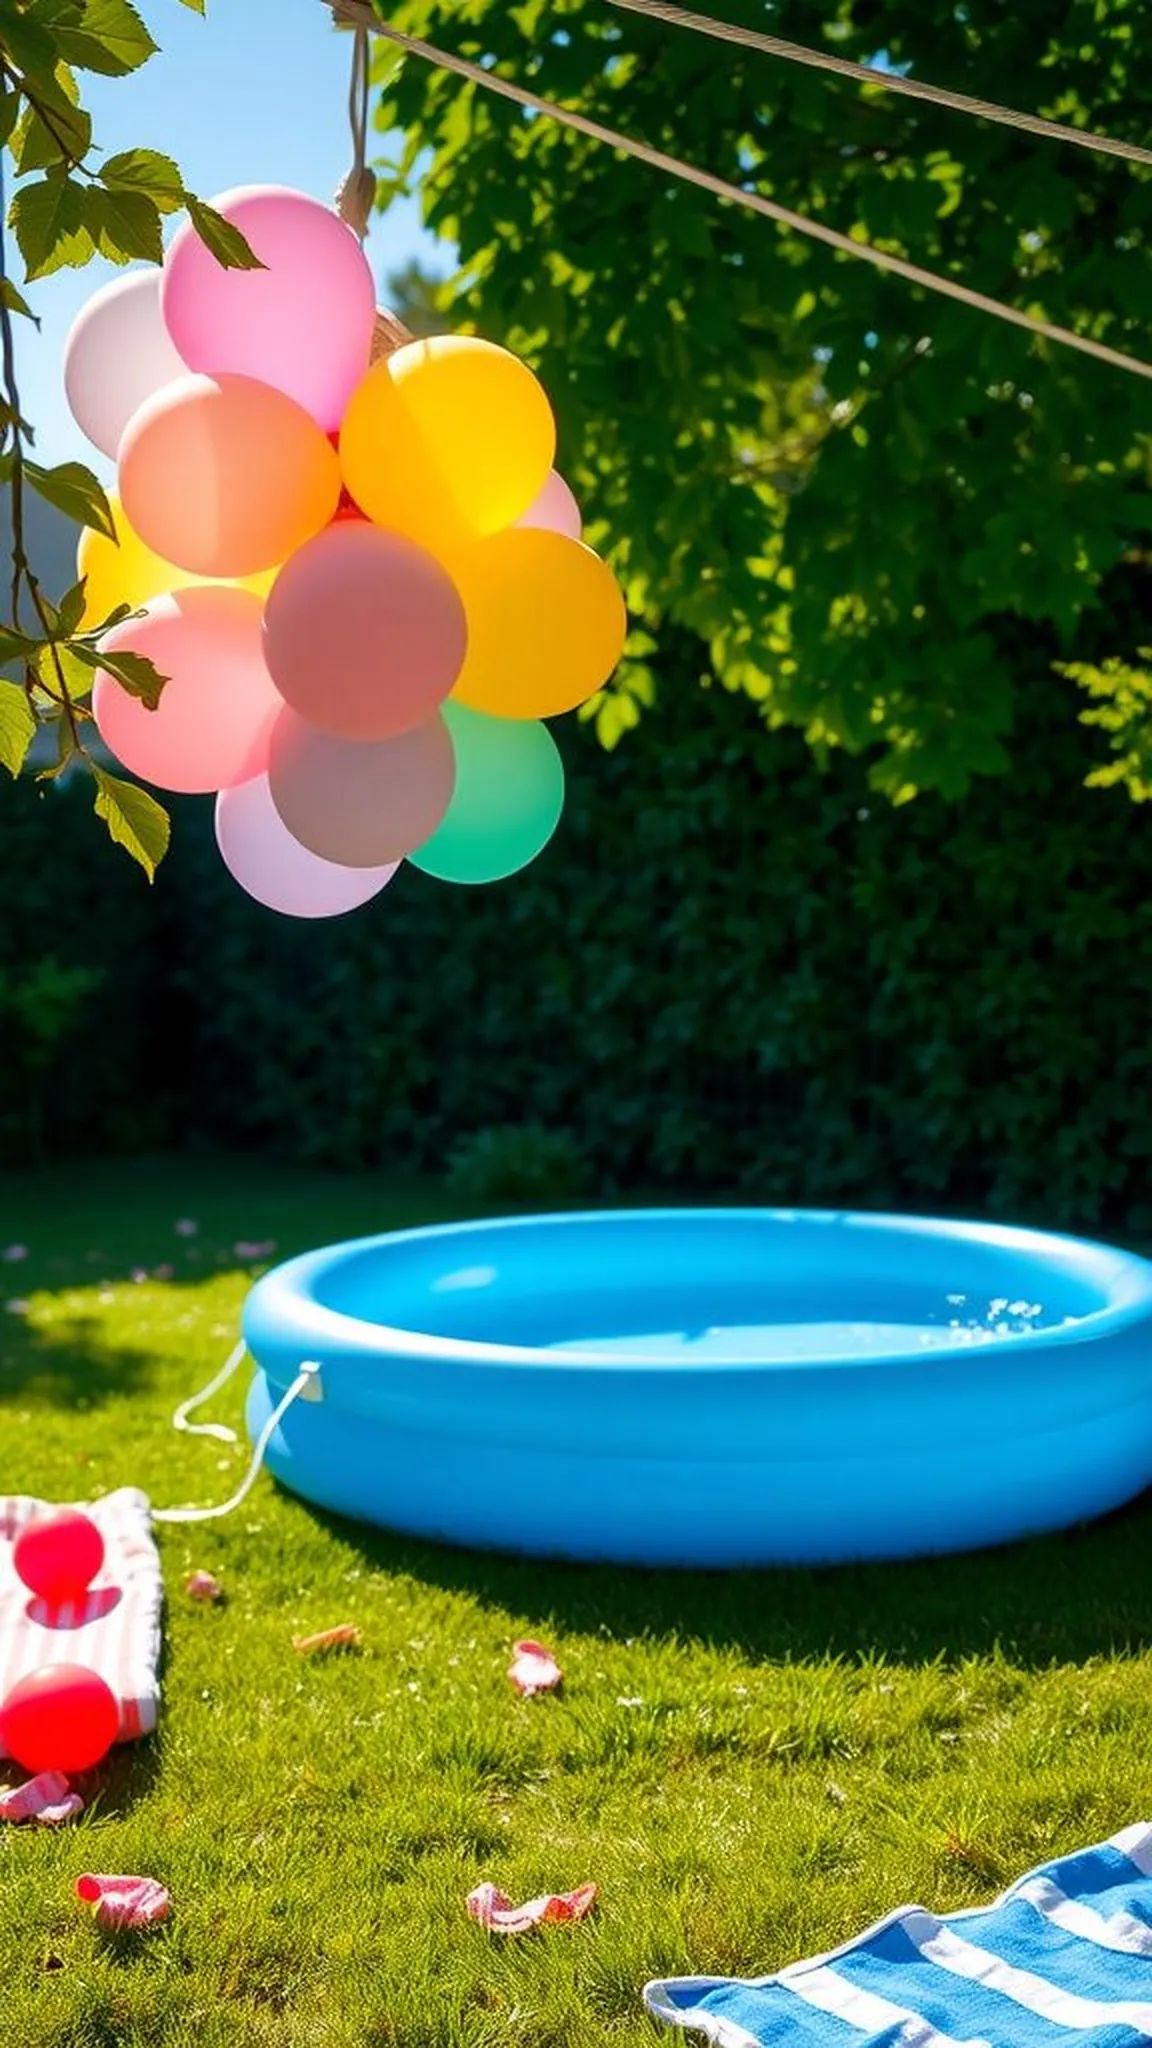
Colorful balloons bobbed in a shallow kiddie pool, promising sudden showers of cool water and squeals. The latex smelled faintly floral when wet and felt slick between fingers as little strings dangled. When the piñata burst a warm summer hush turned into scattered laughter and dripping shirts; every splash left a sparkling trail on skin.
Children darted under shade, towels smelling of chlorine and sunscreen nearby, while soggy confetti and tiny fragments of balloon created a confetti-strewn summer memory that smelled of grass and good-natured chaos.
Items Used
- water balloons (500 pack)
- sturdy rope or twine
- kiddie pool (inflatable)
Steps
- Inflate water balloons and tie securely, filling enough to create a layered hanging cluster.
- Suspend the cluster from a sturdy branch or a simple frame at child-safe height.
- Allow children to take gentle turns attempting to burst balloons until they split, making sure an adult supervises.
- Collect balloon fragments and dispose of them properly after play to keep the yard tidy.
Fresh flower crowns woven from backyard blooms
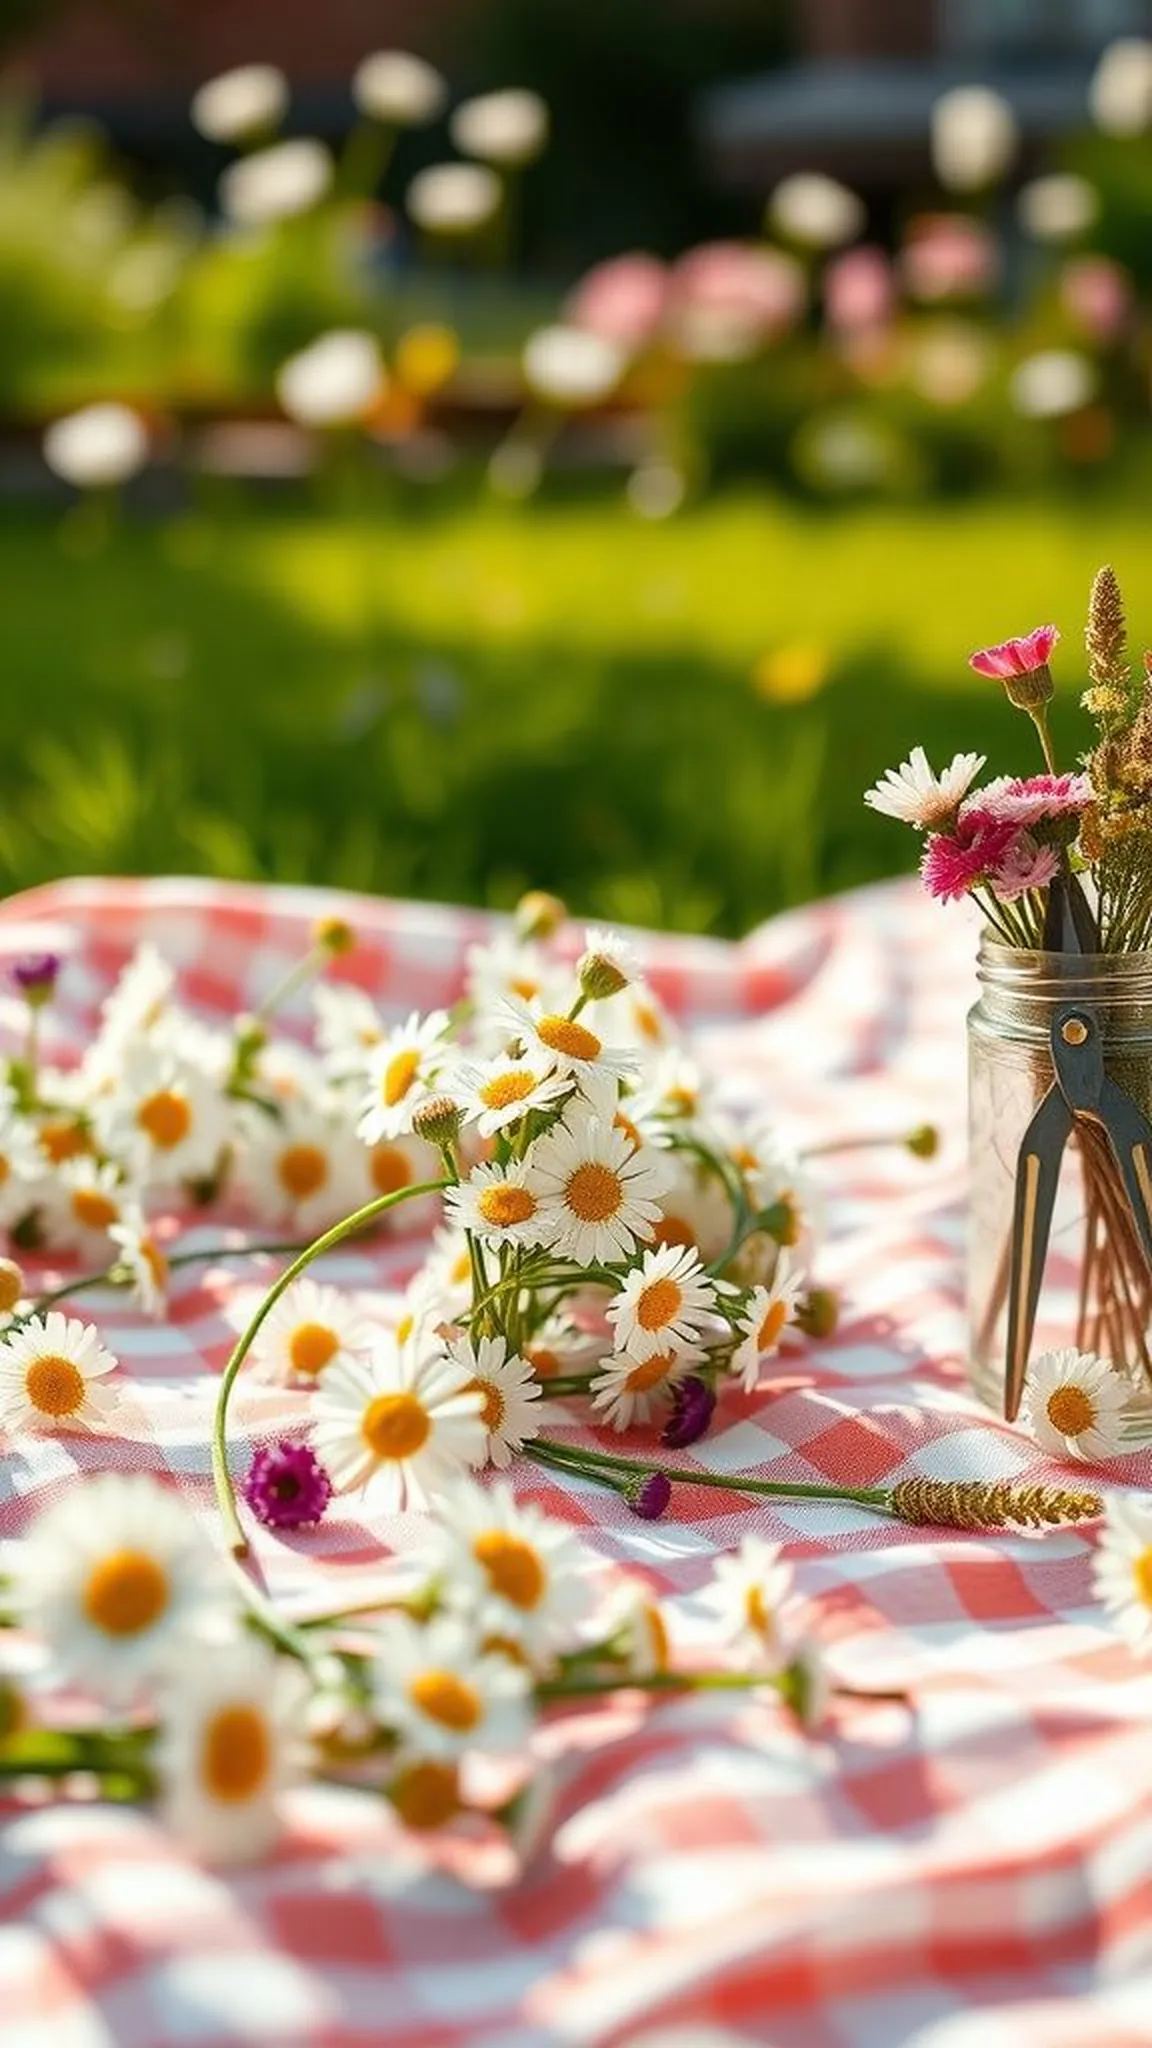
A soft crown of daisies and tiny wildflowers lay in laps, petal edges brushing the skin with a faint honeyed scent. Thin green stems braided into a circular base felt springy and slightly damp, while blossoms threaded along created a bright halo that caught sunbeams. Children examined different textures, comparing velvety petals to papery heads and choosing colors to match shirts or moods.
The crowns bent and bobbed with movement and left a memory of warm afternoons, stray petals tucked into pockets as souvenirs of the hour.
Items Used
- flexible green stems (floral wire alternative)
- assorted small fresh flowers (daisies, clover)
- garden scissors
Steps
- Gather flexible green stems and an assortment of small flowers and filler foliage.
- Form a circular base by twisting stems together, then weave flowers into the base at even intervals.
- Secure ends by tucking stems into the base and trim extra foliage for comfort.
- Wear crowns for a short time outdoors and replace wilted flowers as needed.
Paper plate frisbees for lawn toss games
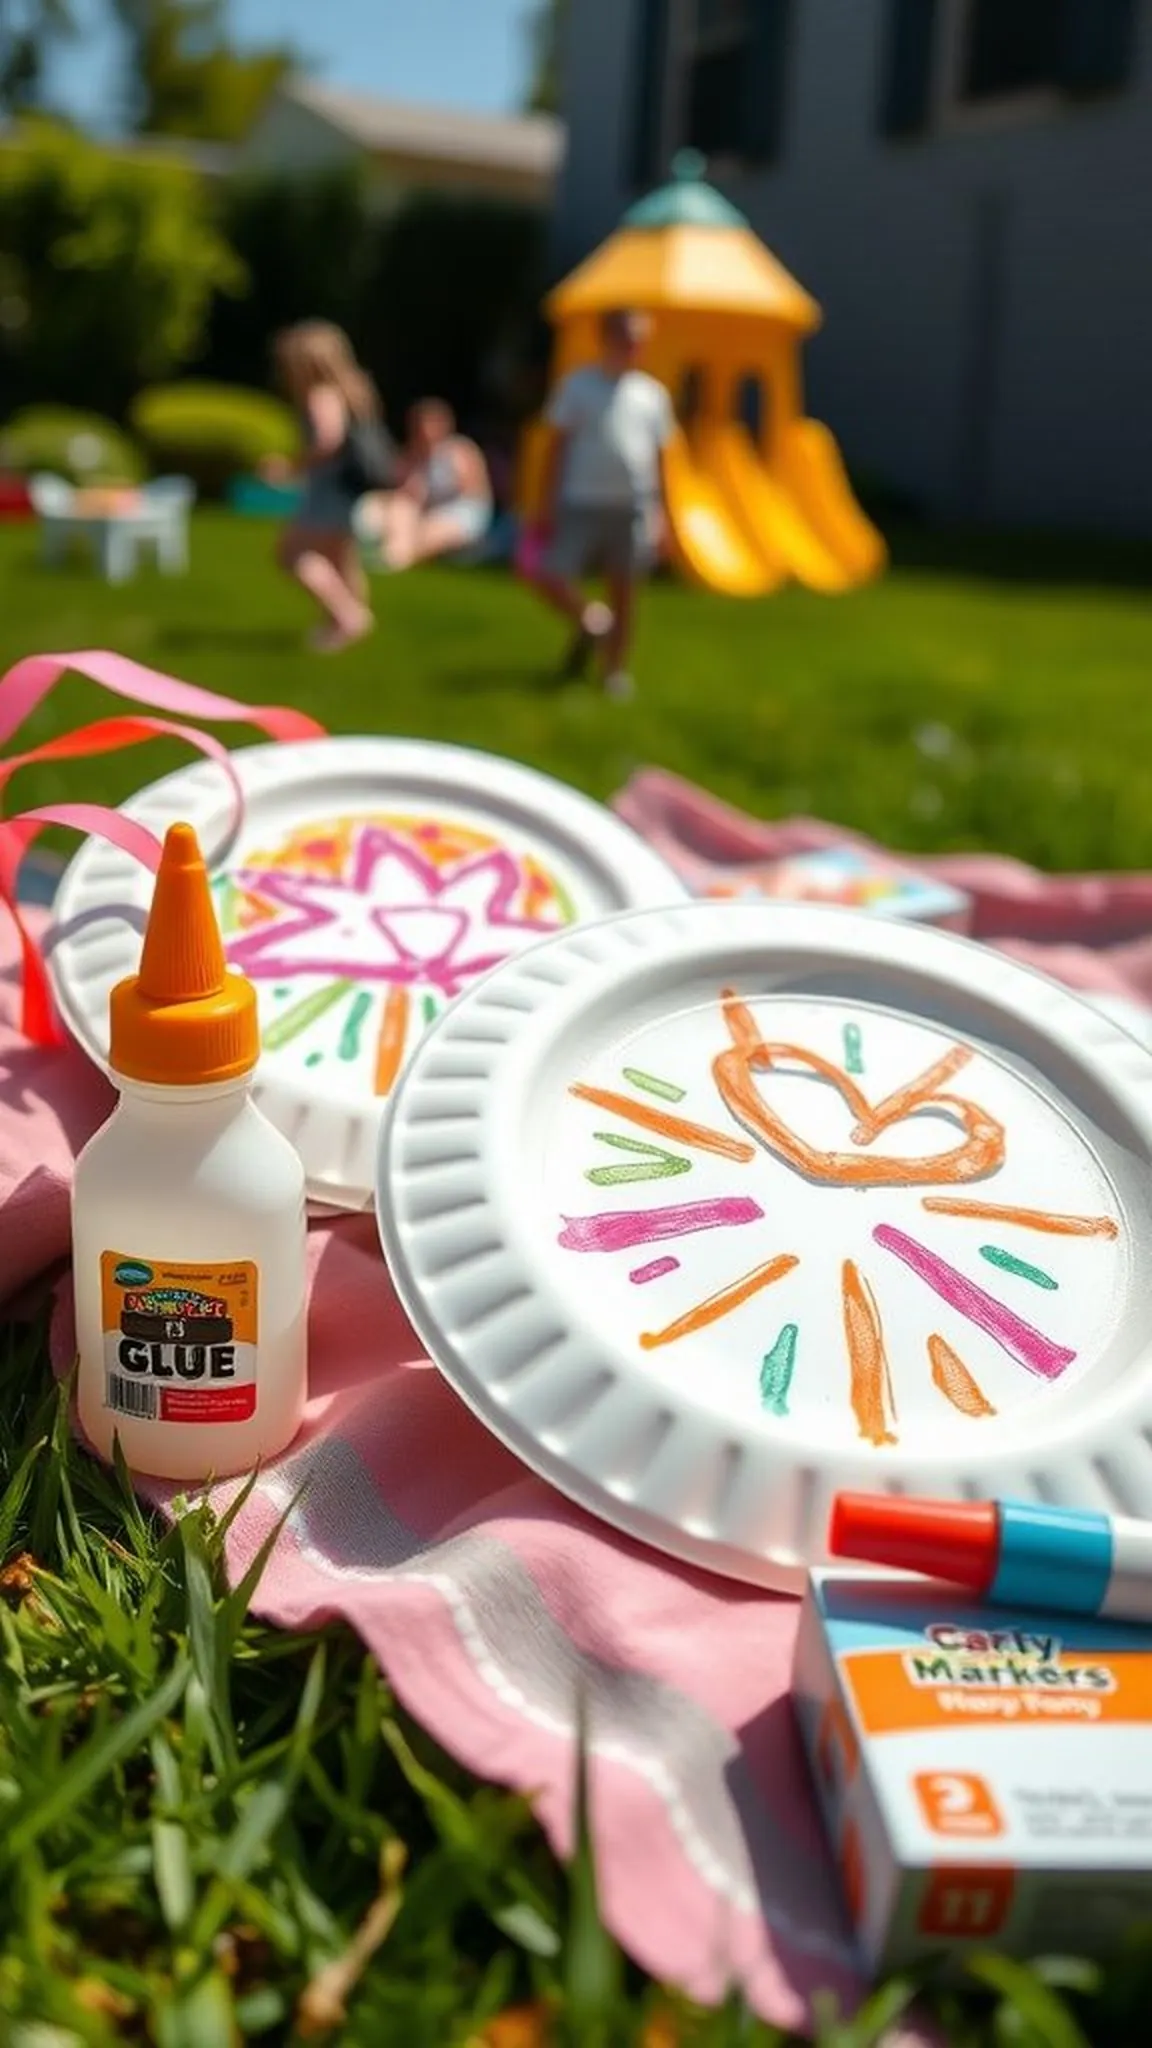
Paper plates lay decorated with concentric suns and smiling faces, edges crinkling slightly where markers had pressed. The plates felt light and papery in hand and sailed with a soft whoosh when flicked; the air carried the faint sharp scent of marker and chalk. Children tested different throws, watching cardboard rings skim the grass and tumble into clover.
Each decorated disc had personality, some trailing ribbons that made them look like tiny comets, and the backyard echoed with soft thuds and pleased exclamations whenever a toss landed just right.
Items Used
- sturdy paper plates (10 inch)
- strong craft glue
- washable markers set
Steps
- Stack two sturdy paper plates together, lining the rims and secure with strong craft glue around edges.
- Decorate the top surface with washable markers or stickers, allowing a focal design to balance the disc.
- Optionally add lightweight streamers to the rim for visual flair and allow glue to dry completely.
- Toss gently outdoors and store in a dry place between play sessions.
Silly sock puppets with button eyes
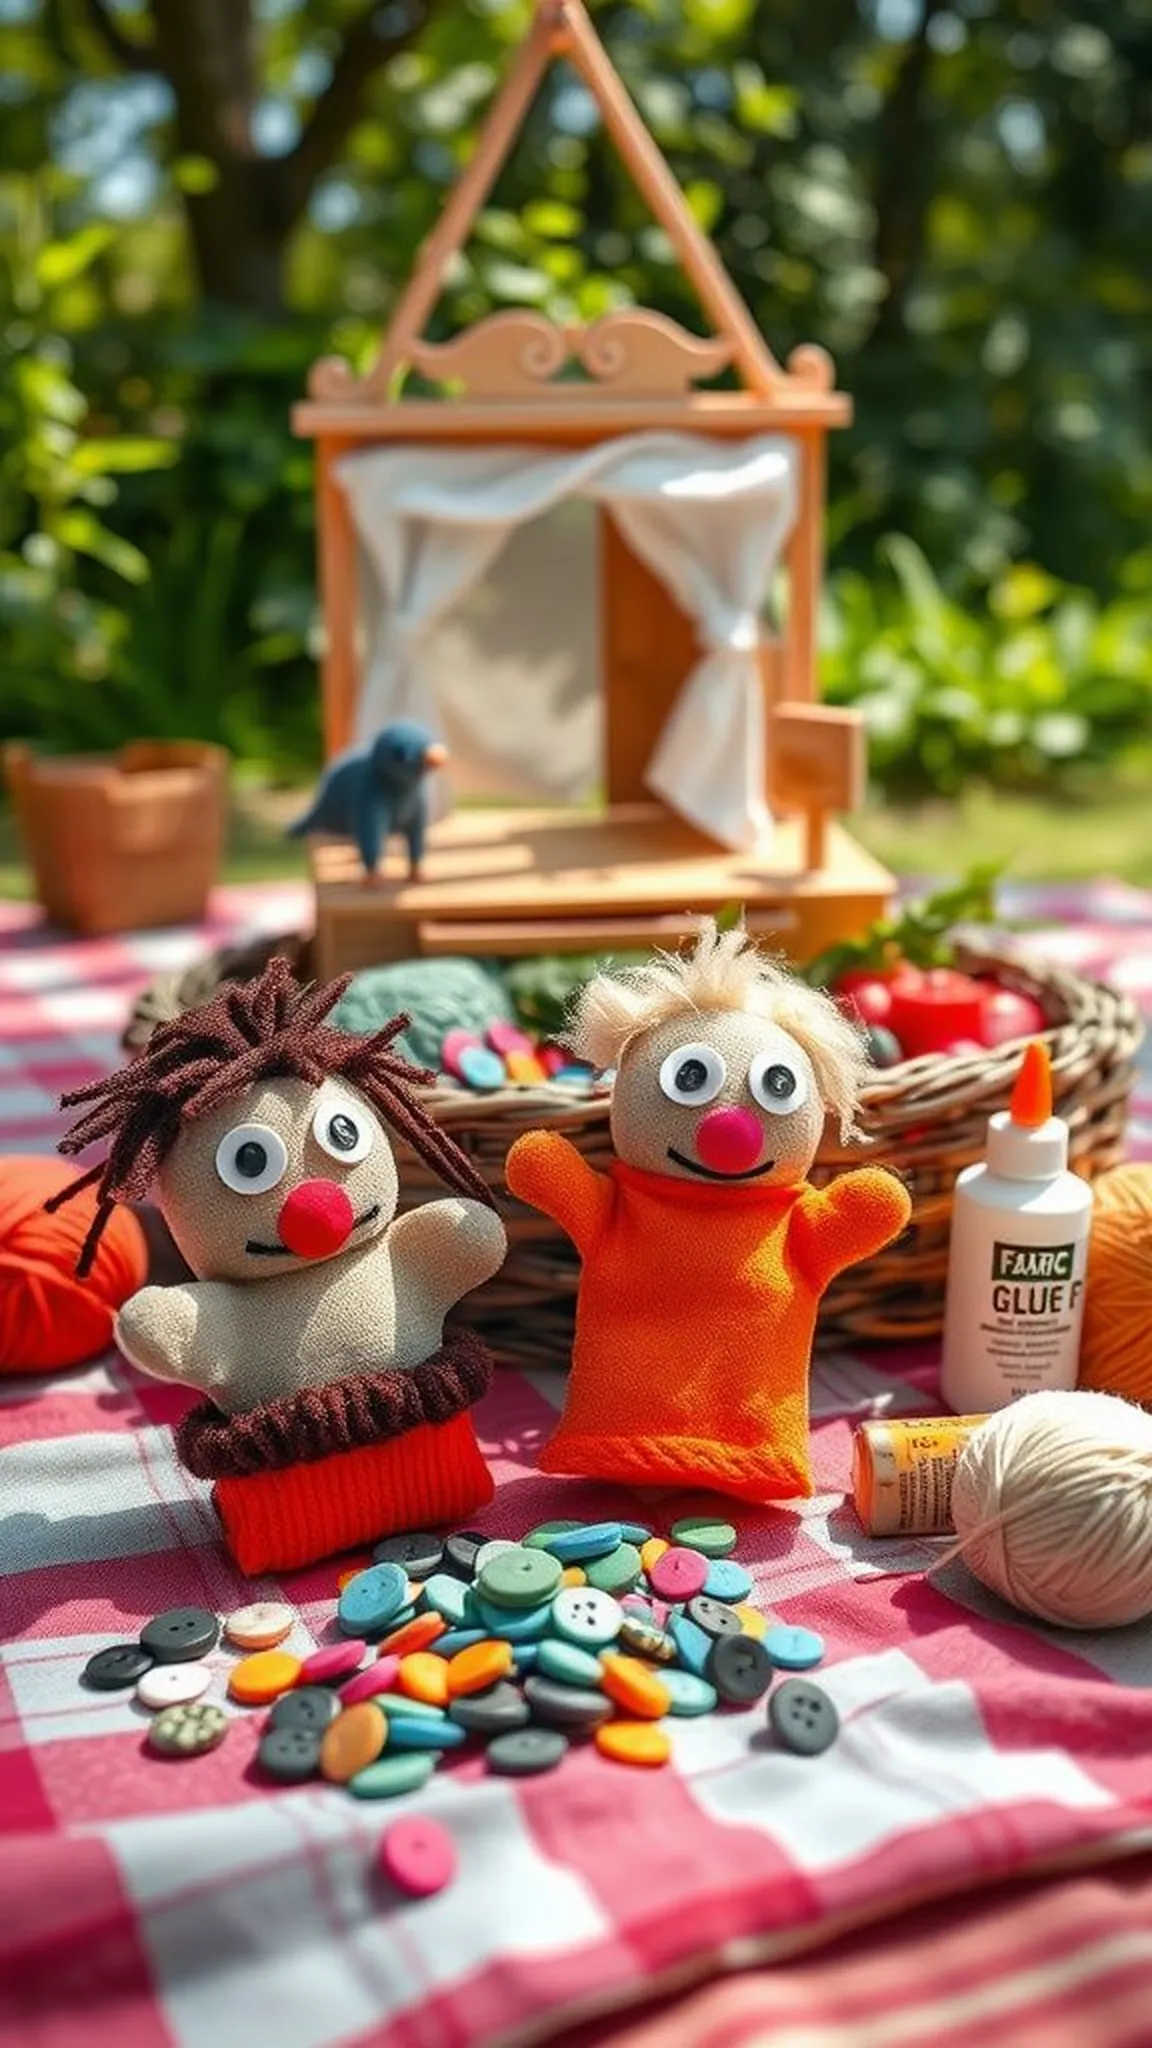
Old socks transformed into characters with button eyes that gleamed like tiny stage lights, and yarn mouths that suggested giggling. The fabric felt familiar and slightly worn, warm from a day in the sun, while buttons and felt added varied textures that begged to be touched. Puppets held a hint of laundry scent mixed with glue and imagination.
When voices were made for them, the backyard turned into a small theater where shadow and sunlight framed tiny dramas and puppets balanced on knees like secret companions.
Items Used
- clean cotton socks (assorted sizes)
- assorted buttons pack
- fabric glue bottle
- yarn skein assorted colors
Steps
- Choose clean socks and gather buttons, felt scraps, yarn and fabric glue.
- Arrange facial features on the sock and affix them with fabric glue, allowing strong bonds to form.
- Add yarn hair or felt accessories for personality and let fully dry before puppet play.
- Stage simple backyard shows using a low table or blanket as the set.
Wind socks dancing in the summer breeze
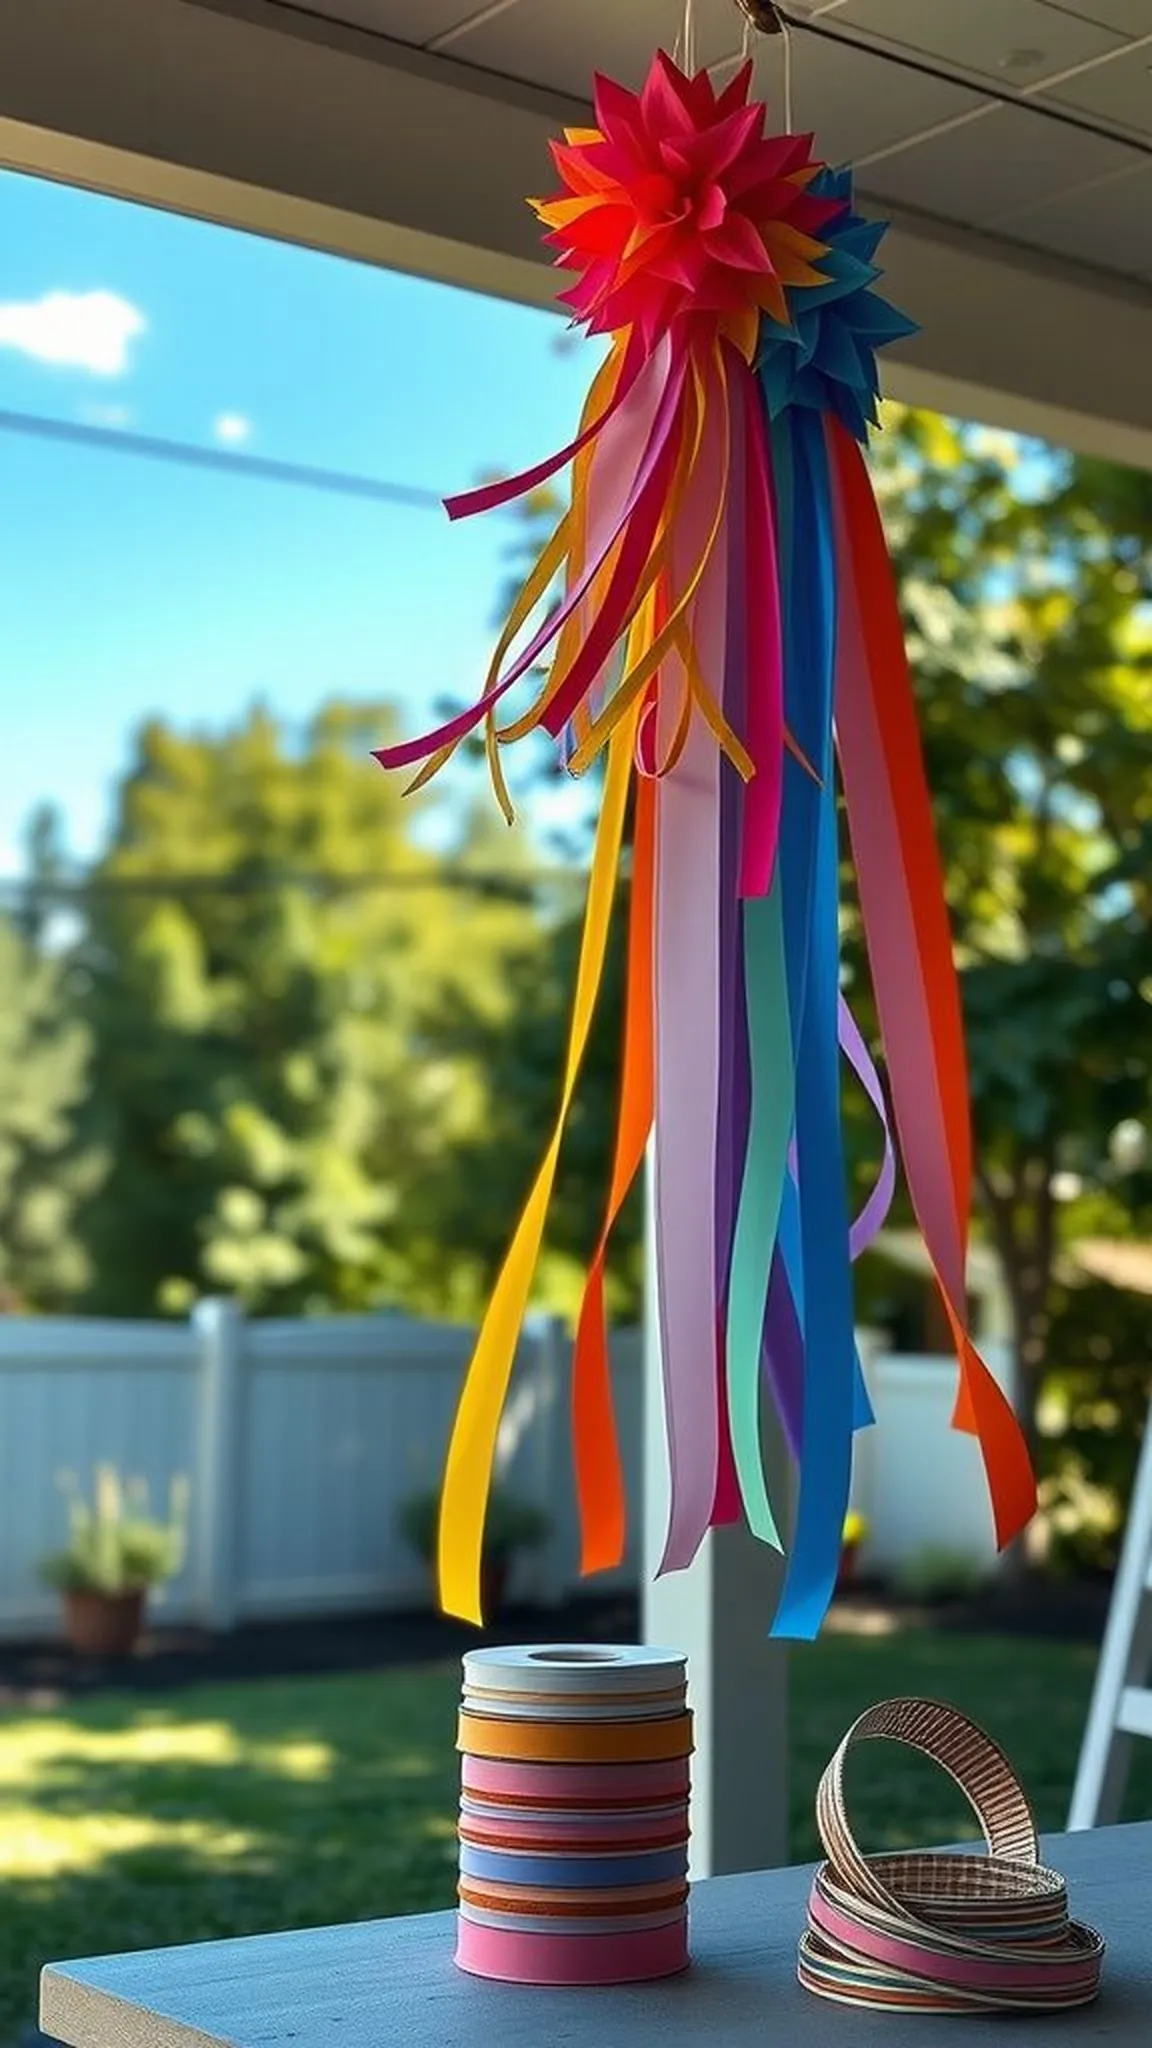
Long ribbons streamed from colorful tubes that spun lazily on a porch post, catching the breeze with a whisper. The tubes held a soft fabric smell and the ribbons made a fluttering sound like distant applause. Children pointed as patterns rolled and shifted, the colors blurring into bands when the wind stiffened.
Mounted over the lawn the wind socks created a moving banner of color, and the contrast between the steady pole and the lively fabric made the whole yard feel celebratory and slightly theatrical on warm afternoons.
Items Used
- lightweight polyester fabric or cardstock tube
- polyester ribbon streamers assorted colors
- metal or plastic ring for top
Steps
- Create a tube from lightweight fabric or cardstock and reinforce the top with a sturdy ring.
- Attach long ribbons or streamers to the bottom edge and secure evenly around the tube.
- Tie a hanging loop to the top ring and suspend from a porch post or tree branch where airflow is steady.
- Inspect fastenings regularly and replace worn ribbons to maintain a bright display.
Garden stepping stones with mosaic treasures
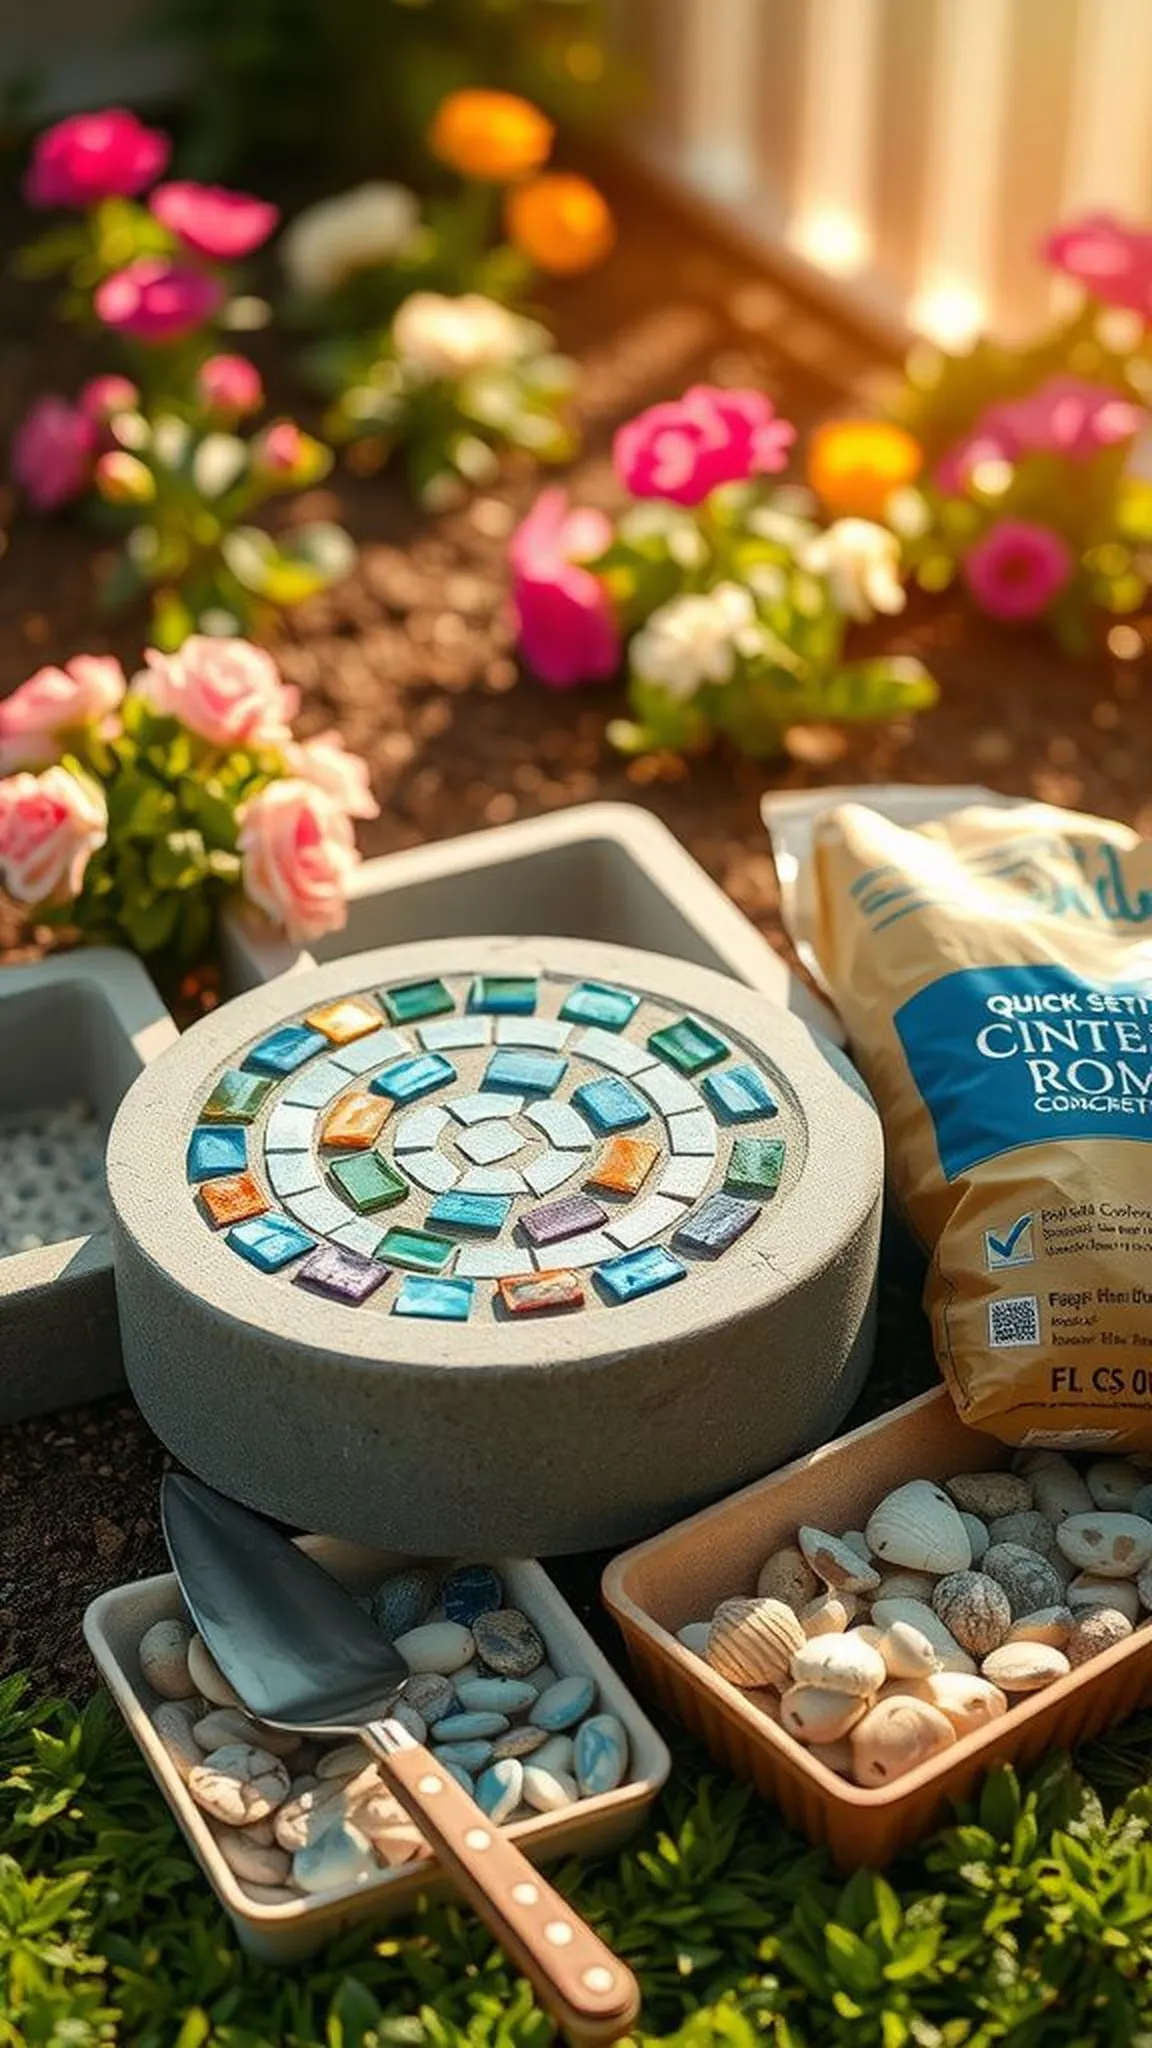
The stepping stones sat like small islands in the garden, speckled with glass tiles and pressed shells that winked in sunlight. The wet mix had a faint earthy scent and tiny air bubbles peeked at the surface as designs were arranged. Children loved pressing glossy fragments into the base, creating stars, hearts and checkerboards that glittered when the sun angled right.
Walking across the stones felt like stepping through a tiny museum of backyard finds, each stone keeping a quiet, heavy presence beneath bare feet.
Items Used
- quick-setting concrete mix (small bag)
- silicone stepping stone molds
- assorted glass mosaic tiles and beads
- small decorative shells
Steps
- Mix quick-setting concrete according to package directions in a large bucket.
- Pour concrete into round molds and smooth the surface lightly.
- Press glass tiles, beads and small shells into the wet surface to create a mosaic pattern.
- Allow concrete to cure fully before removing from molds and set stones into the garden.
Sensory sand jars for tactile backyard play
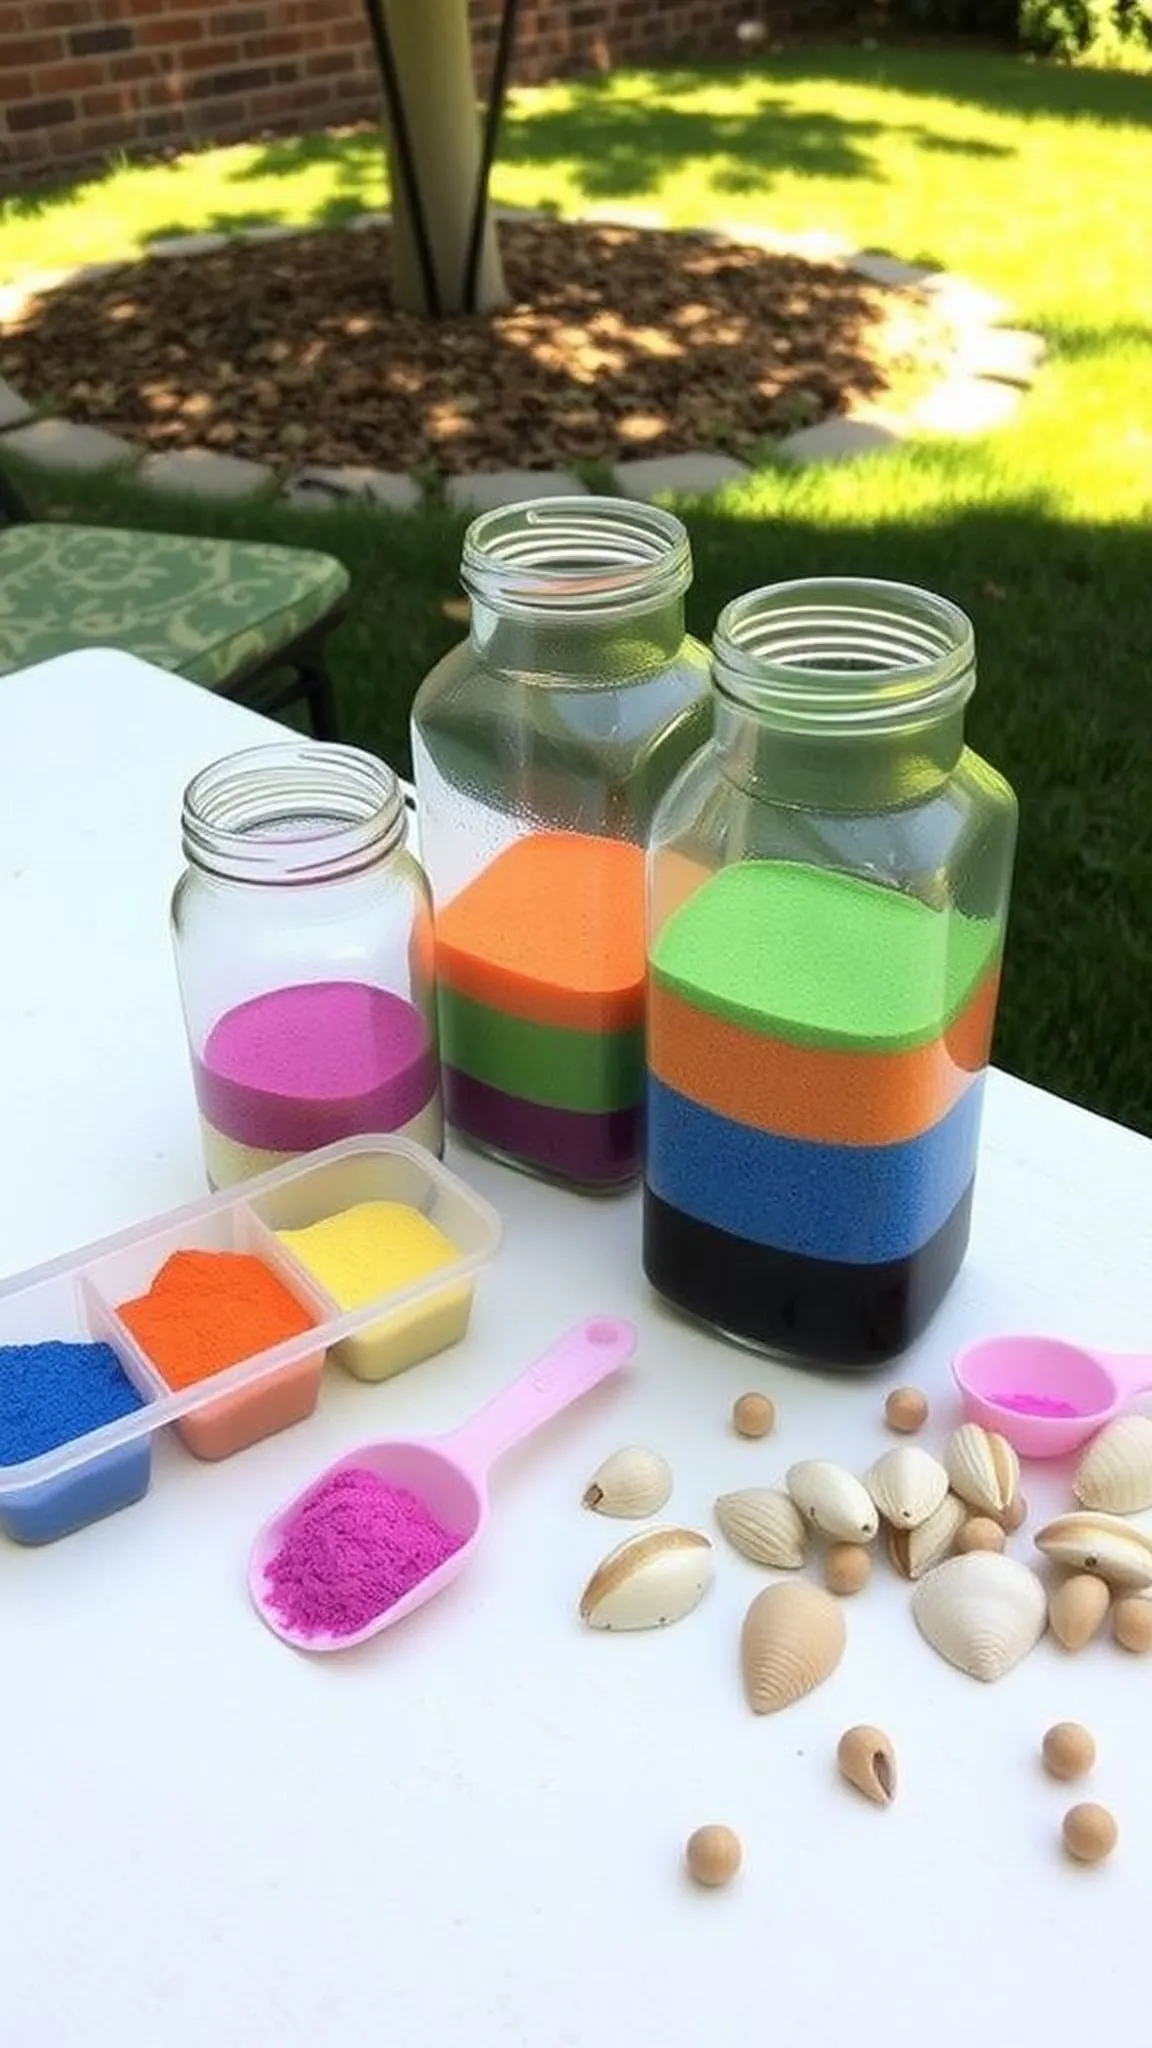
Clear jars held layered sands that glittered and felt grainy beneath fingertips, tiny scoops leaving soft troughs. The scent of warm sugar and shell faintly suggested beach afternoons while colors formed strata like tiny deserts. Children tilted jars to watch colors settle and listened to the whispering slide of fine grains.
Shell fragments and small wooden beads added a coastal soundscape when shaken gently, and the jars made private pockets of texture that could be carried to shady nooks for quiet, focused play.
Items Used
- play sand (2 lb)
- powdered tempera pigments assorted colors
- clear wide-mouthed glass jars with lids
Steps
- Color dry play sand with powdered tempera pigments or chalk dust and mix until fully coated.
- Layer colored sand into clear wide-mouthed jars, pressing lightly to create defined bands.
- Add small shells, wooden beads or tiny toys between layers for tactile surprises.
- Seal jars with tight-fitting lids and label each jar with a color name or pattern.
Mason jar lanterns that glow at dusk
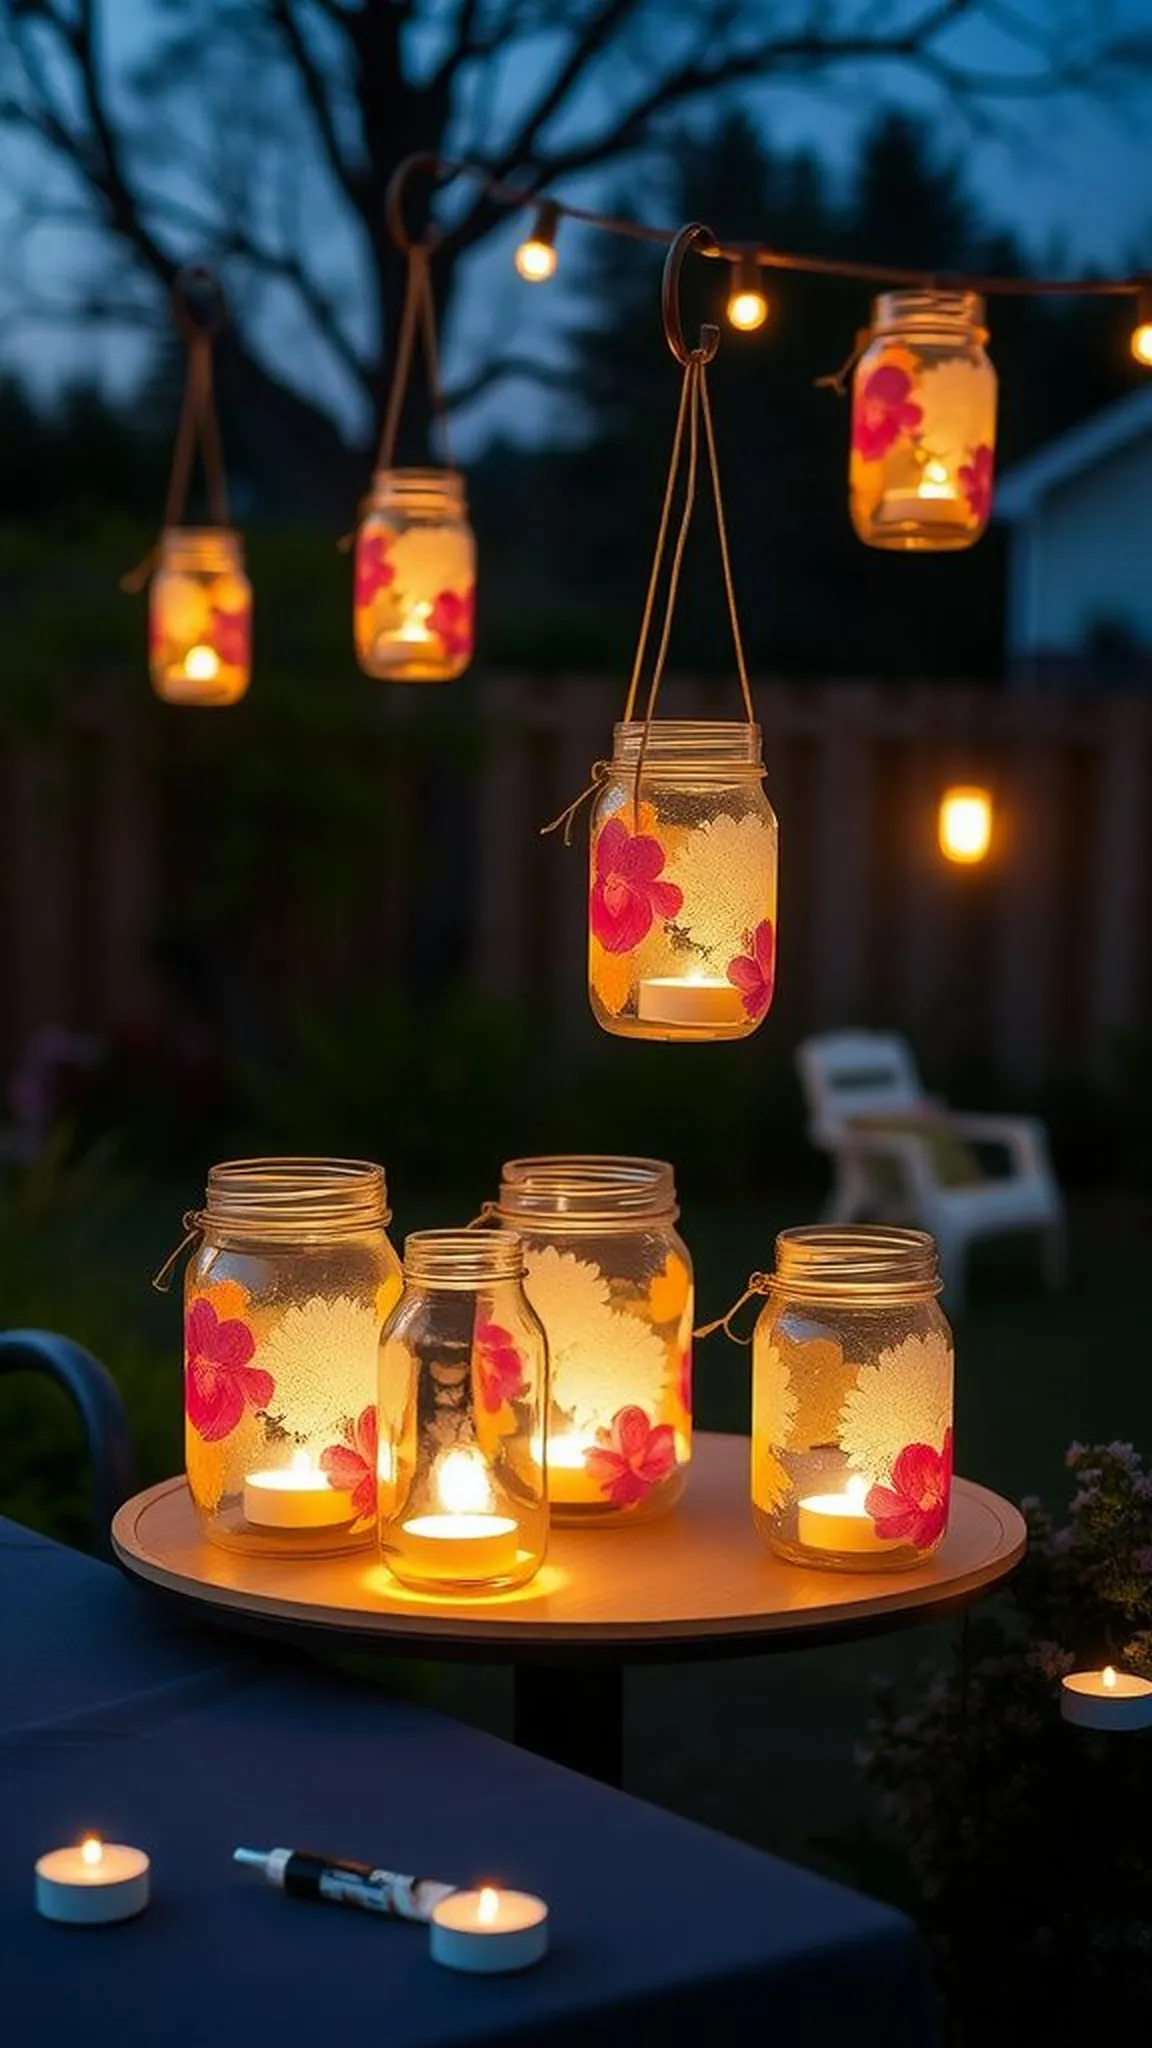
Mason jars glowed gently as battery tea lights flickered inside, their soft light painting amber halos on the picnic blanket. Tissue paper decoupage had made fluid collages across glass, and the surface felt faintly tacky where glue had dried. The yard smelled faintly of night air and cut grass as lanterns hung from shepherd hooks, catching every nearby moth and sparking contented whispers.
Children crept close to peer into the jars, delighted by tiny glowing orbs that turned the backyard into a amiable, pocket-sized evening landscape.
Items Used
- mason jars 16 oz (wide mouth)
- decoupage glue (craft adhesive)
- battery-operated tea lights (pack)
- assorted tissue paper sheets
Steps
- Apply decoupage adhesive to clean mason jars and press tissue paper pieces onto the glass surfaces.
- Smooth over with another layer of adhesive to secure paper and protect the design.
- Place battery-operated tea lights inside jars and close lids or wire a handle for hanging.
- Arrange lanterns on tables or hang from shepherd hooks around the yard for dusk ambiance.